Hitachi BD-W3300 Operating Instructions And Owner's Manual
- カテゴリー
- 電気毛布/枕
- タイプ
- Operating Instructions And Owner's Manual

Hitachi Appliances, Inc.
Hitachi Atago Bldg., 15-12, Nishi Shimbashi 2-chome,
Minato-ku, Tokyo 105-8410 Japan
Operating
InstructionsOperating
Instructions
使用說明書使用說明書
The
Warranty
Card
and
the
Installation
Instruct ions
are
also
supplied
as
separate
documents.
附有保用證與安裝說明書。
Fr ont
Loading
Washer
DryerFront
Loading
Washer
Dryer
前置式滾桶洗衣乾衣機前置式滾桶洗衣乾衣機
ModelModel
型號型號
Thank
you
for
purchasing
the
Hitachi
Front
Loading
Thank
you
for
purchasing
the
Hitachi
Front
Loading
Wa s her
Dryer.Washer
Dr yer.
Please
read
this
manual
carefully
to
ensure
proper
Please
read
this
manual
carefully
to
ensure
proper
operation
of
the
machine.operation
of
the
machine.
Be
sure
to
keep
the
Wa rranty
Card,
the
Basic
Operation
Be
sure
to
keep
the
Warranty
Card,
the
Basic
Operation
Guide,
the
Installation
Instructions,
and
the
Installation
Guide,
the
Installation
Instructions,
and
the
Installation
check
list
(NOTICE
TO
THE
INSTALLER)
for
future
check
list
(NOTICE
TO
THE
INSTALLER)
for
future
reference.reference.
感謝您購買日立前置式滾桶洗衣乾衣機。感謝您購買日立前置式滾桶洗衣乾衣機。
請詳細閱讀本手冊,確保正確操作洗衣乾衣機。請詳細閱讀本手冊,確保正確操作洗衣乾衣機。
務必保留保用證、基本使用指南、安裝說明書及安裝檢查表務必保留保用證、基本使用指南、安裝說明書及安裝檢查表
(安裝人員貼示),供日後參考使用。(安裝 人員貼示),供日後參考使用。
Please
read
the
“
Safety
Precautions
”
carefully
to
ensure
Please
read
the
“
Safety
Precautions
”
careful ly
to
ensure
proper
use
of
the
machine.
proper
use
of
the
machine.
(P.
10
to
14)(P.
10
to
14)
Hitachi Front Loading
Washer Dryer
Heat Recycle
Wind Iron
BD-W3300
3-N0231-4A
BD-W3300
ASIA
G2(C)
請詳細閱讀「安全預防措施」,確保正確使用洗衣機。請詳細閱讀「安 全 預 防 措 施」,確保正確使用洗衣機。
(第
108
至
112
頁)(第
108
至
112
頁)
English
中文
熱循環風熨斗
日立前置式滾桶洗衣乾衣機

2
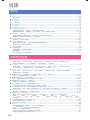
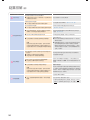
CONTENTS
Before Use
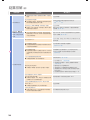
Feat ure s ...................................................................................................................................................................................... 4
Preparation ................................................................................................................................................................................. 5
· Checking the installation ............................................................................................................................................................ 5
Parts and Accessories ..............................................................................................................................................................
6
Control Panel Functions ............................................................................................................................................................8
Safety Precautions .................................................................................................................................................................. 10
Usage Precautions .................................................................................................................................................................. 15
Before You Start Washing ....................................................................................................................................................... 16
Washing and Drying Programs ............................................................................................................................................... 17
Tips for Good Washing Results .............................................................................................................................................. 18
· Preparing your laundry · Helpful hints · How to load the laundry into the drum ..................................................................
1
8, 19
· To ensure smooth spinning operation · Guides for laundry loads · Average weights for laundry
· Notes for using mesh laundry bags .................................................................................................................................... 20, 21
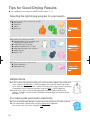
T
ips for Good Drying Results..................................................................................................................................................
22
· Selecting the right drying program for your laundry · Helpful hints · To reduce pills and static electricity ..................................22
· T
o reduce wrinkles · To reduce uneven drying · To prevent shrinking ....................................................................................... 23
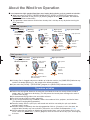
About the Wind Iron Operation ............................................................................................................................................... 24
· T
o reduce wrinkles · Examples of finished laundry ............................................................................................................. 2
4, 25
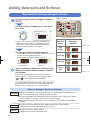
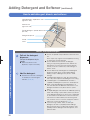
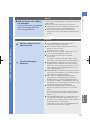
Adding Detergent and Softener ..............................................................................................................................................
26
· Wash load detection and detergent indicators · Recommended amounts of detergent, softener, and bleach ................... 26, 27
· Ho
w to add detergent, bleach, and softener ............................................................................................................................ 28
· Using laundry starch ................................................................................................................................................................ 30
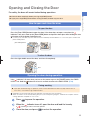
O
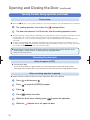
pening and Closing the Door ............................................................................................................................................... 31
· H
ow to open and close the door · Opening the door during operation ...............................................................................3
1, 31
· Releasing the door lock ........................................................................................................................................................... 32
· Using the CHILD LOCK · Preventing the door from being closed ............................................................................................. 33
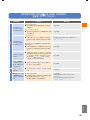
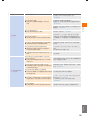
How to Use the Machine
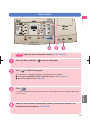
Washing ....................................................................................................................................................................................34
· FUZZY · SPEEDY · HEAVY · FAVORITE · BLANKET · DELICATE · SOFT · Selecting the right program · How to start
Washing & Drying .................................................................................................................................................................... 36
· F
UZZY · SPEEDY WASH & DRY · HEAVY · FAVORITE · SILENT · BLANKET · Selecting the right program · How to start
Drying .......................................................................................................................................................................................38
· F
UZZY · HEAVY · SILENT · BLANKET · STATIC DRY · Selecting the right program · How to start
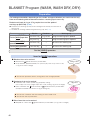
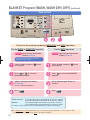
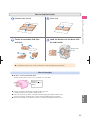
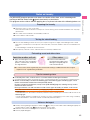
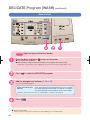
BLANKET Program (WASH, WASH DRY, DRY) .....................................................................................................................
40
· Preparation · How to install or remove the washing cap · How to start .............................................................................4
0~35
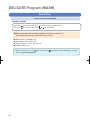
DELICATE Program (WASH) ...............................................................................................................................
.....................44
· Preparation · Notes on laundry · How to start · After washing is finished ........................................................................... 4
4~47
STATIC DRY Program (DRY) ...................................................................................................................................................
48
· How to start · Items that can be dried · After drying is finished ......................................................................................... 4
8, 49
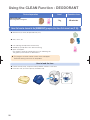
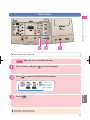
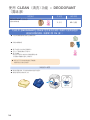
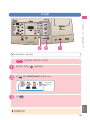
Using the CLEAN Function - DEODORANT ........................................................................................................................... 50
· It
ems that can be cleaned in the [DEODORANT] program · How to start ........................................................................... 50
, 51
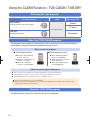
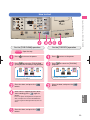
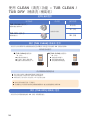
Using the CLEAN Function – TUB CLEAN / TUB DRY .......................................................................................................... 52
· S
electing the right program · About the [TUB CLEAN] program · About the [TUB DRY] program · How to start ............... 52, 53
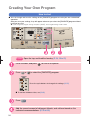
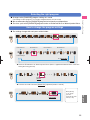
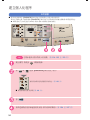
Creating Your Own Program ...................................................................................................................................................
54
· How to start · Selecting the right program · How to change the program settings .............................................................5
4, 55
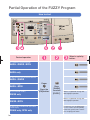
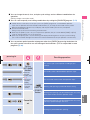
Partial Operation of the FUZZY Program ............................................................................................................................... 56
·
WASH
RINSE
SPIN
·
WASH only
·
WASH
RINSE
·
WASH
SPIN
·
RINSE only
·
RINSE
SPIN
·
DRAIN only, SPIN only
· How to start ............................................................................................................................................................................. 56
Using the DELAY START Function ..........................................................................................................................................58
· H
ow to change the delay time · How to start ..................................................................................................................... 58, 5
9
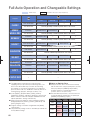
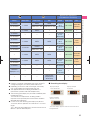
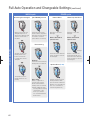
Full Auto Operation and Changeable Settings ...................................................................................................................... 60
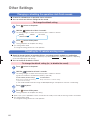
O
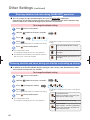
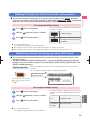
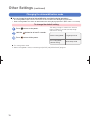
ther Settings .......................................................................................................................................................................... 64
· Changing or disabling the operation start/finish sounds · Disabling the 10-minute warning sound .................................... 6
4, 64
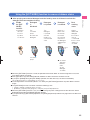
· Using the [HOT WASH] function to remove stubborn stains .....................................................................................................65
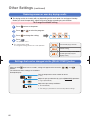
· Reducing uneven or over-dry drying results
.................................................................................................................................
66
· Settings that can be changed via the [DELAY START] button
............................................................................................................
66
· Washing thoroughly in low-temperature environments (temperature sensor control) ................................................................ 67
· Reducing vibration and noise during [WASH DRY] operations ................................................................................................. 68
· Reducing vibration and noise during spin startup or speeding up startup................................................................................68
· Disabling the Tangle-Free Finish function after spin operations ................................................................................................69

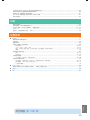
3
English
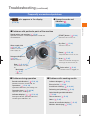
Frequently encountered problems (P. 81)
· Maintaining softness after drying operations (Soft Guard) ........................................................................................................69
· Changing the dehumidification mode ....................................................................................................................................... 70
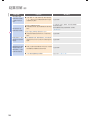
Maintenance
· Lint filter ................................................................................................................................................................................... 71
· Dry filter · Dry filter port ...................................................................................................................................................... 73, 74
· Detergent dispenser · Detergent dispenser port · Main body and drum ............................................................................. 75, 76
· Water supply inlet ..................................................................................................................................................................... 77
· Water tap, one-touch joint, and water supply hose · Drain outlet ............................................................................................. 78
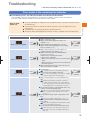
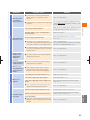
Troubleshooting
Troubleshooting .......................................................................................................................................................................79
· Error codes in the remaining time indicator .............................................................................................................................. 7
9
· Frequently encountered problems ............................................................................................................................................ 81
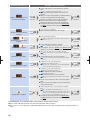
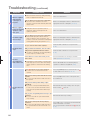
· Unusual sounds ....................................................................................................................................................................... 82
· Problems with particular parts of the machine ......................................................................................................................... 82
· Sounds and vibrations ....................................................................................................................................................................... 82, 83
· Water supply inlet · Drain outlet · Door · Drum ...................................................................................................................................83~85
· Power · [START] button · Detergent dispenser · Dry filter · Sound guides and warnings ...................................................................85~86
· Main body ................................................................................................................................................................................................ 87
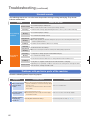
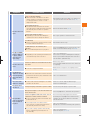
· Problems during operations .....................................................................................................................................................88
· Operations ......................................................................................................................................................................................... 88, 89
· Operation times ................................................................................................................................................................................. 89, 90
· Problems in the control panel ................................................................................................................................................... 91
· Detergent indicator · Operation indicators · Remaining time indicator ............................................................................................... 91, 92
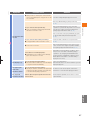
· Problems with washing results ................................................................................................................................................. 93
· Leftover detergent · Excessive lint · Insufficient cleaning · Darkening and yellowing · Color bleeding and discoloration....................93, 94
· Coarse textures · Odors · Uneven or insufficient drying ..................................................................................................................... 94, 95
· Wrinkles after drying ................................................................................................................................................................................ 96
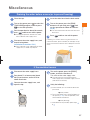
Miscellaneous ..........................................................................................................................................................................97
· Draining the water before a move (or to prevent freezing) · If the machine freezes .................................................................... 9
7
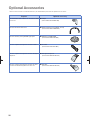
Optional Accessories ..............................................................................................................................................................
98
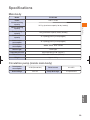
Specifications ..........................................................................................................................................................................99

4
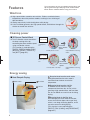
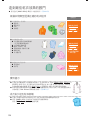
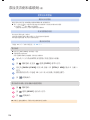
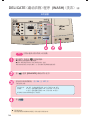
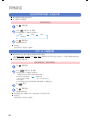
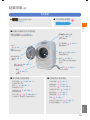
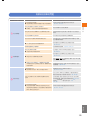
Features
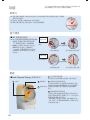
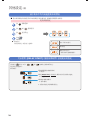
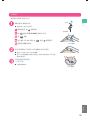
Wind Iron
Cleaning power
Energy saving
The main features of your front loading washer dryer and
tips for good washing and drying results are described
below. Please read them before using your machine.
High-speed airflow smoothes out wrinkles. Clothes are dried at lower
temperatures than with previous models, resulting in less shrinking of
delicate clothes.
Clothes move freely inside the big drum while drying.
A Jet Fan Motor generates the high-speed airflow, which blows through the
clo
t
hes to smooth out wrinkles.
Jeans,
sweatpants,
etc.
Shirts, aprons,
etc.
Laundry does not drop.
Laundry does not lift. Improved beat washing
effect.
Improved beat washing
effect.
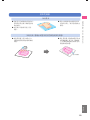
3D Sensor Control Wash
The 3D vibration sensor maximizes
the beat washing effect by
controlling the drum rotation speed
using a revolution sensor.
(This function is used during the
[FUZZY], [SPEEDY WASH & DRY],
[SPEEDY], [HEAVY], [FAVORITE],
and [SOFT] programs.)
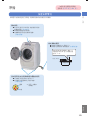
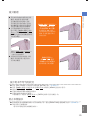
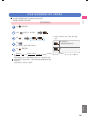
Heat Recycle Drying
Heavy laundry
Light laundry
1
Main motor
3
Eco Vent
2
Jet Fan
1
Recycled heat from the main motor
Heat generated from the main motor is
transferred into the drum to raise the
temperature.
2
Recycled heat from the Jet Fan
In addition to heat from the heater,
compressed heat from the Jet Fan, which
generates high-speed airflow, and heat from
the Jet Fan Motor are used as hot air during
drying.
3
Recycled heat via the Eco Vent
Air warmed by the main motor and heater
enters the Eco Vent (open-close type inlet),
which is set along the drying pipeline, and is
reused as warm air during drying.
(This function is not used during the
[SILENT], [DRY (10 MIN)], and [DEODORANT]
programs.)
High-speed airflow
Increased
drum rotation
speed
Decreased
drum rotation
speed

5
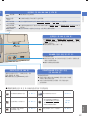
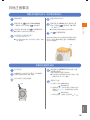
Features / Preparation
English
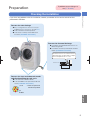
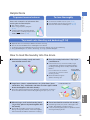
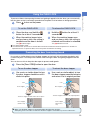
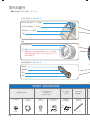
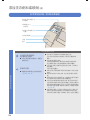
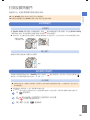
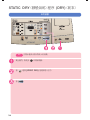
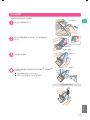
Reasons for abnormal drainage
Is the drain hose elevated more than 10 cm
above the ground?
Is the drain hose firmly attached to the drain
outlet? (Installation Instructions)
The drain hose must not be elevated more than
10 cm when going over a threshold, for example,
and its total length must be 2 m or less.
10 cm or less
2 m or less
Reasons for stops and abnormal sounds
and vibration during the spin cycle
Is the machine installation level?
Is the air bubble in the spirit level inside the
circle? (Installation Instructions)
View the spirit level
from
directly above.
Circle
Air
bubble
Reasons for water leakage
Are you using Hitachi’s new one-touch joint
(supplied) for the connection to the tap? (P. 6)
Is the connection to the tap loose?
Is the union nut firmly connected to the
machine? (Installation Instructions)
Preparation
If you have any problems with the installation, contact your dealer or the service technician that
performed installation.
Checking the installation
If problems occur during use,
see (P. 79 to 96).

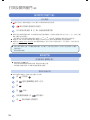
6
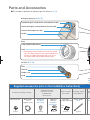
The numbers in parentheses indicate pages for reference. (P. XX)
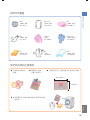
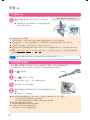
Parts and Accessories
Detergent dispenser (P. 28, 75)
Drum
Lint filter (P
. 71, 72)
(1 piece) (1 piece) (1 piece) (1 piece)(4 pieces)
(1 each)
6 mm
3 mm
Liquid detergent / liquid bleach inlet (right back side)
Filter
Filter lid
Rubber seal
Knob
Lifter
Moving liquid can be heard when the drum is rotated.
This is the liquid inside the 5-Ply Liquid Load Balancer
that acts as a balance during the spin cycle. This is
not residual water that has been left in the drum.
5-Ply Liquid Load Balancer
Powder detergent / powder bleach inlet (left side)
Softener inlet (right front side)
Handle
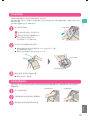
Supplied accessories (refer to the Installation Instructions)
Used when connecting to the tap
Used when the drain
outlet hole is too small
(outlet diameter:
48 mm or less)
Used for leveling
the machine
Used when cleaning
the dry filter port
Us
e
afte
One-touch joint Water supply
hose
(approx. 1.5 m)
Hose piece
(Installation
Instr
uctions)
L-Pipe and
adhesive
(Ins
tallation
Instr
uctions)
Foot caps
(
f
or adjusting height)
Suction nozzle
(P. 74) (Ins
t
D
Ad
(Ins
(Yo

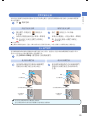
7
Parts and Accessories
English
Dry filter (P. 73, 74)
ning
ort
Used to cover the holes
after the transport bolts
are removed
Used when installing or
removing transport bolts
Used to secure the
drum during transport
or installation
Used for determining
whether the machine
is level
Used before securing the
drain hose connector
e Cover caps
(Installation Instructions)
Spanner for
tr
ansport bolts
(Installation Instructions)
Transport bolts
(Installation Instructions)
Spirit level
(Installation Instructions)
Hose clip
(Installation Instructions)
POWER buttons
Door OPEN button
Power plug
Power cord
Drain hose supports
(holes)
(on left and right sides)
Door lock
Door bellows
Drain hose
(Installation Instructions)
(2 pieces) (1 piece) (2 pieces) (1 piece) (1 piece)
Top
Handle
Filter A
Filter B
Bottom
Water
supply inlet
(P. 77)
Control
panel
Doo
r
Door stopper
Adjustable feet
(Installation Instructions)
(You can adjust the height of the right front foot.)

8
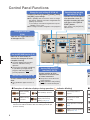
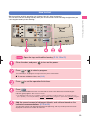
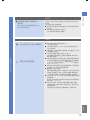
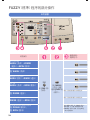
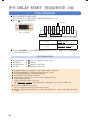
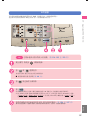
Use the DELAY START
function (P. 58, 59)
Use the HOT WASH function (P. 65)
Set the CHILD LOCK (P. 33)
Remaining time and delay
indicators (P. 26, 58)
Change the cycle settings (P. 55, 60, 61)
Detergent indicator
(P. 26)
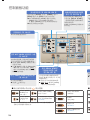
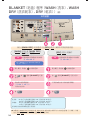
Control Panel Functions
Indicates the suggested amount
of detergent to use.
Blow hot air onto laundry to
activate the detergent for more
complete cleaning.
The [HOT WASH] indicator lights
when set, and blinks during
operation.
This function cannot be used during
the [BLANKET] and [DELICATE]
programs and during [DRY] and
[CLEAN] operations.
Prevent children from opening the
door.
The indicator lights when this is
set.
Set the machine to finish
operation 3 to 12 hours later
in 1-hour increments.
Delay times cannot be set for
some programs.
[DRY] operations and [CLEAN]
programs cannot be delayed.
Combine and change [WASH], [RINSE], [SPIN],
and [DRY] cycle settings.
Press [PAUSE] after the machine starts to change
the settings. Settings cannot be changed after the
[WASH] cycle finishes.
The settings cannot be changed when only the
[WASH] cycle is used.
The settings cannot be changed for some programs.
Indicates the remaining time
after operation starts, or
displays the delay time with
each press of the [DELAY
START] button.
After starting, only the [DELAY]
indicator is lit.
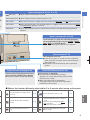
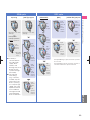
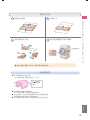
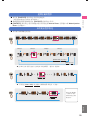
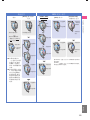
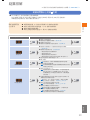
Examples of indicator displays during operation ( indicates blinking)
[WASH (30 MIN)]
in progress
[SPIN (4 MIN)] in progress
Soft Guard operation in
progress
[RINSE (2 times)]
in progress
Defoaming in progress
(display rotates during
[WASH] cycle) (P. 91)
An error has occurred
(e.g., [C08])
During the defoaming operation, water for defoaming is injected
from the front side of the drum after first draining the water (for
up to 15 minutes).
Drying operation on standby
(P. 92)
Tangle-Free Finish operation
in progress (P. 92)
A
Adj
lev
e
T
HIG
DR
LIN
WIN
B

9
Control Panel Functions
English
ay
ime
with
Y
AY]
by
n
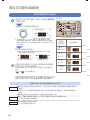
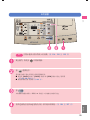
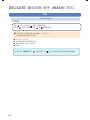
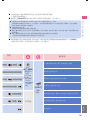
START/PAUSE button (P. 31, 32)Adjust the level of drying (P. 66)
Power buttons (P. 79)
Select a program (P. 34 to 55)
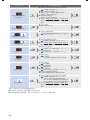
Status indicators (P. 31, 32, 71 to 74)
Cycle through (i.e., light) the selectable programs
for each operation by pressing the [WASH], [WASH
DRY], [DRY], or [CLEAN] button.
The selectable programs differ for each operation.
Turn the power on or off.
If you turn the power on and do not start an operation
within 10 minutes, the power will turn off automatically
(Auto Power Off).
The power turns off automatically after an operation
finishes.
Start or pause an operation.
Even if you press [PAUSE] during a drying
operation, you cannot open the door until the inside
of the drum has cooled.
Make sure that the door is closed before
pressing the button. Failure to do so may result in
malfunction of the machine.
Adjust the level of drying to one of three
levels: [EXTRA], [REGULAR], or [MILD].
The factory default setting is [REGULAR].
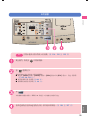
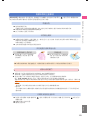
Lights or blinks when the inside of the drum is hot.HIGH (temperature)
Blinks when the dry filter is clogged or after every 25 times the [WASH DRY] and [DRY] operations are used.
DRY FILTER
Blinks when the lint filter is not attached properly or clogged, or after every 30 times the [WASH]
and [WASH DRY] operations are used.
LINT FILTER
Lights when a program that uses the Wind Iron function is selected. Blinks during Wind Iron
operation.
WIND IRON
Lights or blinks when the door is locked.(door lock)
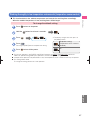
Buttons that function differently when held for 3 to 5 seconds after turning on the power
Turn the Tangle-Free Finish function
on or off.
(P. 69) Turn the pre-finish sound on or off. (P. 64)
Change the operation start/finish
sound.
(P. 64)
Turn the temperature sensor control on
or off.
Adjust the spin speed during [WASH
DRY] operations.
Adjust the spin startup conditions.
(P. 67,
68)
Turn the Soft Guard function on or
off
.
(P. 69)
Change the dehumidification mode (Air /
Water Cooling).
(P. 70)

10
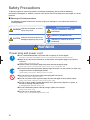
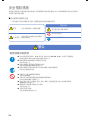
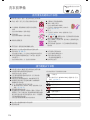
Safety Precautions
To prevent injuries to yourself and others or damage to property, please read the following
precautions thoroughly. In addition, read the notes in this manual carefully to ensure proper use of the
machine.
The following symbols indicate the severity of injury or damage in cases where the machine is
used improperly.
Indicates that death or serious
injury may result.
Indicates WARNING or CAUTION
information.
Indicates a prohibited action.
Indicates an action that must be
performed.
Indicates that minor injuries or
damage to property may result.
Meanings of listed precautions
WARNING
CAUTION
Symbol examples
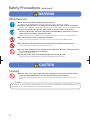
Power plug and power cord
Use a dedicated 220-240 V AC outlet with a capacity of 10 A or higher.
Sharing an outlet with other appliances may cause the outlet to overheat and result in fire.
Wipe off any dust that accumulates on the blades of the power plug or the contact
surfaces.
Failure to do so may result in fire.
Hold the body of the power plug firmly when disconnecting the plug.
Failure to do so may cause electrical shock or short circuits and result in fire.
Disconnect the power plug when performing maintenance on the machine or when not
using the machine for prolonged periods.
Failure to do so may result in electrical shock or injuries.
Do not connect or disconnect the power plug with wet hands.
Doing so may result in electrical shock.
Do not use power cords or power plugs that are damaged or loose power outlets.
Doing so may result in electrical shock, short circuits, or fire.
Do not scratch, modify, forcibly bend, pull, twist, place heavy objects on, pinch, or
otherwise damage the power cord.
A damaged power cord may result in fire.
Do not overload the power outlet by using a splitter, for example.
Doing so may result in fire.
Do not use an extension cord.
Doing so may cause overheating and result in fire.
WARNING

11
Safety Precautions
English
Installation
Do not install the machine in damp locations, such as a bathroom, or in locations
exposed to rain.
Doing so may cause electrical shock or electrical leakage and result in fire.
Do not install the machine on a wheeled platform or other unstable surface.
Doing so may cause excessive vibration and result in injuries or malfunction of the machine.
Laundry and detergent
Do not dry clothes, shoes (sneakers), hats, and other laundry on which animal oil,
vegetable oil, machine oil, dry-cleaning oils, benzene, thinner, gasoline, cosmetic oil,
ointments, and similar substances have adhered, even after washing. In addition, do
not dry items that contain sponge-like materials.
Doing so may cause natural combustion of the oil and materials.
Do not add excessive amounts of detergent.
Use the recommended amounts of detergent. Failure to do so may cause excessive foaming and
malfunction of the machine, and result in water leakage and electrical shock.
During and after operation
Do not insert your hand into the laundry until the drum stops spinning completely.
Your hand may get caught in the laundry and injuries may result, even during gentle spinning. In
particular, keep children away.
When near the machine
Keep flammable materials away from the drum.
(Flammable materials include kerosene, gasoline, benzene, thinner, alcohol, and
laundry on which such substances have adhered.)
Failure to do so may result in fire.
Keep candles, incense, cigarettes, and other sources of fire away from the machine.
Failure to do so may result in fire.
Do not allow children to enter the drum. Do not allow children to operate the machine.
Children may get trapped inside the drum and asphyxiate, or get burned, shocked, or otherwise
injured.
WARNING

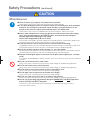
12
Safety Precautions (continued)
Miscellaneous
Remove the door before disposing of the machine.
Children may get trapped in the machine. Loosen the screws and remove the door.
Keep the supplied spirit level and plastic packaging away from children and infants.
Children may accidentally swallow the spirit level or place the packaging on their head and asphyxiate.
If the machine does not operate, emits smoke or unusual odors, or otherwise
operates abnormally, disconnect the power cord immediately and consult a service
representative to request inspection or repair.
Failure to do so may cause electrical shock, electrical leakage, or short circuits, and result in fire.
Do not dismantle, repair, or modify the machine.
Doing so may result in electrical shock, fire, or injuries. (Consult a service representative.)
Do not splash water directly onto the machine when performing maintenance.
Doing so may result in electrical shock or short circuits.
Do not wash laundry on which volatile solvents (gasoline, benzene, thinner, kerosene,
etc.) or sodium hydroxide have adhered.
Doing so may result in fire.
Keep your hands away from the door hinge when closing the door.
Fingers may get caught between the machine and door and result in injuries.
Laundry
Do not wash, rinse, spin, or dry bath mats, doormats, or other hard and thick items
made of waterproofed fabrics that do not allow water to pass through.
The laundry may be damaged, or the machine may malfunction during the spin cycle and cause
injuries.
Fishing wear, ski wear, raincoats, sleeping bags, sauna suits, wetsuits, windbreakers, disposable diapers, bicycle,
motorcycle, or car covers, waterproof mats or sheets, bath mats, etc.
Examples
CAUTION
WARNING

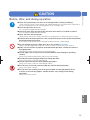
13
Safety Precautions
English
Before, after, and during operation
Open the tap and make sure there is no leakage before washing and drying.
Loose screws may result in water leakage and unexpected damage. The metal fixtures and gasket of
the tap can deteriorate and rust over long periods of use, resulting in leaks.
Close the tap when not in use.
This can prevent unexpected water leakage.
Check for leaks after tap connection whenever the machine is installed or moved.
This can prevent unexpected water leakage.
Open and close the door gently.
Failure to do so may result in injuries, damage to surrounding walls, or malfunction of the machine.
Check that lint and other particles have not attached to the surface of the door bellows
before operating the machine.
Such particles may interfere with the sealing of the door and result in water leakage.
Do not attempt to force the door open when it is locked. (P. 31 to 33)
Doing so may damage the door and lock, or result in injuries or malfunction of the machine.
Make sure the lint filter is properly attached before operation, and do not remove it
during operation.
Improper attachment or removal will result in water leakage.
Do not apply excessive pressure to the door bellows when loading or unloading
laundry.
Doing so may warp the door bellows and result in water leakage.
Do not pull out the detergent dispenser during operation.
Doing so may result in steam or water leakage.
Do not remove the dry filter during drying operations.
Doing so may result in steam or water leakage or burns.
Do not place your hands and feet under the machine during operation.
Doing so may result in injuries.
Do not touch the metallic parts of the drum or door, the top right portion of the
machine, or the laundry (zippers, metallic buttons, etc.) during or after drying
operations.
Doing so may result in burns.
CAUTION

14
Miscellaneous
Close fasteners (e.g., zippers) on laundry before operation.
Failure to do so may result in malfunction of the machine or water leakage.
If any liquid detergent, bleach, or softener remains on the metal parts of the detergent
dispenser, the metal parts of the back side of the door, or any plastic parts on the
exterior of the machine, wipe it off immediately with a soft, damp cloth.
Failure to do so may cause rust and deterioration of the machine parts and result in injuries.
After a water outage occurs or after you disconnect and reconnect the water supply
hose, close the tap and press the [START] button, and check that the detergent
indicator lights before opening the tap slowly.
(Do this after long periods of disuse as well.)
Air may have accumulated in the water supply hose or plumbing fixtures, and the pressurized air may
cause malfunction of the machine, water leakage, or injuries when released.
Install the machine so that you have access the drain outlet for cleaning.
Clogged drain outlets will result in improper drainage and water leakage. If you remove the drain hose
from the drain outlet hole, make sure that it is reinserted securely into the drainage pipe.
Clean the lint filter and drain outlet regularly (i.e., once per month).
Washing laundry that produces a lot of lint or laundry on which hair or pet fur is attached will clog the
lint filter and drain outlet quickly, and result in improper draining and water leakage.
Remove the detergent dispenser and clean the dispenser port regularly (i.e., once per
week).
Accumulation of liquid detergent, softener, or bleach may cause malfunction of the machine and result
in injuries.
Do not use hot water from a water heater.
Doing so may result in malfunction of the machine, water leakage, or improper drying operation.
Do not jam laundry when closing the door.
Doing so may result in malfunction of the machine, water leakage, or improper drying operation.
Do not climb on top of the machine or place heavy objects on it.
Doing so may result in malfunction of the machine or water leakage.
Do not apply excessive pressure to the door or its hinges.
Doing so may result in malfunction of the machine or water leakage.
Do not use water that is 50°C (122°F) or higher in temperature.
Doing so may result in malfunction of the machine, water leakage, or improper drying operation.
Do not use the washing cap (optional) during the [WASH DRY] and [DRY] operations
and the [CLEAN] and [SOFT] programs.
The heat may cause the washing cap to warp and fly out of the drum, resulting in injuries or
malfunction of the machine.
Safety Precautions (continued)
CAUTION

15
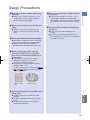
Usage Precautions
English
Do not disconnect the power plug during
operation.
Doing so may result in malfunction. Pause
the operation or turn the power off before
disconnecting the power plug.
Do not use the machine near televisions or
radios.
Doing so may result in interference in the
television screen and television and radio
noise.
Do not overload the machine with laundry.
Overflowing laundry may result in damage to
the laundry, door bellows, and plastic parts.
Doing so may prolong washing times or
produce uneven washing and drying results.
When washing larger loads, separate
underwear, handkerchiefs, and smaller
items into a commercially available mesh
laundry bag.
Smaller items may collect near the door
bellows during operation, resulting in
insufficient washing and drying.
We recommend using the optional washing
cap (MO-F102). (P. 98)
Do not use the washing cap during the [WASH
DR
Y] and [DRY] operations and the [CLEAN]
and [SOFT] programs.
Mesh laundry
bag
Washing cap
Do not overfill commercially available mesh
laundry bags.
Full bags may cause increased noise and
vibration.
Full bags may not dry sufficiently in the spin
cycle.
Put only lightweight items in the bag (e.g.,
lingerie and small items).
Do not use commercially available washing
accessories.
Commercially available accessories, such as
washing balls and filters, may warp and be
damaged by heat, which may result in damage
to the laundry and malfunction of the machine.
Ensure sufficient ventilation during drying
operations.
Doing so ensures efficient drying of the
laundry.
Insufficient ventilation during winter or low
room temperatures may result in condensation
on windows and walls.
Usage Precautions

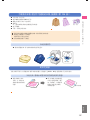
16
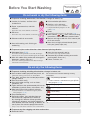
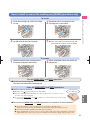
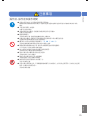
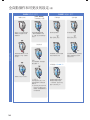
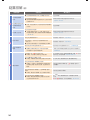
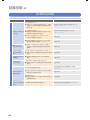
Before You Start Washing
Do not wash or dry the following items
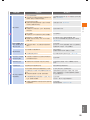
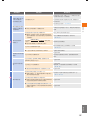
Do not dry the following items
Be sure to check the washing
instructions and guides.
To prevent shrinking, deformation, discoloration, changes in texture, etc.
Leather, fur, feathers, and items that
include these
Rayon, cuprammonium, and their
mixtures
Such items may shrink, deform, or discolor.
Silk items
Such items may shrink, deform, or discolor.
Kimonos and their accessories
Items with coating, resin finishing, or
embossing
Velvet and other pile fabrics
Neckties, suits, and coats
Such items may shrink or deform.
The [DEODORANT] program can be
used. (P. 50)
Shoes
The [STATIC DRY] program can be used. (P. 48)
Items labeled or , items without washing
instructions, and items without material labels
Blankets and rugs made with 100% wool or pile
of 10 mm or more
Items that use highly twisted threads (hard-
twist yarn) (wool, crape, etc.)
To prevent injuries and malfunctions from abnormal spinning vibration
Waterproof items (P. 12)
Such items tend to gravitate to one side, resulting in
malfunction of the machine and damage to the laundry.
Mats with rubber lining underneath or long piles
(doormats, carpets, rugs, etc.)
Such items tend to gravitate to one side, resulting in
malfunction of the machine.
Items that are covered in pet fur
Such items may clog the drain outlet.
Commercially available washing accessories
(washing balls, filters, etc.)
Pillows, cushions, etc.
To prevent shrinking, wrinkling, discoloration, changes in texture, etc.
Items made of rubber, polyurethane plastic, etc.
Follow the cleaning instructions on the product.
Toys, dolls, and items that include polyurethane
sponge material
Items that shrink easily
Items with cotton stuffing, such as futons,
comforters, etc.
Tights and items that are decorated with lace or
embroidery (synthetic fibers, micro fibers, etc.)
Wool, other animal hair, and their mixtures
Certain materials can be dried using the [STATIC
DRY] program. (P. 48)
Deep colored prints
Do not dry clothes, hats, and other items on
which animal oil, vegetable oil, machine oil,
dry-cleaning oils, benzene, thinner, gasoline,
cosmetic oil, ointments, and similar substances
have adhered, even after washing. In addition, do
not dry items that contain sponge-like materials.
Doing so may cause natural combustion of the oil and materials.
Do not wash items with the following washing
instructions:
Dry cleaning is possible
Hang drying is recommended
Light wringing is recommended
Do not wring
Low-temperature ironing is recommended
Do not iron
Labels that prohibit tumble drying, etc.
Certain materials can be dried using the [STATIC
DRY] program. (P. 48)
To prevent dry filter clogging and other malfunctions
Starched clothes

17
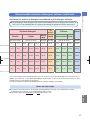
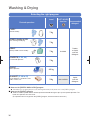
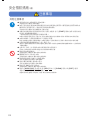
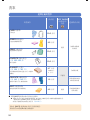
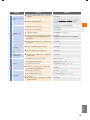
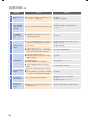
Washing and Drying Programs
English
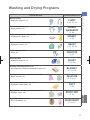
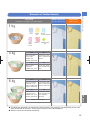
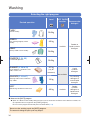
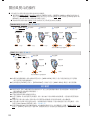
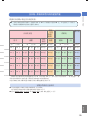
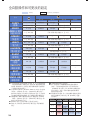
Washing and Drying Programs
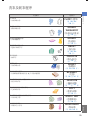
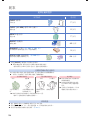
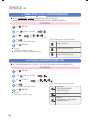
Desired operation
Recommended program
Normal laundry
Underwear, pajamas, etc.
FUZZY
(P. 34, 36, 38)
Fast washing and drying
Shirts, pajamas, etc.
SPEEDY
WASH&DRY
(P. 36)
Fast washing of lightly soiled laundry
Handkerchiefs, aprons, etc.
SPEEDY
(P. 34)
Heavily soiled or thick laundry
Sweatshirts, socks, etc.
HEAVY
(P. 34, 36, 38)
Customized operation
Shirts, etc.
FAVORITE
(P. 54)
Silent operation
Underwear, pajamas, etc.
SILENT
(P. 36, 38)
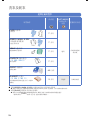
Washing and drying blankets, etc.
Acrylic blankets, comforters, bed pads, curtains, etc.
BLANKET
(P. 40 to 43)
Washing clothes with “hand wash only” labels
Skirts, sweaters, etc.
DELICATE
(P. 44 to 47)
Maintaining soft textures after wash
Hand towels, bath towels, etc.
SOFT
(P. 34)
Drying clothes with dry-clean labels, shoes, etc.
Sweaters, shoes, etc.
STATIC DRY
(P. 48)
Removing odors and smells
Suits, stuffed toys, etc.
DEODORANT
(P. 50, 51)

18
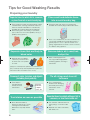
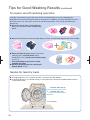
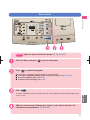
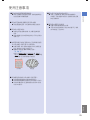
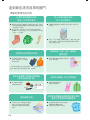
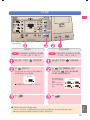
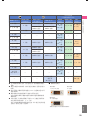
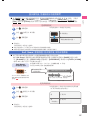
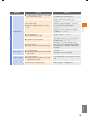
Treat stains as soon as possible
Stains become harder to
remove as time passes. Partial
cleaning of the stained area
before wash may help remove
them.
Separate items for which pilling or lint is
a concern, or turn them inside out
Turn sweaters and other items for
which pilling is a concern inside
out.
Separate such items from towels,
bath towels, etc.
Tie all strings and close all
fasteners
This is to prevent the
fasteners from damaging
the laundry and causing
malfunctions in the
machine.
Remove debris, dirt, sand, hair,
and pet fur
Debris and foreign particles
may clog the drainage pipeline
and drying pipeline, resulting in
malfunction.
Remove all coins, hairpins, and objects
(including from pockets)
These objects
may damage the
laundry or cause
malfunctions.
Remove
matches,
hairpins,
coins, etc.
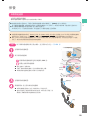
Separate items that are likely to
bleed color
Separate items that bleed
color easily, and wash items
of similar color 2 to 3 pieces
at a time.
(Single pieces of laundry tend to gravitate to one side during the
spin cycle and may not dry sufficiently. Wash them together with
other items for which color transfer is not a concern.)
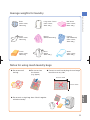
Separate items for which lint is a concern,
or place them into a mesh laundry bag
Place corduroy (or other long pile material) or dark
colored clothes, stockings, and other clothes on
which lint may be noticeable in a commercially
available mesh laundry bag with lint protection.
When washing with other laundry, use the Water-
Injection Rinse function and the [RINSE (3 times)] or
[RINSE (4 times)] operation.
Place small and delicate items
into a mesh laundry bag
Place brassieres with wires into commercially
available mesh laundry bags made for brassieres.
Place socks, handkerchiefs, and other small items into
commercially available mesh laundry bags made for
general purposes. This is to prevent the items from
getting caught between the inside of the door and the
door bellows during operation.
Tips for Good Washing Results
Preparing your laundry

19
Tips for Good Washing Results
English
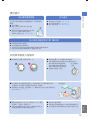
Increase the number of rinse cycles. (P. 55)
Use the Water-Injection Rinse function. (P. 55)
Decrease the amount of detergent. (P. 26, 27)
To prevent coarse textures
Items such as towels can feel coarse after
washing due to flattened piles.
Use a fabric softener.
Wash using the [SOFT] program.
(P. 34)
For items that feel coarse after drying,
run the [DRY] > [FUZZY] program for an
additional 30 minutes. (P. 39)
To rinse thoroughly
Separate items that are likely to bleed color when washing.
Use the recommended amounts of detergent and softener.
Insufficient amounts of detergent or excessive amounts softener may result in darkening.
Using liquid detergent can result in darkening. Try using a powder detergent.
To prevent color bleeding and darkening (P. 94)
Distribute the laundry evenly and avoid
concentration on one side.
Place the laundry behind the 5-Ply Liquid
Load Balancer.
Failure to do so may cause the laundry to get
caught between the door and the door bellows,
resulting in damage to the laundry and the door
bellows.
Place smaller items into the back
of the drum first, and then load the
remaining laundry.
We recommend using the
optional washing cap.
5-Ply Liquid
Load Balancer
When drying a small load of laundry (about
1 kg or less), place a dry towel together with
the laundry.
Small loads of laundry may result in insufficient
drying. Placing a dry towel or similar item together
with the laundry will reduce unevenness in drying.
Do not overload the machine with laundry.
Overflowing laundry may result in damage to the
laundry, door bellows, and plastic parts.
It may also prolong drying times or produce uneven
washing and drying results.
Large items (sheets, cotton blankets, etc.), thick items (jeans,
sweatshirts, etc.), small loads, and mats of various types should
be washed together with other laundry.
Such items tend to gravitate to one side when washed alone, resulting in
excessive vibration and insufficient drying during the spin cycle. (P. 7 9 )
Cotton blanket, etc.
Helpful hints
How to load the laundry into the drum

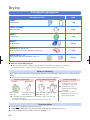
20
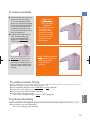
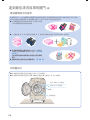
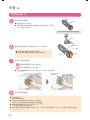
A rough guide for a 10.5 kg load of laundry is the top of the door bellows.
A rough guide for an 8 kg load of laundry is halfway between the top of the door bellows and the
screw shown below.
Screw
Guide for about 10.5 kg
Guide for about 8 kg
Door bellows
If laundry concentrates on one side, the machine will automatically even it out, prolonging the
operation time and consuming more water in the process. In addition, excessive vibration may occur
during the spin cycle, forcing the machine to stop during operation. Take note of the following to
prevent this.
Do not wash thick items (cotton blankets,
jeans, etc.) or items in mesh laundry bags
alone.
Wash 2 to 3 thick items or mesh laundry bags at a time, or wash them together with other laundry.
Place only delicate items (lingerie, brassieres,
stockings, etc.) and small items (socks,
handkerchiefs, etc.) into the mesh laundry bags.
(P. 18, 21)
Overstuffed bags may prevent smooth
spinning
operat
ion.
Set the startup operation for spinning to
Smooth Mode. (P. 68)
Tips for Good Washing Results (continued)
To ensure smooth spinning operation
Guides for laundry loads
ページが読み込まれています...
ページが読み込まれています...
ページが読み込まれています...
ページが読み込まれています...
ページが読み込まれています...
ページが読み込まれています...
ページが読み込まれています...
ページが読み込まれています...
ページが読み込まれています...
ページが読み込まれています...
ページが読み込まれています...
ページが読み込まれています...
ページが読み込まれています...
ページが読み込まれています...
ページが読み込まれています...
ページが読み込まれています...
ページが読み込まれています...
ページが読み込まれています...
ページが読み込まれています...
ページが読み込まれています...
ページが読み込まれています...
ページが読み込まれています...
ページが読み込まれています...
ページが読み込まれています...
ページが読み込まれています...
ページが読み込まれています...
ページが読み込まれています...
ページが読み込まれています...
ページが読み込まれています...
ページが読み込まれています...
ページが読み込まれています...
ページが読み込まれています...
ページが読み込まれています...
ページが読み込まれています...
ページが読み込まれています...
ページが読み込まれています...
ページが読み込まれています...
ページが読み込まれています...
ページが読み込まれています...
ページが読み込まれています...
ページが読み込まれています...
ページが読み込まれています...
ページが読み込まれています...
ページが読み込まれています...
ページが読み込まれています...
ページが読み込まれています...
ページが読み込まれています...
ページが読み込まれています...
ページが読み込まれています...
ページが読み込まれています...
ページが読み込まれています...
ページが読み込まれています...
ページが読み込まれています...
ページが読み込まれています...
ページが読み込まれています...
ページが読み込まれています...
ページが読み込まれています...
ページが読み込まれています...
ページが読み込まれています...
ページが読み込まれています...
ページが読み込まれています...
ページが読み込まれています...
ページが読み込まれています...
ページが読み込まれています...
ページが読み込まれています...
ページが読み込まれています...
ページが読み込まれています...
ページが読み込まれています...
ページが読み込まれています...
ページが読み込まれています...
ページが読み込まれています...
ページが読み込まれています...
ページが読み込まれています...
ページが読み込まれています...
ページが読み込まれています...
ページが読み込まれています...
ページが読み込まれています...
ページが読み込まれています...
ページが読み込まれています...
ページが読み込まれています...
ページが読み込まれています...
ページが読み込まれています...
ページが読み込まれています...
ページが読み込まれています...
ページが読み込まれています...
ページが読み込まれています...
ページが読み込まれています...
ページが読み込まれています...
ページが読み込まれています...
ページが読み込まれています...
ページが読み込まれています...
ページが読み込まれています...
ページが読み込まれています...
ページが読み込まれています...
ページが読み込まれています...
ページが読み込まれています...
ページが読み込まれています...
ページが読み込まれています...
ページが読み込まれています...
ページが読み込まれています...
ページが読み込まれています...
ページが読み込まれています...
ページが読み込まれています...
ページが読み込まれています...
ページが読み込まれています...
ページが読み込まれています...
ページが読み込まれています...
ページが読み込まれています...
ページが読み込まれています...
ページが読み込まれています...
ページが読み込まれています...
ページが読み込まれています...
ページが読み込まれています...
ページが読み込まれています...
ページが読み込まれています...
ページが読み込まれています...
ページが読み込まれています...
ページが読み込まれています...
ページが読み込まれています...
ページが読み込まれています...
ページが読み込まれています...
ページが読み込まれています...
ページが読み込まれています...
ページが読み込まれています...
ページが読み込まれています...
ページが読み込まれています...
ページが読み込まれています...
ページが読み込まれています...
ページが読み込まれています...
ページが読み込まれています...
ページが読み込まれています...
ページが読み込まれています...
ページが読み込まれています...
ページが読み込まれています...
ページが読み込まれています...
ページが読み込まれています...
ページが読み込まれています...
ページが読み込まれています...
ページが読み込まれています...
ページが読み込まれています...
ページが読み込まれています...
ページが読み込まれています...
ページが読み込まれています...
ページが読み込まれています...
ページが読み込まれています...
ページが読み込まれています...
ページが読み込まれています...
ページが読み込まれています...
ページが読み込まれています...
ページが読み込まれています...
ページが読み込まれています...
ページが読み込まれています...
ページが読み込まれています...
ページが読み込まれています...
ページが読み込まれています...
ページが読み込まれています...
ページが読み込まれています...
ページが読み込まれています...
ページが読み込まれています...
ページが読み込まれています...
ページが読み込まれています...
ページが読み込まれています...
ページが読み込まれています...
ページが読み込まれています...
ページが読み込まれています...
ページが読み込まれています...
ページが読み込まれています...
ページが読み込まれています...
ページが読み込まれています...
ページが読み込まれています...
ページが読み込まれています...
ページが読み込まれています...
ページが読み込まれています...
ページが読み込まれています...
ページが読み込まれています...
ページが読み込まれています...
ページが読み込まれています...
ページが読み込まれています...
ページが読み込まれています...
ページが読み込まれています...
-
 1
1
-
 2
2
-
 3
3
-
 4
4
-
 5
5
-
 6
6
-
 7
7
-
 8
8
-
 9
9
-
 10
10
-
 11
11
-
 12
12
-
 13
13
-
 14
14
-
 15
15
-
 16
16
-
 17
17
-
 18
18
-
 19
19
-
 20
20
-
 21
21
-
 22
22
-
 23
23
-
 24
24
-
 25
25
-
 26
26
-
 27
27
-
 28
28
-
 29
29
-
 30
30
-
 31
31
-
 32
32
-
 33
33
-
 34
34
-
 35
35
-
 36
36
-
 37
37
-
 38
38
-
 39
39
-
 40
40
-
 41
41
-
 42
42
-
 43
43
-
 44
44
-
 45
45
-
 46
46
-
 47
47
-
 48
48
-
 49
49
-
 50
50
-
 51
51
-
 52
52
-
 53
53
-
 54
54
-
 55
55
-
 56
56
-
 57
57
-
 58
58
-
 59
59
-
 60
60
-
 61
61
-
 62
62
-
 63
63
-
 64
64
-
 65
65
-
 66
66
-
 67
67
-
 68
68
-
 69
69
-
 70
70
-
 71
71
-
 72
72
-
 73
73
-
 74
74
-
 75
75
-
 76
76
-
 77
77
-
 78
78
-
 79
79
-
 80
80
-
 81
81
-
 82
82
-
 83
83
-
 84
84
-
 85
85
-
 86
86
-
 87
87
-
 88
88
-
 89
89
-
 90
90
-
 91
91
-
 92
92
-
 93
93
-
 94
94
-
 95
95
-
 96
96
-
 97
97
-
 98
98
-
 99
99
-
 100
100
-
 101
101
-
 102
102
-
 103
103
-
 104
104
-
 105
105
-
 106
106
-
 107
107
-
 108
108
-
 109
109
-
 110
110
-
 111
111
-
 112
112
-
 113
113
-
 114
114
-
 115
115
-
 116
116
-
 117
117
-
 118
118
-
 119
119
-
 120
120
-
 121
121
-
 122
122
-
 123
123
-
 124
124
-
 125
125
-
 126
126
-
 127
127
-
 128
128
-
 129
129
-
 130
130
-
 131
131
-
 132
132
-
 133
133
-
 134
134
-
 135
135
-
 136
136
-
 137
137
-
 138
138
-
 139
139
-
 140
140
-
 141
141
-
 142
142
-
 143
143
-
 144
144
-
 145
145
-
 146
146
-
 147
147
-
 148
148
-
 149
149
-
 150
150
-
 151
151
-
 152
152
-
 153
153
-
 154
154
-
 155
155
-
 156
156
-
 157
157
-
 158
158
-
 159
159
-
 160
160
-
 161
161
-
 162
162
-
 163
163
-
 164
164
-
 165
165
-
 166
166
-
 167
167
-
 168
168
-
 169
169
-
 170
170
-
 171
171
-
 172
172
-
 173
173
-
 174
174
-
 175
175
-
 176
176
-
 177
177
-
 178
178
-
 179
179
-
 180
180
-
 181
181
-
 182
182
-
 183
183
-
 184
184
-
 185
185
-
 186
186
-
 187
187
-
 188
188
-
 189
189
-
 190
190
-
 191
191
-
 192
192
-
 193
193
-
 194
194
-
 195
195
-
 196
196
-
 197
197
-
 198
198
-
 199
199
-
 200
200


Hitachi BD-W3300 Operating Instructions And Owner's Manual
- カテゴリー
- 電気毛布/枕
- タイプ
- Operating Instructions And Owner's Manual
他の言語で
- English: Hitachi BD-W3300
関連論文
その他のドキュメント
-
Samsung R1245V ユーザーマニュアル
-
-
LG G-CS1612W ユーザーガイド
-
Samsung WD70J5410AW/SH ユーザーマニュアル
-
-
-
-
-
-