
1
3 4
2
High
Low
S
K
L
N
M
O
P
Q
R
R
S
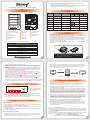
狀態 電源指示燈 系統警示燈
硬碟狀態顯示燈 蜂鳴器
RAID JBOD RAID JBOD
無硬碟 藍燈恆亮 — — — — — —
資料存取 藍燈恆亮 — — 藍燈閃爍 — —
硬碟閒置 藍燈恆亮 — — 藍燈恆亮 — —
資料重建 - 來源碟 藍燈恆亮 — — 藍燈閃爍 — — — —
資料重建 - 資料碟 藍燈恆亮 — — 紫燈閃爍 — — — —
風扇故障 藍燈恆亮 紅燈恆亮 藍燈恆亮 YES
過熱 藍燈恆亮 紅燈恆亮 藍燈恆亮 YES
銳銨科技
SR4-SB31+ X1( x4)
USB 3.1 x1
e-SATA x1
AC x1
x1
x 1
4K
Notebook
www.STARDOM.com.tw
[email protected]

1
3 4
2
Users can set the RAID mode using the LCD and buttons on the front. The default is JBOD mode.
With the “Quick Setup” feature, users can quickly change other RAID modes.
For other settings, please go to the official website related product page to download the manual,
refer to "5. Description of Front Panel Operation and LCD Information".
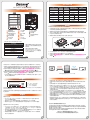
Front view Rear view
HDD access light
HDD enclosure handle
HDD enclosure pin release
LCM display
Power touch switch
System status light
UP button
DOWN button
ESC button
ENTER button
Fan
Mute button
Display port
e-SATA port
USB3.1 port
Power main switch
Power socket
Fan speed switch
Anti-theft lock
S
Stardom Storage Solutions
When connected to the computer system, it’s prohibited to remove, insert or swap the hard drive
while data transfer is being performed.
It’s prohibited to change the positioning of the drives once the initial installation has been
completed as the changes made to the drive positions may destroy the RAID formation.
The product needs to be restarted after adding or changing the RAID mode, and the update is
guaranteed to be the new RAID mode.
When the Notebook which support USB PD function is only connected to SR4-SB31+, SR4-SB31+
can provide up to 24W (12V/2A) power supply, but if then connected to other power supply such like
the original Notebook power supply, Notebook will automatically judge which one will be the main
power source, usually the one which can provide more Wattage will be. At this time, SR4-SB31+
may be interrupted and re-identified by the Notebook. Therefore, before connecting to other power
supplies, please make sure that there are no data accessed between Notebook and SR4-SB31+.
SR4-SB31+ can only provide 24W at most, which is different from the original Notebook power
supply. It mainly to extend the Notebook's usage time. Take Macbook Pro 13" as an example, the
original power supply is 60W, assuming it take 2 hours for it to fully charge the battery , use
SR4-SB31+ might need three times time. Therefore, if user need to use Notebook for a long time,
it is recommended to connect the original power supply first before connect SR4-SB31+.
Whenever turning off or unplugging the SR4-SB31+ from your computer system becomes
necessary, always remember to safely remove it from your operating system first.
It is highly recommended for users to back up important data contained within the SR4-SB31+
unit on a regular basis or whenever the user feels necessary to a remote or a separate storage
device. Stardom will not be responsible for any lost of data caused during the use of the unit or
the recovery of the data lost.
4K
More Pixels
(4K@30Hz)
Smart Charge
(24W)
Notebook
★ Notebook will need to support 5V/9V/12V charge.
Open the package and you should find the following :
1.
2.
3.
4.
5.
Place the system on a stable surface. Ensure that it is well ventilated without blockage to the vent
and kept away from areas near water and damage prone areas.
Use the ejector pin included in the accessory kit and inserted into the pin release opening to eject
the removable drive tray latch and extract the removable drive tray.
For 3.5" HDD/SSD, please secure it by use six the larger screws included in the accessory kit. For
2.5" HDD/SSD, please secure it by use four the smaller screws included in the accessory kit.
When the hard drive installation has been completed, insert the hard drive tray into the system
horizontally and secure the latch into place.
Connect the AC power cable to the SR4-SB31+, and then plug the AC power to the wall socket.
Boot-up the unit.
Status Power LED Larm LED
HDD LED Buzzer
RAID JBOD RAID JBOD
No HDD Blue light always on — — — — — —
Access Blue light always on — —
— —
Disk Idle Blue light always on — — Blue light always on — —
Rebuilding -
Source
Blue light always on — —
Blue light
— — — —
Rebuilding -
Target
Blue light always on — —
Purple light
— — — —
Fan Failed Blue light always on Red light always on Blue light always on YES
Over Temp Blue light always on Red light always on Blue light always on YES
Please check the product and accessories for any defect or missing parts. If you have any
questions, please contact your product supplier.
Please visit the official website - Download page (http://www.stardom.com.tw/STARDOM2016/
download.php) to download drivers and other related resources.
●
●
Contents of Product Package
SR4-SB31+ x 1 ( with removable drive tray enclosed x 4)
USB 3.1 Cable x 1
e-SATA Cable x 1
AC Power Cable x 1
Handle x1
Quick Installation Guide x 1
Screws & Pins
Enter: Enter to next level or Confirm
Esc: Back to next level or Cancel
Up / Down: Select Items
Support DisplayPort
The SR4-SB31+ offers a DisplayPort support DP1.1a, provides up to 4K@30Hz resolution ,
and is compatible with monitor and cables with DisplayPort.
By using third-party's DisplayPort adapter, it can be connected to the monitor with Mini
DisplayPort interface.
By using third-party's active DisplayPort adapter, it can be connected to the monitor with
VGA, DVI and HDMI interface.
1.
2.
3.
Support USB Power Delivery (USB-PD)
USB Power Delivery (USB-PD) introduces charging technology and unified cable standards.
SR4-SB31+ supports USB-PD. Use USB Type-C to USB Type-C cable, it can provide up to 24W
(5V/3A (15W), 9V/2A (18W), 12V/2A (24W)) power charging to the host.
1.
2.
3.
STARDOM is one brand under RAIDON TECHNOLOGY, INC.
Thank you for choosing STARDOM’s product.
The information provided in this manual was checked before publication, but the actual product
specications may have changed before shipping; Latest product specications and updates can be
found at www.STARDOM.com.tw or through your sales representative. No separate notications will be
provided by our company.
If you have any questions about RAIDON products or would like to receive the latest product information,
instruction manuals, or rmware, please contact [email protected].tw for assistance.
All product-related content in this manual are copyrighted by RAIDON TECHNOLOGY, INC.
High
Low
R
S
6.
7.
8.
9.
10.
11.
Connect the cable to the PC and the SR4-SB31+ port.
First turn the power main switch on the back of the product to “I” to turn the power on, then gently
press the power touch switch on the front of the product until the power symbol “ ” lights up.
Set the storage mode using the LCD and buttons on the front (please refer to section 5 for front
panel and LCD information).
After boot-up, your operating system will automatically detect the storage capacity of your hard
drives. Please follow the operating system instructions to configure and format your drives. The
formatted drives can be configured for the RAID setup.
If you are not using the product for a while, you can put the product into shutdown mode: first
press the power touch switch on the front of the product until the power symbol “ ” is off; if
you want to use the product, gently press the power touch switch on the front of the product
until the power is turned on. The symbol “ ” is illuminated.
If the product is not used for a long time, please turn off the product main power switch: first gently
press the power touch switch on the front of the product until the power symbol “ ” is off,
then turn the power main switch on the back of the product to “ O ” to turn off the power.
The product is in a state of near-complete power-off in shutdown mode, and the hard disk, LCD, and fan
are all out of operation, providing only a small portion of power for preparation for subsequent startup.
If the connected host is a notebook that supports USB-PD (5V/9V/12V) charging, it will remain
charging after the notebook is powered off or restarted while the SR4-SB31+ is still power on.
If the SR4-SB31+ cannot be recognized after the notebook restarted, please reconnect the
Type-C cable or restart the SR4-SB31+.
-
 1
1
-
 2
2


