
GR5640-SB31+
SafeTANK
User Manual

» SafeTANK GR5640-SB31+ User Manual ...................1
1. Environmental Requirements ....................................................................................1
2. Package Contents and Product Views ......................................................................1
3. Hardware Requirements and Precautions ................................................................3
4. Hardware Installation Procedure ...............................................................................4
5. Description of Front Panel Operation and LCD Information ...................................... 5
6. Support DisplayPort ..................................................................................................16
7. Support USB Power Delivery (USB-PD) ...................................................................16
8. Replacement of Malfunctioning Drive and Data Rebuild Instructions ............... 17
9. System Temperature Overheat and Fan Failure Management..............................17
10. Frequently Asked Questions ...................................................................................17
» SafeTANK GR5640-SB31+ 產品使用說明 ........... 18
1. 環境需求 ....................................................................................................................18
2. 產品外觀及包裝內容 ..................................................................................................18
3. 硬體需求與注意事項 ..................................................................................................20
4. 硬體安裝 ....................................................................................................................21
5. 前面板操作及 LCD 訊息說明 .....................................................................................22
6. 支援 Display 埠 .......................................................................................................... 33
7. 支援 USB Power Delivery (USB-PD ) ........................................................................33
8. 故障硬碟更換步驟及資料重建功能說明 .....................................................................34
9. 系統過熱與風扇故障狀況排除 ....................................................................................34
10. 常見問題 ..................................................................................................................34
GR5640-SB31+ User Manual
V1.0

GR5640-SB31+ User Manual
1
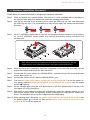
2. Package Contents and Product Views
Introduction
Open the package and you shall nd the following parts:
GR5640-SB31+
GR5640-SB31+ x 1
( with removable drive tray enclosed x 4)
USB 3.1 Cable x 1
e-SATA Cable x 1
AC Power Cable x 1
Quick Installation Guide x 1
Screws & Keys
» SafeTANK GR5640-SB31+ User Manual
Thank you for choosing the RAIDON product. This manual will familiarize you with the RAIDON
GR5640-SB31+ product. We recommend reading through this manual before using the RAIDON
GR5640-SB31+ product. The information provided in this manual was checked before publication,
but the actual product specications may have changed before shipping; Latest product specications
and updates can be found at www.RAIDON.com.tw. No separate notications will be provided by our
company. If you would like to receive the latest RAIDON product information, manuals, and rmware,
or have any questions regarding RAIDON products, please contact your local supplier or visit www.
RAIDON.com.tw for more information.
All product-related content in this manual are copyrighted by RAIDON TECHNOLOGY, INC.
• Please check the product and accessories for any defect or missing parts. If you have any questions,
please contact your product supplier.
• Please visit the ofcial website - Download page (https://www.RAIDON.com.tw/RAIDON2016/
download.php) to download drivers and other related resources.
1. Environmental Requirements
Operating Temperature: 0 ~ 40 ℃ (32 ~ 104 ℉ )
Storage Temperature : -20 ~ 47℃ (-4 ~ 116 ℉ )
Line Voltage : 100 ~ 240V AC

GR5640-SB31+ User Manual
2
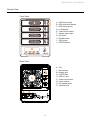
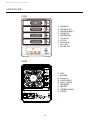
Product View
Front View
Rear View
High
Low
R
S
A. HDD access light
B. HDD enclosure handle
C. HDD tray key lock
D. LCM display
E. Power touch switch
F. System status light
G. UP button
H. DOWN button
I. ESC button
J. ENTER button
K. Fan
L. Mute button
M. Display port
N. e-SATA port
O. USB 3.1 port
P. Power main switch
Q. Power socket
R. Fan speed switch
S. Anti-theft lock

GR5640-SB31+ User Manual
3
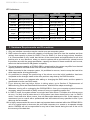
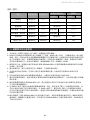
LED Indicators :
3. Hardware Requirements and Precautions
1. Only one interface connection may be used at once per computer system.
2. RAID volume formation utilizes the capacity of whichever hard drive has the smallest and then
multiply that capacity by three for RAID 5, four for RAID 0, to form a large volume, therefore,
it is recommended to only install hard drives of the same brand and specification for all drive
position prior to use. Moreover, when you need to replace with a new hard drive, please be sure
to purchase one with the same specication, capacity and brand. If these conditions can’t be met,
select one that’s at least 20 GB greater in capacity.
3. The actual storage capacity of GR5640-SB31+ recognized by the system may differ from the total
capacity stated on the hard drives once the drives have been formatted.
4. When connected to the computer system, it’s prohibited to remove, insert or swap the hard drive
while data transfer is being performed.
5. It’s prohibited to change the positioning of the drives once the initial installation has been
completed as the changes made to the drive positions may destroy the RAID formation.
6. The product needs to be restarted after adding or changing the RAID mode, and the update is
guaranteed to be the new RAID mode.
7. If you discover that hard drive failure is taking place, go to Section 8 “Replacement of
Malfunctioning Drive and Data Rebuild Instructions” and follow the steps accordingly.
8. Whenever turning off or unplugging the GR5640-SB31+ from your computer system becomes
necessary, always remember to safely remove it from your operating system rst.
9. In RAID 5 mode, the system allows one single hard drive failure. If multiple drive failures occur
at once, it’s likely that all data stored in the system have been destroyed or lost. In RAID 0
mode, if one hard drive failure occurs, then all data maybe destroyed or lost. If this happens, we
recommend you to consult with a professional hard drive data recovery specialist to see if your
data may be recoverable.
10. It is highly recommended for users to back up important data contained within the GR5640-SB31+
unit on a regular basis or whenever the user feels necessary to a remote or a separate storage
device. RAIDON will not be responsible for any lost of data caused during the use of the unit or
the recovery of the data lost.
Status Power LED Alarm LED
HDD LED Buzzer
RAID JBOD RAID JBOD
No HDD Blue light always on — — — — — —
Access Blue light always on — — Blue light ashing — —
Disk Idle Blue light always on — — Blue light always on — —
Rebuilding -
Source
Blue light always on — —
Blue light
ashing
— — — —
Rebuilding -
Target
Blue light always on — —
Purple light
ashing
— — — —
Fan Failed Blue light always on Red light always on Blue light always on YES
Over Temp Blue light always on Red light always on Blue light always on YES

GR5640-SB31+ User Manual
4
4. Hardware Installation Procedure
Please follow the instructions below to complete the hardware installation.
Place the system on a stable surface. Ensure that it is well ventilated without blockage to
the vent and kept away from areas near water and damage prone areas.
Use the key included in the accessory kit to unlock the HDD tray key lock, and then press
the HDD tray key lock. The removable drive tray will pop open and extract the removable
drive tray.
Step 1
Step 2
Step 4
Step 5
Step 6
Step 7
Step 8
Step 9
Step 10
When the hard drive installation has been completed, insert the hard drive tray into the
system horizontally and secure the latch into place.
Connect the AC power cable to the GR5640-SB31+, and then plug the AC power to the wall
socket. Boot-up the unit.
Connect the cable to the PC and the GR5640-SB31+ port.
First turn the power main switch on the back of the product to “I” to turn the power on,
then gently press the power touch switch on the front of the product until the power
symbol “
” lights up.
Set the storage mode using the LCD and buttons on the front (please refer to section 5 for
front panel and LCD information).
After boot-up, your operating system will automatically detect the storage capacity of your
hard drives. Please follow the operating system instructions to congure and format your
drives. The formatted drives can be congured for the RAID setup.
When shutting down, rst press the power touch switch on the front of the product until
the power symbol “
” is turned off, then turn the power main switch on the back of the
product to “O” to turn the power on.
Note: Please avoid using hard disk drives from different manufacturers or different
models from the same manufacturer as this may impact system performance.
Lock
Unlock Press
For 3.5" HDD/SSD, please secure it by use six the larger screws included in the accessory
kit. For 2.5" HDD/SSD, please secure it by use four the smaller screws included in the
accessory kit.
Step 3

GR5640-SB31+ User Manual
5
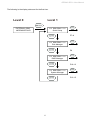
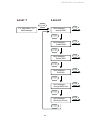
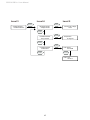
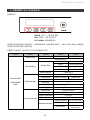
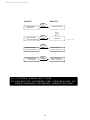
5. Description of Front Panel Operation and LCD Information
Front Panel Operation:
Enter: Enter: Enter to next level or Conrm
Esc: Back to next level or Cancel
Up / Down: Select Items
Users can set the RAID mode using the LCD and buttons on the front. The default is JBOD mode.
Using “Quick Setup” function, users can change the RAID mode to RAID 0 or RAID 5 quickly.
Please refer to LCD Information as below for other setting:
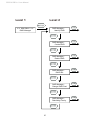
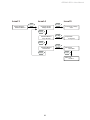
Level 0 Level 1 Level 2 Level 3 Level 4
External 4BAY
HARDWARE
RAID
Quick Setup
Create One RAID RAID 0/ RAID 5 Select Disk
Delete All RAID
Disk Manager
Identify Disk
Disk 1 Check Disk LED
Disk 2 Check Disk LED
Disk 3 Check Disk LED
Disk 4 Check Disk LED
Show Disk Info < Disk Info >
RAID Manager
Identify RAID Select RAID
Create RAID RAID 0 / RAID 5 Select Disk
Delete RAID Select RAID
RAID Info ― ―
Change RAID Pwd < Password > for RAID Setup
Rebuilding Priority Highest/High/Medium/Low/Lowest
System Manager
System Info Firmware Version
Changhe Password < Password > for System Info
Logout From Menu < Y or N >
Alarm Control Mute the Buzzer
Hardware Monitor
Voltage Monitor < 3.3V / 5V / 12V >
Temp. Monitor < Temp. >
Fan Monitor
< Fan Speed /
Fan Level >

EXTERNAL 4 BAY
HARDWARE RAID
═ ═ Main Menu ═ ═
Quick Setup
═ ═ Main Menu ═ ═
Disk Manager
═ ═ Main Menu ═ ═
RAID Manager
═ ═ Main Menu ═ ═
System Manager
Level 0 Level 1
GR5640-SB31+ User Manual
6
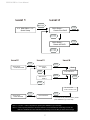
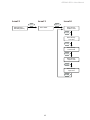
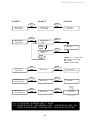
The following is the display status set for the rst time:
P7~8
P9
P10~12
P13~15

Quick Setup :
Delete All RAID
═ ═ Main Menu ═ ═
Quick Setup
Level 1
Quick Setup :
Create One RAID
Quick Setup :
Delete All RAID
Level 2
Select Level :
RAID 0
Enter Password :
_
Enter Password :
_
Are You Sure?
Enter :Yes Esc : No
Select Level :
RAID 5
Level 2
Quick Setup :
Create One RAID
Level 3 Level 4
GR5640-SB31+ User Manual
7
Note
Note 1. If you don’t want to set password, please press "ENTER" to go to next step.
Note 2. If user forgot the password, it will not be allowed to access the data from the storage or write new
data into it. RAIDON will not be held liable for the damage or loss of data you stored on the storage.
• If you did not set password before, please
press "ENTER" to go to next step.

Level 1 Level 2
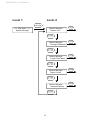
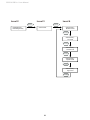
Disk Manager :
Identify Disk
Disk Manager :
Show Disk Info
═ ═ Main Menu ═ ═
Disk Manager
GR5640-SB31+ User Manual
8

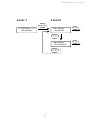
Disk Manager :
Show Disk Info
Select Disk :
Disk 1/2/3/4
Disk Manager :
Identify Disk
Disk Manager :
Disk 1
Disk 2
Disk Manager :
Disk Manager :
Check Disk LED
Model :
Level 2 Level 3 Level 4
Disk 3
Disk Manager :
Disk 4
Disk Manager :
GR5640-SB31+ User Manual
9

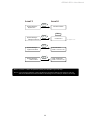
Level 1
═ ═ Main Menu ═ ═
RAID Manager
RAID Manager :
Identify RAID
RAID Manager :
Create RAID
RAID Manager :
Delete RAID
RAID Manager :
RAID Info
RAID Manager :
Change RAID Pwd.
RAID Manager :
Rebuilding Priority
Level 2
GR5640-SB31+ User Manual
10

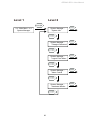
RAID Manager :
Identify RAID
RAID Manager :
Select RAID
Select
RAID :
RAID Set x
Select RAID :
Select Disk :
Select RAID : Information
Select RAID :
RAID Manager :
Create RAID
RAID Manager :
RAID 0
RAID Manager :
RAID 5
RAID Manager :
Delete RAID
RAID Manager :
RAID Information
RAID Manager :
Change RAID Pwd
< Password >
for RAID Setup
Level 2 Level 3 Level 4
Are You Sure?
Enter :Yes Esc : No
GR5640-SB31+ User Manual
11
ENTER :
Enter to next level or Conrm
ESC :
Back to next level or Cancel
UP :
Select HDD/SSD
DOWN :
Cancel the select HDD/SSD
Note
Note 1. If you don’t want to set password, please press "ENTER" to go to next step.
Note 2. If user forgot the password, it will not be allowed to access the data from the storage or write new
data into it. RAIDON will not be held liable for the damage or loss of data you stored on the storage.

RAID Manager :
Rebuilding Priority
Level 2 Level 3
Select Priority :
Medium Level
Select Priority :
Low Level
Select Priority :
Lowest Level
Select Priority :
Highest Level
Select Priority :
High Level
Level 4
Select RAID :
GR5640-SB31+ User Manual
12

Level 1 Level 2
System Manager :
System Info.
System Manager :
Changhe Password
System Manager :
Logout From Menu
System Manager :
Alarm Control
System Manager :
Hardware Monitor
═ ═ Main Menu ═ ═
System Manager
GR5640-SB31+ User Manual
13

System Manager :
System Info.
Firmware Version
Are You Sure?
Enter : Yes Esc : No
Mute The Buzzer?
Enter : Yes Esc : No
System Manager :
Changhe Password
System Manager :
Logout From Menu
System Manager :
Alarm Control
for System Info
Level 3 Level 4
< Password >
GR5640-SB31+ User Manual
14
Note
Note 1. If you don’t want to set password, please press "ENTER" to go to next step.
Note 2. If user forgot the password, it will not be allowed to access the data from the storage or write new
data into it. RAIDON will not be held liable for the damage or loss of data you stored on the storage.

System Manager :
Hardware Monitor
Hardware Monitor
Voltage Monitor
Hardware Monitor
Temp. Monitor
Hardware Monitor
FAN Monitor
3.3V/5V/12V Voltage:
xxxxV
Level 3 Level 4 Level 5
Temperature:
xx degrees
FAN Speed:
xxxx RPM
FAN Level:
LEVEL x
GR5640-SB31+ User Manual
15

GR5640-SB31+ User Manual
16
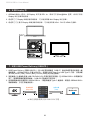
6. Support DisplayPort
1. The GR5640-SB31+ offers a DisplayPort support DP1.1a, provides up to 4K@30Hz resolution ,
and is compatible with monitor and cables with DisplayPort.
2. By using third-party's DisplayPort adapter, it can be connected to the monitor with Mini
DisplayPort interface.
3. By using third-party's active DisplayPort adapter, it can be connected to the monitor with VGA,
DVI and HDMI interface.
1. USB Power Delivery (USB-PD) introduces fast charging technology and unified cable standards.
GR5640-SB31+ supports USB-PD. Use USB Type-C to USB Type-C cable, it can provide up to
24W (5V/3A (15W), 9V/2A (18W), 12V/2A (24W)) power charging to the host.
2. If the connected host is a notebook that supports USB-PD (5V/9V/12V) charging, it will remain
charging after the notebook is powered off or restarted while the GR5640-SB31+ is still on.
3. If the GR5640-SB31+ cannot be recognized after the notebook is turned on, please reconnect the
Type-C cable or restart the GR5640-SB31+.
7. Support USB Power Delivery (USB-PD)
★ Notebook will need to support 5V/9V/12V charge.
Notebook
4K
More Pixels
(4K@30Hz)
Smart Charge
(24W)

GR5640-SB31+ User Manual
17
Q1. Which drive format should I choose to format the hard drives in the GR5640-SB31+?
A: It depends on the computer system you most often use. See the below suggestions:
1. Use NTFS format for Windows 2000/XP/Vista/7/8/10 system
2. Use HFS+ (Mac OS Extended) format for a Mac OS X system
3. Choose FAT32 format if you’ll use the GR5640-SB31+ in both Windows and Mac environments
(the
maximum size of one single le may not exceed 4 GB).
Q2. Why can’t my GR5640-SB31+ reach the transfer performance speed of 200 MB/s via e-SATA
interface as stated on your website?
A: 1. Please rst check if your PCI-E SATA host adapter would only support PCI-E (1X). This type
of host adapters cannot reach the transfer performance speed beyond 135MB/s.
2. The GR5640-SB31+ will need to be set to the RAID 0 mode also.
8. Replacement of Malfunctioning Drive and Data Rebuild Instructions
9. System Temperature Overheat and Fan Failure Management
1. Remove the drive tray containing the malfunctioned hard drive and disassemble the hard drive
from drive tray.
2. Mount the new hard drive onto the tray and insert it back to the empty drive position of the
GR5640-SB31+, then push the latch into place making sure it is secured and locked.
3. In RAID 5 mode, when you turn the system on, the hard drive status indicator of the replacement
drive will interchangeably blink red and purple to inform that the data is being rebuilt to the
replacement drive. During data rebuild, you may operate the GR5640-SB31+ as normal. When
the indicator stops, the data rebuild process has been completed.
If the alarm indicator has lit up red and the audio alarm sounds, this could mean that either a
system fan has stopped operating entirely or the system temperature has exceeded over the default
temperature of 55° C. When this occurs, you may press the mute button at the rear of the system to
shut off the audio alarm and power off the system immediately if in the allowed operational state to let
the system cool. Check and see if the overall operation environment is well ventilated and make sure
there are no blockages to the enclosed fan and then re-power on the system to continue use. If the
problem persists, please turn off the system and contact your supplier or the RAIDON tech support
for further assistance.
When a front hard drive indicator has lit up red and the audio alarm sounds, this could mean the
indicated hard drive may be malfunctioning. If this occurs, you may press the mute button at the
rear of the system to shut off the audio alarm and power off the system immediately if in the allowed
operational state, and then re-power on the system to double check and see if in fact the indicated
hard drive has malfunctioned. If the problem persists, please turn off the system and follow the
directions below :
10. Frequently Asked Questions

GR5640-SB31+ User Manual
18
2. 產品外觀及包裝內容
關於這份手冊
打開包裝外盒後,包裝內容應包含下列組件:
GR5640-SB31+
GR5640-SB31+ 產品本體 X1( 內含抽取盒 x4)
USB 3.1 連接線 x1
e-SATA 連接線 x1
AC 電源線 x1
快速安裝導引 x 1
螺絲及鑰匙
» SafeTANK GR5640-SB31+ 產品使用說明
感謝您使用 RAIDON 的產品。本手冊將介紹 RAIDON GR5640-SB31+ 產品。在您開始使用 RAIDON
GR5640-SB31+ 產品前,建議您先閱讀過本手冊。手冊裡的資訊在出版前雖已被詳細確認,實際產品
規格仍將以出貨時為準;任何產品規格或相關資訊更新請您直接到 www.RAIDON.com.tw 網站查詢,
本公司將不另行通知。若您想獲得 RAIDON 最新產品訊息、使用手冊、韌體 , 或對 RAIDON 產品有任
何疑問,請您聯絡當地供應商或到 www.RAIDON.com.tw 取得相關訊息。
本手冊相關產品內容歸銳銨科技股份有限公司版權所有
1. 環境需求
工作溫度:0 ~ 40 ℃ (32 ~ 104 ℉ )
儲存溫度:-20 ~ 47 ℃ (-4 ~ 116 ℉ )
相對濕度:5% 至 95% 非冷凝狀態
工作電壓:100~240V AC
• 請確認相關配件與產品本身是否有受損或配件缺少,若有任何疑問請與本產品供應商聯絡。
• 請前往官網 - 產品資料下載頁面 (https://www.RAIDON.com.tw/RAIDON2016/download.php) 下載
驅動程式以及其餘相關資源。
ページが読み込まれています...
ページが読み込まれています...
ページが読み込まれています...
ページが読み込まれています...
ページが読み込まれています...
ページが読み込まれています...
ページが読み込まれています...
ページが読み込まれています...
ページが読み込まれています...
ページが読み込まれています...
ページが読み込まれています...
ページが読み込まれています...
ページが読み込まれています...
ページが読み込まれています...
ページが読み込まれています...
ページが読み込まれています...
ページが読み込まれています...
-
 1
1
-
 2
2
-
 3
3
-
 4
4
-
 5
5
-
 6
6
-
 7
7
-
 8
8
-
 9
9
-
 10
10
-
 11
11
-
 12
12
-
 13
13
-
 14
14
-
 15
15
-
 16
16
-
 17
17
-
 18
18
-
 19
19
-
 20
20
-
 21
21
-
 22
22
-
 23
23
-
 24
24
-
 25
25
-
 26
26
-
 27
27
-
 28
28
-
 29
29
-
 30
30
-
 31
31
-
 32
32
-
 33
33
-
 34
34
-
 35
35
-
 36
36
-
 37
37


