
USB 3.0
RAID 0 RAID 1 JBOD
DC
12V IN
POWER
ON/OFF
Please ensure each plug is properly
connected before turning on the power.
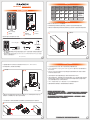
前視圖
硬碟 -1-2 警示燈
背視圖
風扇
電源開關
12V DC IN
GR3660-B3 主體 x1
USB 3.0 連接線 x1
電源轉接器 x1
電源轉接器
快速安裝導引 x1
螺絲及鑰匙
電源線 x1
打開包裝外盒後,包裝內容應包含下列組件 :
1. 為了確保節能功能的正常運作,請將USB連接線常態性與電腦端保持連接。
6. GR3660-B3使用12V規格adapter,請勿使用5V adapter以免損壞機器及資料。
7. 當電源開啟時請勿將硬碟退出,如要更換硬碟請務必先關閉電源。
2. GR3660-B3提供RAID 0 (Striping)、RAID 1 (Mirroring)與JBOD三種RAID模式,請於開啟電源前先
設定RAID模式。
3. RAID模式一旦設定完成,若要進行切換,因切換過程中將會清除硬碟中的資料,請務必先將硬碟
中的資料另行備份後再行切換。
4. 在新增或變更RAID模式後需重新啟動產品,以確保完成更新為新的RAID模式。
5. 在資料自動重建狀態下,若電腦端進入系統待命或是休眠狀態,GR3660會持續完成重建;但當重建
完成後將不會進入待命狀態。此時需用手動方式關機,或是先將電腦系統回復到正常運作狀態後,
之後才能再與電腦端同步進入待命或是休眠狀態。
3. 透過機體背面的RAID模式開關,設定所要使用的RAID模式 (RAID 0 、RAID 1 或 JBOD)。
4. 將相關連接線接上,最後請接上電源轉接器。
5. 硬體安裝完成。開啟電源後請透過作業系統進行後續格式化設定。請依照電腦作業系統指示進行
硬碟格式化,完成硬碟格式化後,便可以進行資料的讀寫。
日後如需抽換SSD/硬碟,用鑰匙轉開托盤,輕按硬碟托盤,抽出硬碟托盤更換SSD/硬碟即可。
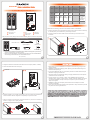
請參照下列步驟,完成GR3660-B3的硬體安裝 :
1. 取出硬碟抽取盒,將硬碟安裝在硬碟抽取盒上並使用附件包裡隨附的螺絲鎖固定硬碟。
2. 硬碟安裝:取出硬碟抽取盒,將硬碟安裝在硬碟抽取盒上並使用附件包裡隨附的螺絲鎖固定硬碟。
RAID模式
產品配件表
USB3.0 連接埠
托盤把手
產品示意圖與配件表
燈號說明
硬體安裝
產品使用注意事項
GR3660-B3
USB 3.0
RAID 0 RAID 1 JBOD
DC
12V IN
POWER
ON/OFF
Please ensure each plug is properly
connected before turning on the power.
SSD安裝
USB 3.0 連接線
硬碟安裝
狀況 未裝硬碟 待機 資料存取 硬碟損毀
未接主機
或休眠
RAID 0
紅燈
恆亮
RAID 1
紅燈
恆亮
紅燈
恆亮
紅燈
恆亮
JBOD ---- ----
----
----
紅燈
恆亮
藍燈
恆亮
藍燈
恆亮
藍燈
恆亮
資料重建
----
----
Source:
藍燈閃爍
Target:
紅藍燈閃爍
藍燈
閃爍
藍燈
閃爍
藍燈
閃爍
V1.1 (Jan. 2019)
請先確認相關配件與產品本身是否有受損或是缺少配件,若有任何疑問,請與您的經銷商或業
務人員聯絡。
請前往官網-產品資料下載頁面 (http://www.raidon.com.tw/RAIDON2016/download.php) 下載驅
動程式以及其餘相關資源。
˙
˙

Product Diagrams and Contents of Product Package
LED Instruction
After you open the outer package, make sure that the following items are contained in the package:
USB 3.0 Cable x1 Quick Guide x1
Contents of Product Package
GR3660-B3
3. Configure the RAID level via the RAID mode switch from the back panel. (RAID 0, 1 & JBOD)
4. Connect the related cable to the correct plugs.
1. Please always connect the USB cable to the computer to ensure the energy saving function
operating normally.
2. GR3660-B3 supports RAID 0 (Striping), RAID 1 (Mirroring) and JBOD. Please configure the
RAID level before powering on.
3. If you reset the RAID mode later on, it would destroy the data in the disks. Please backup the
data before configuring the RAID mode.
4. The product needs to be restarted after adding or changing the RAID mode, and the update is
guaranteed to be the new RAID mode.
5. Once the computer turn to “Standby” or “Sleep” mode, GR3660-B3 will still complete the
rebuilding function. However, it will not change to “Standby” mode after rebuilding. You need to
shut down the GR3660-B3 manually or wake up the computer to synchronize “Standby ” or
“Sleep” mode together.
5. GR3660-B3 is utilizing the 12V adapter, please DO NOT use the 5V adapter to avoid the
machine and data failure.
6. Do not remove the hard drive(s) while the system is powered on. Always remember to power off
the system when removing the hard drives.
Please refer to the following procedures for the hardware installation of GR3660-B3:
1. Install your hard disks into the removable trays and secure them with the screws from accessory
kit. This will protect your hard disk from any unnecessary movement.
2. Once the hard disks have been installed, insert the removable trays into device and close
the handles.
USB 3.0
RAID 0 RAID 1 JBOD
DC
12V IN
POWER
ON/OFF
Please ensure each plug is properly
connected before turning on the power.
Front View
HDD -1-2 Access
Rear View
Fan
Power Switch
12V DC IN
GR3660-B3 Device x1
Power Adaptor x1
Screws and keys
Power Cable x1
RAID Mode
USB3.0 Port
Tray Handle
USB 3.0
RAID 0 RAID 1 JBOD
DC
12V IN
POWER
ON/OFF
Please ensure each plug is properly
connected before turning on the power.
Install SSD
Computer USB Port
Install HDD
5. Hardware installation is now complete. Please power on the unit and follow the OS indications to
format the hardware. After the configuration is completed you may access the data.
Whenever needed an SSD/HDD swap, just simply unlock the tray and releases it from the tray
handle to exchange for the requiring SSD/HDD.
Status No HDD Standby
Data
access
HDD
failed
Sleeping or
Host unplugged
RAID 0 ----
Red
lights on
RAID 1 ----
Red
lights on
Red
lights on
Red
lights on
JBOD ----
Red
lights on
Blue
lights on
Blue
lights on
Blue
lights on
Blue
blinking
Blue
blinking
Blue
blinking
----
Rebuilding
----
----
Source:
Blue Blinking
Target:
Red and Blue
Blinking
Please check the product and accessories for any defect or missing parts. If you have any
questions, please contact your product supplier.
Please visit the official website - Download page (http://www.raidon.com.tw/RAIDON2016/
download.php) to download drivers and other related resources.
˙
˙
V1.1 (Jan. 2019)
-
 1
1
-
 2
2

