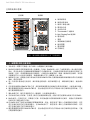
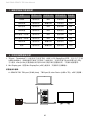
Raidon GR8670-TB3は、最大8台の3.5インチのSATAハードディスクドライブを搭載可能な高性能のハードディスクエンクロージャです。Thunderbolt 3インターフェースを採用しており、最大40Gbpsの高速データ転送速度を実現します。また、RAID 0/1/5/10などの複数のRAIDモードに対応しており、データの保護や高速化を柔軟に設定することができます。
Raidon GR8670-TB3は、ビデオ編集やグラフィックデザイン、大規模なデータの保存やバックアップなど、様々な用途に最適なストレージソリューションです。Thunderbolt 3インターフェースにより、MacやWindowsのコンピュータに簡単に接続でき、すぐに使用することができます。また、静音設計を採用しているため、オフィスや自宅など、静かな環境での使用にも適しています。


-
 1
1
-
 2
2
-
 3
3
-
 4
4
-
 5
5
-
 6
6
-
 7
7
-
 8
8
-
 9
9
-
 10
10
-
 11
11
-
 12
12
-
 13
13
-
 14
14
-
 15
15
-
 16
16
-
 17
17
-
 18
18
-
 19
19
-
 20
20
-
 21
21
-
 22
22
-
 23
23
-
 24
24
-
 25
25
-
 26
26
-
 27
27
-
 28
28
-
 29
29
-
 30
30
-
 31
31
-
 32
32


Raidon GR8670-TB3は、最大8台の3.5インチのSATAハードディスクドライブを搭載可能な高性能のハードディスクエンクロージャです。Thunderbolt 3インターフェースを採用しており、最大40Gbpsの高速データ転送速度を実現します。また、RAID 0/1/5/10などの複数のRAIDモードに対応しており、データの保護や高速化を柔軟に設定することができます。
Raidon GR8670-TB3は、ビデオ編集やグラフィックデザイン、大規模なデータの保存やバックアップなど、様々な用途に最適なストレージソリューションです。Thunderbolt 3インターフェースにより、MacやWindowsのコンピュータに簡単に接続でき、すぐに使用することができます。また、静音設計を採用しているため、オフィスや自宅など、静かな環境での使用にも適しています。
他の言語で
- English: Raidon GR8670-TB3 User manual

