
A
B
C
D
E
F
G
H
I
I
J
J
狀態 M.2 讀取燈
無 M.2 OFF
資料存取 藍燈恆亮
M.2 閒置 藍燈恆亮
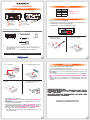
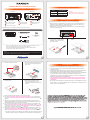
銳銨科技

GT2660-TB3 Quick Installation Guide
Front View Rear View
A
B
C
E
F
G
H
I
J
Contents of Product Package
Place the system on a stable surface. Ensure that the vent is not blocked and that it is
installed in a well-ventilated area. (Please keep the product away from moisture and
other environment that might be harmful to the product)
1.
Remove the screws of the upper
cover of the tray, and then use the
screwdriver to pry open the upper
cover and remove it.
3.
Insert M.2 and lock the screws.5. Remove the release paper from the heat
sink in the upper cover and replace the
upper cover.
6.
When the M.2 installation has been
completed, insert the tray into the
system horizontally and secure the latch
into place.
8.
Remove the screws holding the M.2
position.
4.
Push the to the right, and the
will pop open
to remove the removable tray.
Lock the screws.7.
This system can only transfer data to one computer through one interface at a time.
The usable storage capacity of the M.2 after formatting will be less than the capacity
indicated on the M.2.
All existing data will be deleted when this product is set up for the first time. Please ensure
that all data on the M.2 has been backed up before installation to avoid data loss.
If the GT2660-TB3 needs to be shut down or disconnected, please ensure the GT2660-TB3
is safely removed through your operating system before turning off the power.
GT2660-TB3 uses a 12V/5V AC/DC Adapter. Please do not use other non-certified Power
Adapter to avoid damaging to your GT2660-TB3.
This product does not support the M.2 hot-swap function. If you need to remove
the tray, please do it with the main power switch off to avoid damage to software
and hardware.
We strongly recommend backing up important data stored on the GT2660-TB3 to another
storage device or a remote site. RAIDON will not be held liable for the damage or loss of
data you stored on the GT2660-TB3.
NOTE:
Please make sure that the product is connected to the host (power on status) before turning
on the power, otherwise the product will be on the sleep mode.
D
The product is in a state of near-complete power-off in shutdown mode, and the hard disk, LCD, and fan
are all out of operation, providing only a small portion of power for preparation for subsequent startup.
Please connect the signal cable first, and then power cord later.
First turn the main power switch on the back of the product to “I” to turn the power on,
then gently press the touch power on the front of the product until the power symbol “ ”
lights up.
After turning on the power, please perform subsequent formatting settings through the
operating system. Please follow the instructions of the computer operating system for M.2
formatting; after formatting, you can read and write data.
If you are not using the product for a while, you can put the product into shutdown mode:
first press the touch power on the front of the product until the power symbol “ ” is off;
if you want to use the product, gently press the touch power on the front of the product
until the power is turned on. The symbol “ ” is illuminated.
If the product is not used for a long time, please turn off the product main power switch: first
gently press the touch power on the front of the product until the power symbol “ ” is off,
then turn the main power switch on the back of the product to “ O ” to turn off the power.
9.
10.
11.
12.
13.
Status M.2 access light
No M.2 OFF
Data access Blue light always on
M.2 idle Blue light always on
I
J
Raidon
-
 1
1
-
 2
2

