
SafeTANK
User Manual
GT2660-TB3

» GT2660-TB3 User Manual .........................................1
1. Operating Information .......................................................1
2. Package Contents and Product Views ..............................1
3. Hardware Requirements and Precautions ........................2
4. Hardware Installation ........................................................3
5. The Indication of M.2 access light .....................................5
6. Connect with other devices ...............................................5
7. Common Technical Questions ...........................................6
8. Install The Operation System Into This Device .............7
» GT2660-TB3 產品使用說明 ......................................12
1. 環境需求 ............................................................................12
2. 產品外觀及包裝內容 ..........................................................12
3. 硬體需求與注意事項 ..........................................................13
4. 硬體安裝 ............................................................................14
5. M.2 讀取燈說明 .................................................................15
6. 與其他裝置連接說明 ..........................................................16
7. 常見問題 ............................................................................17
8. 外接磁碟安裝作業系統 .......................................................18
SafeTANK GT2660-TB3 User Manual
V1.0

SafeTANK GT2660-TB3 User Manual
1
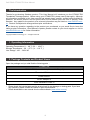
1. Operating Information
The Introduction
Thanks for purchasing Stardom product. This User Manual will introduce you the GT2660-TB3
Thunderbolt™storage product. Before using your GT2660-TB3, please read it thoroughly. Although
all information contented in this User manual had already been carefully veried before publishing,
however, the actual product and its specification will be based upon the time of delivery from
Stardom. Any update to the product or its relevant information may be listed on
www.RAIDON.com.
tw
. Product is subjected to change without prior notications.
If you have any question regarding to the product you purchased, or you would like to know the
latest product information, User Manual’s update, please contact to your local supplier or visit to
www.RAIDON.com.tw
for further information.
Copyright © Raidon Technology, Inc. – All right is reserved.
Operating Temperature: 0 ~ 40 ℃ (32 ~ 104 ℉ )
Storage Temperature : -20 ~ 47℃ (-4 ~ 116 ℉ )
Line Voltage : 100 ~ 240V AC
» GT2660-TB3 User Manual
2. Package Contents and Product Views
Open the package and you shall nd the following parts:
GT2660-TB3
GT2660-TB3 Product Unit x1 (Removable Tray x2)
Thunderbolt™Cable x1
Power Cord x1
AC/DC Adapter x1
Quick Installation Guide x1
• Please check the included parts and the product itself for any damage or missing parts. If you have
any questions, please contact the retailer or sales representative.
• Please download the user manual from the official website (www.raidon.com.tw)

SafeTANK GT2660-TB3 User Manual
2
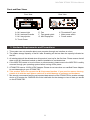
Front and Rear Views
3. Hardware Requirements and Precautions
1. This system can only transfer data to one computer through one interface at a time.
2. The usable storage capacity of the M.2 after formatting will be less than the capacity indicated on
the M.2.
3. All existing data will be deleted when this product is set up for the rst time. Please ensure that all
data on the M.2 has been backed up before installation to avoid data loss.
4. If the MR2-TB3 needs to be shut down or disconnected, please ensure the MR2-TB3 is safely
removed through your operating system before turning off the power.
5. GT2660-TB3 uses a 12V/5V AC/DC Adapter. Please do not use other non-certied Power Adapter
to avoid damaging to your GT2660-TB3.
6. This product does not support the M.2 hot-swap function. If you need to remove the tray,
please do it with the main power switch off to avoid damage to software and hardware.
7. We strongly recommend backing up important data stored on the GT2660-TB3 to another storage
device or a remote site. RAIDON will not be held liable for the damage or loss of data you stored
on the GT2660-TB3.
A. M.2 access light
B. M.2 enclosure handle
C. M.2 tray ejection
D. Touch Power
Front View
Rear View
I
J
E. Fan
F. Fan speed switch
G. Mini DisplayPort
H. Thunderbolt™ port
I. Main power switch
J. Power socket

SafeTANK GT2660-TB3 User Manual
3
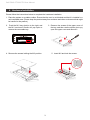
4. Hardware Installation
Please follow the instructions below to complete the hardware installation.
2. Push the M.2 tray ejection to the right, and
the M.2 enclosure handle will pop open to
remove the removable tray.
1. Place the system on a stable surface. Ensure that the vent is not blocked and that it is installed in a
well-ventilated area. (Please keep the product away from moisture and other environment that might
be harmful to the product)
3. Remove the screws of the upper cover of
the tray, and then use the ejector pin to pry
open the upper cover and remove it.
4. Remove the screws holding the M.2 position. 5. Insert M.2 and lock the screws.

SafeTANK GT2660-TB3 User Manual
4
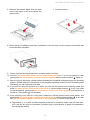
6. Remove the release paper from the heat
sink in the upper cover and replace the
upper cover.
7. Lock the screws.
8. When the M.2 installation has been completed, insert the tray into the system horizontally and
secure the latch into place.
9. Please connect the signal cable rst, and then power cord later.
10. First turn the power main switch on the back of the product to
“I”
to turn the power on, then
gently press the touch power on the front of the product until the power symbol
“
”
lights up.
11. After turning on the power, please perform subsequent formatting settings through the operating
system. Please follow the instructions of the computer operating system for M.2 formatting; after
formatting, you can read and write data.
12. If you are not using the product for a while, you can put the product into shutdown mode: rst
press the touch power on the front of the product until the power symbol
“
”
is off; if you want
to use the product, gently press the touch power on the front of the product until the power is
turned on. The symbol
“ ”
is illuminated.
13. If the product is not used for a long time, please turn off the product main power switch: rst
gently press the touch power on the front of the product until the power symbol
“
”
is off, then
turn the main power switch on the back of the product to
“O”
to turn off the power.
The product is in a state of near-complete power-off in shutdown mode, and the hard disk,
LCD, and fan are all out of operation, providing only a small portion of power for preparation
for subsequent startup.
★

SafeTANK GT2660-TB3 User Manual
5
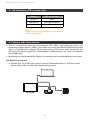
5. The Indication of M.2 access light
6. Connect with other devices
1. TB port: Thunderbolt™3 ports can be connected to TB3, USB3.1 and Display port device. It is
downward to support USB3.0 / USB2.0. This product can connect with different USB devices by USB
Type C to Type A/B cable. It supports TB port power delivery (PD) function, which can provide 15W
(5V / 3A) power output to support 5V / 3A rechargeable notebook computer use. There is no additional
power supply need.
2. Mini Display port: congured with Mini Display Port connection port to provide additional screen output.
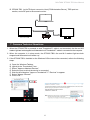
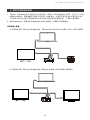
Two System Connections:
A. GT2660-TB3: Let its TB A port connect to Host (PC/Workstation/Server), TB B port to other
Device (USB or TB), and mDP (Mini Display) port to monitor.
Note:
Signal display will vary depending on the denition
of M.2 manufacturers.
Status M.2 access light
No M.2 OFF
Data access Blue light always on
M.2 idle Blue light always on

SafeTANK GT2660-TB3 User Manual
6
7. Common Technical Questions
1. When the GT2660-TB3 is powered on and Thunderbolt™ cable is not connected, the fan and M.2
readout light are both stopped and hibernated until Thunderbolt™ cable is connected to the computer.
2. When the computer is in sleep mode, the GT2660-TB3's fan and M.2 readout light are both
stopped and hibernated until woken up.
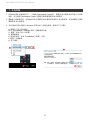
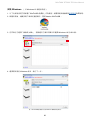
3. If the GT2660-TB3 is installed on the Windows OS but can not be connected, refer to the following
steps:
B. GT2660-TB3: Let its TB A port connect to Host (PC/Workstation/Server), TB B port to a
monitor, and mDP port to the second monitor.
D
RAIDON tech., GT2660-TB3
A. Open the Windows Taskbar.
B. right-click the Thunderbolt™icon.
C. Select "Approve Attached Devices".
D. Select the port to which the device is connected.
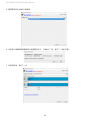
E. Wait for the dialog box "Approve Thunderbolt™™ Devices" to appear.
F. Select "Always Connect"
G. Press "OK"。
A
C
B
E
G
F

SafeTANK GT2660-TB3 User Manual
7
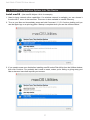
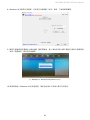
8. Install The Operation System Into This Device
1. Need to have network online capabilities. If a wireless network is available, you can choose it
from the Wi-Fi menu in the menu bar. This menu is also available in macOS Recovery.
2. Turn on your Mac and immediately press and hold Command (
⌘
)-R. Continue holding until you
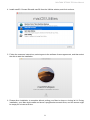
see the Apple logo or a spinning globe. Startup is complete when you see the utilities window:
3. If you need to erase your disk before installing macOS, select Disk Utility from the Utilities window,
then click Continue. You probably don't need to erase, unless you're selling or giving away your
Mac or have an issue that requires you to erase.
Install macOS
(Use macOS Mojave 10.14 for example)

SafeTANK GT2660-TB3 User Manual
8
4. Install macOS. Choose Reinstall macOS from the Utilities window, and click continue.
5. Follow the onscreen instructions, select agree to the software license agreement, and then select
the disk to start the installation.
6. Please allow installation to complete without putting your Mac to sleep or closing its lid. During
installation, your Mac might restart and show a progress bar several times, and the screen might
be empty for minutes at a time.

SafeTANK GT2660-TB3 User Manual
9
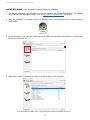
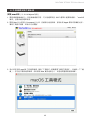
Install Windows
1. The following content is an example of using the software "WinToUSB Free Edition". For related
specications and copyrights, please refer to the software official website for details.
2. After the software is installed, press the shortcut icon of the desktop twice to open Hasleo
WinToUSB.
3. On the left side of the interface, select "Mirror to USB" and click the right folder icon to select the
ISO le for Windows 10.
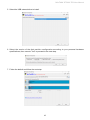
4. Select the version of Windows you want to install and go to the next step.
Note: WinToUSB Free Edition does not support Windows Professional and Enterprise editions.
(Use Windows 10 Home Edition for example)

SafeTANK GT2660-TB3 User Manual
10
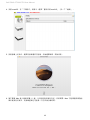
5. Select the USB external drive to install.
6. Select the version of the disk partition configuration according to your personal hardware
specications, then execute "Yes" to proceed to the next step.
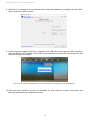
7. Follow the default and follow the next step.

SafeTANK GT2660-TB3 User Manual
11
8. Windows 10 is installed to an external hard drive. After the installation is complete, click the "End"
button, and then conrm to leave.
9. Conrm that the external hard disk is inserted in the USB slot of the computer. After rebooting,
enter the BIOS or UEFI adjusts to the USB external hard disk box as the rst boot sequence, and
saves the settings and leaves.
10. Then start the installation process for Windows 10, and follow the system instructions and
personal requirements to complete the setup.
Note: The screenshot is for illustration only, and the actual situation varies depending on each motherboard.

SafeTANK GT2660-TB3 User Manual
12
2. 產品外觀及包裝內容
1. 環境需求
關於這份手冊
感謝您使用 RAIDON 的產品。本手冊將介紹 RAIDON GT2660-TB3 產品。在您開始使用 RAIDON
GT2660-TB3 產品前,建議您先閱讀過本手冊。手冊裡的資訊在出版前雖已被詳細確認,實際產品規
格仍將以出貨時為準;任何產品規格或相關資訊更新請您直接到 www.RAIDON.com.tw 網站查詢,本
公司將不另行通知。若您想獲得 RAIDON 最新產品訊息、使用手冊、韌體 , 或對 RAIDON 產品有任何
疑問,請您聯絡當地供應商或到 www.RAIDON.com.tw 取得相關訊息。
本手冊相關產品內容歸銳銨科技股份有限公司版權所有
打開包裝外盒後,包裝內容應包含下列組件:
工作溫度 : 5 ~ 35 ℃ (41 ~ 95 ℉ )
儲存溫度 : -20 ~ 47 ℃ (-4 ~ 116 ℉ )
工作電壓 : 100 ~ 240V AC
GT2660-TB3
GT2660-TB3 產品本體 x1( 內含抽取盒 x2)
Thunderbolt™ 連接線 x1
電源線 x1
電源轉換器 x1
快速安裝手冊 x1
» GT2660-TB3 產品使用說明
• 請確認相關配件與產品本身是否有受損或配件缺少,若有任何疑問請與本產品供應商聯絡。
• 請前往官網 (www.raidon.com.tw) 下載使用者說明書。

SafeTANK GT2660-TB3 User Manual
13
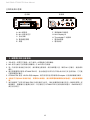
正面與背面示意圖
A. M.2 讀取燈
B. M.2 抽取盒把手
C. 頂出按鍵
D. 電源觸控開關
E. 風扇
3. 硬體需求與注意事項
1. 本系統同一時間只可透過一組介面與一台電腦執行資料傳輸。
2. M.2 格式化後的可使用儲存容量會小於 M.2 標示的容量。
3. 第一次使用本產品進行設定時,資料會被全數清除。請於硬碟置入前,確認 M.2 已備份,避免資料
遺失。
4. 當您需要關閉或移除 GT2660-TB3 時,務必透過您所操作的作業系統中執行安全移除後,方可進
行電源關閉的動作。
5. GT2660-TB3 使用 12V/5A 規格 Adapter,請勿使用其他非原廠規格 Adapter 以免損壞機器及資料。
6. 本產品不支援 M.2 熱插拔功能,若需取出抽取盒,請在關閉電源總開關的狀態進行,避免軟硬體損
毀。
7. 強烈建議除了使用 GT2660-TB3 的資料儲存功能外,請針對重要資料備份到另一個儲存裝置上或
遠端備份,雙重備份您重要的資料。若您儲存在 GT2660-TB3 的資料損毀或遺失,RAIDON 將不
負任何的責任。
前視圖 背視圖
I
J
F. 風扇轉速切換按鈕
G. Mini Display 埠
H. Thunderbolt™ 連接埠
I. 電源總開關
J. 電源插座

SafeTANK GT2660-TB3 User Manual
14
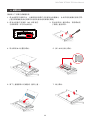
4. 硬體安裝
請參照以下步驟完成硬體安裝
2. 將頂出按鍵向右推移,M.2 抽取盒把
手便會彈開,即可取出抽取盒。
1. 將系統擺放於穩固平台,並確認散熱風扇口沒有被其他物體擋住,系統四周有適當的散熱空間。
( 擺放環境請避免接近潮濕或其他易對產品造成損傷的環境 )
3. 取出抽取盒上蓋的螺絲,再用螺絲起
子撬開上蓋並移除。
4. 取出固定 M.2 位置的螺絲。 5. 插入 M.2 並鎖上螺絲。
6. 撕下上蓋裡散熱片的離型紙,蓋回上蓋。 7. 鎖上螺絲。

SafeTANK GT2660-TB3 User Manual
15
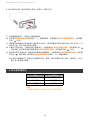
9. 將相關連接線接上,最後接上電源轉接器。
10. 先將產品背面的電源總開關扳動至「 I 」讓電源開啟,再輕壓產品正面的電源觸控開關,直到電源
符號「
」發亮。
11. 開啟電源後請透過作業系統進行後續格式化設定。請依照電腦作業系統指示進行 M.2 格式化;完
成格式化後,便可以進行資料的讀寫。
12. 若暫時不使用產品,可讓產品進入關機模式:先輕壓產品正面的電源觸控開關,直到電源符號「
」燈號熄滅;若要使用產品則輕壓產品正面的電源觸控開關,直到電源符號「 」發亮。
13. 假使長時間不使用產品,則請將產品電源總開關關閉: 先輕壓產品正面的電源觸控開關,直到電
源符號「
」燈號熄滅,再將產品背面的電源總開關扳動至「 O 」讓電源關閉。
8. M.2 安裝完成後,請將抽取盒平移放入主機內,並關上把手。
5. M.2 讀取燈說明
提醒:
燈號顯示會因 M.2 廠商的定義不同而有所差異
本產品在關機模式下為接近完全斷電的狀態,硬碟、LCD 與風扇均停止運作,僅提供一小部分
電力為之後啟動作準備。
★
狀態 M.2 讀取燈
無 M.2 OFF
資料存取 藍燈恆亮
M.2 閒置 藍燈恆亮

SafeTANK GT2660-TB3 User Manual
16
6. 與其他裝置連接說明
1. TB port : Thunderbolt™3 連接埠可串接 TB3,USB 3.1 和 DisplayPort 裝置;其中向下支援
USB3.0/USB2.0,有轉接線即可連接不同規格之 USB 產品,本產品支援 TB port 供電功能 (PD),
可以提供 15W (5V/3A) 的電源輸出給支援 5V/3A 充電的筆記型電腦使用,不用額外連接電源。
2. Mini Display port : 配置 Mini DisplayPort (mDP) 連接埠,支援額外的螢幕輸出。
裝置連接示意圖:
A. GT2660-TB3: TB A port 接 MB (Host),TB B port 接 other Device (USB or TB),mDP 接螢幕。
B. GT2660-TB3: TB A port 接 MB (Host), TB B port 接螢幕 , mDP 接螢幕 ( 雙螢幕 )

SafeTANK GT2660-TB3 User Manual
17
1. GT2660-TB3 在開機情況下,未連接 Thunderbolt™cable 時,風扇與 M.2 讀取燈皆為停止及休眠
狀態,直至連接 Thunderbolt™cable 至電腦才會啟動風扇及 M.2 讀取燈。
2. 電腦進入睡眠模式時,GT2660-TB3 的風扇與 M.2 讀取燈皆為停止及休眠狀態,直至喚醒時才會啟
動風扇及 M.2 讀取燈。
3. 若 GT2660-TB3 裝設在 Windows 作業系統上卻無法連線,請參考下方步驟:
D
RAIDON tech., GT2660-TB3
A. 開啟右下角工作列圖示
B. 在 Thunderbolt™ software 圖示上擊點滑鼠右鍵
C. 選擇「批准已接上的裝置」
D. 選擇連接埠
E. 等候對話框「批准 Thunderbolt™ 裝置」出現
F. 選擇「永遠連接」
G. 按下確定。
A
C
B
E
G
F
7. 常見問題

SafeTANK GT2660-TB3 User Manual
18
8. 外接磁碟安裝作業系統
安裝 macOS
1. 需具備網路連線能力。若有無線網路可用,可以從選單列的 Wi-Fi 選單中選擇該網路。「macOS
復原」也提供這份選單使用。
(以 10.14 Mojave 為例)
2. 開啟 Mac 並立即按住 Command(
⌘
)-R,持續按住這些按鍵,直到出現 Apple 標誌或旋轉的地球。
看到工具程式視窗,即表示完成啟動:
3. 若必須在安裝 macOS 之前清除磁碟,請從「工具程式」視窗選擇「磁碟工具程式」,然後按一下「繼
續」。您可能不需要清除磁碟,除非要將 Mac 賣或送給別人,或是有問題需要清除磁碟。
ページが読み込まれています...
ページが読み込まれています...
ページが読み込まれています...
ページが読み込まれています...
ページが読み込まれています...
-
 1
1
-
 2
2
-
 3
3
-
 4
4
-
 5
5
-
 6
6
-
 7
7
-
 8
8
-
 9
9
-
 10
10
-
 11
11
-
 12
12
-
 13
13
-
 14
14
-
 15
15
-
 16
16
-
 17
17
-
 18
18
-
 19
19
-
 20
20
-
 21
21
-
 22
22
-
 23
23
-
 24
24
-
 25
25


