

1
2

3 4
5 6
7 8
9 10

11 12
13 14
15 16
17 18

19 20
21 22
23 24
25

26

Safety en
7
Safety
Observe the following safety instructions.
General information
You can find general information for this instruction manual here.
¡ Read this instruction manual carefully. Only this will ensure that
you operate accessories safely and efficiently.
¡ Observe the instructions for the base unit.
¡ Follow the safety instructions and warnings.
¡ Keep the manual and the product information in a safe place for
future reference or for the next owner.
Intended use
Only use the accessories:
¡ with a food processor from the same series MUM5.
¡ With genuine parts and accessories.
¡ for cutting up, shredding and grating food.
Safety instructions
Observe the safety instructions.
WARNING‒Risk of cutting!
The cutting discs have sharp blades and edges.
Only take hold of the cutting discs by the edge.
Never touch the sharp blades and edges with bare hands.
WARNING‒Risk of injury!
¡ Rotating drives, tools or accessory parts may cause injury.
Do not reach into the filling shaft.
Only use the pusher to push down ingredients.
¡ Improper use may cause injuries.
Never assemble the accessories on the base unit.
Only attach and remove accessories once the drive has
stopped and the appliance has been unplugged.
Only use the accessories once fully assembled.

en Safety
8
The accessories should only be used in the intended oper-
ating position.
WARNING‒Risk of harm to health!
Soiling on surfaces may be harmful to health.
Follow the cleaning instructions.
Clean surfaces which come in contact with food before
each use.

Avoiding material damage en
9
Avoiding material damage
Avoiding material dam-
age
Avoiding material damage
ATTENTION!
Improper use may cause material
damage.
Do not process food that contains
hard components, e.g. bones.
Do not insert objects into the filling
shaft or housing, e.g. wooden
spoons.
Before use, check the filling shaft
and housing for foreign objects.
Do not apply great force with the
pusher.
Unpacking and checking
Unpacking and checking
Unpacking and checking
Find out here what you need to note
when unpacking the appliance.
Unpacking the accessories
and parts
1. Take the accessories out of the
packaging.
2. Take all other parts and the ac-
companying documents out of the
packaging and place them to
hand.
3. Remove any packaging material.
4. Remove any stickers or film.
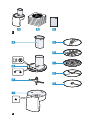
Contents of package
After unpacking all parts, check for
any damage in transit and complete-
ness of the delivery.
→Fig.
1
Continuous feed shredder
Cutting discs
1
1
Depending on the appliance specifications
Accompanying documents
1
Depending on the appliance specifications
Cleaning the accessories be-
fore using for the first time
1. Take the assembled accessories
apart.
→"Dismantling the continuous
feed shredder", Page12
2. Clean all parts that come into con-
tact with food before using for the
first time.
→"Cleaning and servicing",
Page12
3. Put the cleaned and dried parts
out ready for use.
Familiarising yourself with the accessories
Familiarising yourself
with the accessories
Familiarising yourself with the accessories
Components
You can find an overview of the parts
of your accessories here.
→Fig.
2
Housing
Disc holder
Lid with integrated filling shaft
Pusher and measuring jug
Reversible cutting disc, thick/thin
Reversible shredding disc, coarse/fine
Fine grating disc
Reversible slicing / shredding disc
1
Asia vegetables disc
1
1
Depending on the appliance specifications

en Before using the appliance
10
Symbols
You can find an overview of the sym-
bols used on your accessories here.
Symbol Description
Follow the instructions in the oper-
ating instructions.
Do not reach into the filling shaft.
Attach the lid
Position marking housing
Overview of cutting discs
You can find an overview of the cut-
ting discs and their purposes here.
Designa-
tion
Use
Reversible
cutting disc,
thick/thin
Cutting food into thick or thin
slices, e.g. fruit and vegetables.
Marking:
¡ 1 = thick slices
¡ 3 = thin slices
Note:Not suitable for pro-
cessing hard cheese, bread,
rolls or chocolate.
Tip:Only cut up cooked pota-
toes once they have cooled
down.
Reversible
shredding
disc,
coarse/fine
Shredding food coarsely or
finely, e.g. fruit, vegetables or
cheese as Gouda or Edam.
Marking:
¡ 2 = coarse side
¡ 4 = fine side
Note:Not suitable for pro-
cessing nuts or hard cheese,
e.g. Parmesan.
Tip:Shred soft cheese with the
coarse side only.
1
Depending on the appliance specifications
Designa-
tion
Use
Fine grating
disc
Shredding food medium-fine,
e.g. raw potatoes or hard
cheese such as Parmesan.
Note:Not suitable for pro-
cessing soft cheese and cheese
slices.
Reversible
slicing /
shredding
disc
1
Grating raw potatoes or cutting
into slices.
Note:Not suitable for pro-
cessing very fibrous foods, e.g.
leek or mango.
Asia veget-
ables disc
1
For cutting food into thin strips,
e.g. fruit and vegetables.
1
Depending on the appliance specifications
Overload protection
The overload protection system pre-
vents the motor and other compon-
ents from being damaged through
being overloaded.
If the continuous feed shredder is
overloaded or blocked, the disc
holder shaft will break at the prede-
termined breaking point.
Note:Spare parts with a predeter-
mined breaking point are not covered
by our warranty obligations. A new
disc holder is available from cus-
tomer service under order number
00630760.
Before using the appliance
Before using the appli-
ance
Before using the appliance
Prepare the base unit and the ac-
cessories for use.

Basic operation en
11
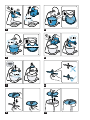
Preparing the base unit
Note:The food processor shown in
the pictures may differ from your
model in terms of shape and fea-
tures.
1. Set up the base unit as described
in the main operating instructions.
2. Press the release button and raise
the swivel arm until it engages.
→Fig.
3
3. Place the bowl in the base unit.
→Fig.
4
4. Turn the bowl anticlockwise until it
engages.
→Fig.
5
5. Press the release button and push
the swivel arm down until it en-
gages in position1.
→Fig.
6
6. Press down the protective cover
for drive2 at the marking and
remove.
→Fig.
7
Assembling the continuous
feed shredder
1. Grip the disc holder level with the
wings.
→Fig.
8
The two plastic tips must point up.
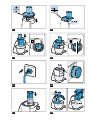
2. Take hold of the required cutting
disc by the edge and fit onto the
disc holder with the side you re-
quire facing up.
‒ Fit single-sided discs with the
blades or serrations facing up.
‒ Fit reversible discs with the re-
quired marking facing up.
→Fig.
9
3. Insert the disc holder with the cut-
ting disc into the housing.
→Fig.
10
4. Place the lid on the housing.
→Fig.
11
Markings and must match
up.
5. Rotate the lid clockwise until it en-
gages.
→Fig.
12
Markings and must match
up.
Fitting continuous feed shred-
der onto the base unit
1. Place the continuous feed shred-
der on drive2 as shown.
→Fig.
13
2. Push the continuous feed shredder
down and rotate clockwise until it
engages.
→Fig.
14
The continuous feed shredder
must be securely connected to the
base unit.
Basic operation
Basic operation
Basic operation
Recommended speeds
Observe the recommended speeds
for optimum results.
Note:Your model is equipped with a
4- or 7-level rotary switch depending
on the features of the appliance. The
recommended speeds for the 4-level
rotary switch are always shown in
brackets in these instructions for use.
Setting Use
7 (4) Slicing, shredding or grating food.
¡ Reversible cutting disc, thick/
thin
¡ Fine grating disc
¡ Reversible slicing / shredding
disc
¡ Asia vegetables disc

en Cleaning and servicing
12
Setting Use
3-4 (2-3) Shred food coarsely or finely us-
ing the reversible shredding disc,
e.g. fruit or vegetables.
Processing food with the con-
tinuous feed shredder
Note:Take note of the recommended
speeds.
Tip:For optimum results, process
thin ingredients in bunches.
1. Prepare your food.
Cut large items of food into pieces
so they fit into the filling shaft.
2. Insert the mains plug.
→Fig.
15
3. Set the rotary switch to the recom-
mended speed.
→Fig.
16
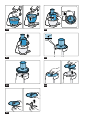
4. Insert the food into the filling shaft
and press down with the pusher,
applying light pressure.
→Fig.
17
5. Stop processing when
‒ all food has been processed.
‒ the food in the bowl almost
reaches the outlet opening of
the continuous feed shredder.
6. Set the rotary switch to .
Wait until the appliance stops.
7. Unplug the mains plug.
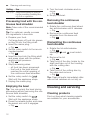
Emptying the bowl
Tip:You can empty the bowl during
processing without removing the con-
tinuous feed shredder.
1. Set the rotary switch to .
Wait until the appliance stops.
2. Press the release button and raise
the swivel arm until it engages.
→Fig.
18
3. Turn the bowl clockwise and re-
move.
→Fig.
19
4. Empty the bowl.
Removing the continuous
feed shredder
1. Rotate the continuous feed shred-
der anticlockwise until it releases.
→Fig.
20
2. Remove the continuous feed
shredder from the base unit.
→Fig.
21
Dismantling the continuous
feed shredder
1. Rotate the lid anticlockwise.
→Fig.
22
Markings and must match
up.
2. Remove the lid.
→Fig.
23
3. Take hold of the disc holder by the
shaft and take out of the housing
with the cutting disc.
→Fig.
24
4. Take hold of the cutting disc by
the edge and remove.
→Fig.
25
Tip:Clean all parts immediately after
use so that residues do not dry on.
Cleaning and servicing
Cleaning and servicing
Cleaning and servicing
Cleaning products
Find out here what cleaning agents
are suitable for your accessories.

Cleaning and servicing en
13
ATTENTION!
Using unsuitable cleaning agents or
incorrect cleaning may damage the
accessories.
Do not use cleaning agents con-
taining alcohol or spirits.
Do not use sharp, pointed or metal
objects.
Do not use abrasive cloths or
cleaning agents.
Overview of cleaning
Here you will find a overview of the
best way to clean the individual com-
ponents.
→Fig.
26
Tip:When processing food such as
carrots, plastic parts may become
discoloured. Remove discolouration
with a soft cloth and a few drops of
cooking oil.

en Troubleshooting
14
Troubleshooting
Troubleshooting
Troubleshooting
You can rectify minor faults on your appliance yourself. Read the troubleshoot-
ing information before contacting our after-sales service. This will avoid unne-
cessary costs.
Malfunctions
Fault Cause Troubleshooting
Processed food does not fall
into the bowl.
Outlet opening or housing is
blocked.
1. Finish processing and unplug from
the mains.
2. Remove the accessory.
3. Take the accessory apart and re-
move the blockage.
Cutting disc does not rotate
although the base unit is run-
ning.
Lid is not fitted and engaged
properly.
Check whether the lid is fitted prop-
erly.
→"Assembling the continuous feed
shredder", Page11
Accessory has been over-
loaded and the disc holder
shaft has broken at the pre-
determined breaking point.
You can order a new disc holder
from customer service under order
number 00630760.

Keselamatan ms
15
Keselamatan
Maklumat umum
Di sini, terdapat maklumat umum mengenai panduan ini.
¡ Baca panduan ini dengan teliti. Barulah anda boleh
menggunakan aksesori dengan selamat dan cekap.
¡ Ikuti arahan untuk peranti asas.
¡ Perhatikan panduan keselamatan dan panduan amaran.
¡ Simpan panduan dan juga maklumat produk untuk penggunaan
atau pengguna seterusnya.
Pengendalian mengikut peraturan
Gunakan aksesori hanya:
¡ dengan mesin dapur siri ini MUM5.
¡ dengan alat ganti dan aksesori tulen.
¡ Untuk memotong dan sagat dari memarut makanan.
Arahan keselamatan
Perhatikan arahan keselamatan.
AMARAN‒Risiko terpotong!
Kepipis pencincang mempunyai pisau dann bucu tajam.
Pegang kepipis pencincang pada pinggirnya sahaja.
Jangan sekali-kali menyentuh pisau dan tepinya tajam
dengan tangan kosong.
AMARAN‒Risiko kecederaan!
¡ Pemacu, alat atau bahagian aksesori yang berputar boleh
menyebabkan kecederaan.
Jangan pegang di dalam bahagian suapan.
Hanya gunakan penghentak untuk menambahkan bahan.
¡ Penggunaan yang tidak betul boleh menyebabkan
kecederaan.
Jangan sesekali pasang aksesori pada unit asas.
Hanya pasang dan tanggalkan aksesori semasa pemacu
berhenti dan peranti tidak terpasang.

ms Keselamatan
16
Gunakan aksesori hanya apabila dipasang sepenuhnya.
Hanya gunakan aksesori pada kedudukan kerja yang
dimaksudkan.
AMARAN‒Risiko bahaya kepada kesihatan!
Kotoran pada permukaan boleh membahayakan kesihatan.
Patuhi arahan pembersihan.
Bersihkan permukaan yang bersentuhan dengan makanan
sebelum setiap penggunaan.

Elakkan kerosakan harta benda ms
17
Elakkan kerosakan harta benda
Elakkan kerosakan harta
benda
Elakkan kerosakan harta benda
PERHATIAN!
Penggunaan yang tidak betul boleh
menyebabkan kerosakan harta
benda.
Jangan proses makanan yang
mengandungi komponen keras,
contohnya tulang.
Jangan masukkan objek ke dalam
bahagian suapan atau perumah,
contohnya sudu kayu.
Periksa benda asing di bahagian
suapan dan perumah sebelum
digunakan.
Jangan kenakan tekanan yang
tinggi ke atas penghentak.
Buka pembungkusan dan periksa
Buka pembungkusan dan
periksa
Buka pembungkusan dan periksa
Anda ketahui di sini perkara yang
perlu diperhatikan semasa membuka
pembungkusan.
Buka pembungkusan
aksesori dan komponen
1. Keluarkan aksesori daripada
bungkusan.
2. Keluarkan semua komponen lain
dan dokumen yang disertakan dari
bungkusan dan sediakan.
3. Tanggalkan bahan pembungkusan
yang sedia ada.
4. Tanggalkan pelekat dan kerajang
yang sedia ada.
Penghantaran
Periksa kerosakan semasa
penghantaran pada semua
komponen dan kelengkapan
penghantaran selepas membuka
pembungkusan.
→Raj.
1
Pecincang berterusan
Cakera pemotong
1
Dokumen yang disertakan
1
Mengikut kelengkapan peranti
Sebelum penggunaan
pertama basuh semua
bahagian aksesori dengan
teliti dan keringkan.
1. Buka aksesori yang dipasang.
→"Keluarkan mesin pencincang
berterusan", Halaman21
2. Bersihkan semua komponen yang
bersentuhan dengan makanan
sebelum penggunaan pertama.
→"Pembersihan dan penjagaan",
Halaman21
3. Sediakan komponen yang
dibersihkan dan dikeringkan untuk
digunakan.
Pengenalan aksesori
Pengenalan aksesori
Pengenalan aksesori
Komponen
Di sini, terdapat gambaran
keseluruhan komponen aksesori
anda.
→Raj.
2
Perumah
Pemegang cakera
1
Mengikut kelengkapan peranti

ms Pengenalan aksesori
18
Penutup dengan aci pengisian
bersepadu
Penolak dan cawan penyukat
Pemotong kepipis, tebal / nipis
Kepipis pemarut kasar/halus
Kepipis pencincang halus.
Cakera pemotong dan pemarut
1
Potongan sayur-Asia
1
1
Mengikut kelengkapan peranti
Simbol
Di sini, anda akan mendapat
gambaran keseluruhan simbol pada
peralatan anda.
Simbol Huraian
Ikut arahan dalam manual arahan.
Jangan pegang di dalam
bahagian suapan.
Pasang penutup.
Penandaan kedudukan pada
perumah.
Gambaran keseluruhan
Cakera pencincang
Di sini anda akan mendapat
gambaran keseluruhan cakera
pengurangan saiz dan tujuannya.
Penentuan Penggunaan
Pemotong
kepipis,
tebal / nipis
Potong makanan menjadi
kepingan tebal atau nipis, mis.
B. buah-buahan dan sayur-
sayuran.
Label:
¡ 1 = kepingan tebal
¡ 3 = Kepingan nipis
1
Mengikut kelengkapan peranti
Penentuan Penggunaan
Nota:Tidak sesuai untuk
memproses keju keras, roti,
ban atau coklat.
Petua:Sila potong kentang
rebus hanya apabila kentang itu
telah sejuk.
Kepipis
pemarut
kasar/halus
Parut makanan menjadi
kepingan kasar atau halus, mis.
B. buah, sayur-sayuran atau
keju, seperti Gouda atau Edam.
Label:
¡ 2 = bahagian kasar
¡ 4 = bahagian halus
Nota:Tidak sesuai untuk
memproses kacang atau keju
keras, contoh Parmesan.
Petua:Parut keju lembut pada
bahagian kasar.
Kepipis
pencincang
halus.
Makanan parut halus-halus,
contoh kentang mentah atau
keju keras seperti parmesan.
Nota:Tidak sesuai untuk
memproses keju lembut dan
kepingan keju.
Cakera
pemotong
dan
pemarut
1
Parut atau potong kentang
mentah.
Nota:Tidak sesuai untuk
memproses makanan yang
sangat berserat, contoh daun
bawang atau mangga.
Potongan
sayur-Asia
1
Potong makanan menjadi
kepingan halus, contoh buah-
buahan dan sayur-sayuran.
1
Mengikut kelengkapan peranti
Pelindung beban berlebihan
Pelindung beban lebih menghalang
motor dan komponen lain daripada
rosak akibat beban berlebihan.

Sebelum penggunaan ms
19
Sekiranya mesin mengisar secara
berlebihan atau tersumbat, paksi
pemmbaa kepipis pecah pada titik
putus yang dimaksudkan.
Nota:Bahagian alat ganti dengan
titik pecah adalah bukan sebahagian
daripada kewajipan waranti kami.
Pembawa cakera baru boleh didapati
dari perkhidmatan pelanggan
menggunakan nombor
pesanan.00630760
Sebelum penggunaan
Sebelum penggunaan
Sebelum penggunaan
Sediakan unit asas dan aksesori
untuk digunakan.
Sediakan perkakas asas.
Nota:Pemproses makanan yang
digambarkan mungkin berbeza
dalam bentuk dan peralatan dari
model anda.
1. Siapkan peranti asas seperti yang
dijelaskan dalam arahan utama.
2. Tekan butang pelepas dan tekan
lengan pemutar hingga terkunci
pada tempatnya.
→Raj.
3
3. Letakkan mangkuk di peranti asas.
→Raj.
4
4. Putar mangkuk mengikut arah
lawan jarum jam sehingga terletak
pada tempatnya.
→Raj.
5
5. Tekan butang pelepas dan tekan
lengan putar ke bawah hingga
terkunci pada tempatnya1.
→Raj.
6
6. Tekan penutup pelindung pemacu
ke bawah sehingga tanda dan
lepaskan. 2
→Raj.
7
Pasang pencincang
berterusan
1. Pegang pembawa cakera pada
ketinggian sayap.
→Raj.
8
Kedua-dua hujung plastik mesti
menunjuk ke atas.
2. Pegang kepipis pencincang yang
diingini di tepi dan letakkan pada
pembawa cakera dengan
bahagian yang diperlukan
menghadap ke atas.
‒ Letakkan mesin basuh satu sisi
dengan pisau atau kawasan
yang dinaikkan menghadap ke
atas.
‒ Letakkan cakera terbalik dengan
tanda yang dikehendaki
menghadap ke atas.
→Raj.
9
3. Letakkan pembawa cakera dengan
cakera pencincang di dalam
tempat.
→Raj.
10
4. Letakkan penutup pada perumah.
→Raj.
11
Penandaan dan mesti
diselaraskan.
5. Putar penutup sitrus mengikut arah
jam sehingga ia masuk ke
tempatnya.
→Raj.
12
Penandaan dan mesti
diselaraskan.
Pasang mesin pencincang
berterusan ke peranti asas
1. Letakkan mesin pencincang
berterusan pada pemacu seperti
yang ditunjukkan.2
→Raj.
13

ms Operasi asas
20
2. Tekan mesin pemotong berterusan
ke bawah dan putar mengikut arah
jam sehingga terkunci pada
tempatnya.
→Raj.
14
Mesin pencincang berterusan
mesti disambungkan dengan kuat
ke peranti asas.
Operasi asas
Operasi asas
Operasi asas
Cadangan kelajuan
Ikuti cadangan kelajuan untuk hasil
terbaik.
Nota:Bergantung pada peralatan,
model anda dilengkapi dengan suis
putar 4-tahap atau 7-tahap. Dalam
arahan operasi ini, kelajuan yang
disyorkan untuk suis putar 4
kedudukan diberikan dalam
kurungan.
Tetapan Penggunaan
7 (4) Potong, sagat atau parut
makanan.
¡ Pemotong kepipis, tebal / nipis
¡ Kepipis pencincang halus.
¡ Cakera pemotong dan pemarut
¡ Potongan sayur-Asia
3-4 (2-3) Parut makanan menjadi kepingan
kasar atau sagat halus dengan
kepipis yang boleh dibalikkan,
contohnya buah-buahan atau
sayur-sayuran.
Memproses makanan dengan
mesin pencincang berterusan
Nota:Hati-hati cadangan kelajuan.
Petua:Untuk hasil terbaik, gunakan
keratan nipis dalam kumpulan.
1. Sediakan makanan.
Potong makanan besar menjadi
kepingan sehingga masuk ke
dalam tabung makanan.
2. Pasangkan palam kuasa.
→Raj.
15
3. Tetapkan suis putar ke kelajuan
yang dicadangkan.
→Raj.
16
4. Letak makanan yang hendak
diproses dalam tiub suapan dan
tolak dengan perlahan ke bawah
dengan penolak.
→Raj.
17
5. Berhenti memproses apabila
‒ semua makanan diproses.
‒ makanan di dalam mangkuk
hampir sampai ke saluran
pencincang berterusan.
6. Tetapkan suis putar ke .
Tunggu perkakas berhenti.
7. Tanggalkan plag.
Kosongkan mangkuk
Petua:Anda boleh mengosongkan
mangkuk semasa diproses tanpa
mengeluarkan mesin pencincang
berterusan.
1. Tetapkan suis putar ke .
Tunggu perkakas berhenti.
2. Tekan butang pelepas dan tekan
lengan pemutar hingga terkunci
pada tempatnya.
→Raj.
18
3. Putar mangkuk mengikut arah jam
dan angkat.
→Raj.
19
4. Kosongkan mangkuk.
Keluarkan mesin pecincang
berterusan
1. Putar mesin pencincang
berterusan arah lawan jam
sehingga melonggarkan.
→Raj.
20
ページが読み込まれています...
ページが読み込まれています...
ページが読み込まれています...
ページが読み込まれています...
ページが読み込まれています...
ページが読み込まれています...
ページが読み込まれています...
ページが読み込まれています...
ページが読み込まれています...
ページが読み込まれています...
ページが読み込まれています...
ページが読み込まれています...
ページが読み込まれています...
ページが読み込まれています...
ページが読み込まれています...
ページが読み込まれています...
ページが読み込まれています...
ページが読み込まれています...
ページが読み込まれています...
ページが読み込まれています...
ページが読み込まれています...
ページが読み込まれています...
ページが読み込まれています...
ページが読み込まれています...
ページが読み込まれています...
ページが読み込まれています...
ページが読み込まれています...
ページが読み込まれています...
-
 1
1
-
 2
2
-
 3
3
-
 4
4
-
 5
5
-
 6
6
-
 7
7
-
 8
8
-
 9
9
-
 10
10
-
 11
11
-
 12
12
-
 13
13
-
 14
14
-
 15
15
-
 16
16
-
 17
17
-
 18
18
-
 19
19
-
 20
20
-
 21
21
-
 22
22
-
 23
23
-
 24
24
-
 25
25
-
 26
26
-
 27
27
-
 28
28
-
 29
29
-
 30
30
-
 31
31
-
 32
32
-
 33
33
-
 34
34
-
 35
35
-
 36
36
-
 37
37
-
 38
38
-
 39
39
-
 40
40
-
 41
41
-
 42
42
-
 43
43
-
 44
44
-
 45
45
-
 46
46
-
 47
47
-
 48
48


