
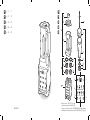
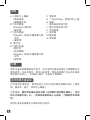
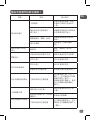
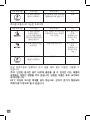
EN
F
1
2
3
4
5
N
J
G
H
2
3
1
1
2
3
2
3
1
D**
A
B*
C*
M
I
E*
L
K
EN p. 1 – 7
ZH p. 8 – 13
VI p. 14 – 21
MS p. 22 – 29
KO p. 30 – 37
8020004637
EN
ZH ZH
VI VI
MS MS
KO KO
* Depending on model ; 視乎型號 ; Tùy theo mẫu
máy ; Bergantung kepada model ; 모델에 따라 다름
** The shape can be different from model ; 形狀可因應型號各異 ; Hình dẫng có thẫ khác so
vẫi mẫu máy ; Bentuk mungkin berbeza daripada model ; 모델에 따라 모양이 다를 수 있음

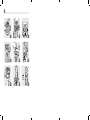
1
1
2
MAX
600 ml
Clic
1
2
11
2
1 2 3
4 5 6
7 8 9

1
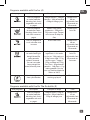
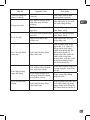
ENDESCRIPTION
A 1 Middle cap
2 Lid
3 Plastic Tritan Jar
B* 1 Seal
2 Powelix blades unit
3 Locking ring
C* 1 Seal
2 Powelix life blades unit with
titanium coating
3 Locking ring
D Motor unit
E* 1 On the go bottle lid
2 On the go bottle
3 Seal
4 Powelix life blades unit with
titanium coating
5 Locking ring
F Tamper
G Start/Stop button
H Screen
I Blender jar lock indicator
J On the go bottle lock indicator
K Control display
L Setting button
M Blend button
N Clean button
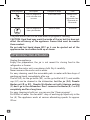
CAUTION:
The safety precautions are part of the appliance. Read them carefully
before using your new appliance for the first time. Keep them in a place
where you can find and refer to them later on. The appliance will only
start if the jar or the bottle is correctly positioned on the motor unit (D)
and the lid locked on the jar.
BEFORE USING YOUR APPLIANCE FOR THE FIRST TIME
Before using your appliance for the first time, rinse the parts that come
into contact with food (jar, bottle, lids and middle cap) with soapy water.
CAUTION: Do not immerse the appliance in water (neither the motor
unit nor the jar base). Never put the motor unit (D) under running
water. Clean it with a damp cloth and dry it carefully. The blades are
extremely sharp.

2
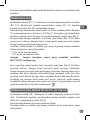
ASSEMBLING AND FITTING THE JAR
Moisten the seal (B1, C1) (even if already fitted on the blade unit (B2,
C2)). Be careful to correctly fit the seal (B1, C1) back onto the blades unit
(B2, C2) the correct way up.
Check the seal is in place on the blades unit. Place the blades (B2 or C2)
on the locking ring (B3 or C3) (Fig 1). Turn the jar upside down and fit the
locking ring with blades on the base of the jar (Fig 2). Lock it by rotating
to lock notch in the clockwise direction (Fig. 2). Make sure the locking ring
is locked correctly : the arrow on the jar must be aligned with the arrow
on the locking ring.
Add the ingredients into the assembled jar without exceeding the
maximum level indicated:
* 1.75 L for thick mixtures
* 1.5 L for liquid preparations
Warning : Do not pour boiling liquids (over 80°C/176°F) into the jar
Lock the lid on the jar and lock in the clockwise direction (Fig 5). Make
sure the lid is locked correctly : the point on the lid should be aligned with
point on the handle. Lock the middle cap in position on the lid and lock it
by rotating it in the clockwise direction. If the lid is not correctly locked,
your appliance will not start; Position the jar correctly on the motor unit :
the point on the jar should aligned with the lock on the motor unit. A jar
logo will appear on the screen and a bip signal will sound.
ASSEMBLING AND FITTING THE ON THE GO BOTTLE
Moisten the seal (E3) (even if already fitted on the blades unit (E4)). Be
careful to correctly fit the seal back onto the blades unit (E4) the correct
way up (Fig 9).
Check the seal is in place on the blades unit.
Make sure all the packaging has been removed before operating the
appliance.

3
EN
Add the ingredients into the bottle without exceeding the maximum level
indicated:
* 400ml for thick mixtures
* 600ml for liquid preparations
Warning : Do not pour boiling liquids (over 80°C/176°F) into the bottle.
Place the blades unit (E4) on the top of the bottle, fit the locking ring (E5),
and lock it by rotating to lock notch in the clockwise direction (Fig. 8).
Make sure the blades unit is locked correctly : the arrow on the locking
ring should be aligned with the arrow on the bottle.
Turn the bottle upside down and position it correctly on the motor unit.
Lock it by rotating it in the clockwise direction. A bottle logo will appear
on the screen and a bip signal will sound
.
USING YOUR APPLIANCE
Put the appliance on a flat, stable, heat-resistant surface away from heat
sources or water splashes
Plug your appliance and select your program or manual settings (time
and speed) and press the start/ stop button : with the Jar (A) you can
change the blending speed from 1 to 9 by pressing the setting +/- buttons
(L). « H »is the maximum speed. You can also set up the working time by
pressing the setting +/- buttons (L) between 5 seconds and 3 minutes.
With the On The Go bottle (E) you can manage the blending speed from
1 to 7 by pressing the setting +/- buttons (L). You can also set up the
working time by pressing the setting +/- buttons (L) beteen 5 seconds and
90 seconds.
Wait for the blender to stop automatically. If you want to stop the blender
before the automatic end of the program, press on the start / stop button.
Do not shake the motor unit or the jar when the blender is in use.
When you use the pusher or the middle cap, hold the jar by its handle to
avoid it falling.
When the blender is in use, do not use any other accessory than the
pusher to avoid damaging the jar.

4
Less than 3 minutes of mixing are enough to blend liquids for most of
the recipes
For adding ingredients while blending, remove the middle cap from the
lid and add the ingredients through the feeder hole. Beware of the risk
of spatter.
CAUTION: After running one cycle in the blender for the maximum
processing time, let the blender rest for 1 minute before operating it
again.
After using the blender for a maximum of three cycles, stop the appliance
and leave to cool to ambient temperature (takes about 2 hours).
The appliance is equipped with overload protection. This prevents the
motor from being damaged by overloading.
If the appliance switches off during operation, proceed as follows :
unplug and leave to cool down for approx.15-20 minutes.
Reconnect the appliance to the power supply and resume blending.
After approx 3 minutes without use, your appliance will start a stand by
mode. To switch on you appliance, press the Start/ Stop button (G)
ROUGH CHOPPING SMALL QUANTITIES
Accessories used : assembled chopper
Chop in a few seconds by pulsing: peanuts, almonds etc.
Model 1600w : quantity / max time: 140g peanuts/8s or 150g almonds/8s

5
EN
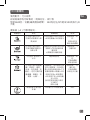
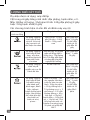
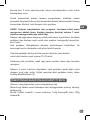
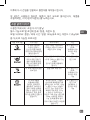
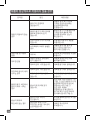
Programs available with the Jar (A)
Auto-programs Description Example of recipe Time
Use this program
to make smoothie:
blending fresh fruits/
vegetables with milk
or yogurt
200g of carrots + 100g of
celeriac + 100g of bananas
+ 500g of orange juice
Default time :
60 sec
Adjustable from
30 seconds to
80 seconds
Use this program
to make ice cream:
blending frozen fruits
with fresh cream or
yogurt
Sorbet: 450g frozen
raspberries + 240g milk +
75g custar sugar. Tamper
must be use to help the
flow
Default time :
1min10s
Use this program to
crush ice cubes into
ice snow
8 ices cubes max Default time :
40 sec
Adjustable from
10 seconds to
50 seconds
Use this program
to make some light
dough like waffle,
cake, pancake,
clafoutis, brownie…
You can not make
heavy dough like
bread, brioche, pizza…
Yoghourt cake : Add
ingredients in this order
on the jar. 120g yoghurt +
210g custar sugar + 7.5g
vanilla sugar + 3 eggs +
125g sunflower oil + 85g
Corn flour + 65g almonds
powder + 140g flour + 11g
baking powder. Put the
mix in a mold and bake for
50min to 180°C
Default time :
1min15s
Adjustable from
30 seconds to
2minutes
Use this program to
clean your blender
200ml of water + 1 drop of
washing-up liquid.
30 seconds
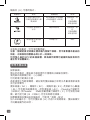
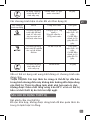
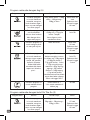
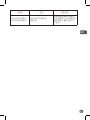
Programs available with the On The Go bottle (E)
Auto-programs Description Example of recipe Time
Use this program
to make smoothie:
blending fresh fruits/
vegetables with milk
or yogurt
100g of carrots + 50g of
banana + 50g of celeriac +
250g of orange juice.
Default time :
45 sec
Adjustable from
30 seconds to
60 seconds

6
Unplug the appliance.
Empty the preparation, the jar is not meant for storing food in the
refrigerator or freezer.
To clean the motor unit, use a damp cloth. Dry it carefully.
Never immerse the motor unit in water.
For easy cleaning, wash the removable parts in water with few drops of
washing-up liquid, immediately after use.
The lid (A2), on the go bottle (E2), on the go bottle lid (E1), and middle
cap (A1) can be cleaned in the dishwasher, but the jar (A3), Powelix
blades unit (B or E3), Powelix life blades unit with titanium coating
(C) don’t go in the dishwasher. Don’t immerse the blades (B, C or E3)
completely and for a long time.
For easy cleaning in both jars, you can use the “Clean program” :
Put 200ml of water. You can add 1 drop of washing-up liquid only in the
Jar (A) The appliance works at various alternating speeds for approx.
30sec.
AFTER USING YOUR APPLIANCE
Auto-programs Description Example of recipe Time
Use this program to
crush ice cubes into
ice snow
4 ices cubes max Default time :
40 sec
Adjustable from
10 seconds to
50 seconds
Use this program to
clean your blender
200ml of water 30 seconds
The pulse button can still be used when no program is running.
CAUTION: Hard food may mark the inside of the jar but this does not
affect the efficiency of the appliance. Frozen food must be smaller
than a walnut.
Do not add hot liquid above 80°C as it can be ejected out of the
appliance due to a sudden build up of steam.

7
EN
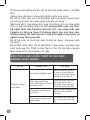
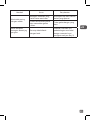
WHAT TO DO IF YOUR APPLIANCE DOES NOT WORK ?
Problems Causes Solutions
Appliance does not work
The plug is not connected.
Connect the appliance to a
socket with the same voltage as
indicated on the rating plate of
the appliance.
The blender jug is not positioned
correctly on the motor unit.
Check that the blender jug
is positioned properly on the
motor unit as explained in the
instructions.
The power switch is on OFF
position.
Follow the instructions for
starting your appliance.
In case of software bug.
Unplug the appliance, wait few
minutes and plug in again.
The appliance stopped
while in use
Overload
Follow the instructions in section
Overload.
Excessive vibrations
The product is not placed on a
flat surface.
Place the appliance on a flat
surface.
Volume of ingredients is too high.
Reduce the quantity of
ingredients processed.
Leak from the lid
Volume of ingredients is too high.
Reduce the quantity of
ingredients processed.
The lid is not correctly positioned
Place the lid correctly on the
blender jug.
Leak from the bottom of
the blender jug
The blades are not correctly
positionned
Fit the locking ring (B3, C3)
(Fig.2) and lock it by rotating
to lock notch in the clockwise
direction (Fig. 2).
Make sure the locking ring is
locked correctly : the point on
the jar must be aligned with the
lock (Fig 9)
The blades do not turn
easily
Pieces of food too large or too
hard.
Reduce the size or quantity of
ingredients processed.
The blended liquid is too hot and
distorted the silicone gasket.
Replace the gasket with a new
one.
Leak from the bottom
of the OTG bottle
The blades are not correctly
positionned
Place the blades unit on the
top of the bottle and lock it by
rotating to lock notch in the
clockwise direction (Fig. 9).

8
描述
A 1頂部中心圓蓋
2攪拌瓶蓋
3聚酯攪拌瓶
B* 1密封膠邊
2Powelix刀頭組件
3鎖定環
C* 1密封膠邊
2 Powelix life鈦金屬塗層刀頭
組件
3鎖定環
D 摩打座
E* 1隨行杯蓋
2隨行杯
3密封膠圈
4 Powelix life鈦金屬塗層刀頭
組件
5鎖定環
F 攪拌棒
G 「Start/Stop」(開始/停止) 鍵
H 螢幕
I 攪拌瓶鎖定指示燈
J 隨行杯鎖定指示燈
K 控制螢幕
L 設定鍵
M 攪拌鍵
N 清潔鍵
注意:
使用本產品時請遵照安全指示。首次使用本產品前請先仔細閱讀安全
措施說明。並妥為保存,留待日後參考。攪拌瓶或隨行杯必須正確安
裝在摩打組(D)上,且杯蓋已鎖好,本產品才會啟動。
初次使用本產品前
初次使用本產品前,請用肥皂水沖洗所有與食物接觸的部分(攪拌
瓶、隨身杯、蓋子、頂部中心圓蓋)。
注意事項:請勿將本產品浸在水裏(包括摩打組及攪拌瓶座)。切勿
用水沖洗摩打組(D)。用濕布清潔然後小心抹乾。刀頭配件非常鋒
利。
使用本產品前請確定已移除所有包裝物。

9
ZH
組裝及置入攪拌瓶
沾濕密封膠圈(B1,C1)(即使已套裝在刀頭組件(B2,C2)上)
。以正確的方法小心地把密封膠圈(B1,C1)重新套裝回刀頭組件
(B2,C2)。
檢查密封膠圈是否已妥當套裝在刀頭組件上。把刀頭組件(B2,C2
)置於鎖定環(B3或C3)(圖 1)上。反轉瓶子,把附有刀頭組件的
鎖定環安裝於瓶子底部(圖 2)。以順時針方向轉動鎖於槽口(圖 2
)。確保刀頭組件妥當鎖上:瓶身的箭咀必需對應鎖定環上的箭咀。
在以組裝的攪拌瓶內加入食材,確保不超過指定的最高位置﹕
* 製作濃稠汁為1.75公升
* 製作稀態汁為1.5公升
警告:切勿把滾態液體(高於 80°C/176°F)倒入瓶內。
把瓶蓋套上瓶身,以順時針方向轉動鎖緊(圖5)。確保瓶蓋妥當鎖
上:瓶蓋上的圓點必需對應杯柄的圓點。把頂部中心圓蓋套入瓶蓋,
以順時針方向轉動鎖緊。如瓶蓋沒有妥當鎖緊,本產品不會啟動;把
瓶身正確置於摩打組件上:瓶子上的圓點必需對應摩打組件的鎖。螢
幕會出現瓶子標示,及發出嗶響聲 。
組裝及置入隨身杯
沾濕密封膠圈(E3)(即使已套裝在刀頭組件(E4)上)。根據(
圖9)指示,以正確的方法小心地把密封膠圈重新套裝回刀頭組件
(E4)。
檢查密封膠圈是否已妥當套裝在刀頭組件上。
在攪拌瓶內加入食材,確保不超過指定的最高位置﹕
* 製作濃稠汁為400毫升
* 製作稀態汁為600毫升
警告:切勿把滾態液體(高於 80°C/176°F)倒入瓶內。
把刀頭組件(E4)置於瓶上,套上密封膠圈(E5),並以順時針方
向轉動鎖於槽口上(圖8)。
確保刀頭組件妥當鎖上:鎖定環上的箭咀必需對應瓶身的箭咀。
反轉瓶子,妥當地置於摩打組件上。以順時針方向轉動鎖定。螢幕會
出現瓶子標示,及發出嗶響聲
。

10
使用本產品
請將本產品放在平坦、穩定、耐熱的表面,並遠離熱源及避免被水濺
到。
連接電源,及選擇預設或自訂(時間及速度)模式,按下開始/結束
鍵:使用攪拌瓶(A)時,您可以設定鍵 +/- (L)改變轉速,可選強
度為1至9。「H」為最高轉速。您並可以設定鍵+/-(L)可調校運作
時間,可選時間為5秒至3分鐘。使用隨身杯(E)時,您可以設定鍵
+/- (L)改變轉速,可選強度為1至7。您並可以設定鍵+/-(L)可
調校運作時間,可選時間為5秒至90秒。
等待攪伴機自動停止。如果您要在程式自動結束前停止攪伴,按「開
始/取消」鍵。
當攪伴器正在運作時,請勿搖動摩打組或攪拌瓶。
使用攪拌棒或頂部中心圓蓋時時,以杯柄拿穩瓶身,避免弄翻。
當攪伴器正在運作時,請勿使用攪拌以外的任何配件,以免對瓶身造
成損壞。
大部分食譜所需湯液,其攪拌時間皆不超過3分鐘。
攪拌期間如需添加材料,可從蓋子拆出頂部中心圓蓋,透過圓孔放入
食材。小心材料濺出。
注意:當攪拌器的一次運作時間已到達上限,請讓其冷卻1分鐘再使
用。
當攪伴器已到達三次運作的極限,請關掉產品,讓其冷卻至室溫(約
需2小時)。
本產品設有超負荷保護。避免摩打因為負荷過重而受損。
如果本產品在操作中突然停止,請進行以下事項﹕
拔掉電源,讓其冷卻大約15至20分鐘。
重新連接電源,繼續攪伴。
產品閒置約3分鐘會進入待用模式。按開始/結束鍵(G)啟動本產
品。

11
ZH
攪拌瓶(A)可應用程式。
自動程式 描述 食譜範例 時間
以此程式製作奶昔:
於鮮奶或乳酪拌入鮮
果/蔬菜
200克蘿蔔+100克塊根芹
+100克香蕉+500克橙汁
預設時間:60
秒
可由30秒至
80秒自由調較
以此程式製作雪糕:
於鮮忌廉或乳酪拌入
冰鮮水果
雪葩450克冰鮮紅莓+240
克鮮奶+75克幼細白糖
攪拌棒
必需使用以輔助流程
預設時間: 1
分鐘10秒
以此程式挫冰製作
冰沙
最多8塊冰粒 預設時間:40
秒
可自由調較
10秒至50秒
以此程式製作輕量麵
糰,如窩夫、蛋糕、
班戟、克拉芙緹、布
朗尼……您亦可製作重
量麵糰,如麵包、布
莉歐、比薩……
乳酪蛋糕:按此順序把食
材加入攪拌瓶。120克乳
酪+210克幼細白糖+7.5
克雲呢拿糖+3隻蛋+125
克葵花籽油+85克粟粉
+65克杏仁粉+140克麵
粉+11克
發粉把混合物倒入模內
以180°C
焗50分鐘
預設時間:1分
鐘15秒
可自由調較
30秒至2分鐘
使用此程式清洗攪
拌器
200毫升水+1滴清潔液 30秒
切少量粗粒
使用配件:刀片組件
在短短幾秒內切碎食材:例如花生、杏仁等
型號1600瓦:份量/最長攪拌時間: 140克花生/8大匙或150克杏仁/8
大匙

12
拔除插頭。
倒出所有食材。攪拌瓶不適宜用作於雪櫃或冰箱儲存食物。
使用濕布清潔摩打組。小心抺乾。
切勿將摩打組浸在水裡。
為使清理工作輕鬆簡易,請在使用攪拌器後立即用水及數滴清潔液清
洗可拆除零件。
攪拌瓶蓋(A2)、隨身杯(E2)、隨身杯蓋(E1)及頂部中心圓蓋
(A1)可放進洗碗機清洗。然而攪拌瓶(A3)、Powelix刀頭組件
(B或E3)及Powelix life鈦金屬塗層刀頭組件(C)不可放進洗碗
機。請勿把刀頭(B,C或E3)完全或長期地浸濕。
如需簡單清洗攪拌瓶及隨身杯,可使用「清潔」程式﹕
加入200毫升水。您可於攪拌瓶(A)內加入1滴清潔液,攪拌器會於
不同轉速運作約30秒。
使用本產品後
隨身杯(E)可應用程式。
自動程式 描述 食譜範例 時間
以此程式製作奶昔:
於鮮奶或乳酪拌入鮮
果/蔬菜
100克蘿蔔+50克香蕉
+50克塊根芹+250克
橙汁
預設時間:45
秒
可自由調較
30秒至60秒
以此程式挫冰製作
冰沙
最多4塊冰粒 預設時間:40
秒
可自由調較
10秒至50秒
使用此程式清洗攪
拌器
200毫升水, 30秒
沒有程式啟動時,仍可使用暫停鍵。
注意:堅硬的食材或會在攪拌瓶內側留下痕跡,但不會影響本產品的
效能。冰鮮食材的體積必須小於一刻核桃。
切勿倒入高於80°C的高溫液體,因為操作期間可能會因為蒸氣突然
產生而令液體噴出。

13
ZH
產品不能運作時該怎麼辦?
問題 原因 解決辦法
產品無法運作
未插電源
所使用電源的電壓,須與
本產品功率牌上所指示的
一致。
攪拌瓶沒有正確地裝在
摩打組上。
檢查攪拌瓶是否已按說明所
示正確裝在摩打組上。
開關鍵處於「關閉」狀態。
請遵循說明書指示使用本
產品。
程式出錯時。
拔除電源,等數分鐘再
插上。
產品在操作中突然
停止
超負荷
遵從「超負荷」部分的
指引。
震動過大
本產品所在的表面不平坦。 請將本產品放在平坦表面。
材料太滿。 減少所處理的材料。
材料從杯蓋洩漏
材料太滿。 減少所處理的材料。
杯蓋所放的位置不當 將杯蓋正確放在攪拌瓶上。
材料從攪拌瓶底漏出 刀頭沒有放在正確位置
套上鎖定環(B3,C3)(
圖 2),並以順時針方向轉
動鎖於槽口(圖 2)。
確保鎖定環正確鎖上:攪拌
瓶上的圓點必需對應鎖(
圖 9)。
刀頭轉動不順
食物塊太大或太硬。
減少所處理材料的大小或
分量。
經攪拌的液體太熱,令矽膠
圈變形。
更換新的矽膠圈。
食材從隨身杯底漏出
刀頭沒有放在正確位置
把刀頭組件置於瓶上,並以
順時針方向轉動鎖於槽口上
(圖9)。

14
MÔ TẢ
A 1Chụpgiữa
2Nắp
3Bìnhtritannhựa
B*1Gioăng
2BộphậnlưỡidaoPowelix
3Vònghãm
C*1Gioăng
2BộphậnlưỡidaoPowelix
cólớpmạtitan
3Vònghãm
D Bộphậnmôtơ
E*1Nắpchaiđựng
2Chaiđựng
3Gioăng
4BộphậnlưỡidaoPowelix
cólớpmạtitan
5Vònghãm
F Cáiđầm
G NútKhởiđộng/Dng
H Màn hình
I Chỉbáokhóabìnhmáyxay
J Chỉbáokhóachaiđựng
K Mànhìnhđiềukhiển
L Nútthiếtlập
MNútxay
N Nútvệsinh
THẬN TRỌNG:
Cácbiệnphápđềphònglàmộtphầncủathiếtbị.Đọckỹtrước
khisửdụngthiếtbịmớilầnđầu.Cấttàiliệuhướngdẫnởmột
nơibạncóthểtìmthấyvàthamkhảosaunày.Thiếtbịsẽchỉ
khởiđộngnếubìnhhoặcchaiđượclắpchínhxáclênbộphận
môtơ(D)vànắpđượcđóngchặttrênbình.
TRƯỚC KHI SỬ DỤNG THIẾT BỊ LẦN ĐẦU
Trướckhisửdụngthiếtbịlầnđầu,hãyrửacácbộphậncótiếp
xúcvớithứcăn(bình,chai,nắpvàchụpgiữa)bằngnướcxà
phòng.

15
VI
LẮP BÌNH MÁY XAY
Làmẩmgioăng(B1,C1)(thậmchícảkhiđãlắpvàobộphận
lưỡidaorồi(B2,C2)).Chúýlắpđúnggioăng(B1,C1)vàobên
trênbộphậnlưỡidao(B2,C2)theochiềuhướnglêntrên.
Kiểmtraxemgioăngđãđượclắpvàođúngvịtrítrênbộphận
lưỡidaohaychưa.Đặtlưỡidao(B2hayC2)lêntrênvònghãm
(B3hoặcC3)(Hình1).Lậtúpbìnhxuốngvàlắpvònghãmvới
lưỡidaolêntrênđếbình(Hình2).Khóanólạibằngcáchxoay
theochiềukimđồnghồđểkhóakhía(Hình2).Đảmbảochắc
chắnđãkhóachặtvònghãmđúngcách:mũitêntrênbìnhphải
thẳnghàngvớimũitêntrênvònghãm.
Chonguyênliệuvàobìnhđãlắpmàkhôngvượtquámứctối
đatheoquyđịnh:
*1,75Lđốivớiđồxaythô
*1,5Lđốivớiđồxaydạnglỏng
Cảnh báo : Không được đổ nước nóng (trên 80°C/176°F)
vào bình máy xay
Đậynắplêntrênbìnhvàkhóatheochiềukimđồnghồ(Hình
5).Đảmbảochắcchắnđãkhóachặtnắpđúngcách:mũitên
trênnắpphảithẳnghàngvớimũitêntrêntaycầm.Lắpchụp
giữavàođúngvịtríbêntrênnắpvàkhóachặtbằngcáchxoay
theochiềukimđồnghồ.Nếunắpkhôngđượckhóachínhxác,
thiếtbịcủabạnsẽkhôngkhởiđộng.Đặtbìnhchínhxáclênbộ
phậnmôtơ:mũitêntrênbìnhphảithẳnghàngvớikhóatrên
bộphậnmôtơ.Logocủabìnhsẽxuấthiệntrênmànhìnhvà
mộttiếngbípsẽphátra.
THẬN TRỌNG: Không được nhúng thiết bị vào nước (bộ
phận môtơ hoặc đế bình). Không được để bộ phận môtơ (D)
dưới nước máy. Vệ sinh bằng miếng vải ẩm và lau thật khô.
Các lưỡi dao rất sắc.
Đảmbảođãtháotấtcảbaobìtrướckhivậnhànhthiếtbị.

16
SỬ DỤNG THIẾT BỊ CỦA BẠN
Đặtthiếtbịlênmộtbềmặtbằngphẳng,ổnđịnh,chốngnhiệt
cáchxacácnguồnnhiệthoặcnướcbắn.
Cắmphíchcắmthiếtbịvàchọnchươngtrìnhhoặcthiếtlập
theo cách thủ công (thời gian và tốc độ) và nhấn nút khởi
động/dng:vớibình(A)bạncóthểthayđổitốcđộxayt1
đến9bằngcáchnhấncácnútthiếtlập+/-(L).«H»làtốcđộ
tốiđa.Bạncóthểcàiđặtthờigianvậnhànhbằngcáchnhấn
cácnútthiếtlập+/-(L)t5giâyđến3phút.Vớichaiđựng(E)
bạncóthểđiềuchỉnhtốcđộxayt1đến7bằngcáchnhấncác
nútthiếtlập+/-(L).Bạncũngcóthểcàiđặtthờigianvậnhành
LẮP CHAI ĐỰNG
Làmẩmgioăng(E3)(thậmchícảkhiđãlắpvàobộphậnlưỡi
daorồi(E4)).Chúýlắpđúnggioăngvàobêntrênbộphậnlưỡi
dao(E4)theochiềuhướnglêntrên(Hình9).
Kiểmtraxemgioăngđãđượclắpvàođúngvịtrítrênbộphận
lưỡidaohaychưa.
Chocácnguyênliệuvàochaimàkhôngvượtquámứctốiđa
theoquyđịnh:
*400mlđốivớiđồxaythô
*600mlđốivớiđồxaydạnglỏng
Cảnh báo : Không được đổ nước nóng (trên 80°C/176°F)
vào chai.
Đặtbộphậnlưỡidao(E4)lêntrênbình,lắpvònghãm(E5)và
xoaytheochiềukimđồnghồđểkhóakhíalại(Hình8).
Đảmbảochắcchắnđãkhóachặtbộphậnlưỡidaođúngcách:
mũitêntrênvònghãmphảithẳnghàngvớimũitêntrênchai.
Lậtúpchaixuốngvàđặtchínhxáclênbộphậnmôtơ.Khóalại
bằngcáchxoaytheochiềukimđồnghồ.Logocủachaisẽxuất
hiệntrênmànhìnhvàmộttiếngbípsẽphátra
.

17
VI
bằngcáchnhấncácnútthiếtlập+/-(L)t5giâyđến90giây.
Chờđếnkhimáyxaytựđộngdng.Nếubạnmuốndngmáy
xaytrướckhi chương trìnhtựđộng kết thúc,hãynhấn nút
khởiđộng/dng.
Khôngđượclắcbộphậnmôtơhoặcbìnhkhiđangsửdụng
máyxay.
Khibạnsửdụngbộđẩyhaychụpgiữa,hãynắmchặttaycầm
củabìnhđểtránhlàmrơi.
Khimáyxayđangchạy,khôngsửdụngbấtkỳphụkiệnnào
khácngoàibộđẩynhằmtránhlàmhỏngbìnhmáyxay.
Trộndưới3phútlàđủđểxaychấtlỏngđốivớihầuhếtcác
côngthức
Đểchothêmnguyênliệukhiđangxay,tháochụpgiữarakhỏi
nắpvàchonguyênliệuvàoqualỗmiệngnạp.Cẩnthậnvới
nguycơbắntóe.
THẬN TRỌNG: Saukhichạymộtchutrìnhtrongmáyxaytrong
thờigianxửlýtốiđa,hãyđểmáyxaynghỉtrong1phúttrước
khivậnhànhlại.
Saukhisửdụngmáyxaytrongtốiđabachutrình,dngthiết
bịvàđểnguộiđếnnhiệtđộmôitrường(mấtkhoảng2giờ).
ThiếtbịđượctrangbịcơchếchốngquátảiCơchếnàyngăn
hiệntượngquátảilàmhỏngmôtơ.
Nếuthiếtbịtắttrongquátrìnhvậnhành,hãytiếnhànhnhư
sau:
rútphíchcắmvàđểnguộitrongkhoảng15-20phút.
Kếtnốilạithiếtbịvớinguồnđiệnvàtiếptụcxay.
Saukhoảng3phútkhôngsửdụng,thiếtbịsẽkhởiđộngchế
độchờ.Đểbậtthiếtbị,nhấnnútKhởiđộng/Dng(G)

18
CácchươngtrìnhhiệncósẵnđốivớiBìnhmáyxay(A)
Cácchương
trìnhtựđộng
Môtả Côngthứcmẫu Thờigian
Sửdụngchương
trìnhnàyđểlàm
sinhtố:trộntrái
cây/rautươivới
sữahoặcsữachua
200gcàrốt+100g
gốccầntây+100g
chuối+500gnước
cam
Thờigianmặc
định:60giây
Cóthểđiều
chỉnht30
giâyđến80
giây
Sửdụngchương
trìnhnàyđểlàm
kem:trộnhoa
quảđônglạnhvới
kemtươihoặc
sữachua
Kemtráicây:450gquả
mâmxôiđônglạnh+
240gsữa+75gđường
bột.Cáiđầmphảiđược
sửdụngđểgiúpdồn
nguyênliệuxuống
Thờigianmặc
định:1phút
10giây
Sửdụngchương
trìnhnàyđể
nghiềncáccụcđá
thànhđábào
tốiđa8cụcđá Thờigianmặc
định:40giây
Cóthểđiều
chỉnht10
giâyđến50
giây
Sửdụngchương
trìnhnàyđểlàm
bộtnhàomỏng
nhưbánhquế,
bánhngọt,bánh
kếp,clafouti,
bánhsôcôlahạnh
nhân...Bạnkhông
thểnhàobộtdày
nhưbánhmì,
bánhmìtròn,
pizza...
Bánhsữachua:Cho
cácnguyênliệutheo
trìnhtựnhưsauvào
bình.120gsữachua
+210gđườngbột+
7,5gđườngva-ni+3
quảtrứng+125dầu
hướngdương+85g
bộtngô+65gbột
hạnhnhân+140gbột
mì+11gbộtnở.Cho
hỗnhợpvàomộtcái
khuônvànướngtrong
50phútvớinhiệtđộ
180°C
Thờigianmặc
định:1phút
15giây
Cóthểđiều
chỉnht30
giâyđến2
phút
LƯỢNG NHỎ CẮT THÔ
Phụkiệnđượcsửdụng:máyđãlắp
Cắttrongvàigiâybằngcáchnhồi:đậuphộng,hạnhnhân,v.V.
Mẫu1600w:sốlượng/thờigiantốiđa:140gđậuphộng/4giây
hoặc150ghạnhnhân/8giây
ページが読み込まれています...
ページが読み込まれています...
ページが読み込まれています...
ページが読み込まれています...
ページが読み込まれています...
ページが読み込まれています...
ページが読み込まれています...
ページが読み込まれています...
ページが読み込まれています...
ページが読み込まれています...
ページが読み込まれています...
ページが読み込まれています...
ページが読み込まれています...
ページが読み込まれています...
ページが読み込まれています...
ページが読み込まれています...
ページが読み込まれています...
ページが読み込まれています...
ページが読み込まれています...
-
 1
1
-
 2
2
-
 3
3
-
 4
4
-
 5
5
-
 6
6
-
 7
7
-
 8
8
-
 9
9
-
 10
10
-
 11
11
-
 12
12
-
 13
13
-
 14
14
-
 15
15
-
 16
16
-
 17
17
-
 18
18
-
 19
19
-
 20
20
-
 21
21
-
 22
22
-
 23
23
-
 24
24
-
 25
25
-
 26
26
-
 27
27
-
 28
28
-
 29
29
-
 30
30
-
 31
31
-
 32
32
-
 33
33
-
 34
34
-
 35
35
-
 36
36
-
 37
37
-
 38
38
-
 39
39


