
UT001G
UT002G
EN Cordless Mixer INSTRUCTION MANUAL 6
ZHCN 充电式搅拌机 使用说明书 14
ID Pengaduk Nirkabel PETUNJUK PENGGUNAAN 22
MS Pembancuh Tanpa Kord MANUAL ARAHAN 31
VI Máy Trộn Sơn Cầm Tay Hoạt
Động Bằng Pin TÀI LIỆU HƯỚNG DẪN 40
TH 49

2
56
1
1
8
7
4
10
9
2
3
7
Fig.1
56
1
1
8
4
2
3
7
7
Fig.2
1
2
Fig.3
Fig.4
Fig.5
12
Fig.6
12
Fig.7
12
Fig.8

3
2
1
Fig.9
1
Fig.10
1
2
3
4
Fig.11
1
2
3
4
Fig.12
2 1
Fig.13
3
2
11
Fig.14
1
2
3
Fig.15

4
3
2
1
3
Fig.16
1
Fig.17
1
33
2
Fig.18
1
2
3
Fig.19
1
2
3
Fig.20
1
2
Fig.21
2
3
2
1
Fig.22

5
2
3
1
4
Fig.23
2
3
2
1
Fig.24

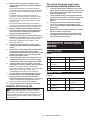
6ENGLISH
ENGLISH (Original instructions)
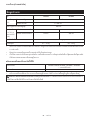
SPECIFICATIONS
Model: UT001G UT002G
No load speed High speed mode 0 - 920 min-1
Low speed mode 0 - 500 min-1
Maximum mixing blade diameter 240 mm
Overall length
(without shaft
and mixing
blade)
with battery cover S 373 mm 363 mm
with battery cover L 412 mm 403 mm
Rated voltage D.C. 36 V - 40 V max
Net weight 5.7 - 7.0 kg 5.8 - 7.2 kg
• Duetoourcontinuingprogramofresearchanddevelopment,thespecicationshereinaresubjecttochange
without notice.
• Specicationsandbatterycartridgemaydierfromcountrytocountry.
• Theweightmaydierdependingontheattachment(s),includingthebatterycartridge.Thelightestandheavi-
estcombinations,accordingtoEPTA-Procedure01/2014,areshowninthetable.
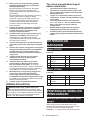
Applicable battery cartridge and charger
Battery cartridge BL4020/BL4025/BL4040*/BL4050F*/BL4080F*
*:Recommendedbattery
Charger DC40RA/DC40RB/DC40RC
• Someofthebatterycartridgesandchargerslistedabovemaynotbeavailabledependingonyourregionof
residence.
WARNING: Only use the battery cartridges and chargers listed above. Use of any other battery cartridges
andchargersmaycauseinjuryand/orre.
Symbols
Thefollowingsshowthesymbolswhichmaybeused
for the equipment. Be sure that you understand their
meaning before use.
Read instruction manual.
Do not use the tool in the rain.
Do not clean the tool with water.
Ni-MH
Li-ion
OnlyforEUcountries
Due to the presence of hazardous com-
ponentsintheequipment,wasteelectrical
andelectronicequipment,accumulators
and batteries may have a negative impact
on the environment and human health.
Do not dispose of electrical and electronic
appliances or batteries with household
waste!
InaccordancewiththeEuropeanDirective
on waste electrical and electronic equip-
ment and on accumulators and batteries
andwasteaccumulatorsandbatteries,
aswellastheiradaptationtonationallaw,
wasteelectricalequipment,batteriesand
accumulators should be stored separately
and delivered to a separate collection point
formunicipalwaste,operatinginaccor-
dance with the regulations on environmen-
tal protection.
Thisisindicatedbythesymbolofthe
crossed-out wheeled bin placed on the
equipment.
Intended use
Thetoolisintendedformixingwallmaterials,etc.
(exceptammablematerials).

7ENGLISH
SAFETY WARNINGS
General power tool safety warnings
WARNING: Read all safety warnings, instruc-
tions, illustrations and specications provided
with this power tool.Failuretofollowallinstructions
listedbelowmayresultinelectricshock,reand/or
seriousinjury.
Save all warnings and instruc-
tions for future reference.
Theterm“powertool”inthewarningsreferstoyour
mains-operated (corded) power tool or battery-operated
(cordless) power tool.
Work area safety
1. Keep work area clean and well lit. Cluttered or
dark areas invite accidents.
2. Do not operate power tools in explosive atmo-
spheres, such as in the presence of ammable
liquids, gases or dust.Powertoolscreatesparks
which may ignite the dust or fumes.
3. Keep children and bystanders away while
operating a power tool. Distractions can cause
you to lose control.
Electrical safety
1. Power tool plugs must match the outlet. Never
modify the plug in any way. Do not use any
adapter plugs with earthed (grounded) power
tools. Unmodiedplugsandmatchingoutletswill
reduce risk of electric shock.
2. Avoid body contact with earthed or grounded
surfaces, such as pipes, radiators, ranges and
refrigerators.Thereisanincreasedriskofelec-
tric shock if your body is earthed or grounded.
3. Do not expose power tools to rain or wet con-
ditions. Water entering a power tool will increase
the risk of electric shock.
4. Do not abuse the cord. Never use the cord for
carrying, pulling or unplugging the power tool.
Keep cord away from heat, oil, sharp edges
or moving parts. Damaged or entangled cords
increase the risk of electric shock.
5. When operating a power tool outdoors, use an
extension cord suitable for outdoor use. Use of
a cord suitable for outdoor use reduces the risk of
electric shock.
6. If operating a power tool in a damp location
is unavoidable, use a residual current device
(RCD) protected supply. Use of an RCD reduces
the risk of electric shock.
7. Power tools can produce electromagnetic
elds (EMF) that are not harmful to the user.
However,usersofpacemakersandothersimilar
medical devices should contact the maker of their
deviceand/ordoctorforadvicebeforeoperating
this power tool.
Personal safety
1. Stay alert, watch what you are doing and use
common sense when operating a power tool.
Do not use a power tool while you are tired or
under the inuence of drugs, alcohol or med-
ication.Amomentofinattentionwhileoperating
powertoolsmayresultinseriouspersonalinjury.
2. Use personal protective equipment. Always
wear eye protection.Protectiveequipmentsuch
asadustmask,non-skidsafetyshoes,hardhator
hearing protection used for appropriate conditions
willreducepersonalinjuries.
3. Prevent unintentional starting. Ensure the
switch is in the o-position before connecting
to power source and/or battery pack, picking
up or carrying the tool. Carrying power tools with
yourngerontheswitchorenergisingpowertools
that have the switch on invites accidents.
4. Remove any adjusting key or wrench before
turning the power tool on.Awrenchorakeyleft
attached to a rotating part of the power tool may
resultinpersonalinjury.
5. Do not overreach. Keep proper footing and
balance at all times.Thisenablesbettercontrol
of the power tool in unexpected situations.
6. Dress properly. Do not wear loose clothing or
jewellery. Keep your hair and clothing away
from moving parts.Looseclothes,jewelleryor
long hair can be caught in moving parts.
7. If devices are provided for the connection of
dust extraction and collection facilities, ensure
these are connected and properly used. Use of
dust collection can reduce dust-related hazards.
8. Do not let familiarity gained from frequent use
of tools allow you to become complacent and
ignore tool safety principles.Acarelessaction
cancausesevereinjurywithinafractionofa
second.
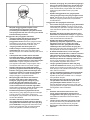
9. Always wear protective goggles to protect
your eyes from injury when using power tools.
The goggles must comply with ANSI Z87.1 in
the USA, EN 166 in Europe, or AS/NZS 1336
in Australia/New Zealand. In Australia/New
Zealand, it is legally required to wear a face
shield to protect your face, too.
It is an employer's responsibility to enforce
the use of appropriate safety protective equip-
ments by the tool operators and by other per-
sons in the immediate working area.

8ENGLISH
Power tool use and care
1. Do not force the power tool. Use the correct
power tool for your application.Thecorrect
powertoolwilldothejobbetterandsaferatthe
rate for which it was designed.
2. Do not use the power tool if the switch does
not turn it on and o.Anypowertoolthatcannot
be controlled with the switch is dangerous and
must be repaired.
3. Disconnect the plug from the power source
and/or remove the battery pack, if detachable,
from the power tool before making any adjust-
ments, changing accessories, or storing power
tools. Such preventive safety measures reduce
the risk of starting the power tool accidentally.
4. Store idle power tools out of the reach of chil-
dren and do not allow persons unfamiliar with
the power tool or these instructions to operate
the power tool.Powertoolsaredangerousinthe
hands of untrained users.
5. Maintain power tools and accessories. Check
for misalignment or binding of moving parts,
breakage of parts and any other condition that
may aect the power tool’s operation. If dam-
aged, have the power tool repaired before use.
Many accidents are caused by poorly maintained
power tools.
6. Keep cutting tools sharp and clean.Properly
maintained cutting tools with sharp cutting edges
are less likely to bind and are easier to control.
7. Use the power tool, accessories and tool bits
etc. in accordance with these instructions, tak-
ing into account the working conditions and
the work to be performed. Use of the power tool
foroperationsdierentfromthoseintendedcould
result in a hazardous situation.
8. Keep handles and grasping surfaces dry,
clean and free from oil and grease. Slippery
handles and grasping surfaces do not allow for
safe handling and control of the tool in unexpected
situations.
9. When using the tool, do not wear cloth work
gloves which may be entangled.Theentangle-
ment of cloth work gloves in the moving parts may
resultinpersonalinjury.
Battery tool use and care
1. Recharge only with the charger specied by
the manufacturer.Achargerthatissuitablefor
onetypeofbatterypackmaycreateariskofre
when used with another battery pack.
2. Use power tools only with specically desig-
nated battery packs. Use of any other battery
packsmaycreateariskofinjuryandre.
3. When battery pack is not in use, keep it away
from other metal objects, like paper clips,
coins, keys, nails, screws or other small metal
objects, that can make a connection from one
terminal to another. Shorting the battery termi-
nalstogethermaycauseburnsorare.
4. Under abusive conditions, liquid may be
ejected from the battery; avoid contact. If con-
tact accidentally occurs, ush with water. If
liquid contacts eyes, additionally seek medical
help.Liquidejectedfromthebatterymaycause
irritation or burns.
5. Do not use a battery pack or tool that is dam-
aged or modied.Damagedormodiedbatteries
may exhibit unpredictable behaviour resulting in
re,explosionorriskofinjury.
6. Do not expose a battery pack or tool to re or
excessive temperature.Exposuretoreortem-
perature above 130 °C may cause explosion.
7. Follow all charging instructions and do not
charge the battery pack or tool outside the
temperature range specied in the instruc-
tions. Charging improperly or at temperatures
outsidethespeciedrangemaydamagethe
batteryandincreasetheriskofre.
Service
1. Have your power tool serviced by a qualied
repair person using only identical replacement
parts.Thiswillensurethatthesafetyofthepower
tool is maintained.
2. Never service damaged battery packs. Service
of battery packs should only be performed by the
manufacturer or authorized service providers.
3. Follow instruction for lubricating and chang-
ing accessories.
Cordless mixer safety warnings
1. Hold the tool with both hands at the intended
handles. Loss of control can cause personal
injury.
2. Ensure sucient ventilation when mixing am-
mable materials to avoid a hazardous atmo-
sphere. Developing vapour may be inhaled or be
ignited by the sparks the power tool produces.
3. Do not mix food.Powertoolsandtheiraccesso-
ries are not designed for processing food.
4. Ensure that the mixing container is placed in a
rm and secure position.Acontainerthatisnot
properly secured may move unexpectedly.
5. Follow the instructions and warnings for the
material to be mixed. Material to be mixed may
be harmful.
6. Do not reach into the mixing container with
your hands or insert any other objects into it
while mixing. Contact with the mixer blade may
leadtoseriouspersonalinjury.
7. Start up and run down the tool in the mixing
container only.Themixerblademaybendorspin
in an uncontrolled manner.
8. Ensure that no liquid splashes against the
housing of the power tool. Liquid that has pen-
etrated the power tool can cause damage to the
tool.
9. Use auxiliary handles, if supplied with the tool.
Lossofcontrolmaycausepersonalinjury.
10. Hold power tool by insulated gripping sur-
faces, when performing an operation where
the cutting accessory may contact hidden wir-
ing.Cuttingaccessorycontactinga“live”wiremay
makeexposedmetalpartsofthepowertool“live”
and could give the operator an electric shock.
11. Always be sure you have a rm footing. Be
sure no one is below when using the tool in
high locations.
12. Hold the tool rmly.

9ENGLISH
13. Keep hands away from rotating parts.
14. Do not leave the tool running. Operate the tool
only when you are holding it.
15. Some materials contain chemicals which may
be toxic. Take caution to prevent dust inhala-
tion and skin contact. Follow safety warnings
by supplier of the material.
16. When performing the mixing operation, place
the mixing container on a at and stable
surface.
SAVE THESE INSTRUCTIONS.
WARNING: DO NOT let comfort or familiarity
with product (gained from repeated use) replace
strict adherence to safety rules for the subject
product. MISUSE or failure to follow the safety
rules stated in this instruction manual may cause
serious personal injury.
Important safety instructions for
battery cartridge
1. Before using battery cartridge, read all instruc-
tions and cautionary markings on (1) battery
charger, (2) battery, and (3) product using
battery.
2. Do not disassemble or tamper with the battery
cartridge.Itmayresultinare,excessiveheat,
or explosion.
3. If operating time has become excessively
shorter, stop operating immediately. It may
result in a risk of overheating, possible burns
and even an explosion.
4. If electrolyte gets into your eyes, rinse them
out with clear water and seek medical atten-
tion right away. It may result in loss of your
eyesight.
5. Do not short the battery cartridge:
(1) Do not touch the terminals with any con-
ductive material.
(2) Avoid storing battery cartridge in a con-
tainer with other metal objects such as
nails, coins, etc.
(3) Do not expose battery cartridge to water
or rain.
A battery short can cause a large current
ow, overheating, possible burns and even a
breakdown.
6. Do not store and use the tool and battery car-
tridge in locations where the temperature may
reach or exceed 50 °C (122 °F).
7. Do not incinerate the battery cartridge even if
it is severely damaged or is completely worn
out. The battery cartridge can explode in a re.
8. Do not nail, cut, crush, throw, drop the battery
cartridge, or hit against a hard object to the
battery cartridge. Such conduct may result in a
re,excessiveheat,orexplosion.
9. Do not use a damaged battery.
10. The contained lithium-ion batteries are subject
to the Dangerous Goods Legislation require-
ments.
Forcommercialtransportse.g.bythirdparties,
forwardingagents,specialrequirementonpack-
aging and labeling must be observed.
Forpreparationoftheitembeingshipped,consult-
ing an expert for hazardous material is required.
Pleasealsoobservepossiblymoredetailed
national regulations.
Tapeormaskoopencontactsandpackupthe
battery in such a manner that it cannot move
around in the packaging.
11. When disposing the battery cartridge, remove
it from the tool and dispose of it in a safe
place. Follow your local regulations relating to
disposal of battery.
12. Use the batteries only with the products
specied by Makita. Installing the batteries to
non-compliantproductsmayresultinare,exces-
siveheat,explosion,orleakofelectrolyte.
13. If the tool is not used for a long period of time,
the battery must be removed from the tool.
14. During and after use, the battery cartridge may
take on heat which can cause burns or low
temperature burns. Pay attention to the han-
dling of hot battery cartridges.
15. Do not touch the terminal of the tool imme-
diately after use as it may get hot enough to
cause burns.
16. Do not allow chips, dust, or soil stuck into the
terminals, holes, and grooves of the battery
cartridge.Itmaycauseheating,catchingre,
burst and malfunction of the tool or battery car-
tridge,resultinginburnsorpersonalinjury.
17. Unless the tool supports the use near
high-voltage electrical power lines, do not use
the battery cartridge near a high-voltage elec-
trical power lines. It may result in a malfunction
or breakdown of the tool or battery cartridge.
18. Keep the battery away from children.
SAVE THESE INSTRUCTIONS.
CAUTION: Only use genuine Makita batteries.
Useofnon-genuineMakitabatteries,orbatteriesthat
havebeenaltered,mayresultinthebatterybursting
causingres,personalinjuryanddamage.Itwill
also void the Makita warranty for the Makita tool and
charger.

10 ENGLISH
Tips for maintaining maximum
battery life
1. Charge the battery cartridge before completely
discharged. Always stop tool operation and
charge the battery cartridge when you notice
less tool power.
2. Never recharge a fully charged battery car-
tridge. Overcharging shortens the battery
service life.
3. Charge the battery cartridge with room tem-
perature at 10 °C - 40 °C (50 °F - 104 °F). Let
a hot battery cartridge cool down before
charging it.
4. When not using the battery cartridge, remove
it from the tool or the charger.
5. Charge the battery cartridge if you do not use
it for a long period (more than six months).
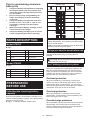
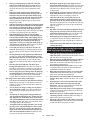
PARTS DESCRIPTION
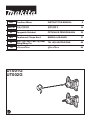
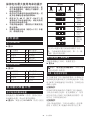
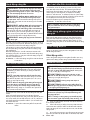
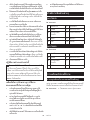
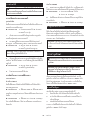
Model UT001G
►Fig.1
1Switch trigger 2Lock-obutton
3Lock button 4Speedadjustingdial
5Speed change knob 6Battery cover
7Handle 8Shaft holder
9Shaft 10 Mixing blade
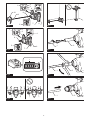
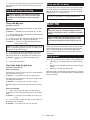
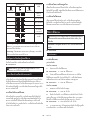
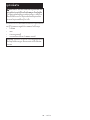
Model UT002G
►Fig.2
1Switch trigger 2Lock-obutton
3Lock button 4Speedadjustingdial
5Speed change knob 6Battery cover
7Handle 8Chuck
PREPARATION
BEFORE USE
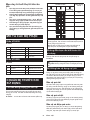
Indicating the remaining battery
capacity
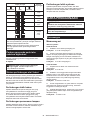
Pressthecheckbuttononthebatterycartridgetoindi-
catetheremainingbatterycapacity.Theindicatorlamps
light up for a few seconds.
►Fig.3: 1. Indicator lamps 2. Check button
Indicator lamps Remaining
capacity
Lighted O Blinking
75% to 100%
50% to 75%
25% to 50%
0% to 25%
Charge the
battery.
Thebattery
may have
malfunctioned.
NOTE: Depending on the conditions of use and the
ambienttemperature,theindicationmaydierslightly
from the actual capacity.
NOTE:Therst(farleft)indicatorlampwillblinkwhen
the battery protection system works.
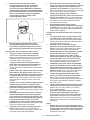
Things you need to know before use
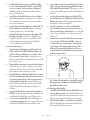
Hold the handle when using or carrying the tool.
►Fig.4
CAUTION: Do not hold the sheet metal part.
Sharpareasmaycauseinjury.
Tool / battery protection system
Thetoolisequippedwithatool/batteryprotectionsys-
tem.Thissystemautomaticallycutsopowertothe
motortoextendtoolandbatterylife.Thetoolwillauto-
matically stop during operation if the tool or battery is
placedunderoneofthefollowingconditions:
Overload protection
Whenthetool/batteryisoperatedinamannerthat
causesittodrawanabnormallyhighcurrent,thetool
automaticallystops.Inthissituation,turnthetoolo
and stop the application that caused the tool to become
overloaded.Thenturnthetoolontorestart.
Overheat protection
Whenthetool/batteryisoverheated,thetoolstops
automatically.Inthissituation,letthetool/batterycool
before turning the tool on again.
Overdischarge protection
Whenthebatterycapacitybecomeslow,thetoolstops
automatically. If the product does not operate even
whentheswitchesareoperated,removethebatteries
from the tool and charge the batteries.

11 ENGLISH
HOW TO USE
CAUTION: Always be sure that the tool is
switched o and the battery cartridge is removed
before carrying out any work on the tool.
NOTICE: When you are not working, lay the
machine down and store it.
►Fig.5
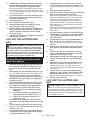
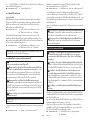
Assembly
Installing the shaft
Optional accessory
For UT001G
1. Tightentheshaftintotheshaftholder.
►Fig.6: 1. Shaft 2. Shaft holder
2. Holdtheatsontheshaftholderwithwrench19
sothattheshaftholdercannotrevolve.Withtheats
heldso,tightenthehexnutwithanotherwrench19in
the direction of arrow.
►Fig.7: 1. Shaft 2. Shaft holder
For UT002G
1. Insert the shaft into the chuck as far as it will go.
►Fig.8: 1. Shaft 2. Chuck
2. Tightenthechuckbyhand,andthenplacethe
chuck key in each of three holes and tighten it clock-
wise. Be sure to tighten the chuck key at all three holes
evenly.
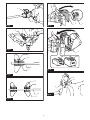
►Fig.9: 1. Chuck key 2. Chuck
3. Toremovetheshaft,turnthechuckkeycoun-
terclockwiseatoneoftheholes,andthenloosenthe
chuck by hand.
4. Whennotinuse,storethechuckkeyasshownin
theguretokeepitfrombeinglost.
►Fig.10: 1. Chuck key
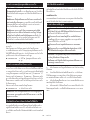
Installing the mixing blade
Optional accessory
Insert the mixing blade into the shaft and secure it with
thehexbolt.Atthistime,positionitsothatthetopend
ofthehexboltalwayststotheatsurfaceontheshaft
and tighten the hex bolt with the provided wrench.
►Fig.11: 1. Hex bolt 2. Shaft 3.Flatsurface4. Mixing
blade
Wheninstallingthemixingbladesattwodierentposi-
tions,mountandsecurethetwomixingbladesonthe
atpartoftheshaftwiththehexboltssothatthesame
surface of the mixing blades faces each other as shown
inthegure.
►Fig.12: 1. Hex bolt 2. Shaft 3.Flatsurface4. Mixing
blade
NOTE:AskyourlocalMakitaServiceCenterabout
which is mixing blades are allowed.
Installing or removing battery
cartridge
CAUTION: Always switch o the tool before
installing or removing of the battery cartridge.
CAUTION: Hold the tool and the battery car-
tridge rmly when installing or removing battery
cartridge.Failuretoholdthetoolandthebattery
cartridgermlymaycausethemtoslipoyourhands
and result in damage to the tool and battery cartridge
andapersonalinjury.
CAUTION: Do not use this tool with the
battery adapter. If you connect the battery adapter
tothetool,thebatterycovercannotbeclosed,and
using the tool with battery cover opened may cause
aninjury.
CAUTION: Be careful not to pinch your n-
gers when opening or closing the battery cover.
NOTICE: Install a battery cover that matches the
size of the battery.
Open the battery cover while pressing the button on the
battery cover.
►Fig.13: 1. Button 2. Battery cover
Toremovethebatterycartridge,slideitfromthetool
while sliding the button on the front of the cartridge.
►Fig.14: 1. Red indicator 2. Button 3. Battery
cartridge
Toinstallthebatterycartridge,alignthetongueonthe
battery cartridge with the groove in the housing and slip
it into place. Insert it all the way until it locks in place
with a little click. If you can see the red indicator as
showninthegure,itisnotlockedcompletely.
Afterinstallingthebatterycartridge,closethebattery
cover securely.
CAUTION: Always install the battery cartridge
fully until the red indicator cannot be seen.Ifnot,
itmayaccidentallyfalloutofthetool,causinginjuryto
you or someone around you.
CAUTION: Do not install the battery cartridge
forcibly.Ifthecartridgedoesnotslideineasily,itis
not being inserted correctly.

12 ENGLISH
Switch action
WARNING: Before installing the battery car-
tridge into the tool, always make sure that the
switch trigger actuates properly and returns to
the “OFF” position by fully pulling and releasing
it.
WARNING: NEVER defeat the lock-o button
by taping down or some other means.Aswitchwith
anegatedlock-obuttonmayresultinunintentional
operationandseriouspersonalinjury.
WARNING: NEVER use the tool if it runs when
you simply pull the switch trigger without press-
ing the lock-o button.Aswitchinneedofrepair
may result in unintentional operation and serious
personalinjury.ReturntooltoaMakitaservicecenter
forproperrepairsBEFOREfurtherusage.
WARNING: Do not install the battery cartridge
with the lock button engaged.
Topreventtheswitchtriggerfrombeingaccidentally
pulled,alock-obuttonisprovided.Tostartthetool,
depressthelock-obuttonandpulltheswitchtrigger.
Toolspeedisincreasedbyincreasingpressureonthe
switch trigger. Release the switch trigger to stop.
Forcontinuousoperation,depressthelockbuttonwhile
pullingtheswitchtrigger,andthenreleasetheswitch
trigger.Tostopthetool,pulltheswitchtriggerfully,then
release it.
►Fig.15: 1. Switch trigger 2.Lock-obutton3. Lock
button
Operation of speed change knob
NOTICE: Use the speed change knob only after
the tool comes to a complete stop. Changing the
tool speed mode before the tool stops may damage
the tool.
NOTICE: Always set the speed change knob
carefully into the correct position. If you operate
the tool with the speed change knob positioned half-
waybetweentheposition1andtheposition2,the
tool may be damaged.
NOTICE: If the rotation speed signicantly
decreases during operation in the high speed
mode, stop the tool and change the mode to the
low speed mode.Otherwise,themotormayget
overloadedandcauseamalfunctionorre.
Twospeedrangescanbepreselectedwiththespeed
change knob.
Select the proper speed mode for the material to be
mixed.
Tochangethespeedmode,turnthespeedchange
knob so that the pointer points to the dot at position
1 for low speed mode or the dot at position 2 for high
speed mode.
►Fig.16: 1.Pointer2. Speed change knob 3. Dot
Operation of speed adjusting dial
Thetoolspeedcanbeadjustedsteplesslybyturning
thespeedadjustingdial.Thenoloadspeedwhenthe
switchtriggerisfullypulledcanbeadjusted270min-1
to 500 min-1 atlowspeedmode,500min-1 to 920 min-1
at high speed mode. Higher speed is obtained when
the dial is turned in the direction of number 5; lower
speed is obtained when it is turned in the direction of
number 1.
Select the proper speed for the material to be mixed.
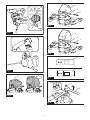
►Fig.17: 1.Speedadjustingdial
NOTICE: The speed adjusting dial can be turned
only as far as 5 and back to 1. Do not force it past
5 or 1.
Accidental restart preventive
function
If you install the battery cartridge while pulling the
switchtriggerorlockingtheswitchtrigger,thetooldoes
notstart.Tostartthetool,releasetheswitchtrigger,and
then pull the switch trigger.
Electronic function
Thetoolisequippedwiththefollowingelectronicfunc-
tion for easy operation.
Soft start
Thesoft-startfunctionminimizesstart-upshock,and
makes the tool start smoothly.
Basic operations
CAUTION: Do not mix ammable materials or
operate the tool around ammable materials such
as paint with thinner used as solvent.Failuretodo
somaycauseaninjury.
CAUTION: Do not mix high viscosity material
in the high speed mode. You may lose the control of
thetoolandcauseaninjury.
CAUTION: Do not rotate the mixing blade
outside the stirring vessel.
CAUTION: If you hear an abnormal noise
during use, turn o the switch and stop using the
tool.
NOTICE: When you mix the material while the
mixing blade oating out of the material, be care-
ful not to splash the material.
NOTICE: Do not use the tool for any purpose
other than stirring mortar, concrete, etc.
1. Select high speed mode or low speed mode
according to the material to be mixed.
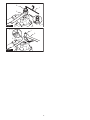
2. Holdthetoolrmlywithbothhands.Placethemix-
ing blade under material fully. Check that the material is
notsolidiedandthesafetyoftheworksite,thenturn
on the tool.

13 ENGLISH
3. Move the mixing blade up and down during the
mixing operation so that whole part of material can be
mixed.
4. Whennishingmixing,turnothetool.Makesure
thatthemixingbladehascometoacompletestop,and
then pull it out of the mixing container.
Applied operations
CAUTION: Always be sure that the tool is
switched o and the battery cartridge is removed
before adjusting or checking function on the tool.
Replacing battery cover
Optional accessory
Installoneofthebatterycoverstotthesizeofyour
battery cartridge.
►Fig.18: 1. Battery cover S 2. Battery cover L
3. Button
1. Open the standard equipped battery cover while
pressing the button on the battery cover.
2. Loosen the screw securing the standard equipped
batterycover.Thenremovethescrew,sleeveandthe
battery cover.
►Fig.19: 1. Screw 2. Sleeve 3. Battery cover (stan-
dard equipped)
NOTE:Thesleevemayremaininthemountingholes.
Inthatcase,pullitoutusingascreworthelike.
3. Alignthemountingholeontheoptionalbattery
cover with the mounting holes on the housing. Insert the
sleeve.Thentightenthescrewstosecureitinplace.
►Fig.20: 1. Screw 2. Sleeve 3. Battery cover
(optional)
4. Close the battery cover securely.
Installing or removing the shaft
holder
country specic
For UT001G
Installoneoftheshaftholdersoptionallyavailabletot
your screw size of the shaft.
►Fig.21: 1. M12 shaft holder 2. M14 shaft holder
Whileholdingthespindlewithawrench,loosenthe
shaft holder with another wrench.
►Fig.22: 1. Shaft holder 2. Wrench 3. Spindle
Toinstalltheshaftholder,performtheremovalproce-
dure in reverse.
For UT002G
1. Insertthehexwrenchintothechuck,andthen
loosen the chuck with the hex wrench while holding the
spindle with the wrench.
►Fig.23: 1. Hex wrench 2. Chuck 3. Wrench
4. Spindle
2. Tightentheshaftholderwithawrenchwhilehold-
ing the spindle with another wrench.
►Fig.24: 1. Shaft holder 2. Wrench 3. Spindle
Handling after use
Useawetclothortheliketocarefullywipeothemate-
rialleftonthetoolafteruse.Extracareshouldbegiven
tothoroughcleaningofthevents,switcharea,cover
openings,etc.
NOTICE: Avoid cleaning the tool in water. Water
will get into the motor housing and cause motor
failure.
MAINTENANCE
CAUTION: Always be sure that the tool is
switched o and the battery cartridge is removed
before attempting to perform inspection or
maintenance.
NOTICE: Never use gasoline, benzine, thinner,
alcohol or the like. Discoloration, deformation or
cracks may result.
TomaintainproductSAFETYandRELIABILITY,
repairs,anyothermaintenanceoradjustmentshould
beperformedbyMakitaAuthorizedorFactoryService
Centers,alwaysusingMakitareplacementparts.
Troubleshooting
Beforeaskingforrepairs,checkthefollowingpoints.
1. Turnthetoolo,andthenturnitonagainto
restart.
2. Chargethebattery(ies)orreplaceit/themwith
recharged battery(ies).
3. Let the tool and battery(ies) cool down.
If no improvement can be found by restoring protection
system,thencontactyourlocalMakitaServiceCenter.
OPTIONAL
ACCESSORIES
CAUTION: These accessories or attachments
are recommended for use with your Makita tool
specied in this manual.Theuseofanyother
accessories or attachments might present a risk of
injurytopersons.Onlyuseaccessoryorattachment
for its stated purpose.
If you need any assistance for more details regard-
ingtheseaccessories,askyourlocalMakitaService
Center.
• Mixingblade
• Shaft
• Batterycover
• Makitagenuinebatteryandcharger
NOTE: Some items in the list may be included in the
toolpackageasstandardaccessories.Theymay
dierfromcountrytocountry.

14
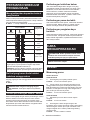
中文简体
中文简体 (原本)
规格
型号: UT001G UT002G
空载速度 高速模式 0-920r/min
低速模式 0-500r/min
最大搅拌叶片直径 240 mm
总长度(不
含轴和搅拌
叶片)
含电池盖S373 mm 363 mm
含电池盖L412 mm 403 mm
额定电压 D.C. 36 V - 40 V最大
净重 5.7 - 7.0 kg 5.8 - 7.2 kg
• 生产者保留变更规格不另行通知之权利。
• 规格和电池组可能因销往国家之不同而异。
• 重量因附件(包括电池组)而异。根据EPTA-Procedure01/2014,最重与最轻的组合见
表格。
适用电池组和充电器
电池组 BL4020/BL4025/BL4040*/BL4050F*/
BL4080F*
*:建议使用的电池
充电器 DC40RA/DC40RB/DC40RC
• 部分以上所列电池组和充电器是否适用视用户所在地区而异。
警告: 请仅使用以上所列电池组和充电器。使用其他类型的电池组或充电器可能会导
致人身伤害和/或失火。
符号
以下显示本设备可能会使用的符号。在使用
工具之前,请务必理解其含义。
阅读使用说明书。
请勿在雨中使用本工具。
请勿用水清洁本工具。
Ni-MH
Li-ion 仅限于欧盟国家
由于本设备中包含有害成分,
因此废弃的电气和电子设备、
蓄电池和普通电池可能会对环
境和人体健康产生负面影响。
请勿将电气和电子工具或电池
与家庭普通废弃物放在一起处
置!
根据欧洲关于废弃电气电子设
备、蓄电池和普通电池、废弃
的蓄电池和普通电池的指令及
其国家层面的修订法案,废弃
的电气设备、普通电池和蓄电
池应当单独存放并递送至城市
垃圾收集点,根据环保法规进
行处置。
此规定由标有叉形标志的带轮
垃圾桶符号表示。

15
中文简体
用途
该工具用于搅拌墙体材料等材料(可燃物除
外)。
安全警告
电动工具通用安全警告
警告: 阅读随电动工具提供的所有安全
警告、说明、图示和规定。不遵照以下所列
说明会导致电击、着火和/或严重伤害。
保存所有警告和说明书以备查
阅。
警告中的术语“电动工具”是指市电驱动(有
线)电动工具或电池驱动(无线)电动工具。
工作场地的安全
1. 保持工作场地清洁和明亮。杂乱和黑暗
的场地会引发事故。
2. 不要在易爆环境,如有易燃液体、气体
或粉尘的环境下操作电动工具。电动工
具产生的火花会点燃粉尘或气体。
3. 操作电动工具时,远离儿童和旁观者。注
意力不集中会使你失去对工具的控制。
电气安全
1. 电动工具插头必须与插座相配。绝不能
以任何方式改装插头。需接地的电动工
具不能使用任何转换插头。未经改装的
插头和相配的插座将降低电击风险。
2. 避免人体接触接地表面,如管道、散热
片和冰箱。如果你身体接触接地表面会
增加电击风险。
3. 不得将电动工具暴露在雨中或潮湿环境
中。水进入电动工具将增加电击风险。
4. 不得滥用软线。绝不能用软线搬运、拉
动电动工具或拔出其插头。使软线远离
热源、油、锐边或运动部件。受损或缠
绕的软线会增加电击风险。
5. 当在户外使用电动工具时,使用适合户
外使用的延长线。适合户外使用的电线
将降低电击风险。
6. 如果无法避免在潮湿环境中操作电动工
具 ,应 使 用 带 有 剩 余 电 流 装 置( RCD)保
护的电源。RCD的使用可降低电击风险。
7. 电动工具会产生对用户无害的电磁场
(EMF)。但是,起搏器和其他类似医
疗设备的用户应在操作本电动工具前咨
询其设备的制造商和/或医生寻求建议。
人身安全
1. 保持警觉,当操作电动工具时关注所从
事的操作并保持清醒。当你感到疲倦,
或在有药物、酒精或治疗反应时,不要
操作电动工具。在操作电动工具时瞬间
的疏忽会导致严重人身伤害。
2. 使用个人防护装置。始终佩戴护目镜。
防护装置,诸如适当条件下使用防尘面
具、防滑安全鞋、安全帽、听力防护等
装置能减少人身伤害。
3. 防 止 意 外 起 动 。在 连 接 电 源 和 /或电池包、
拿起或搬运工具前确保开关处于关断位
置。手指放在开关上搬运工具或开关处
于接通时通电会导致危险。
4. 在电动工具接通之前,拿掉所有调节钥
匙或扳手。遗留在电动工具旋转零件上
的扳手或钥匙会导致人身伤害。
5. 手不要过分伸展。时刻注意立足点和身
体平衡。这样能在意外情况下能更好地
控制住电动工具。
6. 着装适当。不要穿宽松衣服或佩戴饰品。
让你的头发和衣服远离运动部件。宽松衣
服、佩饰或长发可能会卷入运动部件。
7. 如果提供了与排屑、集尘设备连接用的
装置,要确保其连接完好且使用得当。
使用集尘装置可降低尘屑引起的危险。
8. 不要因为频繁使用工具而产生的熟悉感而
掉以轻心,忽视工具的安全准则。某个粗
心的动作可能在瞬间导致严重的伤害。
9. 使用电动工具时请始终佩带护目镜以免伤
害眼睛。护目镜须符合美国ANSI Z87.1、
欧洲EN 166或者澳大利亚/新西兰的AS/
NZS 1336的规定。在澳大利亚/新西兰,
法律要求佩带面罩保护脸部。

16
中文简体
雇主有责任监督工具操作者和其他近工
作区域人员佩带合适的安全防护设备。
电动工具使用和注意事项
1. 不要勉强使用电动工具,根据用途使用
合适的电动工具。选用合适的按照额定
值设计的电动工具会使你工作更有效、
更安全。
2. 如果开关不能接通或关断电源,则不能
使用该电动工具。不能通过开关来控制
的电动工具是危险的且必须进行修理。
3. 在进行任何调节、更换附件或贮存电动
工具之前,必须从电源上拔掉插头和/或
卸下电池包(如可拆卸)。这种防护性
的安全措施降低了电动工具意外起动的
风险。
4. 将闲置不用的电动工具贮存在儿童所及
范围之外,并且不允许不熟悉电动工具
和不了解这些说明的人操作电动工具。
电动工具在未经培训的使用者手中是危
险的。
5. 维护电动工具及其附件。检查运动部件
是否调整到位或卡住,检查零件破损情
况和影响电动工具运行的其他状况。如
有损坏,应在使用前修理好电动工具。
许多事故是由维护不良的电动工具引发
的。
6. 保持切削刀具锋利和清洁。维护良好地
有锋利切削刃的刀具不易卡住而且容易
控制。
7. 按照使用说明书,并考虑作业条件和要
进行的作业来选择电动工具、附件和工
具的刀头等。将电动工具用于那些与其
用途不符的操作可能会导致危险情况。
8. 保持手柄和握持表面干燥、清洁,不得
沾有油脂。在意外的情况下,湿滑的手
柄不能保证握持的安全和对工具的控制。
9. 使用本工具时,请勿佩戴可能会缠结的
布质工作手套。布质工作手套卷入移动
部件可能会造成人身伤害。
电池式工具使用和注意事项
1. 仅使用生产者规定的充电器充电。将适
用于某种电池包的充电器用到其他电池
包时可能会发生着火危险。
2. 仅使用配有专用电池包的电动工具。使用
其他电池包可能会产生伤害和着火危险。
3. 当电池包不用时,将它远离其他金属物
体,例如回形针、硬币、钥匙、钉子、
螺钉或其他小金属物体,以防电池包一
端与另一端连接。电池组端部短路可能
会引起燃烧或着火。
4. 在滥用条件下,液体可能会从电池组中溅
出;应避免接触。如果意外碰到液体,
用水冲洗。如果液体碰到了眼睛,还应
寻求医疗帮助。从电池中溅出的液体可
能会发生腐蚀或燃烧。
5. 不要使用损坏或改装过的电池包或工具。
损坏或改装过的电池组可能呈现无法预测
的结果,导致着火、爆炸或伤害。
6. 不要将电池包暴露于火或高温中。电池
包暴露于火或高于130 ℃的高温中可能
导致爆炸。
7. 遵循所有充电说明。不要在说明书中指
定的温度范围之外给电池包或电动工具
充电。不正确或在指定的温度范围外充
电可能会损坏电池和增加着火的风险。
维修
1. 让专业维修人员使用相同的备件维修电
动工具。这将保证所维修的电动工具的
安全。
2. 决不能维修损坏的电池包。电池包仅能由
生产者或其授权的维修服务商进行维修。
3. 上润滑油及更换附件时请遵循本说明书
指示。
充电式搅拌机使用安全警告
1. 通过手柄用双手握持工具。失控会造成
人身伤害。
2. 混合可燃材料时确保通风良好,避免发
生危险。挥发蒸气可能会被吸入或被电
动工具产生的火花引燃。
3. 不要搅拌食物。电动工具及其附件并非
设计用于加工食物。
4. 确保将搅拌容器置于稳固且安全的位置。
如果容器固定不牢,则会意外移动。
5. 遵循被搅拌材料的说明和警告事项。被
搅拌材料可能有害。
6. 搅拌时,不得将手伸入搅拌容器或插入
任何其他物体。接触搅拌机叶片可能会
导致严重的人身伤害。
7. 仅在搅拌容器内启动和运转工具。搅拌
机叶片可能会弯折或失控旋转。
8. 不得使液体溅到电动工具的外壳。液体
进入电动工具可导致工具损坏。
9. 如果本工具附有辅助手柄,请使用辅助
手柄。失控可能会造成人身伤害。
10. 当进行作业时切割附件可能会接触到隐
藏的电线,请握住电动工具的绝缘抓握
表面。切割附件接触到“带电”的电线
时,电动工具上曝露的金属部分可能也
会“带电”,并使操作者触电。

17
中文简体
11. 请务必确保立足稳固。在高处使用工具
时确保下方无人。
12. 请牢握本工具。
13. 手应远离旋转的部件。
14. 运行中的工具不可离手放置。仅当在握
牢时操作工具。
15. 某些材料含有有毒化学物质。小心不要
吸入粉尘,并避免皮肤接触。遵循材料
供应商的安全警告事项。
16. 进行搅拌操作时,将搅拌容器放置在平
坦稳固的表面。
请保留此说明书。
警告: 请勿为图方便或因对产品足够熟
悉(由于重复使用而获得的经验)而不严格
遵循相关产品安全规则。使用不当或不遵循
使用说明书中的安全规则会导致严重的人身
伤害。
电池组的重要安全注意事项
1. 在使用电池组之前,请仔细通读所有的说
明 以 及( 1) 电 池 充 电 器 ,( 2)电 池 ,以 及
(3)使用电池的产品上的警告标记。
2. 切勿拆卸或改装电池组。否则可能引起
火灾、过热或爆炸。
3. 如果机器运行时间变得过短,请立即停
止使用。否则可能会导致过热、起火甚
至爆炸。
4. 如果电解液进入您的眼睛,请用清水将
其冲洗干净并立即就医。否则可能会导
致视力受损。
5. 请勿使电池组短路:
(1) 请勿使任何导电材料碰触到端子。
(2) 避免将电池组与其他金属物品如钉
子、硬币等放置在同一容器内。
(3) 请勿将电池组置于水中或使其淋雨。
电池短路将产生大的电流,导致过热,
并可能导致起火甚至击穿。
6. 请勿在温度可能达到或超过50°C(122°F)
的场所存放以及使用工具和电池组。
7. 即使电池组已经严重损坏或完全磨损,也
请勿焚烧电池组。电池组会在火中爆炸。
8. 请勿对电池组射钉,或者切削、挤压、抛
掷、掉落电池组,又或者用硬物撞击电池
组。否则可能引起火灾、过热或爆炸。
9. 请勿使用损坏的电池。
10. 本工具附带的锂离子电池需符合危险品
法规要求。
第三方或转运代理等进行商业运输时,
应遵循包装和标识方面的特殊要求。
有关运输项目的准备作业,咨询危险品
方面的专业人士。同时,请遵守可能更
为详尽的国家法规。
请使用胶带保护且勿遮掩表面的联络信
息,并牢固封装电池,使电池在包装内
不可动。
11. 丢弃电池组时,需将其从工具上卸下并
在安全地带进行处理。关于如何处理废
弃的电池,请遵循当地法规。
12. 仅将电池用于Makita(牧田)指定的产
品。将电池安装至不兼容的产品会导致
起火、过热、爆炸或电解液泄漏。
13. 如长时间未使用工具,必须将电池从工
具内取出。
14. 使用工具期间以及使用工具之后,电池组
温度可能较高易引起灼伤或低温烫伤。处
理高温电池组时请小心操作。
15. 在使用工具后请勿立即触碰工具的端子,
否则可能引起灼伤。
16. 避免锯屑、灰尘或泥土卡入电池组的端
子、孔口和凹槽内。否则可能会导致过
热、着火、爆炸和工具/电池组故障,导
致烫伤或人身伤害。
17. 除非工具支持在高压电源线路附近使用,
否则请勿在高压电源线路附近使用电池
组。否则可能导致工具或电池组故障或
失常。
18. 确保电池远离儿童。
请保留此说明书。
小心: 请仅使用Makita(牧田)原装电
池。使用非Makita(牧田)原装电池或经过
改装的电池可能会导致电池爆炸,从而造成
火灾、人身伤害或物品受损。同时也会导致
牧田工具和充电器的牧田保修服务失效。

18
中文简体
保持电池最大使用寿命的提示
1. 在电池组电量完全耗尽前及时充电。发
现工具电量低时,请停止工具操作,并
给电池组充电。
2. 请勿对已充满电的电池组重新充电。过
度充电将缩短电池的使用寿命。
3. 请在10 °C - 40 °C(50 °F - 104 °F)的
室温条件下给电池组充电。请在灼热的
电池组冷却后再充电。
4. 不使用电池组时,请将其从工具或充电
器上拆除。
5. 如果电池组长时间(超过六个月)未使
用,请给其充电。
部件说明
型号UT001G
► 图片1
1开关扳机 2锁止按钮
3锁定按钮 4转速调节刻度盘
5变速钮 6电池盖
7把手 8轴支架
9轴10 搅拌叶片
型号UT002G
► 图片2
1开关扳机 2锁止按钮
3锁定按钮 4转速调节刻度盘
5变速钮 6电池盖
7把手 8夹头
使用前的准备工作
显示电池的剩余电量
按电池组上的CHECK(查看)按钮可显示
电池剩余电量。指示灯将亮起数秒。
► 图片3: 1. 指示灯 2.CHECK(查看)按钮
指示灯 剩余电量
点亮 熄灭 闪烁
75%至
100%
50%至
75%
25%至
50%
0%至
25%
给电池
充电。
电池可
能出现
故障。
注: 在不同的使用条件及环境温度下,指
示灯所示电量可能与实际情况略有不同。
注: 当电池保护系统启动时,第一个(最
左侧)指示灯将闪烁。
使用前需要了解的事项
在使用或搬运工具时,请握住把手。
► 图片4
小心: 请勿握住金属板部件。锋利区域
可能会造成人身伤害。
工具/电池保护系统
本工具配备有工具/电池保护系统。该系统可自
动切断电机电源以延长工具和电池寿命。作业
时,如果工具或电池处于以下情况,工具将会自
动停止运转。
过载保护
以导致异常高电流的方式操作工具/电池时,
工具会自动停止运转。在这种情况下,请关
闭工具并停止导致工具过载的应用程序。然
后开启工具以重新启动。
过热保护
工具/电池过热时,工具会自动停止。在这种
情况下,请待工具/电池冷却后再开启工具。

19
中文简体
过放电保护
电池剩余电量变低时,本工具自动停止运转。
如果即使在打开开关时本产品仍不运转,请从
工具上拆下电池并给电池充电。
具体使用方法
小心: 对工具进行任何装配操作前,请
务必关闭工具电源,并取出电池组。
注意: 未工作时,请务必放下机器并将其
存放起来。
► 图片5
组装
安装轴
选购附件
UT001G型
1. 将轴紧固至轴支架。
► 图片6: 1. 轴 2. 轴支架
2. 用19号扳手固定轴支架中的平面,使其
无法转动。握住平面后,用另一个19号扳手
沿箭头所示方向拧紧六角螺母。
► 图片7: 1. 轴 2. 轴支架
UT002G型
1. 将轴尽可能深地插入夹头。
► 图片8: 1. 轴 2. 夹头
2. 用手旋紧夹头,然后把卡盘键分别插入
三个孔并按顺时针方向旋紧。请务必在所有
三个孔中均匀地拧紧卡盘键。
► 图片9: 1. 卡盘键 2. 夹头
3. 拆下轴时,将卡盘键插入一个孔中并逆
时针旋转,然后用手拧松夹头。
4. 不使用时,请如图所示存放卡盘键以防
丢失。
► 图片10: 1. 卡盘键
安装搅拌叶片
选购附件
将搅拌叶片插入轴中,并用六角螺栓将其固
定。此时,将其放置到位,使六角螺栓的顶
端始终与轴的平面接合,然后用附带的扳手
拧紧六角螺栓。
► 图片11: 1. 六角螺栓 2. 轴 3. 平面 4. 搅
拌叶片
在两个不同的位置安装搅拌叶片时,用六角
螺栓将两个搅拌叶片安装并固定在轴的平面
部位,使各个搅拌叶片的同一表面如图所示
相对。
► 图片12: 1. 六角螺栓 2. 轴 3. 平面 4. 搅
拌叶片
注: 关于所允许的搅拌叶片,请咨询当地
的Makita(牧田)维修服务中心。
安装或拆卸电池组
小心: 安装或拆卸电池组之前,请务必
关闭工具电源。
小心: 安装或拆卸电池组时请握紧工具
和电池组。否 则 它 们 可 能 从 您 的 手 中 滑 落 ,导
致工具和电池组受损,甚至造成人身伤害。
小心: 请勿将本工具与电池连接转换器
一起使用。如果将电池连接转换器连接至工
具,则无法关闭电池盖,在电池盖打开时使
用工具可能会造成人身伤害。
小心: 打开或关闭电池盖时,小心不要
夹住您的手指。
注意: 安装与电池尺寸相匹配的电池盖。
按电池盖上的按钮以打开电池盖。
► 图片13: 1. 按钮 2. 电池盖
拆卸电池组时,按下电池组前侧的按钮,同
时将电池组从工具中抽出。
► 图片14: 1. 红色指示器 2. 按钮 3. 电池组
安装电池组时,要将电池组上的舌簧与外罩
上的凹槽对齐,然后推滑到位。将其完全插
入到位,直到锁定并发出咔哒声为止。若能
看到图示中的红色指示器,则说明未完全锁
紧。
安装好电池组后,牢固关闭电池盖。
小心: 务必完全装入电池组,直至看不
见红色指示器为止。否则,它可能会从工具
中意外脱落,从而造成自身或他人受伤。
小心: 请勿强行安装电池组。如果电池
组难以插入,可能是插入方法不当。

20
中文简体
开关操作
警告: 在将电池组安装至工具之前,请
务必通过将开关扳机扣到底后松开,确保其
扣动自如并退回至“OFF”(关闭)位置。
警告: 切勿通过按压锁止按钮或其他方
法来破坏锁止按钮。使用锁止按钮无效的开
关时可能会出现意外运行的情况,并导致严
重的人身伤害。
警告: 如果在您仅扣动开关扳机但没有
按下锁止按钮的情况下,工具即开始运行,
则切勿使用此工具。在开关需要维修的情况
下,使用工具时可能会出现意外运行的情况
并导致严重的人身伤害。在进一步使用前,
请将工具送回Makita(牧田)维修中心进行
适当的修理。
警告: 切勿在锁定按钮处于啮合状态时
安装电池组。
为 避 免 开 关 扳 机 被 意 外 扣 动 ,采 用 锁 止 按 钮 。
要启动工具时,按下锁止按钮,然后扣动开关
扳机即可。
随着施加在开关扳机上的压力的增大,工具速
度也会提高。松开开关扳机,工具即停止。
需长时间操作时,请在按住开关扳机的同时
按下锁定按钮,然后再松开开关扳机。要停
止工具时,请将开关扳机扣到底,然后将其
松开。
► 图片15: 1. 开关扳机 2. 锁止按钮 3. 锁定按
钮
变速钮的操作
注意: 请仅在工具完全停止后再使用变速
钮。在工具停止前改变工具速度模式可能会
损坏工具。
注意: 请务必小心地将变速钮置于正确位
置。如果在变速钮处于位置1与位置2之间的
半位时操作工具,则会使工具受损。
注意: 如果旋转速度在高速模式下运转时
明显降低,请停止工具并将模式切换至低速
模式。否则,电机可能会过载并导致功能不
良或起火。
使用变速钮可以预选两种速度范围。
选择适合待搅拌材料的适当速度模式。
要改变速度模式时,请转动变速钮,使指针指
向位置1的点以切换成低速模式,或指向位置2
的点以切换成高速模式。
► 图片16: 1. 指针 2. 变速钮 3. 点
转速调节刻度盘的操作
可通过转动转速调节刻度盘来无级调节工具速
度。当完全扣动开关扳机时,可以在低速模式下
将空载速度自270r/min调整至500r/min,在 高
速模式下将500r/min调整至920r/min。朝 数 字
5方向旋转刻度盘时,转速递增;朝数字1方向旋
转 刻 度 盘 时 ,转 速 递 减 。
选择适合待搅拌材料的适当速度。
► 图片17: 1. 转速调节刻度盘
注意: 转速调节刻度盘只能在1和5之间调
节。请勿强行将其拨至超过5或1的位置。
防止意外重启功能
在扣住开关扳机或锁定开关扳机的情况下安装
电池组时,工具不会启动。要启动工具,请松开
开关扳机,然后再扣动开关扳机即可。
电子功能
本工具配备下列电子功能以提高操作便利性。
软启动
软启动功能可将启动时的震动减至最小,确
保工具平稳启动。
基本操作
小心: 不要搅拌可燃材料,或在易燃材
料(含有稀释剂作为溶剂的油漆等)附近操
作工具。否则可能导致人身伤害。
小心: 不要在高速模式下搅拌高粘度材
料。否则可能会造成工具失控和人身伤害。
小心:请勿在搅拌容器外旋转搅拌叶
片。
小心: 在使用时,如果您听到工具发出
异常声音时,请关闭开关并停止使用工具。
注意: 在搅拌叶片浮出材料的情况下进行
搅拌时,注意避免溅出材料。
注意: 请勿将本工具用于搅拌砂浆和混凝
土等以外的其他用途。
1. 根据待搅拌材料选择高速或低速模式。
2. 需用双手握紧工具。将搅拌叶片完全放
置在材料下方。请检查材料是否凝固和工作
现场是否安全,然后开启工具。
3. 在搅拌操作期间上下移动搅拌叶片,确
保材料的所有部分均受到搅拌。
ページが読み込まれています...
ページが読み込まれています...
ページが読み込まれています...
ページが読み込まれています...
ページが読み込まれています...
ページが読み込まれています...
ページが読み込まれています...
ページが読み込まれています...
ページが読み込まれています...
ページが読み込まれています...
ページが読み込まれています...
ページが読み込まれています...
ページが読み込まれています...
ページが読み込まれています...
ページが読み込まれています...
ページが読み込まれています...
ページが読み込まれています...
ページが読み込まれています...
ページが読み込まれています...
ページが読み込まれています...
ページが読み込まれています...
ページが読み込まれています...
ページが読み込まれています...
ページが読み込まれています...
ページが読み込まれています...
ページが読み込まれています...
ページが読み込まれています...
ページが読み込まれています...
ページが読み込まれています...
ページが読み込まれています...
ページが読み込まれています...
ページが読み込まれています...
ページが読み込まれています...
ページが読み込まれています...
ページが読み込まれています...
ページが読み込まれています...
ページが読み込まれています...
ページが読み込まれています...
ページが読み込まれています...
ページが読み込まれています...
-
 1
1
-
 2
2
-
 3
3
-
 4
4
-
 5
5
-
 6
6
-
 7
7
-
 8
8
-
 9
9
-
 10
10
-
 11
11
-
 12
12
-
 13
13
-
 14
14
-
 15
15
-
 16
16
-
 17
17
-
 18
18
-
 19
19
-
 20
20
-
 21
21
-
 22
22
-
 23
23
-
 24
24
-
 25
25
-
 26
26
-
 27
27
-
 28
28
-
 29
29
-
 30
30
-
 31
31
-
 32
32
-
 33
33
-
 34
34
-
 35
35
-
 36
36
-
 37
37
-
 38
38
-
 39
39
-
 40
40
-
 41
41
-
 42
42
-
 43
43
-
 44
44
-
 45
45
-
 46
46
-
 47
47
-
 48
48
-
 49
49
-
 50
50
-
 51
51
-
 52
52
-
 53
53
-
 54
54
-
 55
55
-
 56
56
-
 57
57
-
 58
58
-
 59
59
-
 60
60


