
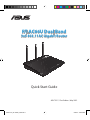
Quick Start Guide
RT-AC66U Dual Band
3x3 802.11AC Gigabit Router
®
APAC7417 / First Edition / May 2012
APAC7417_RT-AC66U_QSG.indd 1 5/28/12 4:58:49 PM

Table of contents
English .............................................................................................6
繁體中文 ........................................................................................19
簡體中文 ........................................................................................32
Bahasa Indonesia .........................................................................45
ไทย
..................................................................................................58
APAC7417_RT-AC66U_QSG.indd 2 5/28/12 4:58:50 PM

NOTE /
注意
/
注意
/
CATATAN
/
หมายเหต
• For more details, refer to the user manual included in
the support CD.
•
更多資訊,請參考驅動程式與公用程式光碟中的使用手冊。
•
更多信息,請參考驅動程序與應用程序光盤中的用
戶手冊。
• Untuk rincian lebih lanjut, lihat panduan pengguna
yang disertakan dalam CD dukungan.
•
สำหรับรายละเอียดเพิ่มเติม ให้ดูคู่มือผู้ใช้ที่ให้มาในแ
ผ่น CD สนับสนุน
APAC7417_RT-AC66U_QSG.indd 3 5/28/12 4:58:50 PM

4
English
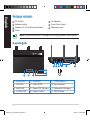
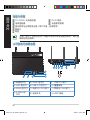
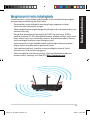
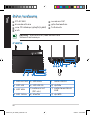
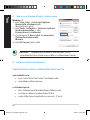
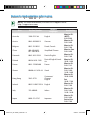
Package contents
RT-AC66U AC adapter
Network cable Quick Start Guide
Support CD (User Manual/utilities) Warranty card
Stand
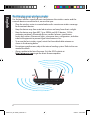
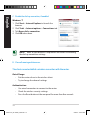
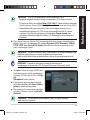
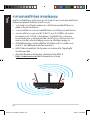
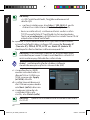
A quick look
1) Power LED 5) 5GHz LED 9) USB 2.0 ports
2) LAN LED 6) USB 2.0 LED 10) Reset button
3) WAN LED 7) Power (DC-IN) port 11) Internet & LAN ports
4) 2.4GHz LED 8) Power switch 12) WPS button
NOTE: If any of the items is damaged or missing, contact your retailer.
7 9 10 12
11
8
1 2
3
5
6
4
APAC7417_RT-AC66U_QSG.indd 4 5/28/12 4:58:52 PM

5
English
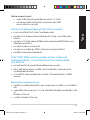
NOTES:
•
USB External HDD/Flash disk:
• The wireless router works with most USB HDDs/Flash disks up to
2TB and supports read-write access for FAT16, FAT32, EXT2, EXT3,
and NTFS.
• To safely remove the USB disk, launch the web GUI
(http://192.168.1.1), then in the Network Map page's upper right
corner, click the USB icon and click Eject USB 1.
• Incorrect removal of the USB disk may cause data corruption.
• For the list of le system and hard disk partitions that the
wireless router supports, visit http://event.asus.com/networks/
disksupport
• For the list of printers that the wireless router supports, visit
http://event.asus.com/networks/printersupport
APAC7417_RT-AC66U_QSG.indd 5 5/28/12 4:58:52 PM

6
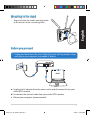
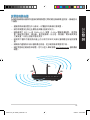
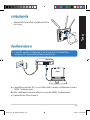
Positioning your wireless router
For the best wireless signal transmission between the wireless router and the
network devices connected to it, ensure that you:
• Place the wireless router in a centralized area for a maximum wireless coverage
for the network devices.
• Keep the device away from metal obstructions and away from direct sunlight.
• Keep the device away from 802.11g or 20MHz only Wi-Fi devices, 2.4GHz
computer peripherals, Bluetooth devices, cordless phones, transformers,
heavy-duty motors, uorescent lights, microwave ovens, refrigerators, and other
industrial equipment to prevent signal interference or loss.
• To ensure the best wireless signal, orient the three detachable antennas as
shown in the drawing below.
• For optimum performance, adjust the internal cooling system. Refer to the user
manual for details.
• Always update to the latest rmware. Visit the ASUS website at
http://www.asus.com to get the latest rmware updates.
45
0
45
0
90
0
English
APAC7417_RT-AC66U_QSG.indd 6 5/28/12 4:58:53 PM

7
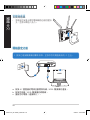
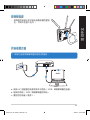
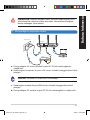
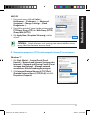
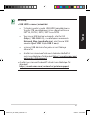
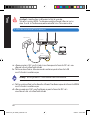
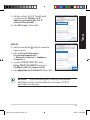
Mounting to the stand
• Align and insert the stand’s mounting hooks
to the wireless router’s mounting holes.
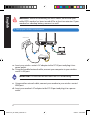
Before you proceed
1. Unplug and disconnect the wires/cables from your existing modem setup
and release your computer’s outmoded IP address.
a: Unplug the AC adapter from the power outlet and disconnect it from your
cable/ADSL modem.
b: Disconnect the network cable from your cable/ADSL modem.
c: Reboot your computer (recommended).
Modem
OFF
!
a
b
c
English
APAC7417_RT-AC66U_QSG.indd 7 5/28/12 4:58:55 PM

8
WARNING! Before disconnecting the wires/cables, ensure that your
cable/ADSL modem has been turned o for at least two minutes. If your
modem has a backup battery, remove it as well.
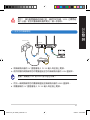
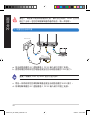
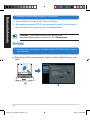
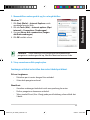
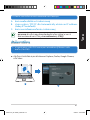
2. Set up your wireless environment.
a: Insert your wireless router’s AC adapter to the DC-IN port and plug it to a
power outlet.
b: Using the bundled network cable, connect your computer to your wireless
router’s LAN port.
IMPORTANT! Ensure that the WAN and LAN LEDs are blinking.
c: Using another network cable, connect your modem to your wireless router’s
WAN port.
d: Insert your modem’s AC adapter to the DC-IN port and plug it to a power
outlet.
English
RT-AC66U
Computer
Modem
LAN
Power
Wall Power Outlet
Power
WAN
a
b
c
d
APAC7417_RT-AC66U_QSG.indd 8 5/28/12 4:58:56 PM

9
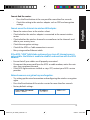
3. Disable some settings on your computer.
A. Disable the proxy server, if enabled.
B. Set the TCP/IP settings to automatically obtain an IP address.
C. Disable the dial-up connection, if enabled.
NOTE: For more details on disabling your computer settings, refer to
Frequently Asked Questions (FAQs).
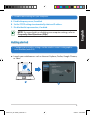
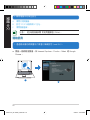
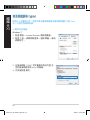
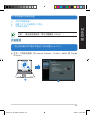
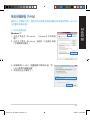
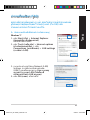
1. Congure your wireless settings via the wireless router’s web graphics
user interface (web GUI).
a: Launch your web browser such as Internet Explorer, Firefox, Google Chrome,
or Safari.
Getting started
English
b
a
APAC7417_RT-AC66U_QSG.indd 9 5/28/12 4:58:58 PM

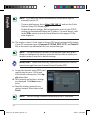
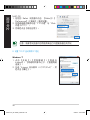
10
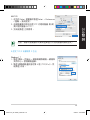
NOTE: If QIS does not launch automatically, follow these steps to
manually launch QIS:
• On your web browser, key in
http://192.168.1.1 and run the Quick
Internet Setup (QIS) Wizard again.
• Disable the proxy settings, dial-up connection, and set your TCP/IP
settings to automatically obtain an IP address. For more details, refer
to the FAQs section or use the Setup Wizard in the support CD for
auto-diagnosis.
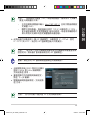
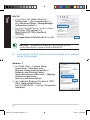
b: The wireless router’s Quick Internet Setup (QIS) feature automatically detects
if your ISP connection type is Dynamic IP, PPPoE, PPTP, L2TP, and Static IP.
Key in the necessary information for your connection type.
IMPORTANT! Obtain the necessary information about your Internet
connection type from your Internet Service Provider (ISP).
NOTE: The auto-detection of your ISP connection type takes place
when you congure the wireless router for the rst time or when your
wireless router is reset to its default settings.
NOTE: You can assign a network name with up to 32 characters.
c: Assign the network name (SSID) and
security key for your 2.4GHz and
5GHz wireless connection. Click Ap-
ply when done.
d: Your Internet and wireless settings
are displayed. Click Next to con-
tinue.
e: Read the wireless network con-
nection tutorial. When done, click
Finish.
English
APAC7417_RT-AC66U_QSG.indd 10 5/28/12 4:58:58 PM

11
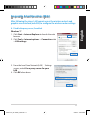
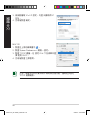
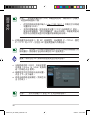
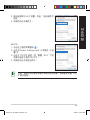
Frequently Asked Questions (FAQs)
After following the steps, I still cannot access the wireless router’s web
graphics user interface (web GUI) to congure the wireless router settings.
A. Disable the proxy server, if enabled.
Windows® 7
1. Click Start > Internet Explorer to launch the web
browser.
2. Click Tools > Internet options > Connections tab
> LAN settings.
3. From the Local Area Network (LAN) Settings
screen, untick Use a proxy server for your
LAN.
4. Click OK when done.
English
APAC7417_RT-AC66U_QSG.indd 11 5/28/12 4:58:59 PM

12
MAC OS
1. From your Safari browser, click Safari > Prefer-
ences > Advanced > Change Settings...
2. From the Network screen, deselect FTP Proxy
and Web Proxy (HTTP).
3. Cllick Apply Now when done.
NOTE: Refer to your browser's help feature for details on disabling the
proxy server.
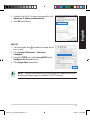
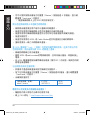
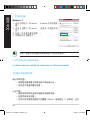
B. Set the TCP/IP settings to automatically obtain an IP address.
Windows® 7
1. Click
Start > Control Panel > Network and
Internet > Network and Sharing Center >
Manage network connections.
2. Select Internet Protocol Version 4 (TCP/IPv4),
then click Properties.
English
APAC7417_RT-AC66U_QSG.indd 12 5/28/12 4:59:00 PM

13
3. To obtain the iPv4 IP settings automatically, tick
Obtain an IP address automatically.
4. Click OK when done.
MAC OS
1. Click the Apple icon located on the top left of
your screen.
2. Click System Preferences > Network >
Congure...
3. From the TCP/IP tab, select Using DHCP in the
Congure IPv4 dropdown list.
4. Cllick Apply Now when done.
NOTE: Refer to your operating system’s help and support feature for
details on conguring your computer’s TCP/IP settings.
English
APAC7417_RT-AC66U_QSG.indd 13 5/28/12 4:59:00 PM

14
C. Disable the dial-up connection, if enabled.
D. Close all running web browsers.
NOTE: Refer to your browser's help feature for details on disabling
the dial-up connection settings.
Windows® 7
1. Click Start > Internet Explorer to launch the
browser.
2. Click Tools > Internet options > Connections tab.
3. Tick Never dial a connection.
4. Click OK when done.
The client cannot establish a wireless connection with the router.
Out of Range:
• Put the router closer to the wireless client.
• Try to change the channel settings.
Authentication:
• Use wired connection to connect to the router.
• Check the wireless security settings.
• Press the Reset button at the rear panel for more than ve seconds.
English
APAC7417_RT-AC66U_QSG.indd 14 5/28/12 4:59:01 PM

15
Cannot nd the router:
• Press the Reset button at the rear panel for more than ve seconds.
• Check the setting in the wireless adapter such as SSID and encryption
settings.
Cannot access the Internet via wireless LAN adapter.
• Move the router closer to the wireless client.
• Check whether the wireless adapter is connected to the correct wireless
router.
• Check whether the wireless channel in use conforms to the channels avail-
able in your country/area.
• Check the encryption settings.
• Check if the ADSL or Cable connection is correct.
• Retry using another Ethernet cable.
If the ADSL “LINK” light blinks continuously or stays o, Internet access is
not possible - the Router is unable to establish a connection with the ADSL
network.
• Ensure that all your cables are all properly connected .
• Disconnect the power cord from the ADSL or cable modem, wait a few min-
utes, then reconnect the cord.
• If the ADSL light continues to blink or stays OFF, contact your ADSL service
provider.
Network name or encryption keys are forgotten.
• Try setting up the wired connection and conguring the wireless encryption
again.
• Press the Reset button of the wireless router for more than ve seconds.
• Factory default settings:
User name / Password:
admin / admin
IP address:
192.168.1.1
SSID: ASUS
English
APAC7417_RT-AC66U_QSG.indd 15 5/28/12 4:59:01 PM

16
Where can I nd more information about the wireless router?
• User Manual in the support CD
• Online FAQ site: http://support.asus.com/faq
• Technical Support site: http://support.asus.com/techserv
• Customer Hotline: Refer to the Support Hotline in this Quick Start Guide
English
SUPPORT HOTLINE
Area Hotline Number Support
Languages
Availability
Taiwan 0800-093-456;
02-81439000
Traditional
Chinese
Mon. to Fri.
9:00-12:00;
13:30-18:00
USA/
Canada
1-812-282-2787 English Mon. to Fri.
8:30-12:00am EST
(5:30am-9:00pm PST)
Sat. to Sun.
9:00am-6:00pm EST
(6:00am-3:00pm PST)
Brazil 4003 0988 (Capital) Portuguese
Mon. to Fri.
9:00am-18:00
0800 880 0988
(demais localidades)
APAC7417_RT-AC66U_QSG.indd 16 5/28/12 4:59:02 PM

17
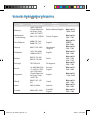
Package contents
RT-AC66U無線路由器 RJ45網路線
電源變壓器 快速使用指南
驅動程式與應用程式光碟(使用手冊、應用程式)
保固卡
底座
認識您的無線路由器
1)電源指示燈 5)5GHz指示燈 9)USB2.0連接埠
2)LAN指示燈 6)USB2.0指示燈 10)重置按鈕
3)WAN指示燈
7)電源(DC-IN)連
接埠
11)網路與LAN連接埠
4)2.4GHz指示
燈
8)電源開關 12)WPS按鈕
注意:若以上列出的任何一項配件有損壞或是短缺的情形,請儘速
聯絡您的經銷商。
7 9 10 12
11
8
繁體中文
1 2
3
5
6
4
APAC7417_RT-AC66U_QSG.indd 17 5/28/12 4:59:03 PM

18
注意:
• USB外界硬碟/隨身碟:
•此無線路由器相容大多數容量高達2TB的USB硬碟/隨身
碟,並支援FAT16、FAT32、EXT2、EXT3與NTFS的存
取。
•欲安全移除USB碟,登入網頁圖形介面(http://192.168.1.1
),然後在網路地圖頁面的右上角點選USB圖示並選擇
移除USB1。
•錯誤移除USB碟將會導致資料遺失。
•請造訪
http://event.asus.com/networks/disksupport獲取此無線
路由器所支援的檔案系統與硬碟磁區清單。
• 請造訪
http://event.asus.com/networks/printersupport獲取此無線路
由器所支援的印表機清單。
繁體中文
APAC7417_RT-AC66U_QSG.indd 18 5/28/12 4:59:03 PM

19
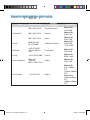
放置您的路由器
為獲取無線路由器與所連接的網路裝置之間的最佳無線傳送訊號,請確認以
下幾點:
• 建議將路由器放置在中心區域,以覆蓋所有無線行動裝置。
• 請勿將裝置放在靠近金屬物品與陽光直射的地方。
• 請遠離其它802.11g或20MHzWi-Fi裝置、2.4GHz電腦周邊裝置、藍芽裝
置、無線室內電話、傳送器、重型發動機、日光燈、微波爐、電冰箱與其他
工業裝置,以防止訊號干擾或丟失。
• 請按照下圖所示擺放路由器上的三根可拆卸式天線以獲取最佳前後訊號覆
蓋。
• 請調節內建散熱系統以獲取最佳效能,更多資訊請參閱使用手冊。
• 請經常更新至最新版本韌體。您可以登入華碩官網
http://tw.asus.com獲取最新
韌體。
45
0
45
0
90
0
繁體中文
APAC7417_RT-AC66U_QSG.indd 19 5/28/12 4:59:04 PM

20
安裝到底座
•
將底座的安裝卡榫對準無線路由器的壁掛
孔,並將卡榫插入孔內。
開始設定之前
1. 拔掉已連接數據機的纜線/排線,並移除您的電腦無效的 IP 位址。.
a: 拔掉AC變壓器的電源並斷開與有線/ADSL數據機的連接。
b: 拔掉您有線/ADSL數據機的網路線。
c: 重啟您的電腦(建議執行)。
Modem
OFF
!
a
b
c
繁體中文
APAC7417_RT-AC66U_QSG.indd 20 5/28/12 4:59:04 PM
ページが読み込まれています...
ページが読み込まれています...
ページが読み込まれています...
ページが読み込まれています...
ページが読み込まれています...
ページが読み込まれています...
ページが読み込まれています...
ページが読み込まれています...
ページが読み込まれています...
ページが読み込まれています...
ページが読み込まれています...
ページが読み込まれています...
ページが読み込まれています...
ページが読み込まれています...
ページが読み込まれています...
ページが読み込まれています...
ページが読み込まれています...
ページが読み込まれています...
ページが読み込まれています...
ページが読み込まれています...
ページが読み込まれています...
ページが読み込まれています...
ページが読み込まれています...
ページが読み込まれています...
ページが読み込まれています...
ページが読み込まれています...
ページが読み込まれています...
ページが読み込まれています...
ページが読み込まれています...
ページが読み込まれています...
ページが読み込まれています...
ページが読み込まれています...
ページが読み込まれています...
ページが読み込まれています...
ページが読み込まれています...
ページが読み込まれています...
ページが読み込まれています...
ページが読み込まれています...
ページが読み込まれています...
ページが読み込まれています...
ページが読み込まれています...
ページが読み込まれています...
ページが読み込まれています...
ページが読み込まれています...
ページが読み込まれています...
ページが読み込まれています...
ページが読み込まれています...
ページが読み込まれています...
ページが読み込まれています...
ページが読み込まれています...
ページが読み込まれています...
ページが読み込まれています...
ページが読み込まれています...
ページが読み込まれています...
ページが読み込まれています...
ページが読み込まれています...
ページが読み込まれています...
-
 1
1
-
 2
2
-
 3
3
-
 4
4
-
 5
5
-
 6
6
-
 7
7
-
 8
8
-
 9
9
-
 10
10
-
 11
11
-
 12
12
-
 13
13
-
 14
14
-
 15
15
-
 16
16
-
 17
17
-
 18
18
-
 19
19
-
 20
20
-
 21
21
-
 22
22
-
 23
23
-
 24
24
-
 25
25
-
 26
26
-
 27
27
-
 28
28
-
 29
29
-
 30
30
-
 31
31
-
 32
32
-
 33
33
-
 34
34
-
 35
35
-
 36
36
-
 37
37
-
 38
38
-
 39
39
-
 40
40
-
 41
41
-
 42
42
-
 43
43
-
 44
44
-
 45
45
-
 46
46
-
 47
47
-
 48
48
-
 49
49
-
 50
50
-
 51
51
-
 52
52
-
 53
53
-
 54
54
-
 55
55
-
 56
56
-
 57
57
-
 58
58
-
 59
59
-
 60
60
-
 61
61
-
 62
62
-
 63
63
-
 64
64
-
 65
65
-
 66
66
-
 67
67
-
 68
68
-
 69
69
-
 70
70
-
 71
71
-
 72
72
-
 73
73
-
 74
74
-
 75
75
-
 76
76
-
 77
77


他の言語で
- English: Asus RT-AC66U User manual
関連論文
-
Asus RT-AC66U ユーザーマニュアル
-
Asus RT-AC1200HP クイックスタートガイド
-
Asus ExpertWiFi EBR63 クイックスタートガイド
-
-
-
-
-
-
-
その他のドキュメント
-
ZTE MF669 ユーザーマニュアル
-
Philips 39PFL5041/T3 ユーザーマニュアル
-
-
Gigabyte GN-B41G ユーザーマニュアル
-
MSI RadiX AX6600 WiFi 6 Tri-Band Gaming Router ユーザーガイド
-
Linksys EA8100 ユーザーガイド
-
 ZyXEL Communications Network Card 70 ユーザーマニュアル
-
 FIC Maat ユーザーマニュアル
-
 ZyXEL Communications Network Card 5 ユーザーマニュアル
-
Synology RT6600ax Hardware Installation Guide


