
v. 2.0 | March 2011 | 3725-76311-020B1
Polycom
®
DMA
™
7000 System
Getting Started Guide

© 2008-2010 Polycom, Inc. All rights reserved.
Polycom, Inc.
4750 Willow Road
Pleasanton, CA 94588-2708
USA
No part of this document may be reproduced or transmitted in any form or by any means, electronic or
mechanical, for any purpose, without the express written permission of Polycom, Inc. Under the law, reproducing
includes translating into another language or format.
As between the parties, Polycom, Inc., retains title to and ownership of all proprietary rights with respect to the
software contained within its products. The software is protected by United States copyright laws and international
treaty provision. Therefore, you must treat the software like any other copyrighted material (e.g., a book or sound
recording).
Every effort has been made to ensure that the information in this manual is accurate. Polycom, Inc., is not
responsible for printing or clerical errors. Information in this document is subject to change without notice.
ii
Trademark Information
Polycom®, the Polycom “Triangles” logo, and the names and marks associated with Polycom’s products are
trademarks and/or service marks of Polycom, Inc., and are registered and/or common-law marks in the United
States and various other countries.
All other trademarks are the property of their respective owners.
Java is a registered trademark of Oracle and/or its affiliates.
Patent Information
The accompanying product is protected by one or more U.S. and foreign patents and/or pending patent
applications held by Polycom, Inc.
End User License Agreement
Use of this software constitutes acceptance of the terms and conditions of the Polycom DMA 7000 system end-user
license agreement (EULA).
The EULA is included in the release notes document for your version, which is available on the Polycom Support
page for the Polycom DMA 7000 system.

Polycom, Inc. iii
Contents
Polycom
®
DMA
™
System Server Setup . . . . . . . . . . . . . . . . . 1
Collect Necessary Materials . . . . . . . . . . . . . . . . . . . . . . . . . . . . . . . . . . . . . . . . 1
Complete the First-Time Setup Worksheet . . . . . . . . . . . . . . . . . . . . . . . . . . . 2
Unpack and Install the Hardware Components . . . . . . . . . . . . . . . . . . . . . . . 3
Configure the Polycom DMA System Server(s) . . . . . . . . . . . . . . . . . . . . . . . 4
Alternate Procedure: Configure the Polycom DMA System Server(s)
Without Using the USB Stick . . . . . . . . . . . . . . . . . . . . . . . . . . . . . . . . . . . . . . . 8
Regulatory Notices . . . . . . . . . . . . . . . . . . . . . . . . . . . . . . 11

DMA Getting Started Guide
iv Polycom, Inc.

Polycom, Inc. 1
Polycom
®
DMA
™
System Server
Setup
The sections below describe the steps required to perform the initial setup of a
Polycom
®
Distributed Media Application
™
(DMA
™
) multipoint conference
platform server or two-node server cluster.
At the end of this procedure, you will have successfully logged into the
Polycom DMA system and be ready to finish configuring the system,
including setting up users and MCUs, integrating with an enterprise directory,
and configuring the system to use a gatekeeper.
Collect Necessary Materials
Before you install a Polycom DMA system, collect these materials:
• Polycom DMA system server shipment
• Completed First-Time Setup Worksheet (see page 2)
• PC running Microsoft Windows (XP Pro or Vista) with:
— USB port
— Java 1.6 or newer
— Internet Explorer 6 or newer, or Firefox 2 or newer
— Adobe Flash Player 9.0.28 or newer
If you’re installing a new server to expand a single-node system into a two-node
cluster, see “Adding a Second Server” in the Polycom DMA Operations Guide or
online help.

DMA Getting Started Guide
2 Polycom, Inc.
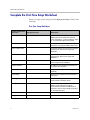
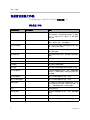
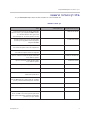
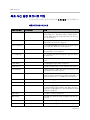
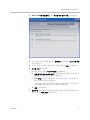
Complete the First-Time Setup Worksheet
Before you begin system setup, fill out the My System Values column of this
worksheet.
First-Time Setup Worksheet
System Configuration
Information My System Values Description
Node 1 system name Local host name of the first (or only) Polycom
DMA system server. Must be a valid host
name: the letters a - z (case-insensitive), digits
0 - 9, and internal hyphens are allowed.
Node 1 IP address Static, physical IP address (dotted quad) for
the first (or only) Polycom DMA system server.
Node 2 system name Local host name of the second Polycom DMA
system server. Not used for single-node
installation.
Node 2 IP address IP address for the second Polycom DMA
system server. Not used for single-node
installation.
Virtual system name Local host name of the virtual host. Required
even for single-node installation.
Virtual IP address IP address of the virtual host. Required even
for single-node installation.
System domain Fully qualified domain name for the system
(optional).
Subnet mask Network mask that defines the subnetwork of
the system.
Default gateway IP address of the gateway server used to route
network traffic outside the subnet.
Primary DNS server IP address of the primary Domain Name
System server (optional, but strongly
recommended; at least one DNS server is
required in order to import global groups from
an enterprise directory).
Secondary DNS server IP address of a second DNS server (optional).
Tertiary DNS server IP address of a third DNS server (optional).

Polycom
®
DMA
™
System Server Setup
Polycom, Inc. 3
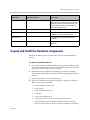
Unpack and Install the Hardware Components
The Polycom DMA system uses either one or two Polycom-branded Dell
servers.
To unpack and install the hardware
1 If you purchased Polycom RMX 2000 conference platforms (MCUs) with
your Polycom DMA system servers, unpack and install them as described
in the Polycom RMX 2000 Getting Started Guide.
2 Examine the Polycom DMA system shipping containers for damage.
Polycom is not responsible for damage sustained during shipment of this
product.
3 Open and review the container packing slips.
4 Open the containers and examine the contents. A single-node Polycom
DMA system shipment includes:
— 1 Polycom DMA system server
— 2 power cords
— 1 rack-mount kit (four-post)
— 1 bezel key
— 1 server documentation set
— 1 copy of this Polycom DMA System Getting Started Guide
— 1 Polycom DMA system installation disk (included for recovery
purposes; the software on the disk is already installed on the server)
DNS search domains Space- or comma-separated list of fully
qualified domain names to query on the DNS
servers to resolve host names (optional). The
system domain is added automatically; you
don’t need to enter it here.
Time zone Time zone in which the system resides.
NTP server #1 IP address of the primary NTP time server
(optional, but strongly recommended).
NTP server #2 IP address of a second NTP time server
(optional).
NTP server #3 IP address of a third NTP time server
(optional).
System Configuration
Information My System Values Description

DMA Getting Started Guide
4 Polycom, Inc.
— 1 USB memory stick containing the Polycom DMA USB Configuration
Utility
— 2 crossover Ethernet cables, short and long (not used for single-server
system)
— Your license documents
If you ordered the optional 2-post rack mounting kit, it’s in a separate box.
A two-node system shipment contains a second set of the above items.
5 Examine the contents for damage.
If you find damage, file a claim with the delivery carrier. Polycom is not
responsible for damage sustained during shipment.
6 Remove all of the components from their containers.
7 Install the Polycom DMA server(s) according to the server
documentation. To rack-mount a server, refer to the Rack Installation
Guide and use the brackets provided.
8 Connect the Polycom DMA server(s) to the network:
a Connect the GB 1 Ethernet port of each server to the enterprise
network.
b For a two-node system, connect one of the provided crossover cables
to the GB 2 ports of the two servers.
Don’t turn on the server(s) at this time.
9 Remove the bezel(s) from the server(s).
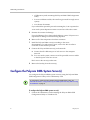
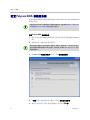
Configure the Polycom DMA System Server(s)
You configure the Polycom DMA system server(s) using the Polycom DMA
USB Configuration Utility on the USB memory stick.
To configure the Polycom DMA system server(s)
1 Connect the USB memory stick containing the Polycom DMA USB
Configuration Utility to a Windows PC.
To configure the system server(s) without using the USB memory stick, see
“Alternate Procedure: Configure the Polycom DMA System Server(s) Without Using
the USB Stick” on page 8.

Polycom
®
DMA
™
System Server Setup
Polycom, Inc. 5
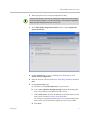
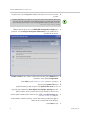
2 When prompted, elect to run the Configuration Utility.
3 In the DMA USB Configuration Utility window, click Configure the
System Parameters.
4 On the Network page, if you’re installing a two-node cluster, click
Enable 2-node configuration.
5 Enter the network values from the First-Time Setup Worksheet and click
Next.
6 On the System Time page:
a Select the correct System time zone for your location.
b Leave Auto Adjust For Daylight Savings checked (deselecting this
may cause problems, especially with NTP servers).
c Under NTP servers, enter the IP addresses (or domain names) for the
time servers from the First-Time Setup Worksheet.
We strongly recommend specifying at least one and preferably three
time servers. Use NTP stratum 3 quality time servers, if possible.
d Click Next.
If autorun doesn’t work or is turned off, navigate to the USB memory stick using My
Computer, Windows Explorer, or another file manager. Then start the Configuration
Utility by double-clicking
dma7000-usb-co nfig.exe
.

DMA Getting Started Guide
6 Polycom, Inc.
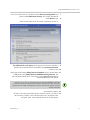
7 On the Security Configuration page, select the unsecured access
methods you want to enable and deselect the ones you want to disable.
Or select High security to disable all those listed.
8 Click Done.
The utility confirms that the configuration file was created and returns
you to the initial menu.
9 Verify that the initial menu now states that The USB stick is set to apply
system parameters.
10 Close the program.
11 In your system tray, click Safely Remove Hardware and select Safely
Remove USB Mass Storage Device. When a message tells you it’s safe to
do so, disconnect the USB memory stick from the PC.
12 Make sure that both servers are off.
13 If you need to replace the system software on the server(s) with a
different version, turn on the first (or only) server (the one you want
configured as Node 1) and insert the system installation disk for that
version. Otherwise, continue with the next step.
The Polycom DMA system software is already installed on the server(s), so the
system installation disk isn’t needed to set up a new system. Using it overwrites the
same software already on the server and needlessly lengthens the setup process.
Put the disk away in a safe place in case it’s ever needed to restore the system.

Polycom
®
DMA
™
System Server Setup
Polycom, Inc. 7
14 On the first (or only) server (the one you want configured as Node 1),
insert the USB stick into a USB port and boot (or reboot) the server. Leave
the second server off.
If you’re replacing the system software, the server boots from the DVD,
and the installation commences. About 15-20 minutes later, the DVD ejects
and the server reboots.
If you’re not replacing the system software (or if you are, after the reboot),
the server reads its network and system parameters from the USB stick
and applies them.
15 Wait for the front panel LCD to display DMA Ready. Then disconnect
the USB stick and if applicable, remove the disk. If you’re installing a
single-node system, skip to step 17.
16 If you’re installing a two-node cluster, turn on the second server
(Node 2). If you’re replacing the system software, insert the Polycom
DMA system installation disk into the DVD drive, turn off the server, and
turn it back on.
If you’re replacing the system software, the server boots from the DVD,
and the installation commences. About 15-20 minutes later, the DVD ejects
and the server reboots.
If you’re not replacing the system software (or if you are, after the reboot),
the server detects and gets its configuration settings from Node 1, and
joins the cluster. When done, both servers’ LCDs display DMA Clustered.
17 On a PC with network access to the Polycom DMA system, point your
browser to the system’s virtual host name or IP address and log in with
user ID
admin
and password
admin
.
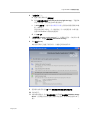
The Polycom DMA system’s management interface appears, displaying
the Dashboard. From its menus, you can complete your system setup:
— Install your license(s) and enable capabilities (H.323, SIP, or both).
— Add MCUs to the system, add conference templates for the MCUs,
and set conference defaults.
— Configure the system to use a gatekeeper (if H.323 is enabled) and set
up SIP protocols and ports (if SIP is enabled).
— Install security certificates.
— Manage system access, either by adding local users or by integrating
the Polycom DMA system with your enterprise directory, and secure
the system.
— Make other desired configuration changes.
Refer to the online help or the Polycom DMA Operations Guide for the
relevant descriptions and procedures.

DMA Getting Started Guide
8 Polycom, Inc.
Alternate Procedure: Configure the Polycom DMA System
Server(s) Without Using the USB Stick
If for some reason you don’t have or can’t use the Polycom DMA USB
Configuration Utility on the USB memory stick, the following procedure
enables you to complete the initial setup using only a laptop PC and an
Ethernet cable.
This is possible because Polycom DMA system servers are shipped with
default network settings that you can use to connect to the system. The settings
are:
IP address:
192.168.1.101
Subnet mask:
255.255.255.0
Default gateway:
192.168.1.1
To configure the Polycom DMA system server(s) using a laptop PC
1 Follow the unpack and install procedure (page 3) through step 7. Do not
connect the server(s) to the enterprise network.
2 Configure the network settings on your laptop to put it on the same
network segment as the Polycom DMA system server(s) (see the server’s
default settings above). For instance, you can use the following settings:
IP address:
192.168.1.20
Subnet mask:
255.255.255.0
Default gateway:
192.168.1.1
3 Connect an Ethernet cable between your laptop and the GB 1 interface of
the first (or only) server (the one you want configured as Node 1) .
You can use the cable that will later connect the server to the switch
(enterprise network). Be sure you connect to the server’s GB 1 interface,
not the GB 2 interface.
4 On the laptop, point your browser to
http://192.168.1.101
(if a
security certificate warning appears, ignore it) and log in with user ID
admin
and password
admin
.
The Polycom DMA system’s management interface appears, displaying
the Dashboard.
5 Go to Configuration > System > Network, enter the network values from
the First-Time Setup Worksheet, and click Update. When asked to
confirm restarting the system, click Yes.
The system begins to reboot.

Polycom
®
DMA
™
System Server Setup
Polycom, Inc. 9
6 While the server is rebooting, disconnect the Ethernet cable from the
laptop and connect the server’s GB1 interface to the enterprise network.
The reboot process takes about three minutes. When it’s finished, the front
panel LCD displays DMA Ready.
7 From a PC with network access to the Polycom DMA system, point your
browser to the system’s virtual host name or IP address and log in with
user ID
admin
and password
admin
.
8 Go to Configuration > System > System Time and do the following:
a Select the correct System time zone for your location.
b Leave Auto Adjust For Daylight Savings checked (deselecting this
may cause problems, especially with NTP servers).
c Under NTP servers, enter the IP addresses (or domain names) for the
time servers from the First-Time Setup Worksheet.
We strongly recommend specifying at least one and preferably three
time servers. Use NTP stratum 3 quality time servers, if possible.
d Click Update. When asked to confirm restarting the system, click Yes.
The system begins to reboot. The process takes about three minutes. When
it’s finished, the front panel LCD displays DMA Ready.
9 Log back into the system and go to Configuration > System > Security
Configuration.
10 Either select one or more unsecured access methods to enable or select
Maximum security. Click Update.
Depending on the settings you made, the system may need to restart. If so,
you’re asked to confirm. Click Yes.
If the system needs to reboot, it does so. The process takes about three
minutes. When it’s finished, the front panel LCD displays DMA Ready.
11 If you’re installing a two-node cluster, verify that Node 2 is off and do the
following:
a Connect the GB 1 Ethernet port of the second server (Node 2) to the
enterprise network.
b Connect one of the provided crossover cables to the GB 2 ports of the
two servers.
c Verify that the first server (Node 1) is running and its front panel LCD
displays DMA Ready. Then turn on the second server (Node 2).
After the second server boots, it detects and gets its configuration
settings from Node 1 and joins the cluster. When done, both servers’
LCDs display DMA Clustered.
12 Log back into the system, if necessary, and complete your system setup.
Refer to the online help or the Polycom DMA Operations Guide for the
relevant descriptions and procedures.

DMA Getting Started Guide
10 Polycom, Inc.

Polycom, Inc. 11
Regulatory Notices
Regulatory Notices
USA Regulatory Notices
Part 15 FCC Rules
This device is compliant with Part 15 of the FCC Rules. Operation is subject to the following two conditions:
1 This device may not cause harmful interference, and
2 This device must accept any interferences received, including interference that may cause undesired operation.
Class A Digital Device or Peripheral
NOTE: This equipment has been tested and found to comply with the limits for a Class A digital device, pursuant to
part 15 of the FCC Rules. These limits are designed to provide reasonable protection against harmful interference
when the equipment is operated in a commercial environment. This equipment generates, uses, and can radiate
radio frequency energy and, if not installed and used in accordance with the instruction manual, may cause harmful
interference to radio communications. Operation of this equipment in a residential area is likely to cause harmful
interference in which case the user will be required to correct the interference at his own expense.
In accordance with part 15 of the FCC rules, the user is cautioned that any changes or modifications not expressly
approved by Polycom Inc. could void the user's authority to operate the equipment.
We recommend that you install an AC surge arrestor in the AC outlet to which this device is connected. This action
will help to avoid damage to the equipment caused by local lightning strikes and other electrical surges.
EEA Regulatory Notices
This Polycom DMA system has been marked with the CE mark. This mark indicates compliance with EEC
Directives 2006/95/EC and 2004/108/EC. A full copy of the Declaration of Conformity can be obtained from
Polycom Ltd, 270 Bath Road, Slough, Berkshire, SL1 4DX, UK.

Polycom DMA
12 Polycom, Inc.
Czech Republic Regulatory Notices
Canadian Regulatory Notices
Class A Digital Device
This Class [A] digital apparatus complies with Canadian ICES-003.
Cet appareil numérique de la classe [A] est conforme à la norme NMB-003 du Canada.
South Korean Regulatory Notices
Worldwide Regulatory Notices
Warning
This is a Class A product. In a domestic environment, this product may cause radio interference in which case the
user may be required to take adequate measures.
Plugs Acts as Disconnect Device
The socket outlet to which this apparatus is connected must be installed near the equipment and must always be
readily accessible.
La prise électrique à laquelle l’appareil est branché doit être installée près de l’équipement et doit toujours être
facilement accessible.
Installation Instructions
Installation must be performed in accordance with all relevant national wiring rules.
L’Installation doit être exécutée conformément à tous les règlements nationaux applicable au filage électrique.
Regulatory Notices

v. 2.0 | 2010 年 2 月 | 3725-76311-007B
Polycom
®
DMA
™
7000 系统
入门指南

© 2008-9 Polycom, Inc. 保留所有权利。
Polycom, Inc.
4750 Willow Road
Pleasanton, CA 94588-2708
USA
未经 Polycom, Inc. 的明确书面许可,不得出于任何目的、以任何形式或任何方式 (无论是电子方式还是机
械方式)对本手册内容的任何部分进行复制或传播。依据法律,复制包括将内容翻译为其他语言或格式。
由于介于两方之间,Polycom, Inc. 保留对其产品所含软件全部所有权的权益和所有权。本软件受美国版权法
和国际条约规定的保护。因此,必须如同对待任何其他版权材料 (例如书籍或录音)一样对待该软件。
我们已尽最大努力来保证本手册信息的正确性。Polycom, Inc. 对打印错误或笔误概不负责。本文档信息如有
更改,恕不另行通知。
ii
商标信息
Polycom®、Polycom“三角”徽标、以及与 Polycom 的产品相关的名称和标记均为 Polycom, Inc. 在美国和其
他国家的注册商标及 / 或服务标记及 / 或普通法标记。
其他所有商标均为其各自所有者所有。
专利信息
附随产品受美国和国外的一项或多项专利和 / 或 Polycom, Inc. 正在申请的专利所保护。

Polycom, Inc. iii
目录
Polycom
®
DMA
™
系统服务器设置 . . . . . . . . . . . . . . . . . . . . 1
收集必要的材料 . . . . . . . . . . . . . . . . . . . . . . . . . . . . . . . . . . . . . . . . . . . . . . . . . . 1
完成首次安装工作表 . . . . . . . . . . . . . . . . . . . . . . . . . . . . . . . . . . . . . . . . . . . . . . 2
打开包装并安装硬件组件 . . . . . . . . . . . . . . . . . . . . . . . . . . . . . . . . . . . . . . . . . . 3
配置 Polycom DMA 系统服务器 . . . . . . . . . . . . . . . . . . . . . . . . . . . . . . . . . . . . 4
替代程序:不使用 USB 记忆棒配置 Polycom DMA 系统服务器 . . . . . . . . . 7
Polycom
®
DMA
™
系统服务器技术规格 . . . . . . . . . . . . . . . . 9

DMA 入门指南
iv Polycom, Inc.
ページが読み込まれています...
ページが読み込まれています...
ページが読み込まれています...
ページが読み込まれています...
ページが読み込まれています...
ページが読み込まれています...
ページが読み込まれています...
ページが読み込まれています...
ページが読み込まれています...
ページが読み込まれています...
ページが読み込まれています...
ページが読み込まれています...
ページが読み込まれています...
ページが読み込まれています...
ページが読み込まれています...
ページが読み込まれています...
ページが読み込まれています...
ページが読み込まれています...
ページが読み込まれています...
ページが読み込まれています...
ページが読み込まれています...
ページが読み込まれています...
ページが読み込まれています...
ページが読み込まれています...
ページが読み込まれています...
ページが読み込まれています...
ページが読み込まれています...
ページが読み込まれています...
ページが読み込まれています...
ページが読み込まれています...
ページが読み込まれています...
ページが読み込まれています...
ページが読み込まれています...
ページが読み込まれています...
ページが読み込まれています...
ページが読み込まれています...
ページが読み込まれています...
ページが読み込まれています...
ページが読み込まれています...
ページが読み込まれています...
ページが読み込まれています...
ページが読み込まれています...
-
 1
1
-
 2
2
-
 3
3
-
 4
4
-
 5
5
-
 6
6
-
 7
7
-
 8
8
-
 9
9
-
 10
10
-
 11
11
-
 12
12
-
 13
13
-
 14
14
-
 15
15
-
 16
16
-
 17
17
-
 18
18
-
 19
19
-
 20
20
-
 21
21
-
 22
22
-
 23
23
-
 24
24
-
 25
25
-
 26
26
-
 27
27
-
 28
28
-
 29
29
-
 30
30
-
 31
31
-
 32
32
-
 33
33
-
 34
34
-
 35
35
-
 36
36
-
 37
37
-
 38
38
-
 39
39
-
 40
40
-
 41
41
-
 42
42
-
 43
43
-
 44
44
-
 45
45
-
 46
46
-
 47
47
-
 48
48
-
 49
49
-
 50
50
-
 51
51
-
 52
52
-
 53
53
-
 54
54
-
 55
55
-
 56
56
-
 57
57
-
 58
58
-
 59
59
-
 60
60
-
 61
61
-
 62
62


Poly RealPresence Distributed Media Application (DMA) クイックスタートガイド
- タイプ
- クイックスタートガイド
- このマニュアルも適しています
関連論文
-
Poly RealPresence Collaboration Server 800s クイックスタートガイド
-
-
Poly VVX 300/310 ユーザーガイド
-
-
Poly HDX 6000 Administrator Guide
-
-
-
-
-