
ENGLISH
Introduction
Congratulations on your purchase and welcome
to Philips! To fully benet from the support that
Philips oers, register your product at
www.philips.com/welcome.
Important safety information
Read this important information carefully before
you use the appliance and its accessories and save
it for future reference. The accessories supplied
may vary for dierent products.
Danger
- Keep the adapter dry (Fig. 2).
Warning
- The adapter contains a transformer. Do not cut
o the adapter to replace it with another plug,
as this causes a hazardous situation.
- This appliance is not intended for use by
persons (including children) with reduced
physical, sensory or mental capabilities, or lack
of experience and knowledge, unless they
have been given supervision or instruction
concerning use of the appliance by a person
responsible for their safety.
- Children should be supervised to ensure that
they do not play with the appliance.
- Always unplug the appliance before you clean
it under the tap.
- Always check the appliance before you use
it. Do not use the appliance if it is damaged,
as this may cause injury. Always replace a
damaged part with one of the original type.
- Do not open the appliance to replace the
rechargeable battery.
Caution
- Never immerse the appliance in water. Do not
use the appliance in the bath or shower.
- Never use water hotter than 80°C to rinse the
appliance.
- Only use this appliance for its intended purpose
as shown in the user manual.
- For hygienic reasons, the appliance should only
be used by one person.
- Do not use the adapter in or near wall sockets
that contain or have contained an electric air
freshener to prevent irreparable damage to the
adapter.
- Never use compressed air, scouring pads,
abrasive cleaning agents or aggressive
liquids such as petrol or acetone to clean the
appliance.
Electromagnetic elds (EMF)
- This Philips appliance complies with all
applicable standards and regulations regarding
exposure to electromagnetic elds.
General
- This appliance can be safely cleaned under the
tap (Fig. 3).
- The appliance is suitable for mains voltages
ranging from 100 to 240 volts.
- The adapter transforms 100-240 volts to a safe
low voltage of less than 24 volts.
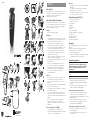
General description (Fig.1)
1 Full size trimmer (32mm)
2 Attachment connector
3 On/o button
4 Adapter
5 Small plug
6 Pouch
7 Hair comb (32mm)
8 Beard and stubble comb (32mm)
9 Detail comb
10 Nosetrimmer rotary
11 Detail foil shaver
12 Detail trimmer (21mm)
Charging
It takes approximately 10 hours to fully charge the
appliance.
When the appliance is fully charged, it has an
operating time of up to 60 minutes.
1 Switch o the appliance.
2 Insert the small plug into the appliance and put
the adapter in the wall socket (Fig. 4).
Using the appliance
Warning: Always check the appliance before
you use it. Do not use the appliance if it is
damaged, as this may cause injury. Always
replace a damaged part with one of the
original type.
Note: The appliance can only be used without
cord.
Detaching and attaching cutting elements
1 To detach a cutting element, turn it anti-
clockwise and pull it upwards o the handle
(Fig. 5).
2 To attach a cutting element, place it on the
handle and turn it clockwise (Fig. 6).
Detaching and attaching combs
1 To detach any type of comb from the cutting
element, press the length setting selector,
grab the sides and pull it upwards o the cutting
element (Fig. 7).
2 To attach any type of comb onto a cutting
element, slide it into the guiding grooves on
both sides of the handle (Fig. 8).
Switching the appliance on and o
1 To switch on the appliance, slide the on/o
button up (Fig. 9).
2 To switch o the appliance, slide the on/o
button down.
4222.002.8643.1
1
3-20
1-18
1
2
3
4
5
6
7 8
12 11 10 9
QG3340
161514
2
1
2
5
8
11
17
20
23
3
1
2
6
9
12
18
21
4
3
2
1
7
10
13
19
22

Precision attachments for use on
face
Nose trimming
You can use the nose trimmer attachment to trim
your nose hair and ear hair.
- Make sure your nostrils are clean. Make sure
your outer ear channels are clean and free from
wax.
- Do not insert the tip more than 0.5cm and make
controlled movements.
Nose trimmer rotary
Trimming nose hair:
- Gently move the tip in and out of your nose
while turning it round to remove unwanted hairs
(Fig. 10).
Trimming ear hair:
- Slowly move the tip round the ear to remove
hairs that stick out beyond the rim of the ear.
- Gently move the tip in and out of the outer ear
channel to remove unwanted hairs (Fig. 11).
Detail trimmer (21mm)
You can use the detail trimmer without comb to
create ne lines and contours around your facial
style, close to the skin (Fig. 12) (to a length of
0.5mm).
Eyebrow and detail comb
You can use the 21mm detail trimmer with
the detail comb attached for tidying up your
eyebrows or trimming your sideburns (Fig. 13).
Detail foil shaver
You can use the detail foil shaver to shave
unwanted hairs on your cheeks and chin with
precision. Gently press the detail foil shaver onto
the skin and shave along contoured edges to
remove any hairs (Fig. 14).
Attachments for use on beard
- We advise you to start at the highest length
setting to familiarize yourself with the
appliance.
- Make controlled movements against the hair
growth and move it over the part that needs
trimming.
Full-size trimmer 32mm
You can use the full-size metal trimmer without
comb to get clean lines around your beard, neck
and sideburns close to the skin (Fig. 15) (to a length
of 0.5mm).
Beard and stubble comb
You can use the beard and stubble comb attached
to the full size trimmer to evenly trim your beard,
stubble and moustache. You can choose any
setting between 1 and 18mm in steps of 1mm
(Fig. 16).
Attachments for use on head
Hair clipping with comb
- Comb the hair in the growth direction.
- Slowly move the trimmer against the hair
growth direction. Press lightly.
- Since hair grows in dierent directions,
you need to move the appliance in dierent
directions as well (upward, downward or
across).
- Always make sure that the at part of the comb
is in full contact with the scalp to obtain an
even result.
- When you trim for the rst time, start at the
highest length setting (20mm) to familiarise
yourself with the appliance.
Hair clipping without comb:
- Be careful when you trim without comb
because the trimmer removes every hair it
touches.
- Before you start to contour the hairline around
the ears, with any comb attachment, comb the
hair ends over the ears.
- Tilt the appliance in such a way that only the
edge of the trimmer touches the hair.
- Only cut the hair ends. The hairline should be
close to the ear.
- To contour the neckline and sideburns, turn the
appliance and make downward strokes.
- Move the appliance slowly and smoothly.
Follow the natural hairline.
Full-size metal trimmer 32mm
You can use the full-size metal trimmer without
comb to clip hair very close to the skin (to a length
of 0.5mm) or to create contours around your ears
or neck (Fig. 17).
Hair comb
You can use the hair comb attached to the full size
trimmer for an even haircut.You can choose any
setting between 3 and 20mm in steps of 1mm
(Fig. 18).
Cleaning and storage
Never use scouring pads, abrasive cleaning agents
or aggressive liquids such as petrol or acetone to
clean the appliance.
Always switch o the appliance and
disconnect it from the mains before cleaning.
Never dry the trimmer teeth with a towel or tissue,
as this may damage the trimmer teeth.
1 Remove any comb or attachment from the
appliance.
2 Blow and/or shake out any hair that has
accumulated in the attachments and/or combs
(Fig. 19).
3 Clean the attachments, the combs and the
appliance under a lukewarm tap after every use
(Fig. 20).
4 Carefully shake o excess water and let all
parts dry.
5 Store the appliance and its attachments in the
storage pouch to prevent damage.
Cleaning shaving foils
The shaving foil is very delicate. Handle it carefully.
Replace the shaving foil if it is damaged.
Detail foil shaver
1 Pull the top part of the detail foil shaver o the
bottom part. (Fig. 21)
2 Blow and/or shake out any hair that has
accumulated inside the detail foil shaver.
(Fig. 22)
3 Clean the top part of the detail foil shaver under
a lukewarm tap (Fig. 23).
4 Shake o excess water and leave to dry
completely.
Ordering accessories
To purchase accessories for this appliance, please
visit our online shop at www.shop.philips.com/
service. If the online shop is not available in your
country, go to your Philips dealer or a Philips
service centre. If you have any diculties obtaining
accessories for your appliance, please contact the
Philips Consumer Care Centre in your country. You
nd its contact details in the worldwide guarantee
leaet.
Recycling
- Do not throw away the product with the normal
household waste at the end of its life, but
hand it in at an ocial collection point for
recycling. By doing this, you help to preserve
the environment.
Guarantee and support
If you need information or support, please visit
www.philips.com/support or read the separate
worldwide guarantee leaet.
Guarantee restrictions
Cutting units are not covered by the terms of the
international guarantee because they are subject
to wear.
Troubleshooting
This chapter summarises the most common
problems you could encounter with the appliance.
If you are unable to solve the problem with the
information below, visit www.philips.com/support
for a list of frequently asked questions or contact
the Consumer Care Centre in your country.
Problem Possible
cause
Solution
The combs
do not stay
attached to
the handle
You did
not attach
the comb
correctly.
Slide the comb into
the guiding grooves
on both sides of
the appliance
('click’).
The guiding
grooves are
dirty.
Clean the
appliance and the
guiding grooves
thoroughly.
Problem Possible
cause
Solution
The comb is
broken.
Go to your Philips
dealer or contact
a Philips service
centre to purchase
a new comb.
The
appliance
does
not work
anymore.
The
rechargeable
battery is
empty.
Charge the
appliance (see
chapter 'Charging').
Make sure you
switch o the
appliance before
you charge it.
During charging,
the charging light
on the adapter
ashes. If the
charging light does
not ash, check
whether there is a
power failure or if
the wall socket is
live. If there is no
power failure and
the wall socket
is live but the
charging light still
does not ash,
take the appliance
to your dealer or
a Philips service
centre.
The
appliance
does not
charge
when it is
connected
to the mains.
The
appliance
has to be
switched o
when you
charge it.
Switch o the
appliance.
This
appliance
can only be
used without
a cord.
After charging,
remove the
adapter from the
wall socket and
pull the small
plug out of the
appliance.
The
appliance
does not
trim as well
as it used to.
The cutting
element
of the
attachment
you are using
is dirty.
Remove the
attachment from
the appliance.
Clean the
attachment under
a lukewarm tap.
Make sure that
the appliance
is charged
suciently.
The
appliance
becomes
hot.
The cutting
element
of the
attachment
you are using
is dirty.
Remove the
attachment from
the appliance.
Clean the
attachment under
a lukewarm tap.

旋转式鼻毛修剪器
修剪鼻毛
:
- 将尖端轻轻插入和移出鼻孔,
同时转动尖端,以便去除不想要的
毛发(图10)。
修剪耳毛:
- 在耳部周围缓缓移动尖端,以剃掉
突出耳缘的毛发。
- 将尖端轻轻插入和移出外耳道,
以便去除不想要的毛发(图11)。
细节修剪器(21 毫米)
您可以使用不带梳齿的细节修剪器在
您的面部周围以非常贴近皮肤(图12)
的距离(0.5毫米长)修剪出细线和
轮廓。
眉毛及细节梳齿
您可以使用安装细节梳齿的21毫米
细节修剪器来修整您的眉毛或修剪您
的鬓角(图13)。
精细刀网剃须刀
您可以使用精细刀网剃须刀精确剃除
脸颊和下巴上多余的毛发。在皮肤上
轻按精细刀网剃须刀,沿着轮廓边缘
剃除所有毛发(图14)。
用于剃须的附件
- 我们建议您从最高的长度设定开始
修剪,以熟悉产品的使用方法。
-
正对头发生长方向控制好产品的
移动,并在需要修剪的部分移动产
品。
全尺寸 32 毫米修剪器
您可以使用不带梳齿的全尺寸金属修
剪器在您的胡须、颈部和鬓角周围以
非常贴近皮肤(图15)的距离
(0.5毫米长)修剪出明晰的线条。
胡须和短茬发梳
您可以使用连接到全尺寸修剪器的胡
须和短茬发梳来均匀修剪胡须、短茬
和须髭。您可以选择1到18毫米之
间的任何设置,以1毫米(图16)
为间隔进行调节。
1 关闭产品。
2 将小插头插入产品,然后将适配
器插入墙壁插座(图4)。
使用本产品
警告: 使用前,请务必检查产品。
请勿使用损坏的产品,否则可能对人
体造成伤害。 请务必用原装型号更换
损坏的部件。
注意: 本产品只能在不接电源的情况
下使用。
拆卸和连接修剪部件
1 要拆卸修剪部件,请将其逆时针
旋转并向上将其从手柄(图5)上拔
下。
2 要连接修剪部件,请将其放在手
柄上并顺时针(图6)放置。
拆卸和安装梳齿
1 要从修剪部件上拆卸任何类型的
梳齿,请按下长度调校选择器,
抓住梳齿两侧并向上将其从修剪
部件
(图7)上拔下。
2 要将任何类型的梳齿安装到修剪
部件上,请将其滑入手柄(图8)
两侧上的导槽中。
打开或关闭产品
1 要打开本产品,请向上(图9)滑动
开/关按钮。
2 要关闭本产品,请向下滑动开/关
按钮。
用于面部的精确脱毛附件
鼻毛修剪
- 您可以使用鼻毛修剪器附件修剪鼻
毛和耳毛。
- 确保鼻腔是清洁的。确保耳朵外耳
道清洁,没有耳垢。
- 尖端插入深度不得超过0.5厘米,
且必须控制好产品的移动。
- 切勿使用温度高于80°C的热
水冲洗本产品。
- 只能将本产品用于用户手册中所
示的原定用途。
- 出于卫生的目的,本产品只能供
一个人使用。
- 请勿在包含或已经包含电动空气
清新器的墙壁插座的上面或周围
使用适配器,从而防止适配器受
到不可修复的损坏。
-
切勿使用压缩气体、钢丝绒、
研磨性清洁剂或腐蚀性液体
(例如汽油或丙酮)来清洁产
品。
电磁场 (EMF)
- 本Philips产品符合所有有关暴露
于电磁场的适用标准和法规。
概述
- 该产品可放心在水龙头下(图3)
清洗。
- 符号注释:适合用在打开的水龙头
下进行清洗。
- 本产品适合在100-240伏的电源
电压下工作。
- 电源适配器可将100-240伏的电压
转换为24伏以下的安全低电压。
基本说明(图 1)
1 全尺寸修剪器(32毫米)
2 附件连接器
3 开/关按钮
4 适配器
5 小插头
6 存储袋
7 发梳(32毫米)
8 胡须和短茬发梳(32毫米)
9 细节梳齿
10 旋转式鼻毛修剪器
11 精细刀网剃须刀
12 细节修剪器(21毫米)
充电
本产品充满电约需要10小时。
当产品充满电时,可以使用长达
60分钟。
简体中文
简介
感谢您的惠顾,欢迎光临飞利浦!
为了让您能充分享受飞利浦提供的支
持,请在www.philips.com/welcome
上注册您的产品。
重要安全信息
使用本产品及其附件之前,请仔细
阅读本重要信息,并妥善保管以供
日后参考。随附的附件可能因产
品而异。
危险
- 保持适配器干燥(图2)。
- 警告符号注释:禁止用在打开的
水龙头下进行清洗
。
警告
- 适配器中包含一个变压器。
请勿剪下适配器并更换为其他插
头,否则将导致严重后果。
- 本产品适合由8岁或以上年龄
的儿童以及肢体不健全、感觉或
精神上有障碍或缺乏相关经验和
知识的人士使用,但前提是有人
对他们使用本产品进行监督或指
导,以确保他们安全使用,并且
让他们明白相关的危害。切勿
让儿童玩弄本产品。不要让儿
童在无人监督的情况下对本产品
进行清洁和保养。
- 在自来水龙头下清洗本产品之
前,务必拔掉其电源插头。
- 使用前,请务必检查产品。
请勿使用损坏的产品,否则可能
对人体造成伤害。请务必用原
装型号更换损坏的部件。
- 请勿拆开设备来更换充电电池。
警告
- 切勿将产品浸入水中。请勿在
洗澡或淋浴时使用本产品。

问题 可能的
原因
解决方法
产品无法
工作。
充电电
池的电
量已耗
尽。
将产品充电
(见“充电”
一章)。 确
保在充电前关
闭产品电源。
在充电期间,
适配器上的充
电指示灯将闪
烁。 如果充
电指示灯不闪
烁,请检查是
否存在电源故
障,或墙壁插
座是否通电。
如果不存在电
源故障并且墙
壁插座已通
电,但充电指
示灯仍然不闪
烁,请将本产
品送至经销商
或飞利浦服务
中心。
产品连接
到电源时
不能充
电。
在为产
品充电
时,必
须将其
关闭。
关闭产品。
本产品
只能在
不接电
源的情
况下使
用。
充电之后,
从电源插座上
拔下适配器,
并从产品上拔
出小插头。
产品的修
剪效果没
有以前
好。
您使用
的附件
的修剪
部件变
脏。
从产品中取出
附件。 在微温
的自来水下清
洁该附件。
保修和支持
如果您需要信息或支持,请访问
www.philips.com/support或阅读单
独的全球保修卡。
保修条款
修剪部件不在国际保修条款的涵盖范围之
内,因为修剪部件属于易磨损物品。
故障种类和处理方法
本章归纳了使用本产品时最常见的一
些问题。如果您无法根据以下信息
解决问题,请访问www.philips.com/
support查阅常见问题列表,或联系
您所在国家/地区的客户服务中心。
问题 可能的
原因
解决方法
梳齿不能
固定在手
柄上
您没有
正确连
接梳
齿。
将梳齿滑入产品
两侧的导槽中
(可听到“咔
哒”一声)。
导槽不
干净。
彻底清洁产品
和导槽。
梳齿不能
固定在手
柄上
修剪梳
已损
坏。
请联系飞利浦
经销商或飞利
浦服务中心购
买新的修剪
梳。
在进行清洁之前,请务必关闭本产品
并断开电源。
切勿用毛巾或纸巾擦干修剪器齿,
否则可能会损坏修剪器齿。
1 从产品中取出梳齿或附件。
2 吹去或甩掉积聚在附件和/或发梳
(图19)上的头发。
3 每次使用(图20)后,在微温的
自来水下清洁附件、发梳和本产
品。
4 小心地甩掉多余的水份并让所有
部件晾干。
5 将产品及其附件存放在存储袋
中,以免损坏。
清洁剃毛刀网
剃毛刀网是非常精密的部件。请小心
握持。如果损坏,则应更换剃毛刀
网。
精细刀网剃须刀
1 将精细刀网剃须刀的顶部部件抽
离底部部件。(图21)
2 吹掉和/或甩掉积聚在精细刀网剃
须刀(图22)内部的毛发。
3 在微温的自来水(图23)下清洁精
细刀网剃须刀的顶部部件。
4 甩掉多余的水份,待其完全晾
干。
订购配件
要购买本产品的附件,请访问我们的
网上商城:www.shop.philips.com/
service。如果您所在的国家/地区没
有网上商城,请联系您的飞利浦经销
商或飞利浦服务中心。如果您为本产
品购买附件有困难,请联系您所在国
家/地区的飞利浦客户服务中心。您
可以在全球保修卡中可找到其详细联
系信息。
回收
弃置本产品时,请不要将其与一般生
活垃圾放在一起,应将其交给政府指
定的回收中心。这样做将有利于环
保。
用于头部的附件
使用梳齿修剪头发
- 按头发生长的方向梳理头发。
-
正对头发生长方向缓慢移动修剪器。
轻轻按压。
- 由于头发会朝不同方向生长,您还
必须沿着不同方向(向上、向下或
交叉)移动本产品。
- 务必确保梳齿的扁平部分完全接触
到头皮,以获得均匀的效果。
- 第一次修剪时,从最高的长度设定
(20毫米)开始修剪,以熟悉产品
的使用方法。
不使用梳齿修剪头发:
- 由于修剪器会剔除接触到的每一根
毛发,因此在不使用梳齿进行修剪
时要特别小心。
- 在开始修整耳朵周围的发际线轮廓
之前,请使用任何梳齿附件先沿耳
朵梳理发梢。
- 倾斜本产品,仅使修剪器的一边接
触到头发。
- 仅修剪发梢。发际线应该紧贴双耳
轮廓。
- 要紧贴颈部周围和鬓角轮廓,请转
动产品并向下修剪。
- 缓慢、流畅地移动产品。顺着自然
生长的发际线
。
全尺寸金属修剪器(32 毫米)
您可使用不带修剪梳的全尺寸金属修
剪器以非常贴近头皮的距离(0.5毫
米长)修剪头发,或修整耳部或颈部
(图17)周围的轮廓。
发梳
您可使用连接到全尺寸修剪器上的发
梳来均匀地修剪头发。您可以选择
3到20毫米之间的任何设置,
以1毫米(图18)为间隔进行调节。
清洁和存放
切勿使用钢丝球、研磨性清洁剂或腐
蚀性液体(例如汽油或丙酮)来清洁
本产品。

问题 可能的
原因
解决方法
产品的修
剪效果没
有以前
好。
确保将本产品
充满电。
产品会发
热。
您使用
的附件
的修剪
部件变
脏。
从产品中取出
附件。 在微温
的自来水下清
洁该附件。
保留备用
发行日期: 07/12/2015
-
 1
1
-
 2
2
-
 3
3
-
 4
4
-
 5
5


他の言語で
- English: Philips QG3340 User manual