
PTZ PRO 2
Setup Guide | 设置指南 | 設定指南
설치 가이드 | Panduan Pemasangan


English 3
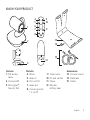
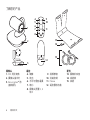
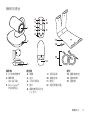
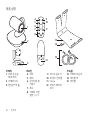
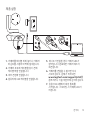
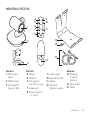
KNOW YOUR PRODUCT
Camera
1. 10X lossless
zoom
2. Camera LED
3. Kensington
®
Security Slot
Remote
4. Mirror
5. Zoom in
6. Pan and tilt
7. Zoom out
8. Camera presets
1, 2, and 3
9. Video mute
10. Far end control
11. Home
12. Remote
battery door
Accessories
13. Camera mount
14. Cable lock
15. Cables
13
14
15
2
3
1
12
5
6
8
7
10
4
9
11

4 English
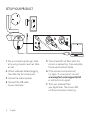
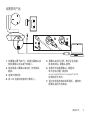
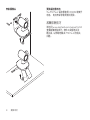
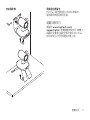
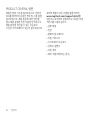
SET UP YOUR PRODUCT
1. Set up camera by placing on table
or by using camera mount on table
or wall.
2. Attach cable lock before plugging
the cable into the camera port.
3. Connect to external power.
4. Connect the USB cable
to your computer.
5. The camera LED will ash when the
camera is connecting. Once complete,
the camera head will rotate.
6. If the camera cannot connect,
try again. If issues persist, consult
www.logitech.com/support/ptz2
or call technical support.
7. Start your video call from
your application. The camera LED
will illuminate when streaming.
a
b c

English 5
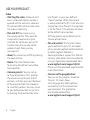
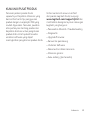
VISIT PRODUCT CENTRAL
Discover your product’s full potential.
Get valuable information and usage
tips by browsing easy-to-use FAQs.
Find answers to product questions
and get help setting up your product.
See if there’s software available
for download that can enhance
your product experience.
To enjoy all the benets
of your Logitech product,
visit www.logitech.com/support/ptz2
and take advantage of Logitech’s wide
range of useful support services.
– Troubleshooting
– Diagnostics
– Firmware upgrades
– Support community
– Software downloads
– In-box documentation
– Warranty information
– Spare parts (if available)

6 English
USE YOUR PRODUCT
Video
– Starting the video: Video will start
once a video call/capture session is
opened and the camera is selected.
The camera LED will illuminate when
the video is streaming.
– Pan and tilt the camera using
the remote control. Press once for
incremental movement or press
and hold for continuous pan or tilt.
Caution: Do not manually rotate
webcam head. Doing so may
damage unit.
– Zoom the camera up to 10X by pressing
the zoom button.
– Home: Press the Home button
to return to the default, out-of-box
home position.
– Camera presets: You can set up
to 3 preset positions. First, position
the camera using the pan and tilt
controls, and then press and hold one
of the preset buttons for 3 seconds
to save that position. You may return
to your dened position at any time
by pressing the preset button once.
Use Preset 1 as your own dened
“home” position. When the camera
is reconnected to the PC, it will return to
the position set in Preset 1. If no position
is set for Preset 1, the camera will return
to the default home position.
All three presets are by default set to
the out-of-box home.
– Far end control: This function allows
you to control the pan, tilt, and zoom
of any remote Logitech ConferenceCam
or select Logitech Webcams.
Some applications support this feature
natively, while others can be enabled by
using an application downloaded from
www.logitech.com/support/ptz2.
Please visit the download page listed for
more information.
– Camera settings application:
You can use this program to control
the pan, tilt, zoom, focus,
and image quality (like brightness
and contrast) of the camera from
your computer. This application
can be downloaded from
www.logitech.com/support/ptz2.

English 7
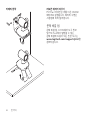
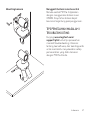
Mounting your camera Changing the remote control battery
The PTZ Pro 2 remote control runs on
a Li-ion CR2032 battery. Battery life will
vary based on usage.
TROUBLESHOOTING TIPS
Please visit www.logitech.com/
support/ptz2 for troubleshooting tips,
information on software tools, and for
a diagnostic tool to help troubleshoot
issues you may have with your PTZ Pro 2.
x2

8 简体中文
了解您的产品
摄像头
1. 10X 无损变焦
2. 摄像头指示灯
3. Kensington
®
防
盗锁插孔
遥控
4. 镜像
5. 放大
6. 水平与垂直遥摄
7. 缩小
8. 摄像头预置 1、2
和 3
9. 视频静音
10. 远端控制
11. Home
12. 遥控器电池盖
配件
13. 摄像机底座
14. 线缆锁
15. 线缆
13
14
15
2
3
1
12
5
6
8
7
10
4
9
11

简体中文 9
设置您的产品
1. 将摄像头置于桌子上,或通过摄像头底
座将摄像头支在桌子或墙上。
2. 将 线 缆 插 入 摄 像 头 端 口 前 ,先 安 装 线
缆锁。
3. 连接外部电源。
4. 将 USB 连接线连接到计算机上。
5. 摄 像 头 指 示 灯 闪 烁 ,表 示 正 在 连 接 。
连 接 成 功 后 ,摄 像 头 旋 转 。
6. 如果无法连接摄像头,请重试。
若仍存在问题,请咨询
www.logitech.com/support/ptz2
或致电技术支持。
7. 通过应用程序启动视频通话。 播放时,
摄像头指示灯将亮起。
a
b c

10 简体中文
访问产品中心
全面发掘产品潜力。 请浏览常见问答集,
了解相关的实用信息和技巧。 查询有关产
品问题的答案及产品安装帮助。 查看是否
有软件可供下载,提升产品体验。
如需尽享罗技产品的各种优势,请访问
www.logitech.com/support/ptz2,充 分 利
用罗技体贴周到的支持服务。
– 故障排除
– 诊断
– 固件升级
– 支持社区
– 软件下载
– 包装盒内文件
– 保修信息
– 备 用 部 件( 若 有 供 应 )

简体中文 11
使用您的产品
视频
– 观看视频: 启动视频电话/拍摄并选择了
摄像头之后,视频将立即开始。 视频播放
时,摄像头指示灯亮起。
– 使 用遥控器可上下左 右移动调整摄 像头。
单次按下可进行增量移动调节,按住不
放可连续进行上下左右调整。 注意:
请勿手动旋转网络摄像头。 否则可能损
坏设备。
– 按下缩放键,可实现摄像头 10X 变焦。
– Home: 按下 Home 按键可返回出厂设
置的默认原位。
– 摄像头预置: 最多可设置 3 个预置
位置。 首先,通过控制装置确定摄像头
位置,之后按住其中一个摄像头预置键
3 秒钟以保存该位置。 按下预置按钮,
可随时恢复到自定义位置。
将预置 1 自定义为“原位”。 当摄像头重新
连接至 PC 时 ,将 返 回 至 预 置 1 所设置的
位置。 如果预置 1 未 设 置 位 置 ,摄 像 头 将
返回至默认原位。
所有三个预置默认均设置为出厂原位。
– 远端控制: 该功能允许您控制任意远程
罗技视频会议系统或指定罗技网络摄像
头 的 平 移 、倾 斜 和 变 焦 。 某些应用本身
便支持此功能,其他应用则可以借助从
www.logitech.com/support/ptz2 下载的
应用程序加以实现。 请访问下载页面查
看更多信息。
– 摄 像头设置应用程 序: 您可以使用
此程序控制您电脑摄像头的平移、
倾斜、变焦、聚焦和图像质量(比如
亮度和对比度)。 此应用程序可从
www.logitech.com/support/ptz2 下载。

12 简体中文
安装摄像头 更换遥控器电池
The PTZ Pro 2 遥控器使用 CR2032 锂离子
电池。 电池寿命依使用情况而异。
故障排除技巧
请访问 www.logitech.com/support/ptz2
查 看 故 障 排 除 技 巧 、软 件 工 具 信 息 及 诊
断 工 具 ,以 帮 助 您 解 决 PTZ Pro 2 的相关
问题。
x2

繁體中文 13
瞭解您的產品
攝影機
1. 10 倍無損變焦
2. 攝影機
LED 指示燈
3. Kensington
®
防盜鎖插孔
遙控器
4. 鏡像
5. 放大
6. 平移和傾斜
7. 縮小
8. 攝影機預設設定
1、2 和 3
9. 視訊靜音
10. 遠端控制
11. 歸位
12. 遙控器電池蓋
配件
13. 攝影機底座
14. 連接線鎖
15. 連接線
13
14
15
2
3
1
12
5
6
8
7
10
4
9
11

14 繁體中文
安裝您的產品
1. 請將攝影機放在桌上或使用桌上或壁掛攝
影機安裝底座來安裝攝影機。
2. 先安裝連接線鎖,然後將連接線插入到攝
影 機 連 接 埠。
3. 連 接 外 部 電 源。
4. 將 USB 連接線連接到您的電腦。
5. 攝影機 LED 指示燈會在連接攝影機
時 閃 爍。 完 成 後,攝 影 機 頭 會 開 始 旋 轉。
6. 如果不能連接攝影機,請再試一次。
如果問題持續發生,請查詢
www.logitech.com/support/ptz2
或 致 電 技 術 支 援 人 員。
7. 從應用程式啟動視訊通話。 串 流 播 放 時,
攝影機 LED 指 示 燈 會 亮 起。
a
b c

繁體中文 15
造訪產品中心
全面發掘產品潛力。 請 瀏 覽 常 見 問 答 集,
瞭解相關的實用資訊和技巧。 查詢有關產
品問題的答案並獲得關於產品設定的説明。
查看是否有可供供下載以提升產品體驗的
軟 體。
若要盡享羅技產品的所有優點,請造訪
www.logitech.com/support/ptz2,
充分利用羅技體貼周到的支援服務。
– 疑難排解
– 診斷
– 韌體升級
– 支援社群
– 軟體下載
– 包裝盒內文件
– 保固資訊
– 備用零件 (若有供應)

16 繁體中文
使用您的產品
視訊
– 啟 動 視 訊: 視訊會在開啟視訊通話/拍攝作
業階段和選取攝影機後,開始播放。 串流
播 放 視 訊 時,攝 影 機 LED 指 示 燈 會 亮 起。
– 使用遙控器進行攝影機的平移和傾斜
操 作。 按一下可進行增量移動,按住不放
可連續進行平移或傾斜移動。 注 意: 不要
手 動 旋 轉 攝 影 機 頭。 否則可能損壞裝置。
– 按下變焦按鈕,可使攝影機進行變焦,最高
可達 10 倍。
– 歸 位: 按下「歸位」按鈕可回到出廠時預
設 的 歸 位 位 置。
– 攝影機預先設定: 您最多可設定 3 個預先
設 定 位 置。 首 先,請 使 用 平 移 和 傾 斜 控 制
鍵將攝影機放置於定位,然後按住一個預
先設定按鈕 3 秒鐘不放,以儲存此位置。
按一下預先設定按鈕即可隨時返回到您定
義 的 位 置。
使用「預先設定 1」作為您自己定義的「歸
位 」位 置。 攝影機重新連接到 PC 時,其 會
回 到「 預 先 設 定 1」中所設定的位置。 如果
「預先設定 1」沒 有 設 定 位 置,攝 影 機 會 返
回 到 預 設 的 歸 位 位 置。
在 預 設 狀 態 下,所 有 3 個預先設定都是設
定 為 出 廠 歸 位 位 置。
– 遠 端 控 制: 此功能讓您可以控制任何遠
端羅技 ConferenceCam 或特定羅技網
路攝影機的平移、傾斜和縮放操作。 某
些應用程式原生支援此功能,其他應用
程式可使用從www.logitech.com/
support/ptz2 下載的軟體來啟用此功
能。 詳細資訊請造訪所列出的下載頁面。
– 攝 影 機 設 定 應 用 程 式: 您可以使用此程式
來從電腦控制攝影機的平移、傾斜、變焦、
對焦和影像品質 (例如亮度和對比度)。
此應用程式可從 www.logitech.com/
support/ptz2 下 載。

繁體中文 17
安裝攝影機 更換遙控器電池
PTZ Pro 2 遙控器使用 CR2032 鋰 電 池。
電池壽命依使用情況而異。
疑難排解技巧
請造訪 www.logitech.com/
support/ptz2,查看疑難排解技巧、軟體工
具資訊及獲得可協助您解決使用 PTZ Pro 2
時可能發生之任何問題的診斷工具。
x2

18 한국어
제품 설명
카메라
1. 10배 무손실
확대/축소
2. 카메라 LED
3. 켄싱턴
®
락 홀
리모컨
4. 미러
5. 확대
6. 상하이동 및
기울기
7. 축소
8. 카메라 사전
설정 1, 2, 3
9. 비디오 음소거
10. 파 엔드 컨트롤
11. Home
12. 리모컨 배터리
도어
부속품
13. 카메라 마운트
14. 케이블 락
15. 케이블
13
14
15
2
3
1
12
5
6
8
7
10
4
9
11

한국어 19
제품 설정
1. 카메라를 테이블 위에 놓거나 카메라
마운트를 사용하여 벽에 설치합니다.
2. 카메라 포트에 케이블을 넣기 전에
케이블 락을 연결합니다.
3. 외부 전원에 연결합니다.
4. 컴퓨터에 USB 케이블을 연결합니다.
5. 비디오가 연결된 경우 카메라 LED가
깜박입니다. 완료되면 카메라 헤드가
회전합니다.
6. 카메라를 연결할 수 없으면 다시
시도하십시오. 문제가 지속되면
www.logitech.com/support/ptz2를
참조하거나 기술 지원부에 문의하십시오.
7. 응용 프로그램에서 화상 통화를
시작합니다. 스트리밍 시 카메라 LED가
켜집니다.
a
b c

20 한국어
PRODUCT CENTRAL 방문
제품의 전체 기능을 알아보십시오. 편리한
FAQ를 탐색하여 유용한 정보 및 사용 팁을
알아보십시오. 제품 질문에 대한 답변을
찾고 제품 설정을 위한 도움을 받으십시오.
제품 환경을 개선할 수 있는 다운로드
가능한 소프트웨어가 있는지 알아보십시오.
로지텍 제품의 모든 이점을 활용하려면
www.logitech.com/support/ptz2를
방문하고 로지텍의 광범위하고 유용한 지원
서비스를 이용하십시오.
– 문제 해결
– 진단
– 펌웨어 업그레이드
– 지원 커뮤니티
– 소프트웨어 다운로드
– 상자내 설명서
– 보증 정보
– 예비 부품(해당되는 경우)
ページが読み込まれています...
ページが読み込まれています...
ページが読み込まれています...
ページが読み込まれています...
ページが読み込まれています...
ページが読み込まれています...
ページが読み込まれています...
ページが読み込まれています...
-
 1
1
-
 2
2
-
 3
3
-
 4
4
-
 5
5
-
 6
6
-
 7
7
-
 8
8
-
 9
9
-
 10
10
-
 11
11
-
 12
12
-
 13
13
-
 14
14
-
 15
15
-
 16
16
-
 17
17
-
 18
18
-
 19
19
-
 20
20
-
 21
21
-
 22
22
-
 23
23
-
 24
24
-
 25
25
-
 26
26
-
 27
27
-
 28
28


関連論文
-
Logitech G535 ユーザーガイド
-
Logitech Wireless Mouse M170 インストールガイド
-
-
-
-
Logitech Zone Vibe 100 ユーザーガイド
-
Logitech C920 インストールガイド
-
-
-