
PCM-A10 4-740-910-21(2)
Linear PCM Recorder
PCM-A10
Operating Instructions
GB
CT
© 2018 Sony Corporation Printed in China
4-740-910-21(2)
Refer to the Help Guide
This is the Operating Instructions, which provides you with instructions on
the basic operations of the linear PCM recorder.
The Help Guide is an online manual.
Refer to the Help Guide when you would like to know further details,
operations and possible solutions when a problem occurs.
http://rd1.sony.net/help/icd/pcma10/h_zz/
Check the supplied items
• Linear PCM Recorder (1)
• Wind screen (1)
• Carrying case (1)
• Operating Instructions (this sheet)
• Warranty card (1)
• Application Software, Sound Organizer 2 (Installer file stored in the built-in
memory so that you can install it to your computer.)
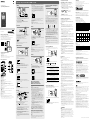
Parts and controls
Built-in microphones
Peak indicator
Display window
OPTION button
T-MARK (track mark) button
BACK/
HOME button
STOP button
REC/PAUSE (record/pause) button, recording indicator
(play/enter) button*¹
Control button (DPC (Digital Pitch Control),
A-B(repeat A-B),
(review/fast backward), (cue/fast forward))
(headphones) jack
USB connector cover (You can find the USB connector retracted behind
the cover.)
VOL –/+*¹ (volume –/+) button
REHEARSAL button
USB slide lever
(N-mark) (Put an NFC-enabled smartphone onto this mark to establish
an NFC pairing.)
Hole for attaching the tripod (No tripod is supplied with your
linear PCM recorder.)
(microphone) jack
HOLD•POWER switch*²
microSD card slot (The card slot is located under the cover.)
Slot cover
Built-in speaker
Strap hole (No strap is supplied with your linear PCM recorder.)
*¹ The (play/enter) button and VOL + (volume +) button have a tactile dot. Use the tactile
dot as a reference when operating the linear PCM recorder.
*² Sliding the HOLD•POWER switch to “POWER” and holding it for 8 seconds or longer restarts
your linear PCM recorder. For detailed instructions, refer to the Help Guide.
Let’s try out your new linear PCM recorder
Charge
Charge the linear PCM recorder.
Slide the USB slide lever in the direction of the arrow, and insert the
USB connector into the USB port of a running computer.
When the battery is fully charged, the battery indicator changes from
the charging animation to “
.”
Disconnect the linear PCM recorder.
Make sure that the message “Accessing” is no longer on the
display window. Then refer to the Help Guide to remove the
linear PCM recorder safely.
Power on
Slide and hold the HOLD•POWER switch in the direction of “POWER” until
the window display appears.
To turn the power off, slide the HOLD•POWER switch to “POWER” and
hold it until “Power Off” appears on the display window.
To prevent unintentional operations (HOLD)
Slide the HOLD•POWER switch in the direction of “HOLD.”
¼
To release the linear PCM recorder from the HOLD status, slide the
HOLD•POWER switch towards the center.
Initial settings
Select
(/)
Enter
When you power on your linear PCM recorder for the first time, the
“Configure Initial Settings” screen appears on the display window. You
can then select the display language, set the clock, and turn on/off the
beep sound.
Select “Yes” to start the initial settings.
Select the display language.
You can select from the following languages:
Deutsch (German), English*, Español (Spanish), Français (French),
Italiano (Italian), Русский (Russian), Türkçe (Turkish),
한국어 (Korean),
简体中文 (Simplified Chinese), 繁體中文 (Traditional Chinese)
* Default setting
Set the current year, month, day, hour, and minute.
¼
To go back to the previous clock setting item, press BACK/HOME.
Select “Next.”
Select “ON” or “OFF” to turn on or off the beep sound.
When the initial settings finish, the completion message and then the
HOME menu screen appear.
Note
You can change any of the initial settings at any time later. For detailed
instructions, refer to the Help Guide.
Record
Built-in microphones
STOP
REC/PAUSE
Recording
indicator
Peak indicator
Select
(/)
Enter
¼
Before you start recording, make sure that the HOLD status is released.
Select “ Record” from the HOME menu.
The recording standby screen appears.
Select a storage and a folder to save the recorded file.
¼
To save the recorded file on the microSD card, you need to change the file
storage destination folder. Select “Recording Folder” - “SD Card” from the
OPTION menu, and then start recording.
Adjust the angle of the linear PCM recorder's built-in
microphones with your fingertips so that they point in the
direction of the recording source.
Turn the linear PCM recorder so that its built-in microphones
point in the direction of the target sound source.
Press and hold REC/PAUSE.
The recording indicator flashes in red and the linear PCM recorder
pauses for recording. When the built-in microphones pick up sounds,
the peak level meter bars change in length to indicate the recording
volume levels.
Using the HOME menu
You can use the HOME menu for a variety of operations, including
locating and playing a recorded file and changing the settings of your
linear PCM recorder.
Select
(
/
)
Enter
BACK/HOME
Press and hold BACK/HOME.
The HOME menu screen appears.
The HOME menu items are aligned in the following sequence.
Recorded
Files
Record SettingsBluetooth Back
to XX*
Music
Select your desired function from the following:
Music
You can select and play one of the files you have
imported from a computer. To locate a music file,
select “All Songs,” “Albums,” “Artists,” or “Folders.”
When importing files, be sure to import them into
the MUSIC folder.
Recorded Files
You can select and play one of the files you have
recorded with your linear PCM recorder. To locate a
recorded file, select “Latest Recording,” “Search by
REC Date,” “Search by REC Scene,” or “Folders.”
Record
You can display the record standby screen, and then
start recording.
Bluetooth
You can display the menu screen for items that use
the Bluetooth function, such as REC Remote, NFC,
and Bluetooth audio devices.
Additionally, you can turn on/off the Bluetooth
function or make device registration (pairing).
Settings
You can display the Settings menu screen and
change various settings on the linear PCM recorder.
Back to XX*
You can go back to the screen that was displayed
before the HOME menu screen.
* The function you are currently using is displayed in “XX.”
¼
Press STOP to return to the screen displayed before you entered the HOME
menu.
Using the OPTION menu
You can use the OPTION menu to perform a variety of functions, including
changing the settings of your linear PCM recorder.
The available items differ depending on the situation.
Enter
OPTION
Select
(/)
Select your desired function from the HOME menu, and then press
OPTION.
Select the menu item for which you want to change the setting.
Select your desired setting option.
Copying files from your
linear PCM recorder to a computer
You can copy the files and folders from your linear PCM recorder to a
computer to store them.
Follow the instructions in “Charge” to connect your
linear PCM recorder to a computer.
Drag and drop the files or folders you want to copy from
“PCMRECORDER” or “MEMORY CARD” to the local disk on the
computer.
To copy a file or folder (Drag and drop)
1 Click and hold,
2 drag,
3 and then drop.
PCMRECORDER or
MEMORY CARD
Your computer
Disconnect your linear PCM recorder from the computer.
Installing Sound Organizer 2
Install Sound Organizer on your computer.
Sound Organizer allows you to exchange files between your
linear PCM recorder and your computer.
Songs imported from music CDs and other media, MP3 and other audio
files imported to a computer can also be played and transferred to the
linear PCM recorder.
Notes
• Sound Organizer is compatible with Windows computers only. Itis not
compatible with Mac.
• This linear PCM recorder is compatible with Sound Organizer 2 only.
• If you format the built-in memory, all data stored there will be deleted. (The
Sound Organizer software installer will also be deleted.)
¼
• When installing Sound Organizer, log in to an account with administrator
privileges.
• The installation procedure varies depending on the Windows version. The
following procedure uses Windows 10 as an example.
Follow the instructions in “Charge” to connect your
linear PCM recorder to a computer.
Make sure the linear PCM recorder is successfully detected by the
computer.
“Connecting” appears and stays on the linear PCM recorder's display
window while the linear PCM recorder is connected to the computer.
Right-click at the bottom left corner of the desktop, and then click
[File Explorer] on the menu.
Double-click [PCMRECORDER] - [FOR WINDOWS].
Double-click [SoundOrganizer_V2001] (or [SoundOrganizer_V2001.
exe]).
Follow the computer's on-screen instructions.
When the [Welcome to Sound Organizer 2 Installer] window
appears, click [Next].
Make sure that you accept the terms of the license agreement,
select [I accept the terms in the license agreement], and then click
[Next].
When the [Setup Type] window appears, select [Standard] or
[Custom], and then click [Next].
Follow the instructions on the screen and set the installation settings
when you select [Custom].
When the [Ready to Install the Program] window appears, click
[Install].
The installation starts.
When the [Sound Organizer 2 has been installed successfully.]
window appears, check [Launch Sound Organizer 2 Now], and
then click [Finish].
Note
You may need to restart your computer after installing Sound Organizer 2.
Precautions
On power
DC 3.7V : the built-in rechargeable lithium-ion battery
DC 5.0V : when charged using USB
Rated current consumption : 500mA
On safety
Do not operate the unit while driving, cycling or operating any motorized
vehicle.
On handling
• Do not leave the unit in a location near heat sources, or in a place subject
to direct sunlight, excessive dust or mechanical shock.
• Should any solid object or liquid fall into the unit, remove the battery
and have the unit checked by qualified personnel before operating it any
further.
• When using your linear PCM recorder, remember to follow the
precautions below in order to avoid warping the cabinet or causing the
linear PCM recorder to malfunction.
– Do not sit down with the linear PCM recorder in your back pocket.
– Do not put your linear PCM recorder into a bag with the headphones/
earphones cord wrapped around it and subject the bag to strong impact.
• Be careful not to allow water to splash on the unit. The unit is not
waterproof. In particular, be careful in the following situations.
– When you have the unit in your pocket and go to the bathroom, etc.
When you bend down, the unit may drop into the water and may get wet.
– When you use the unit in an environment where the unit is exposed to
rain, snow, or humidity.
– In circumstances where you get sweaty. If you touch the unit with wet
hands or if you put the unit in the pocket of sweaty clothes, the unit may
get wet.
• Listening with this unit at high volume may affect your hearing.
• For traffic safety, do not use this unit while driving or cycling.
• Do not use this unit at a place where the inability to hear surrounding
sounds may present a danger.
• You may feel pain in your ears if you use the headphones when the
ambient air is very dry.
This is not because of a malfunction of the headphones, but because of
static electricity accumulated in your body. You can reduce static electricity
by wearing non-synthetic clothes that prevent the emergence of static
electricity.
On noise
• Noise may be heard when the unit is placed near an AC power source, a
fluorescent lamp or a mobile phone during recording or playback.
• Noise may be recorded when an object, such as your finger, etc., rubs or
scratches the unit during recording.
On maintenance
To clean the exterior, use a soft cloth slightly moistened in water. Then use a
soft dry cloth to wipe the exterior. Do not use alcohol, benzine or thinner.
If you have any questions or problems concerning your unit, please consult
your nearest Sony dealer.
Notes on the Bluetooth function
• Bluetooth wireless technology allows connection at a distance of up
to about 10 m. However, the effective range may vary depending on
obstructions (people, metals, walls, etc.) or signal status.
• Because Bluetooth and wireless LAN (IEEE802.11b/g) devices use the
same frequency (2.4 GHz), signal interference may occur, resulting in
communication speed decrease, noise, or inability to connect, if Bluetooth
communications are used near a wireless LAN device. In such cases, take
the following measures.
– Perform Bluetooth communications at least 10 m away from the wireless
LAN device when connecting your linear PCM recorder and a Bluetooth
device.
– Place your linear PCM recorder and the Bluetooth device as close
together as possible.
– Turn off the wireless LAN device when performing Bluetooth
communications within about 10 m of a wireless LAN device.
• Radio waves emitted from a Bluetooth device may affect the operation of
equipment such as electronic medical devices. Turn off your linear PCM
recorder and other Bluetooth devices in the following locations as failure
to do so may cause an accident.
– In hospitals, near priority seats on trains, in airplanes, in places such as
gasoline stations where flammable gases are present, near automatic
doors or fire alarms.
WARNING
• Do not expose the batteries (battery pack or batteries installed) to
excessive heat such as sunshine, fire or the like for a long time.
• Do not dismantle, open or shred secondary cells or batteries.
• Do not expose cells or batteries to heat or fire. Avoid storage in direct
sunlight.
• In the event of a cell leaking, do not allow the liquid to come in contact
with the skin or eyes. If contact has been made, wash the affected area
with copious amounts of water and seek medical advice.
• Secondary cells and batteries need to be charged before use. Always
refer to the manufacturer’s instructions or equipment manual for proper
charging instructions.
• After extended periods of storage, it may be necessary to charge
and discharge the cells or batteries several times to obtain maximum
performance.
• Dispose of properly.
Press or to select the optimum recording volume level for
the sound source.
You can check the current recording volume level on the peak level
meters. Adjust the recording volume so that the recording volume
level stays around -12 dB (), which fits within the optimum range.
If too loud sounds are detected during recording, “OVER” ()
appears on the display window and the peak indicator lights. In such
a case, turn down the recording volume by pressing until “OVER”
disappears and the peak indicator goes out to avoid sound distortion.
You can press and hold or to keep turning up or down the
recording volume.
¼
With the rehearsal function, you can easily adjust the recording volume
level. For the rehearsal function, refer to the Help Guide.
Press REC/PAUSE.
“REC” appears on the display window and the recording indicator
lights in red.
Press STOP to stop recording.
“Saving...” and then recording standby screen appear on the display
window.
Listen
BACK/HOME
Select
(
//
/
)
Enter
VOL –/+ button
Select “ Recorded Files” from the HOME menu.
Select “Latest Recording,” “Search by REC Date,” “Search by REC
Scene,” or “Folders.”
Select your desired file.
Playback starts.
Press VOL + or VOL - to adjust the volume.
Press STOP to stop playback.
¼
Right after you stopped recording, you can press to play the file you have
just recorded.
To add a track mark
You can add a track mark at a point at which you want to divide a file later
or locate during playback. You can add a maximum of 98 track marks to
each file.
You can also add track marks during recording.
Delete
Enter
OPTION
Select
(/)
Note
Once a file is deleted, you cannot restore it.
Select the file you want to delete from the list of recorded files
or play back the file you want to delete.
Select “Delete a File” from the OPTION menu.
“Delete?” appears and the selected file starts playing for your
confirmation.
Select “Yes.”
“Please Wait” appears and stays until the selected file is deleted.
Enjoy music wirelessly
Listen to audio from the
BLUETOOTH® audio device
You can establish a wireless connection between a Bluetooth audio
device and the linear PCM recorder and listen to audio from the Bluetooth
audio device.
Make device registration (pairing)
To establish a wireless connection between Bluetooth audio devices for
the first time, you need to have the devices registered with each other.
This device registration process is called “pairing.”
Place the Bluetooth audio device to which you establish a
Bluetooth connection in pairing mode.
Be sure to place the linear PCM recorder within 1m from the
Bluetooth audio device.
While recording is on standby, select “ Bluetooth” -
“AudioDevice” - “AddDevice (Pairing)” from the HOME menu.
When either “Turn Bluetooth On?” or “Disconnect Connected Audio
Device. Continue?” appears on the display window, select “Yes.”
When “Search for Audio Devices. Prepare the Other Device to
Connect.” appears on the display window, press the button
to start searching.
The search for Bluetooth audio devices that are available for device
registration starts and the list of the found devices appears on the
display window.
Select the Bluetooth device that you want to register for
establishing a Bluetooth connection.
When the device is registered, “Connection Complete” appears on the
display window.
Start playback on the linear PCM recorder.
Now, you can listen to audio from the Bluetooth audio device.
To disconnect the Bluetooth connection between the
linear PCM recorder and the Bluetooth audio device
Select “ Bluetooth” - “Audio Device” - “Disconnect” from the HOME menu.
When the Bluetooth connection is disconnected, playback stops.
To switch the audio output destination between the
Bluetooth headphones and the connected headphones
While a Bluetooth connection is established, no audio is output to the
headphones connected to the headphones jack.
To use the connected headphones for listening, disconnect the Bluetooth
connection.
Notes
• You cannot monitor the recording audio with the connected Bluetooth audio
device.
• The recording audio is output to the (headphones) jack. Use the
headphones for monitoring.
Operations with the smartphone
(REC Remote)
Select
(
//
/
)
Enter
With the Bluetooth function of your linear PCM recorder, you can operate
your linear PCM recorder (recording, changing the recording settings, etc.)
using a smartphone.
To operate your linear PCM recorder using a smartphone
You need to install REC Remote on the smartphone and make a pairing
between the smartphone and your linear PCM recorder.
Pairing means having Bluetooth devices registered with each other to
establish a wireless connection for the first time.
To make a pairing with the linear PCM recorder using REC Remote, you
need the latest version of REC Remote. If your smartphone has REC
Remote already installed, be sure to upgrade it to the latest version.
Search GooglePlay or AppStore for RECRemote and install it
on the smartphone.
On the linear PCM recorder, select “ Bluetooth” - “RECRemote”-
“Add Device (Pairing)” from the HOME menu and follow the
on-screen instruction to turn on the Bluetooth function.
On the smartphone, start REC Remote and select “PCM-A10”
(your linear PCM recorder) from the available device list. For
detailed instructions, refer to the help of REC Remote and the
manual supplied with the smartphone.
Now you can use the smartphone for linear PCM recorder operations.
To turn on or off the Bluetooth function of your
linear PCM recorder
When you turn off the Bluetooth function, the linear PCM recorder is
disconnected from all the devices connected via Bluetooth connections,
including a Bluetooth audio device and a smartphone with REC Remote
installed.
Select “ Bluetooth” - “Bluetooth ON/OFF” from the HOME
menu.
To turn on the Bluetooth function, select “ON.” To turn it off,
select “OFF.”
CAUTION
Danger of explosion if battery is incorrectly replaced.
Replace only with the same or equivalent type.
Risk of explosion if battery is replaced by an incorrect type. Dispose of used
batteries according to the instructions.
Information for customers in the UAE
This equipment has been tested and found to comply with the limits set out
in the EMC regulation using a connection cable shorter than 3 meters.
Notice for users
All rights reserved. This manual or the software described herein, in whole
or in part, may not be reproduced, translated or reduced to any machine
readable form without prior written approval from Sony Corporation.
What you record is for personal enjoyment and use only. Copyright laws
prohibit other forms of use without the permission of the copyright holders.
Specifications
Capacity (User available capacity*¹*²)
16 GB (approx. 12.80 GB = 13,743,895,347 Byte)
Maximum recording time*³ (Built-in memory)
The maximum recording time of all the folders is as follows.
LPCM 96 kHz/24 bit (STEREO) 6 hours 35 minutes
LPCM 48 kHz/24 bit (STEREO) 13 hours 15 minutes
LPCM 48 kHz/16 bit (STEREO) 19 hours 50 minutes
LPCM 44.1 kHz/24 bit (STEREO) 14 hours 25 minutes
LPCM 44.1 kHz/16 bit (STEREO) 21 hours 35 minutes
MP3 320 kbps (STEREO) 95 hours 25 minutes
MP3 192 kbps (STEREO) 159 hours
MP3 128 kbps (STEREO) 238 hours
MP3 48 kbps (MONO) 636 hours
Battery Life (a built-in rechargeable lithium-ion battery)*⁴
The battery life spans provided here are all approximate periods of time.
For the battery life of the linear PCM recorder in any other mode, refer to the
Help Guide.
REC Mode Recording
Playback
with the
built-in
speaker
Playback
with the
headphones
Recording
with REC
Remote
Playback
via the
Bluetooth
connection
LPCM
96kHz/24bit
15 hours 9 hours 18 hours 10 hours 14 hours
LPCM
44.1kHz/16bit
20 hours 9 hours 22 hours 12 hours 18 hours
MP3 192kbps 22 hours 10 hours 25 hours 12 hours 18 hours
Music file
(LPCM
192kHz/24bit)
- 7 hours 13 hours - 10 hours
Dimensions (w/h/d) (not incl. projecting parts and controls)
Approx. 39.2mm × 109.5mm × 16.0mm
Mass
Approx. 82g
Temperature/Humidity
Operating temperature 5°C - 35°C
Operating humidity 25% - 75%
Storage temperature -10°C - +45°C
Storage humidity 25% - 75%
Compatible memory cards
• microSDHC cards from 4 GB to 32 GB
• microSDXC cards of 64 GB or more
*¹ A small amount of the built-in memory is used for file management and therefore not
available for user storage.
*² When the built-in memory is formatted with the linear PCM recorder.
*³ Default settings for the recording scenes.
*⁴ Measured values acquired under our measurement conditions. These values may decrease
depending on the usage conditions.
Trademarks and licenses
• Microsoft, Windows and Windows Media are registered trademarks or
trademarks of Microsoft Corporation in the United States and/or other
countries.
• microSD, microSDHC and microSDXC logos are trademarks of SD-3C, LLC.
• MPEG Layer-3 audio coding technology and patents licensed from
Fraunhofer IIS and Thomson.
• Google Play is a trademark of Google LLC.
• Apple, the Apple logo, iPhone and Mac are trademarks of AppleInc.,
registered in the U.S. and other countries.
AppStore is a service mark of AppleInc., registered in the U.S. and other
countries.
• Use of the Made for Apple badge means that an accessory has been
designed to connect specifically to the Apple product(s) identified in
the badge, and has been certified by the developer to meet Apple
performance standards. Apple is not responsible for the operation of this
device or its compliance with safety and regulatory standards.
• Compatible iPhone models
iPhone X, iPhone 8, iPhone 8 Plus, iPhone 7, iPhone 7 Plus, iPhone SE,
iPhone 6s, iPhone 6s Plus, iPhone 6, iPhone 6 Plus, iPhone 5s, iPhone 5c,
iPhone 5
• The BLUETOOTH® word mark and logos are registered trademarks owned
by Bluetooth SIG, Inc. and any use of such marks by Sony Corporation
is under license. Other trademarks and trade names are those of their
respective owners.
• The N-Mark is a trademark or registered trademark of NFC Forum, Inc. in
the United States and in other countries.
All other trademarks and registered trademarks are trademarks or registered
trademarks of their respective holders. Furthermore, “™” and “®” are not
mentioned in each in this manual.
This product is protected by certain intellectual property rights of Microsoft
Corporation. Use or distribution of such technology outside of this product
is prohibited without a license from Microsoft or an authorized Microsoft
subsidiary.
The “Sound Organizer 2” uses software modules as shown below:
Windows Media Format Runtime
Notes on the License
This linear PCM recorder comes with software that are used based on
licensing agreements with the owners of that software.
Based on requests by the owners of copyright of these software
applications, we have an obligation to inform you of the following. Please
read the following sections.
Licenses (in English) are recorded in the built-in memory of your
linear PCM recorder. Establish a Mass Storage connection between the
linear PCM recorder and a computer to read licenses in the “LICENSE” folder.
On GNU GPL/LGPL applied software
The software that is eligible for the following GNU General Public License
(hereinafter referred to as “GPL”) or GNU Lesser General Public License
(hereinafter referred to as “LGPL”) are included in the linear PCM recorder.
This informs you that you have a right to have access to, modify, and
redistribute source code for these software programs under the conditions
of the supplied GPL/LGPL.
Source code is provided on the web. Use the following URL to download it.
http://www.sony.net/Products/Linux/
We would prefer you do not contact us about the contents of source code.
Licenses (in English) are recorded in the built-in memory of your
linear PCM recorder. Establish a Mass Storage connection between the
linear PCM recorder and a computer to read licenses in the “LICENSE” folder.

PCM-A10 4-740-910-21(2)
線性PCM錄音機
PCM-A10
使用說明書
GB
CT
© 2018 Sony Corporation Printed in China
經型式認證合格之低功率射頻電機,非經許可,公司、商號或使用者均不得擅自
變更頻率、加大功率或變更原設計之特性及功能。
低功率射頻電機之使用不得影響飛航安全及干擾合法通信;經發現有干擾現象
時,應立即停用,並改善至無干擾時方得繼續使用。前項合法通信,指依電信法
規定作業之無線電通信。低功率射頻電機須忍受合法通信或工業、科學及醫療用
電波輻射性電機設備之干擾。
詳情請參閱說明指南
這是一份提供線性PCM錄音機基礎操作說明的使用說明書。
說明指南是線上手冊。
如果您想要瞭解進一步的詳細資料、操作說明,以及問題發生
時可行的解決方案,請參閱說明指南。
http://rd1.sony.net/help/icd/pcma10/h_zz/
請檢查附件項目
• 線性PCM錄音機 (1)
• 防風罩 (1)
• 攜行包 (1)
• 使用說明書(本摺頁)
• 保固卡 (1)
• Sound Organizer 2應用程式軟體(安裝程式檔案儲存於內建記憶體,您可以將
軟體安裝在電腦上。)
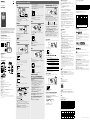
零件與控制按鈕
內建麥克風
峰值指示燈
顯示視窗
OPTION按鈕
T-MARK(曲目標記)按鈕
BACK/
HOME按鈕
STOP按鈕
REC/PAUSE(錄音/暫停)按鈕、錄音指示燈
(播放/輸入)按鈕*¹
控制按鈕( DPC(Digital Pitch Control)、
A-B(重播A-B)、
(倒帶/快倒)、(提示/快進))
(耳機)插孔
USB接頭保護蓋(您可將USB接頭收到保護蓋內。)
VOL –/+*¹(音量–/+)按鈕
REHEARSAL按鈕
USB滑桿
(N標記)(將支援NFC的智慧型手機靠近此標記即可建立NFC配對。)
三腳架安裝孔(本線性PCM錄音機未隨附三腳架。)
(麥克風)插孔
HOLD•POWER開關*²
microSD記憶卡插槽(記憶卡插槽位在保護蓋下方。)
插槽保護蓋
內建喇叭
腕帶孔(線性PCM錄音機未隨附腕帶。)
*¹ (播放/輸入)按鈕和VOL +(音量+)按鈕具有觸點。操作線性PCM錄音機時可以使用觸點作
為參考。
*² 將HOLD•POWER開關滑向“POWER”並按住8秒以上,即可重新啟動線性PCM錄音機。如需詳細說
明,請參閱說明指南。
開始使用全新的線性PCM錄音機
充電
充電線性PCM錄音機。
將USB滑桿向箭頭方向滑動,將USB接頭插入正在運行的電腦的USB連接
埠。
電池完全充滿時,電池指示燈會從充電動畫切換成“
”。
中斷連接線性PCM錄音機。
確認顯示視窗沒有繼續顯示“Accessing”訊息。然後參閱說明指南,安全
地移除線性PCM錄音機。
開啟電源
將HOLD•POWER開關向“POWER”方向滑動且保持不動,直到出現視窗顯示。
若要關閉電源,請將HOLD•POWER開關滑向“POWER”且保持不動,直
到“Power Off”出現在顯示視窗上。
防止意外操作(HOLD)
將HOLD•POWER開關向“HOLD”方向滑動。
¼
若要解除線性PCM錄音機的HOLD狀態,請將HOLD•POWER開關滑向中間位置。
初始設定
選取
(/)
輸入
首次開啟線性PCM錄音機的電源時,“Configure Initial Settings”畫面會出現在
顯示視窗上。接著您可選取顯示語言、設定時鐘,以及開啟/關閉嗶聲。
選取“Yes”開始進行初始設定。
選取顯示語言。
您可選取以下語言:
Deutsch(德文)、English*(英文)、Español(西班牙文)、
Français(法文)、Italiano(義大利文)、Русский(俄文)、
Türkçe(土耳其文)、한국어(韓文)、
简体中文(簡體中文)、
繁體中文
* 預設設定
設定目前的年、月、日、時和分。
¼
若要返回上一個時鐘設定項目,請按BACK/HOME。
選取“Next”。
選取“ON”或“OFF”以開啟或關閉嗶聲。
初始設定完成時,完成訊息及HOME選單畫面會依序顯示。
附註
您之後隨時可以變更任何初始設定。如需詳細說明,請參閱說明指南。
錄音
內建麥克風
STOP
REC/PAUSE
錄音指示燈
峰值指示燈
選取
(/)
輸入
¼
開始錄音前,請確認HOLD狀態已解除。
從HOME選單選取“ Record”。
錄音待機畫面會隨即顯示。
選取儲存裝置及資料夾以儲存錄音檔。
¼
若要在microSD記憶卡中儲存錄音檔,您必須變更檔案儲存目的地資料夾。從
OPTION選單選取“Recording Folder” - “SD Card”,然後開始錄音。
用指尖調整線性PCM錄音機內建麥克風的角度,確定麥克風朝向錄音
音源。
轉動線性PCM錄音機,使內建麥克風朝向目標音源。
按住REC/PAUSE。
錄音指示燈會閃爍紅色,且線性PCM錄音機會暫停錄音。當內建麥克風收
音時,峰值位準表的指示條長度會根據錄音音量而改變。
使用HOME選單
您可使用HOME選單執行各項操作,包括尋找和播放錄音檔,以及變更線性PCM
錄音機的設定。
選取
(
/
)
輸入
BACK/HOME
按住BACK/HOME。
此時會出現HOME選單畫面。
HOME選單項目會依下列順序顯示。
Recorded
Files
Record SettingsBluetooth Back
to XX*
Music
從下列項目選取所需的功能:
Music
可選取並播放已從電腦匯入的任何檔案。若要尋找
音樂檔案,請選取“All Songs”、“Albums”、“Artists”
或“Folders”。匯入檔案時,請務必匯入MUSIC資料夾。
Recorded Files
可選取並播放使用線性PCM錄音機錄製的任何檔案。若
要尋找錄音檔,請選取“Latest Recording”、“Search by
REC Date”、“Search by REC Scene”或“Folders”。
Record
可顯示錄音待機畫面並開始錄音。
Bluetooth
可針對使用Bluetooth功能的項目顯示相應的選單畫面,
例如REC Remote、NFC及Bluetooth音訊裝置。
此外,您亦可開啟/關閉Bluetooth功能或進行裝置註冊
(配對)。
Settings
可顯示設定選單畫面並且變更線性PCM錄音機上的各
種設定。
Back to XX*
可返回進入HOME選單畫面前顯示的畫面。
* 目前使用的功能顯示在“XX”中。
¼
按 STOP即可返回進入HOME選單前顯示的畫面。
使用OPTION選單
您可使用OPTION選單執行各項功能,包括變更線性PCM錄音機的設定。
可用的項目根據狀況而有不同。
輸入
OPTION
選取
(/)
從HOME選單選取所需的功能,然後按OPTION。
選取您要變更設定的選單項目。
選取所需的設定選項。
將線性PCM錄音機上的檔案複製到電腦
可以將線性PCM錄音機上的檔案和資料夾複製到電腦上進行儲存。
遵循“充電”中的指示將線性PCM錄音機連接到電腦。
將想要複製的檔案或資料夾從“PCMRECORDER”或“MEMORYCARD”拖
放到電腦的本機磁碟上。
複製檔案或資料夾(拖放)
1 按住
2 拖曳
3 然後放置
PCMRECORDER或
MEMORY CARD
電腦
從電腦上取下線性PCM錄音機。
安裝SoundOrganizer2
將Sound Organizer安裝到您的電腦。
Sound Organizer可讓您在線性PCM錄音機與電腦之間交換檔案。
也可以播放從音樂CD和其他媒體匯入的歌曲、匯入到電腦的MP3和其他音訊檔
案,並將其傳輸到線性PCM錄音機上。
附註
• Sound Organizer僅相容於Windows電腦,不相容於Mac。
• 本線性PCM錄音機僅相容於Sound Organizer 2。
• 如果您格式化內建記憶體,會刪除該處所有儲存的資料。(Sound Organizer軟體安
裝程式將會一併刪除。)
¼
• 安裝Sound Organizer時,請以具有系統管理員權限的帳戶進行登入。
• 安裝程序視Windows版本而定。下列程序以Windows 10為例。
遵循“充電”中的指示將線性PCM錄音機連接到電腦。
確定電腦成功偵測到線性PCM錄音機。
當線性PCM錄音機連接到電腦時,“Connecting”將會出現並持續顯示在線性
PCM錄音機的顯示視窗上。
用滑鼠右鍵按一下桌面的左下角,然後按一下選單上的[檔案總管]。
按兩下[PCMRECORDER]-[FORWINDOWS]。
按兩下[SoundOrganizer_V2001](或[SoundOrganizer_V2001.exe])。
依照螢幕上的指示進行操作。
當[WelcometoSoundOrganizer2Installer]視窗出現時,按一下[Next]。
確定接受授權合約的條文之後,請選取[Iacceptthetermsinthelicense
agreement],然後按一下[Next]。
當[SetupType]視窗出現時,請選取[Standard]或[Custom],然後按一下
[Next]。
遵循畫面上的指示進行,然後在選擇[Custom]時進行安裝設定。
當[ReadytoInstalltheProgram]視窗出現時,請按一下[Install]。
安裝作業隨即開始。
當[SoundOrganizer2hasbeeninstalledsuccessfully.]視窗出現時,請勾
選[LaunchSoundOrganizer2Now],然後按一下[Finish]。
附註
安裝Sound Organizer 2後,您可能需要重新啟動電腦。
事先注意事項
有關電源
DC 3.7V:內建充電鋰離子電池
DC 5.0V: 使用USB充電時
額定電流消耗:500mA
有關安全
駕車、騎車或操作任何機動車時不要操作本機。
有關握拿
• 不要讓本機靠近熱源或放置於陽光直射、灰塵很多或有機械振動的地方。
• 假如有任何固體或液體落入本機,在進一步操作之前,請先取出電池並請合格
的人員檢查。
• 使用線性PCM錄音機時,務必遵守以下注意事項,以免造成機殼變形或線性
PCM錄音機故障。
– 請勿在線性PCM錄音機置於後口袋時坐下。
– 請勿將耳機線纏繞的線性PCM錄音機放進袋子裡,然後使袋子受到強力碰
撞。
• 請小心不要讓水潑濺到機身。本機並不防水。尤其請特別注意下列情況。
– 當將本機放在口袋中並前往浴室等地時。
當彎下腰,本機可能會掉入水中而弄溼。
– 當在本機會曝露於雨水、雪或溼氣的環境中使用本機時。
– 在會弄溼的狀況下。如果以潮溼的雙手碰觸本機,或將本機放在潮溼衣物的
口袋內,本機將會弄溼。
• 使用本機時音量很大可能會影響您的聽力。
• 為確保交通安全,請勿在開車或騎腳踏車時使用本機。
• 在無法聽到周遭聲音就可能釀成危險的地方,請勿使用本機。
• 如果在四周空氣非常乾燥的時候使用耳機,可能會感到耳朵疼痛。
這不是因為耳機故障所造成,而是因為體內累積了太多的靜電。可以藉由穿戴
能避免產生靜電的非合成材質衣物來減少靜電。
有關噪音
• 當本機放置於交流電源、螢光燈或行動電話旁進行錄音或播放時,可能會聽到
噪音。
• 當手指等物體在錄音期間觸碰或刮到本機時,可能會錄下噪音。
有關維護
要清潔本機外表,請使用稍微沾水的軟布。接著使用軟質乾布擦拭本機外表。不
要使用酒精、汽油或稀釋劑。
如果對本機有任何疑問或問題,請向最近的Sony經銷商諮詢。
Bluetooth功能注意事項
• Bluetooth無線技術可實現最遠約10公尺的連線。然而,有效距離可能會因障礙
物(人群、金屬、牆壁等)或訊號狀態而有不同。
• 若在無線LAN裝置附近使用Bluetooth通訊,由於Bluetooth和無線
LAN(IEEE802.11b/g)裝置使用相同的頻率(2.4 GHz),因此可能發生訊號干
擾,而導致通訊速度降低、產生雜訊或是無法連線。在這樣的情況下,請採取
以下措施。
– 將線性PCM錄音機和Bluetooth裝置進行連線時,請在距離無線LAN裝置至少
10公尺遠的地方執行Bluetooth通訊。
– 盡可能縮短線性PCM錄音機和Bluetooth裝置的相隔距離。
– 在距離無線LAN裝置不到10公尺遠的地方執行Bluetooth通訊時,關閉無線
LAN裝置。
• Bluetooth裝置發射的無線電波可能影響到電子醫療裝置等設備的運作。在以
下地點時,請關閉線性PCM錄音機和其他Bluetooth裝置,否則可能會造成意外
危險。
– 醫院內、列車博愛座附近、飛機上、存在易燃氣體的場所(例如:加油站)、
自動門或火警警報器附近。
警告
• 請勿將電池(安裝的電池組或電池)長時間暴露在過熱的熱源下,如陽光或火
源等。
• 請勿分解、拆開或切碎蓄電池或電池。
• 請勿讓蓄電池或電池暴露於高溫或火源。避免存放在陽光直射處。
• 蓄電池漏液時,請勿讓液體接觸到皮膚或眼睛。若不慎接觸,請使用大量清水
清洗接觸部位,然後尋求醫療建議。
• 蓄電池和電池需要先充電才能使用。務必參閱製造商說明書或設備手冊,瞭解
正確充電指示。
• 長時間存放後,可能需要對蓄電池或電池充電和放電數次,才能獲得最大效
能。
• 以正確方式棄置。
注意
如更換不正確的電池,可能有爆炸的危險。
僅限更換相同或同等類型的電池。
若替換的電池類型不正確,則會有爆炸風險。
請根據說明來丟棄使用過的電池。
僅適用於台灣
廢電池請回收
本設備經測試符合 EMC 規範有關使用 3 公尺以內連接線的規定限制。
使用者須知
保留所有權利。未事先取得Sony Corporation書面核准時,不得全部或部分複
製、翻譯本手冊或其中說明的軟體,或將其縮減為任何機器可讀形式。
錄製的內容僅供個人娛樂及使用。著作權法禁止未經著作權所有者許可而用於
其他用途。
規格
容量(使用者可用容量*¹*²)
16 GB(約12.80 GB=13743895347位元組)
最長錄音時間*³(內建記憶體)
所有資料夾的最長錄音時間如下。
LPCM 96 kHz/24 bit (STEREO) 6小時35分鐘
LPCM 48 kHz/24 bit (STEREO) 13小時15分鐘
LPCM 48 kHz/16 bit (STEREO) 19小時50分鐘
LPCM 44.1 kHz/24 bit (STEREO) 14小時25分鐘
LPCM 44.1 kHz/16 bit (STEREO) 21小時35分鐘
MP3 320 kbps (STEREO) 95小時25分鐘
MP3 192 kbps (STEREO) 159小時
MP3 128 kbps (STEREO) 238小時
MP3 48 kbps (MONO) 636小時
電池續航力(內建充電鋰離子電池)*⁴
此處提供的電池續航力為約略時間。
關於線性PCM錄音機其他模式的電池續航力,請參閱說明指南。
REC Mode 錄音
使用內建
喇叭播放
使用耳機
播放
使用REC
Remote錄音
透過
Bluetooth連
線播放
LPCM
96 kHz/24 bit
15小時 9時 18小時 10小時 14小時
LPCM
44.1 kHz/16 bit
20小時 9小時 22小時 12小時 18小時
MP3 192 kbps 22小時 10小時 25小時 12小時 18小時
音樂檔案
(LPCM
192 kHz/24 bit)
- 7小時 13小時 - 10小時
按或將音源設為理想的錄音音量。
您可在峰值位準表上查看目前錄音音量。調整錄音音量,將錄音音量保持
在大約-12 dB()的理想範圍內。
如果錄音時偵測到音量太高,“OVER”()會出現在顯示視窗上且峰值
指示燈會閃爍。這時,請按 直到“OVER”消失且峰值指示燈熄滅來降低
錄音音量,以避免聲音失真。
您可按住 或 ,持續調高或調低錄音音量。
¼
您可使用排練功能輕鬆調整錄音音量。如需排練功能的說明,請參閱說明指南。
按REC/PAUSE。
“REC”會出現在顯示視窗上,且錄音指示燈會亮起紅色。
按STOP停止錄音。
“Saving...”及錄音待機畫面會依序出現在顯示視窗上。
聆聽
BACK/HOME
選取
(//
/
)
輸入
VOL –/+按鈕
從HOME選單選取“ RecordedFiles”。
選取“LatestRecording”、“SearchbyRECDate”、“SearchbyREC
Scene”或“Folders”。
選取您要的檔案。
播放隨即開始。
按VOL+或VOL-調整音量。
按STOP停止播放。
¼
停止錄音後,您可按 立即播放剛錄製的檔案。
新增曲目標記
可以在稍後想要分割檔案或想在播放中尋找的點時新增曲目標記。每個檔案最
多可以新增98個曲目標記。
您也可以在錄音期間新增曲目標記。
刪除
輸入
OPTION
選取
(/)
附註
一旦檔案被刪除,就不能還原。
從已錄製檔案的清單中選取您要刪除的檔案,或播放您要刪除的檔
案。
從OPTION選單選取“DeleteaFile”。
此時會顯示“Delete?”,且選取的檔案會開始播放供您確認。
選取“Yes”。
此時會顯示“Please Wait”,直到選取的檔案刪除為止。
以無線方式欣賞音樂
從BLUETOOTH®音訊裝置聆聽音訊
您可在Bluetooth音訊裝置與線性PCM錄音機之間建立無線連線,並從
Bluetooth音訊裝置聆聽音訊。
裝置註冊(配對)
若是第一次在Bluetooth音訊裝置之間建立無線連線,您必須先相互註冊裝
置。此裝置註冊程序稱為“配對”。
將您要建立Bluetooth連線的Bluetooth音訊裝置切換至配對模式。
將線性PCM錄音機放在距離Bluetooth音訊裝置1公尺的範圍內。
錄音處於待機狀態時,請從HOME選單選取“ Bluetooth”-“Audio
Device”-“AddDevice(Pairing)”。
當“Turn Bluetooth On?”或“Disconnect Connected Audio Device.
Continue?”出現在顯示視窗上時,請選取“Yes”。
當“SearchforAudioDevices.PreparetheOtherDevicetoConnect.”出
現在顯示視窗上時,請按按鈕開始搜尋。
這時會開始搜尋可用於裝置註冊的Bluetooth音訊裝置,已發現裝置的清
單會出現在顯示視窗上。
選取您要註冊並建立Bluetooth連線的Bluetooth裝置。
裝置註冊後,“Connection Complete”會出現在顯示視窗上。
在線性PCM錄音機上開始播放。
現在,您可以從Bluetooth音訊裝置聆聽音訊。
中斷線性PCM錄音機與Bluetooth音訊裝置之間的Bluetooth連線
從HOME選單選取“ Bluetooth” - “Audio Device” - “Disconnect”。
當Bluetooth連線中斷時,播放就會停止。
在Bluetooth耳機與已連接耳機之間切換音訊輸出目的地
當Bluetooth連線建立時,音訊不會輸出至與耳機插孔相連接的耳機。
若要使用連接的耳機聆聽音訊,請中斷Bluetooth連線。
附註
• 您無法使用連接的Bluetooth音訊裝置監聽錄音。
• 錄音會輸出至 (耳機)插孔。使用耳機進行監聽。
使用智慧型手機操作(RECRemote)
選取
(//
/
)
輸入
透過線性PCM錄音機的Bluetooth功能,您可使用智慧型手機來操作線性PCM
錄音機(錄音、變更錄音設定等)。
使用智慧型手機操作線性PCM錄音機
您需要在智慧型手機上安裝REC Remote,並讓智慧型手機和線性PCM錄音機
進行配對。
配對是指讓Bluetooth裝置相互註冊並初次建立無線連線的程序。
若要使用REC Remote與線性PCM錄音機進行配對,您必須使用最新版的REC
Remote。若您的智慧型手機已安裝REC Remote,請務必升級為最新版。
在GooglePlay或AppStore搜尋RECRemote並安裝至智慧型手機。
在線性PCM錄音機上,從HOME選單選取“ Bluetooth”-“REC
Remote”-“AddDevice(Pairing)”,並依照螢幕上的指示開啟
Bluetooth功能。
在智慧型手機上啟動RECRemote,並從可用裝置清單選
取“PCM-A10”(您的線性PCM錄音機)。如需詳細說明,請參閱REC
Remote的說明及智慧型手機隨附的手冊。
現在,您可以使用智慧型手機執行線性PCM錄音機操作。
開啟或關閉線性PCM錄音機的Bluetooth功能
關閉Bluetooth功能時,線性PCM錄音機與透過Bluetooth進行連接的所有裝置
會中斷連線,包括Bluetooth音訊裝置及已安裝REC Remote的智慧型手機。
從HOME選單選取“ Bluetooth”-“BluetoothON/OFF”。
若要開啟Bluetooth功能,請選取“ON”。若要將其關閉,請選
取“OFF”。
尺寸(寬/高/深)(不包括突出部分和控制按鈕)
約 39.2 mm × 109.5 mm × 16.0 mm
重量
約82 g
溫度/溼度
操作溫度 5°C - 35°C
操作溼度 25% - 75%
儲存溫度 -10°C - +45°C
儲存溼度 25% - 75%
相容記憶卡
• 4 GB至32 GB microSDHC卡
• 64 GB以上microSDXC卡
*¹ 檔案管理必須使用少量的內建記憶體,因此這些記憶體無法供使用者儲存之用。
*² 當使用線性PCM錄音機對內建記憶體進行格式化時。
*³ 錄音場景的預設設定。
*⁴ 測量值係根據本公司測量條件取得。這些值可能因實際使用情況而減少。
單元
限用物質及其化學符號
鉛
(Pb)
汞
(Hg)
鎘
(Cd)
六價鉻
(Cr
+6
)
多溴聯苯
(PBB)
多溴二苯醚
(PBDE)
電路板 - ○ ○ ○ ○ ○
外殼 - ○ ○ ○ ○ ○
顯示板 - ○ ○ ○ ○ ○
揚聲器 - ○ ○ ○ ○ ○
鋰離子
電池組
○ ○ ○ ○ ○ ○
配件 - ○ ○ ○ ○ ○
備考1. “超出0.1 wt %”及“超出0.01 wt %”係指限用物質之百分比含量超出
百分比含量基準值。
備考2.“○”係指該項限用物質之百分比含量未超出百分比含量基準值。
備考3.“-”係指該項限用物質為排除項目。
商標及授權
• Microsoft、Windows和Windows Media是Microsoft Corporation在美國和/或其他
國家的註冊商標或商標。
• microSD、microSDHC和microSDXC標誌為SD-3C, LLC的商標。
• MPEG Layer-3音頻編碼技術和專利由Fraunhofer IIS和Thomson授權。
• Google Play為Google LLC的商標。
• Apple、Apple標誌、iPhone和Mac是Apple Inc.(蘋果電腦公司)在美國以及其
它國家註冊的商標。
App Store是Apple Inc.的服務標章。
• “Made for Apple”徽章的使用,是指某配件可以與特定的標有該徽章的Apple產
品連接,並經開發者證明符合Apple性能標準。Apple並不對該裝置的操作或其
安全和規章標準的遵行提供保證。
• 相容的iPhone機型
iPhone X、iPhone 8、iPhone 8 Plus、iPhone 7、iPhone 7 Plus、iPhone SE、
iPhone 6s、iPhone 6s Plus、iPhone 6、iPhone 6 Plus、iPhone 5s、iPhone 5c、
iPhone 5
• BLUETOOTH®文字商標和標誌為Bluetooth SIG, Inc.所有的註冊商標,且Sony
Corporation擁有這類商標的使用授權。其他商標和商標名稱均為其各自所有者
所有。
• N-Mark為NFC Forum, Inc.在美國和其他國家的商標或註冊商標。
所有其他商標和註冊商標是其各自所有者的商標或註冊商標。此外,本手冊不會
每次皆註明“™”和“®”。
This product is protected by certain intellectual property rights of Microsoft
Corporation. Use or distribution of such technology outside of this product is
prohibited without a license from Microsoft or an authorized Microsoft subsidiary.
“Sound Organizer 2”使用的軟體模組如下所示:
Windows Media Format Runtime
關於使用授權的注意事項
本線性PCM錄音機附有根據軟體所有者的授權協議使用的軟體。
根據這些軟體應用程式版權所有者的要求,我們有義務告知您下列事項。請閱讀
下列章節。
使用授權(英文版)記錄於線性PCM錄音機的內建記憶體中。請在線性PCM錄音
機與電腦之間建立Mass Storage連接,以便閱讀“LICENSE”資料夾中的使用授權。
關於GNUGPL/LGPL應用軟體
線性PCM錄音機中包含符合下列GNU General Public License(下文稱之為“GPL”)
或GNU Lesser General Public License(下文稱之為“LGPL”)條件的軟體。
這是要讓您知道,您有權在隨附GPL/LGPL的條款下存取、修改和重新分配這些
軟體程式的原始碼。
原始碼透過資訊網提供。請用下列URL下載。
http://www.sony.net/Products/Linux/
關於原始碼的內容,希望您不要向我們查詢。
使用授權(英文版)記錄於線性PCM錄音機的內建記憶體中。請在線性PCM錄音
機與電腦之間建立Mass Storage連接,以便閱讀“LICENSE”資料夾中的使用授權。
-
 1
1
-
 2
2

