
ENGLISH
Introduction
Congratulations on your purchase and
welcome to Philips! To fully benet from
the support that Philips offers, register your
product at www.philips.com/welcome.
Important
Read this user manual carefully before you
use the appliance and save it for future
reference.
Danger
- Make sure the adapter does not get
wet (Fig. 1).
- The adapter contains a transformer.
Do not cut off the adapter to replace
it with another plug, as this causes a
hazardous situation.
Warning
- This appliance is not intended for use
by persons (including children) with
reduced physical, sensory or mental
capabilities, or lack of experience and
knowledge, unless they have been given
supervision or instruction concerning
use of the appliance by a person
responsible for their safety.
- Children should be supervised to
ensure that they do not play with the
appliance.
- Be careful with hot water when you
clean the appliance. Always check if the
water is not too hot, to prevent your
hands from getting burnt.
Caution
- Charge, use and store the shaver at a
temperature between 5°C and 35°C.
- Always put the protection cap on the
shaver to protect the shaving heads
when you are travelling.
- The shaver and the accessories are not
dishwasher-proof.
- Never use water hotter than 80°C to
rinse the shaver.
- Only use the adapter supplied.
- Do not use the shaver or the adapter if
it is damaged.
- If the adapter is damaged, always have
it replaced with one of the original type
in order to avoid a hazard.
- Water may leak from the socket at the
bottom of the shaver when you rinse
it. This is normal and not dangerous
because all electronics are enclosed in
a sealed power unit inside the shaver.
Compliance with standards
- This shaver complies with the
internationally approved safety
regulations and can be safely used in
the bath or shower and cleaned under
the tap (Fig. 2).
- This Philips appliance complies with all
standards regarding electromagnetic
elds (EMF). If handled properly
and according to the instructions in this
user manual, the appliance is safe to use
based on scientic evidence available
today.
General
- The adapter transforms 100-240 volts
to a safe low voltage of less than 24
volts.
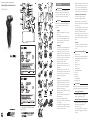
General description (Fig. 3)
1 Protection cap
2 Shaving unit with shaving head holder
3 Shaving head holder release buttons
4 On/off button
5 Display
6 Retaining ring
7 Cutter
8 Shaving guard
9 Shaving head holder
10 Trimmer
11 Adapter
12 Small plug
13 Cleaning brush
14 Storage pouch
The display
Before you use the shaver for the rst time,
remove the protective foil from the display.
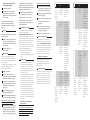
’Charging’ indication
- When the shaver is charging, the
battery symbol ashes (Fig. 4).
’Battery fully charged’ indication
- When the battery is fully charged,
the battery symbol lights up
continuously (Fig. 5).
- If you leave the shaver connected to
the mains, the light goes out after 30
minutes.
RQ361, RQ360
Register your product and get support at
www.philips.com/welcome
4222.002.5403.2
3
1 2
5 6
8 9
11 12
14 15 16
17 18 19
20 21 22
23 24 25
26 27 28
29 30 31
32 33 34
35
4
7
10
13
15/10/2012
本产品所配备的电源适配器有2种规格,
请以实物为准。

’Battery low’ indication
- When the battery is almost empty, the
plug symbol starts ashing (Fig. 6).
- When you switch off the shaver, the
plug symbol continues to ash for a
few more seconds.
Travel lock
You can lock the shaver when you are going
to travel. The travel lock prevents the shaver
from being switched on by accident.
Note: The travel lock cannot be activated
when the shaver is connected to the mains.
Activating the travel lock
1 Press and hold the on/off button until
the travel lock symbol stops ashing
and the motor stops running (Fig. 7).
The travel lock is now activated.
Note: If you release the on/off button before
the travel lock symbol stops ashing, the travel
lock is not activated.
Deactivating the travel lock
1 Press and hold the on/off button until
the travel lock symbol stops ashing
and the motor starts running.
The shaver is now ready for use again.
Note: When you start charging, the travel lock
is deactivated automatically.
Charging
It takes approx. 60 minutes to fully charge
the battery.
When you charge the shaver for the rst
time or after a long period of disuse, let it
charge for 90 minutes.
A fully charged shaver provides up to 40
shaving minutes.
If you have a heavy beard, the shaver may
provide less than 40 shaving minutes. The
number of shaving minutes may also vary
over time, depending on your shaving
behaviour, cleaning habits and beard type.
Charging
Do not charge the shaver in a closed
pouch or in the packaging.
1 Put the small plug in the shaver.
2 Put the adapter in the wall socket.
, The battery symbol on the shaver
ashes to show that the shaver is
charging (see chapter ‘The display’).
Note: When you remove the adapter from the
wall socket and leave the small plug in the
shaver, the shaver may not work for a few
seconds.
Using the shaver
Note: You cannot use the shaver while it is
connected to the mains.
Shaving
Skin adaptation period
Your rst shaves may not bring you the
result you expect and your skin may even
become slightly irritated. This is normal. Your
skin and beard need time to adapt to any
new shaving system.
We advise you to shave regularly (at least
3 times a week) for a period of 3 weeks to
allow your skin to adapt to the new shaver.
During this period, use your new electric
shaver exclusively and do not use other
shaving methods. If you use different shaving
methods, it is more difcult for your skin to
adapt to the new shaving system.
1 Press the on/off button to switch on
the shaver.
2 Move the shaving heads over your
skin. Make both straight and circular
movements (Fig. 8).
3 Press the on/off button to switch off
the shaver.
4 Clean the shaver after every
shave (see chapter ‘Cleaning and
maintenance’).
Wet shaving
You can also use this shaver on a wet face
with shaving foam or shaving gel.
To shave with shaving foam or shaving gel,
follow the steps below:
1 Apply some water to your skin.
2 Apply shaving foam or shaving gel to
your skin.
3 Rinse the shaving unit under the tap
to ensure that the shaving unit glides
smoothly over your skin.
4 Press the on/off button to switch on
the shaver.
5 Move the shaving heads over your
skin. Make both straight and circular
movements.
Note: Rinse the shaver under the tap regularly
to ensure that it continues to glide smoothly
over your skin.
6 Dry your face and thoroughly rinse
the shaver with a sufcient amount
of water after every shave. Make sure
you rinse all foam or shaving gel off
the shaver (see also chapter ‘Cleaning
and maintenance’).
Trimming
You can use the trimmer to groom
your sideburns and moustache.
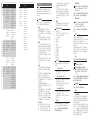
1 Pull the shaving unit straight off the
shaver (Fig. 9).
Note: Do not twist the shaving unit while you
pull it off the shaver.
2 Insert the lug of the trimmer into the
slot in the top of the shaver (1). Then
press down the trimmer (2) to attach
it to the shaver (‘click’) (Fig. 10).
3 Press the on/off button to switch
on the trimmer. You can now start
trimming.
4 Press the on/off button to switch off
the trimmer.
5 Pull the trimmer straight off the
shaver (Fig. 11).
Note: Do not twist the trimmer while you pull
it off the shaver.
6 Insert the lug of the shaving unit into
the slot in the top of the shaver
(1). Then press down the shaving
unit (2) to attach it to the shaver
(‘click’) (Fig. 12).
Cleaning and maintenance
Never use scouring pads, abrasive cleaning
agents or aggressive liquids such as petrol
or acetone to clean the shaver and its
accessories.
- Clean the shaver after every shave.
- Clean the shaving heads frequently
with Philips Shaving Head Cleaning
Spray (HQ110) for optimal shaving
performance.
- You can clean the outside of the
shaver with a damp cloth. Do not clean
the shaving unit with a cloth.
Cleaning the shaving unit
Be careful with hot water. Always check if
the water is not too hot, to prevent your
hands from getting burnt.
1 Switch off the shaver.
2 Rinse the shaving unit under a hot tap
for some time (Fig. 13).
Note: You can also clean the shaving unit with
the cleaning brush supplied.
3 After rinsing the appliance under the
tap, hold it upright for 10-15 seconds
to allow water to run out of the
bottom.
4 Press the release buttons on the
shaving unit (1) and pull the shaving
head holder off the shaving unit
(2). (Fig. 14)
5 Rinse the shaving head holder under a
hot tap for 30 seconds (Fig. 15).
Note: You can also clean the shaving head
holder with the cleaning brush supplied.
6 Carefully shake off excess water and
let the shaving head holder dry.
Never dry the shaving head holder with
a towel or tissue, as this may damage the
shaving heads.
7 Reattach the shaving head holder
to the shaving unit (‘click’) (Fig. 16).
Extra-thorough cleaning method
1 Switch off the shaver.
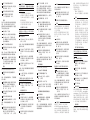
2 Press the release buttons on the
shaving unit (1) and pull the shaving
head holder off the shaving unit
(2) (Fig. 17).
3 To unlock the orange retaining ring,
turn it in the direction of the arrows
indicated in and on the retaining
ring (Fig. 18).
4 Lift the retaining ring out of the
shaving head holder. (Fig. 19)
5 Remove the cutter and the shaving
guard (Fig. 20).
Note: Do not clean more than one cutter
and shaving guard at a time, since they are
all matching sets. If you accidentally put a
cutter in the wrong shaving guard, it may
take several weeks before optimal shaving
performance is restored.
6 Clean the cutter with the cleaning
brush supplied (Fig. 21).
7 Clean the inside of the shaving
guard (Fig. 22).
8 After cleaning, place the shaving guard
back into the shaving head holder.
Make sure the two wings t exactly
into the recesses of the shaving head
holder (Fig. 23).
9 Place the cutter back into the shaving
guard with the cutter legs pointing
downwards (Fig. 24).
10 Place the retaining ring back onto the
shaving head holder (1). To reattach
the retaining ring, turn it against the
direction of the arrows indicated in
and on the retaining ring (2) (Fig. 25).
Note: Make sure the retaining ring is xed
properly. The four wings of the retaining ring
have to be located exactly under the recesses
of the shaving head holder (Fig. 26).
11 Reattach the shaving head holder to
the shaving unit (‘click’). (Fig. 16)
Note: If the shaving unit does not close
smoothly, check if you have positioned the
shaving heads properly and if the retaining
rings are xed properly.
Cleaning the trimmer
Clean the trimmer after every use.
Cleaning the trimmer under the
tap
1 Switch on the appliance with the
trimmer attached.
2 Rinse the trimmer under a hot tap for
some time. (Fig. 27)
3 After cleaning, switch off the appliance.
4 After rinsing the appliance under the
tap, hold it upright for 10-15 seconds
to allow water to run out of the
bottom.

Be careful, the battery strips are sharp.
1 Undo the screw in the back panel of
the shaver with a screwdriver (1) and
remove the back panel (2) (Fig. 32).
2 Bend the hooks aside and remove the
power unit (Fig. 33).
3 Break the snap hooks (1) and remove
the front panel of the power unit
(2) (Fig. 34).
4 Take out the battery holder (1) and
cut the battery tags with a pair of
cutting pliers (2) (Fig. 35).
5 Remove the rechargeable battery.
Guarantee and service
If you need service or information or if
you have a problem, please visit the Philips
website at www.philips.com/support or
contact the Philips Consumer Care Centre
in your country. You nd its phone number
in the worldwide guarantee leaet. If there
is no Consumer Care Centre in your
country, go to your local Philips dealer.
Guarantee restrictions
The shaving heads (cutters and guards)
are not covered by the terms of the
international guarantee because they are
subject to wear.
Troubleshooting
This chapter summarises the most common
problems you could encounter with the
appliance. If you are unable to solve the
problem with the information below, visit
www.philips.com/support for a list of
frequently asked questions or contact the
Consumer Care Centre in your country.
Cleaning the trimmer with the
cleaning brush supplied
1 Switch off the trimmer.
2 Clean the trimmer with the short-
bristled side of the cleaning brush.
Brush up and down along the trimmer
teeth. (Fig. 28)
Tip: For optimal trimmer performance,
lubricate the trimmer teeth frequently
with Philips Shaving Head Cleaning Spray
(HQ110).
Storage
Note: Make sure the shaving unit is dry before
you store the shaver.
1 Put the protection cap on the shaver
after use to prevent damage and to
avoid dirt accumulation in the shaving
heads (Fig. 29).
2 Store the shaver in the
pouch supplied.
Replacement
For maximum shaving performance, we
advise you to replace the shaving heads
every two years. Replace damaged shaving
heads right away.
Only replace the shaving heads with original
RQ32 Philips shaving heads. See also
chapter ‘Ordering accessories’.
1 Switch off the shaver.
2 Press the release buttons on the
shaving unit and pull the shaving head
holder off the shaving unit (Fig. 14).
3 To unlock the orange retaining ring,
turn it in the direction of the arrows
indicated in and on the retaining
ring (Fig. 18).
4 Lift the retaining ring out of the
shaving head holder (Fig. 19).
5 Remove the shaving heads and place
new ones in the shaving head holder.
Make sure the two wings of the shaving
heads t exactly into the recesses.
6 Place the retaining ring back onto the
shaving head holder (1). To reattach
the retaining ring, turn it against the
direction of the arrows indicated in
and on the retaining ring (2) (Fig. 25).
Note: Make sure the retaining ring is xed
properly. The four wings of the retaining ring
have to be located exactly under the recesses
of the shaving head holder (Fig. 26).
7 Reattach the shaving head holder to
the shaving unit (‘click’) (Fig. 16).
Note: If the shaving unit does not close
smoothly, check if you have positioned the
shaving heads properly and if the retaining
rings are xed properly.
Ordering accessories
To purchase accessories for this appliance,
please visit our online shop at
www.shop.philips.com/service. If the
online shop is not available in your country,
go to your Philips dealer or a Philips service
centre. If you have any difculties obtaining
accessories for your appliance, please
contact the Philips Consumer Care Centre
in your country. You nd its contact details
in the worldwide guarantee leaet.
The following accessories are available:
- RQ32 Philips shaving heads
- HQ110 Philips Shaving Head Cleaning
Spray
Environment
- Do not throw away the appliance
with the normal household waste at
the end of its life, but hand it in at an
ofcial collection point for recycling.
By doing this, you help to preserve the
environment (Fig. 30).
- The built-in rechargeable shaver battery
contains substances that may pollute
the environment. Always remove the
battery before you discard or hand in
the shaver at an ofcial collection point.
Dispose of the battery at an ofcial
collection point for batteries. If you
have trouble removing the battery, you
can also take the appliance to a Philips
service centre. The staff of this centre
will remove the battery for you and will
dispose of it in an environmentally safe
way (Fig. 31).
Removing the rechargeable
shaver battery
Only remove the rechargeable battery
when you discard the shaver. Make sure
the rechargeable battery is completely
empty when you remove it.
Problem Possible
cause
Solution
The travel
lock is
activated.
To deactivate
the travel lock,
press and hold
the on/off
button until
the travel lock
symbol stops
ashing and
the motor
starts running.
The tem-
perature of
the shaver
is too high.
In this case,
the shaver
does not
work.
Let the shaver
cool down. As
soon as the
temperature
of the shaver
has dropped
sufciently, you
can switch
on the shaver
again.
When you
remove
the adapter
from the
wall socket
and leave
the small
plug in the
shaver, the
shaver does
not work
for a few
seconds.
Remove the
small plug
from the
shaver.
The
shaver
does not
work,
even
though
it is con-
nected to
the mains.
This shaver
is not
designed
to be used
directly
from the
mains.
Remove
the adapter
from the
wall socket
and the small
plug from the
shaver. You can
now switch
on the shaver
again.
Problem Possible
cause
Solution
The
shaver
does not
shave as
well as it
used to.
The shaving
heads are
damaged
or worn.
Replace the
shaving heads
(see chapter
‘Replace-
ment’).
The shaving
heads are
dirty.
Clean the
cutters and
guards with
the cleaning
brush supplied
(see chapter
‘Cleaning and
maintenance’,
section ‘Extra-
thorough
cleaning
method’).
Long hairs
obstruct
the shaving
heads.
Clean the
cutters and
guards with
the cleaning
brush supplied
(see chapter
‘Cleaning and
maintenance’,
section ‘Extra-
thorough
cleaning
method’).
Shaving
foam or
shaving gel
has accu-
mulated in
the shaving
heads.
Rinse the
shaving heads
thoroughly
with a suf-
cient amount
of water.
The
shaver
does not
work
when I
press the
on/off
button.
The re-
chargeable
battery is
empty.
Recharge
the battery
(see chapter
‘Charging’).

Problem Possible
cause
Solution
After fully
charg-
ing the
shaver, it
provides
less
than 40
shaving
minutes.
If you have
a heavy
beard, the
shaver may
provide
less than
40 shaving
minutes.
The num-
ber of shav-
ing minutes
may also
vary over
time,
depending
on your
shaving
behaviour,
cleaning
habits and
beard type.
Problem Possible
cause
Solution
My skin is
irritated
after
shaving.
Your skin
needs time
to get
used to
the Philips
shaving
system.
Skin irritation
during the
rst 2-3
weeks of use
is possible.
After this
period, the
skin irritation
usually disap-
pears.
The shaving
heads are
damaged
or worn.
Replace the
shaving heads
(see chapter
‘Replace-
ment’).
The
rotation
speed of
the shav-
ing heads
is lower
than
usual.
Too much
dirt has
collected in
the shaving
heads.
Clean the
shaving heads.
See chapter
‘Cleaning and
maintenance’.
The re-
chargeable
battery is
low.
Recharge
the battery.
See chapter
‘Charging’.
The shav-
ing heads
do not
stay in
place.
You did not
x the re-
taining rings
properly.
The retaining
ring is xed
properly
if the four
wings of the
retaining ring
are located
exactly under
the recesses
of the shaving
head holder.
启用旅行锁
1 按住开/关按钮,直至旅行锁符号停
止闪烁,马达停止运行。(图7)
旅行锁将被激活。
注意:如果在旅行锁符号停止闪烁之前
松开开/关按钮,则不会激活旅行锁。
解除旅行锁
1 按住开/关按钮,直至旅行锁符号停
止闪烁,马达开始运行。
现在可以重新开始使用剃须刀。
注意:开始充电时,将自动禁用旅行
锁。
充电
电池充满电需要约 60 分钟。
如果是首次为剃须刀充电,或长时间未
使用后充电,应充电 90 分钟。
充满电的剃须刀可提供多达 40 分钟的
剃须时间。
如果您的胡须较为浓密,则剃须时间
就可能不足 40 分钟。剃须时间还可能
因您的剃须方式、清洁习惯和胡须类
型而异。
充电
切勿在封闭的软袋或包装中为剃须刀
充电。
1 将小插头插入剃须刀。
2 将电源适配器插入电源插座。
, 剃须刀上的电池符号闪烁,表示剃
须刀正在充电(请参阅“显示屏”
一章)。
注意:如果您将适配器从电源插座上拔
下并将小插头留在剃须刀内,剃须刀可
能有几秒钟无法工作。
使用剃须刀
注意:剃须刀不得接电使用。
剃须
皮肤适应期
前几次剃须可能不会带给您预期效果,
并且您的皮肤可能会受到轻度刺激。这
是正常的。您的皮肤和胡须需要时间适
应新的剃须系统。
建议您在 3 周时间内定期剃须(至少每
周 3 次),以便让您的皮肤适应新的剃
须刀。在此期间,请仅使用新的电动剃
须刀,不要使用其他剃须方法。如果您
使用不同的剃须方法,那么您的皮肤会
更难适应新的剃须系统。
允许在盛水的浴缸、淋浴、洗脸盆
或其他器皿附近使用本器具。
(图 2)
- 这款飞利浦产品符合关于电磁场
(EMF) 的相关标准。据目前的科学
证明,如果正确使用并按照本用户
手册中的说明进行操作,本产品是
安全的。
概述
- 电源适配器可将 100-240 伏的电压
转换为 24 伏以下的安全低电压。
基本说明 (图 3)
1 保护盖
2 剃须刀头部件(带剃须刀头支架)
3 剃须刀头支架释放钮
4 开/关按钮
5 显示屏
6 固定环
7 刀片
8 网罩
9 剃须刀头支架
10 修发器
11 适配器
12 小插头
13 清洁刷
14 存储袋
显示屏
初次使用剃须刀前,请从显示屏上取下
保护膜。
“正在充电”指示
- 剃须刀充电时,电池符号会闪
烁。 (图 4)
“电池已充满电”指示
- 当电池已完全充满电时,电池符号
将持续亮起。 (图 5)
- 如将剃须刀连接至电源,则指示灯
会在 30 分钟后熄灭。
“电池电量低”指示
- 当电池电量即将耗尽时,插头符号
会开始闪烁。 (图 6)
- 关闭剃须刀后,插头符号会持续闪
烁几秒钟。
旅行锁
您可以在携带剃须刀旅行之前将其锁
住。旅行锁可防止剃须刀被意外打开。
注意:当剃须刀连接到电源插座时,
将无法激活旅行锁。
简体中文
简介
感谢您的惠顾,欢迎光临飞利浦!为了
您能充分享受飞利浦提供的支持,请
在 www.philips.com/welcome 上注册
您的产品。
注意事项
使用本产品之前,请仔细阅读本使用说
明书,并妥善保管以备日后参考。
危险
- 确保电源适配器干燥。 (图 1)
- 电源适配器内含有一个变压器。切
勿自行更换插头,否则将导致严重
后果。
- 电源软线不能更换,如果软线损
坏,此器具(电源适配器)应废弃。
警告
- 本产品不打算由肢体不健全、感觉
或精神上有障碍或缺乏相关经验和
知识的人(包括儿童)使用,除非
有负责他们安全的人对他们使用本
产品进行监督或指导。
- 应照看好儿童,确保他们不玩耍本
产品。
- 清洁产品时要小心使用热水。切记
先检查水温是否太高,以防手被
烫伤。
注意
- 必须在 5 摄氏度至 35 摄氏度之间
的温度下充电、使用和存放剃须
刀。
- 旅行携带时,应确保将保护盖放在
剃须刀上,以保护剃须刀头。
- 剃须刀及附件不能用洗碗机清洗。
- 切勿使用温度高于 80°C 的热水冲
洗剃须刀。
- 只能使用随附的适配器。
- 如果剃须刀或适配器已损坏,请勿
再使用。
- 如果适配器已损坏,则务必更换原
装型号适配器,以免发生危险。
- 冲洗产品时,水可能从剃须刀底部
的插口漏出。这是正常的,而且没
有危险,因为所有的电子线路都密
封在剃须刀内的一个密封壳内。
符合标准
- 此剃须刀符合国际认可的安全标
准,可在洗澡或淋浴时安全地使
用,并可在水龙头下清洗。 符号注
释:适合于在洗澡或淋浴时使用。

1 按下开/关按钮启动剃须刀。
2 将剃须刀头在皮肤上移动。作直线
和迂回动作。(图8)
3 按开/关按钮关闭剃须刀电源。
4 每次剃须后均应清洁剃须刀
(见“清洁和保养”一章)。
湿剃
您也可以先用剃须泡沫或剃须啫喱将脸
弄湿,然后再用此剃须刀进行剃须。
要用剃须泡沫或剃须啫喱剃须,请按照
下面的步骤执行操作:
1 用水润湿一下皮肤。
2
在皮肤上涂上剃须泡沫或剃须啫喱。
3 在水龙头上冲洗一下剃须刀头部
件,确保剃须刀头部件可以在您的
皮肤上顺畅滑动。
4 按下开/关按钮启动剃须刀。
5 将剃须刀头在皮肤上移动。作直线
和迂回动作。
注意:在水龙头下定期冲洗剃须刀,确
保其能够继续在您的皮肤上顺畅滑动。
6 每次剃须后,把脸擦干并用足量的
水彻底冲洗剃须刀。确保冲净剃须
刀上的所有泡沫或剃须啫喱(另请
参阅“清洁和保养”一章)。
修发
您可使用修剪器修剪鬓角和小胡子。
1 将剃须刀头部件竖直抽离剃须刀。
(图9)
注意:将其抽离剃须刀时,不要旋转剃
须刀头部件。
2 将修剪器的凸缘插入剃须刀顶部的
槽内(1)。然后按下修剪器(2)以
将其安装在剃须刀上(可听到“咔
哒”一声)。(图10)
3 按开/关按钮打开修发器。可以立即
开始修剪。
4 按开/关按钮关闭修发器。
5 将修发器竖直抽离剃须刀。(图11)
注意:将修发器抽离剃须刀时,不要
旋转。
6 将剃须刀头部件的凸缘插入剃须刀
顶部的槽内(1)。然后按下剃须刀头
部件(2)以将其安装在剃须刀上
(可听到“咔哒”一声)。(图12)
困难,请联系您所在国家/地区的飞利浦
客户服务中心。可在全球保修卡中找到
其详细联系信息。
可选配以下附件:
- RQ32 飞利浦剃须刀头
- HQ110 飞利浦剃须刀头清洁喷雾剂
环保
- 弃置产品时,请不要将其与一般生
活垃圾堆放在一起;应将其交给官
方指定的回收点。这样做有利于环
保。 (图 30)
- 内置充电电池含有可能会污染环境
的物质。丢弃剃须刀时,一定要将
电池取出,或将剃须刀送到官方指
定的回收站。到官方指定的电池回
收站处理电池。如果您在取出电池
时遇到问题,您也可以将剃须刀送
至飞利浦维修中心。维修中心的员
工会帮您取出电池,并以环保的方
式处理它。 (图 31)
卸下剃须刀的充电电池
只有在丢弃剃须刀时才可取下充电电
池。请确保在取下充电电池时电量已完
全耗尽。
注意,电池带非常锋利。
1 用螺丝刀(1)拧下剃须刀后面板中
的螺钉,并卸下后面板(2)。
(图32)
2 将钩子向外掰,取出电源部件。
(图33)
3 脱开安全钩(1),取下电源部件(2)
的前面板。(图34)
4 取出电池舱(1),用一把钢丝钳(2)
剪下电池标签。(图35)
5 卸下充电电池。
保修与服务
如果您需要服务或信息,或者有任何疑
问,请访问飞利浦网站:www.philips.
com/support。您也可与您所在国家/地
区的飞利浦客户服务中心联系(可从全
球保修卡中找到其电话号码)。如果您
所在的国家/地区没有飞利浦客户服务中
心,请与当地的飞利浦经销商联系。
保修条款
由于剃须刀头(刀片和网罩)属于易磨
损物品,因此不在国际保修条款的涵盖
范围之列。
存储
注意:确保剃须刀头部件是干燥的,然
后再存放剃须刀。
1 使用后请盖上剃须刀保护盖,以防
止损坏剃须刀头并避免其内积聚灰
尘。(图29)
2 将剃须刀存放在随附的软袋中。
更换
为获得最佳剃须效果,建议您每隔两年
更换一次剃须刀头部件。损坏的剃须刀
头应立即更换。
剃须刀头仅可使用原装 RQ32 飞利浦
剃须刀头进行更换。另请参阅“订购附
件”一章。
1 关闭剃须刀。
2 按剃须刀头部件上的释放钮并将
剃须刀头支架从剃须刀头部件中抽
离。(图14)
3 要打开橙色固定环,请按其内和其
上所示的箭头方向转动固定环。
(图18)
4 将固定环从剃须刀头支架中提起并
取出。(图19)
5 取下剃须刀头,将新刀头放入剃须
刀头部件。
确保剃须刀头的两个翼状物正好插入
凹槽。
6 将固定环置于剃须刀头支架(1)
上。要重新安装固定环,请逆着其
内和其上所示的箭头方向转动固定
环(2)。(图25)
注意:确保正确固定固定环。固定环的
四个翼状物必须正好位于剃须刀头支架
的凹槽下方。(图26)
7 将剃须刀头支架重新装回剃须刀
头部件中(可听到“咔哒”一声)
。(图16)
注意:如果剃须刀头部件关闭不畅,请
检查剃须刀头的放置是否正确,固定环
是否正确固定。
订购附件
要购买本产品的附件,请访问我们
的在线商城 www.shop.philips.com/
service。如果您的国家/地区没有在线
商城,请联系您的飞利浦经销商或飞利
浦服务中心。如果您购买产品的附件有
5 取下刀片和网罩。(图20)
注意:不要同时清洁多组刀片和网罩,
因为它们都是相互匹配的。如果不小心
将刀片装到了错误的网罩上,则需要数
周时间才能恢复产品的最佳剃须性能。
6 用随附的清洁刷清洁刀片。(图21)
7 清洁网罩的内侧。(图22)
8 清洁后,将网罩装回剃须刀头支
架。确保两个翼状物正好插入剃须
刀头支架的凹槽。(图23)
9 将刀片重新装回至网罩,刀片柄朝
下。(图24)
10将固定环置于剃须刀头支架(1)
上。要重新安装固定环,请逆着其
内和其上所示的箭头方向转动固定
环(2)。(图25)
注意:确保正确固定固定环。固定环的
四个翼状物必须正好位于剃须刀头支架
的凹槽下方。(图26)
11 将剃须刀头支架重新装回剃须刀
头部件中(可听到“咔哒”一声)
。(图16)
注意:如果剃须刀头部件关闭不畅,请
检查剃须刀头的放置是否正确,固定环
是否正确固定。
清洁修发器
每次使用后都应清洁修发器。
在水龙头下冲洗修发器
1 打开装有修剪器的产品。
2 在热水龙头下冲洗一会儿修发
器。(图27)
3 清洁完成后,关闭产品。
4 在水龙头下冲洗本产品后,将其竖
直握住10-15秒钟,使水从底部流
出。
使用随附的清洁刷清洁修发器
1 关闭修发器。
2 使用清洁刷的短毛一侧清洁修剪
器。沿着修剪器齿上下刷净。
(图28)
提示:为获得最佳修剪效果,请经常使
用飞利浦剃须刀头清洁喷雾剂(HQ110)
润滑修发器齿。
清洁和保养
切勿使用钢丝绒、研磨性清洁剂或腐蚀
性液体(例如汽油或丙酮)来清洁剃须
刀及其附件。
- 每次剃须后均应清洁剃须刀。
- 经常使用飞利浦剃须刀头清洁喷雾
剂 (HQ110) 清洁剃须刀头,以获得
最佳剃须效果。
- 您可以用湿布清洁剃须刀的外侧。
切勿用布清洁剃须刀头部件。
清洁剃毛刀头部件
使用热水时一定要小心。切记先检查水
温是否太高,以防烫手。
1 关闭剃须刀。
2 在热水龙头下冲洗一会儿剃须刀头
部件。(图13)
注意:您也可以使用随附的清洁刷清洁
剃须刀头部件。
3 在水龙头下冲洗本产品后,将其竖
直握住10-15秒钟,使水从底部流
出。
4 按剃须刀头部件(1)上的的释放钮
并将剃须刀头支架从剃须刀头部件
(2)中抽离。(图14)
5 将剃须刀头支架在热水龙头下冲洗
30秒。(图15)
注意:您也可以使用随附的清洁刷清洁
剃须刀头支架。
6 小心甩干多余的水,然后使剃须刀
头支架干燥。
不要用毛巾或纸巾擦干剃须刀头支架,
因为这样可能会损坏剃须刀头。
7 将剃须刀头支架重新装回剃须刀
头部件中(可听到“咔哒”一声)
。(图16)
超彻底清洁方法
1 关闭剃须刀。
2 按剃须刀头部件(1)上的的释放钮
并将剃须刀头支架从剃须刀头部件
(2)中抽离。(图17)
3 要打开橙色固定环,请按其内和其
上所示的箭头方向转动固定环。
(图18)
4 将固定环从剃须刀头支架中提起并
取出。(图19)

故障种类和处理方法
本章归纳了使用本产品时最常见的一些
问题。如果您无法根据以下信息解决问
题,请访问 www.philips.com/support
查阅常见问题列表,或联系您所在国家/
地区的客户服务中心。
问题 可能的
原因
解决方法
剃须刀
的剃须
效果没
有以前
好。
剃须刀头
已损坏或
磨损。
更换剃须刀头
(见“更换”
一章)。
剃须刀头
很脏。
用随附的清洁
刷清洁刀片和
网罩(请参
阅“清洁和保
养”一章中
的“彻底清
洁方法”部
分)。
过长的胡
须堵塞了
剃须刀
头。
用随附的清洁
刷清洁刀片和
网罩(请参
阅“清洁和保
养”一章中
的“彻底清
洁方法”部
分)。
剃须刀头
中积聚了
剃须泡沫
或剃须啫
喱。
用足量的水彻
底冲洗剃须刀
头。
按下开/
关钮
时,剃
须刀不
工作。
充电电池
的电量已
耗尽。
给电池充电
(见“充电”
一章)。
旅行锁已
被激活。
要禁用旅行
锁,请按住
开/关按钮,
直至旅行锁符
号停止闪烁,
马达开始运
行。
问题 可能的
原因
解决方法
剃须刀的
温度过
高。此
时,剃须
刀无法工
作。
让剃须刀冷
却。一旦剃须
刀降到足够低
的温度,便可
重新打开剃须
刀。
如果您将
适配器从
电源插座
上拔下并
将小插头
留在剃须
刀内,剃
须刀可能
有几秒钟
无法工
作。
将小插头从
剃须刀上卸
下。
剃须刀
不工
作,即
使已连
接电
源。
这款剃须
刀不可直
接插电使
用。
从电源插座中
拔下适配器,
并从剃须刀上
拔下小插头。
您可以立即重
新打开剃须
刀。
我在剃
须后出
现皮肤
过敏。
您的皮肤
需要一定
的时间
来适应飞
利浦剃须
刀。
在前 2-3 周的
使用过程中,
可能会出现皮
肤过敏。在此
之后,皮肤过
敏通常会消
失。
剃须刀头
已损坏或
磨损。
更换剃须刀头
(见“更换”
一章)。
剃须刀
头的转
速比平
时慢。
剃须刀头
中积聚了
太多的灰
尘。
清洁剃须刀
头。请参阅“
清洁和保养”
一章。
充电电池
的电量不
足。
给电池充电。
见“充电”一
章。
剃须刀
头未固
定到
位。
未正确固
定固定
环。
固定环的四个
翼状物正好位
于剃须刀头支
架的凹槽下方
时,才能固定
好固定环。
问题 可能的
原因
解决方法
完全充
电后,
剃须刀
提供的
剃须时
间不足
40 分
钟。
如果您的
胡须非常
浓密,则
剃须时间
就可能不
足 40 分
钟。剃须
时间还可
能因您的
剃须方
式、清洁
习惯和胡
须类型而
异。
-
 1
1
-
 2
2
-
 3
3
-
 4
4
-
 5
5
-
 6
6


他の言語で
- English: Philips RQ360/16 User manual