
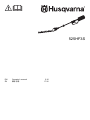
525HF3S
EN Operator's manual 2-16
ZH 操作手册 17-30

Contents
Introduction..................................................................... 2
Safety..............................................................................3
Assembly........................................................................ 7
Operation........................................................................ 8
Maintenance................................................................. 10
Troubleshooting............................................................ 14
Transportation, storage and disposal........................... 15
Technical data.............................................................. 16
Introduction
Product description
The product is a pole hedge trimmer with a combustion
engine.
Intended use
Use the product to cut branches and twigs. Do not use
the product for other tasks.
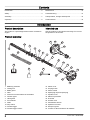
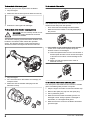
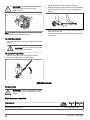
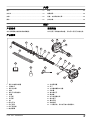
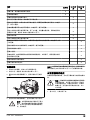
Product overview
17
16
15
14
2
1
23
3
4
5
6
7
8
9
10
12
13
18
11
20
19
21
24
22
1. Blade tip protection
2. Cutting unit
3. Blade guard
4. Gear
5. Socket for manual release of the blades
6. Grease nipple
7. Hand guard
8. Front handle
9. Shaft
10. Stop switch
11. Throttle trigger
12. Throttle trigger lockout
13. Clutch cover
14. Air purge bulb
15. Choke control
16. Spark plug cap and spark plug
17. Cylinder cover
18. Starter rope handle
19. Fuel tank
20. Air filter cover
21. Combination wrench
22. Operator’s manual
23. Transport guard
24. 2-stroke oil. Not included for all markets.
2 1118 - 001 - 05.09.2019

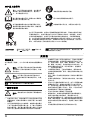
Symbols on the product
WARNING: This product can be dangerous
and cause serious injury or death to the
operator or others. Be careful and use the
product correctly.
Read the operator's manual carefully and
make sure that you understand the
instructions before you use this product.
Use a protective helmet in locations where
objects can fall on you. Use approved
hearing protection. Use approved eye
protection.
Use approved protective gloves.
Use stable boots with non-slip soles.
Stop the product fully before you touch the
cutting tool.
There is no electrical insulation in this product. If the product touches or comes
near high voltage power lines, it can cause serious injury or death to the opera-
tor. Electricity can move between different objects by a curve. The highter the
voltage, the longer the electricity can move. Electricity can also move through
branches and other objects, especially if the object is wet. Always keep a dis-
tance at a minimum of 10 m/33 ft between the product and high voltage power
lines and/or objects that touches the power lines. If it is necessary to do work
near the power lines, make sure that the power is off before you start the work.
Keep a distance at a minimum of 15 m/50 ft to other persons or animals during
the operation.
yyyywwxxxx The rating plate shows serial number.
yyyy is the production year and ww is
the production week.
Note: Other symbols/decals on the product refer to
special certification requirements for some markets.
Safety
Safety definitions
Warnings, cautions and notes are used to point out
specially important parts of the manual.
WARNING: Used if there is a risk of injury or
death for the operator or bystanders if the
instructions in the manual are not obeyed.
CAUTION: Used if there is a risk of damage
to the product, other materials or the
adjacent area if the instructions in the
manual are not obeyed.
Note: Used to give more information that is necessary in
a given situation.
General safety instructions
WARNING: Read the warning instructions
that follow before you use the product.
• Incorrect or careless use of the product can turn it
into a dangerous tool that can cause serious or even
fatal injury. It is extremely important that you read
and understand the contents of this operator’s
manual.
• This product produces an electromagnetic field
during operation. This field may under some
circumstances interfere with active or passive
medical implants. To reduce the risk of serious or
fatal injury, we recommend persons with medical
implants to consult their physician and the medical
implant manufacturer before operating this product.
• Overexposure to vibration can lead to circulatory
damage or nerve damage in people who have
impaired circulation. Contact your doctor if you
experience symptoms of overexposure to vibration.
Such symptoms include numbness, loss of feeling,
tingling, pricking, pain, loss of strength, changes in
skin color or condition. These symptoms normally
appear in the fingers, hands or wrists. The risk
increases at low temperatures.
• If you encounter a situation where you are uncertain
how to proceed you should ask an expert. Contact
your dealer or your service workshop. Avoid all
1118 - 001 - 05.09.2019 3

usage which you consider to be beyond your
capability.
• Keep in mind that the operator is responsible for
accidents or hazards occurring to other people or
their property.
• Never allow anyone else to use the product without
first ensuring that they have understood the contents
of the operator’s manual.
• Never allow children to use or be in the vicinity of the
product. As the product is equipped with a spring-
loaded stop switch and can be started by low speed
and force on the starter handle, even small children
under some circumstances can produce the force
necessary to start the product. This can mean a risk
of serious personal injury. Therefore remove the
spark plug cap when the product is not under close
supervision.
• Store the product out of reach of children.
• Never use the product if you are tired, if you have
drunk alcohol, or if you are taking medication that
could affect your vision, your judgement or your
coordination.
• Never use a product that is faulty. Carry out the
checks, maintenance and service instructions
described in this manual. Some maintenance and
service measures must be carried out by trained and
qualified specialists. Refer to instructions under the
heading Maintenance.
• Never use a product that has been modified in any
way from its original specification.
Safety instructions for operation
WARNING:
Read the warning instructions
that follow before you use the product.
• Never use the product in extreme weather conditions
such as severe cold, very hot and/or humid climates.
• Faulty blades can increase the risk of accidents.
• Ensure that no-one comes closer than 15 m / 50 ft
while you are working.
• Observe your surroundings and make sure that there
is no risk of people or animals coming into contact
with the cutting equipment.
• Inspect the working area. Remove any objects that
could be thrown out.
• Always ensure you have a safe and stable working
position.
• Never leave the product unsupervised with the motor
running.
• Make sure that your hands and feet do not come
near the cutting unit when the engine is running.
• If anything jams in the blades while you are working,
switch off the engine and wait until it has stopped
completely before cleaning the blades. Disconnect
the HT lead from the spark plug. Refer to
Product
overview on page 2
.
• When the engine is switched off, keep your hands
and feet away from the cutting unit until it has
stopped completely.
• Watch out for stumps of branches that can be thrown
out during cutting.
• Listen out for warning signals or shouts when you
are wearing hearing protection. Always remove your
hearing protection as soon as the engine stops.
• Never work from a ladder, stool or any other raised
position that is not fully secured.
• Always use both hands to hold the product. Hold the
product in front of your body.
• If any foreign object is hit or if vibrations occur stop
the product immediately. Disconnect the HT lead
from the spark plug. Check that the product is not
damaged. Repair any damage.
• Ensure that the spark plug cap and ignition lead are
undamaged to avoid the risk of electric shock.
• Check that all nuts and screws are tight.
• Make sure the gear housing is lubricated correctly.
Refer to
To lubricate the gear housing on page 14
.
• The gear housing gets hot when the product has
been in use. To avoid burning yourself do not touch
the gear housing.
• All covers and guards must be fitted before starting.
• The transport guard should always be fitted to the
cutting unit when the product is not in use.
Personal protective equipment
WARNING: Read the warning instructions
that follow before you use the product.
• Always use approved personal protective equipment
when you use the product. Personal protective
equipment cannot fully prevent injury but it
decreases the degree of injury if an accident does
occur. Let your dealer help you select the right
equipment.
• Use approved hearing protection that provides
adequate noise reduction. Long-term exposure to
noise can result in permanent hearing impairment.
• Use approved eye protection. If you use a visor, you
must also use approved protective goggles.
Approved protective goggles must comply with the
ANSI Z87.1 standard in the USAs or EN 166 in EU
countries.
• Use gloves when necessary, for example when you
attach, examine or clean the cutting equipment.
4
1118 - 001 - 05.09.2019

• Use sturdy non-slip boots or shoes.
• Use clothing made of a strong fabric. Always use
heavy, long pants and long sleeves. Do not use
loose clothing that can catch on twigs and branches.
Do not wear jewelry, short pants, sandals or go with
bare feet. Put your hair up safely above shoulder
level.
• Keep first aid equipment close at hand.
Safety devices on the product
WARNING:
Read the warning instructions
that follow before you use the product.
• Do not use a product with defective safety devices.
• Do a check of the safety devices regularly. If the
safety devices are defective, speak to your
Husqvarna service agent.
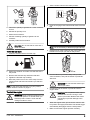
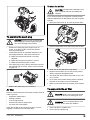
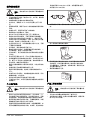
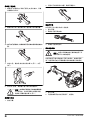
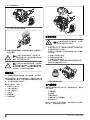
To do a check of the throttle trigger lockout
1. Make sure that the throttle trigger lockout (A) and
throttle trigger (B) move freely and that the return
spring operates correctly.
A
B
2. Make sure that the throttle trigger is locked at the
idle position when the throttle trigger lockout is
released.
3. Push down the throttle trigger lockout and make sure
that it goes back to its initial position when you
release it.
4. Start the product. Refer to
To start the engine on
page 9
. Apply full throttle.
5. Release the throttle trigger and make sure that the
blades stop and stay stationary.
WARNING:
If the blades move when the
throttle trigger is in the idle position, then
the carburetor idle speed must be
adjusted. Refer to
To adjust the idle
speed on page 11
.
To do a check of the stop switch
1. Start the engine.
2. Move the stop switch to the stop position and make
sure that the engine stops.
1118 - 001 - 05.09.2019
5

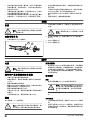
To do a check of the hand guard
The hand guard prevents injuries from the blades.
1. Stop the engine.
2. Make sure that the hand guard is attached correctly.
3. Examine the hand guard for damages.
To do a check of the vibration damping system
WARNING: Use of incorrectly wound cord or
an incorrect cutting attachment increases
the level of vibration.
The vibration damping system decreases vibration in the
handles to a minimum which makes the operation
easier. The vibration damping system decreases the
vibrations between the engine unit and the shaft unit.
1. Stop the engine.
2. Do a visual check for deformation and damage, for
example cracks.
3. Make sure that the vibration damping units are
attached correctly.
To do a check of the muffler
The muffler keeps noise levels to a minimum and sends
exhaust fumes away from the operator.
• Do a visual check for damage and deformation.
• Make sure that the muffler is correctly attached to
the product.
• If the muffler on your product has a spark arrester
screen, do a visual check. Replace the spark
arrester screen if it is damaged.
a) Clean the spark arrester screen if it is blocked. A
blocked spark arrester screen causes the engine
to become too hot which causes damage to the
engine.
b) Make sure that the spark arrestor mesh is
attached correctly.
To do a check of the blades and blade guard
The outer part of the blades has the function of a blade
guard. The blade guard prevents cut injuries.
1. Stop the engine and make sure that the blades stop.
2. Remove the spark plug cap from the spark plug.
3. Put on protective gloves.
4. Make sure that the blade and blade guard is not
damaged or bent. Always replace a damaged or
bent blade, or a damaged blade guard.
5. Make sure that the screws to the blades and blade
guard are tight.
6
1118 - 001 - 05.09.2019

Fuel safety
WARNING: Read the warning instructions
that follow before you use the product.
• Do not mix the fuel indoor or near a heat source.
• Do not start the product if there is fuel or engine oil
on the product. Remove the unwanted fuel/oil and let
the product dry. Remove unwanted fuel from the
product.
• If you spill fuel on your clothing, change clothing
immediately.
• Do not get fuel on your body, it can cause injury. If
you get fuel on your body, use a soap and water to
remove the fuel.
• Do not start the engine if you spill oil or fuel on the
product or on your body.
• Do not start the product if the engine has a leak.
Examine the engine for leaks regularly.
• Be careful with fuel. Fuel is flammable and the fumes
are explosive and can cause injuries or death.
• Do not breathe in the fuel fumes, it can cause injury.
Make sure that there is a sufficient airflow.
• Do not smoke near the fuel or the engine.
• Do not put warm objects near the fuel or the engine.
• Do not add the fuel when the engine is on.
• Make sure that the engine is cool before you refuel.
• Before you refuel, open the fuel tank cap slowly and
release the pressure carefully.
• Do not add fuel to the engine in an indoor area. Not
sufficient airflow can cause injury or death because
of asphyxiation or carbon monoxide.
• Tighten the fuel tank cap carefully or a fire can
occur.
• Move the product at a minimum of 3 m (10 ft) from
the position where you filled the tank before a start.
• Do not put too much fuel in the fuel tank.
• Make sure that a leak cannot occur when you move
the product or fuel container.
• Do not put the product or a fuel container where
there is an open flame, spark or pilot light. Make
sure that the storage area does not contain an open
flame.
• Only use approved containers when you move the
fuel or put the fuel into storage.
• Empty the fuel tank before long-term storage. Obey
the local law on where to dispose fuel.
• Clean the product before long-term storage.
• Remove the spark plug cap before you put the
product into storage to make sure that the engine
does not start accidentally.
Safety instructions for maintenance
WARNING: Read the warning instructions
that follow before you use the product.
• Stop the engine and make sure that the cutting
equipment stops. Let the product become cool
before you do the maintenance.
• Disconnect the spark plug cap before you do the
maintenance.
• The exhaust fumes from the engine contain carbon
monoxide, an odourless, poisonous and very
dangerous gas that can cause death. Do not run the
product indoors or in closed spaces.
• The exhaust fumes from the engine are hot and can
contain sparks. Do not run the product indoors or
near flammable material.
• Accessories and changes to the product that are not
approved by the manufacturer, can cause serious
injury or death. Do not change the product. Always
use original accessories.
• If the maintenance is not done correctly and
regularly, there is an increased risk of injury and
damage to the product.
• Only do the maintenance as this operator's manual
recommends. Let an approved Husqvarna service
agent do all other servicing.
• Let an approved Husqvarna service agent do
servicing on the product regularly.
• Replace damaged, worn or broken parts.
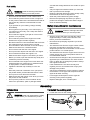
Assembly
Introduction
WARNING: Read and understand the safety
chapter before you assemble the product.
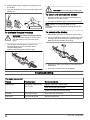
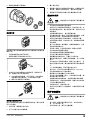
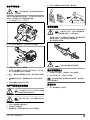
To install the cutting unit
1. Loosen the screw on the cutting unit (A).
B
A
C
1118 - 001 - 05.09.2019 7

2. Put the shaft in the cutting unit. Align the screw (A)
with the hole in the shaft.
CAUTION: Make sure that the drive
shaft (C) engages with the gear in the
cutting unit.
3. Tighten the screw (A) with your fingers. Make sure
that screw (A) goes into the hole in the shaft.
4. Tighten the screw (A) fully.
5. Tighten the screw (B) fully.
Operation
Introduction
WARNING: Read and understand the safety
chapter before you use the product.
To do before you operate the product
• Examine the work area and remove loose objects.
• Do a check of the cutting unit. Refer to
To do a
check of the blades and blade guard on page 6
.
• Make sure that the gear housing is correctly
lubricated.
• Make sure that the safety devices of the product
operates correctly. Do not use the product without all
safety devices installed correctly.
• Make sure that all screws and nuts are tight.
• Make sure that all covers are attached correctly and
not damaged before you start the product.
• Make sure that the cutting unit stops when the
engine is at idle speed.
Fuel
This product has a two-stroke engine.
CAUTION: Incorrect type of fuel can result in
engine damage. Use a mixture of gasoline
and two-stroke oil.
Premixed fuel
• Use Husqvarna premixed alkylate fuel of a good
quality, for best performance and extension of the
engine life. This fuel contains less harmful chemicals
compared to regular fuel, which decreases harmful
exhaust fumes. The quantity of remains after
combustion is lower with this fuel, which keeps the
components of the engine more clean.
To mix fuel
Gasoline
• Use good quality unleaded gasoline with a maximum
of 10% ethanol contents.
CAUTION: Do not use gasoline with an
octane grade less than 90 RON/87 AKI.
Use of a lower octane grade can cause
engine knocking, which causes engine
damages.
• We recommend that you use gasoline of a higher
octane grade for work with continuously high rpm.
Two-stroke oil
• For best results and performance use Husqvarna
two-stroke oil.
• If Husqvarna two-stroke oil is not available, use a
two-stroke oil of good quality for air-cooled engines.
Speak to your servicing dealer to select the correct
oil.
CAUTION: Do not use two-stroke oil for
water-cooled outboard engines, also
referred to as outboard oil. Do not use oil
for four-stroke engines.
To mix gasoline and two-stroke oil
Gasoline, liter Two-stroke oil,
liter
2% (50:1)
5 0.10
10 0.20
15 0.30
20 0.40
CAUTION: Small errors can influence the
ratio of the mixture drastically when you mix
small quantities of fuel. Measure the quantity
of oil carefully and make sure that you get
the correct mixture.
8 1118 - 001 - 05.09.2019

1. Fill half the quantity of gasoline in a clean container
for fuel.
2. Add the full quantity of oil.
3. Shake the fuel mixture.
4. Add the remaining quantity of gasoline to the
container.
5. Carefully shake the fuel mixture.
CAUTION: Do not mix fuel for more than 1
month at a time.
To fill the fuel tank
1. Clean the area around the fuel tank cap.
2. Shake the container and make sure that the fuel is
fully mixed.
3. Remove the fuel tank cap and fill the fuel tank.
4. Tighten the fuel tank cap carefully.
5. Move the product 3 m/10 ft or more away from the
refueling area and fuel source before you start the
engine.
Note:
To see where the fuel tank is on your product,
refer to
Product overview on page 2
.
To start the engine
WARNING:
Keep a minimum distance of 15
m/50 ft from persons or animals when you
start the product. There is a risk that the
cutting unit starts to move.
1. Set the choke control in the choke position.
2. Push the air purge bulb until the bulb starts to fill with
fuel.
Note: It is not necessary to fill the air purge bulb fully.
3. Hold the body of the product on the ground with your
left hand. Do not put your feet on the product.
4. Pull the starter rope handle slowly until you feel
some resistance, then pull the starter rope handle
with force.
WARNING:
Do not wind the starter rope
around your hand.
5. Continue to pull the starter rope handle until the
engine starts.
CAUTION:
Do not pull the starter rope to
full extension and do not let go of the
starter rope handle. Release the starter
rope slowly to prevent damage to the
product.
6. When the engine starts, put the choke control in the
run position and apply full throttle. The throttle trigger
automatically disengages from the start position.
7. Make sure that the engine operates smoothly.
1118 - 001 - 05.09.2019
9

WARNING: Do not use the product with a
damaged spark plug cap to prevent
electrical shock.
Note: To start the product when the engine is warm, it is
not necessary to use the choke control.
To stop the product
• Move the stop switch to the stop position to stop the
engine.
CAUTION: The stop switch automatically
goes back to run position.
To operate the product
• Start near the ground and move the product up
along the hedge when you cut the sides.
• Adjust the speed to align with the work load.
• Make sure that the engine does not touch the hedge.
• Hold the product near your body for a stable work
position.
• Make sure that the tip of the cutting equipment does
not touch the ground.
• Be careful and work slowly until all the branches are
correctly cut.
Maintenance
Introduction
WARNING: Read and understand the safety
chapter before you do maintenance on the
product.
Maintenance schedule
Maintenance Before
operation
After 40
h
After 100
h
Clean the external surface. After each operation.
10 1118 - 001 - 05.09.2019

Maintenance Before
operation
After 40
h
After 100
h
Clean the muffler, exhaust pipe and engine from leaves, dirt and unwanted lubri-
cant.
After each operation.
Make sure that the cutting unit does not move at idle speed. X
Do a check of the stop switch. Refer to
To do a check of the stop switch on page
5
.
X
Examine the cutting unit for damages and cracks. Replace if it is damaged. X
Examine the hand guard for damages and cracks. Replace if it is damaged. X
Do a check of the throttle trigger lockout and the throttle trigger. Refer to
To do a
check of the throttle trigger lockout on page 5
.
X
Examine the engine, the fuel tank and the fuel hose for leaks. X
Tighten nuts and screws. X
Examine the starter and the starter rope for damages. X
Do a check that the screws that hold the blades together are correctly tightened. X
Clean the air filter. Clean more frequently if used in areas which has dust. Re-
place if it is damaged.
X
Examine the vibration damping units for damages and cracks. Replace if it is
damaged.
X
Clean the external surface of the spark plug and the area around it. Remove the
spark plug and measure the electrode gap. Adjust the electrode gap or replace
the spark plug. Refer to
To examine the spark plug on page 13
.
X
Clean the cooling system. X
Clean the external surface of the carburetor and the area around it. X
Examine the fuel filter for contamination and the fuel hose for cracks and other
defects. Replace if it is damaged.
X
Clean the spark arrester screen on the muffler, replace if it is damaged. X
Clean the inner surface of the fuel tank. X
Replace the spark plug. X
Examine the clutch, clutch spring and the clutch drum for wear. Replace if it is
damaged by an approved servicing dealer.
X
Make sure that the gear housing is filled with grease. X
Do a check of all cables and connections. X
To adjust the idle speed
1. Clean the air filter and attach the air filter cover.
2. Start the product. Refer to
To start the engine on
page 9
.
1118 - 001 - 05.09.2019 11

3. Turn the idle adjustment screw T clockwise until the
cutting unit starts to move.
4. Turn the idle adjustment screw counterclockwise
until the cutting unit stops.
WARNING: If the cutting unit does not
stop when you adjust the idle speed,
speak to your nearest servicing dealer.
Do not use the product until it is correctly
adjusted or repaired
Note: The idle speed is correct when the engine
operates smoothly in all positions.Refer to
Technical
data on page 16
for the recommended idle speed.
To do maintenance on the muffler
The muffler decreases the noise level and directs the
exhaust gases away from the operator.
WARNING:
Mufflers that have catalytic
converters get very hot during operation and
will stay hot for some time after you stop the
product. This also applies at idle speed. If
you touch the product it can result in burns
to the skin. Think about of the risk of fire.
1. Stop the product and let it cool down.
2. Remove the cover to the muffler.
3. Remove the screw holding the spark arrestor mesh.
4. Clean the spark arrestor mesh if it is blocked or
replace it if it is damaged.
CAUTION: The spark arrestor mesh must be
replaced if it is damaged. Do not use a
product if the spark arrestor mesh on the
muffler is missing or defective.
CAUTION: If the spark arrestor mesh is
frequently blocked it can be a sign that
performance of the catalytic converter is
decreased. Turn to your servicing dealer to
examine the muffler. A blocked spark
arrestor mesh will cause overheating and
result in damage to the cylinder and piston.
Cooling system
The product has a cooling system to keep the operation
temperature as low as possible.
Clean the components of the cooling system with a
brush weekly or more frequently in rougher conditions. A
dirty or blocked cooling system makes the product too
hot which causes damage to the piston and cylinder.
The cooling system has the following components:
1. Air intake on the starter.
2. Fins on the flywheel.
3. Cooling fins on the cylinder.
4. Cylinder cover.
5. Muffler cover.
6. Muffler plate.
12
1118 - 001 - 05.09.2019

1
6
3
4
5
2
To examine the spark plug
CAUTION: Always use the recommended
spark plug type. Incorrect spark plug type
can cause damage to the product.
• Examine the spark plug if the engine is low on
power, is not easy to start or does not operate
correctly at idle speed.
• To decrease the risk of unwanted material on the
spark plug electrodes, obey these instructions:
a) Make sure that the idle speed is correctly
adjusted.
b) Make sure that the fuel mixture is correct.
c) Make sure that the air filter is clean.
• If the spark plug is dirty, clean it and make sure that
the electrode gap is correct, refer to
Technical data
on page 16
.
• Replace the spark plug if it is necessary.
Air filter
Remove dust and dirt from the air filter to keep it clean in
order to prevent:
• Carburettor malfunctions.
• Starting problems.
• Loss of engine power.
• Unnecessary wear to engine parts.
• Too much fuel consumption.
Clean the air filter at an interval of 25 hours, or more
regularly if conditions are unusually dusty.
To clean the air filter
CAUTION: A air filter that is damaged, very
dirty or soaked with fuel must always be
replaced.
If you use an air filter for a long time it cannot be fully
cleaned. Replace the air filter with a new one at regular
intervals.
1. Move the choke lever up, to close the choke valve.
2. Remove the air filter cover and remove the air filter.
3. Clean the air filter with warm soap water.
4. Replace the air filter if it is too dirty to fully clean it.
Always replace a damaged air filter.
5. Also clean the inner surface of the filter cover. Use
air or a brush.
6. Do a check of the rubber sealing surface. Replace
the filter on the rubber seal if it is damaged.
7. Make sure that the filter is dry before you assemble
it.
To apply oil to the air filter
CAUTION: Always use Husqvarna special
air-filter oil. Do not use other types of oil.
WARNING: Put on protective gloves. The
air-filter oil can cause skin irritation.
1. Put the air filter in a plastic bag.
2. Put the oil in the plastic bag.
1118 - 001 - 05.09.2019
13

3. Rub the plastic bag to supply the oil equally across
the air filter.
4. Push the unwanted oil out of the air filter while in the
plastic bag.
To lubricate the gear housing
WARNING: Do not touch the gear housing
immediately after operation of the product.
The gear housing is hot and can cause
injury.
• Use Husqvarna special grease. Speak to your
servicing dealer for more information about
recommended grease.
• Add the grease through the grease nipple.
CAUTION: Do not fill the gear housing fully.
To clean and lubricate the blades
1. Clean the blades from unwanted materials before
and after you use the product.
2. Lubricate the blades before long periods of storage.
Note: Speak to your servicing dealer for more
information about recommended cleaning agents and
lubricants.
To examine the blades
1. Remove the cap on the socket of the gear housing.
2. Put the combination wrench in the socket of the gear
housing and turn clockwise and counterclockwise.
Make sure that the blades move freely.
3. Examine the edges of the blades for damages and
deformation.
4. Use a file to remove burrs on the blades.
Troubleshooting
The engine does not start
Problem Possible cause Recommended step
Starter pawls The starter pawls cannot
move freely.
Adjust or replace the starter pawls.
Clean around the starter pawls.
Speak to an approved servicing dealer.
Fuel tank Incorrect fuel type. Drain it and use correct fuel.
Carburetor Incorrect idle speed. Adjust the idle speed.
14 1118 - 001 - 05.09.2019

The engine does not start
Problem Possible cause Recommended step
No spark The spark plug is dirty or
wet.
Make sure that the spark plug is dry and clean.
Incorrect electrode gap.
Clean the spark plug. Make sure that the electrode gap
of the spark plug is correct. Make sure that the spark
plug is installed with a suppressor.
Refer to
Technical data on page 16
for correct elec-
trode gap.
Spark plug The spark plug is loose. Tighten the spark plug.
The engine starts but stops again
Problem Possible cause Recommended step
Fuel tank Incorrect fuel type. Drain it and use correct fuel.
Carburetor Incorrect idle speed. Adjust the idle speed. Refer to
To adjust the idle speed
on page 11
. Speak to your servicing dealer if it is neces-
sary.
Air filter Clogged air filter. Clean the air filter.
Blade
Problem Possible causes Recommended step
The blade moves slowly or
does not move.
The blade is blocked or it is
damaged.
Clean the blades from unwanted materials. Refer to
To
clean and lubricate the blades on page 14
. Remove
burrs from the blade, refer to
To examine the blades on
page 14
. Replace the blade if it is damaged.
The blade does not cut
easily.
The blade is not sharp or it
is damaged.
Sharpen the blade, refer to
To examine the blades on
page 14
. Replace the blade if it is damaged.
The blade becomes hot. There is friction between
the blades.
Remove burrs from the blade and lubricate the blade.
Refer to
To examine the blades on page 14
.
Transportation, storage and disposal
Transportation and storage
• Always allow the product to cool down before
storage.
• For storage and transportation of the product and
fuel, make sure that there are no leaks or fumes.
Sparks or open flames, for example from electrical
devices or boilers, can start a fire.
• Always use approved containers for storage and
transportation of fuel.
• Empty the fuel before transportation or before long-
term storage. Discard the fuel at an applicable
disposal location.
• Attach the transport guard during transportation and
storage.
• Remove the spark plug cap from the spark plug.
• Attach the product during transportation. Make sure
that it cannot move.
1118 - 001 - 05.09.2019 15

• Clean and do servicing on the product before long-
term storage.
Technical data
Technical data
525HF3S
Engine
Cylinder displacement, cu.in/cm
3
1.50/24.5
Cylinder bore, inch/mm 1.34/34
Stroke, inch/mm 1.06/27
Idle speed, rpm 3000
Recommended max speed, rpm 12000
Maximum engine power acc. to ISO 8893, kW/hp @ rpm 0.9/8500
Catalytic converter muffler Yes
Speed-regulated ignition system Yes
Ignition system
Spark plug NGK BPM8Y
Electrode gap, inch/mm 0.026/0.65
Fuel and lubrication system
Fuel tank capacity, US Pint/l 1.06/0.5
Weight
Without fuel, lb/kg 13.4/6.1
Sound levels
1
Equivalent sound pressure level at the operator’s ear, measured according
to ISO 22868, dB(A)
92
Vibration levels
2
Equivalent vibration levels (a
hv,eq
) at handles, measured according to ISO 22867, m/s
2
:
Front/Rear, mm/s
2
3.9/2.9
Blades
Length, inch/mm 25.6/650
Blade speed, cuts/min 4339
1
Reported data for equivalent sound pressure level has a typical statistical dispersion (standard deviation) of 1
dB (A).
2
Reported data for equivalent vibration level has a typical statistical dispersion (standard deviation) of 1 m/s
2
.
16 1118 - 001 - 05.09.2019

内容
简介...............................................................................17
安全性........................................................................... 18
安装...............................................................................22
操作...............................................................................22
维护...............................................................................24
故障排除....................................................................... 28
运输、存放和废弃处理..................................................29
技术参数....................................................................... 29
简介
产品说明
本产品是配备内燃机的高枝绿篱剪。
预期用途
本产品用于切割树枝和枝桠。切勿将产品用于其他任务。
产品概览
17
16
15
14
2
1
23
3
4
5
6
7
8
9
10
12
13
18
11
20
19
21
24
22
1. 锯片尖端保护装置
2. 切割单元
3. 锯片防护罩
4. 齿轮
5. 锯片手动释放插口
6. 油嘴
7. 护手板
8. 前手柄
9. 轴
10. 停止开关
11. 油门扳机
12. 油门扳机锁
13. 离合器罩
14. 注油泵球囊
15. 风门
16. 火花塞线帽和火花塞
17. 汽缸罩
18. 启动绳把手
19. 燃油箱
20. 空气滤清器外壳
21. 组合扳手
22. 操作手册
23. 运输护板
24. 二冲程机油。并非在所有市场都附带。
1118 - 001 - 05.09.2019 17

本产品上的符号
警告:本产品可能会带来危险,会对操作员
或其他人造成严重伤害或死亡。请多加小
心,并正确使用本产品。
请认真阅读本操作手册,确保在充分理解各
项说明之后再使用本产品。
在可能被落物砸中的地方请使用保护头盔。
请使用获得批准的听觉保护设备。请使用获
得批准的眼部保护装备。
请使用获得批准的保护手套。
穿上带有防滑鞋底的结实靴子。
在接触切割工具之前,先要完全关停产品。
本产品不具有电绝缘。如果本产品触碰到或接近高压电线,可能会对操作员造成
严重伤害或死亡。电流可通过绕行方式在不同物体之间流动。电压越高,电流可
以流动的距离就越远。电流还可以通过树枝和其它物体流动,尤其是潮湿的物
体。本产品与高压电线和/或触及电线的物体之间务必至少保持 10 m/33 ft 的距
离。如果需要在电线附近进行作业,请确保在开始作业之前切断电源。在作业过
程中,必须与其他人员或动物至少保持 15 m/50 ft 的距离。
yyyywwxxxx 标牌上显示了序列号。yyyy 是生产年
份,ww 是生产周。
注意: 有关本产品上的其他符号/标识,请参阅适用于某
些市场的特殊认证要求。
安全性
安全定义
本手册使用了“警告”、“小心”和“注意”来指出特别重要的内
容。
警告: 当不遵守手册中的说明可能会给操作
员或周围人员带来伤害或死亡风险时,会使
用此标志。
小心: 当不遵守手册中的说明可能会对产
品、其他材料或附近区域造成损坏时,会使
用此标志。
注意: 用于提供特定状况下所需的更多信息。
一般安全须知
警告: 请在使用本产品前阅读下面的警告说
明。
• 在使用本产品时,疏忽或使用不当均有可能造成严重
或致命伤害。阅读并且理解本《操作手册》的内容极
其重要。
• 本产品在操作期间会产生电磁场。电磁场在某些情况
下会干扰有源或无源医疗植入体。为了减少严重或致
命性伤害风险,我们建议使用医疗植入体的人员在操
作本产品之前事先咨询其医生及医疗植入体制造商。
• 血液循环不佳的人受到过度振动时,可能会导致循环
系统或神经伤害。如果您因过度振动而引起以下症
状,请自行就医。例如:麻痹、感觉麻木、发痒、刺
痛、痛楚、体力缺乏、肤色或身体状况发生变化。这
些症状通常出现在手指、双手或手腕上。低温情况
下,这种危险会增加。
• 当您遇到任何情况,不知如何继续时,请咨询专家。
与您的经销商或保养厂联系。避免任何超出您能力范
围的使用。
• 切记,操作人员有责任避免其他人及其财产遭受意外
或危险。
• 在事先未确保其他人了解说明书的内容前,禁止其使
用本产品。
• 切勿允许儿童使用或靠近本产品。由于产品配备加载
弹簧的停止开关,慢速在启动器把手上施力即可启
动,有时甚至连儿童也有足够大的力气启动产品。这
就有可能造成严重的人员伤亡。因此,产品在没有严
密监督的情况下要拔掉火花塞线帽。
• 将本产品存放在儿童触及不到的位置。
• 感到疲劳时,或者在饮酒或曾服用可能会影响视力、
判断力或协调能力的药物后,请勿操作本产品。
• 禁止使用有故障的产品。按照本说明书中的说明进行
检查、维护和保养。部分维护和保养措施必须由受过
培训并有相应资质的专家进行。请参阅《维护》篇的
说明。
• 切勿使用曾对原规格进行任何改动的本产品。
18 1118 - 001 - 05.09.2019

操作安全须知
警告: 请在使用本产品前阅读下面的警告说
明。
• 切勿在极端天气条件下使用本产品,如严寒、酷热和/
或潮湿气候条件下。
• 有缺陷的锯片会增加发生事故的风险。
• 在作业时,请确保 15 米 / 50 英尺范围之内无人靠
近。
• 观察您的周围,确保不存在人或动物接触切割设备的
风险。
• 检查作业区。清除所有可能飞出的物体。
• 确保您的工作位置安全、稳定。
• 禁止在马达运行时使本产品处于无人看管状态。
• 确保在发动机运转期间,手脚不要靠近切割装置。
• 如果在作业时有任何东西卡在锯片上,请关闭引擎,
待其完全停止后再清理锯片。断开 HT 导线与火花塞
的连接。请参阅
产品概览在第 17 页上
。
• 在发动机关闭之后,在切割装置完全停止之前,手脚
不要靠近切割装置。
• 在切割时,请注意树枝条可能飞出。
• 戴有听觉保护设备时,请留意警告信号或呼喊声。一
旦引擎停机,便取下听觉保护设备。
• 切勿在梯子、凳子或其他没有完全固定的高处位置进
行作业。
• 务必用双手握住本产品。将本产品握在身体的前方。
• 如果碰撞到任何异物或者发生振动,请立即关闭本产
品。断开 HT 导线与火花塞的连接。检查并确保本产
品未受损。维修所有受损部分。
• 确保火花塞线帽和点火器导线未受损,以免出现电击
风险。
• 检查并确认所有螺母和螺丝都已上紧。
• 确保正确润滑齿轮箱。请参阅
润滑齿轮箱在第 27
页上
。
• 在使用本产品过程中,齿轮箱的温度会非常高。切勿
触摸齿轮箱,以防烫伤。
• 启动前必须安装好所有的盖子和防护罩。
• 不使用本产品时,必须将运输保护装置始终安装到切
割装置上。
个人防护装备
警告:
请在使用本产品前阅读下面的警告说
明。
• 操作产品时务必使用获得批准的个人防护装备。个人
防护装备不能完全避免受伤,但当意外发生时,可降
低伤害程度。请经销商协助您选择正确的防护装备。
• 使用获得批准的听觉保护设备,尽量降低噪音。长期
接触噪音可能会导致永久性听力损伤。
• 请使用获得批准的眼部保护装备。如果佩戴面罩,必
须同时佩戴获得批准的护目镜。在美国,经批准的护
目镜必须符合 ANSI Z87.1 标准;在欧盟国家/地区,
必须符合 EN 166 标准。
• 必要时戴上手套,例如在安装、检查或清洁切割设备
时。
• 穿上坚固的防滑靴或防滑鞋。
• 穿着高强度纤维制成的衣物。务必穿着结实的长裤和
长袖衣服。切勿穿着容易钩住小树枝和分枝的衣物。
切勿佩戴珠宝、穿着短裤、凉鞋或光脚。确保头发安
全地挽在肩部以上。
• 确保急救箱触手可及。
产品上的安全装置
警告:
请在使用本产品前阅读下面的警告说
明。
• 切勿在安全装置有故障的情况下使用产品。
• 定期检查安全装置。如果安全装置有故障,请联系您
的 Husqvarna 保养厂。
1118 - 001 - 05.09.2019
19

检查油门扳机锁
1. 确保油门扳机锁 (A) 和油门扳机 (B) 活动自如,且复
位弹簧工作正常。
A
B
2. 确保在松开油门扳机锁后油门扳机锁止在怠速位置。
3. 按下油门扳机锁,并确保松开手后其会返回至初始位
置。
4. 启动产品。请参阅
启动发动机在第 23 页上
。全开
油门。
5. 松开油门扳机,确保锯片停止转动并保持静止。
警告: 如果油门扳机处于怠速位置而锯
片仍然运转,则必须调整化油器的怠速。
请参阅
调整怠速在第 25 页上
。
检查停止开关
1. 启动引擎。
2. 将停止开关移至停止位置,确保引擎停止。
检查护手板
护手板用于防止锯片造成人身伤害。
1. 停止引擎。
2. 确保护手板正确安装。
3. 检查护手板是否损坏。
检查防振系统
警告: 使用未正确缠绕的打草绳或使用不正
确的切割刀片会增加振级。
防振系统用于最大程度减少手柄上的振动,使操作更简
单。防振系统可减少引擎装置与驱动轴装置之间的振动。
1. 停止引擎。
2. 目视检查是否存在变形和损坏,如裂纹。
20
1118 - 001 - 05.09.2019
ページが読み込まれています...
ページが読み込まれています...
ページが読み込まれています...
ページが読み込まれています...
ページが読み込まれています...
ページが読み込まれています...
ページが読み込まれています...
ページが読み込まれています...
ページが読み込まれています...
ページが読み込まれています...
ページが読み込まれています...
ページが読み込まれています...
-
 1
1
-
 2
2
-
 3
3
-
 4
4
-
 5
5
-
 6
6
-
 7
7
-
 8
8
-
 9
9
-
 10
10
-
 11
11
-
 12
12
-
 13
13
-
 14
14
-
 15
15
-
 16
16
-
 17
17
-
 18
18
-
 19
19
-
 20
20
-
 21
21
-
 22
22
-
 23
23
-
 24
24
-
 25
25
-
 26
26
-
 27
27
-
 28
28
-
 29
29
-
 30
30
-
 31
31
-
 32
32


他の言語で
- English: Husqvarna 525HF3S User manual
関連論文
その他のドキュメント
-
Zenoah EBZ8550 取扱説明書
-
-
-
Philips NT3650/16 Product Datasheet
-
-
Hikoki CG 31EBS ユーザーマニュアル
-
Hitachi CS 33EB Handling Instructions Manual
-
Wacker Neuson CT36-8A ユーザーマニュアル
-
Wacker Neuson BS60-2 ユーザーマニュアル
-