3 請在使用之前,詳細閱讀本安裝手冊。此安裝手冊只提供規格、安裝及 DOP-EXLNHJ1AE 基本操作與設定,
有關於 DOP-EXLNHJ1AE 所包含的網路協定內容,在此無詳細的介紹,請讀者參閱相關的專業文章或書籍資
料。
3 本擴充模組須搭配本公司 DOP-AE 系列人機產品進行使用,實施配線時,務必拔除/切斷人機電源。
3 使用者使用本擴充模組時,必須將之安裝於具防塵、防潮及免於電擊/衝擊意外之外殼配線箱內。另必須具備
保護措施(如: 特殊之工具或鑰匙才可打開)防止非維護人員操作或意外衝擊本體,造成危險及損壞。
3 輸入電源切斷後,一分鐘之內,請勿觸摸內部電路。請勿在上電時觸摸任何端子。
3 搭配使用的人機本體上之接地端子
務必正確的接地,可提高產品抗雜訊能力。
3 擴充模組連接口之端子禁止外力重壓,避免導致產品損壞。
X யݡᖎ̬
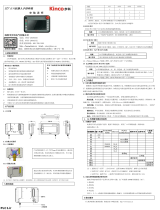
1.1 型號說明
DOP - EXLNHJ 1 AE
(1)
(2) (3) (4)
(1)產品名稱 DOP:Delta Operation Panel
(2)機種名稱 EXLNHJ:乙太網路擴充模組
(3)版本識別碼
(4)適用機型 AE:DOP-AE 系列人機
1.2 產品外觀及各部介紹
1. 乙太網路連接口
2. 擴充模組螺絲固定孔
3. 擴充模組連接口
4. 銘牌
Y Αਕఢॾ
選項
DOP-EXLNHJ1AE
電源電壓 DC 5V +/-10%, 1A(人機供應)
介面
RJ-45 with Auto MDI/MDIX
埠數
1 Port
傳輸方式
IEEE 802.3, IEEE 802.3u
傳輸線
Category 5e (TIA/EIA-568-A, TIA/EIA-568-B)
傳輸速率 10/100 Mbps 自動偵測
網路協定
ICMP, IP, TCP, UDP, DHCP, Modbus TCP
雜訊免疫力
ESD (IEC 61131-2, IEC 61000-4-2): 8KV Air Discharge
EFT (IEC 61131-2, IEC 61000-4-4): Power Line: 2KV, Communication I/O: 1KV
Damped-Oscillatory Wave: Power Line: 1KV, Digital I/O: 1KV
RS (IEC 61131-2, IEC 61000-4-3): 26MHz ~ 1GHz, 10V/m
操作/儲存環境
操作:溫度 0℃~50℃,濕度 10%~85%,污染等級 2
儲存:溫度-40℃~85℃,濕度 5%~85%
耐振動/衝擊 國際標準規範 IEC61131-2, IEC 68-2-6 / IEC61131-2 & IEC 68-2-27
Z щ྅̈́੨ቢ
3.1 安裝方式
施工注意
1. 鎖鏍絲及配線時請避免微小的金屬導體掉入擴充模組內部。
2. 擴充模組與其它之控制元件應保持 50mm 以上之間隔,並應遠離高壓線及動力設備。
3.2 注意事項
使用環境
1. 請勿將擴充模組裝置於落塵大、油煙、金屬性粉塵及腐蝕性或可燃性氣體的環境當中。
2. 請勿將擴充模組裝置於高溫、結露之環境。
3. 請勿將擴充模組裝置有直接振動及衝擊的場所。
[ హវనؠ
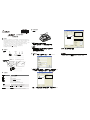
開啟 Screen Editor 軟體,人機介面種類選擇 AE 系列機型,Base Port 選擇 Delta DVP TCP/IP。
DOP-EXLNHJ1AE 設定
1. 點選”選項”Æ”設定模組參數”Æ”通訊”,點選 Ethernet 可在視窗右側設定人機 IP,若在連線的網路中有 DHCP
Server, 可選擇 DHCP 方式自動取得網路組態參數;若使用 Static IP,請自行設定網路組態參數。
2. 點選Base Port 可在視窗右側設定控制器IP。若連接的控制器不是台達PLC,可在控制器選項中更改為Modbus
TCP/IP。
3. 設定完成後,請按下確定,即可開始編輯人機畫面。
NOTE
1) 本說明書內所記載之規格若有變更,本公司恕不另行通知。當內容規格有所修正時,請洽詢代理商或至台達網站
http://www.delta.com.tw/industrialautomation/下載最新版本。
http://www.delta.com.tw/industri alautomation/
˙͉შྮᕖ·ሀ
щ྅ᄲځ
ڦຍְี
1
3
4
2

3 Please read this instruction carefully before use.
3 This instruction provides the information of specifications, installation and basic operation and settings.
Regarding the Ethernet Networking protocols supported by DOP-EXLNHJ1AE, there is no detailed
information available on this instruction. If the users need complete information of Ethernet Networking
protocols, please refer to relevant professional articles and books.
3 DOP series Extension Ethernet Module should be used with DOP-AE series HMI product. Ensure to
switch off the power before wiring.
3 Please install this DOP series Extension Ethernet Module in an enclosure free of airborne dust, humidity,
electric shock and vibration. The enclosure should prevent non-maintenance staff from operating the
device (e.g. key or specific tools are required for opening the enclosure) in case danger and damage on
the device may occur.
3 DO NOT touch any internal circuit in 1 minute after the power is switched off. Do NOT touch any
terminal when the power is switched on.
3 Make sure the ground terminal
is correctly grounded in order to prevent electromagnetic
interference.
3 DO NOT place any heavy objects on the connection port of DOP series Extension Ethernet Module.
Doing so may damage the product.
X Introduction
1.1 Model Explanation
DOP - EXLNHJ 1 AE
(1) (2) (3) (4)
(1) Product Name DOP: Delta Operation Panel
(2) Series EXLNHJ: Extension Ethernet Module
(3) Version
(4) Applicable HMI Series AE: DOP-AE Series HMI
1.2 Product Outline
1. Connection Port for Ethernet
2. Direct Mounting Hole
3. Connection Port for Extension Module
4. Nameplate
Y Function Specifications
Item DOP-EXLNHJ1AE
Power Supply Voltage DC 5V +/-10%, 1A (provided by HMI)
Interfaced Supported RJ-45 with Auto MDI/MDIX
Number of Ports 1 Port
Transmission Method
(Standard Conformance)
IEEE 802.3, IEEE 802.3u
Transmission Cable Category 5e (TIA/EIA-568-A, TIA/EIA-568-B)
Transmission Speed 10/100 Mbps Auto Detection
Ethernet Protocol ICMP, IP, TCP, UDP, DHCP, Modbus TCP
Noise Immunity
ESD (IEC 61131-2, IEC 61000-4-2): 8KV Air Discharge
EFT (IEC 61131-2, IEC 61000-4-4): Power Line: 2KV, Communication I/O: 1KV
Damped-Oscillatory Wave: Power Line: 1KV, Digital I/O: 1KV
RS (IEC 61131-2, IEC 61000-4-3): 26MHz ~ 1GHz, 10V/m
Operation / Storage
Environment
Operation: 0
o
C~50
o
C (Temperature), 10%~85% (Humidity), Pollution Degree 2
Storage: -40
o
C~85
o
C (Temperature), 5%~85% (Humidity)
Vibration / Shock Resistance Standards: IEC61131-2, IEC 68-2-6 / IEC61131-2 & IEC 68-2-27
Z Installation & Wiring
3.1 Installtion
Wiring Note
1. Please avoid any conductive debris and tiny metal materials enter the Extension Ethernet Module when
screwing and wiring.
2. Allow a minimum space of 50mm between the Extension Ethernet Module and other control devices, and
keep the Extension Ethernet Module away from the high-voltage lines or any power equipment.
3.2 Caution
Environment
1. DO NOT install the Extension Ethernet Module in a place subjected to corrosive or flammable gases, liquids,
or airborne dust or metallic particles.
2. DO NOT install the Extension Ethernet Module in a location high temperature and high humidity (where
temperature and humidity will exceed specification).
3. DO NOT install the Extension Ethernet Module in a location where vibration and shock will exceed
specification.
[ Software Settings
Activate Delta Screen Editor software program. Under Application Name choose a name to save.
Under HMI choose a AE series HMI. Under Base Port Control choose Delta DVP TCP/IP.
Settings of DOP-EXLNHJ1AE
1. Select Options > Configuration and click Communication tab. The users can choose Ethernet option
and set HMI IP address on right side of the window. If connecting to a DHCP Server, the users can select
DHCP to get network configuration automatically when the DHCP console starts. If Static IP address is
used, the users need to complete network configuration manually.
2. Clicking Base Port option can set IP address of the connecting controller on right side of the window. If
the connecting controller is not Delta DVP series PLC, the users can change Delta DVP TCP/IP to
Modbus TCP/IP by using the Controller drop-down list.
3. After completing all settings, please click Ok button to save the settings and start to edit the screen data
of HMI.
NOTE
1) The content of this instruction sheet may be revised without prior notice. Please consult our distributors or download the most
updated version at http://www.delta.com.tw/industrialautomation.
http://www.delta.com.tw/industri alautomation/
Extension Ethernet Module
Instruction Sheet
Warning
1
3
4
2
-
 1
1
-
 2
2


他の言語で
関連論文
-
Delta Electronics Network Device DOP-B クイックスタートガイド
-
-
-
-
-
-