
CED1800BT
Quick Start Guide
快速入門指南
快速入门指南
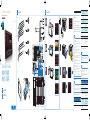
Install / 安裝 / 安装
Enjoy/ 使用 / 使用
Install / 安裝 / 安装
a
bcde fghijk
l
m
n
o
p
q
r
s
t
182 mm
112 mm
5 mm
Enjoy/ 使用 / 使用
English
Install the car entertainment
system
Always follow the instructions in this chapter in
sequence.
These instructions are for a typical installation.
However, if your car has different requirements, make
the adjustment accordingly. If you have any question
regarding installation kits, consult your local retailer.
Note
•
This system is designed for negative ground (earth) 12V DC
operation only.
• Always install this system in the car dashboard. Other
locations can be dangerous as the rear of the system heats
up during use.
• To avoid short-circuit: before you connect, make sure that
the ignition is off.
• Make sure that you connect the yellow and red power supply
leads after all other leads are connected.
• Make sure that all loose leads are insulated with electrical
tape.
• Make sure that the leads do not get caught under screws or
in parts that will move (e.g. seat rail).
• Make sure that all ground (earth) leads are run to a common
ground (earth) point.
• Use only the supplied mounting hardware for a safe and
secure installation.
• Improperfusescancausedamageorre.Whenyouneedto
change the fuse, consult a professional.
• Whenyouconnectotherdevicestothissystem,makesure
that the rating of the car circuit is higher than the total fuse
value of all the connected devices.
• Never connect speaker wires to the metal body or chassis
of the car.
• Never connect speaker wires with stripes to one another.
Connect wires
Note
•
Make sure that all loose leads are insulated with electrical
tape.
• Consult a professional to connect wires as instructed below.
• Before connection, check the car's wiring carefully.
1 Connect the ISO male connectors. (1-1)
ISO male
connectors
Connect to
a Green strip, black-
edged green strip
Rear left speaker
b Whitestrip,black-
edged white strip
Front left speaker
c Gray strip, black-
edged gray strip
Front right speaker
d Purple strip, black-
edged purple strip
Rear right speaker
e Red strip Ignition key +12V DC
when ON/ACC
f Blue strip Motor/electric antenna
relay control lead
g White-edgedblue
strip
Amplierrelaycontrol
lead
h Black strip Ground
i Yellow strip The +12V car battery
which is energized at all
times
2 Connect other wires if necessary. (1-2)
Caution
•
To avoid an accident, the driver must not watch video while
driving. By design, this system disallows watching video during
drive. Park your car in a safe place and engage the parking
brake before watching video.
Note
•
Whentheparkingbrakeofyourvehicleisnotengaged,the
video blocking system is activated. It blocks the display of
front video source only.
• If the system is not properly connected with the parking
brake control module of your vehicle, video signals will be
blocked by the system.
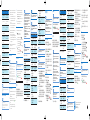
Connectors and
sockets on rear panel
External sockets or
connectors
1 For ISO male
connectors
As indicated above
2 REAR OUT R (Red
socket)
Rear right speaker
3 AV-IN R (Red socket) Right audio channel
output socket of an
external player
4 AV-IN L(White
socket)
Left audio channel
output socket of an
external player
5 REAR OUT L(White
socket)
Rear left speaker
Always there to help you
Register your product and get support at
Question?
Contact
Philips
Question?
Contact
Philips

Specifications are subject to change without notice
© 2013 Koninklijke Philips Electronics N.V.
All rights reserved.
CED1800BT_98_QSG_V1.0
15
OE SWC IR
REMOTE IN
(
黑色電線
)
接地
16
OE SWC AD
LEARN
(
白色電線
)
OE SWC AD
引
線
1
17
OE SWC AD
LEARN
(
白色電線
)
OE SWC AD
引
線
2
18 OE SWC AD
LEARN
(
黑色電線
)
接地
19 External Mic
(
黑色接頭
)
外接麥克風
20 GPS AERIAL
(
黑色接頭
)
GPS
智慧型天線
秘訣
•
ISO
接頭的針腳配置會因您的車輛類型而有所差異。為
避免損壞系統,請正確連接。
安裝入儀表板
備註
•
將主裝置安裝至車上前,請先確定電線已正確連接。
•
如果預設電台在點火開關關閉再開啟時遺失,請將紅色
引線與黃色引線交錯,重新連接。
1 如果車輛沒有車載磁碟機或導航電腦,請
中斷與汽車電池負極的連接。
• 如果車輛具備車載磁碟機或導航電腦並
中斷與汽車電池的連接,可能導致電腦
失去已儲存的資料。
• 如果未中斷與汽車電池的連接,為了避
免出現短路,請確定裸露纜線不會相
互接觸。
2 請確定汽車儀表板開口是符合以下
尺寸:
(1-3)
• 由於儀表板開口傾斜角超過
20
度時,
裝置便無法使用:請確認汽車儀表板開
口的水平傾斜介於
0
到
20
度之間。
3 將裝置滑入儀表板,直到聽見咔噠聲。
(1-4)
4 重新連接汽車電池的負極。
Connectors and
sockets on rear panel
External sockets or
connectors
6 VIDEO IN (Yellow
socket)
Video output socket
of an external player
7 VIDEO OUT 1
(Yellow socket)
Video input socket
of an external display
device
8 VIDEO OUT 2
(Yellow socket)
Video input socket
of an external display
device
9 RADIO ANTENNA
(Black connector)
Radio antenna
10 CAMERA IN (Purple
socket)
Video output socket
of an external camera
11 SUB-W OUT (Blue
socket)
Sub-woofer
12 REVERSE CAMERA
(Purple wire)
Reverse camera (B+)
13 PARKING BRAKE
(Pink wire)
Parking brake (-)
14 OE SWC IR REMOTE
IN (Brown wire)
OESWCremotein
15 OE SWC IR REMOTE
IN (Black wire)
Ground
16 OE SWC AD LEARN
(Whitewire)
OESWCADLearn
line 1
17 OE SWC AD LEARN
(Whitewire)
OESWCADLearn
line 2
18 OE SWC AD LEARN
(Black wire)
Ground
19 External Mic (Black
connector)
External microphone
20 GPS AERIAL (Black
connector)
GPS smart antenna
Tip
•
The pin arrangement for the ISO connectors depends on the
type of your vehicle. To avoid damage to the system, connect
properly.
Mount into the dashboard
Note
•
Make sure that wires are correctly connected before you
mount the main unit into a car.
• If preset radio stations are lost when the ignition key is
turned OFF and then back ON, reconnect the red leads
crosswise to the yellow ones.
1 If the car does not have an on-board drive or
navigation computer, disconnect the negative
terminal of the car battery.
• If you disconnect the car battery in a car
that has an on-board drive or navigation
computer, the computer may lose its
memory.
• If the car battery is not disconnected, to
avoid short-circuit, make sure that bare
wires do not touch each other.
2 Make sure that the car dashboard opening is
within these measurements: (1-3)
• Since the unit cannot be used if the
dashboard opening’s slant angle is above 20
degrees, make sure that the horizontal slant
of the car dashboard opening is between 0
and 20 degrees.
3 Slide the unit into the dashboard until a click
sound is heard. (1-4)
4 Reconnect the negative terminal of the car
battery.
Pair a device
Note
•
Philips does not guarantee the compatibility with all
Bluetooth devices.
• Before pairing a device with this system, read its user
manual for Bluetooth compatibility.
• Make sure that Bluetooth function is enabled on your
device, and your device is set as visible to all other
Bluetooth devices.
• The operational range between this system and a
Bluetooth device is approximately 8 meters (24 feet).
• Any obstacle between this system and a Bluetooth device
can reduce the operational range.
• Keep away from any other electronic device that may cause
interference.
Pair the rst device
1 Activate the Bluetooth function on this system.
2 Tap on this system to search for other
Bluetooth devices.
3 In the device list, tap the name of your
Bluetooth device, and then tap
behind the
name.
» The paring starts, and then a pairing
request from CED1800 is displayed on
your device.
4 On your device, accept the pairing request
from CED1800, enter the default password
‘0000‘,andthenconrmthepasswordentry.
» [Paired OK!]ashes,andthen
[Connecting] is displayed on this system.
5 On your device, enable or permit the
connection with CED1800.
Call a number
You can make phone calls with the system.
1 Tap on top of the screen.
» The keypad is displayed.
• If the keypad is not displayed, tap
.
2 Tap number icons to enter the phone number.
• To clear the last digit, tap
.
• To clear all digits, tap
.
• To return to the previous screen, tap
.
3 Tap to send the call.
• To end the call, tap
.
• To enter numbers during the call, tap
to
displaythekeypadrst.
Answer a call
Note
•
By default, all incoming calls are picked up automatically. You
can disable the function of automatic answer.
1 Whenthereisanincomingcall,[Incoming
call…] is displayed on the screen.
2 Tap to answer the call.
• To reject or end the call, tap
.
中文繁體
安裝
請務必依順序遵循本章指示。
這些指示適用於一般安裝。但是,如果您的汽
車有不同的需求,請進行對應的調整。如果您
對安裝工具包有任何疑問,請洽詢當地的經銷
商。
備註
•
此系統經設計僅適用於負極接地
12V DC
操作。
•
請務必將本系統安裝於汽車儀表板中。若安裝於其他位
置可能造成危險,因為使用過程中系統背面會發熱。
•
為避免出現短路:請確定在連線之前關閉點火開關。
•
確定連接所有引線後,再連接黃色和紅色電源引線。
•
確定所有鬆散引線已使用絕緣膠帶絕緣。
•
確定引線未纏繞在螺絲或移動零件上
(
如座椅橫擋
)
。
•
確定所有接地引線連接到常規接地端。
•
僅限使用隨附的壁掛配件進行安裝,以確保掛置牢固,
安全無虞。
•
不適用的保險絲會導致產品受損或引起火災。若要更換
保險絲,請洽詢專業人士。
•
將其他裝置連接到此系統時,請確定汽車電路的功率高
於所有已連接裝置的保險絲數值總和。
•
請勿將揚聲器線連接至金屬體或汽車底盤。
•
請勿將揚聲器線對接。
連接電線
備註
•
確定所有鬆散引線已使用絕緣膠帶絕緣。
•
請洽詢專業人員,協助依照下列指示連接電線。
•
連線前,仔細檢查汽車佈線。
1 連接
ISO
公接頭。
(1-1)
ISO
公接頭 連接至
a
綠色線束、黑邊
的綠色線束
左後方揚聲器
b
白色線束、黑邊
的白色線束
左前方揚聲器
c
灰色線束、黑邊
的灰色線束
右前方揚聲器
d
紫色線束、黑邊
的紫色線束
右後方揚聲器
e
紅色線束 點火開關
+12V DC
,
當處於
ON/ACC
狀
態時
f
藍色線束 馬達
/
電動天線繼電器控
制引線
g
白邊的藍色線束 擴大機繼電器控制引線
h
黑色線束 接地
i
黃色線束
+12V
汽車電池,此電
池隨時呈通電狀態
2 必要時連接其他電線。
(1-2)
注意
•
為避免任何意外發生,駕駛開車時切勿觀看視訊。本系
統在設計上不允許在駕駛時觀賞視訊。觀看視訊前,請
先將車輛妥善停在安全的地方,並拉起手煞車。
備註
•
當您車輛的手煞車未拉起時,視訊阻擋系統為啟動狀
態。它只會阻擋前方視訊來源的顯示。
•
如果系統未正確地連接車輛的手剎車控制模組,系統將
會阻擋視訊訊號。
後方面板上的接頭
與插孔
外接插孔或接頭
1
若為
ISO
公接頭 如上所述
2 REAR OUT R
(
紅色插孔
)
右後方揚聲器
3 AV-IN R
(
紅色插孔
)
外接播放機的右聲道
輸出插孔
4 AV-IN L
(
白色插孔
)
外接播放機的左聲道
輸出插孔
5 REAR OUT L
(
白色插孔
)
左後方揚聲器
6 VIDEO IN
(
黃色插孔
)
外接播放機的視訊輸
出插孔
7 VIDEO OUT 1
(
黃色插孔
)
外接顯示裝置的視訊
輸入插孔
8 VIDEO OUT 2
(
黃色插孔
)
外接顯示裝置的視訊
輸入插孔
9
RADIO
ANTENNA
(
黑色接頭
)
收音機天線
10 CAMERA IN
(
紫色插孔
)
外接相機的視訊輸
出插孔
11 SUB-W OUT
(
藍色插孔
)
重低音揚聲器
12
REVERSE
CAMERA
(
紫色電線
)
後視攝影機
(B+)
13
PARKING
BRAKE
(
粉紅色電線
)
手煞車
(-)
14
OE SWC IR
REMO
TE IN
(
棕色電線
)
OE SWC
遠端輸入
配對裝置
備註
•
Philips
不保證能與所有藍牙裝置相容。
•
將裝置與本系統配對之前,請先閱讀使用者手冊以瞭解
藍牙相容性。
•
請確認您裝置上的藍牙功能已啟用,且您的裝置設定為
對所有其他藍牙裝置顯示。
•
此系統與藍牙裝置間的操作範圍約
8
公尺
(24
呎
)
。
•
此裝置與藍牙裝置之間的任何障礙,都可能縮短操作
範圍。
•
請盡量遠離可能造成干擾的其他電子裝置。
配對第一個裝置
1 啟動系統上的藍牙功能。
2 點選系統上的
可搜尋其他藍牙裝置。
3 在裝置清單中,點選藍牙裝置的名稱,然
後點選名稱後方的
。
» 配對隨即開始,然後裝置會顯示來自
CED1800
的配對要求。
4 在您的裝置上,接受來自
CED1800
的配
對要求,輸入預設密碼「
0000
」,然後確
認密碼。
»
[
已配對成功!
]
會閃爍,然後系統會顯
示
[
正在連線
]
。
5 在您的裝置上,啟用或允許與
CED1800
的連線。
撥打電話號碼
您可以使用系統撥打電話。
1 點選螢幕最上方的
。
» 畫面會顯示鍵盤。
• 如果沒有顯示鍵盤,請點選
。
2 點選號碼圖示可輸入電話號碼。
• 若要清除最後一個數字,請點選
。
• 若要清除所有數字,請點選
。
• 若要返回上一個畫面,請點選
。
3 點選
可撥出電話。
• 若要結束通話,請點選
。
• 若要在通話期間輸入數字,點選
可
立即顯示鍵盤。
接聽電話
備註
•
預設會自動接聽所有來電。您可以停用自動接聽的功
能。
1 如果有來電,螢幕上會顯示
[
來電…
]
。
2 按
可接聽來電。
• 若要拒絕或結束通話,請點選
。
中文简体
安装
始终依照顺序,遵循本章的说明。
此说明适用于典型安装。但是,如果您的汽车有
不同的需要,请做相应的调整。如果遇到任何关
于安装套件的问题,请咨询当地的零售商。
注
•
根据设计,本系统只能在负极接地
12V
直流电压下工
作。
•
请务必将本系统安装在汽车仪表盘内。若安装在其他
位置,则可能会因为系统在使用过程中背面发热而发
生危险。
•
避免短路:连接之前,请确保点火器处于关闭状态。
•
确保连接完所有其他导线后,再连接黄色和红色电源
线。
•
确保所有松散导线均已用电气胶带隔离。
•
确保不要将导线挂在螺钉下或可移动的部件(如座椅
导轨)中。
•
确保将所有地线连接至同一接地点。
•
只能使用随附的安装硬件,以确保安装安全稳固。
•
使用不适当的保险丝可能会造成损坏或引起火灾。需要
更换保险丝时,请咨询专业人员。
•
将其他设备连接至本系统时,应确保汽车电路容量等级
高于所有连接设备的总保险丝容量。
•
切勿将扬声器线连接至汽车的金属体或底盘。
•
切勿将扬声器线彼此连接。
连接导线
注
•
确保所有松散导线均已用电气胶带隔离。
•
请咨询专家按如下说明连接导线。
•
连接前,请仔细检查汽车的导线。
1 连接
ISO
公口连接器。
(1-1)
ISO
公口连
接器
连接至
a
绿色线,黑边
绿色线
后置左扬声器
b
白色线,黑边白
色线
前左扬声器
c
灰色线,黑边灰
色线
前右扬声器
d
紫色线,黑边紫
色线
后置右扬声器
e
红色线 当处于
ON/ACC
时,点
火钥匙为
+12V
直流
f
蓝色线 马达
/
电动天线中继控
制线
g
白边蓝色线 扩音器中继控制线
h
黑色线 接地
i
黄色线 始终可供电的
+12V
汽
车电池
2 如有必要,可连接其他导线。
(1-2)
注意
•
为避免发生事故,司机在开车时不能观看视频。根据设
计,该系统不允许行驶时观看视频。必须先将车停在安
全的地方并拉好停车制动装置,才能观看视频。
注
•
如果未拉好停车制动装置,则会启动视频屏蔽系统。其
仅屏蔽前部视频来源显示屏。
•
如果该系统与汽车的停车制动控制模块未正确连接,则
会屏蔽视频信号。
后面板上的接口
和插孔
外部插孔或接口
1
对于
ISO
公口连
接器
如上所示
2
REAR OUT R
(红色插孔)
后置右扬声器
3
AV-IN R
(红色插孔)
外部播放器的右声道
输出插孔
4
AV-IN L
(白色插孔)
外部播放器的左声道
输出插孔
5
REAR OUT L
(白色插孔)
后置左扬声器
6
VIDEO IN
(黄色插孔)
外部播放器的视频输
出插孔
7
VIDEO OUT 1
(黄色插孔)
外部显示设备的视频
输入插孔
8
VIDEO OUT 2
(黄色插孔)
外部显示设备的视频
输入插孔
9
RADIO ANTENNA
(黑色接口)
收音机天线
10
CAMERA IN
(紫色插孔)
外部相机的视频输出
插孔
11
SUB-W OUT
(蓝色插孔)
低音扬声器
12
REVERSE CAMERA
(紫色导线)
后视系统
(B+)
13
PARKING
BRAKE(粉红色
导线)
停车制动装置
(-)
14
OE SWC IR
REMOTE IN(棕色
导线)
OE SWC
遥控输入
15
OE SWC IR
REMOTE IN(黑色
导线)
接地
16
OE SWC AD
LEARN(白色导
线)
OE SWC AD Learn
线
路
1
17
OE SWC AD
LEARN(白色导
线)
OE SWC AD Learn
线
路
2
18
OE SWC AD
LEARN(黑色导
线)
接地
19
External Mic(黑
色
接口)
外置麦克风
20
GPS AERIAL(黑
色接口)
GPS
智能天线
提示
•
ISO
连接器的插针排列取决于您的车辆类型。为避免系
统损坏,请正确连接。
安装到仪表板
注
•
确保已正确连接导线,然后再将主装置安装至汽车。
•
如果点火钥匙转至
OFF
(关)并转回
ON
(开)时,
预设电台丢失,请将红色导线以交叉方式重新连接至
黄色导线。
1 如果汽车没有车载驱动器或导航电脑,请
断开汽车电池的负极。
• 如果在汽车配备有车载驱动器或导航电
脑的情况下断开汽车电池,那么电脑中
存储的数据可能会丢失。
• 如果未断开汽车电池,为避免短路,应
确保裸线不会相互接触。
2 确保汽车仪表盘开口在以下尺寸范围之
内:
(1-3)
• 因为如果仪表盘开口的倾斜角度超过
20
度,将不能使用本装置,请确保汽
车仪表盘开口的水平倾斜角度在
0
到
20
度之间。
3 将装置滑入仪表盘,直至听到i 咔哒j
声。
(1-4)
4 重新连接汽车电池的负极。
配对设备
注
•
飞利浦不保证可与所有蓝牙设备兼容。
•
将设备与该系统配对前,请阅读此用户手册了解蓝牙
兼容性。
•
确保您的设备已启用蓝牙功能,并将其设置为对所有其
他蓝牙设备可见。
•
本系统与蓝牙设备之间的操作范围约为
8
米(
24
英
尺)。
•
本系统与蓝牙设备之间的任何障碍物都会使操作范围
缩小。
•
请远离任何其他可能造成干扰的电子设备。
配对第一个设备
1 激活本系统上的蓝牙功能。
2 轻击本系统上的
搜索其他蓝牙设备。
3 在设备列表中,轻击您的蓝牙设备名称,
然后轻击名称后面的
。
» 配对开始,然后您的设备上将显示来自
CED1800
的配对请求。
4 在您的设备上,接受来自
CED1800
的配对
请求,输入默认密码i 0000j ,然后确认密
码输入。
» [Paired OK!]
将闪烁,然后本系统上显示
[Connecting]
。
5 在您的设备上,启用或允许与
CED1800
连
接。
拨号
您可以使用系统拨打电话。
1 轻击屏幕顶部的
。
» 将显示小键盘窗口。
• 如果未显示键盘,请轻击
。
2 轻击号码图标以输入电话号码。
• 要清除最后一位数,请轻击
。
• 要清除所有数字,请轻击
。
• 要返回上一个屏幕,请轻击
。
3 轻击
拨出电话。
• 要结束通话,请轻击
。
• 要在通话期间输入号码,请轻击
以先
显示键盘。
接听电话
注
•
默认情况下,自动接听所有来电。您可以禁用自动接
听功能。
1 如有来电,屏幕上将显示
[Incoming
call| ]。
2 轻击
接听电话。
• 要拒绝或结束通话,请轻击
。
-
 1
1
-
 2
2

