
NAM6700r
AV Media Receiver
User Manual
Nakamichicaraudio.com
Nakamichi.caraudio
Nakamichi.Global

Introduction of Touch Key Functions ---------------------
Functions and Applications ------------------------------
Safety Instructions -----------------------------------------
Main Menu ------------------------------------------------
Radio -------------------------------------------------------
Music ------------------------------------------------------
Video ------------------------------------------------------
Bluetooth ---------------------------------------------------
Bluetooth --------------------------------------------------
Input ------------------------------------------------------
Navigation -------------------------------------------------
Setting up --------------------------------------------------
Setting up - -------------------------------------------------
Setting up --------------------------------------------------
Wire Link ----------------------------------------------------
Technical Specification -----------------------------------
Common Troubleshooting Guidelines ---------------------
Precautions ------------------------------------------------
1 EN
2 EN
2 EN
2 EN
3 EN
4 EN
5 EN
5 EN
6 EN
7 EN
7 EN
8 EN
9EN
10EN
11EN
12EN
13EN
14EN
15EN
CONTENTS
Setting up --------------------------------------------------

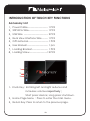
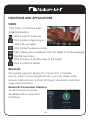
INTRODUCTION OF TOUCH KEY FUNCTIONS
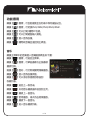
Accessory List
1、Power Cable
-------------------------
1 PCS
2、20P-RCA Wire------------------------ 1 PCS
3、USB Wire ------------------------------ 2 PCS
4、Rear View Interface Wire ------- 1 PCS
5、GPS Antenna------------------------- 1 PCS
6、User Manual -------------------------- 1 pcs
7、Loading Bracket-------------------- 1 PCS
8、Loading Screw ----------------------12 PCS
1Knob Key :Rotating left and right reduces and
increases volume respectively;
Short press: silence; Long press: shutdown.
2、Home Page Menu:Press to enter the main menu.
3、Return Key: Press to return to the previous page.
1 EN
1
2
3

2 EN
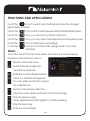
FUNCTIONS AND APPLICATIONS
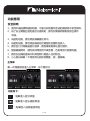
Safety Instructions
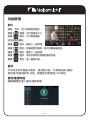
Main Menu
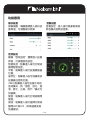
The first boot defaults to the main menu, as shown in the following figure;
The functions are as follows:
: Click to enter the Bluetooth interface
1 Please read the instructions before operating the unit.
Damage caused by non-compliance with the instructions
will not be covered under warranty.
2 In order for safe driving and to avoid violating any traffic
regulations, please do not watch any videos and do not
operate the unit while driving.
3 In order to avoid short circuiting the unit, please do not
expose the unit to rain or any other source of water.
4 In order to avoid short circuiting the unit, please do not
expose the unit to any bare metal during installation.
5 Do not attempt to dismantle the unit for maintenance, all
service and maintenance should be performed by an
authorized service centre or technician.
6 When the engine is turned off, avoid using the unit
for an extended period of time as this might drain the
car's battery.
7 Do not insert anything into the vent and other
openings of the equipment.
8 Wipe the screen carefu
lly! Do not use sharp objects to
push against the screen.

3 EN
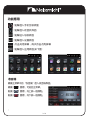
FUNCTIONS AND APPLICATIONS
Radio
:Click to enter the mobile Internet interface
:Click to enter the radio interface
:Click to enter the navigation interface
:Click to enter the settings interface
:Click Close Screen, and click Lighting Screen again
:Click to enter the application interface, as follows:
: Click to enter the music playing interface
: Click to enter the video playback interface
Touch the radio in the main menu to enter the radio interface
Touch the icon to return to the main menu
Touch the【 】Icon, move up
one frequency point
Touch the【 】Icon, move down
one frequency point

4 EN
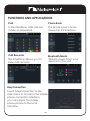
Music
Touch the icon to search automatically and save the strongest
signal station in the list.
Touch the【 】Icon, switch bands between FM1/FM2/FM3/AM1/AM2.
Touch the【 】Icon, you can turn on/off the ST function.
Touch the【 】Icon, you can open the keyboard input frequency point.
Touch the【 】Icon to enter the sound settings.
Touch the icon to turn off the radio and go back to the main
interface.
: Return to the main menu.
: Switch between single loop
and all loop playback.
: Enter the sound settings interface.
: Turn on or off random playback
: You can add your favorite songs to
the collection list.
: Return to the previous directory.
: Close the music player and return to the home page.
: Play the previous song.
: Pause playback and click again to continue playing.
: Play the next song.
: Enter the music playlist.
Touch the music from the main menu and enter the music playing
interface, instructions as follows:
FUNCTIONS AND APPLICATIONS

5 EN
VIDEO
Bluetooth
This system supports Bluetooth connection of mobile
phone. After connecting Bluetooth, you can make calls/
answer calls/access contact list/music playback and other
supported functions.
Bluetooth Connection Interface
Touch the icon to enter
the Bluetooth connection
interface.
: Click to switch screen size
: Click to play a single song or
play it all over again.
: Click to play the previous video.
: After clicking, pause playback and click again to continue playing.
: Play the next video.
: Click to add your favorite video to the playlist.
: Click to enter the playlist.
Click "Video" to enter the video
playback interface
FUNCTIONS AND APPLICATIONS

EasyConnection
Phone Book
Touch "EasyConnection" in the
main menu to access to the mobile
phone connection interface,
you can project the mobile
phone picture to the local
machine.
Bluetooth Music
Call Records
Call
This interface allows you to
view call records.
Stream music from your
device to the unit.
In this interface, calls can be
made or answered.
The phone book can be
viewed at this interface.
6 EN
FUNCTIONS AND APPLICATIONS

Insert the video input interface
into the video input,
and the audio input interface
into the audio input.
In the application menu, touch
the "image input" icon to enter
the input interface.
INPUT
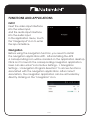
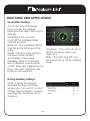
Navigation
Before using the navigation function, you need to install
the navigation application APK. After installing the APK
a corresponding icon will be created on the application desktop.
Click on it to launch the corresponding navigation application.
Users can also enter "Locomotive Settings - > Navigation
Settings - > Navigation Program Selection" to access functions
associated with the navigation application. After correct
association, the navigation application can be activated by
directly clicking on the "navigation" icon.
7 EN
FUNCTIONS AND APPLICATIONS

8 EN
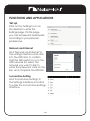
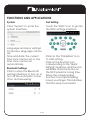
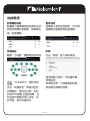
Set up
Click on the "Settings" icon on
the desktop to enter the
Settings page. On this page,
you can set relevant parameters
according to your personal
preferences.
Network and Internet
Find "Network and Internet" in
the settings interface and click
into the WIFI item to confirm
that the WIFI switch is on. In the
WIFI network list, select the
network you want to link to,
enter the password, click on the
link, and complete the WIFI link.
Locomotive Setting
Find "Locomotive Settings" in
the Settings Interface and click
to enter the Locomotive Settings
Interface.
FUNCTIONS AND APPLICATIONS

9 EN
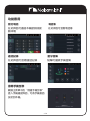
Display Settings
Screen adjustment: Touch icon
into display settings interface
to change display settings.
Universal Settings
Standby time: sStandby time can
be set according to your own
preference.
Auxiliary Contact: The suspension
ball can be opened or closed.
There are seven common
function keys on the suspension
ball.
Reversing Volume Suppression: You
can choose "no, weak, medium
and strong" settings.
Restore factory settings: After
clicking, the system parameters
can be restored to the default
value.
Volume setting: After entering,
the default volume of each
mode can be adjusted
according to your preference.
Volume Setting
FUNCTIONS AND APPLICATIONS

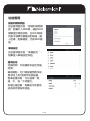
Sound Effect Setting
Smart Bass: You can turn
on or off the Intelligent Bass
with this function.
Touch the "Sound Settings"
icon to enter the settings
interface and adjust the sound
settings.
Balance:The speaker position
can be set by clicking on the
entry.
Delay:Click to enter and set
the best sound location
according to the needs.
Equalizer: Click to enter and
set up different sound effects
mode, there are "original sound,
pop, rock, jazz, classical, user"
mode to choose from.
Click to enter the Driving
Assistant Setting Interface,
where you can switch on and
off the driving impact, reverse
warning line, and front-end
camera.
Driving Auxiliary Settings
10 EN
Loudness:You can turn on or
off the loudness when you
click on it.
Filter:The HPF and LPF can
be turned on or off by clicking
here.
FUNCTIONS AND APPLICATIONS

11 EN
Fast Setting
Touch the "SWC" icon to go into
the SWC settings interface
Click on the "CLEARALL" icon
to start setting.
Click on the function icon
corresponding to the "Quick
Settings" interface, and the icon
will flicker. Press the button on
the SWC panel for a long time.
When the corresponding
function icon stops flickering,
loosen your finger. This indicates
that the setup is successful.
Bluetooth Settings
Click to enter the Bluetooth
settings interface to turn on or
turn off the automatic conne
ction and answering.
System
Click "System" to enter the
system interface.
Language and input settings:
local menu language can be
set;
Time and date: The current
time zone can be set, or the
time zone can be set
automatically.
FUNCTIONS AND APPLICATIONS

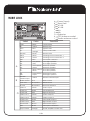
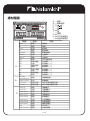
WIRE LINK
12 EN
Power Supply
Rear View
Extension
Radio antenna socket
GPS Antenna socket
NA
NA
C
A
B
6P-USB
4P-USB
D
E
F
G
H
I
FR-
Front left speaker-
Front left speaker+ White
White / Black
Gray
Gray/Black
Front right speaker+
Rear left speaker+
Rear left speaker -
Rear right speaker-
Rear right speaker+
Green/Black
Green
Purple/black
Purple
Reverse wireBrown
Blue
Red Ignition wire
Automatic antenna
Yellow
Black
Battery wire
Ground wire
Lamp control wire
Steering wheel control wire 1White
Orange
Green
ANT
RL-
FR+
RL+
FL-
RR-
FL+
RR+
GND
B+
ACC
ILL
Reverse
SWC1
SWC2
Steering wheel control wire 2
Front right speaker-
A
B
Reverse
camera input
Yellow Reverse camera input
Pink
Brake control
Blue/White
Brake control
WIFI antenna
Audio in-R
Audio in-L
Video Out-2
Audio Out-L
Audio Out-R
Video Out-1
Sub-woofer
Video in
MIC
Amp.Control
Red
Red
White
Yellow
White
Yellow
Yellow
Brown
Orange
Right audio input
Video output 2
Right audio output
Left audio output
Subwoofer output
Video input
Microphone interface
Power amplifier control wire
Left audio input
Black
Video output 1
G
Color FunctionLabel
BT ANT Blue/White Bluetooth antenna
A
B
C D E
F G
H
I

13 EN
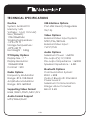
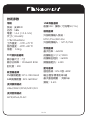
TECHNICAL SPECIFICATIONS
Routine USB Interface Options
System: Android 9.0
Memory: 16G
Voltage:14.4(10.5-16V)
Size(WxHxD):
178x100x60MM
Working Temperature:
-10℃-+70 ℃
Storage Temperature:
-20℃-+80 ℃
Net Weight: 0.5Kg
TFT Display Options
Display Size:7“
Display Resolution:
1024x600 RGB
Contrast:500
Radio Options
Frequency Modulation
Range:87.5-108.0MHZ
Amplitude Modulation
Range:522-1620KHZ
Supporting Video Format
H264 /WMV /DIVX /MKV /FLV
Audio Format Support
MP3/WMA/FLAC
Post-USB: Read (chargeable
5V/1A)
Video Options
External Video Input System:
NTSC/PAL/SECAM
External Video Input:
1VP-P/75Ω
Audio Options
Maximum Power:4x50W
Pre-output(V):1V/10KΩ
Pre-output Impedance:≤600Ω
Speaker Impedance:4-8Ω
Bluetooth Options
Communication System:
BT4.0 + EDR
Output: Bluetooth Standard
Power Level 2
Maximum Communication
Range: About 5 meters
Band: 2.4G

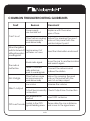
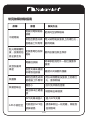
COMMON TROUBLESHOOTING GUIDELINES
Fault Reason Resolvent
Power supply
fuse burned out
Other factors causing
microprocessors to
work abnormally
Replacement of
batteries or fuses
Weak radio signal
Replace with the same
type of fuse
Reboot by pressing the reset
hole on the panel with the
pointed object point
Reset the information and save it
Move the car to another location
and search again
Failure to connect
radio antennas
leads to weak signals
Other factors cause
microprocessors to
work abnormally
Reboot by pressing the reset
hole on the panel with the
point of a sharp object
Connect the antenna and
retrieve the station
Can't boot
When the ignition
switch is turned off,
all the information
or setting is lost.
The radio is
ineffective
No image
Low voice Increase the volume
Output line incorrectly
connected
Check Output Line Connection
Silent output
GPS can't locate
GPS antenna not
inserted
Insert GPS antenna
Possibly in the GPS
signal shielding area
Please drive the car a distance
and move to the signal area.
14 EN

Do not connect the speaker wire connector to the battery,
otherwise the machine will be seriously damaged.
Check the speaker on your car before connecting the
speaker wire connector to the speaker voice coil.
PRE
CA
U
TION
S
Regarding
po
w
e
r s
upp
l
y
and
s
peake
r
connec
ti
on
s
:
14 EN


AV媒體接收器
NAM6700r
用戶手冊
Nakamichicaraudio.com
Nakamichi.caraudioNakamichi.Global

觸摸按鍵功能介紹- ----------------------------------------
功能應用 --------------------------------------------------
安全說明 --------------------------------------------------
主菜單 ----------------------------------------------------
收音機 ----------------------------------------------------
音樂 ------------------------------------------------------
影片 ------------------------------------------------------
藍牙 ------------------------------------------------------
藍牙 -------------------------------------------------------
設置 -------------------------------------------------------
影響輸入 --------------------------------------------------
導航 -------------------------------------------------------
設定 -------------------------------------------------------
設定 -------------------------------------------------------
設定 -------------------------------------------------------
線材鏈接 --------------------------------------------------
技術參數 --------------------------------------------------
常見故障排除指南 -----------------------------------------
注意事项 --------------------------------------------------
1 CN
2 CN
2 CN
2 CN
3 CN
4 CN
5 CN
5 CN
6 CN
6 CN
7 CN
7 CN
8 CN
9CN
10CN
11CN
12CN
13CN
14CN
目錄
ページが読み込まれています...
ページが読み込まれています...
ページが読み込まれています...
ページが読み込まれています...
ページが読み込まれています...
ページが読み込まれています...
ページが読み込まれています...
ページが読み込まれています...
ページが読み込まれています...
ページが読み込まれています...
ページが読み込まれています...
ページが読み込まれています...
ページが読み込まれています...
ページが読み込まれています...
ページが読み込まれています...
ページが読み込まれています...
-
 1
1
-
 2
2
-
 3
3
-
 4
4
-
 5
5
-
 6
6
-
 7
7
-
 8
8
-
 9
9
-
 10
10
-
 11
11
-
 12
12
-
 13
13
-
 14
14
-
 15
15
-
 16
16
-
 17
17
-
 18
18
-
 19
19
-
 20
20
-
 21
21
-
 22
22
-
 23
23
-
 24
24
-
 25
25
-
 26
26
-
 27
27
-
 28
28
-
 29
29
-
 30
30
-
 31
31
-
 32
32
-
 33
33
-
 34
34
-
 35
35
-
 36
36


