
iR2771-S3
iR2772-S3
User Manual
InTANK


iR2771-S3 & iR2772-S3 User Manual
1
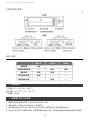
Table of Contents
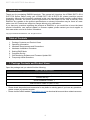
1. Package Contents and Product Views
Introduction
Thank you for purchasing RAIDON products. This manual will introduce the InTANK
iR2771-S3 &
iR2772-S3
Series. Before using your InTANK
iR2771-S3 & iR2772-S3
, please read this manual
thoroughly. Although all information contained in this user manual has been carefully veried before
publishing, however, the actual product specification will be based on the time of delivery from
RAIDON. Any updates to the product specications or relevant information may be found on www.
raidon.com.tw. Products are subject to change without prior notications.
If you have any questions regarding the products of RAIDON, or you would like to know the latest
product information, user manual update, or rmware update, please contact your local supplier or
visit www.raidon.com.tw for further information.
Copyright © RAIDON TECHNOLOGY, INC. All rights reserved.
Open the package and you should nd the following:
1. Package Contents and Product Views
2. Operating Information
3. Hardware Requirements and Precautions
4. Hardware Installation Procedure
5. Setting RAID Mode
6. Computer Set Up
7. GUI Monitoring Software and Firmware Update GUI
8. Frequently Asked Questions
iR2771-S3 & iR2772-S3
iR2771-S3 or iR2772-S3 Device
x 1
( with removable drive tray enclosed x 2)
Screws and key
x 2
Quick Installation Guide x 1
Internal RS232 Cable x1 (iR2772-S3)
• Please check the product and accessories for any defect or missing parts. If you have any questions,
please contact your product supplier.
• Please visit the ocial website (www.raidon.com.tw) to download drivers and other related resources.

iR2771-S3 & iR2772-S3 User Manual
2
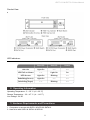
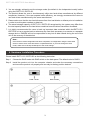
Product View
LED Indicators :
2. Operating Information
3. Hardware Requirements and Precautions
Operating Temperature : 5 ~ 35 °C (41 ~ 95 °F)
Storage Temperature : -20 ~ 47 °C (-4 ~ 116 °F)
Line Voltage : 5V DC
1. Computers or servers with SATA I & SATA II & SATA III.
2. Hard drive with SATA I & SATA II & SATA III
HDDIdle
HDDFailorAdsent
HDDAccess
Rebuilding(Source)
Rebuilding(Target)
LightOn
──
LightOn
LightOn
──
BlueLED
──
LightOn
Blinking
──
Blinking
──
On
──
──
──
RedLED Buzzer

iR2771-S3 & iR2772-S3 User Manual
3
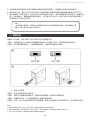
4. Hardware Installation Procedure
Please install iR2771-S3 / iR2772-S3 as the following instruction.
Choose the RAID mode with RAID switch on the back panel. The default value is RAID 1.
Install the product unit into the computer chassis and make the necessary connections
and mount the product unit properly and securely to the bay position desired.
Step 1
Step 2
Note :
Once the drive mode conguration has been completed, re-conguration using the same hard
drives to set the drive mode will result in complete data loss. If you must change the drive
mode, make sure to backup all data prior to the mode change.
3. You are strongly advised to set the storage mode (the default is the Independent mode) before
using the iR2771-S3 / iR2772-S3.
4. The product allows the user to simultaneously utilize two hard drives manufactured by dierent
companies. However, if the user expects better eciency, we strongly recommend the users to
use hard drives manufactured by the same manufacturer.
5. Please make sure that the two hard drives are free from bad blocks or defects prior to installation
in order to avoid system crashes or data loss.
6. The actual storage capacity of iR2771-S3 / iR2772-S3 recognized by the system may dier from
the total capacity stated on the hard drives combined once the drives have been formatted.
7. It is highly recommended for users to back up important data contained within theiR2771-S3 /
iR2772-S3 unit on a regular basis or whenever the user feels necessary to a remote or a separate
storage device. RAIDON will not be responsible for any lost of data caused during the use of the
unit or the recovery of the data lost.
RAID 0 ModeRAID 1 Mode

iR2771-S3 & iR2772-S3 User Manual
4
※
Note :
1. RS232 Port and RS232 Cable: Provides hardware status monitoring to industrial control system or IPC via RS232.
2. We do not recommend users to disassemble the device without proper instructions and authorization. The manufacture warranty
will not cover the damages caused by unauthorized disassembling.
3. To prevent the device from malfunction, please make sure the device is connected with a direct and dedicated power connection of
a stable power input.
※
Step 3
Step 4
Step 5
Step 6
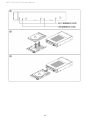
Mounting Positions
Mount the hard drive onto the removable tray.
Re-insert the removable tray when completed and make sure the tray is securely inserted
into the appropriate position.
When hardware installation is completed, you can turn on the power of the main unit to
proceed with relevant settings and applications.
Installation completed. Your operating system should automatically detect the hard drives
within. Please proceed to format the drives. Once formatting is completed, you may then
start to operate the device.

iR2771-S3 & iR2772-S3 User Manual
5
5. Setting the Hard Drive Array Mode
6. Computer Set Up
Please select the RAID mode with the jumper located at the back panel. The original default is RAID
1, still there are four pins at the back panel for RAID mode selection: to set the RAID 0 mode, set to
. To set the RAID 1 mode, set to .
1. RAID 1 Mode
1). Place two new hard drives into iR2771-S3 / iR2772-S3 and strongly suggest you to use two
identical hard drives to get the equal capacity. If the capacity is dierent, iR2771-S3 / iR2772-S3
is downward to the small hard drive capacity.
2). Under RAID 1 mode, two hard drives has the identical information as one to mirror to the other
one, therefore each of the hard drive failed is still able to function normally. When you replace
the failed hard disk to the new one the system automatically rebuilding the data to the newly
place hard disk.
2. RAID 0 Mode
1). Place two new hard drives into iR2771-S3 / iR2772-S3 and strongly suggest you to use two identical
hard drives to get the equal capacity. If the capacity is different, iR2771-S3 / iR2772-S3 is
downward to the small hard drive capacity.
2). Under RAID 0 mode, capacity is add up to a one big volume, also with the feature of faster
read / write performance ecient.
When the hardware setup for iR2771-S3 / iR2772-S3 is complete, you are now ready to turn the
machine on.
After the hardware installation is complete, the iR2771-S3 / iR2772-S3 will be treated as one single
hard drive. Set the hard drive to AUTO in the computer’s BIOS. When the computer is turned on, the
system will retrieve the following information:
1. In iR2771-S3 / iR2772-S3, the installed hard drive can be detected by the Device Manager of
Computer Management for Windows.
2. Customers can choose to format the hard drive by using the Disk Management tool of the
operating system before using the iR2771-S3 / iR2772-S3.

iR2771-S3 & iR2772-S3 User Manual
6
At this point, the installation process is completely nished. The user can freely retrieve and save
data to iR2771-S3 / iR2772-S3 just like retrieving and saving data to a regular hard drive. If the user
experiences any abnormality during the operation, please refer to the trouble shooting Q&A section
in Appendix.
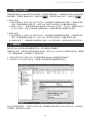
You can install GUI software to monitor the status of iR2771-S3 / iR2772-S3. This can be done by
installing software from CD.
※
The HDD1 equals to Pri HDD and HDD2 equals to Sec HDD.
1. System Status
This GUI will auto detects the connected iR2771-S3 / iR2772-S3 and reveals relative information
accordingly.
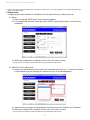
7. GUI Monitoring Software and Firmware Update
2. Firmware Upgrade
You may update the Firmware via this GUI, simply click on “Load” button to locate the rmware
le to proceed. After update is nished, you may restart the power properly to operate with newly
updated rmware.

iR2771-S3 & iR2772-S3 User Manual
7
※
Caution : Any random rmware updates may cause device in malfunction, it is strongly suggested not to update device rmware if
device is operating properly.
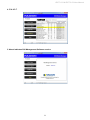
3. E-Mail Notify
Conguring an e-mail address for notication of drive malfunctioning or being removed.
3-1 Setup
1). Insert “Outgoing” SMTP and e-mail name and address.
2). If it is passwords required, select the option “SMTP Login Authentication” and insert the
passwords.
3). When the conguration completed, click on the “OK” button to save.
※
Device must be connected in operational states during congurations to take eects.
3-2 HDD Fail / Device Removed
1). Insert the e-mail address of the receiver for notication and click on “+” to add the inserted
e-mail address onto the notifying list. (Maximum up to 10 e-mail addresses)
2). Insert the error message and descriptions from the columns of “Subject” and “Contents”.
3). When the conguration completed, click on the “OK” button to save.
※
Device must be connected in operational states during congurations to take eects.

iR2771-S3 & iR2772-S3 User Manual
8
5. About Indicates GUI Management Software version
4.
S.M.A.R.T.

iR2771-S3 & iR2772-S3 User Manual
9
Unstable system after connecting iR2771-S3 / iR2772-S3
Hard Drive Failure
Q1.
A:
Q2.
A:
After installing iR2771-S3 / iR2772-S3, we are unable to start the computer or the computer can
not locate iR2771-S3 / iR2772-S3 upon startup.
1. Please check whether the SATA Cable connection cables are properly connected to the
computer system and whether SATA drives are functioning normally.
2. If everything is functioning properly but the user still can not start the computer system, then
the problem might be the system incompatibility. If such incompatibility takes place, please
contact our technical support department.
When the iR2771-S3 / iR2772-S3 is in use, the computer system is functioning normally but the
iR2771-S3 / iR2772-S3 access speed is abnormal.
Please rst check whether the iR2771-S3 / iR2772-S3 is in the progress of executing data auto-
rebuild.
1. Please examine if the length of the connection cables, SATA cable that connect the drives to
the computer system is too long and whether the specication these cables complies with the
requirements.
2. If both the lengths and specification of the cables are checked out ok, please turn off
iR2771-S3 / iR2772-S3 and remove the hard drive from iR2771-S3 / iR2772-S3. Test the
hard drive directly with the computer system since it might be the bad sectors in the hard
drive that are causing the longer than normal system down time.
Under the mirror mode (RAID 1), what will be the system’s total storage capacity when adding a
brand new hard drive?
1. The total storage capacity for iR2771-S3 / iR2772-S3 is determined by the storage capacity of
the primary hard drive installed during the initial usage.
2. The storage capacity will not increase after initial installation even when place a brand new
hard drive with larger storage capacity.
Why does the error message appear when I installed the second hard drive?
The storage capacity of the second hard drive must be larger than the first hard drive.
Otherwise, iR2771-S3 / iR2772-S3 can not rebuild the new hard drive.
10. Frequently Asked Questions
Q1.
A:
Q2.
A:
About Auto Rebuilding Function
What will happen if we turn off the computer’s power while iR2771-S3 / iR2772-S3 is still
executing data auto rebuilding?
he mirror mode (RAID 1), if the power is out of the auto rebuilding process, the controller
will remember when completion percentage of the auto rebuilding process and resume the
rebuilding process when the power is back on.
Is it possible to lose any part of the data during the data auto rebuilding?
The data auto rebuilding function will copy data from one sector to another sector. Technically
speaking, the data will not be lost during the auto rebuilding process. However, if the original
hard drive is detected with bad sectors during the rebuilding process, iR2771-S3 / iR2772-S3 will
make hypothetical duplication instead of treat the bad sectors as hard drive failure. Therefore,
the data stored in the bad sectors could potentially be lost during rebuilding.
Q1.
A:
Q2.
A:

iR2771-S3 & iR2772-S3 User Manual
10
目錄索引
1. 產品外觀及包裝內容
關於這份手冊
感謝您使用 RAIDON 的產品。本手冊將介紹 InTANK iR2771-S3 & iR2772-S3 產品。在您開始使用
iR2771-S3 &iR2772-S3 產品前,建議您先閱讀過本手冊。手冊裡的資訊在出版前雖已被詳細確認,實
際產品規格仍將以出貨時為準;任何產品規格或相關資訊更新請您直接到 www.raidon .com.tw 網站查
詢,本公司將不另行通知。 若您想獲得 RAIDON 最新產品訊息、使用手冊、韌體或對 RAIDON 產品
有任何疑問,請您聯絡當地供應商或到 www.raidon.com.tw 取得相關訊息。
本手冊相關產品內容歸 銳銨科技股份有限公司 版權所有
打開包裝外盒後,包裝內容應包含下列組件:
1. 產品外觀及包裝內容
2. 環境需求
3. 硬體需求與注意事項
4. 硬體安裝
5. 設定 RAID 層級
6. 電腦安裝
7. GUI 功能說明與韌體更新
8. 常見問題
iR2771-S3 or iR2772-S3
iR2771-S3 or iR2772-S3 產品本體 X1( 內含抽取盒 x2)
光碟 x 1
螺絲及鑰匙 x 2
快速安裝導引 x 1
內接 RS232 連接線 x1 (iR2772-S3)
• 請確認相關配件與產品本身是否有受損或配件缺少,若有任何疑問請與本產品供應商聯絡。
• 請前往官網 (www.raidon.com.tw) 下載驅動程式以及其餘相關資源。

iR2771-S3 & iR2772-S3 User Manual
11
正面與背面示意圖
燈號一覽表 :
2. 環境需求
工作溫度 : 5 ~ 35 ℃ (41 ~ 95 ℉ )
儲存溫度 : -20 ~ 47 ℃ (-4 ~ 116 ℉ )
工作電壓 : 5V DC
3. 硬體需求與注意事項
1. 電腦或伺服器具備 SATA I、SATA II 或 SATA III 介面。
2. 具備 SATA I、SATA II 或 SATA III 介面的硬碟。
3. 強烈建議使用 iR2771-S3 / iR2772-S3 前先設定好 RAID 模式 ( 預設值是 RAID 1)。
4. 本系統允許使用不同廠牌的硬碟。但如果要獲得更好的效能,我們強烈建議使用相同廠牌型號的硬碟。
硬碟閒置
無硬碟/硬碟故障
資料存取
資料重建(來源)
資料重建(目標)
恆亮
──
恆亮
恆亮
──
藍色LED
──
恆亮
閃爍
──
閃爍
──
鳴叫
──
──
──
紅色LED 蜂鳴器

iR2771-S3 & iR2772-S3 User Manual
12
5. 安裝硬碟前請先確認所使用的硬碟並無壞軌或是其他問題,以免導致系統損毀或資料遺失。
6. 硬碟格式化後,iR2771-S3 / iR2772-S3 的總使用儲存容量或許會與硬碟容量加總後的有所不同。
7. 強烈建議除了使用 iR2771 / iR2772-S3 的資料儲存功能外,請針對重要資料備份到另一個儲存裝
置上或遠端備份,雙重備援您重要的資料。若您儲存在 iR2771 / iR2772-S3 的資料損毀或遺失,
RAIDON 將不負任何的責任。
注意:
一旦使用模式確認後 , 使用相同的硬碟進行模式切換將會導致資料遺失 . 如果需要進行模
式變更 , 請於變更前先進行資料備份。
4. 硬體安裝
請參照下列步驟,完成 iR2771-S3 / iR2772-S3 的硬體安裝 :
請使用背板上的 RAID 控制鍵選擇 RAID 0 或 RAID 1 模式,原廠預設值為 RAID 1。
將主體裝置在機殼上,連接相關連接線,並確認固定螺絲是否鎖上。
步驟 1
步驟 2
Note :
1. RS232 埠與 RS232 線:提供工控系統或是工業電腦透過 RS232 監控硬碟狀態。
2. 我們不建議使用者在未經授權的情況下自行拆卸系統。如未經授權自行拆卸所導致的損毀將不在保固之列 。
3. 為了防止系統發生問題,請確保系統的電源供應是穩定且獨立的。
※
步驟 3
步驟 4
步驟 5
步驟 6
螺絲孔位說明
將您的硬碟安裝至抽取盒上。
確認完成後請插回抽取盒,並確認取盒確實插入且固定在適當位置。
硬體安裝完成。您可開啟電源進行相關設定與應用。
完成。你的作業系統將會自行辨識硬體,辨識成功後請先完成硬碟格式化,完成後即可使用。

iR2771-S3 & iR2772-S3 User Manual
13

iR2771-S3 & iR2772-S3 User Manual
14
5. 設定 RAID 層級
請透過機器後面的 jumper 來設定 RAID 層級。出廠預設值是 RAID 1。機器背面有四根 pin 腳用來設定
RAID 層級,若要設定 RAID 0 模式,請設定為 ;若要設定 RAID 1 模式,請設定為 。
1. RAID 1 模式
1). 將新的硬碟放入 iR2771-S3 / iR2772-S3 中。強烈建議您使用兩顆相同的硬碟,以便取得對等的
容量。如果兩顆硬碟的容量不同,iR2771-S3 / iR2772-S3 將會以小容量的硬碟為依據。
2). RAID 1 模式下,兩顆硬碟是鏡射關係因此擁有相同的資料,因此有一顆硬碟損毀仍
然可以正常運作。當放入新硬碟取代損毀硬碟後,系統會自動將資料重建到新的硬碟。
2. RAID 0 模式
1). 將新的硬碟放入 iR2771-S3 / iR2772-S3 中。強烈建議您使用兩顆相同的硬碟,以便取得對等的
容量。如果兩顆硬碟的容量不同,iR2771-S3 / iR2772-S3 將會以小容量的硬碟為依據。
2). RAID 0 模式下,兩顆硬碟的容量會被加總成一個大儲存容量,並且提供更佳的存取效能 。
6. 電腦設定
當 iR2771-S3 / iR2772-S3 的硬體安裝完成,即可準備進行開機動作。
硬體安裝完成後,將 BIOS 的硬碟偵測設定為自動,iR2771-S3 / iR2772-S3 將會被視為如同一顆硬碟
一般。當電腦開機後,系統會顯示下列偵測訊息 :
1. 安裝在 iR2771-S3 / iR2772-S3 中的硬碟能夠被 Windows 的裝置管理員偵測到。
2. 使用 iR2771-S3 / iR2772-S3 前,使用者可以透過磁碟管理選擇硬碟的格式。
到此完成整個安裝程序。使用者可以如同存取一般硬碟般的使用 iR2771-S3 / iR2772-S3。如果使用上
仍有問題,請參閱附件的 Q&A。

iR2771-S3 & iR2772-S3 User Manual
15
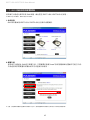
7. GUI 功能說明與韌體更新
使用者可以透過光碟來安裝 GUI 軟體,藉此監控 iR2771-S3 / iR2772-S3 的狀態。
※ HDD1 等於 Pri 硬碟,HDD2 等於 Sec 硬碟。
1.
系統狀態
GUI 會自動偵測 iR2771-S3 / iR2772-S3 並且顯示相關資訊 .
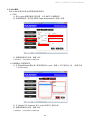
2.
韌體升級
使用者可以透過此 GUI 進行韌體升級。只需簡單的點選
“
Load
”
指定韌體檔案位置後即可進行升級。
升級過程或許需要重新啟動系統來完成整個升級程序。
※ 注意:任意更新韌體有可能導致系統運作不正常。強烈建議如果系統運作正常情況下不要進行韌體升級。

iR2771-S3 & iR2772-S3 User Manual
16
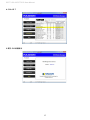
3.
E-Mail 通知
設定 e-mail 帳號來收取系統問題或被移除通知。
3-1 設定
1). 填入 e-mail 相關名稱與完整位置,以及 SMTP 的相關資訊。
2). 如果需要密碼,請勾選
“
SMTP Login Authentication
”
並輸入密碼 。
3). 相關資訊填寫完成後,點選
“
OK
”
。
※ 設定過程中,系統必須維持在正常運作狀態。
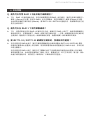
3-2 硬碟損毀 / 裝置被移除
1). 在 E-Mail Address 欄位填入要收取通知的 e-mail,點選
“
+
”
即可增加另一組。( 最多可填
入 10 組 e-mail)
2). 在
“
Subject" 與
“
Contents
”
填入 e-mail 訊息的主旨與內容。
3). 相關資訊填寫完成後,點選
“
OK"。
※ 設定過程中,系統必須維持在正常運作狀態。

iR2771-S3 & iR2772-S3 User Manual
17
4.
S.M.A.R.T.
5.
關於 GUI 軟體版本

iR2771-S3 & iR2772-S3 User Manual
18
Q. 是否可以利用 RAID 1 功能來進行硬碟備份?
Q. 是否可以在 RAID 1 下使用單顆硬碟?
Q. 當 iR2771-S3 / iR2772-S3 硬碟發生錯誤時,我應該如何處理?
A: 可以,RAID 1 本身即鏡射功能,若您有硬碟需要利用 RAID 1 進行備份,請將存有資料硬碟放入
硬碟 1 (Source) 的位置,設定成 RAID 1 並完成開機後,再把新硬碟放入硬碟 2(Target) 的位置,
系統將會自動進行資料備份 (Rebuild),當 iR2771-S3 / iR2772-S3 重建完成,兩個硬碟內就已經
是完全相同資料。
可以,但是將會喪失原本 RAID 1 的資料安全功能,建議您在 RAID 1 模式下,應使用兩顆硬碟以
確保資料安全,在單顆硬碟下,RAID 1 將無法進行鏡射功能,一旦單一硬碟損毀則內部的資料將
全數損毀。建議用戶只要發生有一個硬碟損壞的狀態,應儘快購買一個新硬碟回來更換。
若您使用的是 RAID 0 模式,請您先確認哪顆硬碟發生錯誤並關掉 iR2771-S3 / iR2772-S3 電源,
將損毀的硬碟抽出並置換上新的硬碟,再度開啟電源後系統將重建您的 RAID 0 系統,原本的資
料將全數遺失。
若您使用的是 RAID 1 模式,請用戶在不關機的情況下直接將損毀的硬碟抽出並置換上新的硬碟,
當新硬碟置入後,系統將會自動開始「重建」程序,當重建完成,即可正常使用。請注意,當系
統處於資料重建中時,請勿將任一硬碟抽出,以確保資料的完整性。
8. 常見問題
A:
A:
ページが読み込まれています...
-
 1
1
-
 2
2
-
 3
3
-
 4
4
-
 5
5
-
 6
6
-
 7
7
-
 8
8
-
 9
9
-
 10
10
-
 11
11
-
 12
12
-
 13
13
-
 14
14
-
 15
15
-
 16
16
-
 17
17
-
 18
18
-
 19
19
-
 20
20
-
 21
21


