

1

2

3 4
5
6
7
8
9
10

11 12
13 14
15
16
17
18

19
20
21 22
23
24
25 26

en
7
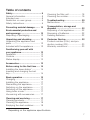
Table of contents
Safety...............................................8
General information..........................8
Intended use.....................................8
Restriction on user group.................9
Safety instructions ............................9
Preventing material damage ........12
Environmental protection and
saving energy................................12
Disposing of packaging .................12
Unpacking and checking ..............12
Unpacking the appliance and
parts ...............................................12
Included with the appliance ...........12
Familiarising yourself with
your appliance...............................13
Appliance .......................................13
Controls ..........................................13
Status display .................................13
Accessories...................................13
Before using for the first time ......14
Installing the base station
1
.............14
Inserting and charging the bat-
tery..................................................14
Basic operation .............................15
Charging.........................................15
Installing the appliance ..................17
Dismantling the appliance..............17
Switching on the appliance ............17
Switching off the appliance ............17
Using turbo mode ..........................17
Vacuuming with accessories..........17
Cleaning and servicing.................17
Cleaning products ..........................17
Cleaning the appliance ..................18
Emptying the dust container ..........18
Cleaning the filter unit ....................18
Cleaning the nozzles ......................19
Troubleshooting............................20
Malfunctions ...................................20
Transportation, storage and
disposal .........................................22
Disposing of old appliance ............22
Disposing of batteries ....................22
Sending batteries ...........................22
Customer Service..........................22
Product number (E-Nr.) and pro-
duction number (FD) ......................23
Warranty conditions........................23
1
Depending on the appliance specifications

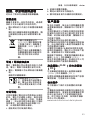
en Safety
8
Safety
Observe the following safety instructions.
General information
You can find general information for this instruction manual here.
¡ Read this instruction manual carefully.
¡ This manual is intended for the user of the appliance.
¡ Follow the safety instructions and warnings.
¡ Keep the instruction manual and the product information safe
for future reference or for the next owner.
¡ Do not connect the appliance if it has been damaged in transit.
Intended use
Please read the information on intended use to ensure that you
use the appliance correctly and safely.
Only use this appliance:
¡ As specified in this instruction manual.
¡ With genuine parts and accessories. Damage caused by using
third-party products is not covered under the warranty.
¡ For cleaning surfaces.
¡ In private households and in enclosed spaces in a domestic en-
vironment at room temperature.
¡ Up to an altitude of max. 2000m above sea level.
Do not use the appliance:
¡ For vacuum-cleaning persons or animals.
¡ For vacuuming up harmful, sharp-edged, hot or burning sub-
stances.
¡ For vacuuming up damp substances or liquids.
¡ For vacuuming up highly flammable or explosive materials and
gases.
¡ For vacuuming up ash or soot from tiled stoves and central
heating systems.
¡ For vacuuming up toner dust from printers and photocopiers.
¡ For vacuuming up building rubble.

Safety en
9
Disconnect the appliance from the power supply when:
¡ cleaning the appliance.
Restriction on user group
Avoid risks to children and vulnerable persons.
This appliance may be used by children aged 8 or over and by
people who have reduced physical, sensory or mental abilities or
inadequate experience and/or knowledge, provided that they are
supervised or have been instructed on how to use the appliance
safely and have understood the resulting dangers.
Children must not play with the appliance.
Cleaning and user maintenance must not be performed by chil-
dren unless they are being supervised.
Safety instructions
Follow these safety instructions when using the appliance.
WARNING‒Risk of electric shock!
¡ Incorrect repairs are dangerous.
Repairs to the appliance should only be carried out by
trained specialist staff.
Only use genuine spare parts when repairing the appliance.
¡ If the appliance or the power cord of the quick charger
1
is
damaged, this is dangerous.
Never operate a damaged appliance.
Never operate an appliance with a cracked or fractured sur-
face.
"Call Customer Service." →Page22
Repairs to the appliance should only be carried out by
trained specialist staff.
¡ An ingress of moisture can cause an electric shock.
Only use the appliance in enclosed spaces.
Never expose the appliance to intense heat or humidity.
Do not use steam- or high-pressure cleaners to clean the
appliance.
1
Depending on the appliance specifications

en Safety
10
¡ If the insulation of the power cord on the quick charger
1
is
damaged, this is dangerous.
Never let the power cord come into contact with hot appli-
ance parts or heat sources.
Never let the power cord come into contact with sharp
points or edges.
Never kink, crush or modify the power cord.
¡ Improper installation is dangerous.
Connect and operate the charging cable
1
and the quick
charger
1
only in accordance with the specifications on the
rating plate.
Connect the charging cable
1
and the quick charger
1
to a
power supply with alternating current only via a properly in-
stalled socket with earthing.
WARNING‒Risk of burns!
The filter systems may become warm during operation and
may catch fire when used in conjunction with flammable sub-
stances or substances that contain alcohol.
When cleaning the appliance, do not use flammable sub-
stances or substances that contain alcohol.
WARNING‒Risk of injury!
¡ Moving parts and openings on the appliance may cause in-
jury.
Keep clothing, hair, fingers and other body parts away from
the openings on the appliance and the moving parts.
Never point the pipe or the nozzles towards eyes, hair, ears
or mouths.
¡ An appliance that falls may endanger people.
Ensure that children do not play with the appliance, even
when it is in the base station
1
.
1
Depending on the appliance specifications

Safety en
11
WARNING‒Danger: Magnetism!
Permanent magnets that are contained in the appliance may
affect electronic implants, e.g. heart pacemakers or insulin
pumps.
Persons with electronic implants must stand at least 10cm
away from the appliance.
WARNING‒Risk of suffocation!
Children may put packaging material over their heads or wrap
themselves up in it and suffocate.
Keep packaging material away from children.
Do not let children play with packaging material.
WARNING‒Risk of explosion!
A short-circuit may cause the battery to explode.
Protect the battery against fire, heat and constant sunlight.
Protect the battery against water and penetrating moisture.
Never open the battery.
When not in use, keep the battery away from metal objects,
e.g. paper clips, coins, keys, nails or screws.
WARNING‒Risk of harm to health!
¡ Fumes that escape from a damaged battery are dangerous.
Supply fresh air.
If there are any problems, seek medical advice from a doc-
tor.
¡ Liquids that escape from a damaged battery are dangerous.
If these come into contact with the skin, wash immediately
with cold water.
If these come into contact with the eyes, seek medical help.

en Preventing material damage
12
Preventing material damage
Preventing material dam-
age
Preventing material damage
To prevent material damage to your
appliance, accessories or any other
objects, follow these instructions.
ATTENTION!
¡ Liquid that escapes from a dam-
aged battery may lead to material
damage.
Check and clean any wet ob-
jects.
Replace damaged objects.
¡ Worn or sharp-edged outsides of
nozzles may damage sensitive
hard floors, such as parquet or li-
noleum.
Regularly check the outsides of
the nozzles for wear.
Replace the worn nozzle.
¡ Vacuuming without the brush roller
in place may damage the rotating
drive axle.
Never use the nozzle without the
brush roller in place.
¡ Dirt in the motor may damage the
motor.
Never operate the appliance
without the filter unit.
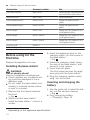
Environmental protection and saving energy
Environmental protection
and saving energy
Environmental protection and saving energy
Help protect the environment by us-
ing your appliance in a way that con-
serves resources and by disposing of
reusable materials properly.
Disposing of packaging
The packaging materials are environ-
mentally compatible and can be re-
cycled.
Sort the individual components by
type and dispose of them separ-
ately.
Unpacking and checking
Unpacking and checking
Unpacking and checking
Find out here what you need to note
when unpacking the appliance.
Unpacking the appliance and
parts
1. Take the appliance out of the
packaging.
2. Take all other parts and the ac-
companying documents out of the
packaging and place them to
hand.
3. Remove any packaging material.
4. Remove any stickers or film.
Included with the appliance
After unpacking all parts, check for
any damage in transit and complete-
ness of the delivery.
Note:The appliance comes with ad-
ditional accessories depending on its
features.
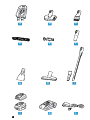
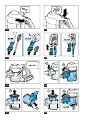
→Fig.
1
Base station
1
Mini electro-nozzle
1
2-in-1 furniture brush with upholstery
nozzle
1
Replacement nozzle for power brush
1
Replacement brush for mini electro-
nozzle
1
Adapter for XXL upholstery nozzle
1
Mattress nozzle
1
XXL upholstery nozzle
1
1
Depending on the appliance specifications

Familiarising yourself with your appliance en
13
Crevice nozzle
1
Battery
1
Quick charger
1
Charging cable
1
1
Depending on the appliance specifications
Familiarising yourself with your appliance
Familiarising yourself
with your appliance
Familiarising yourself with your appliance
Familiarise yourself with the parts of
your appliance.
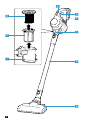
Appliance
You can find an overview of the parts
of your appliance here.
→Fig.
2
Dust container
Fluff filter
Cartridge filter
Turbo switch
On/off switch
Status display
Dust container release button
Suction pipe
Floor nozzle with power brush
Controls
You can find an overview of the con-
trols for your appliance here.
¡ "Switch on the appliance."
→Page17
¡ "Switch off the appliance."
→Page17
"Use turbo mode." →Page17
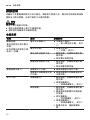
Status display
The status display indicates the differ-
ent operating statuses.
Operating
status
Status display
Normal mode Display lights up white.
Turbo mode LED slowly flashes white.
Battery charge
below 20%
Display rapidly flashes red.
Battery empty Display goes out.
Charging pro-
cess
LED slowly flashes white.
Battery is fully
charged
Display lights up white and
goes out after approx. two
minutes.
Over-/under-tem-
perature protec-
tion
Display lights up red and
goes out after approx. 10
seconds.
Accessories
Accessories
Accessories
Only use original accessories. These have been made especially for your appli-
ance. Here you can find an overview of your appliance's accessories and how
to use them.
Accessories Accessory number Use
XXL upholstery nozzle BBZ130SA Clean upholstered furniture.
1
Depending on the country version

en Before using for the first time
14
Accessories Accessory number Use
XXL crevice nozzle BBZ131SA Clean crevices, corners and nar-
row and hard-to-reach places.
Mattress nozzle BBZ133SA Clean mattresses.
Rechargeable battery
1
BHZUB1830 Supply the appliance with
power.
Rechargeable battery
1
BHZUB183CN Supply the appliance with
power.
Quick charger
1
BHZUC18N Charge the 18 V Power for ALL
rechargeable battery.
Quick charger
1
BHZUC18NCN Charge the 18 V Power for ALL
rechargeable battery.
Quick charger
1
BHZUC18NGB Charge the 18 V Power for ALL
rechargeable battery.
Accessory set BHZUKIT
1
Depending on the country version
Before using for the first time
Before using for the
first time
Before using for the first time
Prepare the appliance for use.
Installing the base station
1
WARNING
Risk of electric shock!
Incorrect installation is dangerous.
Check whether any household wir-
ing could be damaged in the in-
stallation area.
Do not install the base station hori-
zontally or vertically above, below
or next to a socket.
1. Remove the front panel towards
the front.
→Fig.
3
2. Wall-mount the base station
1
.
Install the base station
1
close to a
socket.
3. Insert the appliance plug for the
charging cable
1
into the recess in
the base station
1
.
→Fig.
4
4. Guide the charging cable
1
along
the side of the base station
1
and
secure it in the recess.
5. Insert the front panel.
The front panel secures the appli-
ance plug into the base station
1
.
6. Plug the charging cable's mains
plug
1
into the socket.
Inserting and charging the
battery
1. Use the guide rail to insert the bat-
tery into the vacuum cleaner.
→Fig.
5
2. Fully charge the battery.
→"Charging", Page15
1
Depending on the appliance specifications

Basic operation en
15
Basic operation
Basic operation
Basic operation
You can find out everything you need
to know about operating your appli-
ance here.
Charging
Depending on the appliance features,
you can charge the battery in three
different ways.
WARNING
Risk of fire!
Improper use of the battery and the
rapid charger
1
is dangerous.
Only charge the battery in char-
gers that are recommended by the
manufacturer.
Only use the battery in connection
with the Bosch appliance.
Charge the battery using the ori-
ginal charging cable
1
or the ori-
ginal quick charger
1
.
Only use batteries from the Power
for ALL 18V series.
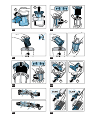
Charging using the charging cable
1
Note:The power supply unit on the
charging cable
1
and the appliance
heat up while charging. This is nor-
mal and harmless.
Requirement:The battery has been
inserted.
→"Inserting and charging the bat-
tery", Page14
1. Place the vacuum cleaner close to
the socket.
2. Plug the appliance plug into the
vacuum cleaner.
→Fig.
6
3. Insert the mains plug into the
socket.
a The status display slowly flashes
white while the battery is charging.
Once the battery is fully charged,
the status display lights up white
for a few minutes.
Tip:To check that the battery has
charged fully, briefly disconnect the
vacuum cleaner from the mains. The
status display then lights up white.
You can charge the vacuum cleaner
whenever it is not in use.
Charging in the base station
1
WARNING
Risk of injury!
An appliance that falls may endanger
people.
Ensure that children do not play
with the appliance, even when it is
in the base station
1
.
Note:The power supply unit on the
charging cable
1
and the appliance
heat up while charging. This is nor-
mal and harmless.
Requirement:The battery has been
inserted.
Insert the vacuum cleaner into the
base station
1
from the front.
→Fig.
7
a The status display flashes white
while the battery is charging. Once
the battery is fully charged, the
status display lights up white for a
few minutes.
Tip:To check that the battery has
charged fully, briefly disconnect the
vacuum cleaner from the mains.
Once the status display lights up
white, the appliance is fully charged.
1
Depending on the appliance specifications

en Basic operation
16
Charging using the quick charger
1
1. Press the release button and re-
move the battery to the rear.
→Fig.
8
2. Observe the enclosed instructions.
Battery charging times
You can find an overview of the bat-
tery charging times here.
Notes
¡ The specified charging times may
vary depending on the battery
charging status, the battery tem-
perature and the age of the bat-
tery.
¡ You can find out which battery
charging times are achieved with
the quick charger
1
in the instruc-
tions of for the quick charger
1
.
Tip:If the quick charger
1
displays a
battery charging status of approx.
80%, you can remove and use the
battery.
Battery charging status of 18V2,5Ah 18V3,0Ah
80% in hrs 3,5 4
97%–100% in hrs 4 5
Battery runtimes
You can find an overview of the battery runtimes, depending on the battery that
is used, here.
Note
The following modes affect the battery runtime:
¡ Mode 1: Normal mode with non-electrical accessory
¡ Mode 2: Normal mode with electrical floor nozzle
¡ Mode 3: Turbo mode with electrical floor nozzle
Runtime 18V2,5Ah 18V3,0Ah
Mode 1 up to min. 30 35
Mode 2 up to min. 25 30
Mode 3 up to min. 8 10
Notes
¡ Like every Li-ion battery, the batter-
ies from the Power for ALL 18V
series wear out over time, meaning
that the battery capacity and the
runtime decrease. This is a natural
aging process and not the result of
a material error, manufacturing er-
ror or material defect.
1
Depending on the appliance specifications

Cleaning and servicing en
17
¡
You can delay the natural wear by
using the following measures:
Only charge the battery in the
temperature range between
0°C and 45°C.
Only store the battery in the tem-
perature range between -20°C
and 50°C.
Do not store the battery for an
extended period of time if it is
fully charged or fully discharged.
Installing the appliance
1. Place the suction pipe onto the ap-
pliance's connection port and lock
it in place.
→Fig.
9
2. Insert the end of the suction pipe
into the floor nozzle and lock it in
place.
Dismantling the appliance
1. Press the release button and pull
the suction pipe out of the floor
nozzle.
→Fig.
10
2. Press the release button and pull
the suction pipe out of the appli-
ance's connection port.
Switching on the appliance
Press .
→Fig.
11
a The status display lights up white.
Switching off the appliance
Press .
a The status display goes out.
Using turbo mode
Requirement:The appliance has
been switched on.
→"Switching on the appliance",
Page17
Press .
→Fig.
12
a The status display flashes white.
Vacuuming with accessories
1. Place the required accessory onto
the suction pipe or the appliance's
connection port.
→Fig.
13
2. After use, insert the accessory into
the base station
1
.
→Fig.
14
Cleaning and servicing
Cleaning and servicing
Cleaning and servicing
To keep your appliance working effi-
ciently for a long time, it is important
to clean and maintain it carefully.
Cleaning products
Only use suitable cleaning products.
ATTENTION!
Using unsuitable cleaning products
or incorrect cleaning may damage
the appliance.
Do not use harsh or abrasive de-
tergents.
Do not use cleaning products with
a high alcohol content.
Do not use hard scouring pads or
cleaning sponges.
Wash sponge cloths thoroughly
before use.
1
Depending on the appliance specifications

en Cleaning and servicing
18
Cleaning the appliance
Requirement:The appliance is
switched off.
→"Switching off the appliance",
Page17
1. Disconnect the appliance from the
charging cable
1
.
2. Clean the appliance and the ac-
cessory with a soft cloth and a
commercially available plastic
cleaner.
Emptying the dust container
Empty the dust container at the latest
when the fill level has reached the
mark. In order to achieve the
best possible vacuuming results,
empty the dust container after every
use of the vacuum cleaner.
Requirement:The appliance is
switched off.
→"Switching off the appliance",
Page17
1. Check the fill level of the dust con-
tainer.
→Fig.
15
2. Check how dirty the filter unit is
and clean it if necessary.
→"Cleaning the filter unit",
Page18
3. To remove the dust container,
press the release button.
→Fig.
16
4. Remove the filter unit from the dust
container.
→Fig.
17
5. Empty the dust container.
6. Insert the filter unit into the dust
container and check that it is
seated correctly.
→Fig.
18
7. Insert the dust container.
a The dust container audibly clicks
into position.
Cleaning the filter unit
When you empty the dust container,
also clean the filter. This gives you a
good vacuuming result.
ATTENTION!
Penetrating moisture may damage
the filters.
Never allow the filters to come into
contact with liquids.
Requirement:The appliance is
switched off.
→"Switching off the appliance",
Page17
1. Remove the dust container.
→Fig.
16
2. Remove the filter unit from the dust
container.
→Fig.
19
3. To unlock the cartridge filter, turn
the filter unit in the direction.
→Fig.
20
4. Remove the cartridge filter.
5. Tap out the cartridge filter over a
bin.
→Fig.
21
6. Lightly shake the fluff filter over a
bin and lightly tap on it.
→Fig.
22
7. Clean the fluff filter with a dry cloth.
8. Insert the cartridge filter into the
fluff filter.
→Fig.
23
9. Lock the cartridge filter in the dir-
ection.
10. Insert the filter unit into the dust
container.
→Fig.
18
1
Depending on the appliance specifications

Cleaning and servicing en
19
11. Insert the dust container.
a The dust container audibly clicks
into position.
Cleaning the nozzles
Requirement:"The appliance is
switched off." →Page17
1. Disconnect the nozzle from the ap-
pliance.
2. Release the brush roller.
→Fig.
24
3. Remove the brush roller sideways
from the nozzle.
4. Use scissors to cut through
threads and hairs along the
bristles
1
or cut through the cutting
groove
1
.
→Fig.
25
5. Insert the brush roller sideways
along the guide bar and into the
nozzle.
→Fig.
26
6. Lock the brush roller.
Note:The brush roller is self-clean-
ing. When operating the brush roller
on carpet, your appliance automatic-
ally vacuums the cut threads and
hairs after more than 30 seconds.
1
Depending on the appliance specifications

en Troubleshooting
20
Troubleshooting
Troubleshooting
Troubleshooting
You can rectify minor faults on your appliance yourself. Read the troubleshoot-
ing information before contacting after-sales service. This will avoid unneces-
sary costs.
WARNING
Risk of electric shock!
Incorrect repairs are dangerous.
Repairs to the appliance should only be carried out by trained specialist
staff.
Only use genuine spare parts when repairing the appliance.
Malfunctions
Fault Cause Troubleshooting
The appliance is not work-
ing.
The battery status display
does not show any status.
The red battery status dis-
play lights up for 10
seconds.
The battery has not been in-
serted correctly.
Insert the battery correctly.
→"Inserting and charging the bat-
tery", Page14
The battery has not been
charged.
Charge the battery.
→"Charging", Page15
The battery has overheated
or overcooled.
1. Switch off the appliance and dis-
connect the appliance from the
power supply.
2. Wait until battery has reached room
temperature.
The appliance has over-
heated or overcooled.
1. Switch off the appliance and dis-
connect the appliance from the
power supply.
2. Wait until the appliance has
reached room temperature.
The dust container cannot
be inserted.
The filter unit is not com-
plete.
Check whether the filter unit is com-
plete.
The filter unit or dust con-
tainer is not positioned cor-
rectly.
Check whether the filter unit and
dust container are inserted cor-
rectly.
Suction is reduced. The filter is blocked. 1. Switch off the appliance and dis-
connect the appliance from the
power supply.
2. Clean the filter unit.
→"Cleaning the filter unit",
Page18
ページが読み込まれています...
ページが読み込まれています...
ページが読み込まれています...
ページが読み込まれています...
ページが読み込まれています...
ページが読み込まれています...
ページが読み込まれています...
ページが読み込まれています...
ページが読み込まれています...
ページが読み込まれています...
ページが読み込まれています...
ページが読み込まれています...
ページが読み込まれています...
ページが読み込まれています...
ページが読み込まれています...
ページが読み込まれています...
ページが読み込まれています...
ページが読み込まれています...
ページが読み込まれています...
ページが読み込まれています...
ページが読み込まれています...
ページが読み込まれています...
ページが読み込まれています...
ページが読み込まれています...
ページが読み込まれています...
ページが読み込まれています...
ページが読み込まれています...
ページが読み込まれています...
ページが読み込まれています...
ページが読み込まれています...
ページが読み込まれています...
ページが読み込まれています...
ページが読み込まれています...
ページが読み込まれています...
ページが読み込まれています...
ページが読み込まれています...
ページが読み込まれています...
ページが読み込まれています...
ページが読み込まれています...
ページが読み込まれています...
ページが読み込まれています...
ページが読み込まれています...
ページが読み込まれています...
ページが読み込まれています...
ページが読み込まれています...
ページが読み込まれています...
ページが読み込まれています...
ページが読み込まれています...
ページが読み込まれています...
ページが読み込まれています...
ページが読み込まれています...
ページが読み込まれています...
-
 1
1
-
 2
2
-
 3
3
-
 4
4
-
 5
5
-
 6
6
-
 7
7
-
 8
8
-
 9
9
-
 10
10
-
 11
11
-
 12
12
-
 13
13
-
 14
14
-
 15
15
-
 16
16
-
 17
17
-
 18
18
-
 19
19
-
 20
20
-
 21
21
-
 22
22
-
 23
23
-
 24
24
-
 25
25
-
 26
26
-
 27
27
-
 28
28
-
 29
29
-
 30
30
-
 31
31
-
 32
32
-
 33
33
-
 34
34
-
 35
35
-
 36
36
-
 37
37
-
 38
38
-
 39
39
-
 40
40
-
 41
41
-
 42
42
-
 43
43
-
 44
44
-
 45
45
-
 46
46
-
 47
47
-
 48
48
-
 49
49
-
 50
50
-
 51
51
-
 52
52
-
 53
53
-
 54
54
-
 55
55
-
 56
56
-
 57
57
-
 58
58
-
 59
59
-
 60
60
-
 61
61
-
 62
62
-
 63
63
-
 64
64
-
 65
65
-
 66
66
-
 67
67
-
 68
68
-
 69
69
-
 70
70
-
 71
71
-
 72
72


