
1
3
2 4
e
h
<40°C
1
i
1000
MAX
MAX 1800
ml
MAX 1.8L
<1L
21
3
ON
4 5
2-2
2-3
32
OFF
8
7
MIN · · · · · · · · · MAX
4
5
ON
6
c
d
a
b
9
10
11
2-1
2-4
MIN · · · · · · MAX
3-1
5
(MAX)
(MAX)
1000 ml
MAX
1800 ml
60 sec
1800 ml
60 sec
35-45 sec
8 x
60 sec
<40 °C
g
f
j
k
1
3
2 4
e
h
<40°C
1
i
1000
MAX
MAX 1800
ml
MAX 1.8L
<1L
21
3
ON
4 5
2-2
2-3
32
OFF
8
7
MIN · · · · · · · · · MAX
4
5
ON
6
c
d
a
b
9
10
11
2-1
2-4
MIN · · · · · · MAX
3-1
5
(MAX)
(MAX)
1000 ml
MAX
1800 ml
60 sec
1800 ml
60 sec
35-45 sec
8 x
60 sec
<40 °C
g
f
j
k
HR3752
HR3756
HR3757
© 2018 Koninklijke Philips N.V.
All rights reserved.
3000 002 84974
EN User manual 7
KO 사용
설명서 14
TC 使用手冊 20
TH คู่มือผู้ใช้ 25
36 FA
42 AR

1
3
2 4
e
h
<40°C
1
i
1000
MAX
MAX 1800
ml
MAX 1.8L
<1L
21
3
ON
4 5
2-2
2-3
32
OFF
8
7
MIN · · · · · · · · · MAX
4
5
ON
6
c
d
a
b
9
10
11
2-1
2-4
MIN · · · · · · MAX
3-1
5
(MAX)
(MAX)
1000 ml
MAX
1800 ml
60 sec
1800 ml
60 sec
35-45 sec
8 x
60 sec
<40 °C
g
f
j
k
1
3
2 4
e
h
<40°C
1
i
1000
MAX
MAX 1800
ml
MAX 1.8L
<1L
21
3
ON
4 5
2-2
2-3
32
OFF
8
7
MIN · · · · · · · · · MAX
4
5
ON
6
c
d
a
b
9
10
11
2-1
2-4
MIN · · · · · · MAX
3-1
5
(MAX)
(MAX)
1000 ml
MAX
1800 ml
60 sec
1800 ml
60 sec
35-45 sec
8 x
60 sec
<40 °C
g
f
j
k
1
3
2 4
e
h
<40°C
1
i
1000
MAX
MAX 1800
ml
MAX 1.8L
<1L
21
3
ON
4 5
2-2
2-3
32
OFF
8
7
MIN · · · · · · · · · MAX
4
5
ON
6
c
d
a
b
9
10
11
2-1
2-4
MIN · · · · · · MAX
3-1
5
(MAX)
(MAX)
1000 ml
MAX
1800 ml
60 sec
1800 ml
60 sec
35-45 sec
8 x
60 sec
<40 °C
g
f
j
k

7
English
EN
•
Assembling,
disassembling or
cleaning it.
•
It is left unattended.
•
Do not immerse the
motor unit or vacuum
lid in water or any other
liquid.
•
Check if the voltage
indicated on the
appliance corresponds to
the local mains voltage
before you connect the
appliance.
•
Do not use the appliance
if the plug or the mains
cord is damaged or has
visible cracks. If the mains
cord is damaged, you
must have it replaced by
Philips, a service centre
authorised by Philips or
similarly qualied persons
in order to avoid a hazard.
•
Make sure the blade
unit is securely fastened
and the lid is properly
assembled to the blender
jar before you use the
appliance.
•
This appliance shall not
be used by children. Keep
the appliance and its cord
out of reach of children.
1 Important
Read this user manual carefully before
you use the appliance and save it for
future reference.
Warning
•
Do not misuse the
appliance to avoid
potential injury.
•
Do not pour hot liquid
into the blender as it
can be ejected out of
the appliance due to a
sudden steaming.
•
Do not touch the
sharp blades when the
appliance is plugged in.
If the blades get stuck,
unplug the appliance
before you remove the
ingredients. Be careful
when handling the sharp
cutting blades, emptying
the jar and during
cleaning.
•
Switch o and unplug the
appliance from the power
supply before:
•
Removing the jar from
the base, changing
accessories or
approaching parts that
move in use.

8
EN
Caution
•
In order to avoid a hazard
due to inadvertent
resetting of the thermal
cut-out, this appliance
must not be powered
through an external
switching device, such as
a timer, or connected to
a circuit that is regularly
switched on and o by
the utility.
•
Never use any
accessories or parts from
other manufacturers or
that Philips does not
specically recommend. If
you use such accessories
or parts, your guarantee
becomes invalid.
•
Do not exceed the
maximum volume
indication on the
blender jar.
•
Do not exceed the
maximum quantities
and processing times
indicated in the relevant
table.
•
If food sticks to the wall of
the blender jar, switch o
the appliance and unplug
•
This appliance can be
used by persons with
reduced physical, sensory
or mental capabilities or
lack of experience and
knowledge if they have
been given supervision
or instruction concerning
use of the appliance in
a safe way and if they
understand the hazards
involved.
•
Children should be
supervised to ensure that
they do not play with the
appliance.
•
Never assemble or
disassemble the blender
jar to the motor base
while the power is on.
Switch o the appliance
and unplug it rst.
•
This appliance is for
household use only.
•
Read the cleaning
procedure from section 7
“Cleaning” before use.
•
Do not operate the
blender for more than
30 seconds without any
ingredient(s). It may lead
to overheating.

9
English
EN
Built-in safety lock
This feature ensures that you can
only switch on the appliance if the
blender jar is assembled on the motor
unit properly. If the blender jar is not
correctly assembled, the built-in safety
lock will be locked.
Safety Feature
This blender is tted with a safety feature
which safeguards against excessive
loads. In case of overloading, the blender
automatically activates the protection
and operation will stop and the
overloading symbol will light up on the
control panel. If this occurs, set the rotary
knob to OFF, unplug the appliance and
allow it to cool down for 15 minutes.
Remove the ingredients and clean up
the blender jar before starting operation.
Electromagnetic elds
(EMF)
This Philips appliance complies with all
applicable standards and regulations
regarding exposure to electromagnetic
elds.
Recycling
Do not throw away the product with the
normal household waste at the end of its
life, but hand it in at an ocial collection
point for recycling. By doing this, you help
to preserve the environment.
Follow your country’s rules for the
separate collection of electrical and
electronic products. Correct disposal
helps prevent negative consequences for
the environment and human health.
it. Then use a spatula
(not supplied with the
product) to remove the
food from the wall.
Blender
Warning
•
Never reach into the
blender jar with your
ngers or an object while
the appliance is running.
Caution
•
To prevent spillage, do not
put more than 1.8 litres
of liquid in the blender
jar, especially when you
process at a high speed.
Do not put more than 1
litre in the blender jar when
you process ingredients
that tend to foam.
•
Do not let the appliance
run for more than
3 minutes at a time. Let the
appliance cool down to
room temperature before
you continue blending.
•
Always make sure the lid
is properly closed and
assembled on the jar
before you switch on the
appliance.

10
EN
For more recipes, go to
www.kitchen.philips.com.
Note
• If you want to prepare a larger quantity, let the
appliance cool down to room temperature
before you process the next batch of
ingredients.
4 Important notes
Stop and unplug the appliance if there
is a pungent appliance smell or smoke.
Let it cool down for 15 minutes.
Do not add heavy ingredients such as
bread dough or mash potatoes - the
ingredient mixture will become too thick
or too heavy to process.
To avoid overloading the appliance,
you can
•
Add more liquid ingredient
•
Process in several small batches
•
Use a higher speed setting
5 Safety protection
The blender has a safety protection
system. When the blender runs over
3 minutes continuously, it will stop
processing automatically. If you have
not nished processing after 3 minutes,
switch o the appliance and let it cool
down to room temperature. Never use
over 3 minutes consecutively without
allowing to cool to room temperature rst.
When assembling the blender jar to
the motor unit (8), make sure the rotary
knob is in the OFF position rst.
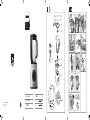
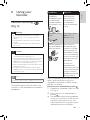
2 Overview (Fig. 1)
a Vacuum module
b Air release button
c Vacuum lid
d Filter
e Blender jar
f Blade unit
g Collar
h Motor unit
i Rotary knob and preset buttons:
- MIN/MAX/ON
To turn on the blender and select
a blending speed setting.
- OFF
To turn o the blender.
- Vacuum button
To vacuum the blender jar.
- Vacuum and blending preset
button
To vacuum the blender jar and
process the ingredients as
programmed.
- Ice crushing button
To crush ice.
- Pulse button
To blend briey and for easy
cleaning.
j Lid of on-the-go bottle (HR3756
only)
k On-the-go bottle (HR3756 only)
3 Before first
time use
Before you use the appliance and
accessories for the rst time, thoroughly
clean the parts that come into contact
with food. You can follow the cleaning
procedure from section 7 “Cleaning”.

11
English
EN
Ingredients Solution
Powdered
ingredients,
(powdered sugar,
cocoa powder,
roasted soybean
our, protein, etc.)
Blend them briey
with liquid or
dissolve them
completely in
a separated
container before
using.
Ingredients with
steam
Cool them down
below 40 °C
before using.
Mixed ingredients
with air bubbles or
foam formation
Pour them to
the blending jar
carefully to avoid
any formation of
air bubble or foam.
Do not exceed the
maximum volume
indication on the
blender jar.
Do not mix
ingredients by
shaking as this may
cause a failure due
to the suction of
bubbles produced
during shaking.
Vacuum blending allows you to prepare
drinks and smoothies using fruits,
vegetables and water or other liquids
that do not oxidise.
Preset vacuum and blending mode
1
Prepare your blender (step 1 to step
6 in g. 3).
2
Press the vacuum and blending
button .
» The blender automatically prepares
a vacuum connection to the vacuum
module. It then starts to vacuum
the jar and the LED ring lights up to
indicate the vacuum progress.
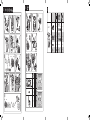
6 Using your
blender
Vacuum blending
(Fig. 3)
Warning
• Do not blend dry ingredients (for example
pepper, beans, corn or star anise) without
liquid.
• The blender jar cannot be used for vacuum
storage.
• Make sure the vacuum lid is completely dry
before use.
Caution
• Make sure the lter is securely attached to the
vacuum lid before using (Fig. 2-1).
• For the ingredients that are easy to froth, such
as milk and soymilk, the maximum volume is
1000 ml. Do not exceed the maximum volume
indication on the blender jar (Fig. 2-2).
• Never ll the blender jar with ingredients hotter
than 40 °C (Fig. 2-3).
• If bubbles / foam expand beyond the MAX
1800 ml indication, stop the vacuum operation
at once (Fig. 2-4).
Note
• Precut food into pieces of approx. 2 x 2 x 2 cm.
To avoid the device failure, refer to the
solutions in the table below to prepare
ingredients.

12
EN
the blender, turn the knob to OFF
position and then to ON position
again.
3
Turn the knob to a blending speed
setting (min to max) or press
the pulse button to process
ingredients as needed.
4
Press the air release button on the
lid when you nish processing (the
LED light ring is fully on) (step 9 in
g.3).
5
Remove the jar from the motor unit
and open the lid.
6
Pour out the jar contents.
Pulse and ice crushing
functions
To process ingredients briey (such as
garlic), press and hold the pulse button
for a few seconds, and then release it.
Repeat the procedure several times.
To crush ice, press the ice crushing
button . To stop processing before
the program ends, press the selected
program button again or turn the rotary
knob to the OFF position.
Note
• After one minute processing for ice
crushing, the blender will stop the process
automatically.
• Do not blend dry ingredients (for example
pepper corn or star anise).
• If you press the vacuum button or the
vacuum and blending button during or
after blending, the blender enters the error
mode and the error message (vacuum error
icon ) lights up (Fig. 3-1). To reset the
blender, turn the knob to OFF position and
then to ON position again.
•
To stop, press the vacuum and
blending button again.
•
If you accidently rotate the speed
knob during the vacuum process,
the blender enters the error mode
and the error message (vacuum error
icon ) lights up (g. 3-1). To reset
the blender, turn the knob to OFF
position and then to ON position
again.
•
When the vacuum operation
completes, the blender
automatically starts to process the
ingredients (i.e. smoothies) for the
preset time and then stop.
3
Press the air release button on
the lid when the processing is
completed (the LED light ring is fully
on) (step 9 in g.3).
4
Remove the jar from the motor unit
and open the lid.
5
Pour out the jar contents.
Manual vacuum and blending mode
1
Prepare your blender (step 1 to step
6 in g. 3).
2
Press the vacuum button .
» The blender automatically prepares
a vacuum connection to the
vacuum module. It then starts to
vacuum the jar and the LED ring
lights up to indicate the vacuum
progress. When the vacuum process
is completed (the LED light ring
is fully on), the blender enters the
standby mode.
•
To stop during the vacuum process,
press the vacuum button again.
•
If you accidently rotate the speed
knob during the vacuum process,
the blender enters the error mode
and the error message (vacuum error
icon ) lights up (g. 3-1). To reset

13
English
EN
7 Cleaning (Fig. 4)
Caution
• Before you clean the appliance, unplug it.
• The cutting edges are sharp. Be careful when
you clean the blade unit.
• Make sure that the cutting edges of the blade
do not come into contact with hard objects.
This may cause the cutting edges to become
blunt.
• Do not pour water directly to the vacuum
module under the tap water during cleaning.
This may allow water to be sucked to the
vacuum system and damage the appliance.
• Make sure wipe the lter dry after cleaning.
Clean the motor unit with a moist cloth.
Clean the other parts in lukewarm
water with some cleaning agent or in a
dishwasher.
Easy cleaning
Follow the steps in Fig. 4.
Note
• Press and hold the pulse button a few
times.
8 Guarantee and
service
If you have a problem, need service,
or need information, see www.philips.
com/support or contact the Philips
Consumer Care Center in your country.
The phone number is in the worldwide
guarantee leaet. If there is no
Consumer Care Center in your country,
go to your local Philips dealer.
9 Troubleshooting
Problem Solution
Blender stops
operating during
the vacuum
process and the
error message
(vacuum error
icon ) lights
up.
Switch o the appliance
and make sure the lid is
assembled properly and
closed fully. Make sure
to clean the vacuum lid
completely to avoid any
substance on the air
release valve.
There are two
maximum
indication levels
on the jar and
which one I
should use?
The lower maximum
indication level is
for milk, soy milk and
other foamy ingredients
as they are easy to froth
during the vacuum
process.
10 Recipe
Ingredients:
100 g corn
salad
4 pcs Kiwifruit
(peeled)
400 ml water
Procedure:
1. Cut ingredients
to roughly
2 x 2 x 2 cm size.
2. Add all ingredients
into the jar and
close the lid.
3. Blend with
pre-set vacuum
and blending
function or on
maximum speed
for 1 minute.
600 g pork
20 g scallion
180 ml water
1. Cut the pork
into pieces of
2 x 2 x 2 cm.
2. Put the pork,
scallion and water
into jar.
3. Blend the recipe
for 10 seconds at
max speed.

14
KO
•
제품을 사용하지 않고
자리를 비울 경우
•
본체나 진공 뚜껑을 물
또는 기타 액체에 담그지
마십시오.
•
제품을 전원에 연결하기
전에 제품에 표시된 전압과
사용 지역의 전압이
일치하는지 확인하십시오.
•
플러그나 전원 코드가
손상되었거나 금이 간 경우
제품을 사용하지 마십시오.
전원 코드가 손상된 경우,
안전을 위해 필립스
서비스 센터 또는 필립스
서비스 지정점에 의뢰하여
교체하십시오.
•
제품을 사용하기 전에
칼날부가 단단히 고정되어
있는지, 뚜껑이 블렌더
용기에 올바르게 장착되어
있는지 확인하십시오.
•
이 제품은 어린이가
사용해서는 안됩니다.
제품과 전원 코드는
어린이의 손이 닿지 않는
곳에 보관하십시오.
•
신체적, 감각적 또는
정신적인 능력이
부족하거나 경험과 지식이
없는 사람이 이 제품을
사용하려면 제품의 안전한
사용과 관련된 감독과
지시를 받고, 생할 수 있는
위험에 대해 충분히 이해한
상태여야 합니다.
1
중요
사항
제품을 사용하기 전에는 본 사용 설명서를
주의 깊게 읽고 나중에 참조할 수 있도록 잘
보관하십시오.
경고
•
잠재적인 부상의 위험이
있으므로 제품을 본래 용도
이외의 목적으로 사용하지
마십시오.
•
뜨거운 액체를 블렌더에
넣을 경우 갑작스러운
열기로 인해 제품 밖으로 튈
수 있으니 뜨거운 액체를
넣지 마십시오.
•
제품이 전원에 연결되어
있을 때는 날카로운 칼날을
만지지 마십시오. 칼날에
음식물이 끼어 움직이지
않을 경우, 먼저 전원
코드를 뽑은 다음 음식물을
빼내십시오. 날카로운
칼날을 다루거나 용기를
비울 때 혹은 세척할 때는
주의를 기울여 주십시오.
•
다음 동작을 하기 전에
제품의 전원을 끄고 전원
코드를 뽑으십시오.
•
용기를 본체에서
분리하거나 액세서리를
교체하거나 작동 중인
부품을 만질 경우
•
제품을 조립하거나
분리하거나 세척하는
경우

한국어
15
KO
•
블렌더 용기의 최대
용량 표시선을 초과하지
마십시오.
•
해당 표에 표시된 최대량
및 작동 시간을 초과하지
마십시오.
•
음식이 블렌더 용기의
벽면에 붙으면 제품의
전원을 끄고 전원 코드를
뽑으십시오. 그런 다음 주걱
(제품에 동봉되어 있지
않음)을 사용하여 벽면에
붙은 음식을 떼어내십시오.
블렌더
경고
•
제품이 작동 중일 때는
블렌더 용기 내부에
손가락이나 다른 물건을
절대 넣지 마십시오.
주의
•
특히 고속으로 작동할 경우,
내용물이 흘러 나오지
않도록 블렌더 용기에
액체를 1.8리터 이상 넣지
마십시오. 거품이 나는
재료인 경우에는 블렌더
용기에 1리터 이상 넣지
마십시오.
•
한 번에 3분 이상 제품을
작동하지 마십시오.
제품이 실내 온도까지
식도록 기다렸다가 다시
사용하십시오.
•
어린이가 제품을 가지고
놀지 않도록 보호자의
감독이 필요합니다.
•
전원이 켜져 있는 동안에는
블렌더 용기를 절대 본체에
조립하거나 분리하지
마십시오. 먼저 제품 전원을
끈 다음 전원 코드를
뽑으십시오.
•
본 제품은 가정용입니다.
•
사용 전에 7장의“세척”
에서 세척 절차를
읽으십시오.
•
블렌더를 재료 없이 30초
이상 작동하지 마십시오.
과열을 초래할 수 있습니다.
주의
•
열 차단 장치가 의도치 않게
재설정되어 위험한 상황이
발생하는 것을 막기 위해,
타이머와 같은 외부 전원
장치를 통해 제품에 전력을
공급하거나 설비 시설에
의해 정기적으로 전원이
꺼졌다 켜지는 회로에
제품을 연결하지 마십시오.
•
다른 제조업체에서
만들었거나 필립스에서
권장하지 않은 액세서리
또는 부품은 절대
사용하지 마십시오.
이러한 액세서리나 부품을
사용했을 경우에는 품질
보증이 무효화됩니다.

16
KO
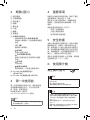
2
개요
(
그림
1)
a 진공
모듈
b 공기
배출
버튼
c 진공
뚜껑
d 필터
e 블렌더
용기
f 칼날부
g 연결부
h 본체
i 회전
조절기
및
프리셋
버튼
:
- MIN/MAX/ON
블렌더를 켜고 블렌딩 속도 설정을
선택합니다.
- OFF
블렌더 전원을 끕니다.
- 진공 버튼
블렌더 용기를 진공 상태로 만듭니다.
- 진공 및 블렌딩 프리셋 버튼
블렌더 용기를 진공 상태로
만들고 재료를 프로그래밍된 대로
블렌딩합니다.
- 얼음 분쇄 버튼
얼음을 분쇄합니다.
- 순간작동 버튼
빠르게 블렌딩하고 간편하게
세척합니다.
j 휴대용
용기
뚜껑
(HR3756
만
해당
)
k 휴대용
용기
(HR3756
만
해당
)
3
최초
사용
전
제품 및 액세서리를 처음 사용하기 전에
음식과 닿는 부품은 깨끗이 세척하십시오.
7장의 “세척”에 나와 있는 세척 절차를
따르십시오.
보다 자세한 요리법은 www.philips.co.kr/
kitchen을 참조하십시오.
참고
• 더 많은 양의 재료를 준비하려는 경우 다음
분량의 음식을 조리하기 전에 제품을 실내 온도와
비슷해질 때까지 식혀 주십시오.
•
제품을 켜기 전에 항상
뚜껑이 제대로 닫혀서
용기에 조립되어 있는지
확인하십시오.
내장된
안전
잠금
기능
이 기능은 블렌더 용기가 본체에 올바르게
장착한 경우에만 작동합니다. 블렌더
용기가 올바르게 조립되어 있지 않을 경우
내장된 안전 잠금 장치가 잠깁니다.
안전
기능
이 블렌더는 지나친 작동을 방지하는
안전 기능이 내장되어 있습니다. 과부하가
걸릴 경우 블렌더의 보호 기능이 자동으로
활성화되어 작동이 정지되고 제어판의
과부하 기호 에 불이 들어옵니다. 이렇게
되면 회전 조절기를
OFF(
꺼짐
)
로 설정하고
제품 코드를 뽑은 뒤 15분 간 열기를
식히십시오. 제품을 작동하기 전에 재료를
꺼내서 블렌더 용기를 세척하십시오.
EMF(
전자기장
)
이 필립스 제품은 EMF(전자기장)와 관련된
모든 기준 및 규정을 준수합니다.
재활용
수명이 다 된 제품은 일반 가정용 쓰레기와
함께 버리지 마시고 지정된 재활용품 수거
장소에 버리십시오. 이를 통해 환경 보호에
동참하실 수 있습니다.
해당 국가의 전기/전자 제품 분리 수거
규칙에 따라 버리십시오. 올바른 제품
폐기를 통해 환경 및 인류의 건강을 유해한
영향으로부터 보호할 수 있습니다.

한국어
17
KO
주의
• 사용 전에 필터가 진공 뚜껑에 단단하게
고정되었는지 확인하십시오(그림 2-1).
• 우유, 두유와 같이 거품이 발생하기 쉬운 재료의
경우 최대 용량은 1000ml입니다. 블렌더 용기의
최대 용량 표시선을 초과하지 마십시오(그림 2-2).
• 블렌더 용기에 온도가 40°C 이상인 재료는 절대
넣지 마십시오(그림 2-3).
• 기포/거품이 MAX 1800ml 표시선 위로 올라오면
즉시 진공 작동을 중지하십시오(그림 2-4).
참고
• 재료를 약 2 x 2 x 2cm 조각으로 미리 썰어
놓으십시오.
장치의 고장을 예방하기 위해 재료 준비 시
아래 표를 참조하십시오.
재료 해결책
가루로 된 재료(설탕
가루, 코코아 가루,
볶은 콩가루,
단백질 등)
사용하기 전에
액체를 넣고
짧게 블렌딩하거나
별도의 용기에서
완전히
녹이십시오.
찐 재료 사용하기
전에 40°C 이하로
식히십시오.
섞어서 기포나
거품이 나는 재료
기포나 거품이 더
생기지 않도록 혼합
용기에 조심스럽게
붓습니다. 블렌더
용기의 최대 용량
표시선을 초과하지
마십시오.
흔들어서 섞을 경우
흔들다가 생긴
거품으로 인해
문제가 발생할 수
있으므로 재료를
흔들어서 섞지
마십시오.
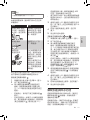
4
중요
참고
사항
독특한 기계 냄새 또는 연기가 나는 경우
제품을 멈추고 전원 코드를 뽑으십시오. 15
분 간 식히십시오.
빵 반죽, 으깬 감자와 같은 걸쭉한 재료는
넣지 마십시오. 재료가 지나치게 걸쭉해져
블렌딩할 수 없게 됩니다.
제품의 과부하를 피하기 위해 다음을
수행할 수 있습니다
•
액체 재료 추가
•
소량의 재료로 여러 번 작동
•
더 높은 속도 설정 사용
5
안전
보호
이 블렌더에는 안전 보호 시스템이
있습니다. 블렌더를 한 번에 3분 이상 연속
작동시키면 자동으로 멈추게 됩니다. 3
분 이상 작동해야 하는 경우에는 제품의
전원을 끄고 제품이 실온 온도와 비슷해질
때까지 식히십시오. 제품이 실온과
비슷해질 때까지 식히지 않은 상태에서
연속으로 3분 이상 작동하지 마십시오.
블렌더 용기를 본체(8)에 장착하기
전에 회전 조절기가 OFF 위치에 있는지
확인하십시오.
6
블렌더
사용
방법
진공
블렌딩
(
그림
3)
경고
• 마른 재료(예: 통후추, 콩, 옥수수 또는 팔각)를
액체 없이 갈지 마십시오.
• 블렌더 용기는 진공 보관용으로 사용할 수
없습니다.
• 제품을 사용하기 전에 진공 뚜껑이 완전히
건조되었는지 확인하십시오.

18
KO
•
진공이 진행되는 도중에 실수로 속도
조절기를 돌린 경우 블렌더가 오류
모드가 되고 오류 메시지(진공 오류
아이콘 )가 켜집니다(그림 3-1).
블렌더를 리셋하려면 조절기를
OFF
위치로 돌린 다음,
ON
위치로 다시
돌립니다.
3
필요한 블렌딩 속도 설정(최소 ~ 최대)
으로 조절기를 돌리거나 순간작동
버튼( )을 눌러 재료를 블렌딩합니다.
4
블렌딩이 완료되면(LED 링이 완전히
켜짐) 뚜껑의 공기 배출 버튼을
누릅니다(그림 3의 9단계).
5
모터 본체에서 용기를 분리하고
뚜껑을 엽니다.
6
용기 내용물을 따라냅니다.
순간작동
및
얼음
분쇄
기능
재료를 짧게 갈려면(예: 마늘) 순간
작동 버튼 을 몇 초 간 길게 눌렀다가
놓습니다. 이 과정을 몇 차례 반복합니다.
얼음을 분쇄하려면 얼음 분쇄 버튼
를 누릅니다. 프로그램이 끝나기 전에
블렌딩을 중단하려면 선택한 프로그램
버튼을 다시 누르거나 회전 조절기를 OFF
위치로 돌립니다.
참고
• 얼음을 분쇄한 지 1분이 지나면 블렌더 작동이
자동으로 중지됩니다.
• 마른 재료(예: 통후추 또는 팔각)를 갈지 마십시오.
• 블렌딩 도중이나 블렌딩이 완료된 뒤에 진동
버튼 또는 진공 및 블렌딩 버튼 을 누르면
블렌더가 오류 모드가 되고 오류 메시지(진공
오류 아이콘 )가 켜집니다(그림 3-1). 블렌더를
리셋하려면 조절기를 OFF 위치로 돌린 다음, ON
위치로 다시 돌립니다.
진공 블렌딩을 사용하면 과일, 야채, 물
또는 기타 액체를 사용하여 산화되지 않는
음료와 스무디를 만들 수 있습니다.
프리셋
및
블렌딩
모드
1
블렌더를 준비합니다(그림 3의 1단계 ~
6단계). 3).
2
진공 및 블렌딩 버튼( )을 누릅니다.
» 블렌더가 자동으로 진공 모듈과의 진공
연결 준비 상태로 돌입한 다음 용기가
진공되기 시작하고 진공이 진행되고
있음을 알려주는 LED 링이 켜집니다.
•
중지하려면 진공 및 블렌딩 버튼 을
다시 누릅니다.
•
진공이 진행되는 도중에 실수로 속도
조절기를 돌린 경우 블렌더가 오류
모드가 되고 오류 메시지(진공 오류
아이콘 )가 켜집니다(그림 3-1).
블렌더를 리셋하려면 조절기를
OFF
위치로 돌린 다음,
ON
위치로 다시
돌립니다.
•
진공 작업이 완료되면 블렌더가 자동으로
재료를 갈기 시작하며(예: 스무디) 사전
설정 시간이 지나면 중단합니다.
3
블렌딩이 완료되면(LED 링이 완전히
켜짐) 뚜껑의 공기 배출 버튼을
누릅니다(그림 3의 9단계).
4
모터 본체에서 용기를 분리하고
뚜껑을 엽니다.
5
용기 내용물을 따라냅니다.
수동
진공
및
블렌딩
모드
1
블렌더를 준비합니다(그림 3의 1단계 ~
6단계). 3).
2
진공 버튼( )을 누릅니다.
» 블렌더가 자동으로 진공 모듈과의 진공
연결 준비 상태로 돌입한 다음 용기가
진공되기 시작하고 진공이 진행되고
있음을 알려주는 LED 링이 켜집니다.
진공 과정이 끝나면(LED 링이 완전히
켜짐) 블렌더가 대기 모드로 전환됩니다.
•
진공 도중에 중지하려면 진동 버튼
을 다시 누릅니다.

한국어
19
KO
7
세척
(
그림
4)
주의
• 제품을 세척하기 전에 전원 코드를 뽑으십시오.
• 칼날은 날카롭습니다. 칼날부를 세척할 때는
주의하십시오.
• 칼날이 단단한 물건에 부딪히지 않도록
주의하십시오. 칼날이 무뎌질 수 있습니다.
• 세척 중에 진공 모듈에 물을 붓거나 흐르는 수돗물
아래에 직접 두지 마십시오. 진공 시스템에 물이
들어가면 기계가 손상될 수 있습니다.
• 세척 후에는 필터의 물기를 닦습니다.
본체는 젖은 천으로 닦습니다 .
기타 부품은 소량의 세제를 푼 따뜻한 물
또는 식기 세척기로 세척하십시오 .
손쉬운
세척
그림의 단계를 따릅니다. 4.
참고
• 순간작동 버튼 을 여러 차례 길게 누르십시오.
8
품질
보증
및
서비스
서비스 또는 정보가 필요하거나 문제가
있으면 www.philips.com/support를
참조하거나 현지 필립스 고객 상담실로
문의하십시오. 전국 서비스 센터 안내는
제품 보증서를 참조하십시오. 거주 지역에
서비스 센터가 없는 경우 필립스 대리점에
문의하십시오.
9
문제
해결
문제점 해결책
진공 도중에
블렌더의 작동이
멈추고 오류
메시지(진동 오류
아이콘 )가
켜집니다.
제품의 전원을 끈 다음
뚜껑이 제대로 장착되고
완전히 닫혀 있는지
확인하십시오. 공기 배출
밸브에 이물질이 끼지
않도록 진공 뚜껑을
깨끗하게 세척하십시오.
용기에 두
개의 최대
용량 표시선이
있습니다. 어느
것을 참고해야
합니까?
낮은 용량 표시선
은 진공 과정이 진행될
때 거품이 발생하기
쉬운 우유, 두유 등의
재료를 사용하는 경우
참고합니다.
10
레시피
재료
:
콘 샐러드 100g
껍질을 벗긴
키위 4개
물 400ml
절차
:
1. 재료를 약
2 x 2 x 2cm
크기로 썹니다.
2. 용기에 모든
재료를 넣고
뚜껑을 닫습니다.
3. 사전 설정 진공 및
블렌딩 기능으로
블렌딩하거나 1
분 간 최대 속도로
블렌딩합니다.
돼지고기 600g
골파 20g
물 180ml
1. 돼지고기를
2 x 2 x 2cm
크기의 육면체로
자릅니다.
2. 용기에 돼지고기,
골파와 물을
넣습니다.
3. 재료를 최대
속도로 10초간
블렌딩합니다.

20
TC
•
如果插頭或電源線損壞或出
現明顯裂痕,請勿繼續使用
本產品。如果電源線損壞,
則必須交由飛利浦、飛利浦
授權之服務中心,或是具備
相同資格的技師更換,以免
發生危險。
•
使用本產品前,請先確認刀
組已安裝穩固,並且果汁壺
已正確蓋上壺蓋。
•
請勿讓孩童使用本產品。
請勿讓孩童接觸產品與電
源線。
•
身體官能或心智能力退化
者,或是經驗與使用知識缺
乏者,可在有人從旁監督或
適當指示如何安全使用本產
品,以及瞭解潛在危險的狀
況下使用本產品。
•
請勿讓孩童將產品當成
玩具。
•
當電源開啟時,請勿組裝或
拆卸馬達底座上的果汁壺。
關閉產品電源,並先拔除
插頭。
•
本產品僅供家用。
•
使用前請詳閱第
7
節
「清潔」的清潔程序。
•
當果汁機內沒有任何食材
時,請勿運轉超過
30
秒。
這可能導致過熱狀況。
1
重
要事項
在使用本產品前,請先仔細閱讀本使用手
冊,並保留說明以供日後參考。
警告
•
請務必以正確的方式使用本
產品,以免發生潛在危險。
•
請勿將高溫液體倒入果汁
機,液體可能會因為突然
冒出的蒸氣而從產品中噴
出來。
•
當產品插電時,請勿觸碰尖
銳的刀片部分。如果刀片卡
住,請先拔掉產品插頭,再
將卡住刀片的食材取出。在
處理尖銳的刀片、取出壺內
的食材及進行清潔時,請務
必小心。
•
進行下列動作前,請先關閉
產品電源並將插頭拔下:
•
將果汁壺從底座取下、
更換配件,或需要觸碰
使用中會移動的零件。
•
組裝、拆卸或清潔
產品。
•
當產品無人看顧時。
•
請勿將馬達座或真空蓋子浸
入水或其他液體中。
•
在您連接電源之前,請檢查
本地的電源電壓是否與產品
所標示的電源電壓相符。

繁體中文
21
TC
•
產品的運轉時間一次不可超
過
3
分鐘。請先讓產品冷卻
至室溫,再繼續進行攪拌。
•
開啟產品電源前,請務必確
認已妥善蓋好及裝好果汁
壺蓋。
內建安全鎖
這項功能可確保只有將果汁壺在馬達座上
裝妥後,才能開啟產品電源。如果果汁壺
未正確組裝,內建安全鎖將會鎖定。
安全功能
這台果汁機配備安全功能,可防止裝入過
量食材。如果果汁機超過負荷,其會自動
啟動保護功能並停止運轉,此時控制面板
上的超過負荷符號
也會亮起。若發生此
情形,請將旋轉鈕設為
OFF
,拔掉產品電
源插頭,並靜待
15
分鐘讓產品冷卻。取出
食材並清潔果汁壺,再重新開始操作。
電磁場
(EMF)
本飛利浦產品符合所有電磁場暴露的相關
適用標準和法規。
回收
本產品使用壽命結束時,請勿與一般家庭
廢棄物一併丟棄。請將該產品送至政府指
定的回收點或進行回收。此舉能為環保盡
一份心力。
請遵循您所在國家
/
地區對電氣與電子產品
分類收集的規定。正確處理廢棄產品有助
於避免對環境和人類健康帶來負面影響。
注意
•
為避免不當重設過熱保險裝
置而發生危險,本產品不得
透過定時器等外接開關裝置
供電,亦不可連接至經常開
啟關閉的電路設備。
•
請勿使用其他製造商的任何
配件或零件,或非由飛利浦
建議之配件或零件。如果您
使用此類配件或零件,保固
即會失效。
•
請勿超過果汁壺的上限容量
標線。
•
請勿超過相關表格中註明的
最大用量與處理時間。
•
如果食材黏在果汁壺內緣,
請關閉產品電源並拔除插
頭,
然後使用抹刀
(
產品未
隨附
)
將內緣的食材刮除。
果汁機
警告
•
當產品運轉時,絕對不可以
將手指或其他物品伸入果汁
壺內。
注意
•
為避免溢出,請勿將超過
1.8
公升的液體倒入果汁壺
中,特別是當您以高速處理
食材時。處理易起泡的食材
時,放入果汁壺內的食材不
得超過
1
公升。

22
TC
4
重要事項
如產品出現強烈異味或冒煙,請停下產品
並拔掉插頭。讓其冷卻
15
分鐘。
請勿加入太多太重的食材,如麵團或馬
鈴薯泥,否則會變得太濃稠厚實,不好
處理。
為避免產品超過負荷,您可以
•
多加一些液體食材
•
少量分批處理食材
•
使用較高的速度設定
5
安全防護
本果汁機具備安全防護系統。當果汁機連
續運轉超過
3
分鐘時,即會自動停止處
理。如果達到
3
分鐘之後食材尚未處理完
畢,請先關閉產品電源並讓它冷卻至室溫
後,再繼續使用。切勿連續使用超過
3
分
鐘以上,務請先待其冷卻至室溫。
將果汁壺組裝至馬達座
(8)
的時候,請先確
定旋轉鈕位於「
OFF
」位置。
6
使用果汁機
真空攪拌
(
圖
3)
警告
• 請勿攪拌沒有液體的乾食材
(
例如胡椒粒、豆子、
玉米或八角
)
。
• 果汁壺無法用於真空收納。
• 請先確認真空蓋子已完全乾燥再使用。
注意
• 使用前,請確定濾網已確實裝至真空蓋子
(
圖
2-1)
。
• 針對牛奶與豆漿等容易發泡的食材,最大容量為
1000
毫升。請勿超過果汁壺的上限容量標線
(
圖
2-2)
。
• 請勿將溫度超過
40 °C
的食材放入果汁壺中
(
圖
2-3)
。
• 如果泡泡
/
泡沫膨脹超過
MAX
最高
1800
毫升的
標線,請立即停止真空操作
(
圖
2-4)
。
2
概覽
(
圖
1)
a 真空模組
b 空氣釋放鈕
c 真空蓋子
d 濾網
e 果汁壺
f 刀組
g 軸套
h 馬達座
i 旋轉鈕和預設鈕:
- MIN/MAX/ON (
最低
/
最高
/
開
)
開啟果汁機電源,以及選擇攪拌速度
設定。
- OFF (
關
)
關閉果汁機電源。
-
真空鈕
讓果汁壺產生真空。
-
真空與攪拌預設鈕
讓果汁壺產生真空並依照程式處理
食材。
-
碎冰鈕
打碎冰塊。
-
瞬間加速按鈕
短時間攪拌,以及進行簡易清潔。
j
On-the-Go
隨攜瓶的蓋子
(
僅
HR3756)
k
On-the-Go
隨攜瓶
(
僅
HR3756)
3
第一次使用前
第一次使用產品和配件之前,請先徹底清
洗會接觸到食物的部分。您可以依照第
7
節「清潔」的清潔程序。
如需更多食譜,請前往
www.kitchen.philips.com
網站。
備註
• 若您要準備的食物份量較大,請待本產品冷卻至
室溫再繼續處理下一批食材。

繁體中文
23
TC
若要重設果汁機,請將旋鈕轉至
OFF
位置,然後再轉至
ON
位置。
•
真空操作完成時,果汁機會自動開始處
理食材
(
如冰沙
)
,並在達到預先設定的
時間後停止。
3
處理完成時
(LED
環狀指示燈會完全亮
起
)
,按下蓋子上的空氣釋放鈕
(
圖
3
中
的步驟
9)
。
4
把果汁壺從馬達座上移開,並打開
蓋子。
5
倒出果汁壺內容物。
手動真空與攪拌模式
1
準備好果汁機
(
步驟
1
至步驟
6
,圖
3)
。
2
按下真空鈕
。
» 果汁機會自動準備真空連接至真空
模組。接著會開始讓果汁壺產生真
空,
LED
環狀指示燈會亮起表示真空進
度。真空過程完成
(
LED
環狀指示燈會
完全亮起
)
時,果汁機會進入待機模式。
•
若要在真空過程期間停止,請再按一次
真空鈕
。
•
在真空過程中,如果不小心轉到速度旋
鈕,果汁機會進入錯誤模式,錯誤訊息
(
真空錯誤圖示
)
會亮起
(
圖
3-1)
。
若要重設果汁機,請將旋鈕轉至
OFF
位置,然後再轉至
ON
位置。
3
將旋鈕轉到攪拌速度設定
(
最低到最高
)
或按下瞬間加速按鈕
,以視需要處
理食材。
4
處理完成時
(LED
環狀指示燈會完全亮
起
)
,按下蓋子上的空氣釋放鈕
(
圖
3
中
的步驟
9)
。
5
把果汁壺從馬達座上移開,並打開蓋子。
6
倒出果汁壺內容物。
瞬間加速與碎冰功能
若要短時間處理食材
(
例如大蒜
)
,請按住
瞬間加速按鈕
幾秒鐘,然後再放開。
重複此程序數次。
若要製作碎冰,請按下碎冰鈕
。若要在
程式結束前停止,請再次按下所選程式的
按鈕,或將旋轉鈕轉到
OFF
位置。
備註
• 預先將食材都切成約
2 x 2 x 2
公分。
為避免裝置故障,請參閱下表中的方法來
準備食材。
食材 方法
粉狀的食材
(
糖粉、
可可粉、烘焙過的
大豆粉、蛋白質等
)
與液體一起短時間
攪拌或在另一個容
器中將其完全溶解
後,再使用。
冒氣的食材
冷卻至 40 °C 以
下,再使用。
食材混有
氣泡或泡沫
小心地將其倒入果
汁壺,避免形成氣
泡或泡沫。請勿超
過果汁壺的上限容
量標線。
請勿以搖晃的方式
混合食材,因為搖
晃時產生的泡泡吸
力,可能會造成故
障問題。
真空攪拌可讓您使用水果、蔬菜和水或其
他不會氧化的液體來準備飲品與冰沙。
預設真空與攪拌模式
1
準備好果汁機
(
步驟
1
至步驟
6
,圖
3)
。
2
按下真空與攪拌鈕
。
» 果汁機會自動準備真空連接至真空
模組。接著會開始讓果汁壺產生真
空,
LED
環狀指示燈會亮起表示真空
進度。
•
若要停止,再次按下真空與攪拌鈕
即可。
•
在真空過程中,如果不小心轉到速度旋
鈕,果汁機會進入錯誤模式,錯誤訊息
(
真空錯誤圖示
)
會亮起
(
圖
3-1)
。

24
TC
9
疑難排解
問題 解決方法
在真空過程中,
果汁機會停止運
作,錯誤訊息
(
真空錯誤圖示
)
會亮起。
請關閉產品電源,確定
已妥善裝好蓋子,並完
全關上。請務必徹底清
潔真空蓋子,以避免空
氣釋放閥門上有任何
物質。
果汁壺上有兩個最
高液位標線,我應
該使用哪個
?
下面的最高液位標線
適用於牛奶、豆漿
和其他易起泡的食材,
因為這些食材在真空過
程中容易起泡。
10
食譜
食材:
100
公克
萵苣纈草
4
個奇異果
(
削皮
)
水
400
毫升
步驟:
1.
將食材切成大約
2 x 2 x 2
公分的
大小。
2.
將所有食材放入
壺中,然後關上
蓋子。
3.
以預設力道和攪拌
功能或最高速度攪
拌
1
分鐘。
600
公克豬肉
20
公克蔥
180
毫升水
1.
把豬肉切成
2 x 2 x 2
公分大小
的塊狀。
2.
將豬肉、蔥和水倒
入果汁壺中。
3.
以最高速度攪拌食
譜材料
10
秒。
備註
• 處理碎冰一分鐘後,果汁機會自動停止處理。
• 請勿使用本產品攪拌乾食材
(
例如胡椒粒或八角
)
。
• 如果您在攪拌期間或之後按下真空鈕
或真空
與攪拌鈕
,果汁機會進入錯誤模式,錯誤訊
息
(
真空錯誤圖示
)
會亮起
(
圖
3-1)
。若要重
設果汁機,請將旋鈕轉至
OFF
位置,然後再轉
至
ON
位置。
7
清潔
(
圖
4)
注意
• 清潔本產品之前,請先拔掉插頭。
• 刀鋒很鋒利。清理刀組時請小心。
• 切勿讓刀片的刀鋒接觸堅硬物品。這可能會造成
刀鋒變鈍。
• 在水龍頭下進行清潔時,請勿將水直接倒入真空
模組。真空系統可能會因此吸入水分,進而損壞
本產品。
• 清潔後,請務必擦乾濾網。
請用濕布清潔馬達座。
使用少許清潔劑或在洗碗機中以溫水清潔
其他零件。
簡易清潔
依照步驟操作,請見圖
4.
備註
• 按住瞬間加速按鈕
數次。
8
保固與服務
如果您有任何問題、需要維修或資訊,
請參閱
www.philips.com/support
或聯絡
您當地的飛利浦客戶服務中心。電話號碼
可參閱全球保證書。若您所在國家
/
地區沒
有客戶服務中心,請洽詢當地的飛利浦經
銷商。
ページが読み込まれています...
ページが読み込まれています...
ページが読み込まれています...
ページが読み込まれています...
ページが読み込まれています...
ページが読み込まれています...
ページが読み込まれています...
ページが読み込まれています...
ページが読み込まれています...
ページが読み込まれています...
ページが読み込まれています...
ページが読み込まれています...
ページが読み込まれています...
ページが読み込まれています...
ページが読み込まれています...
ページが読み込まれています...
ページが読み込まれています...
ページが読み込まれています...
-
 1
1
-
 2
2
-
 3
3
-
 4
4
-
 5
5
-
 6
6
-
 7
7
-
 8
8
-
 9
9
-
 10
10
-
 11
11
-
 12
12
-
 13
13
-
 14
14
-
 15
15
-
 16
16
-
 17
17
-
 18
18
-
 19
19
-
 20
20
-
 21
21
-
 22
22
-
 23
23
-
 24
24
-
 25
25
-
 26
26
-
 27
27
-
 28
28
-
 29
29
-
 30
30
-
 31
31
-
 32
32
-
 33
33
-
 34
34
-
 35
35
-
 36
36
-
 37
37
-
 38
38


