
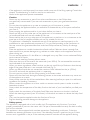
SCF870

2

3
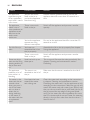
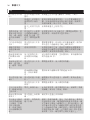
A
C
D
E
F
G
K
I
N
M
J
L
H
B
1

4

6
繁體中文 18
简体中文 28
47

6
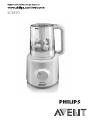
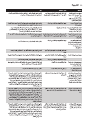
Congratulations on your purchase and welcome to Philips AVENT! To fully benet from the support
that Philips AVENT offers, register your product at www.philips.com/welcome.
This combined steamer and blender is particularly suitable for preparing small amounts of baby
food. The combined steamer and blender supports all parents in preparing fresh meals for their
babies with a simple steaming and blending function combined in one appliance.
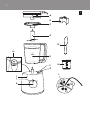
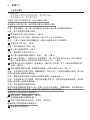
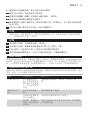
Lid with steam hole
Valve
Sieve
Blade unit
Jar with blade unit holder
Steam outlet on motor unit
Locking area for handle
Filling opening of water tank
Motor unit
Steaming light
Control knob
Bottom of the appliance with mains cord
Measuring cup
Spatula
Read this user manual carefully before you use the appliance and save it for future reference.
- Never immerse the motor unit in water or any other liquid, nor rinse it under the tap.
- Check if the voltage indicated on the appliance corresponds to the local mains voltage before
you connect the appliance.
- Do not use the appliance if the plug, the mains cord or the appliance itself is damaged.
- If the mains cord is damaged, you must have it replaced by Philips, a service centre authorised by
Philips or similarly qualied persons in order to avoid a hazard.
- This appliance is not intended for use by persons (including children) with reduced physical,
sensory or mental capabilities, or lack of experience and knowledge, unless they have been given
supervision or instruction concerning use of the appliance by a person responsible for their
safety.
- Children should be supervised to ensure that they do not play with the appliance.
- Keep the appliance out of the reach of children.
- Do not touch the blades, especially when the appliance is plugged in. The blades are very sharp.
- If the blades get stuck, unplug the appliance before you remove the ingredients that block the
blades.
- The appliance becomes very hot during steaming and may cause burns when touched. Only lift
the jar by its handle.
- Beware of hot steam that comes out of the jar during steaming and when you remove its lid.
- Beware of hot steam that comes out of the lling opening of the water tank when you open its
lid.
- When the steaming process is nished, hot steam continues to come out of the steam outlet on
the motor unit and the steam hole in the lid of the jar for some time. Be careful when you lift
the jar off the motor unit.

- If the appliance is used improperly, hot steam could come out of the lling opening. Consult the
chapter ‘Troubleshooting’ in order to avoid or to resolve this.
- Never let the appliance operate unattended.
- Never use any accessories or parts from other manufacturers or that Philips does
not specically recommend. If you use such accessories or parts, your guarantee becomes
invalid.
- Do not place the appliance on or near an operating or still hot stove or cooker.
- Always unplug the appliance before you assemble or disassemble any of the parts and before
you clean it.
- Always unplug the appliance and let it cool down before you clean it.
- Never use the jar or any other part of the appliance in a microwave, as the metal parts of the
jar handle and blade unit are not suitable for this use.
- Never sterilise the jar or any other part of the appliance in a steriliser or in a microwave, as the
metal parts of the jar handle and blade unit are not suitable for this use.
- This appliance is intended for household use only. If the appliance is used improperly or for
professional or semi-professional purposes or if it is not used according to the instructions in
the user manual, the guarantee becomes invalid and Philips refuses any liability for damage
caused.
- Place the appliance on a stable, horizontal and level surface. Make sure there is enough free
space around it to prevent damage to e.g. cabinets or other objects, as the appliance emits hot
steam during use.
- Do not use the appliance if it has fallen or is damaged in any way. Take it to an authorised Philips
service centre for repair.
- Never use the steaming function without water.
- Make sure that you do not overll the water tank (max. 200ml). Do not exceed the maximum
level indicated on the measuring cup.
- When you steam ingredients, make sure that you do not overll the jar. Make sure that the top
edge of the green blade unit is not covered with food (Fig. 2).
- When you blend liquids, do not exceed the maximum level indicated on the jar (450ml).
- Do not lift and move the appliance while it is operating.
- Do not insert any object into the lling opening or the steam outlet.
- Never rell the water tank during the steaming process, as hot water and steam may come out
of the appliance as a result.
- Always make sure that the lid has cooled down after steaming before you open it to add more
ingredients for blending, if necessary.
- Never connect this appliance to a timer switch or remote control system in order to avoid a
hazardous situation.
- Always check the temperature of the baby food on the back of your hand before you feed your
baby.
- Always check the consistency of the baby food. Make sure there are no chunks in the food.
- When the steaming process (max. 20 minutes) is nished, do not steam or reheat the baby food
again.
- Only use the spatula supplied to take the food out of the jar.
- Regular descaling prevents damage to the appliance.
The appliance is equipped with a built-in safety lock. The appliance only functions if you have
properly assembled all parts on the motor unit. If all parts are assembled correctly, the built-in safety
lock will be unlocked.
The appliance is also equipped with overheat protection. Overheating could occur if the time
between two steaming processes is too short, if the blending function is used too long or if there
are too much ingredients in the jar. If the overheat protection switches off the appliance during
7

use, set the control knob to 0 and let the appliance cool down for a few minutes. After this, you can
use the appliance again.
This Philips appliance complies with all standards regarding electromagnetic elds (EMF). If handled
properly and according to the instructions in this user manual, the appliance is safe to use based on
scientic evidence available today.
1 Remove all packaging material from the appliance.
2 Clean all parts except the motor unit (see chapter ‘Cleaning and maintenance’).
Always check the temperature of the baby food on the back of your hand before you feed your
baby.
Always make sure that the lid has cooled down after steaming before you open it to add more
ingredients for blending, if necessary. Do not exceed the maximum level indicated on the jar.
Empty the water tank before you rell it to start a new steaming process.
Always make sure that the top edge of the green blade unit is not covered with food when you
start steaming.
Do not exceed the maximum level indicated on the jar (450ml) when you blend liquids.
This appliance is intended for steaming fresh solid ingredients and then blending them to obtain
baby food. See the recipe booklet for some examples. Normally you would rst steam the
ingredients and then blend them. However, you can also use the appliance for steaming or blending
only. When you use the appliance for blending only, skip the sections ‘Filling the water tank’ and
‘Steaming’ and only follow the instructions in section ‘Blending’. After blending, never steam already
blended food. Never steam the same batch of ingredients for longer than 20 minutes or more than
once.
This appliance is NOT intended for:
- Defrosting food
- Steaming frozen food
- Steaming already blended food
- Steaming the same ingredients for more than 20 minutes
- Cooking rice and pasta
- Blending ingredients rst and then steaming them
- Heating up uids, e.g. soup or water
- Keeping food warm for several hours
- Reheating food
1 Fill the measuring cup with water up to the required level (Fig. 3).
The measuring cup shows millilitres and the corresponding steaming time in minutes. See the
separate recipe booklet for the recommended quantities of the recipes.
Note: Do not exceed the maximum level indicated on the measuring cup (200ml) to make sure that you
do not overll the water tank.
Note: We advise you not to use mineral water, as the minerals contained in this type of water cause scale
to build up inside the water tank.
2 Pour the water into the lling opening and close the lid (Fig. 4).
8

Note: Never put anything else than water in the water tank.
If certain vegetables and fruits are steamed gently, they are perfect for babies who start to eat solid
food. Steaming is the healthiest way of preparing food, as the food retains lots of vitamins and other
healthy nutrients.
Note: You can nd recipes and the cooking times required for these recipes in the separate recipe
booklet. Note that the recipes are related to the age of the child.
Note: Do not steam frozen ingredients because the appliance cannot heat up frozen food to the
temperature required for steaming. Always defrost frozen solid ingredients before you steam them in this
appliance. Shake off any excess water from the defrosted ingredients before you put them in the jar.
1 Put the blade unit on the blade unit holder in the jar (Fig. 5).
2 Cut solid ingredients into small pieces (cubes not bigger than 2-3cm) before you put them in
the jar.
Note: Do not process a large quantity of solid ingredients at the same time. Process these ingredients in a
series of small batches instead.
3 Put the ingredients in the jar. (Fig. 6)
Note: Do not exceed the top edge of the green blade unit.
Note: Never put water or any other liquid in the jar for steaming, to avoid damage to the appliance.
4 Put the valve in the lid of the jar (Fig. 7).
Note: Make sure the valve is xed in the lid.
5 Put the sieve in the lid of the jar (‘click’) (Fig. 8).
6 Place the lid on the jar and turn it clockwise to x it. The small projections on the lid have to
slide into the grooves in the jar. Make sure that the large projection of the lid is placed
exactly over the handle of the jar (Fig. 9).
7 Place the jar upside down on the motor unit, i.e. with the lid downwards. Make sure the
handle is on the right-hand side (Fig. 10).
Note: The appliance does not start steaming if the jar and handle are not in the correct position.
8 Turn the control knob to the steaming position.
, The steaming light lights up orange to indicate that the appliance is steaming (Fig. 11).
Hot steam or hot water could burn your ngers. Do not touch and never let children touch hot
parts and steam, as this may cause scalds (Fig. 12).
, The steaming time depends on the amount of water you have put in the water tank. See
the table in chapter ‘Ingredients and steaming times’ and the recipe booklet.
, When the steaming process is nished, the appliance produces a buzzing sound and the
steaming light goes out.
9 Set the control knob to the off position. Wait 2 minutes until no more steam comes out of
the steam outlet, to avoid scalding by hot steam. (Fig. 13)
If you want to serve the steamed baby food without blending it, test the food on the back of
your hand to make sure it is at a safe temperature for your baby.
Note: If you want to steam another batch of ingredients, let the appliance cool down for 10 minutes
before you start steaming again.
9

10 If you want to proceed with blending the steamed food, follow the instructions in section
‘Blending after steaming’ below.
11 Under normal conditions, no water remains behind in the water tank after steaming.
However, in some situations (e.g. in case of scale build-up inside the water tank, interruption
of the steaming process or unintended use), some water could remain behind in the water
tank. In this case, empty the water tank completely after use to avoid bacterial growth. To
descale the water tank, see chapter ‘Cleaning and maintenance’.
1 Grab the jar handle and lift the jar off the motor unit. Turn the jar around and shake it so that
the food falls down onto the blade unit (Fig. 14).
Only touch the jar handle. The lid, bottom and outer surface of the jar are hot (Fig. 15).
2 If necessary, remove the lid and add additional ingredients for blending (e.g. water or oil).
Always make sure that the lid has cooled down after steaming before you open it to add more
ingredients (do not exceed the maximum level indication) or to remove the remaining water
from the water tank.
After you have put liquids in the jar, never put the jar in the steaming position.
3 Place the jar upright on the motor unit, i.e. with the lid upwards. Make sure the handle is on
the right-hand side and positioned between the two ridges of the locking area (Fig. 16).
4 Turn the control knob to the blending position. Hold the knob in this position until the food
is properly blended (Fig. 17).
Do not let the appliance blend for more than 30 seconds at a time. If you have not nished
blending after 30 seconds, switch off the appliance and wait a few seconds before you continue. If
the appliance becomes hot, let it cool down for a few minutes before you continue.
Note: If the ingredients stick to the wall of the jar, switch off the appliance and loosen them with the
spatula or add some liquid.
Note: Make sure that the blended baby food has the right consistency (e.g. no lumps) before you serve it.
Note: If the baby food is still too solid add some uid (e.g. water) until the baby food is soft and smooth.
5 When you have nished blending, simply release the control knob. (Fig. 18)
, The knob automatically returns to the off position.
6 Remove the blended food from the jar. If necessary, use a spatula.
Make sure that the baby food is at a safe temperature for your baby.
7 Unplug the appliance.
8 Under normal conditions, no water remains behind in the water tank after steaming.
However, in some situations (e.g. in case of scale build-up inside the water tank, interruption
of the steaming process or unintended use), some water could remain behind in the water
tank. In this case, empty the water tank completely after use to avoid bacterial growth. To
descale the water tank, see chapter ‘Cleaning and maintenance’.
The appliance is intended for:
- pureeing steamed and cooked ingredients for baby food
- blending uids and fruits for baby drinks
10

The appliance is not intended for chopping hard ingredients such as ice cubes and sugar cubes.
After you have put liquids in the jar, never put the jar in the steaming position.
Note: When you blend uids, make sure you do not ll the jar beyond the maximum level indication on
the jar.
Note: Never steam baby food after you have blended it.
1 Put the blade unit on the blade unit holder in the jar (Fig. 5).
2 Cut solid ingredients into small pieces (cubes not bigger than 2-3cm) before you put them in
the jar.
Tip: Do not process a large quantity of solid ingredients at the same time. Process these ingredients in a
series of small batches instead.
3 Put the ingredients in the jar. (Fig. 6)
Note: Do not exceed the top edge of the green blade unit.
4 Put the valve in the lid of the jar (Fig. 7).
Note: Make sure the valve is xed in the lid.
5 Put the sieve in the lid of the jar (‘click’) (Fig. 8).
6 Place the lid on the jar and turn it clockwise to x it. The small projections on the lid have to
slide into the grooves in the jar. Make sure that the large projection of the lid is placed
exactly over the handle of the jar. (Fig. 9)
7 Place the jar upright on the motor unit, i.e. with the lid upwards. Make sure the handle is on
the right-hand side and positioned between the two ridges of the locking area (Fig. 16).
8 Turn the control knob to the blending position. Hold the knob in this position for as long as
you need but for not more than 30 seconds (Fig. 17).
Note: If the ingredients stick to the wall of the jar, switch off the appliance and loosen them with the
spatula or add some liquid. Do not exceed the maximum level indication on the jar.
Note: Make sure that the blended baby food has the right consistency (e.g. no lumps) before you serve it.
Note: If the baby food is still too solid add some uid (e.g. water) until the baby food is soft and smooth.
Do not exceed the maximum level indication on the jar.
Note: Never steam baby food after you have blended it.
Do not let the appliance blend for more than 30 seconds at a time. If you have not nished
blending after 30 seconds, switch off the appliance and wait a few seconds before you continue. If
the motor unit becomes hot, let it cool down for a few minutes before you continue.
Make sure the baby food is at a safe temperature for your baby.
9 When you have nished blending, simply release the control knob. (Fig. 18)
, The knob automatically returns to the off position.
10 Remove the blended food from the jar. If necessary, use a spatula.
Make sure that the baby food is at a safe temperature for your baby.
11 Unplug the appliance.
11

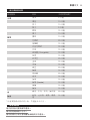
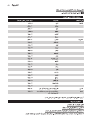
Type of food Ingredient Approximate steaming time*
Apple 5 min
Orange 10 min
Peach 10 min
Pear 5 min
Pineapple 15 min
Plum 10 min
Asparagus 10 min
Broccoli 20 min
Carrot 15 min
Cauliower 15 min
Celery 15 min
Courgette 15 min
Fennel 15 min
French beans 20 min
Leek 15 min
Onion 15 min
Peas 20 min
Pepper 15 min
Potato 20 min
Pumpkin 15 min
Spinach 15 min
Swede 15 min
Sweet potato 15 min
Tomato 15 min
Chicken, beef, lamb, pork etc. 20 min
Salmon, sole, cod, trout etc. 15 min
* All food has to be cut in small cubes, no bigger than 2-3cm.
Clean the appliance after every use.
Never immerse the motor unit in water.
Never use bleach or chemical sterilising solutions/tablets in the appliance.
Never use scouring pads, abrasive cleaning agents or aggressive liquids such as petrol, acetone or
alcohol to clean the appliance.
12

1 Unplug the appliance and remove the jar from the motor unit (Fig. 19).
2 Remove the lid from the jar and turn the lid upside down (Fig. 20).
3 remove the sieve and the valve from the lid. (Fig. 21)
4 Remove the blade unit from the jar (Fig. 22).
5 Clean the blade unit under the tap thoroughly, immediately after use. Make sure you also
rinse the inside of the tube of the blade unit (Fig. 23).
Handle the blade unit very carefully. The cutting edges are very sharp.
Note: If you want to clean the blade unit more thoroughly, you can also place it in the dishwasher after
you have rinsed it.
6 Clean the other parts that have come into contact with food in hot water with some
washing-up liquid immediately after use.
Note: All parts, except the motor unit, can also be cleaned in the dishwasher.
7 If necessary, clean the motor unit with a moist cloth.
8 Check if any food particles have entered the water tank. You can do this by looking into the
lling opening to see if there are any food particles in it or by checking if the water has an
unusual colour and by smelling if the water tank produces an unpleasant or a burnt smell. If
this is the case, clean the water tank (see section ‘Descaling the water tank’ in this chapter).
9 Leave the lid of the lling opening open to prevent bacterial growth.
If food particles enter the water tank, they may get stuck to the heating element in the water tank
during the next steaming processes. These particles cannot be removed by just rinsing the water
tank.
In addition, you have to descale the appliance every four weeks to ensure it continues to work
100% effectively. To reduce scale build-up, it is helpful to use pre-boiled or ltered water in the
appliance.
To remove food particles inside the water tank and to descale the appliance, follow the descaling
instructions below.
1 Make sure the appliance is switched off.
2 Add one sachet of citric acid (10g) to 200ml of warm water.
Note: You can also use a solution of 150ml water and 50ml white vinegar (8% acetic acid).
3 Fill the water tank with the solution of citric acid (or vinegar) and water.
4 Close the lid of the lling opening.
5 Place the empty jar (without any food inside) fully assembled with blade unit and lid on the
motor unit in steaming position (i.e. with the lid pointing downwards).
6 Turn the control knob to steaming position.
, The steaming light lights up orange to indicate that the appliance is steaming.
7 Switch off the appliance after 5-6 min of steaming and unplug it.
8 Pour the used solution of citric acid (or vinegar) and water out of the water tank. (Fig. 24)
9 Rinse the water tank and the jar thoroughly with fresh water several times.
10 Fill the tank with 200ml water and let the appliance complete a steaming process of 20
minutes with the empty jar before you use the appliance with food again.
13

11 Leave the lid of the lling opening open to prevent bacterial growth.
- Do not throw away the appliance with the normal household waste at the end of its life, but
hand it in at an ofcial collection point for recycling. By doing this, you help to preserve the
environment (Fig. 25).
1 Empty the water tank before you store the appliance (Fig. 24).
2 Make sure all parts are clean and dry before you store the appliance (see chapter ‘Cleaning’).
3 Store the appliance with the blade unit in the jar to prevent damage.
4 Do not place the lid on the jar and leave the lid of the lling opening open to avoid bacterial
growth.
If you need service or information or if you have a problem, please visit the Philips AVENT website
at www.philips.com/AVENT or contact the Philips Consumer Care Centre in your country (you nd
its phone number in the worldwide guarantee leaet). If there is no Consumer Care Centre in your
country, go to your local Philips dealer.
This chapter summarises the most common problems you could encounter with the appliance. If
you are unable to solve the problem with the information below, contact the Consumer Care
Centre in your country.
Problem Possible cause Solution
The appliance
does not work.
The appliance is
equipped with a safety
lock. If the parts have
not been assembled
properly onto the
motor unit, the
appliance does not
work.
Assemble all parts properly. See chapter ‘Using the
appliance’.
The steaming light
does not go on.
The appliance is not
connected to the
mains.
Put the plug in the wall socket.
The jar is not properly
placed on the motor
unit.
Place the jar properly on the motor unit.
You want to start a
second steaming
process just after one
has nished.
Switch off the appliance and allow it to cool down
for a few minutes before you start a second
steaming process.
14

Problem Possible cause Solution
The ingredients
are not heated up
completely.
The pieces in the jar
are too big, there is
too much food in the
jar or you have not
steamed the food long
enough.
Cut the food into smaller pieces (2-3cm), decrease
the amount of food in the jar or select a longer
steaming time (max. 20 minutes). Check the recipe
booklet and/or the table in chapter ‘Ingredients and
steaming times’ to make sure that you select the
correct steaming time for the ingredients you want
to steam or the recipe you want to prepare.
The appliance
does not steam.
You have not put
water in the appliance.
Switch off the appliance and put the right amount
of water in the appliance.
You have not put the
jar on the motor unit
in the correct position.
Place the jar on the appliance in the correct
position (see section ‘Steaming’ in chapter ‘Using the
appliance’).
Steaming takes
too long or the
steam function
does not work at
all.
There is too much
scale in the water tank.
Descale the water tank. See chapter ‘Cleaning and
maintenance’, section ‘Descaling’.
Steam is coming
out of the lling
opening.
The lid of the lling
opening is not closed
properly.
Close the lid of the lling opening properly (‘click’).
The steam outlet on
the motor unit is
blocked by food or by
scale.
Clean the steam outlet with a pointy object without
damaging the seal and follow the descaling
instructions in the future. See chapter ‘Cleaning and
maintenance,’ section ‘Descaling’.
The steam hole in the
lid is blocked.
Clean the steam hole in the lid properly.
The steaming light
goes on again after
the steaming
process is nished.
After some time,
the appliance
buzzes again.
You have
accidentally left the jar
on the base for more
than 10 minutes
without switching off
the appliance.
Switch off the appliance within 10 minutes after the
steaming process is nished and then blend the
food or remove it from the jar.
The blade unit or
motor unit is
blocked.
There is too much
food in the jar.
Switch off the appliance and process a smaller
quantity. Do not ll the jar beyond the top edge of
the green blade unit.
The motor unit
gives off an
unpleasant smell
during the rst
few times of use.
This is normal. If the appliance continues to give off this smell after
you have used it a few times, check whether the
processing quantity and processing time are correct.
See chapter ‘Ingredients and steaming times’.
15

Problem Possible cause Solution
The appliance
continues to give
off an unpleasant
smell after I used it
a few times.
You put too much
food in the jar or
you let the appliance
blend too long.
Process smaller quantities and do not let the
appliance blend for more than 30 seconds at a
time.
The appliance
makes a lot of
noise, produces an
unpleasant smell,
feels hot to the
touch, emits
smoke, etc.
There is too much
food in the jar.
Switch off the appliance and process a smaller
quantity.
You let the appliance
operate too long
without interruption.
Do not let the appliance blend for more than 30
seconds at a time.
The lid of the jar
leaks.
You have not
assembled the lid on
the jar properly.
Assemble the lid on the jar properly. See chapter
‘Using the appliance’.
There is too much
food in the jar.
Switch off the appliance and process a smaller
quantity.
There are white
spots on the lling
opening and/or on
the jar, sieve and
lid.
Scale has built up on
these parts.
This is normal. Remove the scale periodically. See
chapter ‘Cleaning and maintenance’, section
‘Descaling’.
The appliance
produces a lot of
noise while it is
blending.
The sieve is not
attached to the lid of
the jar.
Make sure that the sieve is attached to the lid of
the jar.
The water in the
water tank has an
unusual colour
when you pour it
out of the water
tank or when it
enters the jar
during steaming,
or the water in
the water tank has
an unpleasant
smell.
Food particles have
entered the water
tank during use.
Clean the water tank according to the instructions
in chapter ‘Cleaning and maintenance, section
‘Descaling the water tank’. Use the appliance strictly
according to the instructions. Make sure you do not
overll the water tank with water (max 200ml) and
that you do not overll the jar with food (do not ll
the jar beyond the top edge of the green blade
unit). Do not steam the same ingredients for more
than 20 minutes and do not put water for steaming
directly in the jar. Also make sure that the valve is
xed in the lid.
16

Problem Possible cause Solution
A smell of grilled
or burnt food
comes out of the
water tank
Food particles have
entered the water
tank during use and
have caked onto the
heating element.
Clean the water tank according to the instructions
in chapter ‘Cleaning and maintenance, section
‘Descaling the water tank’. Use the appliance strictly
according to the instructions. Make sure you do not
overll the water tank with water (max 200ml) and
that you do not overll the jar with food (do not ll
the jar beyond the top edge of the green blade
unit). Do not steam the same ingredients for more
than 20 minutes and do not put water for steaming
directly in the jar. Also make sure that the valve is
xed in the lid.
There are dark
spots in the baby
food or the water
in the jar has an
unusual colour.
Food particles have
entered the water
tank during use and
have caked onto the
heating element. This
causes residues of
these food particles to
enter the jar during
steaming.
Clean the water tank according to the instructions
in chapter ‘Cleaning and maintenance, section
‘Descaling the water tank’. Use the appliance strictly
according to the instructions. Make sure you do not
overll the water tank with water (max 200ml) and
that you do not overll the jar with food (do not ll
the jar beyond the top edge of the green blade
unit). Do not steam the same ingredients for more
than 20 minutes and do not put water for steaming
directly in the jar. Also make sure that the valve is
xed in the lid.
- Voltage/wattage: see type plate on the bottom of the appliance.
- Maximum capacity of water tank: 200ml.
- Maximum capacity of jar, solid ingredients: 800ml.
- Maximum capacity of jar, liquids: 450ml.
- Usage temperature: 10°C to 40°C
- Protection: temperature-controlled heating system and safety lock.
17

18
簡介
恭喜您購買本產品並歡迎加入飛利浦 AVENT!請於 www.philips.com/welcome 註冊您的
產品,以善用飛利浦 AVENT 提供的支援。
本二合一蒸鍋食物調理機特別適合調製少量嬰兒食品。一機兼具簡單蒸煮及攪拌功能的蒸
鍋食物調理機,方便父母為寶寶調製新鮮餐點。
一般說明 (圖 1)
蒸汽孔設計上蓋
閥門
濾網
刀組
附刀組座的果汁壺
馬達座上的蒸汽孔
把手鎖定區
水箱注水
馬達座
蒸煮指示燈
控制鈕
機座底部與電源線
量杯
抹刀
重要事項
在使用本產品前,請先仔細閱讀本使用手冊,並保留說明以供日後參考。
危險
- 請勿將馬達座浸入水中或其他液體中,也不要在水龍頭下沖洗。
警示
- 在您連接電源之前,請檢查本地的電源電壓是否與產品所標示的電壓相符。
- 當插頭、電線或產品本身受損時,請勿使用產品。
- 如果電線損壞,則必須交由飛利浦、飛利浦授權之服務中心,或是具備相同資格的技
師更換,以免發生危險。
- 基於安全考慮,在缺乏監督及適當指示之下,本產品不適用於孩童及任何身體、知
覺、或心理功能障礙者,或缺乏使用經驗及知識者。
- 請勿讓孩童使用本產品或當成玩具。
- 請勿讓孩童接觸本產品。
- 請勿觸碰刀片,尤其是當產品插上電源時。刀片非常銳利。
- 如果刀片卡住,請先拔掉插頭,再將卡住刀片的食材取出。
- 本產品在蒸煮時會產生高溫,碰觸可能導致燙傷,取用果汁壺時請抓取把手。
- 蒸煮及掀開蓋子時,請小心從果汁壺冒出的熱蒸氣。
- 打開蓋子時,留意從水箱注水口冒出的熱蒸氣。
- 蒸煮程序完成時,馬達座上的蒸氣孔及果汁壺蓋的蒸氣孔會繼續冒出熱蒸氣。將果汁
壺從馬達座取下時請小心。
- 如果不當使用本產品,高溫蒸汽可能會從注水口釋出。請參閱「故障排除」單元,以
避免或解決此問題。
- 不可在無人看顧的情況下任由產品運作。
警告
- 請勿使用其他製造商的任何配件或零件,或非飛利浦建議之配件或零件。如果您使用
此類配件或零件,保修即會失效。
- 請勿將產品置於或靠近正在運作或仍有餘熱的火爐或鍋具上。
- 組裝或拆解及清潔任何零件之前,請務必拔除本產品插頭。
繁體中文

- 在進行清潔之前,請務必先拔除電器電源插頭並待其冷卻。
- 請勿在微波爐使用果汁壺或產品的任何其他部分,因為果汁壺把手和刀組的金屬部分
不適合這種用途。
- 請勿使用殺菌器或微波爐來消毒果汁壺或產品的任何其他部分,因為果汁壺把手和刀
組的金屬部分不適合這種用途。
- 本電器用品僅供家用。如果不當使用本產品、作為 (半) 專業用途,或未依照使用手冊
操作,保固將無效,且飛利浦將不擔負任何損壞賠償責任。
- 請將本產品放置於平穩的表面,確定周圍預留足夠空間,以免損壞櫥櫃或其他物品,
因為本產品使用中會冒出熱蒸氣。
- 如果本產品發生掉落或任何損壞,請不要使用,請交由飛利浦授權的服務中心維修。
- 請勿在無水狀態下使用蒸煮功能。
- 請勿在水箱 (上限 200 毫升) 中加入過多水量,不得超過量杯的最高水位線。
- 蒸煮食材時,請勿在果汁壺加入過量的食材,確定綠色刀組的上緣未被食物蓋
住。 (圖 2)
- 攪拌液體時,容量請勿超過果汁壺 (450 毫升) 的最高刻度。
- 產品運作中請勿搬動或移動。
- 請勿在注水口或蒸氣孔中塞入任何物品。
- 蒸煮過程中請勿在水箱加水,因為本產品會因而冒出熱水與蒸汽。
- 蒸煮後如需加入其他食材攪拌時,請確定果汁壺蓋已經冷卻。
- 切勿將本產品加裝定時開關或搖控系統,以避免發生危險。
- 餵食寶寶前,請務必先用您的手背測試食物溫度。
- 務必檢查食物質地,確定沒有大塊狀食材。
- 蒸煮程序 (上限 20 分鐘) 完成時,請勿再次蒸煮或重新加熱嬰兒食品。
- 請僅使用產品隨附的抹刀將食物從果汁壺中取出。
- 定期清除水垢可避免產品受損。
安全系統
本產品內建安全鎖,所有零件必須正確安裝在馬達座上才能運轉。若零件全部安裝正確,
內建安全鎖才會解除。
本產品還配備過熱保護裝置。如果兩個蒸煮程序相距時間太短、攪拌功能使用時間太長,
或如果果汁壺內放入太多食材,可能發生過熱情形。如果過熱保護裝置在使用中關閉產
品,請將控制鈕設定為 0,讓產品冷卻數分鐘。之後,您便可再使用本產品。
電磁波 (EMF)
本飛利浦產品符合電磁波 (Electromagnetic fields,EMF) 所有相關標準。只要使用方式正
確並依照本使用手冊之說明進行操作,根據現有的科學研究資料,使用本產品並無安全顧
慮。
第一次使用
1 取下產品的所有包裝。
2 清洗馬達座以外的所有零件 (請參閱「清潔與維護」單元)。
使用此產品
餵食寶寶前,請務必先用您的手背測試食物溫度。
蒸煮後如需打開蓋子加入其他食材攪拌,請確定蓋子已經冷卻。容量請勿超過果汁壺的最
高刻度。
為水箱加水以開始新的蒸煮程序前,請先清空水箱。
開始蒸煮時,務必確定綠色刀組的上緣未被食物蓋住。
攪拌液體時,容量請勿超過果汁壺的最高刻度 (450 毫升)。
繁體中文 19

本產品適用於蒸煮新鮮的固體食材,之後加以攪拌來製作嬰兒食品。如需範例,請參閱食
譜。通常是先蒸煮再攪拌食材,但您也可以單獨使用蒸煮或攪拌功能。只使用攪拌功能
時,請跳過「加水至水箱內」和「蒸煮」章節,只需遵照「攪拌」章節的說明即可。攪拌
之後,請勿蒸煮已經攪拌過的食物。請勿蒸煮同一批食材 20 分鐘以上或超過一次。
本產品不適用於:
- 解凍食物
- 蒸煮冷凍食品
- 蒸煮已經攪拌過的食物
- 蒸煮同樣的食材超過 20 分鐘
- 煮飯和煮義大利粉
- 先攪拌食材然後加以蒸煮
- 加熱液體,例如湯或水
- 持續保溫食物數小時
- 重新加熱食物
加水至水箱內
1 使用量杯裝水,並加至需要的水位。 (圖 3)
量杯刻度為毫升,對應的蒸煮時間單位為分鐘。請參閱附贈食譜中的建議水量。
注意: 水量請勿超過量杯的最高水位刻度 (200 毫升),以確保不會在水箱加入過量的水。
注意: 建議您不要使用礦泉水,因為這類水所含的礦物質會導致水箱內堆積水垢。
2 將水倒入注水口,蓋上蓋子。 (圖 4)
注意: 請勿在水箱中加入水以外的液體。
蒸
有些蔬果以文火蒸煮,非常適合讓剛開始吃固態食物的寶寶食用。蒸煮是最健康的食物調
理方式,可保留食物大量的維生素和其他養分。
注意: 您可以在附贈的食譜中找到這些調理方式以及所需的蒸煮時間。請注意,食譜是配
合兒童年齡設計。
注意: 請勿蒸煮冷凍食材,因為本產品無法將冷凍食品加熱至蒸煮所需的溫度。請一律先
將冷凍的固體食材解凍,然後再使用本產品蒸煮。先甩乾解凍食材的多餘水分,然後再放
入果汁壺中。
1 將刀組放在果汁壺的刀組座上。 (圖 5)
2 固體食材放入果汁壺前,請先切成小塊 (小於 2-3 公分的塊狀)。
注意: 不要一次處理大量的固體食材。請改以少量多次的方式來處理。
3 將食材放入果汁壺。 (圖 6)
注意: 請勿超過綠色刀組的上緣。
注意: 請勿使用果汁壺蒸煮水或任何其他液體,以免損害本產品。
4 蓋上果汁壺蓋的閥門。 (圖 7)
注意: 確定閥門已固定於蓋子上。
5 蓋上果汁壺蓋的篩網 (會聽見「喀噠」一聲)。 (圖 8)
6 蓋上果汁壺的蓋子,以順時針方向旋轉固定。蓋上的小突起部分必須卡入果汁壺的凹
槽中。確定杯蓋的大突起部分對準果汁壺把手上方。 (圖 9)
7 將果汁壺上下顛倒放在馬達座上 (蓋子朝下)。確定把手位於右側。 (圖 10)
注意: 如果果汁壺和把手位置不正確,本產品不會開始蒸煮。
繁體中文20
ページが読み込まれています...
ページが読み込まれています...
ページが読み込まれています...
ページが読み込まれています...
ページが読み込まれています...
ページが読み込まれています...
ページが読み込まれています...
ページが読み込まれています...
ページが読み込まれています...
ページが読み込まれています...
ページが読み込まれています...
ページが読み込まれています...
ページが読み込まれています...
ページが読み込まれています...
ページが読み込まれています...
ページが読み込まれています...
ページが読み込まれています...
ページが読み込まれています...
ページが読み込まれています...
ページが読み込まれています...
ページが読み込まれています...
ページが読み込まれています...
ページが読み込まれています...
ページが読み込まれています...
ページが読み込まれています...
ページが読み込まれています...
ページが読み込まれています...
ページが読み込まれています...
ページが読み込まれています...
ページが読み込まれています...
ページが読み込まれています...
ページが読み込まれています...
-
 1
1
-
 2
2
-
 3
3
-
 4
4
-
 5
5
-
 6
6
-
 7
7
-
 8
8
-
 9
9
-
 10
10
-
 11
11
-
 12
12
-
 13
13
-
 14
14
-
 15
15
-
 16
16
-
 17
17
-
 18
18
-
 19
19
-
 20
20
-
 21
21
-
 22
22
-
 23
23
-
 24
24
-
 25
25
-
 26
26
-
 27
27
-
 28
28
-
 29
29
-
 30
30
-
 31
31
-
 32
32
-
 33
33
-
 34
34
-
 35
35
-
 36
36
-
 37
37
-
 38
38
-
 39
39
-
 40
40
-
 41
41
-
 42
42
-
 43
43
-
 44
44
-
 45
45
-
 46
46
-
 47
47
-
 48
48
-
 49
49
-
 50
50
-
 51
51
-
 52
52


