
Register your
new device on
MyBosch now and
get free benefits:
bosch-home.com/
welcome
MUM5....GB
Universal kitchen machine
[en] Instruction manual
[ms] Arahan pengendalian
[zf] 使用說明書
[zh] 使用说明书
[ar]
Universal kitchen machine 10
Pemproses makanan sejagat 21
廚師機 33
多功能食物料理机(全能厨师机) 42
62


7

9

9
9

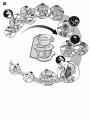
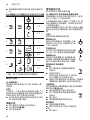
550-2700 g
350-550 g
350-1000 g
100-600 ml 7 1-6 min
5 4-6 min
1 30 s
3 3-6 min
1 30 s
3 5-6 min
1 30 s
3 6-7 min
1 30 s
3 4-5 min
1 30 s
7 4-6 min
1-8 x
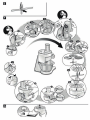
560-1100 g
350-1000 g
K

1000 g 7
1000 g 5
1000 g 5
1000 g 5
1000 g 6
1000 g 7
1000 g 6
1000 g 5
800 g 7
1000 g 7
L

5-10 x 10 g 2-4 x 2 sM
300-1000 g 45-120 s7
300-1000 g 45-120 s7
300-1250 g 45-120 s7
300-1250 g 45-120 s7
300-750 g 45-120 s7
150 s7
1 x
350-1000 g 45-90 s7
M

N

10
en Intended use
Intended use
This appliance is intended for domestic use only. Use the appliance
only for processing normal amounts of food and for normal amounts
of time for domestic use.
The appliance is suitable for mixing, kneading and beating food.
The appliance must not be used for processing other substances
or objects. Additional applications are possible if the accessories
approved by the manufacturer are used. Only use the appliance
with approved genuine parts and accessories. Never use the
accessory parts for other appliances.
Only use the appliance indoors at room temperature and up to
2000 m above sea level.
Important safety information
Read and follow the instruction manual carefully and keep for later
reference! Enclose these instructions when you give this appliance
to someone else. If the instructions for correct use of the appliance
are not observed, the manufacturer’s liability for any resulting
damage will be excluded.
This appliance can be used by persons with reduced physical,
sensory or mental capabilities or lack of experience and/or
knowledge if they have been given supervision or instruction
concerning use of the appliance in a safe way and if they
understand the hazards involved. Keep children away from the
appliance and connecting cable and do not allow them to use the
appliance. Do not let children play with the appliance. Cleaning and
user maintenance must not be performed by children.
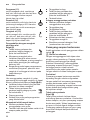
W Risk of electric shock and fire!
■ Connect and operate the appliance only in accordance with the
specifications on the rating plate. Do not use the appliance if the
power cord and/or appliance are damaged. Only our customer
service may repair the appliance, e.g. by replacing a damaged
power cord, in order to avoid hazards.
■ Use only the rotary switch to switch the appliance on or off. Never
connect the appliance to timer switches or remote- controllable
sockets. Never leave the appliance unattended while it is
switched on!
■ Do not place the appliance on or near hot surfaces, e.g. hobs.
The power cord must not come into contact with hot parts or be
pulled across sharp edges.
■ Never immerse the base unit in water or place it in the
dishwasher. Do not steam-clean the appliance. Do not use the
appliance with damp hands.

11
en
Important safety information
■ After each use, whenever the appliance is unsupervised, prior to
assembly, prior to disassembly, prior to cleaning and in the event
of an error, the appliance must always be disconnected from the
mains.
W Risk of injury!
■ Before replacing accessories or additional parts which move
during operation, the appliance must be switched off and dis-
connected from the power supply. After switching off, the drive
continues for a short time. Wait until the drive has come to
a standstill.
■ Do not adjust the swivel arm while the appliance is switched on.
■ Only use tools when the bowl is inserted, the lid is fitted and the
protective drive covers are in place! When using accessories, fit
the bowl, lid and drive covers according to the instructions!
■ While operating the appliance, never reach into the bowl or filling
shaft with your hands. Do not insert any objects (e.g. wooden
spoon) into the bowl or filling shaft. Keep hands, hair, clothing
and other utensils away from rotating parts.
■ Never use tools and accessories or 2 accessories at the same
time. When using the accessories, follow the individual operating
instructions enclosed.
■ The accessory must be completely assembled before use. Never
assemble the accessory on the base unit. The accessory should
only be used in the intended operating position.
■ Do not grip the sharp blades or edges of the cutting discs. Take
hold of cutting discs by the edge only.
■ Do not touch blender blades with bare hands.
■ Never reach into the attached blender! Never use the blender
without the lid in place.
■ Care shall be taken when handling the sharp cutting blades,
emptying the container and during cleaning.
W Risk of scalding!
If processing hot liquids, steam escapes through the funnel in the
lid.
W Risk of suffocation!
Do not allow children to play with packaging material.
W Caution!
We recommend that the appliance is never switched on for longer
than is necessary to process the ingredients. Do not operate
at no-load.

12
en Important safety information
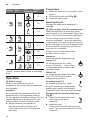
Safety systems
Start lock-out
See “Operating positions” table.
The appliance can be switched on in
pos. 1 and 3 only:
■ when the bowl (11) has been inserted
and turned until it locks into place.
Restart lock-out
If the power is interrupted, the appliance
remains switched on but the motor does
not start running again when the power
is restored. To switch the appliance on
again, turn the rotary switch to P,
then switch on.
Overload protection
If the motor switches itself off while the
appliance is being used, the overload
protection feature has been activated.
A possible cause may be that too much
food was processed at one time.
If a safety system is activated, see
“Troubleshooting”.
The appliance requires no maintenance.
Congratulations on the purchase of your
new Bosch appliance.
You can find further information about
our products on our web page.
Contents
Intended use ............................................. 10
Important safety information .....................10
Safety systems .........................................12
Overview...................................................13
Operating positions...................................13
Operation .................................................. 14
Cleaning and servicing .............................17
Storage .....................................................18
Troubleshooting ........................................ 18
Application examples ...............................19
Special accessories .................................. 20
Disposal .................................................... 20
Guarantee.................................................20
W Important!
It is essential to clean the appliance thoroughly after each use or
after it has not been used for an extended period (X “Cleaning and
servicing” see page 17).
W Explanation of the symbols on the appliance or accessory
i
Follow the instructions in the operating instructions.
Y
Caution! Rotating blades.
W
Caution! Rotating tools.
Do not place fingers in the feed tube.

13
en
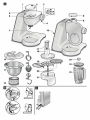
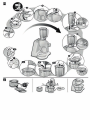
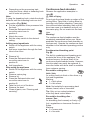
Overview
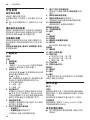
Overview
Fig. A:
Base unit
1 Release button
2 Swivel arm
“Easy Armlift” function to support the
upward movement of the arm (see
“Work positions”).
3 Rotary switch
When the appliance has been switched
off (position P), the appliance runs
automatically to the optimum position for
changing the tools.
P = Stop
M = Instantaneous switching at
maximum speed, hold switch for
required blending duration.
Settings 1-7, Operating speed:
1 = low speed – slow,
7 = high speed – fast.
4 On/Off display
Is lit while the appliance is operating
(rotary switch on M or 1-7). Flashes
if the appliance has been operated
incorrectly, the electronic fuse has
tripped or the appliance is defective –
see section “Troubleshooting”.
5 Drive cover
To remove the drive cover, press on
the rear area and remove cover.
6 Drive for
– Continuous-feed shredder and
– Citrus press (optional accessory*)
When not in use, attach the drive cover.
7 Drive for tools (stirrer, whisk, kneading
hook) and mincer (optional accessory*)
8 Blender drive cover
9 Drive for blender (optional accessory*)
When not in use, attach the blender
drive cover.
10 Cord store
Stow the cord in the cord store
Bowl with accessories
11 Stainless steel stirring bowl
12 Lid
Tools
13 Stirrer
14 Whisk
15 Kneading hook with dough deflector
16 Accessories bag
For storage of the tools and cutting
discs.
Continuous-feed shredder
17 Pusher
18 Cover with filling shaft
19 Cutting discs
a Reversible cutting disc – thick / thin
b Reversible shredding disc –
coarse / fine
c Fine grating disc
20 Disc holder
21 Housing with outlet opening
Blender*
22 Blender jug
23 Lid
24 Funnel
* If an accessory is not included in the
product package, it can be purchased via
the trade or customer service.
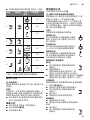
Operating positions
Fig. B:
Attention!
Before operating the appliance, attach the
tool / accessory to the correct drive and
in the correct position and place in the
operating position according to this table.
The swivel arm must be engaged in every
operating position.
Note
The swivel arm features an “Easy Armlift”
function which supports the upwards
movement of the swivel arm.
Selecting the operating position:
■ Press the Release button and move
the swivel arm. Support movement with
your hand.
■ Move the swivel arm until it engages in
the required position.

14
en Operation
Position Drive
Tool /
Accessory
Operating
speed
1
7
1-7
1-5
1-3
2
7 * –
3
6
3-7
3-5
4
9 5-7
7
5-7
* Insert / remove whisk, stirrer or kneading
hook.
Operation
W Risk of injury!
Do not insert mains plug until all
preparations for working with the appliance
are complete.
Attention!
Do not operate the appliance without an
accessory/tool in the operating position.
Do not operate the appliance empty. Do not
expose appliance or accessories to heat
sources. Parts are not microwave-safe.
■ Before operating the appliance
and accessories for the first time,
clean thoroughly; see “Cleaning and
servicing”.
Preparation
■ Place the base unit on a smooth, clean
surface.
■ Pull out the power cord (Fig. C).
■ Insert the mains plug.
Bowl and tools
Observe the application examples in
table K
W Risk of injury from the rotating tools
While the appliance is operating, never
place fingers in the mixing bowl. Attach the
cover (12) before operating the appliance!
Do not change tools until the drive has
come to a standstill – when the appliance
is switched off, the drive continues running
briefly and stops in the tool change position.
Do not move the swivel arm until the tool
has come to a standstill.
Always secure unused drives with
protective drive covers.
Attention!
Use bowl with this appliance only.
Stirrer (13)
for stiring mixtures, e.g. cake
mixture, fruit cake, … and folding
in ingredients such as raisins and
chocolate chips
Whisk (14)
for whisking egg whites and cream
(min. 30 % fat content) and for
mixing sponge mixture
Kneading hook (15)
for kneading dough e.g. yeast
dough, bread dough, pizza dough,
pasta dough, pastry and folding in
ingredients such as seeds into the dough
Working with the bowl and the tools
Fig. D:
■ Press the Release button and
move the swivel arm to
position 2.
■ Insert the bowl:
Tilt the bowl forwards and then set it
down. Turn anti-clockwise until it locks
into place.

15
en
Operation
■ Depending on the processing task,
insert the stirrer, whisk or kneading hook
until it locks into position.
Note:
If using the kneading hook, rotate the dough
deflector until the kneading hook can lock
into position (Fig. D-4b).
■ Put the ingredients to be processed into
the bowl.
■ Press the Release button and
move the swivel arm to
position 1.
■ Attach the cover.
■ Set the rotary switch to the desired
setting.
Adding more ingredients
■ Switch off the appliance with the rotary
switch.
■ Add more ingredients through the feed
tube in the cover.
or
■ Remove lid.
■ Press the Release button and
move the swivel arm to
position 2.
■ Add ingredients.
After using the appliance
■ Switch off the appliance with the rotary
switch.
■ Remove mains plug.
■ Remove lid.
■ Press the Release button and
move the swivel arm to
position 2.
■ Take the tool out of the drive.
■ Remove the bowl.
■ Clean all parts, see “Cleaning and
servicing”.
Continuous-feed shredder
Observe the application examples in
table L
W Risk of injury
Do not grip the sharp blades or edges of the
cutting discs. Take hold of cutting discs by
the edge only. Before attaching / removing
the continuousfeed shredder, wait until the
drive has come to a standstill and pull out
the mains plug. Do not reach into the feed
tube.
Warning!
The continuous-feed shredder must be
completely assembled before use. Never
assemble the continuous-feed shredder on
the base unit. Operate the continuous-feed
shredder in the indicated operating position
only.
Predetermined breaking point
Fig. E:
The built-in predetermined breaking point
protects the drive of the appliance. If an
overload occurs, the drive shaft of the
continuous-feed shredder breaks. However,
the drive shaft can easily be replaced. A
new disc holder with drive shaft is available
from customer service.
Reversible cutting disc –
thick / thin
for cutting food into thick or thin slices, e.g.
fruit and vegetables.
Marking:
■ 1 = thick slices
■ 3 = thin slices
Note: Not suitable for processing hard
cheese, bread, rolls or chocolate.
Tip: Only cut up cooked potatoes
once they have cooled down.
Reversible shredding disc –
coarse / fine
for shredding food coarsely or finely, e.g.
fruit, vegetables or cheese as Gouda or
Edam.
Marking:
■ 2 = coarse side
■ 4 = fine side

16
en Operation
Note: Not suitable for processing nuts or
hard cheese, e.g. Parmesan.
Tip: Shred soft cheese with the coarse side
only.
Fine grating disc
for shredding food finely, e.g. nuts
or hard cheese such as Parmesan.
Note: Not suitable for processing soft
cheese and cheese slices.
Working with the continuous-feed
shredder
Fig. F:
■ Press the Release button and
move the swivel arm to
position 2.
■ Insert the bowl:
Tilt the bowl forwards and then set it
down. Turn anti-clockwise until it locks
into place.
■ Press the Release button and
move the swivel arm to
position 3.
■ Remove drive cover from the
drive of the continuous-feed shredder
(Fig. F-5a).
■ Hold disc holder at the lower end,
ensuring that the two tips are face up.
■ Carefully place the required slicing or
shredding disc onto the tips of the disc
holder (Fig. F-6a).
In the case of reversible discs, ensure
that the required side is face up.
■ Grip disc holder at the upper end and
insert into the housing (Fig. F-6b).
■ Attach the cover (note mark) and turn all
the way in a clockwise direction.
■ Place continuous-feed shredder on the
drive and rotate all the way in a clock-
wise direction, as illustrated in Fig. F-8.
■ Turn rotary switch to recommended
setting.
■ Put food to be processed in the feed
tube and push down with the pusher.
Warning!
Prevent the cut ingredients from building up
in the outlet opening.
Tip: To ensure even cutting results, process
thin ingredients in bunches.
Note: If the food to be processed sticks in
the continuous-feed shredder, switch food
processor off, pull out mains plug, wait until
the drive comes to a standstill, remove
cover from the continuous-feed shredder
and empty feed tube.
After using the appliance
■ Switch off the appliance with the rotary
switch.
■ Rotate the continuous-feed shredder in
an anti-clockwise direction and remove.
■ Rotate the lid in an anti-clockwise
direction and remove.
■ Remove disc holder with disc. To do
this, press finger from below against the
drive shaft (Fig. G).
■ Clean parts.
Blender
Observe the application examples in
table M
W Risk of injury from sharp blades /
rotating drive!
Never place fingers in the attached blender!
Do not remove / attach the blender until the
drive is at a standstill! Operate the assem-
bled blender only and with the lid attached.
Do not operate blender when empty.
W Risk of scalding!
If processing hot liquids, steam escapes
through the funnel in the lid.
Working with the blender
Fig. H:
■ Press the release button and
move the swivel arm to
position 4.
■ Remove the blender drive cover.
■ Attach blender jug (mark on the handle
on mark on the base unit) and turn all
the way in an anti-clockwise direction.
■ Add ingredients.
Maximum amount of liquid = 1.25 litres;
maximum amount of frothing or hot
liquids = 0.75 litres.

17
en
Cleaning and servicing
■ Attach the cover and turn anti-clockwise
all the way into the blender handle. The
cover must be locked in position.
■ Set the rotary switch to the desired
setting.
Adding more ingredients
Fig. H-8:
■ Switch off the appliance with the rotary
switch.
■ Remove the lid and add ingredients
or
■ remove the funnel and gradually add
solid ingredients through the refill
opening
or
■ pour liquid ingredients through the
funnel.
After using the appliance
■ Switch off the appliance with the rotary
switch.
■ Rotate the blender in a clockwise
direction and remove.
Tip: It is recommended to clean the blender
immediately after use.
W Attention!
Using unsuitable food may damage the
appliance.
■ Do not process food that is hotter than
70 °C in the blender jug.
■ Do not process frozen ingredients, apart
from ice cubes, unless they have been
added into a sufficient amount of liquid.
■ Do not process food that contains hard
components. Before processing pip
and stone fruits (apples, peaches, etc.),
remove the pips or stones.
Notes
Restrictions on processing:
■ Do not use it to chop ingredients like
almonds, onions, parsley and meat.
■ The blender cannot produce spreads,
such as peanut butter,coconut butter or
nut spreads.
■ Use enough liquid when mixing solid
food.
■ Mix powdered food with sufficient liquid
before blending, or dissolve it entirely
in liquid. Examples of powdered food
include icing sugar, cocoa powder,
roasted soy-beans, flour, protein
powder.
Cleaning and servicing
The attachments and accessories used
must be thoroughly cleaned after each use.
X Table N
Attention!
Do not use abrasive cleaning agents.
Surfaces may be damaged.
Cleaning the base unit
W Danger of electric shock!
Never immerse the base unit in water or
place under running water. Do not use a
steam cleaner.
■ Remove mains plug.
■ Wipe the base unit and drive cover with
a damp cloth. If required, use a little
detergent.
■ Then dry the base unit.
Cleaning the bowl and tools
The bowl and tools are dishwasher-
proof. Do not wedge plastic parts in the
dishwasher, as they could be permanently
deformed during the washing process!
Cleaning the continuous-feed
shredder
All parts of the continuous-feed shredder
are dishwasher-proof.
Tip: To remove the red film after processing
e.g. carrots, pour a little cooking oil on a
cloth and rub the film off the continuous-
feed shredder (not the cutting discs). Then
rinse the continuous-feed shredder.
Cleaning the blender
W Risk of injury from sharp blades!
Do not touch blender blades with bare
hands.
The blender jug, lid and funnel are
dishwasher-proof.

18
en Storage
Tip: After processing liquids, it is often suffi-
cient to clean the blender without removing
it from the appliance. Pour 700 ml of water
and a drop of washing-up liquid into the
attached blender. Switch on the blender
for aproximately 1 minute (setting 7). Pour
out the water and rinse out the blender with
clear water.
Important information
If required, clean accessories bag. Follow
care instructions in the bag.
Storage
W Risk of injury!
When the appliance is not in use, pull out
the mains plug.
Fig. J:
■ Store tools and cutting discs in the
accessories bag.
■ Keep accessories bag in the bowl.
Troubleshooting
W Risk of injury!
Before eliminating a fault, pull out the mains
plug.
Important information
The Operating indicator flashes if the
appliance has been operated incorrectly
or the electronic fuse has tripped or the
appliance is defective.
The swivel arm must be engaged in
every operating position.
Initially try to eliminate the problem which
has occurred with the help of the following
information.
Fault
Appliance does not start.
Remedial action
■ Check the power supply.
■ Check the mains plug.
■ Check swivel arm. Correct position?
Engaged?
■ Screw on blender or bowl as far as
possible.
■ Attach the blender cover and screw on
as far as possible.
■ Attach drive cover to unused drives.
■ The safety lock is active. Switch
appliance to P and then back to the
required setting.
Fault
Appliance switches off during use. The
overload protection feature has been
activated. Too much food was processed
at one time.
Remedial action
■ Switch off the appliance.
■ Reduce processing quantity.
Fault
While the drive was running, the release
button was inadvertently pressed. The
swivel arm moves up. The drive switches
off, but does not stop in the tool change
position.
Remedial action
■ Set the rotary switch to P.
■ Move swivel arm to position 1.
■ Switch on appliance (setting 1).
■ Switch off appliance again.
Tool stops in tool change position.
Fault
Blender does not start working or stops
during use, the drive is “humming”. Blade
is blocked.
Remedial action
■ Switch off the appliance and pull out the
mains plug.
■ Detach the blender and remove the
obstruction.
■ Re-attach the blender.
■ Switch on the appliance.
Important information
If the fault cannot be eliminated, please
contact customer service.

19
en
Application examples
Application examples
Observe general recommendations in
table K, table L, table M.
Do not exceed permitted maximum
quantities.
Sponge mixture
Basic recipe
– 2 eggs
– 2-3 tbs. hot water
– 100 g sugar
– 1 packet of vanilla sugar
– 70 g flour
– 70 g cornflour
– Baking powder if required
■ Beat the ingredients (except flour and
cornflour) with the whisk for approx.
4-6 minutes at setting 7 until frothy.
■ Rotate switch to setting 1 and spoon
in the sifted flour and cornflour within
approx. ½ to 1 minute.
Maximum quantity: 2 x basic recipe
Cake mixture
Basic recipe
– 6 eggs
– 500 g sugar
– 1 pinch of salt
– 2 packets of vanilla sugar or peel from
½ lemon
– 500 g butter or margarine (room
temperature)
– 1000 g flour
– 1 packet of baking powder
– 250 ml milk
■ Mix the eggs, sugar, salt and vanilla
sugar or lemon peel with the stirrer for
approx. 10 seconds at setting 1.
■ Set to setting 5 and process for approx.
120 seconds.
■ Add butter and process for approx.
60 seconds at setting 3.
■ Add flour and baking powder and
process for approx. 2 minutes at
setting 1.
■ Set to setting 3 and gradually add the
milk within 2 minutes.
Maximum quantity: 1 x basic recipe
Heavy fruit cake
Basic recipe
– 3 eggs
– 135 g sugar
– 135 g margarine
– 255 g flour
– 10 g baking powder
– 150 g currants
– 150 g mixed dried fruit
■ Insert stirring whisk.
■ Add all ingredients except the dried fruit.
■ Process for 30 seconds at setting 1.
■ Then process for 3-5 minutes at
setting 5.
■ Select setting 2.
■ Add the dried fruit within the next
30-60 seconds.
Maximum quantity: 2 x basic recipe
Short pastry
Basic recipe
– 125 g butter (room
temperature)
– 100-125 g sugar
– 1 egg
– 1 pinch of salt
– A little lemon peel or vanilla sugar
– 250 g flour
– Baking powder if required
■ Using the stirrer, process all ingredients
for approx. ½ minute at setting 1, then
for approx. 3-6 minutes at setting 3.
From 250 g flour:
■ Knead the ingredients with the kneading
hook for approx. ½ minute at setting 1,
then for approx. 5-6 minutes at setting 3.
Maximum quantity: 2 x basic recipe
Yeast dough
Basic recipe
– 500 g flour
– 1 egg
– 80 g fat (room temperature)
– 80 g sugar
– 200-250 ml lukewarm milk
– 25 g fresh yeast or 1 packet of dried
yeast
– Peel of ½ lemon
– 1 pinch of salt

20
en Special accessories
■ Process all ingredients for approx.
½ minute at setting 1, then for approx.
3-6 minutes at setting 3 using the
kneading hook.
Maximum quantity: 2 x basic recipe
Pasta dough
Basic recipe
– 300 g flour
– 3 eggs
– 1-2 tbs. (10-20 g) cold water as required
■ Process all ingredients for approx.
3-5 minutes at setting 3 until a dough
forms.
Maximum quantity: 1,5 x basic recipe
Bread dough
Basic recipe
– 1000 g flour
– 2 packets of dry yeast
– 2 tsp. salt
– 600-650 ml warm water
■ Process all ingredients for approx.
½ minute at setting 1, then for approx.
6-7 minutes at setting 3 using the
kneading hook.
Mayonnaise
– 1 egg
– 1 tsp. mustard
– ¼ l oil
– 1 tbs. lemon juice or vinegar
– 1 pinch of salt
– 1 pinch of sugar
Ingredients must be at room temperature.
Making mayonnaise is only possible with
whole egg.
■ Process the ingredients (except the oil)
in the blender for several seconds at
setting 3 or 4.
■ Switch the blender to setting 7 and
slowly pour the oil through the funnel
and mix until the mayonnaise emulsifies.
Eat the mayonnaise immediately, do not
store.
Special accessories
You can buy accessories from the after-
sales service, from specialist retailers or
online. Only use genuine accessories as
these have been specifically designed for
your appliance.
Accessories vary from one appliance to
another. When purchasing accessories,
always quote the exact product number
(E-Nr.) of your appliance.
You can find out which accessories are
available for your appliance in our cata-
logue, in the online shop or from our after-
sales service.
www.bosch-home.com
Disposal
J
Dispose of packaging in an environ-
mentally-friendly manner. This
appliance is labelled in accordance
with European Directive 2012/19/EU
concerning used electrical and
electronic appliances (waste electrical
and electronic equipment – WEEE).
The guideline determines the frame-
work for the return and recycling
of used appliances as applicable
throughout the EU. Please ask your
specialist retailer about current
disposal facilities.
Guarantee
The guarantee conditions for this appliance
are as dened by our representative in the
country in which it is sold. Details regarding
these conditions can be obtained from
the dealer from whom the appliance was
purchased. The bill of sale or receipt must
be produced when making any claim under
the terms of this guarantee.
Changes reserved.
ページが読み込まれています...
ページが読み込まれています...
ページが読み込まれています...
ページが読み込まれています...
ページが読み込まれています...
ページが読み込まれています...
ページが読み込まれています...
ページが読み込まれています...
ページが読み込まれています...
ページが読み込まれています...
ページが読み込まれています...
ページが読み込まれています...
ページが読み込まれています...
ページが読み込まれています...
ページが読み込まれています...
ページが読み込まれています...
ページが読み込まれています...
ページが読み込まれています...
ページが読み込まれています...
ページが読み込まれています...
ページが読み込まれています...
ページが読み込まれています...
ページが読み込まれています...
ページが読み込まれています...
ページが読み込まれています...
ページが読み込まれています...
ページが読み込まれています...
ページが読み込まれています...
ページが読み込まれています...
ページが読み込まれています...
ページが読み込まれています...
ページが読み込まれています...
ページが読み込まれています...
ページが読み込まれています...
ページが読み込まれています...
ページが読み込まれています...
ページが読み込まれています...
ページが読み込まれています...
ページが読み込まれています...
ページが読み込まれています...
ページが読み込まれています...
ページが読み込まれています...
ページが読み込まれています...
ページが読み込まれています...
ページが読み込まれています...
ページが読み込まれています...
ページが読み込まれています...
ページが読み込まれています...
-
 1
1
-
 2
2
-
 3
3
-
 4
4
-
 5
5
-
 6
6
-
 7
7
-
 8
8
-
 9
9
-
 10
10
-
 11
11
-
 12
12
-
 13
13
-
 14
14
-
 15
15
-
 16
16
-
 17
17
-
 18
18
-
 19
19
-
 20
20
-
 21
21
-
 22
22
-
 23
23
-
 24
24
-
 25
25
-
 26
26
-
 27
27
-
 28
28
-
 29
29
-
 30
30
-
 31
31
-
 32
32
-
 33
33
-
 34
34
-
 35
35
-
 36
36
-
 37
37
-
 38
38
-
 39
39
-
 40
40
-
 41
41
-
 42
42
-
 43
43
-
 44
44
-
 45
45
-
 46
46
-
 47
47
-
 48
48
-
 49
49
-
 50
50
-
 51
51
-
 52
52
-
 53
53
-
 54
54
-
 55
55
-
 56
56
-
 57
57
-
 58
58
-
 59
59
-
 60
60
-
 61
61
-
 62
62
-
 63
63
-
 64
64
-
 65
65
-
 66
66
-
 67
67
-
 68
68


