Fnirsi IR40 ユーザーマニュアル

タイプ
ユーザーマニュアル

Fnirsi IR40は、プロフェッショナルグレードのレーザー距離計で、正確で信頼性の高い測定を行うことができます。内蔵されたBluetooth機能により、測定データをスマートフォンやタブレットにワイヤレスで送信できます。Fnirsi IR40は、建設、リフォーム、不動産、その他の用途に最適なツールです。

Fnirsi IR40の主な機能は次のとおりです。

  • 40メートルの測定範囲
  • ±2mmの測定精度
  • 面積、体積の計算
  • ピタゴラスの定理による間接測定
  • Bluetooth接続
  • 360度の画面回転
  • バックライト付きディスプレイ
  • 自動電源オフ機能

Fnirsi IR40は、現場での測定に最適なツールです。コンパクトで軽量なデザインで、持ち運びや保管が簡単です。また、頑丈な構造で、過酷な環境での使用にも耐えることができます。

m
m
m
m
IR40智能测距仪
IR40 SMART RANGEFINDER
09【 1 】 按键及功能
09【 2 】 参数解析
10【 3 】 显示说明
10【 4 】 操作指引
11【 5 】 高级测量说明
13【 6 】 蓝牙状态指示
13【 7 】 电池电量指示
14【 8 】 错误代码
14【 9 】 安全警告
14【 10 】 生产信息
15【 11 】 连接APP
目录 CATALOG
01【 1 】 Keys and Functions
01【 2 】 Parameters
02【 3 】 Show Description
02【 4 】 Instructions
04【 5 】 Advanced Measurement
06【 6 】 Bluetooth Status Indication
06【 7 】 Battery Level Indication
06【 8 】 Error Code
07【 9 】 Safety Warning
07【 10 】 Production Information
08【 11 】 Connect to APP
01
【 1 Keys and Functions
LCD display Charging indicator
Type-C port Reset hole
Laser receiver lens Laser emission lens
On/Measure key Off/Clear key
【 2 Parameters
Resolution: 1mm
Unit: m/ft/in
Measurement time: 0.1~3s
Measurement accuracy: ±(2mm+5x10⁻⁵Dmm)
Operating temperature range: 0~40 degrees
Storage temperature range: -20 degrees to 60 degrees
Executive standard: GB7247.1-2012
Laser Class: Class II
Laser type: 620-670nm
Measurement range: 0.05~40m
▲ Parameter Analysis
▲ Test Conditions
1. General Conditions: General conditions:It refers to the strong reflection ability
of the laser irradiation area.(such as painting white walls).The background lighting
is dim and the operating temperature is 15°C-35°C.At this time, an error effect of
plus or minus 0.05 mm/m should be considered
02
【 3 Show Description
m
m
m
m
Laser
working state
Edge L2 icon
Edge L1 icon
Edge L3 icon
Measurement
reference indication
Current
measurement mode
Bluetooth icon
Edge L1
measurement data
Units of
measurement
Edge L3
measurement data
Current
measurement data
Edge L2
measurement data
Power display
【 4 Instructions
▲ Power On Press and hold the "⑦ On/Measure key" for 3 seconds. When the
"FNIRSI" LOGO appears on the LCD display, the device is turned on
▲ Power Off Press and hold "⑧ Off/Clear key" for 3 seconds.When the LCD
display turns off, the device is turned off.(When there is no operation after power
on: the laser will automatically turn off after 15 seconds, and it will
automatically turn off after 5 minutes)
1. The rangefinder cannot be moved during measurement, it needs to be placed
on a fixed support surface
2. Do not block the laser emission hole and the receiving lens during measurement
3. Based on physical principles, errors will occur when measuring on certain
surfaces, such as transparent, highly reflective, low reflective or porous surfaces.
Aiming targets can be placed on the above objects if necessary to improve
measurement accuracy
▲ Operation Precautions
2. Disadvantages: Refers to the weak reflectivity of the laser-irradiated area.(Like
black cardboard polished tiles.)The background lighting is strong and the working
temperature is <0°C or >45°C.At this time, an error effect of plus or minus 0.15
mm/m should be considered
03
Reset: Poke the "④ Reset hole" with a toothpick and the machine will be
forced to shut down.Used to handle exceptions.
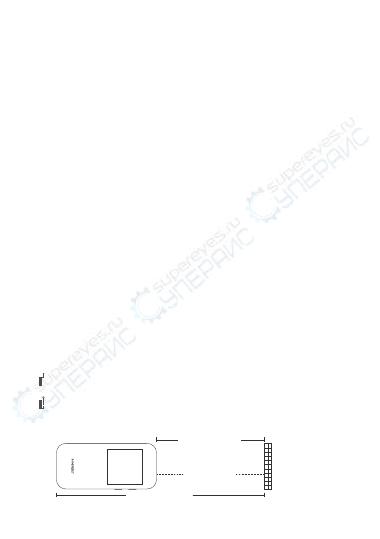
Laser emission
Front benchmark
Measurement
object
Post benchmark
Single Measurement: Single measurement:Single short press "⑦ On/measure
key" to start measurement.Short press the "⑦ On/Measure key" again to get the
measurement data.The page displays up to 4 sets of measurement data. During
measurement, the straight line at the "measurement mode" turns into a dotted
line, indicating that the measurement is being performed
360° Screen Flip: Built-in gravity sensor chip, the screen can be flipped
automatically.Instructions:Long press the power button in the off state, don't let
go after power on, and enter the display interface after 3 seconds to switch the
adaptive rotation function on/off.
Unit Switching: Quickly double-click with "⑦ On/Measure key" to switch the
unit. The order of unit switching is meter → feet → inch
Automatic Calibration
1. In the off state, press and hold the "⑧ Off/Clear key", then press and hold the
"⑦ On/Measure key" for 3 seconds, when the screen displays "CAL", it means that
the calibration mode is entered
2. Short press "⑦ On/Measure key" to increase the calibration value.Short press
"⑧ Off/Clear key" to decrease the calibration value.The calibration range is
"-10mm to 10mm". Press and hold the "⑦ On/Measure key" for 2 seconds to
indicate that the calibration is complete.Automatically enter the measurement
interface
Clear Function: Clear function:Short press "⑧ Off/Clear key" to cancel the last
command.A single measurement (area or volume, etc.) within the same
function.You can use "⑧ Off/Clear key" to clear the last measurement operation
and re-measure
Measurement Reference Switching
Measurement reference switching: Quickly double-click the "⑧ Off/Clear key" to
switch the front and rear benchmarks
1. Front benchmark: Front datum refers to the measurement starting
position from the top of the device
2. Post benchmark: Rear datum refers to taking the bottom of the device as
the starting position for measurement, and the device defaults to the rear datum
04
Measurement Mode Switching: Long press the "⑦ On/Measure key" to switch
the measurement mode cyclically.The order is "Linear Measurement" → "Area
Measurement" → "Volume Measurement" → "Pythagorean One" → "Secondary
Pythagorean (Data Addition)" → "Secondary Pythagorean (Data Subtraction)"
Area Measurement: Click "⑦ On/Measure key", and measure the length and
width in turn.The dotted line during measurement indicates the edge to be
measured.When all sides are measured, the system automatically calculates the
area
【 5 Advanced Measurement
Volume Measurement: Click the “⑦ On/Measure key”, and measure the
length and width in turn.The dotted line during measurement indicates the edge
to be measured.When all sides are measured, the system automatically calculates
the area
m3
m
m
m
6.000
3.000
2.000
1.000
Edge L
measurement data
Side W
measurement data
Edge H
measurement data
Volume
measurement symbol
Volume
calculation data
L
W
H
m2
m
m
2.000
2.000
1.000
Edge L
measurement data
Area measurement
symbol
Edge W
measurement data
Area
calculation data
L
W
A Pythagorean: When the selection interface is not measured, the solid yellow
line indicates the edge of the final calculation result.Short press "⑦ On/Measure
key" to start measurement.The dotted line during measurement indicates the edge
to be measured.Short press again to get measurement data.Measure the data of the
right-angled base "L1" and the right-angled hypotenuse "L2" in sequence.At the
end of the measurement, the bottom edge L3 data will be automatically calculated
05
L3
m
m
m
1.089
1.499
1.853
Edge L1 measurement data
Side L3 to be calculated
Edge L2 measurement data
Edge L3
Computational data
One Pythagorean
measurement symbol
L2
L1
Launch
point Measurement
object
Quadratic Pythagorean (data subtraction): When entering the interface and
not starting the measurement, the yellow solid line indicates the edge of the final
calculation result.Short press "measurement end will" to start the measurement,
the dotted line indicates the edge to be measured during measurement.
Short press again to get measurement data.Measure the right-angle base L1 data,
L2 data and right-angle hypotenuse L3 data in sequence.At the end of the
measurement, the bottom edge L4 data will be automatically calculated
Quadratic Pythagorean(data addition): When entering the interface and not
starting the measurement, the yellow solid line indicates the edge of the final
calculation result.Short press "⑦ On/Measure key" to start measurement
When measuring, the dotted line indicates the edge to be measured. Short press
again to get the measurement data.Measure the triangle hypotenuse L1 data,
height L2 data, and hypotenuse L3 data in sequence.At the end of the
measurement, the bottom edge L4 data will be automatically calculated
1.938
Edge L1
measurement data
Edge L4 to be calculated
m
m
m
m
1.838
1.715
1.954
Edge L2
measurement data
Edge L2
measurement data
Edge L4
measurement data
Quadratic Pythagorean
measurement symbol
L1
L2 L4
L3
Launch
point Measurement
object
06
ERR02: Unstable signal
ERR04: Target out of range
ERR06: Background light is too strong
【 8 Error Code
ERR01: Hardware malfunction
ERR03: Abnormal temperature
ERR05: Invalid measurement result
ERR07: The signal is too strong or too weak
ERR30: Does not satisfy the Pythagorean theorem
ERR60: No light return or hardware failure
【 7 Battery Level Indication
Battery Level Indicator: When all segments of the battery icon on the LCD
display are displayed, it means the battery is fully charged.The number of
displayed segments decreases, indicating that the power is relatively reduced.
When only the battery box is displayed, it should be ready to charge in
time.When charging, the segment code will flow and the red charging indicator
on the left side of the device will light up.When the red light goes out, the battery
is fully charged
Automatic Shutdown When Low Battery: When the battery is too low, the
LCD display will prompt the low battery.And countdown to shutdown
【 6 Bluetooth Status Indication
▲ After power on, the Bluetooth icon at the top of the screen flashes.After the
bluetooth connection is successful, the bluetooth icon will no longer flash
1.722
Side L1 measurement data
Edge L4 to be calculated
m
m
m
m
0.538
1.768
1.961
Edge L3 measurement data
Edge L2 measurement data
Edge L4 Computational data
Quadratic Pythagorean
measurement symbol
L1
L2
L4
L3
Launch
point Measurement
object
07
【 9 Safety Warning
Warning! Before using the product for the first time.Please read the safety
regulations and operating instructions carefully first
▲ Please read all operating instructions and safety regulations in this manual
carefully before using the product.Using the product not in accordance with the
operating methods in this manual may cause damage to the product, affect the
measurement accuracy, and cause personal injury to the user or others
▲ Do not open or repair the product by yourself in any way.It is strictly prohibited
to illegally modify or change the performance of the product's laser
transmitter.Please keep the product properly, do not place it where children can
reach
▲ It is strictly forbidden to use the product laser to irradiate your own or others'
eyes and other parts of the body.It is strictly forbidden to irradiate the laser on the
surface of highly reflective objects
▲ The electromagnetic radiation of the product may cause interference to other
equipment and devices.Please do not use this product near aircraft or medical
equipment.Do not use the product in a flammable and explosive environment.
▲ Used batteries and scrapped products replaced by products cannot be
disposed of with household waste.Please dispose of used batteries and scrapped
products in accordance with relevant national or local laws
Product name: FNIRSI 40m Smart Rangefinder
Brand / Model: FNIRSI / FNIRSI-IR40
Manufacturer: Shenzhen FNIRSI Technology Co., Ltd.
Website: www.fnirsi.cn
Address: Building C, Weihuada Industrial Park, Dalang Street, Longhua District,
Shenzhen, Guangdong, China
【 10 Production Information
08
【 11 Connect APP
Please search for "RangeFinder" in Google Play (Android) or App
Store (IOS) to download the rangefinder APP and install it for
authorized use.
On the APP device page "+" to enter the searching page, it will
automatically search for nearby devices.
When the rangefinder icon appears, select the corresponding
device to add and connect successfully, and the Bluetooth icon on
the terminal device page is always on.
09
【 2 参数解析
测量范围: 0.05~40m
测量精度: ±(2mm+5x10⁻⁵Dmm)
分辨率: 1mm
单位: m/ft/in
测量时间: 0.1~3s
激光等级: II级
激光类型: 620-670nm
工作温度范围 :0°C~40°C
储存温度范围: -20°C~60°C
执行标准: GB7247.1-2012
▲ 基本参数
1. 一般条件指激光照射区域反射能力强如涂刷白色的墙壁)背景照明
暗且工作温度为15℃-35℃。此时要考虑一个正负0.05毫米/米的误差影响
2. 不利条件指激光照射区域反射能力弱(如黑色纸板抛光砖)背景照明
强且工作温度为<0℃或>45℃,此时要考虑一个正负0.15毫米/米的误差
影响
▲ 测试条件
【 1 按键及功能
LCD显示屏 充电指示灯
Type-C充电口 复位孔
激光接收镜头 激光发射镜头
开机/测量键 关机/清除键
10
【 3 显示说明
m
m
m
m
激光工作状态
边“ L 2 ”图 标
边“ L 1 ”图 标
边“ L 3 ”图 标
测量基准指示
当前测量模式
蓝牙图标
“L1”测量数据
测量单位
“L3”测量数据
当前测量数据
“L2”测量数据
电量显示
开机 按住“⑦开机/测量键”3秒不放当屏幕出现“FNIRSI”LOGO后松
表明设备开机
▲ 关机 按住“⑧关机/清除键”3秒不放黑屏后松手,表明设备已关机(开
机无任何操作时15秒后会自动关闭激光5分钟后会自动关机)
▲ 复位 用牙签短戳“④复位孔”机器会强制关机,用于处理异常情况
单次测量 单次短按“⑦开机/测量键”开始测量再次短按“⑦开机/测
量键”得到测量数据页面最多显示4组测量数据,测量时“测量模式”处直
线变为虚线代表发射激光正在测量
360°屏幕翻转 内置重力感应芯片,屏幕可自动翻转;
操作说明:关机状态下长按开机键,开机后也不松手3秒后进入屏幕翻转页
面设置(只能设置当前翻转状态的的对立状态如:当前自适应翻转功能开
操作后变为关)
单位切换 “⑦开机/测量键快速双击可以切换单位,单位切换的顺
序为m(米 →ft(英尺) → inch(英寸)
1. 测量时不能够移动测距仪需要将其放置在固定的支撑面上
2. 测量时不可以遮挡住激光发射孔和接收透镜
3. 基于物理原理在某些特定的物体表面进行测量时会产生误差例如透
明的高反射的低反射的或多孔的物体表面。必要时可在上述的物体上
放置瞄准靶以提高测量精度
▲ 注意事项
【 4 操作指引
11
m2
m
m
2.000
2.000
1.000
边L 测量数据
边W 测量数据
面积测量符号
面积计算数据
L
W
测量模式切换 长按“⑦开机/测量键”可循环切换测量模式依次为“直
线测量”“面积测量”“体积测量”“一次勾股”“二次勾股(数据
相加)”“二次勾股(数据相减)”
面积测量 单击“⑦开机/测量键”依次测量长宽,测量时虚线表示即将
测量的边全部边测量结束系统自动计算出面积
【 5 高级测量说明
自动校准在关机状态下,按住“⑧关机/清除键”不放,然后按住“⑦开机
/测量键”3秒,当屏幕显示“CAL”,即表示进入校准模式。短按“⑦开机/测量
键”增大校准值,短按“⑧关机/清除键”减小校准值,校准范围为“-10mm到
10mm”长按“⑦开机/测量键”2秒不放表示校准完成,自动进入测量界面
清除功能 短按“⑧关机/清除键”则取消最后一个指令在同一个功能
内单次测量(面积或体积等可以用“⑧关机/清除键”清除上一个测量操
重新测量
测量基准切换 快速双击“⑧关机/清除键”可以切换前后基准
1.
“ ”前基准 前基准是指以设备的顶部为测量起始位置
2.
“ ”后基准 后基准是指以设备的底部为测量起始位置设备默认为后
基准
激光发射
前基准
测量物
后基准
12
体积测量 单击“⑦开机/测量键”依次测量长宽高,测量时虚线表示即
将测量的边全部边测量结束系统自动计算出体积
m3
m
m
m
6.000
3.000
2.000
1.000
边L 测量数据
边H 测量数据
边W 测量数据
体积测量符号
体积计算数据
L
W
H
一次勾股 选到界面未测量时黄色实线指示最终计算结果的边;短按
“⑦开机/测量键”开始测量,测量时虚线表示即将测量的边再次短按得到
测量数据。依次测量直角底边“L1”数据和直角斜边“L2”数据测量结束将
自动计算出底边L3数据
m
m
m
1.089
1.499
1.853
边L1 测量数据
待计算边 L3
边L2 测量数据
边L3 计算数据
一次勾股测量符号
测量物
发射点
L2
L1
L3
二次勾股(数据相加) 选到界面未测量时,黄色实线指示最终计算结果
的边;短按“⑦开机/测量键”开始测量测量时虚线表示即将测量的边,
次短按得到测量数据。依次测量三角形斜边L1数据、高L2数据、斜边L3数据
测量结束将自动计算出底边L4数据
13
1.938
边L1 测量数据
待计算边 L4
m
m
m
m
1.838
1.715
1.954
边L3 测量数据
边L2 测量数据
边L4 计算数据
二次勾股测量符号
测量物
发射点
L1
L2 L4
L3
【 7 电池电量指示
电池电量指示 当LCD显示屏上电池图标的段码全显示时,表示电池
满电;显示的段数减少,表示电量相对减少;当只有电池框显示时应及时
准备充电;充电时,段码会流动显示并且设备左侧的红色充电指示灯亮
起。当红色指示灯熄灭后,表明电池充满
自动关机 在电量过低时,LCD显示屏会提示低电量并倒计时关机
【 6 蓝牙状态指示
▲ 开机后屏幕顶部的蓝牙图标呈闪烁效果。蓝牙连接成功后,蓝牙图标
将不再闪烁
二次勾股(数据相减) 选到界面未测量时,黄色实线指示最终计算结果
的边;短按“测量结束将”开始测量测量时虚线表示即将测量的边,再次短
按得到测量数据。依次测量直角底边L1数据、L2数据和直角斜边L3数据。
量结束将自动计算出底边L4数据
1.722
边L1 测量数据
待计算边 L4
m
m
m
m
0.538
1.768
1.961
边L3 测量数据
边L2 测量数据
边L4 计算数据
二次勾股测量符号 测量物
发射点
L1
L2
L4
L3
14
产品名称: FNIRSI 40m智能测距仪
品牌/ 型号: 菲尼瑞斯/ FNIRSI-IR40
服务热线: 0755-83242477
生产商: 深圳市菲尼瑞斯科技有限公司
地址: 广东省深圳市龙华区大浪街道伟华达工业园C栋西边8楼
【 10 生产信息
警告! 初次使用产品前,请先仔细阅读安全条例和操作指南
▲ 在使用产品之前请仔细阅读本手册中的所有操作指南和安全条例,没有按
照本手册所指引的操作方法使用产品有可能会造成产品的损害、影响测量精
度、对使用者或他人造成人身伤害
▲ 不要用任何方式自行打开或修理产品,严禁非法改装或改变产品激光发射
器的性能。请妥善保管产品,不要放置在儿童可以接触到的地方,避免无关人
员的使用
▲ 严禁用产品激光器照射自己或他人的眼睛及身体其他部位严禁将激光器
照射在高反光的物体表面上
▲ 产品电磁辐射可能对其他设备和装置造成干扰请不要在飞机或医疗设备
附近使用本产品,不要在易燃易爆的环境中使用产品
▲ 产品更换的废旧电池和报废的产品不可与生活垃圾一同处理,请按国家或
者当地的相关法律规定处理废旧电池和报废产品
【 9 安全警告
【 8 错误代码
ERR01:硬件故障
ERR03:温度不正常
ERR05:无效的测量结果
ERR07:信号过强或过弱
ERR60:没有光返回或者硬件故障
ERR02:信号不稳定
ERR04:目标超出范围
ERR06:背景光太强
ERR30:不满足勾股定理
15
请在Google Play (安卓系统或 App Store(IOS系统)搜索
“RangeFinder”下载测距仪APP并安装授权使用。
在APP设备页面“+”进入搜索设备页面会自动搜索附近设备。
当出现测距仪图标后选择对应的设备即可成功添加并连接终端设备页面
蓝牙图标常亮。
【 11 连接APP
下载手册或固件
Download Manuals
and Firmware
  • Page 1 1
  • Page 2 2
  • Page 3 3
  • Page 4 4
  • Page 5 5
  • Page 6 6
  • Page 7 7
  • Page 8 8
  • Page 9 9
  • Page 10 10
  • Page 11 11
  • Page 12 12
  • Page 13 13
  • Page 14 14
  • Page 15 15
  • Page 16 16
  • Page 17 17
  • Page 18 18
  • Page 19 19
  • Page 20 20

Fnirsi IR40 ユーザーマニュアル

タイプ
ユーザーマニュアル

Fnirsi IR40は、プロフェッショナルグレードのレーザー距離計で、正確で信頼性の高い測定を行うことができます。内蔵されたBluetooth機能により、測定データをスマートフォンやタブレットにワイヤレスで送信できます。Fnirsi IR40は、建設、リフォーム、不動産、その他の用途に最適なツールです。

Fnirsi IR40の主な機能は次のとおりです。

  • 40メートルの測定範囲
  • ±2mmの測定精度
  • 面積、体積の計算
  • ピタゴラスの定理による間接測定
  • Bluetooth接続
  • 360度の画面回転
  • バックライト付きディスプレイ
  • 自動電源オフ機能

Fnirsi IR40は、現場での測定に最適なツールです。コンパクトで軽量なデザインで、持ち運びや保管が簡単です。また、頑丈な構造で、過酷な環境での使用にも耐えることができます。

他の言語で