
HR3865, HR3866
HR3868
© 2017 Koninklijke Philips N.V.
All rights reserved.
4240 002 02338
发布日期
:
2017-06-14
保留备用
EN User manual 7 SC 用户手册 18
ӝ φ伔⎜ᯏ⨼ᵰ
ශਭ φ HR3865, HR3868
仓ᇐ⭫ু φ 220V Њ
仓ᇐ仇⦽ φ 50 Hz
仓ᇐ䗉ޛࣕ⦽ φ 2000 W
⭕ӝᰛᵕ φ䈭㿷ӝᓋ䜞
ӝ൦ φѣളᒵђ൩
伔⎜δѣളεᣋ䍺ᴿ䲆ޢਮ
ޞള亴ᇘᵃࣗ✣㓵 : 4008 800 008
ᵢӝṯᦤളḽ GB4706.1-2005,
GB4706.30-2008 䙖
р⎭ᐸཟⴤ㾵䐥 218 ਭ 1602-1605
产品中有害物质的名称及含量
部件
名称
有害物质
铅
(
Pb
)
汞
(
Hg
)
镉
(
Cd
)
六价铬
Cr(VI)
多溴联苯
(
PBB
)
多溴二苯醚
(
PBDE
)
主机
x O x O O O
本表格依据
SJ/T 11364
的规定编制。
○
:
表示该有害物质在该部件所有均质材料中的含量均在
GB/T 26572
规定的限量要求以下。
×
:
表示该有害物质至少在该部件的某一均质材料中的含量超出
GB/T 26572
规定的限量要求。
1
a
b
c
d
f
e
g
m
i
jkl
HR3868
h
4
6
7
8
2
9
10
2
1
3
5

5
4
5 6
1
2 3
7
8
3
4
7
6
1
4
21
3
8
3
5
2
HR3868
6
2
3
1
4
4
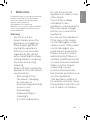
(MAX)
(MAX)
2 L
2 L
1.8 L
1.7 L
1.7 L
14 x
2 L 1 min.
1 min.
1 min.
1 min.
30 sec
4 min.
1.7
L2
min.
30 sec x3
600 g 30 sec
600
g3
min.
4 min.
7
200 g MIN
300 g MAX

7EN
English
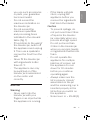
• Do not immerse the
appliance in water or any
other liquid.
• Check if the voltage
indicated on the
appliance corresponds to
the local mains voltage
before you connect the
appliance.
• Do not use the appliance
if the plug or the mains
cord is damaged or has
visible cracks. If the mains
cord is damaged, you
must have it replaced by
Philips, a service centre
authorized by Philips or
similarly qualied persons
in order to avoid a hazard.
• Make sure the lid and
measuring cup are
properly assembled to
the blender jar before you
use the appliance.
• This appliance shall not
be used by children. Keep
the appliance and its cord
out of reach of children.
1 Welcome
Congratulations on your purchase and
welcome to Philips! To fully benet
from the support that Philips oers,
register your product at
www.philips.com/welcome.
Read this user manual carefully before
you use the appliance and save it for
future reference.
Warning
• Do not touch the
sharp blades when the
appliance is plugged in.
If the blades get stuck,
unplug the appliance
before you remove the
ingredients. Be careful
when handling the sharp
cutting blades, emptying
the bowl and during
cleaning.
• Switch o and unplug the
appliance from the power
supply before:
- Removing it from
the stand, changing
accessories or
approaching parts that
move in use.
- Assembling,
disassembling or
cleaning it.
- It is left unattended.

8 EN
switching device, such as
a timer, or connected to
a circuit that is regularly
switched on and o by
the utility.
• Do not put the jar on the
main unit if the motor
coupling is still running.
• Do not take out the jar
from the main unit if
the blade is not totally
stopped.
• The blender can not be
used without load or
with a minimum quantity
of ingredient or liquid
(250 ml). Putting too less
ingredients or liquid can
cause damage to the
blender.
• The blender must be
operated with the rubber
pad. Do not remove the
rubber pad on top of the
motor unit.
Caution
• Never use any
accessories or parts from
other manufacturers or
that Philips does not
specically recommend. If
• This appliance can be
used by persons with
reduced physical, sensory
or mental capabilities or
lack of experience and
knowledge if they have
been given supervision
or instruction concerning
use of the appliance in
a safe way and if they
understand the hazards
involved.
• Children should be
supervised to ensure that
they do not play with the
appliance.
• Never assemble or
disassemble the blender
jar to the motor base
while the power is on.
• This appliance is
intended for household
use only.
• Read the cleaning
procedure from “User
Manual” before use.
• In order to avoid a hazard
due to inadvertent
resetting of the thermal
cut-out, this appliance
must not be supplied
through an external

9EN
English
• If the blade unit gets
stuck, unplug the
appliance before you
remove the ingredients
that block the blades.
Caution
• To prevent spillage, do
not put more than 2 litres
of liquid in the blender
jar, especially when you
process at a high speed.
Do not put more than
2 litres in the blender jar
when you process liquids
or ingredients that tend to
foam.
• Do not operate the
appliance for multiple
batches of recipes. Let
the appliance to cool
down for 30 minutes
before you continue
operating again.
• Always make sure the
lid is properly closed/
assembled on the jar
and the measuring cup is
inserted properly in the
lid before you switch on
the appliance.
• Noise level: Lc = 89 dB [A]
you use such accessories
or parts, your guarantee
becomes invalid.
• Do not exceed the
maximum indication on
the blender jar.
• Do not exceed the
maximum quantities
and processing times
indicated in the relevant
table (Fig. 7).
• If food sticks to the wall of
the blender jar, switch o
the appliance and unplug
it. Then use a spatula to
remove the food from the
wall.
• Never ll the blender jar
with ingredients hotter
than 40 °C.
• The appliance can only
be switched on if the
blender jar is assembled
on the motor unit
correctly.
Blender
Warning
• Never reach into the
blender jar with your
ngers or an object while
the appliance is running.

10 EN
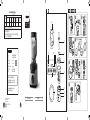
Control panel
h Speed selector (Rotary knob)
0: switch o the blender
1-10: switch on the blender and
select a blending speed
setting
P: pulse setting
i Program LED and button
Fruit & vegetable smoothie
Five grains & soy milk
Nuts
Soup
Ice crushing
j Overheat warning LED
k Timer (M:SS)
l Sleep LED
m Dome (HR3868 only)
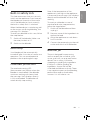
3 Before first use
Before you use the blender for the rst
time, thoroughly clean the parts that
come into contact with food.
If the timer shows “---”, turn the rotary
knob to speed 0 and place the jar on
the motor unit.
Electromagnetic elds
(EMF)
This Philips appliance complies with all
standards regarding electromagnetic
elds (EMF). If handled properly and
according to the instructions in this user
manual, the appliance is safe to use
based on scientic evidence available
today.
Recycling
Do not throw away the product with the
normal household waste at the end of its
life, but hand it in at an ocial collection
point for recycling. By doing this, you
help to preserve the environment.
2 Overview (Fig. 1)
Main unit
a Tamper
b Measuring cup
c Blender lid
d Blender jar
e Rubber pad
f Motor unit
g Power switch

11EN
English
Note: if the temperature of the
appliance is too high or the appliance
is overused, the message “Hot” displays
directly and the blender will also stop
working.
To reset your blender in case of
overload and auto stop protection,
follow the steps below:
1
Switch o the blender and then
unplug it.
2
Remove some of the ingredients to
reduce the load.
3
Allow the appliance to cool down
for 30 minutes.
4
Connect the power plug to the wall
outlet and switch on the blender.
Blender jar
The jar is designed for processing
various recipes like smoothie, juice,
sauce, grain milk, soup, puree, frozen
dessert, ice crushing, nut butter,
chopping or grinding dry ingredients.
If the jar is used for grinding dry
ingredients, the jar wall will be
scratched and become cloudy. There
is no negative impact on the blending
performance and no food safety
concern. It is still safe to use.
Built-in safety lock
This feature ensures that you can only
switch on the appliance if you have put
the blender jar correctly on the motor
unit. If the blender jar is put correctly,
the built-in safety lock is unlocked.
When the blender jar is not placing well
on the motor unit during blending, the
message “Err” displays.
To reset your blender in this case, follow
the steps below:
1
Switch o the blender. Make sure
the rotary knob is at “0”.
2
Switch on the blender.
Auto stop
Your blender will be automatically
turned o after 4 minutes of continuous
operation. This can avoid potential
problems due to prolonged usage.
Overload protection
The overheat warning LED
(thermometer icon) ashes when the
blender is overloaded. If the blender
continues working with heavy load,
the message “Hot” displays when it
is fully overloaded. The blender will
automatically stop working.

12 EN
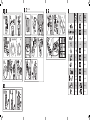
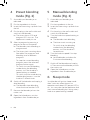
5 Manual blending
mode (Fig. 3)
1
Assemble your blender jar as
indicated.
2
Put the ingredients in the jar.
3
Insert the measuring cup and close
the lid.
4
Put the plug in the wall outlet and
switch on the blender.
5
Turn the knob to a speed setting as
needed.
» The blender starts blending.
» The timer starts counting up.
• To switch to pulse blending
mode during the blending
process, turn the knob to P
several times.
6
Turn the knob to speed 0 to stop
blending.
» Let the blender cool down for
5 minutes after blending.
7
Switch o the blender and unplug
it. Then remove the blender jar from
the motor unit.
8
Open the lid and pour out the
ingredients from the blender jar.
6 Sleep mode
Your blender will go into sleep mode
after 3 minutes when there is no
operation and sleep LED (power LED) is
on. You can wake up the appliance and
start manual blending by turning rotary
knob to a speed setting needed.
4 Preset blending
mode (Fig. 2)
1
Assemble your blender jar as
indicated.
2
Put the ingredients in the jar.
3
Insert the measuring cup and close
the lid.
4
Put the plug in the wall outlet and
switch on the blender.
» The timer shows 0:00 and
program LEDs turn on. The
appliance is ready to use.
5
Select a program by pressing a
program button on the panel.
» The blender starts blending as
programmed.
» The timer starts counting down.
• See table 1 for purposes and
blending time of dierent
programs.
• To stop the current blending
program, press the selected
program button again.
• To switch to manual blending
mode during the blending
process, turn the knob to a
speed setting as needed.
• To switch to pulse mode during
the blending process, turn the
knob to P several times.
6
Switch o the blender and unplug it
after blending.
» The blender stops blending
when the timer reaches 0:00.
7
Remove the blender jar from the
motor unit.
8
Open the lid and pour out the
ingredients from the blender jar.

13EN
English
9 Cleaning (Fig. 6)
Warning
• Before you clean the appliance, unplug it.
• Refer to Fig. 6 for information on cleaning the
parts with water, dishwashing machine and/or
moist cloth.
• Do not remove the rubber pad on top of the
motor unit.
Caution
• Make sure that the cutting edges of the blades
do not come into contact with hard objects.
This may cause the blade to get blunt.
• The cutting edges are sharp. Be careful when
you clean the blade units.
1
Clean the motor unit with a moist
cloth.
2
Clean the other parts in hot water
(< 60°C) with some washing-up
liquid or in a dishwasher.
3
Store the appliance and accessories
in a dry place after cleaning.
Quick cleaning
Follow the steps below to clean the
blender jar easier.
1
Pour lukewarm water (not more
than 1 liters) and a few drops of
washing-up liquid into the blender
jar.
2
Insert the measuring cup and close
the lid.
3
Turn the knob to speed 10. Let the
blender run for 30 seconds or until
the blender jar is clean.
4
After use, switch o the blender and
then unplug the appliance.
5
Remove the blender jar and rinse it
with clean water.
7 Use the tamper
(Fig. 4)
You can use the tamper to process
very thick mixtures or recipes with less
liquid which cannot be processed well
in a normal blender, e.g. nut butters,
frozen dessert or puree vegetables. The
tamper helps circulation by preventing
air formed.
The tamper is used to stir and push
ingredients into the blades when the
blender is on.
Note: Use the tamper only when the lid
is assembled correctly to the jar to avoid
tamper hitting the blades.
Tips: You can move the tamper up and
down, turn around or push it toward
the side or corner of the jar to help
ingredients circulate.
8 Use the dome
(HR3868 only)
(Fig. 5)
You can use the dome to reduce the
noise during blending.
Follow the steps to assemble and use
the dome as indicated in g. 5.

14 EN
10 Guarantee and service
If you have a problem, need service, or need information, see www.philips.com/
support or contact the Philips Consumer Care Center in your country. The phone
number is in the worldwide guarantee leaet. If there is no Consumer Care Center in
your country, go to your local Philips dealer.
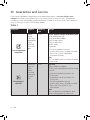
Table 1
Program Purpose Blending
time
Recipe
Fruit & vegetable
Smoothie
Blend
whole
fruits and
vegetables
to get
both the
juice and
ber
1 min Carrot, apple, orange and celery juice
400g peeled orange
400g quartered apple
250g sliced carrots
250g sliced celery
300ml water
15g honey
1. Put all ingredients into jar.
2. Insert measuring cup and close lid.
3. Press the “Fruit & vegetable
smoothie” button.
Tips:
You can add some ice cubes to obtain
a cool juice
Five grains &
soy milk
Blend any
types of
grains,
beans,
nuts and
water into
smooth
milk
2 min Soy milk
450g soaked soy beans
1250ml room temperature water Sugar
to taste
1. Cook the soaked soy beans for
20 minutes.
2. Drain beans and cool down for
15 minutes.
3. Put all ingredients into jar.
4. Insert measuring cup and close lid.
5. Press the “Five grains & soy
milk”button.
Tips:
You can precook more beans and
store in refrigerator for later use.

15EN
English
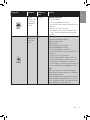
Program Purpose Blending
time
Recipe
Nuts
Grind
whole nuts
into nely
chopped
result
30 sec Ground almonds
200g almonds
1. Put all ingredients into jar.
2. Insert the measuring cup and close
the lid.
3. Press the “Nuts” button.
4. To obtain a oury result, press the
“Nuts” button again after program
stops.
Soup
Blend
vegetables
into silky
soup
4 min Creamy tomato soup
750g quartered tomatoes
160g sliced carrots
700ml stock
½ tbsp white wine vinegar
Salt and pepper to taste
1. Put all ingredients into jar.
2. Insert the measuring cup and close
the lid.
3. Press the “Soup” button.
4. When the program stops, take out
the jar and remove the lid. Pour out
soup into a cooking pot. Cook for
15 minutes or until it is hot enough to
serve. Add salt and pepper to taste.
Tips:
You can tune your soup by adding
1 tbsp fresh thyme leaves or a handful
of fresh basil leaves.
When preparing soups with extremely
hard ingredients (like bones of some
sh), suggest to lter out and discard
any hard pieces left in the jar.

16 EN
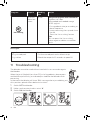
Program Purpose Blending
time
Recipe
Ice crushing
Crush ice
within few
pulses
30 sec Mango and yoghurt with crushed ice
14 pieces ice cubes
240g peeled and seeded mango
200ml yoghurt
1. Put ingredients into jar according to
above sequence.
2. Insert measuring the cup and close
the lid.
3. Press the “Ice crushing” button.
Tips:
You can press the “Ice crushing”
button again to obtain a smoother
result.
Recipe:
Ingredients:
950 g minced pork
20 g scallion
Procedure:
1. Put the minced pork and scallion into jar.
2. Blend the recipe for 10 seconds at speed 10.
11 Troubleshooting
The blender cannot be used without load which can cause damage to
the blender.
When the jar is lled with less than 250 ml of ingredients, please press
and hold the jar lid rmly (as indicated) to stabilize the blender while
processing.
In the event that display will show “Err” message due to jar wobbling out
of its position, please follow below instructions:
1
Switch OFF the blender.
2
Make sure the rotary knob is set at “0”.
3
Switch ON the blender.
1
3
2

17EN
English
Problem Solution
Why does the jar
become scratched
and cloudy?
If the jar is used for grinding dry ingredients, the jar wall will be
scratched and become cloudy. There is no negative impact on the
blending performance and no food safety concern. It is still safe to use.
Why do the
ingredients become
warm after blending?
This is a high speed blender so processing time is faster than a
normal blender. You can use the preset blending mode or shorten the
blending time under manual blending mode to avoid over blending
and warming.
When the blender
stops working and
the message “Hot”
displays, what does it
mean?
The overheat warning LED (thermometer icon) ashes when the
blender is overloaded. If the blender continues working with heavy
load, the message “Hot” displays when it is fully overloaded. The
blender will automatically stop working.
Note: if the temperature of the appliance is too high or the appliance is
overused, the message “Hot” displays directly and the blender will also
stop working.
To reset your blender in case of overload and auto stop protection,
follow the steps below:
1
Switch o the blender and then unplug it.
2
Remove some of the ingredients to reduce the load.
3
Allow the appliance to cool down for 30 minutes.
4
Connect the power plug to the wall outlet and switch on the blender.

18
ZH-S
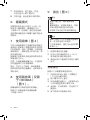
•
使用产品之前,要确保杯盖
和量杯已正确组装至搅拌
杯上。
•
儿童不得使用本产品。应将
产品及其线缆置于儿童触及
不到的地方。
•
本产品适合由肢体不健全、
感觉或精神上有障碍或缺乏
相关经验和知识的人士使
用,但前提是有人对他们使
用本产品进行监督或指导,
以确保他们安全使用,并且
让他们明白相关的危害。
•
应照看好儿童,避免他们玩
耍本产品。
•
切勿在通电时在马达底座上
拆装搅拌杯。
•
本产品仅限于家用。
•
使用之前,请阅读“用户手
册”中的清洁步骤。
•
为避免因不慎重置过热保护
装置而发生危险,切勿通过
外部切换设备(例如定时
器)为本产品供电,也不要
连接到具有定期开关切换功
能的电路。
•
请勿在马达耦合装置仍运行
时将搅拌杯置于主装置上。
•
请勿在刀片未完全停止时从
主装置上取下搅拌杯。
•
如果未放入食材或液体,或
者未达到最低份量(
250
毫
升),则搅拌机无法使用。
1 欢迎使用
恭喜您购买了您的产品,欢迎您来到
Philips
大家庭!
为了让您能充分享受
飞利浦提供的支持,请在
www.philips.com/welcome
上注册您
的产品。
使用本产品之前,请仔细阅读本使用说
明书,并妥善保管以备日后参考。
警告
•
产品通电时切勿触摸锋利的
刀片。如果刀片被卡住,请
先拔下电源插头再清除原
料。拿取锋利的切割刀片、
清空加工杯和清洁时要非常
小心。
•
执行以下操作之前请关闭产
品并拔出电源插头:
- 将其从底座中取下、更
换附件或接触在使用时
会活动的部件。
- 安装、拆卸或清洁。
- 产品处于无人看管状态。
•
不要将本产品浸入水中或任
何其它液体中。
•
在将产品连接电源之前,请
先检查产品所标电压与当地
的供电电压是否相符。
•
如果插头或电源线保护盖损
坏或有明显破裂,请勿使用
产品。如果电源线损坏,为
避免危险,必须由飞利浦或
其授权的服务中心,或类似
的专职人员来更换。

19
ZH-S
简体中文
警告
•
为避免溅出,搅拌杯中的
液量不要超过
2
升,尤其是
以高速加工时。在加工液体
或容易起泡的原料时,请不
要在搅拌杯中装入超过
2
升
的量。
•
请勿使用该产品加工多批菜
品。先让产品冷却
30
分钟,
然后再继续运行。
•
在打开产品电源之前,应始
终确保杯盖已正确关闭
/
安
装在搅拌杯上,量杯也正确
插入盖子中。
•
噪音强度:
Lc = 89 dB [A]
电磁场 (EMF)
本飞利浦产品符合与电磁场
(EMF)
相
关的所有标准。目前的科学依据证明,
如果正确使用并根据本用户手册中的说
明进行操作,则本产品是安全的。
回收
弃置产品时,请不要将它与一般生活垃
圾一同丢弃,应将其交给官方指定的回
收中心。这样做有利于环保。
如果食材或液体放入过少,
则可能损坏搅拌机。
•
搅拌机必须通过橡胶垫进行
操作。切勿取下马达组件顶
部的橡胶垫。
警告
•
切勿使用由其它制造商生产
的,或未经飞利浦特别推荐
的任何附件或部件。如果使
用此类附件或部件,您的保
修将失效。
•
不要超出搅拌杯上所标注的
最大刻度。
•
不要超出相关表中所示的最
大份量和加工时间(图
7
)。
•
如果食物粘在搅拌杯杯壁
上,请关闭产品并拔下电源
插头。然后使用刮铲去除杯
壁上的食物。
•
切勿将温度超过
40 °C
的原
料装入搅拌杯。
•
只有在搅拌杯已正确安装在
马达装置上后,才能打开产
品电源。
搅拌机
警告
•
在产品运转时,切勿将手指
或其它物体伸入搅拌杯中。
•
如果刀片组件被卡住,请先
拔下电源插头,然后清除堵
塞刀片的原料。

20
ZH-S
3 首次使用之前
首次使用本搅拌机之前,请彻底清洁与
食物接触的部件。
如果定时器显示“
---
”,则将旋钮调
至速度
0
,然后将搅拌杯置于马达组
件上。
内置安全锁
此功能可确保您只有将搅拌杯正确放置
在马达装置上,才可以打开产品。如
果搅拌杯放置正确,则内置安全锁将
被解锁。
此功能可确保您只有将搅拌杯正确
安装在马达装置上时,才可以打开产
品。如果搅拌杯放置正确,则内置
安全锁将被解锁。
在搅拌过程中,如果未将搅拌杯正确
放置到马达组件上,将出现“
Err
”
(错误)消息。
要在此情况下重置搅拌机,请按照以下
步骤操作:
1
关闭搅拌机。
确保旋钮位于“
0
”
2
打开搅拌机。
自动停止
搅拌机在连续工作
4
分钟后将自动关
闭。这可避免因长时间使用而导致的潜
在问题。
过载保护
搅拌机内过载时,过热警告
LED
(温度计图标)会闪烁。
如果搅拌机
持续重负荷工作,在其完全过载时会显
示“
Hot
”(过热)消息。
搅拌机将自
动停止工作。
2 概述
(
图 1
)
主装置
a 捣棒
b 量杯
c 搅拌杯盖
d 搅拌杯
e 橡胶垫
f 马达组件
g 电源开关
控制面板
h 调速旋钮
(
旋转式按钮
)
0
:
关闭搅拌机
1-10
:
打开搅拌机并选择搅拌速
度档
P
:
暂动设置
i 预设程序 LED 和按钮
果蔬冰昔
五谷和豆浆
坚果
汤
碎冰
j 过热警告 LED
k 定时器
(
分
:
秒
)
l 睡眠模式 LED
m 隔音罩
(
仅限于 HR3868
)

21
ZH-S
简体中文
•
要了解不同程序的用途和搅拌
时间,请参阅表
1
。
•
要停止当前搅拌程序,请再次
按选定的程序按钮。
•
要在搅拌过程中切换至手动搅
拌模式,请根据需要将旋钮调
至相应速度档。
•
要在搅拌过程中切换至暂动模
式,请将旋钮多次调至
P
档。
6
搅拌后,先关闭搅拌机,再拔下
插头。
» 当定时器达到
0:00
时,搅拌机
会停止搅拌。
7
从马达组件上卸下搅拌杯。
8
打开杯盖,倒出搅拌杯中的原料。
5 手动搅拌模式
(
图 3
)
1
按照图示组装好搅拌杯。
2
将物料放入搅拌杯中。
3
插入量杯并关上盖子。
4
将插头接入电源插座,打开
搅拌机。
5
根据需要将旋钮调至相应速度档。
» 搅拌机将开始搅拌。
» 定时器将开始计时。
•
要在搅拌过程中切换至暂动搅
拌模式,请将旋钮多次调至
P
档。
6
将旋钮调至速度
0
可停止搅拌。
» 搅拌后,让搅拌机冷却
5
分钟。
注意:如果产品的温度过高或使用时间
过久,则会直接显示“
Hot
”(过热)
消息,且搅拌机将停止工作。
要在过载和自动停止保护时重置搅拌
机,请按以下步骤操作:
1
关闭搅拌机,然后拔下插头。
2
取出部分原料以减少负载。
3
让产品冷却
30
分钟。
4
将电源插头连接至插座,然后打开
搅拌机。
搅拌杯
搅拌杯设计用于处理多种食谱像冰昔、
果汁、酱汁、谷牛奶、汤、菜泥、冷冻
的甜点、碎冰、坚果酱、切碎或碾磨
干物料。
如果搅拌杯用于碾磨干物料,则杯壁将
被刮花且变混浊。不会影响搅拌性能且
无需担心食品安全。它仍可安全使用。
4 预设搅拌模式
(
图 2
)
1
按照图示组装好搅拌杯。
2
将物料放入搅拌杯中。
3
插入量杯并关上盖子。
4
将插头接入电源插座,打开
搅拌机。
» 定时器会显示
0:00
,预设程序
LED
会亮起。产品即可使用。
5
按面板上的程序按钮,选择程序。
» 搅拌机会按照设定开始搅拌。
» 定时器开始倒数计时。

22
ZH-S
9 清洁
(
图 6
)
警告
•
清洁产品之前,请先拔掉电源
插头。
•
请参阅图
6
,获得有关用水、洗碗
机和
/
或湿布清洁部件的信息。
•
切勿取下马达组件顶部的橡胶垫。
警告
•
确保刀片的刀刃不会接触到坚硬物
体。这可能会使刀片变钝。
•
刀刃非常锋利。清洁刀片组件时要
非常小心。
1
用湿布清洁马达装置。
2
在加少许洗涤液的热水
(< 60
°
C)
或洗碗机中清洁其他部件。
3
清洁后将本产品和附件放在干燥的
地方。
快速清洁
按照以下步骤更易清洁搅拌杯。
1
向搅拌杯中倒入温水(不要超过
1
升)和几滴洗涤剂。
2
插入量杯并关上盖子。
3
将旋钮调至速度
10
。让搅拌机运行
30
秒或直至搅拌杯清洗干净。
4
使用后,关闭搅拌机,然后拔下产
品插头。
5
卸下搅拌杯并用清水冲洗。
7
关闭搅拌机,拔下插头。然后,
从马达组件上卸下搅拌杯。
8
打开杯盖,倒出搅拌杯中的原料。
6 睡眠模式
如果搅拌机未运行时间达
3
分钟,则
其将进入睡眠模式,睡眠模式
LED
(电源
LED
)会亮起。通过将旋钮调
至所需的速度档可以唤醒产品并开始手
动搅拌。
7 使用捣棒
(
图 4
)
您可以使用捣棒加工极稠的混合物或含
液体较少的食物(普通搅拌机无法搅拌
均匀的食物,例如,坚果酱、冷冻甜品
或蔬菜泥)。捣棒可防止形成气泡,有
助于食物流动。
捣棒用于在搅拌机开启后搅拌原料并将
其推送到刀片上。
注意:为避免捣棒碰撞刀片,仅当搅拌
杯杯盖盖好时方可使用捣棒。
提示:您可以上下移动、转动捣棒或
将其向搅拌杯的边角推动,这样有助于
原料流动。
8 使用隔音罩
(
仅限
于 HR3868
)
(
图 5
)。
用隔音罩可以降低搅拌时的噪音。
按照以下步骤组装并使用隔音罩
(如图
5
所示)

23
ZH-S
简体中文
10 保修与服务
如果您有问题,需要服务或信息,请访问
www.philips.com/support
或联系您所
在国家或地区的飞利浦客户服务中心。在全球保修卡中可找到其电话号码。如果您
所在的国家
/
地区没有飞利浦客户服务中心,请向当地的飞利浦经销商求助。
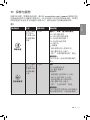
表 1
预设程序 作用 搅拌时间 推荐食谱
果蔬冰昔
对整个果蔬
进行榨汁,
以获得汁液
并保留果蔬
纤维
1
分钟
胡萝卜
、
苹果
、
橙子和芹菜汁
400
克去皮的橙子
400
克分成四份的苹果
250
克切成片的胡萝卜
250
克切成片的芹菜
300
毫升水
15
克蜂蜜
1.
将所有原料放入搅拌杯中。
2.
插入量杯并合上盖子。
3.
按下”水果和蔬菜冰昔”按钮。
使用提示
:
您可以添加一些冰块获得凉爽的
果汁。
五谷和豆浆
将任一类谷
物、豆子、
坚果和水搅
拌成顺滑的
汁液
2
分钟 豆浆
450
克泡软的大豆
1250
毫升室温水
加糖调味
1.
将泡软的大豆烹制
20
分钟。
2.
沥干大豆并冷却
15
分钟。
3.
将所有原料放入搅拌杯中。
4.
插入量杯并合上盖子。
5.
按下”五谷和豆浆”按钮。
使用提示
:
您可以预先烹饪更多大豆并将其存
放在冰箱中保存,以备日后使用。

24
ZH-S
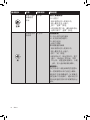
预设程序 作用 搅拌时间 推荐食谱
坚果
将整个坚果
研磨成切
碎状
30
秒 将杏仁碾磨成粉
200
克杏仁
1.
将所有原料放入搅拌杯中。
2.
插入量杯并合上盖子。
3.
按下“坚果”按钮。
4.
欲获得粉质口感,请在程序停止
后再次按下”坚果”按钮。
汤
将蔬菜搅拌
到汤中
4
分钟 奶油番茄汤
750
克分成四份的番茄
160
克切成片的胡萝卜
700
毫升汤料
½
汤匙白酒醋
调味用食盐和辣椒
1.
将所有原料放入搅拌杯中。
2.
插入量杯并合上盖子。
3.
按下“汤”按钮。
4.
程序停止时,取出搅拌杯,取下
盖子。
将汤倒入烹饪锅。烹煮
15
分钟,或直至其足够热,以便
上菜。加入盐和胡椒粉调味。
使用提示
:
您可以添加
1
汤匙新鲜的百里香叶
或一把鲜罗勒叶来对汤进行调味。
准备制作含有很硬食材(比如某些
鱼的鱼骨)的汤类时,建议将任何
搅拌后残留在搅拌杯中的硬物滤出
丢弃。
ページが読み込まれています...
ページが読み込まれています...
-
 1
1
-
 2
2
-
 3
3
-
 4
4
-
 5
5
-
 6
6
-
 7
7
-
 8
8
-
 9
9
-
 10
10
-
 11
11
-
 12
12
-
 13
13
-
 14
14
-
 15
15
-
 16
16
-
 17
17
-
 18
18
-
 19
19
-
 20
20
-
 21
21
-
 22
22


他の言語で
- English: Philips HR3865/00 User manual
