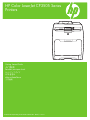
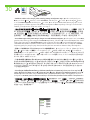
HP Color LaserJet CP3505 Printer series クイックスタートガイド
- タイプ
- クイックスタートガイド

HP Color LaserJet CP3505 Series
Printers
Getting Started Guide
入门指南
Panduan persiapan Awal
セットアップ ガイド
시작 설명서
入門指南
0089/1.824.51
Terdaftar di Deperindag Provinsi DKI Jakarta No :

版权与许可
© 2007 版权所有 Hewlett-Packard Development
Company, L.P.
未经事先书面许可,严禁进行任何形式的复制、改
编或翻译,除非版权法另有规定。
此处包含的信息如有更改,恕不另行通知。
HP 产品和服务的所有保修事项已在产品和服务所附
带的保修声明中列出,此处内容不代表任何额外保
修。HP 公司对此处任何技术性或编辑性的错误或遗
漏概不负责。
部件号:CB441-90905
第 1 版,2007 年 3 月
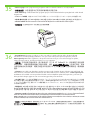
FCC 规则
经测试,本设备符合 FCC 规则第 15 部分对 B 类
数字设备的限制规定。这些限制旨在合理地避开居
住环境中的有害干扰。本设备可以产生、利用并发
射无线射频能量。如果不按说明中的要求安装和使
用本设备,有可能对无线电通信产生有害干扰。但
也不能保证在特定的安装中不会产生干扰的问题。
如果本设备确实对无线电或电视接收造成干扰(可
以通过开关设备来确定),请采取以下一种或多种
措施排除干扰:
• 重新调整接收天线的方向或位置。
• 增加设备和接收器之间的距离。
• 将本设备电源插座与接收器电源的插座设在不同
的电路上。
• 咨询代理商或经验丰富的无线电/电视技术人员。
未经 HP 公司的明确同意而擅自更改或改动本打印
机,将取消用户对此设备的操作权限。根据 FCC 规
则第 15 部分中的 B 类限制规定,需要使用屏蔽的
接口电缆。有关更多规范信息,请参阅 HP Color
LaserJet CP3505 电子版用户指南。
Hewlett-Packard 对任何据称与提供或使用本信息
的行为有关的直接、间接、偶发性、继发性或其他
损失概不负责。
商标声明
Microsoft® 和 Windows® 是 Microsoft
Corporation 在美国的注册商标。
Copyright and License
© 2007 Copyright Hewlett-Packard Development Company, L.P.
Reproduction, adaptation or translation without prior written
permission is prohibited, except as allowed under the
copyright laws.
The information contained herein is subject to change
without notice.
The only warranties for HP products and services are set
forth in the express warranty statements accompanying such
products and services. Nothing herein should be construed as
constituting an additional warranty. HP shall not be liable for
technical or editorial errors or omissions contained herein.
Part number: CB441-90905
Edition 1, 3/2007
FCC Regulations
This equipment has been tested and found to comply with the
limits for a Class B digital device, pursuant to Part 15 of the
FCC rules. These limits are designed to provide reasonable
protection against harmful interference in a residential
installation. This equipment generates, uses, and can radiate
radio-frequency energy. If this equipment is not installed and
used in accordance with the instructions, it may cause
harmful interference to radio communications. However, there is
no guarantee that interference will not occur in a particular
installation. If this equipment does cause harmful interference
to radio or television reception, which can be determined by
turning the equipment off and on, correct the interference by
one or more of the following measures:
• Reorient or relocate the receiving antenna.
• Increase separation between equipment and receiver.
• Connect equipment to an outlet on a circuit different from that
to which the receiver is located.
• Consult your dealer or an experienced radio/TV technician.
Any changes or modifications to the printer that are not
expressly approved by HP could void the user’s authority to
operate this equipment. Use of a shielded interface cable is
required to comply with the Class B limits of Part 15 of FCC
rules. For more regulatory information, see the
HP Color LaserJet CP3505 electronic user guide.
Hewlett-Packard shall not be liable for any direct, indirect,
incidental, consequential, or other damage alleged in
connection with the furnishing or use of this information.
Trademark Credits
Microsoft® and Windows® are U.S. registered trademarks of
Microsoft Corporation.

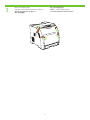
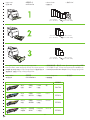
1
2
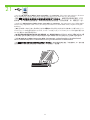
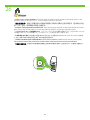
21.5 Kg.
47.4 lbs.
22
9
m
m
(
9
in
)
89
m
m
(
3.
5 in
)
35
6
mm
(1
4 in
)
89
m
m
(
3.
5
in)
1
7
8
mm
(
7 in
)
17° - 25°C
(62.6° - 77°F)
1
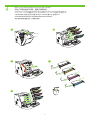
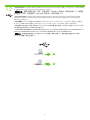
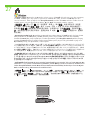
• Unpack the printer.
• Select a sturdy, well-ventilated, dust-free area to position the printer.
• 打开打印机的包装。
• 选择一个稳固、通风良好、无尘的地方放置打印机。
• Membongkar printer.
• Pilih tempat yang kokoh, berventilasi baik dan bebas debu untuk menaruh printer.
• プリンタの梱包を開きます。
• 安定していて換気がよく、ほこりが少ない場所を選んでプリンタを設置します。
• 프린터 포장을 풉니다.
• 표면이 평평하고 통풍이 잘 되며 먼지가 없는 곳에 프린터를 놓습니다.
•
•
• 拆開印表機包裝。
• 請選擇穩固、通風良好、無灰塵的區域來放置裝置。

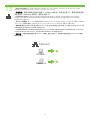
3
2
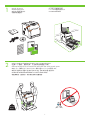
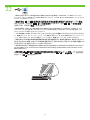
• Remove all shipping tape.
• 取下所有装运胶带。
• Lepaskan semua pita rekat kemasan pengiriman.
• 保護テープをすべて取り外します。
• 포장용 테이프를 모두 제거합니다.
•
• 撕下所有的膠帶。

4
1 2
3 4
5
3
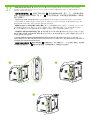
• Remove print cartridge shipping locks and reinstall cartridges.
• 取出打印碳粉盒的装运锁,重新安装碳粉盒。
• Lepaskan kunci kemasan pengiriman kartrid cetak kemudian pasang kembali kartridnya.
• プリント カートリッジの保護キャップをすべて取り外し、カートリッジを取り付け直します。
• 카트리지에서 포장용 잠금 장치를 제거한 후 카트리지를 다시 설치합니다.
•
• 取出碳粉匣的裝運固定鎖,然後重新安裝。

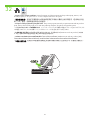
5
6
4
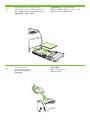
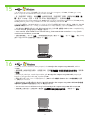
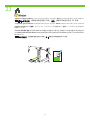
• Adjust paper guides, and load print media.
• Install the output bin.
• 调整纸张导板,并装入打印介质。
• 安装出纸槽。
• Atur pemandu kertas lalu masukkan media cetak.
• Pasang nampan keluaran.
• 用紙ガイドを調整して、印刷メディアをセットします。
• 排紙ビンを取り付けます。
• 용지 조정대를 조정한 후 인쇄 용지를 넣습니다.
• 출력 용지함을 설치합니다.
•
•
• 調整紙張導板,並裝入列印紙材。
• 安裝出紙槽。

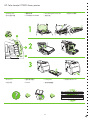
7
8
1 2
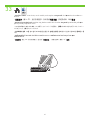
5
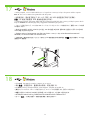
• Connect the power cord and turn on the printer.
• Attach control panel overlay (if neccessary).
• Do not connect USB until the
software prompts you.
• 连接电源线,并打开打印机电源。
• 安装控制面板贴面(如有必要)。
• 切勿连接 USB 直到软件提
示您这样做。
• Hubungkan kabel listrik lalu hidupkan printer.
• Pasang lapisan panel kontrol (jika perlu).
• Jangan hubungkan USB sampai
perangkat lunak memunculkan
prompt.
• 電源コードを接続し、プリンタの電源を入れます。
• 必要に応じて、コントロール パネルにオーバーレイを貼
り付けます。
• ソフトウェアが要求するまでは、
USB を接続しないでください。
• 전원 코드를 연결한 후 프린터를 켭니다.
• 제어판 오버레이를 부착합니다(필요한 경우).
• 소프트웨어에서 표시할 때까지
USB를 연결하지 마십시오.
•
•
• USB
• 插入電源線,並開啟印表機電源。
• 貼上控制面板貼紙 (如有需要)。
• 請勿在軟體出現提示之前
連接 USB 纜線。

9
10
2
1
3
6
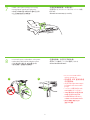
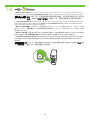
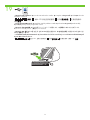
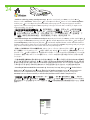
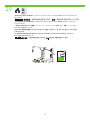
• Set default language and location.
• Control-panel features. 1) Use the and buttons to select the menu options. 2) Press to accept the selection.
3) Press Cancel to return to the Ready screen.
• Note: If control-panel display is blank with no light or text, go to step 37 (Blank Display).
• 设置默认语言和位置。
• 控制面板功能。1)使用 和 按钮选择菜单选项。2)按 接受所作选择。3)按取消返回到
就绪屏幕。
•
注意:如果控制面板显示屏为空白,没有指示灯亮起也没有显示文本,请转至步骤 37(空白显示屏)。
• Setel bahasa standar dan lokasi.
• Fitur-fitur panel kontrol. 1) Gunakan tombol dan untuk memilih berbagai opsi menu. 2) Tekan untuk menerima
pilihan. 3) Tekan Batal untuk kembali ke layar Ready [Siap].
• Catatan: Jika layar panel kontrol kosong tanpa cahaya atau teks, lanjutkan ke langkah 37 (Layar Kosong).
• デフォルトの言語と国/地域を設定します。
• コントロール パネルの操作方法 。 1) ボタンと ボタンを使って、メニュー オプションを選択します。2) を押して、選
択項目を決定します。3) [キャンセル] ボタンを押すと、[準備完了] 画面に戻ります。
• 注記:コントロール パネルにランプやテキストが表示されない場合は、手順 37 (電源を入れてもプリンタに何も表示され
ない場合) に進みます。
• 기본 언어 및 위치를 설정합니다.
• 제어판 기능. 1) 및 버튼을 사용하여 메뉴 옵션을 선택합니다. 2) 표시를 눌러 선택한 옵션을 적용합니다.
3) 취소를 누르면 준비 화면으로 돌아갑니다.
•
주: 제어판에 표시등이나 텍스트가 표시되지 않는 경우 37단계의 "시작했으나 아무것도 표시되지 않는 경우"를 참조하십시오.
•
• 1) 2) 3)
• 37
• 設定預設語言和位置。
• 控制面板功能。1) 使用 和 按鈕選擇功能表選項。2) 按下 以接受選擇。3) 按下「取消」以返回「就緒」
畫面。
• 註:如果控制面板顯示幕為空白,沒有亮燈或文字,請前往步驟 37 (空白顯示幕)。

11
7
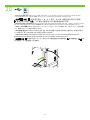
• Set the media size and type. At the control-panel, press Menu , use the and buttons to scroll to Paper Handling,
and then press to select the tray to configure. Set the Type and Size for each tray by using the and buttons.
Press to select the settings.
• 设置介质尺寸和类型。在控制面板上,按菜单,使用 和 按钮滚动到纸张处理,然后按
选择要配置的纸盘。设置每个纸盘的类型和尺寸,方法是使用 和 按钮。按 选择
设置。
• Setel ukuran dan jenis media. Pada panel kontrol, tekan Menu, gunakan tombol dan untuk menggulir ke
Penanganan Kertas lalu tekan untuk memilih baki yang akan dikonfigurasi. Setel Jenis dan Ukuran untuk tiap baki
dengan menggunakan tombol dan . Tekan untuk memilih pengaturan.
• 用紙のサイズとタイプを設定します。コントロール パネルで、[メニュー] ボタンを押し、 ボタンと ボタンを使って
[用紙処理] メニューまでスクロールし、 を押して設定するトレイを選択します。 と ボタンを使って、トレイごとに
[タイプ] と [サイズ] を設定します。 を押して 選択項目を決定します。
• 용지 크기 및 종류 설정. 제어판에서 메뉴를 누르고 및 버튼을 사용하여 용지 취급을 찾은 후 표시를 눌러
구성할 용지함을 선택합니다. 각 용지함에 종류 및 크기를 설정하려면 및 버튼을 사용합니다. 표시를 눌러
설정을 선택합니다.
•
• 設定紙材尺寸及類型。在控制面板上,按下「功能表」,使用 和 按鈕捲動至「紙張處理」,然後按下 以選
擇要設定的紙匣。使用 和 按鈕,為每個紙匣設定「類型」及「尺寸」。按下 以選擇設定。

12
Windows
Macintosh
14
19
8
• USB Installation. To install software for Windows by using a direct connection (USB), go to step 14. To install software
for Macintosh by using a direct connection (USB), go to step 19.
• USB 安装。要使用直接连接 (USB) 安装适用于 Windows 的软件,请转至步骤 14。要使用
直接连接 (USB) 安装适用于 Macintosh 的软件,请转至步骤 19。
• Penginstalan USB. Untuk menginstal perangkat lunak Windows dengan menggunakan koneksi langsung (USB),
lanjutkan ke langkah 14. Untuk menginstal perangkat lunak Macintosh dengan menggunakan koneksi langsung,
lanjutkan ke langkah 19.
• USB の接続 。 ダイレクト接続 (USB) を使用して Windows にソフトウェアをインストールするには、手順 14 に進みま
す。ダイレクト接続 (USB) を使用して Macintosh にソフトウェアをインストールするには、手順 19 に進みます。
• USB 설치. 직접 연결(USB)을 사용하여 Windows용 소프트웨어를 설치하려면 14단계로 이동하고, Macintosh용 소
프트웨어를 설치하려면 19단계로 이동하십시오.
• USBWindowsUSB14
MacintoshUSB19
• USB 安裝。若要使用直接連線 (USB) 安裝 Windows 的軟體,請前往步驟 14。若要使用直接連線 (USB) 安裝
Macintosh 的軟體,請前往步驟 19。

13
Macintosh
Windows
Network
29
23
9
• Network Installation. To install software for Windows by using a network connection, go to step 23. To install
software for Macintosh by using a network connection, go to step 29.
• 网络安装。要使用网络连接安装适用于 Windows 的软件,请转至步骤 23。要使用网络连接
安装适用于 Macintosh 的软件,请转至步骤 29。
• Penginstalan Jaringan. Untuk menginstal perangkat lunak Windows dengan menggunakan koneksi jaringan,
lanjutkan ke langkah 23. Untuk menginstal perangkat lunak Macintosh dengan menggunakan koneksi jaringan,
lanjutkan ke langkah 29.
• ネットワークの接続 。 ネットワーク接続を使用して Windows にソフトウェアをインストールするには、手順 23 に進みま
す。ネットワーク接続を使用して Macintosh にソフトウェアをインストールするには、手順 29 に進みます。
• 네트워크 설치. 네트워크 연결을 사용하여 Windows용 소프트웨어를 설치하려면 23단계로 이동하고, Macintosh용
소프트웨어를 설치하려면 29단계로 이동하십시오.
• Windows23
Macintosh29
• 網路安裝。若要使用網路連線安裝 Windows 的軟體,請前往步驟 23。若要使用網路連線安裝 Macintosh 的軟體,
請前往步驟 29。

10
14
• Windows USB installation. Insert the CD, and follow the onscreen instructions. Do not plug in the USB cable until
prompted by the software. Note: If New Hardware Found appears, insert the CD and follow the onscreen instructions.
•
Windows USB 安装。插入 CD,然后按照屏幕上的说明进行操作。在出现软件提示之前,请不要
插入 USB 电缆。注意:如果出现找到了新硬件,则插入 CD,然后按照屏幕上的说明进行操作。
• Penginstalan USB Windows. Masukkan CD, kemudian ikuti petunjuk pada layar. Jangan memasangkan kabel USB
sampai diperintahkan oleh perangkat lunak. Catatan: Jika New Hardware Found [Ditemukan Perangkat Keras Baru]
muncul, masukkan CD lalu ikuti petunjuk pada layar.
• Windows での USB 接続 。 CD を挿入して、画面の指示に従います。ソフトウェアが要求するまでは、USB ケーブルを接
続しないでください。注記:[新しいハードウェアが見つかりました] というメッセージが表示されたら、CD を挿入して画
面の指示に従います。
• Windows USB 설치. CD를 넣고 화면 위의 지시사항에 따릅니다. 소프트웨어에서 표시하기 전까지는 USB 케이블
을 꽂지 마십시오. 주: 새 하드웨어 발견이 표시되면 CD를 넣고 화면에 표시되는 지시를 따르십시오.
•
USBWindowsUSB
New Hardware Found
• Windows USB 安裝。插入 CD,然後按照螢幕上的指示進行。請勿在軟體出現提示之前插入 USB 電纜。註:如果出
現「找到新硬體」,請插入 CD,然後按照螢幕上的指示進行。

11
15
16
• On the Welcome screen, click Install. If the welcome screen does not appear, click Start, click Run, type x:setup
(where x represents the CD-ROM drive letter), and then click OK.
• Follow the onscreen instructions. When prompted, select Directly to this computer using a USB cable, and then
click OK.
• 按照屏幕上的说明进行操作。出现提示时,选择使用 USB 电缆直接连接至此计算机,然后单
击确定。
• 在“欢迎使用”屏幕上,单击安装。如果没有出现“欢迎使用”屏幕,请依次单击开始、运
行,键入 x:setup(其中 x 代表 CD-ROM 的驱动器盘符),然后单击确定。
• Ikuti petunjuk pada layar. Sewaktu diperintahkan, pilih Directly to this computer using a USB cable [Langsung ke
komputer ini menggunakan kabel USB], kemudian klik OK.
• Pada layar Welcome [Selamat Datang], klik Install [Instal]. Jika layar selamat datang tidak muncul, klik Start [Mulai],
klik Run [Jalankan], ketik x:setup (x adalah huruf untuk drive CD-ROM), kemudian klik OK.
• 画面の指示に従います。プロンプトが表示されたら、[USB ケーブルを使用してこのコンピュータに直接接続] を選択
し、[OK] をクリックします。
• [ようこそ] の画面で、 [インストール] をクリックします。[ようこそ] の画面が表示されない場合は、[スタート] - [ファイル
名を検索して実行] をクリックし、「x:setup」 (x は CD-ROM ドライブを示す文字) と入力してから [OK] をクリックします。
• 화면에 표시되는 지시를 따릅니다. 메시지가 표시되면 Directly to this computer using a USB cable(USB 케이블을
사용하여 이 컴퓨터로 직접 연결)을 선택한 후 확인을 누릅니다.
• 시작 화면에서 설치를 누릅니다. 시작 화면이 표시되지 않는 경우 시작, 실행을 차례로 누르고 x:setup(여기서 x는
CD-ROM 드라이브 문자)을 입력한 후 확인을 누릅니다.
• Directly to this computer using a USB cableOK
• InstallStartRunx:setupx
OK
• 按照螢幕上的指示進行。出現提示時,請選擇「使用 USB 電纜直接連接到這部電腦」,然後按一下「確定」。
• 在歡迎使用畫面上,按一下「安裝」。如果歡迎畫面沒有出現,請按一下「開始」,按一下「執行」,輸入 x:setup
(其中 x 代表 CD-ROM 光碟機代號),然後按一下「確定」。

18
17
12
• When prompted, connect a USB cable that is no longer than 2 meters (6.5 feet) to the printer and the computer.
Note: HP does not recommend using USB hubs with this printer.
• Click Finish. If prompted, restart the computer. Go to step 35.
• 出现提示时,用长度不超过 2 米(6.5 英尺)的 USB 电缆连接打印机与计算机。
注意:HP 建议不要使用 USB 集线器连接此打印机。
• 单击完成。出现提示时,重新启动计算机。转至步骤 35。
• Setelah diperintahkan, hubungkan kabel USB yang panjangnya tidak lebih dari 2 meter (6,5 kaki) ke printer dan ke
komputer. Catatan: HP tidak menganjurkan penggunaan hub USB dengan printer ini.
• Klik Finish [Selesai]. Jika diperintahkan, restart komputer. Lanjutkan ke langkah 35.
• プロンプトが表示されたら、2m 以内の USB ケーブルでプリンタとコンピュータを接続します。注記:USB ハブの使用
はお勧めしません。
• [終了] をクリックします。プロンプトが表示されたら、コンピュータを再起動します。手順 35 に進みます。
• 메시지가 표시되면 2미터(6.5피트)가 넘지 않는 USB 케이블을 프린터와 컴퓨터에 연결합니다. 주: 이 프린터에
USB 허브를 사용하지 마십시오.
• 마침을 누릅니다. 메시지가 표시되면 컴퓨터를 다시 시작합니다. 35단계로 이동하십시오.
• USB26.5
HPUSB
• Finish35
• 出現提示時,請將長度不超過 2 公尺 (6.5 英呎) 的 USB 纜線連接到印表機和電腦。註:使用此印表機時,HP 不建
議搭配 USB 集線器。
• 按一下「完成」。如果出現提示,請重新啟動電腦。請前往步驟 35。

19
13
• Macintosh USB installation. A) Insert the CD and run the installer. B) Complete an Easy Install. C) Click Quit when the
installation is finished.
• Macintosh USB 安装
。
A) 插入 CD 并运行安装程序。B) 完成简易安装。C) 安装完成后,
单击退出。
• Penginstalan USB Macintosh. A) Masukkan CD lalu jalankan installer. B) Selesaikan Easy Install [Instal Mudah].
C) Klik Quit [Keluar] setelah penginstalan selesai.
• Macintosh での USB 接続 。 A) CD を挿入して、インストーラを起動します。B) [簡易インストール] を実行します。
C) インストールが完了したら、[終了] をクリックします。
• Macintosh USB 설치. A) CD를 넣은 후 설치 프로그램을 실행합니다. B) 손쉬운 설치를 수행합니다. C) 설치가 완
료되면 종료를 누릅니다.
•
USBMacintoshA)B)
C)Quit
• Macintosh USB 安裝。A) 插入 CD,並執行安裝程式。B) 完成簡易安裝。C) 安裝完成時,請按一下「結束」。

20
14
• Connect the USB cable. A) Connect a USB cable that is no longer than 2 meters (6.5 feet) to the printer and the
computer. B) Restart the computer. Note: HP does not recommend using USB hubs with this printer.
• 连接 USB 电缆。A) 用长度不超过 2 米(6.5 英尺)的 USB 电缆连接打印机与计算机。
B) 重新启动计算机。注意: HP 建议不要使用 USB 集线器连接此打印机。
•
Menghubungkan kabel USB. A) Hubungkan kabel USB yang panjangnya tidak lebih dari 2 meter (6,5 kaki) ke printer
dan ke komputer. B) Restart komputer. Catatan: HP tidak menganjurkan penggunaan hub USB dengan printer ini.
• USB ケーブルの接続 。 A) 2m 以内の USB ケーブルでプリンタとコンピュータを接続します。B) コンピュータを再起動し
ます。注記:USB ハブの使用はお勧めしません。
• USB 케이블 연결. A) 2미터(6.5피트)가 넘지 않는 USB 케이블을 프린터와 컴퓨터에 연결합니다. B) 컴퓨터를 다
시 시작합니다. 주: 이 프린터에 USB 허브를 사용하지 마십시오.
• USBA)USB26.5
B)HPUSB
• 連接 USB 纜線。A) 將長度不超過 2 公尺 (6.5 英呎) 的 USB 纜線連接到印表機和電腦。B) 重新啟動電腦。註:使用
此印表機時,HP 不建議搭配 USB 集線器。

21
15
• Go to the HD/Applications/Utilities/Printer Setup Utility or the Print Center. If the printer name appears in the Printer
List, the installation is complete. If the printer name does not appear in the Printer List, go to the next step.
•
转至 HD/应用程序/实用程序/打印机设置实用程序或打印中心。如果打印机名称出现在“打印
机列表”中,则表明已完成安装。如果打印机名称
没有
出现在“打印机列表”中,请转至下一步。
• Lanjutkan ke HD/Applications/Utilities/Printer Setup Utility atau Print Center. Jika nama printer muncul dalam Daftar
Printer, berarti penginstalan sudah selesai. Jika nama printer tidak muncul dalam Daftar Printer, lanjutkan ke langkah
berikutnya.
• [HD] - [アプリケーション] - [ユーティリティ] - [プリンタ設定ユーティリティ] または [プリントセンター] に進みます。[プリン
タリスト] にプリンタの名前が表示されていれば、インストールは完了です。[プリンタリスト] にプリンタの名前が表示され
て
いない
場合は、次の手順に進みます。
• HD/응용 프로그램/유틸리티/프린터 설정 유틸리티 또는 프린트 관리자로 이동합니다. 프린터 목록에 프린터 이름
이 표시되면 설치가 완료된 것입니다. 프린터 이름이 프린터 목록에 나타나지
않으면
다음 단계로 이동하십시오.
• HD/Applications/Utilities/Printer Setup UtilityPrint Center
• 前往 HD/應用程式/公用程式/印表機設定公用程式或列印中心。如果印表機名稱出現在「印表機清單」中,表示安裝
已完成。如果印表機名稱
沒有
出現在「印表機清單」中,請前往下一個步驟。

22
16
• Add the printer. A) In the HD/Applications/Utilities/Printer Setup Utility or Print Center, click Add. Click the drop-
down menu, and select USB. B) In the Printer Model drop-down list, select HP. C) Under Printer Name, select the printer,
and then click Add. Go to step 35.
• 添加打印机。A) 在 HD/应用程序/实用程序/打印机设置实用程序或打印中心中,单击添加。
单击下拉菜单,然后选择 USB。B) 在打印机型号下拉菜单中,选择 HP。C) 在打印机名称下,
选择打印机,然后单击添加。转至步骤 35。
• Menambahkan printer. A) Di HD/Applications/Utilities/Printer Setup Utility atau Print Center, klikAdd. Klik menu
buka bawah, lalu pilih USB. B) Dalam daftar buka bawah Printer Model, pilih HP. C) Di bawah Printer Name, pilih
printer, kemudian klik Add. Lanjutkan ke langkah 35.
• プリンタの追加 。 A) [HD] - [アプリケーション] - [ユーティリティ] - [プリンタ設定ユーティリティ] または [プリントセンター]
で、[追加] をクリックします。ポップアップメニューから [USB] を選択します。B) [プリンタのモデル] ドロップダウン リス
トから、[HP] を選択します。C) [プリンタ名] からプリンタを選び、[追加] をクリックします。手順 35 に進みます。
• 프린터 추가. A) HD/응용 프로그램/유틸리티/프린터 설정 유틸리티 또는 프린트 관리자에서 추가를 누릅니다. 드
롭다운 메뉴를 눌러 USB를 선택합니다. B) 프린터 모델 드롭다운 목록에서 HP를 선택합니다. C) 프린터 이름에서 프
린터를 선택한 다음 추가를 누릅니다. 35단계로 이동하십시오.
• A)HD/Applications/Utilities/Printer Setup UtilityPrint CenterAdd
USBB)Printer ModelHPC)Printer Name
Add35
• 新增印表機。A) 在 HD/應用程式/公用程式/印表機設定公用程式或列印中心中,按一下「新增」。按一下下拉式功
能表,然後選擇「USB」。B) 在「印表機機型」下拉式清單中,選擇「HP」。C) 在「印表機名稱」下,選擇印表機,
然後按一下「新增」。請前往步驟 35。

23
HP Color LaserJet CP3505
User Guide
17
• Windows network installation. Connect a network cable to the printer. Note: Ensure that all cables are HP-compliant.
• Windows 网络安装。将网络电缆连接至打印机。注意:确保所有电缆均符合 HP 标准。
•
Penginstalan jaringan Windows. Hubungkan kabel jaringan ke printer. Catatan: Pastikan semua kabel sesuai standar HP.
• Windows でのネットワーク接続 。 ネットワーク ケーブルをプリンタに接続します。注記:ケーブルはすべて HP 対応品
を使用してください。
•
Windows 네트워크 설정. 프린터에 네트워크 케이블을 연결합니다. 주: 모든 케이블이 HP 호환 제품인지 확인하십시오.
• Windows
HP
• Windows 網路安裝。將網路電纜線連接到印表機。註:請確認所有電纜線都與 HP 相容。

24
18
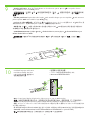
• Find the IP address by printing a Configuration Page. A) At the control-panel, press Menu, use the the and
buttons to scroll to Information, and then press to select. B) Use the and buttons to scroll to Print Configuration
and then press to select. C) On the printed Embedded JetDirect page (the second printed page) the IP address
appears under HP Direct Configuration. Note: Depending on the type of network that is installed, you might need to
assign at IP addres. See step 25.
• 通过打印配置页来查找 IP 地址。A) 在控制面板上,按菜单,使用 和 按钮滚动到信
息,然后按 进行选择。B) 使用 和 按钮滚动到打印配置,然后按 进行选择。
C) 在已打印的嵌入式 JetDirect 页(打印出的第二页)上,IP 地址出现在“HP 直接配置”下
面。注意:根据已安装的网络类型,可能需要指定 IP 地址。请参见步骤 25。
• Cari alamat IP dengan mencetak Halaman Konfigurasi. A) Pada panel kontrol, tekan Menu, gunakan tombol dan
untuk menggulir ke Information [Informasi], lalu tekan untuk memilih. B) Gunakan tombol dan untuk menggulir
ke Print Configuration [Cetak Konfigurasi] lalu tekan untuk memilih. C) Pada halaman cetakan Embedded JetDirect
(halaman cetakan kedua) alamat IP muncul di bawah HP Direct Configuration. Catatan: Tergantung pada jenis jaringan
yang diinstal, Anda mungkin harus menentukan alamat IP. Lihat pada langkah 25.
• 設定ページを印刷して IP アドレスを確認します。A) コントロール パネルで、[メニュー] ボタンを押し、 と ボタンを
使って [情報] メニューまでスクロールし、 を押して選択します。B) と ボタンを使って、[設定の印刷] メニューま
でスクロールし、 を押して選択します。C) 内蔵 Jetdirect (印刷 2 ページ目) の HP Jetdirect 設定の欄に IP アドレスが表
示されます。注記:お使いのネットワークの種類によって、IP アドレスの設定が必要な場合があります。手順 25 を参照
してください。
• 구성 페이지를 인쇄하여 IP 주소 찾기. A) 제어판에서 메뉴를 누르고 및 버튼을 사용하여 Information(정보)을
찾은 후 표시를 눌러 선택합니다. B) 및 버튼을 사용하여 Print Configuration(인쇄 구성)을 찾은 후 표시
를 눌러 선택합니다. C) 인쇄된 내장 JetDirect 페이지(두 번째 인쇄 페이지)의 HP Direct Configuration 부분에 IP 주소
가 표시됩니다. 주: 설치된 네트워크 종류에 따라 IP 주소를 할당해야 할 수 있습니다. 25단계를 참조하십시오.
• IPA)
B) C)
EmbeddedJetDirectIPHPDirectConfiguration
IP25
• 列印組態頁,以找出 IP 位址。A) 在控制面板中,按下「功能表」,使用 和 按鈕捲動至「資訊」,然後按下
以選擇。B) 使用 和 按鈕捲動至「列印組態」,然後按下 以選擇。C) 在所列印的嵌入式 JetDirect 頁 (第二
張列印頁面) 中,IP 位址即顯示在 HP JetDirect 組態下方。註:您可能需要根據安裝的網路類型來指派 IP 位址。請參閱
步驟 25。
ページが読み込まれています...
ページが読み込まれています...
ページが読み込まれています...
ページが読み込まれています...
ページが読み込まれています...
ページが読み込まれています...
ページが読み込まれています...
ページが読み込まれています...
ページが読み込まれています...
ページが読み込まれています...
ページが読み込まれています...
ページが読み込まれています...
ページが読み込まれています...
ページが読み込まれています...
ページが読み込まれています...
ページが読み込まれています...
-
 1
1
-
 2
2
-
 3
3
-
 4
4
-
 5
5
-
 6
6
-
 7
7
-
 8
8
-
 9
9
-
 10
10
-
 11
11
-
 12
12
-
 13
13
-
 14
14
-
 15
15
-
 16
16
-
 17
17
-
 18
18
-
 19
19
-
 20
20
-
 21
21
-
 22
22
-
 23
23
-
 24
24
-
 25
25
-
 26
26
-
 27
27
-
 28
28
-
 29
29
-
 30
30
-
 31
31
-
 32
32
-
 33
33
-
 34
34
-
 35
35
-
 36
36


HP Color LaserJet CP3505 Printer series クイックスタートガイド
- タイプ
- クイックスタートガイド
関連論文
-
HP Color LaserJet 3800 Printer series クイックスタートガイド
-
HP LaserJet 9050 Printer series インストールガイド
-
HP LaserJet M3027 Multifunction Printer series クイックスタートガイド
-
HP Color LaserJet 3550 Printer series クイックスタートガイド
-
-
HP LaserJet M5035 Multifunction Printer series クイックスタートガイド
-
HP LaserJet M4345 Multifunction Printer series クイックスタートガイド
-
-
-