
I:\0186-PC115\ML\4687810631_HT-MT500_GB-CT\00COV-
HTMT500SP1\010COV.fm
masterpage:
Right
HT-MT500
4-687-810-63(1)
HT-MT500
Operating Instructions
GB
CT
Sound Bar
HT-MT500
4-687-810-63(1)
I:\0186-PC115\ML\4687810631_HT-MT500_GB-CT\00COV-
HTMT500SP1\010BCO.fm
masterpage: Left
©2017 Sony Corporation Printed in Malaysia 4-687-810-63(1)
The software of this system may be updated in the future. To find out details on any available
updates, please visit the following URL.
http://www.sony-asia.com/section/support

2
GB
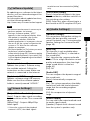
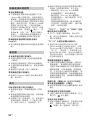
Do not install the appliance in a
confined space, such as a bookcase or
built-in cabinet.
To reduce the risk of fire, do not cover
the ventilation opening of the appliance
with newspapers, tablecloths, curtains,
etc.
Do not expose the appliance to naked
flame sources (for example, lighted
candles).
To reduce the risk of fire or electric
shock, do not expose this appliance to
dripping or splashing, and do not place
objects filled with liquids, such as vases,
on the appliance.
The unit is not disconnected from the
mains as long as it is connected to the
AC outlet, even if the unit itself has been
turned off.
As the main plug is used to disconnect
the unit from the mains, connect the
unit to an easily accessible AC outlet.
Should you notice an abnormality in the
unit, disconnect the main plug from the
AC outlet immediately.
As the main plug of AC power adapter is
used to disconnect the AC power
adapter from the mains, connect it to an
easily accessible AC outlet. Should you
notice an abnormality in it, disconnect it
from the AC outlet immediately.
Do not expose batteries or appliances
with battery-installed to excessive heat,
such as sunshine and fire.
Indoor use only.
Recommended cables
Properly shielded and grounded cables
and connectors must be used for
connection to host computers and/or
peripherals.
For the Bar Speaker
The nameplate is located on the bottom
of the Bar Speaker.
For the AC adapter
Labels for AC adapter Model No. and
Serial No. are located at the bottom of
AC adapter.
WARNING

3
GB
Table of Contents
What’s in the Box ..........................5
What You Can Do with the
System .....................................6
Guide to Parts and Controls ..........8
About the Home Menu ................ 13
Setup
Connecting a TV or Portable Audio
Device via the ANALOG IN
Jack ........................................ 15
Connecting to a Wired
Network ................................. 16
Connecting to a Wireless
Network ..................................17
Detaching the Grille Frame ......... 19
Listening to the Sound
Listening to the TV ......................20
Listening to the Connected AV
Device ....................................20
Listening to Music on a USB
Device .....................................21
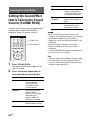
Selecting the Sound Effect
Setting the Sound Effect that is
Tailored to Sound Sources
(SOUND FIELD) ....................... 22
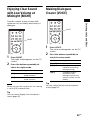
Enjoying Clear Sound with Low
Volume at Midnight
(NIGHT) .................................. 23
Making Dialogues Clearer
(VOICE) ...................................23
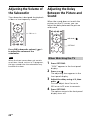
Adjusting the Volume of the
Subwoofer .............................24
Adjusting the Delay Between the
Picture and Sound .................24
Listening to Music/Sound
with the BLUETOOTH®
Function
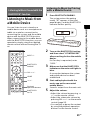
Listening to Music from a Mobile
Device ....................................25
Listening to Sound of the
Connected TV or Device from
Headphones ..........................28
Listening to Music/Sound
Using the Network Function
Listening to Music on your PC via a
Home Network ......................30
Listening to Music on the Mobile
Device with SongPal ............. 31
Using Chromecast built-in ........... 32
Using Spotify ................................33
Using the MUSIC SERVICE
Button ....................................34
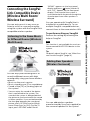
Connecting the SongPal Link-
Compatible Device
(Wireless Multi Room/Wireless
Surround) ...............................35
Using the Various Functions/
Settings
Customizing the Speaker Settings
for Surround Sound ...............38
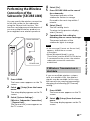
Performing the Wireless Connection
of the Subwoofer
(SECURE LINK) ........................39
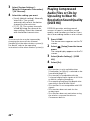
Playing Compressed Audio Files or
CDs by Upscaling to Near Hi-
Resolution Sound Quality
(DSEE HX) ...............................40
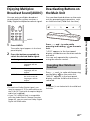
Enjoying Multiplex Broadcast Sound
(AUDIO) .................................. 41
Deactivating Buttons on the Main
Unit ........................................ 41
Basic Setup
Startup Guide
(separate
document)
GB

4
GB
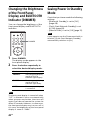
Changing the Brightness of the
Front Panel Display and
BLUETOOTH Indicator
(DIMMER) .............................. 42
Saving Power in Standby
Mode ..................................... 42
Sending the Remote Signal to the
TV via the Main Unit ............. 43
Using the Control for HDMI
Function ................................ 43
Using the “BRAVIA” Sync
Function ................................ 45
Using the Setup Display .............. 46
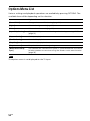
Options Menu List ........................52
Troubleshooting
Troubleshooting ...........................53
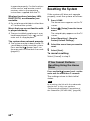
Resetting the System .................. 60
Additional Information
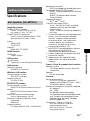
Specifications ...............................61
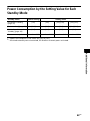
Power Consumption by the Setting
Value for Each Standby
Mode ..................................... 63
Playable Types of Audio Files ..... 64
Supported Input Audio
Formats ................................. 65
On BLUETOOTH
Communication .................... 66
END USER LICENSE
AGREEMENT ...........................67
Precautions .................................. 71
Index .............................................75

5
GB
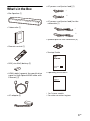
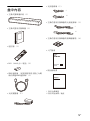
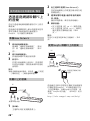
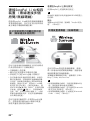
What’s in the Box
•Bar Speaker (1)
•Subwoofer (1)
• Remote control (1)
• R03 (size AAA) battery (2)
• HDMI cable (supports the specification
equal to High Speed HDMI cable with
Ethernet) (1)
•AC adapter (1)
• AC power cord (mains lead) (1)
• AC power cord (mains lead) for the
subwoofer (1)
• Speaker pad for the subwoofer (4)
•Startup Guide
• Operating Instructions
*For Taiwan models
** For other countries/regions
*
**
*
**

6
GB
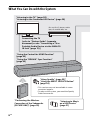
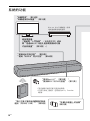
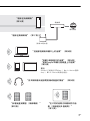
What You Can Do with the System
“Listening to Music
on a USB Device”
(page 21)
“Using the Control for HDMI Function”
(page 43)
“Using the “BRAVIA” Sync Function”
(page 45)
“Performing the Wireless
Connection of the Subwoofer
(SECURE LINK)” (page 39)
“Using Spotify” (page 33)*
“Using the MUSIC SERVICE Button”
(page 34)
“Listening to the TV” (page 20)
“Listening to the Connected AV Device” (page 20)
* This service may not be available in some
countries/regions.
* To play on the system, you need the Spotify
Premium account.
Connecting the TV
(refer to “Startup Guide” (separate
document) or see “Connecting a TV or
Portable Audio Device via the ANALOG
IN Jack” (page 15).)
Blu-ray Disc™ player, cable
box, or satellite box, etc.

7
GB
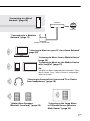
“Listening to Music from a Mobile Device”
(page 25)
“Listening to Music on the Mobile Device
with SongPal” (page 31)
Tip
SongPal has been updated and released as Sony |
Music Center. Sony | Music Center is compatible
with the system.
“Listening to Sound of the Connected TV or Device
from Headphones” (page 28)
“Listening to the Same Music
in Different Rooms (Wireless
Multi Room)” (page 35)
“Adding Rear Speakers
(Wireless Surround)” (page 35)
“Listening to Music on your PC via a Home Network”
(page 30)
“Connecting to a Wired
Network” (page 16)
Internet
Router
Modem
Wireless LAN router
“Connecting to a Wireless
Network” (page 17)

8
GB
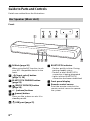
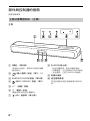
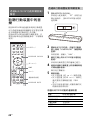
Guide to Parts and Controls
Details are omitted from the illustrations.
Front
N-Mark (page 26)
When using the NFC function, touch
your NFC-compatible device to the
mark.
(input select) button
(page 13, 20)
BLUETOOTH PAIRING button
(page 25)
(MUSIC SERVICE) button
(page 34)
+/– (volume) buttons
(power) button
Turns on the system or sets it to
standby mode.
(USB) port (page 21)
BLUETOOTH indicator
– Flashes quickly in blue: During
pairing standby status
– Flashes in blue: BLUETOOTH
connection is being attempted
– Lights in blue: BLUETOOTH
connection has been established
Front panel display
Remote control sensor
Point the remote control at the
remote control sensor to operate
the system.
Bar Speaker (Main Unit)

9
GB
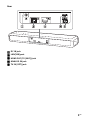
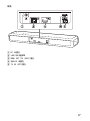
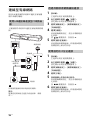
Rear
DC IN jack
LAN(100) port
HDMI OUT (TV (ARC)) jack
ANALOG IN jack
TV IN (OPT) jack

10
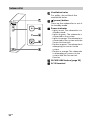
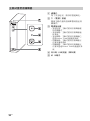
GB
Ventilation holes
For safety, do not block the
ventilation holes.
(power) button
Turns on the subwoofer or sets it
to standby mode.
Power indicator
– Lights in red: The subwoofer is in
standby mode
– Lights in green: The subwoofer is
connected to the system
– Lights in orange: The subwoofer is
connected to the system with the
Secure Link function
– Flashes in green: The subwoofer is
attempting to connect to the
system
– Flashes in orange: The subwoofer
is attempting to connect to the
system with the Secure Link
function
SECURE LINK button (page 39)
AC IN terminal
Subwoofer

11
GB
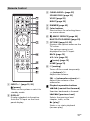
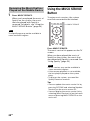
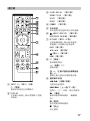
INPUT +/– (page 13, 20)
(power)
Turns on the system or sets it to
standby mode.
DISPLAY
Displays playback information
from the TV input on the front
panel display.
CLEAR AUDIO+ (page 22)
SOUND FIELD (page 22)
VOICE (page 23)
NIGHT (page 23)
DIMMER (page 42)
Color buttons
Shortcut keys for selecting items
on some menus.
MUSIC SERVICE (page 34)
BLUETOOTH PAIRING (page 25)
OPTIONS (page 24, 52)
Displays the options menu on the
TV screen.
The options menu is not
displayed for the TV input.
BACK (page 13)
/// (page 13)
(enter) (page 13)
HOME (page 13)
(muting)
Turns off the sound temporarily.
(volume) +*/–
Adjusts the volume.
SW (subwoofer volume) +/–
Adjusts the volume of the
subwoofer.
Playback operation buttons
/ (rewind/fast forward)
Searches backward or forward.
/ (previous/next)
Selects the previous/next
chapter, track, or file.
(play)*
Starts or re-starts playback
(resume play).
Remote Control


13
GB
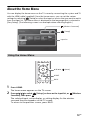
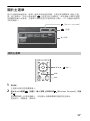
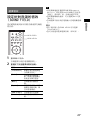
About the Home Menu
You can display the home menu on the TV screen by connecting the system and TV
with the HDMI cable (supplied). From the home menu, you can set the various
settings by selecting [Setup] or select the input or service that you want to watch
from the input list. The home menu is displayed in the language that is selected in
[Easy Setup]. (The following screen is an example when selecting English.)
1 Press HOME.
The home menu appears on the TV screen.
2 Press /// to select [Setup], an item on the input list, or [Wireless
Surround], then press .
The selected input, setup display, or setting display for the wireless
surround function appears on the TV screen.
To return to the previous screen, press BACK.
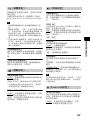
Using the Home Menu
[Setup]
Input list
[Wireless Surround]
HOME
BACK
///, (enter)

14
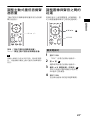
GB
Input list
[Setup]
See “Using the Setup Display” (page 46).
[Wireless Surround]
Displays the setting display for the wireless surround function that allows
you to use the wireless speakers (not supplied) as the surround speakers of
the system. Perform the setting by following the on-screen instructions.
For details about the supported wireless speakers, refer to the following URL.
http://sony.net/nasite
Tip
You can also select the input by pressing INPUT +/– repeatedly.
In these Operating Instructions, the operations are described as steps that are
operated on the home menu displayed on the TV screen by using the remote control
while the system and TV are connected with the HDMI cable (supplied).
The operating steps that select items on the TV screen by using /// and are
simplified in the following way.
Example: Select [Setup] from the home menu.
The operation that selects an item by pressing /// and is expressed as
“select.”
Example: Select [Network Settings] - [Internet Settings] - [Wired Setup] on the
home menu.
When repeating the operation that selects an item by pressing /// and , the
selected items are linked with “-.”
Tips
• You can use the buttons on the main unit if they have the same or similar names as those
on the remote control.
• Characters in brackets [ ] appear on the TV screen. Characters in quotes “ ” appear in the
front panel display.
Input name Explanation
[TV] Outputs the TV sound. (page 20)
[Bluetooth Audio] Outputs the sound of device that is connected with the
BLUETOOTH function. (page 25)
[Analog]
Outputs the sound of device that is connected to the ANALOG IN jack.
(page 20)
[USB] Outputs music files stored on a connected USB device. (page 21)
[Home Network] Outputs music files on the device that is connected via the
network. (page 30)
[Music Service List] Displays the operation method for music services. (page 34)
About the Steps Description

15
GB
Setup
Basic Setup
Refer to Startup Guide (separate
document).
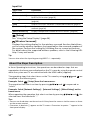
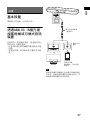
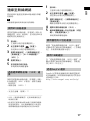
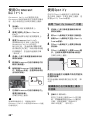
Connecting a TV or
Portable Audio Device
via the ANALOG IN Jack
To connect following devices to the
system, connect them via the ANALOG
IN jack on the system.
– TV that does not have an HDMI jack
and optical digital output jack
– Portable audio device such as a
smartphone, WALKMAN®
If the TV’s headphone jack also serves as
an audio output jack, check the audio
output settings of the TV. For details, refer
to the operating instructions of the TV.
Setup
Note
Smartphone,
WALKMAN®, other
audio devices etc.
TV
Analog audio cable
(not supplied)
Analog
audio out

16
GB
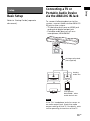
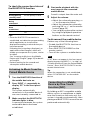
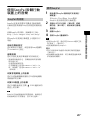
Connecting to a Wired
Network
Prepare the network by connecting the
system and PC to your home network
with a LAN cable.
The following illustration is the example
for connection of the system and PC to
your home network.
The server needs to be connected to the
same network as that of the system.
Tip
We recommend that you use a shielded
straight interface cable (not supplied).
1 Press HOME.
The home menu appears on the TV
screen.
2 Select [Setup] from the home
menu.
The setup display appears on the TV
screen.
3 Select [Network Settings] -
[Internet Settings] - [Wired Setup].
4 Select [Auto].
The system starts network settings
and the network setting status
appears.
Press / to browse information,
and then press .
5 Select [Save & Connect].
The system starts connecting to the
network. For details, refer to the
messages that appear on the TV
screen.
1 Press HOME.
The home menu appears on the TV
screen.
2 Select [Setup] from the home
menu.
The setup display appears on the TV
screen.
3 Select [Network Settings] -
[Internet Settings] - [Wired Setup].
4 Select [Manual].
Connecting to a PC or Router
with a LAN Cable
Note
Internet
LAN cable
(not supplied)
Server
Router
Modem
Connecting by Obtaining
the Network Information
Automatically
Connecting by Using a
Fixed IP Address

17
GB
Setup
5 Perform the setting by following
the on-screen instructions.
The system starts network settings
and the network setting status
appears.
Press / to browse information,
and then press .
6 Select [Save & Connect].
The system starts connecting to the
network. For details, refer to the
messages that appear on the TV
screen.
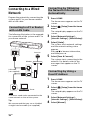
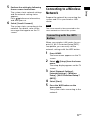
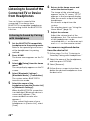
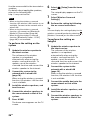
Connecting to a Wireless
Network
Prepare the network by connecting the
system and PC to your wireless LAN
router.
The server needs to be connected to the
same network as that of the system.
When your wireless LAN router (access
point) is Wi-Fi Protected Setup (WPS)-
compatible, you can easily set the
network settings with the WPS button.
1 Press HOME.
The home menu appears on the TV
screen.
2 Select [Setup] from the home
menu.
The setup display appears on the TV
screen.
3 Select [Network Settings] -
[Internet Settings] - [Wireless
Setup] - [Wi-Fi Protected Setup™
(WPS)].
4 Select [Start].
5 Press the WPS button on the
access point.
The system starts connecting to the
network.
Note
Connecting with the WPS
Button

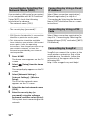
18
GB
If your wireless LAN router (access point)
is not compatible with Wi-Fi Protected
Setup (WPS), check the following
information in advance.
– The network name (SSID)*
_____________________________________
– The security key (password)**
_____________________________________
* SSID (Service Set Identifier) is a name that
identifies a particular access point.
**This information should be available
from a label on your wireless LAN router/
access point, from the operating
instructions, from the person who set up
your wireless network, or from the
information provided by your Internet
service provider.
1 Press HOME.
The home menu appears on the TV
screen.
2 Select [Setup] from the home
menu.
The setup display appears on the TV
screen.
3 Select [Network Settings] -
[Internet Settings] - [Wireless
Setup].
The list of the network name
appears on the TV screen.
4 Select the desired network name
(SSID).
5 Enter the security key (or
password) using the software
keyboard, and then select [Enter].
The system starts connecting to the
network.
Select [New connection registration] -
[Manual registration] in step 4 of
“Connecting by Selecting the Network
Name (SSID)”and follow the on-screen
instructions.
Select [New connection registration] in
step 4 of “Connecting by Selecting the
Network Name (SSID)” and select [(WPS)
PIN Method].
SongPal can connect the system to the
same wireless network as that of the
mobile device. For details, follow the
instruction of the app or refer to the
following URL.
http://info.songpal.sony.net/help/
Connecting by Selecting the
Network Name (SSID)
Connecting by Using a Fixed
IP Address
Connecting by Using a PIN
Code
Connecting by SongPal

19
GB
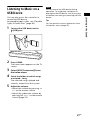
Setup
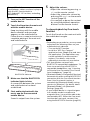
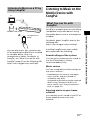
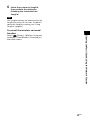
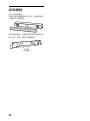
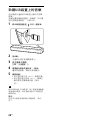
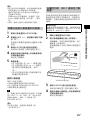
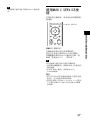
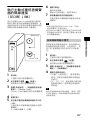
Detaching the Grille
Frame
You can detach the grille frame.
We recommend that you use the main
unit without attaching the grille frame if
you will be listening to High-Resolution
Audio.
To attach the grille frame, fit it to the
main unit by directing the arrow mark
on the rear of the grille frame upward.
The grille frame is fixed by a magnet.
Arrow mark

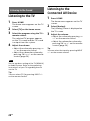
20
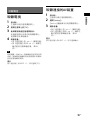
GB
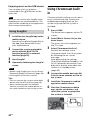
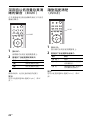
Listening to the TV
1 Press HOME.
The home menu appears on the TV
screen.
2 Select [TV] on the home menu.
3 Select the program using the TV’s
remote control.
The selected TV program appears
on the TV screen and the TV sound
is output from the system.
4 Adjust the volume.
• Adjust the volume by pressing
+/– on the remote control.
• Adjust the subwoofer volume by
pressing SW +/– on the remote
control (page 24).
Set the speakers setting of the TV (BRAVIA)
to Audio System. Refer to the operating
instructions of your TV regarding how to
set the TV.
Tip
You can select [TV] by pressing INPUT +/–
on the remote control.
Listening to the
Connected AV Device
1 Press HOME.
The home menu appears on the TV
screen.
2 Select [Analog].
The [Analog] screen is displayed on
the TV screen.
3 Adjust the volume.
• Adjust the volume by pressing
+/– on the remote control.
• Adjust the subwoofer volume by
pressing SW +/– on the remote
control (page 24).
Tip
You can select the input by pressing INPUT
+/– on the remote control.
Listening to the Sound
Note
ページが読み込まれています...
ページが読み込まれています...
ページが読み込まれています...
ページが読み込まれています...
ページが読み込まれています...
ページが読み込まれています...
ページが読み込まれています...
ページが読み込まれています...
ページが読み込まれています...
ページが読み込まれています...
ページが読み込まれています...
ページが読み込まれています...
ページが読み込まれています...
ページが読み込まれています...
ページが読み込まれています...
ページが読み込まれています...
ページが読み込まれています...
ページが読み込まれています...
ページが読み込まれています...
ページが読み込まれています...
ページが読み込まれています...
ページが読み込まれています...
ページが読み込まれています...
ページが読み込まれています...
ページが読み込まれています...
ページが読み込まれています...
ページが読み込まれています...
ページが読み込まれています...
ページが読み込まれています...
ページが読み込まれています...
ページが読み込まれています...
ページが読み込まれています...
ページが読み込まれています...
ページが読み込まれています...
ページが読み込まれています...
ページが読み込まれています...
ページが読み込まれています...
ページが読み込まれています...
ページが読み込まれています...
ページが読み込まれています...
ページが読み込まれています...
ページが読み込まれています...
ページが読み込まれています...
ページが読み込まれています...
ページが読み込まれています...
ページが読み込まれています...
ページが読み込まれています...
ページが読み込まれています...
ページが読み込まれています...
ページが読み込まれています...
ページが読み込まれています...
ページが読み込まれています...
ページが読み込まれています...
ページが読み込まれています...
ページが読み込まれています...
ページが読み込まれています...
ページが読み込まれています...
ページが読み込まれています...
ページが読み込まれています...
ページが読み込まれています...
ページが読み込まれています...
ページが読み込まれています...
ページが読み込まれています...
ページが読み込まれています...
ページが読み込まれています...
ページが読み込まれています...
ページが読み込まれています...
ページが読み込まれています...
ページが読み込まれています...
ページが読み込まれています...
ページが読み込まれています...
ページが読み込まれています...
ページが読み込まれています...
ページが読み込まれています...
ページが読み込まれています...
ページが読み込まれています...
ページが読み込まれています...
ページが読み込まれています...
ページが読み込まれています...
ページが読み込まれています...
ページが読み込まれています...
ページが読み込まれています...
ページが読み込まれています...
ページが読み込まれています...
ページが読み込まれています...
ページが読み込まれています...
ページが読み込まれています...
ページが読み込まれています...
ページが読み込まれています...
ページが読み込まれています...
ページが読み込まれています...
ページが読み込まれています...
ページが読み込まれています...
ページが読み込まれています...
ページが読み込まれています...
ページが読み込まれています...
ページが読み込まれています...
ページが読み込まれています...
ページが読み込まれています...
ページが読み込まれています...
ページが読み込まれています...
ページが読み込まれています...
ページが読み込まれています...
ページが読み込まれています...
ページが読み込まれています...
ページが読み込まれています...
ページが読み込まれています...
ページが読み込まれています...
ページが読み込まれています...
ページが読み込まれています...
ページが読み込まれています...
ページが読み込まれています...
ページが読み込まれています...
ページが読み込まれています...
ページが読み込まれています...
ページが読み込まれています...
ページが読み込まれています...
ページが読み込まれています...
ページが読み込まれています...
ページが読み込まれています...
ページが読み込まれています...
ページが読み込まれています...
ページが読み込まれています...
-
 1
1
-
 2
2
-
 3
3
-
 4
4
-
 5
5
-
 6
6
-
 7
7
-
 8
8
-
 9
9
-
 10
10
-
 11
11
-
 12
12
-
 13
13
-
 14
14
-
 15
15
-
 16
16
-
 17
17
-
 18
18
-
 19
19
-
 20
20
-
 21
21
-
 22
22
-
 23
23
-
 24
24
-
 25
25
-
 26
26
-
 27
27
-
 28
28
-
 29
29
-
 30
30
-
 31
31
-
 32
32
-
 33
33
-
 34
34
-
 35
35
-
 36
36
-
 37
37
-
 38
38
-
 39
39
-
 40
40
-
 41
41
-
 42
42
-
 43
43
-
 44
44
-
 45
45
-
 46
46
-
 47
47
-
 48
48
-
 49
49
-
 50
50
-
 51
51
-
 52
52
-
 53
53
-
 54
54
-
 55
55
-
 56
56
-
 57
57
-
 58
58
-
 59
59
-
 60
60
-
 61
61
-
 62
62
-
 63
63
-
 64
64
-
 65
65
-
 66
66
-
 67
67
-
 68
68
-
 69
69
-
 70
70
-
 71
71
-
 72
72
-
 73
73
-
 74
74
-
 75
75
-
 76
76
-
 77
77
-
 78
78
-
 79
79
-
 80
80
-
 81
81
-
 82
82
-
 83
83
-
 84
84
-
 85
85
-
 86
86
-
 87
87
-
 88
88
-
 89
89
-
 90
90
-
 91
91
-
 92
92
-
 93
93
-
 94
94
-
 95
95
-
 96
96
-
 97
97
-
 98
98
-
 99
99
-
 100
100
-
 101
101
-
 102
102
-
 103
103
-
 104
104
-
 105
105
-
 106
106
-
 107
107
-
 108
108
-
 109
109
-
 110
110
-
 111
111
-
 112
112
-
 113
113
-
 114
114
-
 115
115
-
 116
116
-
 117
117
-
 118
118
-
 119
119
-
 120
120
-
 121
121
-
 122
122
-
 123
123
-
 124
124
-
 125
125
-
 126
126
-
 127
127
-
 128
128
-
 129
129
-
 130
130
-
 131
131
-
 132
132
-
 133
133
-
 134
134
-
 135
135
-
 136
136
-
 137
137
-
 138
138
-
 139
139
-
 140
140
-
 141
141
-
 142
142
-
 143
143


