
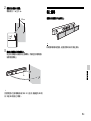
HT-ST9
Sound Bar
Operating Instructions
GB
使用說明書
CT

2
GB
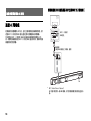
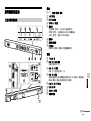
Do not install the appliance in a confined space, such as a bookcase or
built-in cabinet.
To reduce the risk of fire, do not cover the ventilation opening of the
appliance with newspapers, tablecloths, curtains, etc.
Do not expose the appliance to naked flame sources (for example,
lighted candles).
To reduce the risk of fire or electric shock, do not expose this appliance
to dripping or splashing, and do not place objects filled with liquids, such
as vases, on the appliance.
The unit is not disconnected from the mains as long as it is connected to
the AC outlet, even if the unit itself has been turned off.
As the main plug is used to disconnect the unit from the mains, connect
the unit to an easily accessible AC outlet. Should you notice an
abnormality in the unit, disconnect the main plug from the AC outlet
immediately.
Do not expose batteries or appliances with battery-installed to excessive
heat, such as sunshine and fire.
Indoor use only.
Recommended cables
Properly shielded and grounded cables and connectors must be used for
connection to host computers and/or peripherals.
WARNING

3
GB
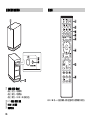
About These Operating Instructions
The instructions in these Operating Instructions describe the controls on
the remote control. You can also use the controls on the Bar Speaker if
they have the same or similar names as those on the remote control.
Some illustrations are presented as conceptual drawings, and may be
different from the actual products.
The items displayed on the TV screen may vary depending on the area.
The default setting is underlined.
The text enclosed in brackets ([--]) appears on the TV screen, and the
text enclosed in double quotation marks (“-”) appears on the front panel
display.

4
GB
About These Operating Instructions .....................................3
Listening/Viewing
Listening to Sound from a TV, Blu-ray Disc™ Player,
Cable/Satellite Box, etc. ...................................................6
Playing Music/Photo from a USB Device ..............................7
Listening to Music from a BLUETOOTH Device .....................7
Playing Music/Photo from Other Devices via the Network
Function ............................................................................7
Sound Adjustment
Enjoying Sound Effects (Football mode, etc.) .......................8
Using the DSEE HX Function (Reproducing Audio Codec
Files with Natural Sound Quality) ....................................9
BLUETOOTH Functions
Listening to Music from a BLUETOOTH Device ...................10
Listening to Sound by Transmitting to a
BLUETOOTH-compatible Receiver ................................. 12
Network Functions
Connecting to a Wired Network ..........................................14
Connecting to a Wireless Network ...................................... 15
Playing Music/Photo Files on a Home Network ..................16
Displaying the Screen of the Mobile Device on a TV (Screen
mirroring) ........................................................................18
Enjoying Various Online Services (Music Services) .............18
Viewing Copyright-protected 4K Content
Connecting a 4K TV ............................................................. 20
Connecting 4K Devices ........................................................ 21
Settings and Adjustments
Using the Setup Display .......................................................22
Using the Options Menu ..................................................... 28
Other Functions
Controlling the System Using a Smartphone or Tablet
(SongPal) ........................................................................ 30
Using the Control for HDMI Function for “BRAVIA” Sync .... 31
Enjoying multiplex broadcast sound (Dual Mono) ..............33
Deactivating Buttons on the Bar Speaker (Child Lock) .......33
Changing the brightness .................................................... 34
Saving Power in Standby Mode .......................................... 34
Enabling the IR Repeater Function (when you cannot
control the TV) ............................................................... 34
Further Setting for the Wireless System (Subwoofer) .........35
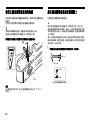
Modifying the Angle of the Bar Speaker ............................ 36
Mounting the Bar Speaker on a Wall .................................. 36
Attaching the Grille Frame ...................................................37
Table of contents
Connecting
Startup Guide (separate document)

5
GB
Additional Information
Precautions .......................................................................... 38
Troubleshooting ...................................................................41
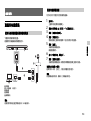
Guide to Parts and Controls ................................................ 46
Playable Types of Files ........................................................ 49
Supported Audio Formats ................................................... 50
Specifications ...................................................................... 50
On BLUETOOTH Communication .........................................53
Index .................................................................................... 54
END USER LICENSE AGREEMENT ......................................... 56

6
GB
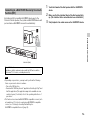
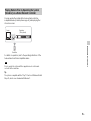
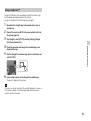
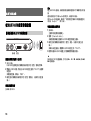
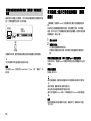
Listening to Sound from a TV, Blu-ray Disc™
Player, Cable/Satellite Box, etc.
1
Press HOME.
The home menu appears on the TV screen.
2 Press /// to select the desired input, and then press .
You can also use INPUT on the remote control.
Tip
You can also press PAIRING and MIRRORING on the remote control to
select [Bluetooth Audio] and [Screen mirroring] respectively.
Listening/Viewing
[TV]
“TV”
Device (TV, etc.) that is connected to the TV (DIGITAL IN (TV)) jack, or a TV that
is compatible with the Audio Return Channel function and connected to the
HDMI OUT (ARC) jack
[HDMI1]/[HDMI2]/[HDMI3]
“HDMI 1”/”HDMI 2”/”HDMI 3”
Device that is connected to HDMI IN 1, HDMI IN 2 or HDMI IN 3
[Bluetooth Audio]
“BT”
BLUETOOTH device that supports A2DP
[Analog]
“Analog”
Device that is connected to the ANALOG IN jacks
[USB]
“USB”
USB device that is connected to the (USB) port
[Screen mirroring]
“SCR M”
Screen mirroring-compatible device
[Home Network]
“H.Net”
Content stored on a server
[Music Services]
“M.Serv”
Content of music services offered on the Internet

7
GB
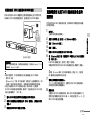
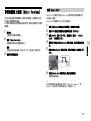
Listening/Viewing
Playing Music/Photo from a USB Device
You can play music/photo files stored on a connected USB device.
For playable types of files, see “Playable Types of Files” (page 49).
1 Connect the USB device to the (USB) port.
Refer to the operating instructions of the USB device before
connecting.
2 Press HOME.
The home menu appears on the TV screen.
3 Press /// to select [USB], and then press .
4 Press / to select [Music] or [Photo].
5 Select the desired content using /// and .
Do not remove the USB device during operation. To avoid data corruption
or damage to the USB device, turn the system off before connecting or
removing the USB device.
Listening to Music from a BLUETOOTH Device
Refer to “BLUETOOTH Functions” (page 10).
Playing Music/Photo from Other Devices via
the Network Function
Refer to “Network Functions” (page 14).
Note

8
GB
Enjoying Sound Effects (Football mode, etc.)
You can easily enjoy pre-programmed sound effects that are
tailored to different kinds of sound sources.
Press SOUND FIELD repeatedly during playback.
Tip
You can also press CLEARAUDIO+ to select [ClearAudio+].
To select the sound field from the options menu
1 Press OPTIONS and / to select [Sound Field], and then press
.
2 Press / to select the desired sound field, and then press .
Sound effects are produced to give you a genuine in-stadium feeling
when watching live football broadcasts.
Press FOOTBALL repeatedly while watching a football match
broadcast.
[Narration On]: Creates an immersive feeling of being in a football
stadium through enhanced stadium cheers.
[Narration Off]: Creates a more immersive feeling of being in a
football stadium by minimizing the volume level of narration in
addition to enhancing cheers.
[Off]: The football mode is turned off.
We recommend that you select the football mode when watching a
football match broadcast.
If you hear unnatural sound in the content when [Narration Off] is
selected, you should use [Narration On].
The football mode is automatically set to [Off] when you perform the
following.
– Turn off the system.
– Press any of the sound field buttons (page 48).
This feature does not support monaural sound.
If the stereo audio signal input is detected, Sony’s proprietary up-mixer
gets activated depending on the selected sound field.
Tips
You can also select [Football] from the options menu (page 28).
If 5.1 channel audio stream is available, we recommend that you select
it on your TV or cable/satellite box.
Sound Adjustment
Selecting the Sound Field
[ClearAudio+]
The appropriate sound setting is automatically selected for the sound source.
[Movie]
Sound effects are optimized for movies. This mode replicates the density and
rich expanse of sound.
[Movie 2]
Sound effects are optimized for movies. This mode replicates sound looping
around the listener to the rear.
[Music]
Sound effects are optimized for music.
[Game Studio]
Sound effects are optimized for game play.
[Music Arena]
Sound effects allow you to enjoy live music concerts filled with great
excitement created by Sony’s unique Audio DSP technology.
[Standard]
Sound effects are optimized for the individual source.
Using the Football Mode Function
Notes

9
GB
Sound Adjustment
Sound is output at low volume with minimum loss of fidelity and
clarity of dialogue.
Press NIGHT repeatedly.
[On]: Activates the night mode function.
[Off]: Deactivates the night mode function.
Tip
You can also select [Night] from the options menu (page 28).
This helps make dialogues clearer.
Press VOICE repeatedly.
[Type 1]: Standard
[Type 2]: Dialogue range is enhanced.
[Type 3]: Dialogue range is enhanced, and the parts of range
difficult to be discerned by the elderly are boosted.
Tip
You can also select [Voice] from the options menu (page 28).
Using the DSEE HX Function (Reproducing
Audio Codec Files with Natural Sound
Quality)
DSEE HX upscales existing sound sources to near hi-resolution
sound quality, and it makes you feel as if you are really there at the
recording studio or concert.
This function is only available when [Music] is selected as the sound
field.
Only the fine sound restoration feature of the DSEE HX function will be
applied to PCM audio sources with lossless compression. The DSEE HX
function does not work for DSD (DSDIFF, DSF) format files. The file is
expanded to a maximum 96 kHz/24 bit equivalent.
This function works with 2-channel digital input signals of 44.1 kHz or
48 kHz.
This function does not work when [Analog] is selected.
This function does not work when [Transmitter] in [Bluetooth Mode] is
selected. (page 24).
1 Press HOME.
The home menu appears on the TV screen.
2 Select [Setup] - [Audio Settings] from the home menu.
3 Select [DSEE HX].
4 Select [On].
Using the Night Mode Function
Using the Voice Function
Notes

10
GB
Listening to Music from a BLUETOOTH Device
To pair the system with the device
1 Press PAIRING.
The indicator (blue) of the Bar Speaker flashes quickly during
BLUETOOTH pairing.
2 Turn on the BLUETOOTH function, and then select “HT-ST9” after
searching for it on the BLUETOOTH device.
If a Passkey is requested, enter “0000.”
3 Make sure that the indicator (blue) of the Bar Speaker lights up.
(This indicates that a connection has been established.)
To cancel pairing operation
Press the HOME or INPUT.
Tip
Once the BLUETOOTH connection is established, an indication
recommending which application to download will be displayed
according to what device you have connected.
Following the instructions displayed, an application called SongPal,
which will enable you to operate this system, can be downloaded.
Refer to “Controlling the System Using a Smartphone or Tablet (SongPal)”
(page 30) for details on SongPal.
To listen to sound from the paired device
1 Press HOME.
The home menu appears on the TV screen.
2 Select [Bluetooth Audio].
This system automatically reconnects to the BLUETOOTH device it
was most recently connected to.
3 Make sure that the indicator (blue) of the Bar Speaker is lit. (This
indicates that a connection has been established.)
If a connection has not been established, select “HT-ST9” on the
BLUETOOTH device.
4 Start audio playback with the music app on the connected
BLUETOOTH device.
Once the system and the BLUETOOTH device are connected, you can
control playback by pressing , , , / and /.
BLUETOOTH Functions
Pairing this System with a BLUETOOTH Device
Indicator (blue)
Note

11
GB
BLUETOOTH Functions
By holding an NFC-compatible BLUETOOTH device near to the
N mark on the Bar Speaker, the system and BLUETOOTH device will
pair and make a BLUETOOTH connection automatically.
Depending on your device, you may need to perform the following
items on your remote device in advance.
– Turn on the NFC function.
– Download the “NFC Easy Connect” application from Google Play™ and
start the application. (The application may not be available in some
countries/regions.) For details, refer to the operating instructions of
your device.
This feature does not work with BLUETOOTH-compatible receivers (such
as headphones). To listen to sound using a BLUETOOTH-compatible
receiver, see “Listening to Sound by Transmitting to a
BLUETOOTH-compatible Receiver” (page 12).
1 Touch the N mark of the Bar Speaker with the BLUETOOTH
device.
2 Make sure that the indicator (blue) of the Bar Speaker lights
up. (This indicates that a connection has been established.)
3 Start playback of an audio source on the BLUETOOTH device.
Connecting to a BLUETOOTH Device by One-touch
Function (NFC)
Compatible devices
Smartphones, tablets, and music players with the NFC function built-in
(OS: Android™ 2.3.3 or later, excluding Android 3.x)
Notes
Indicator (blue)

12
GB
Listening to Sound by Transmitting to a
BLUETOOTH-compatible Receiver
You can listen to sound of the source playing via this system by using
a BLUETOOTH-compatible receiver (such as headphones).
1 Press HOME.
The home menu appears on the TV screen.
2 Select [Setup] - [Bluetooth Settings] from the home
menu.
3 Select [Bluetooth Mode].
4 Select [Transmitter].
5 Turn on BLUETOOTH function on the BLUETOOTH receiver.
6 Select the BLUETOOTH receiver’s name from the [Device List]
in [Bluetooth Settings] (page 25).
When the BLUETOOTH connection is established, the indicator
(blue) lights up.
If you cannot find your BLUETOOTH receiver’s name in the list,
select [Scan].
The [Device List] screen appears after a confirmation dialog when
you change [Bluetooth Mode] to [Transmitter] from other modes.
7 Return to the home menu and select the desired input.
[BT TX] appears in the front panel display, and the sound is
output from the BLUETOOTH receiver.
No sound is output from speakers of the system.
8 Adjust the volume.
Adjust the volume level of the BLUETOOTH receiver first. When
connected with a BLUETOOTH receiver, volume level of the
BLUETOOTH receiver can be controlled with VOLUME +/– on the
Bar Speaker and +/– on the remote control.
You may not be able to adjust the volume level depending on the
BLUETOOTH receiver.
[Screen mirroring], [Bluetooth Audio] and Home Theatre Control
function are disabled when the system is in transmitter mode.
When input of [Bluetooth Audio] or [Screen mirroring] is selected, you
cannot set [Bluetooth Mode] to [Transmitter]. You cannot switch it with
RX/TX on the remote control neither.
You can register up to 9 BLUETOOTH receivers. If a 10th BLUETOOTH
receiver is registered, the least recently connected BLUETOOTH receiver
will be replaced by the new one.
The system can display up to 15 detected BLUETOOTH receivers in the
[Device List].
You cannot change the sound effect or settings in the options menu
while transmitting sound.
Some content cannot be output due to content protection.
Playback of audio/music on the BLUETOOTH receivers is delayed
compared to that on the system due to the characteristics of
BLUETOOTH wireless technology.
No sound is output from speakers and HDMI OUT (ARC) jack when a
BLUETOOTH receiver is successfully connected to the system.
Tips
You can enable or disable the reception of AAC or LDAC audio from the
BLUETOOTH device (page 25).
You can also switch the [Bluetooth Mode] using RX/TX on the remote
control.
When the BLUETOOTH device in step 5 has finished pairing and that is
the most recently connected device, you can connect it to the system
automatically by simply pressing RX/TX on the remote control. In this
case, you do not need to perform step 6.
Note
Notes

13
GB
BLUETOOTH Functions
To disconnect the BLUETOOTH receiver
Perform any of the following items.
– Disable the BLUETOOTH function on the BLUETOOTH receiver.
– Set [Bluetooth Mode] to [Receiver] or [Off] (page 24).
– Turn off the system or the BLUETOOTH receiver.
– Select the device name of the connected BLUETOOTH-compatible
receiver from [Device List] in [Bluetooth Settings].
To delete a registered BLUETOOTH receiver from the
device list
1 Follow steps 1 to 6 of “Listening to Sound by Transmitting to a
BLUETOOTH-compatible Receiver.”
2 Select the device, and then press OPTIONS.
3 Select [Remove], and then press .
4 Follow the on-screen instructions to delete the desired
BLUETOOTH device from the device list.

14
GB
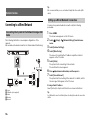
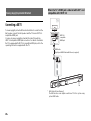
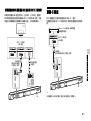
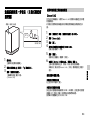
Connecting to a Wired Network
The following illustration is an example configuration of the
network.
We recommend a wired connection for stable network functioning.
Tip
We recommend that you use a shielded straight interface cable (LAN
cable).
You can set up a wired network connection by the following
procedure.
1 Press HOME.
The home menu appears on the TV screen.
2 Select [Setup] - [Network Settings] from the home
menu.
3 Select [Internet Settings].
4 Select [Wired Setup].
The screen for selecting the IP address acquisition method
appears on the TV screen.
5 Select [Auto].
The system starts connecting to the network.
The confirmation screen appears.
6 Press / to browse information, and then press .
7 Select [Save & Connect].
The system starts connecting to the network. For details, refer to
the messages that appear on the TV screen.
If using a fixed IP address
Select [Custom] in step 5 and follow the on-screen instructions.
Tip
See [Network Connection Status] when checking the network connection
status.
Network Functions
Connecting the System to the Network Using a LAN
Cable
Server
LAN cable (not supplied)
Router
Modem
Internet
Setting up a Wired Network Connection

15
GB
Network Functions
Connecting to a Wireless Network
Before performing network settings
When your wireless LAN router (access point) is Wi-Fi Protected
Setup (WPS)-compatible, you can easily set the network settings
with the WPS button.
If not, you will be required to select or enter the following
information. Check the following information in advance.
The network name (SSID)* of the wireless LAN router/access point
The security key (password)** for the network
* SSID (Service Set Identifier) is a name that identifies a particular access
point.
** This information should be available from a label on your wireless LAN
router/access point, from the operating instructions, from the person
who set up your wireless network, or from the information provided by
your Internet service provider.
1 Press HOME.
The home menu appears on the TV screen.
2 Select [Setup] - [Network Settings] from the home
menu.
3 Select [Internet Settings].
4 Select [Wireless Setup(built-in)].
5 Select [Wi-Fi Protected Setup (WPS)].
6 Select [Start].
7 Press the WPS button on the access point.
The system starts connecting to the network.
If selecting the network name (SSID) you want
Select the network name (SSID) you want in step 5, enter the security
key (or passphrase) using the software keyboard, and then select
[Enter] to confirm the security key. The system starts connecting to
the network. For details, refer to the messages that appear on the TV
screen.
If using a fixed IP address
Select [New connection registration] in step 5 and follow the on-
screen instructions.
If using a (WPS) PIN code
Select [New connection registration] in step 5, and then select [(WPS)
PIN method].
Tip
See [Network Connection Status] when checking the network connection
status.
Setting up a Wireless LAN Connection

16
GB
Playing Music/Photo Files on a Home
Network
You can play music/photo files on other home network-compatible
devices by connecting them to your home network.
This system can be used as a player and renderer.
Server: Stores and shares digital media content
Player: Finds and plays digital media content from the server
Renderer: Receives and plays digital media content from the server
and can be operated by another device (controller)
Controller: Operates the renderer device
Prepare to use the Home Network function.
Connect the system to a network.
Prepare another home network-compatible device. For details,
refer to the operating instructions of the device.
1 Press HOME.
The home menu appears on the TV screen.
2 Select [Home Network].
3 Select the desired device.
4 Press / to select [Music] or [Photo] and then press
.
5 Select the desired content using /// and .
Playing Files Stored on a Server via the System
(Player)
Player
(This system)
Server

17
GB
Network Functions
You can operate the system with a home network controller-
compatible device (a mobile phone app, etc), when playing files
stored on a server.
For details on operation, refer to the operating instructions of the
home network controller-compatible device.
Do not operate the system with the supplied remote control and a
controller at the same time.
Tip
The system is compatible with the “Play To” function of Windows Media®
Player 12, which comes standard with Windows 7.
Playing Remote Files by Operating the System
(Renderer) via a Home Network Controller
Note
Controller
Renderer
(This system)
Server

18
GB
Displaying the Screen of the Mobile Device
on a TV (Screen mirroring)
[Screen mirroring] is a function to display the screen of a mobile
device on the TV by Miracast technology.
The system can be connected directly with a Screen mirroring-
compatible device (e.g. smartphone, tablet). You can enjoy using
the display screen of the device on your large TV screen. No wireless
router (or access point) is required to use this feature.
1 Press MIRRORING.
2 Follow the on-screen instructions.
Activate the Screen mirroring function from your mobile device.
For details on how to activate the function, refer to the operating
instructions supplied with your mobile device.
To connect to an Xperia smartphone using One-touch
mirroring function (NFC)
Press MIRRORING, then hold the Xperia smartphone near to the N-
Mark on the Bar Speaker.
To exit mirroring
Press HOME or INPUT.
When using Screen mirroring, the quality of picture and sound may
sometimes be deteriorated due to interference from other networks.
Depending on the usage environment, the quality of the picture and
sound may be deteriorated.
Some network functions may not be available during Screen mirroring.
Make sure that your device is compatible with Miracast. Connectivity
with all Miracast compatible devices is not guaranteed.
Tip
If you see that the quality of picture and sound is often deteriorated, try
setting the [Screen mirroring RF Setting] (page 27).
Enjoying Various Online Services (Music
Services)
You can listen to music services offered on the Internet with this
system. To use this function, the system must be connected to the
Internet.
The operation below will display a guide to invite you to music
services. Follow the guide to enjoy the music services.
1 Press HOME.
The home menu appears on the TV screen.
2 Select [Music Services].
The music services list appears on the TV screen.
Tip
You can update the service provider list by pressing OPTIONS,
followed by select [Update List].
3 Select the desired music service.
Notes

19
GB
Network Functions
Google Cast allows you to select music content from the Google
Cast-enabled app and play back on the system.
Google Cast requires the initial setup using SongPal.
1 Download free SongPal app to the mobile device such as
smartphone.
2 Connect the device by Wi-Fi to the same network as that of
the system (page 15).
3 Start SongPal, select [HT-ST9], and tap [Settings]-[Google
Cast]-[Learn how to Cast].
4 Check the operation and Google Cast-enabled apps, and
download the app.
5 Start the Google Cast-enabled app, tap the cast button, and
select [HT-ST9].
6 Select and play music on the Google Cast-enabled app.
The music is played on the system.
You cannot use Google Cast while “Google Cast Updating” is shown on
the front panel display of the Bar Speaker. Wait until the update is
complete, and then try again.
Using Google Cast™
Note

20
GB
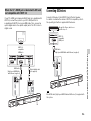
Connecting a 4K TV
To view copyright-protected 4K content and listen to sound from the
Bar Speaker, connect the Bar Speaker and the TV via an HDCP 2.2-
compatible HDMI jack.
You can only view copyright-protected 4K content through the
HDCP 2.2-compatible HDMI jack connection. For details on whether
the TV is equipped with HDCP 2.2- compatible HDMI jack, refer to the
operating instructions supplied with the TV.
* ARC (Audio Return Channel)
The ARC function sends digital sound from a TV to this system using
just an HDMI cable.
Viewing Copyright-protected 4K Content
When the TV’s HDMI jack is labeled with ARC* and
compatible with HDCP 2.2
HDMI cable
(High Speed HDMI Cable with Ethernet, supplied)
HDCP 2.2-
compatible
HDMI jack
ページが読み込まれています...
ページが読み込まれています...
ページが読み込まれています...
ページが読み込まれています...
ページが読み込まれています...
ページが読み込まれています...
ページが読み込まれています...
ページが読み込まれています...
ページが読み込まれています...
ページが読み込まれています...
ページが読み込まれています...
ページが読み込まれています...
ページが読み込まれています...
ページが読み込まれています...
ページが読み込まれています...
ページが読み込まれています...
ページが読み込まれています...
ページが読み込まれています...
ページが読み込まれています...
ページが読み込まれています...
ページが読み込まれています...
ページが読み込まれています...
ページが読み込まれています...
ページが読み込まれています...
ページが読み込まれています...
ページが読み込まれています...
ページが読み込まれています...
ページが読み込まれています...
ページが読み込まれています...
ページが読み込まれています...
ページが読み込まれています...
ページが読み込まれています...
ページが読み込まれています...
ページが読み込まれています...
ページが読み込まれています...
ページが読み込まれています...
ページが読み込まれています...
ページが読み込まれています...
ページが読み込まれています...
ページが読み込まれています...
ページが読み込まれています...
ページが読み込まれています...
ページが読み込まれています...
ページが読み込まれています...
ページが読み込まれています...
ページが読み込まれています...
ページが読み込まれています...
ページが読み込まれています...
ページが読み込まれています...
ページが読み込まれています...
ページが読み込まれています...
ページが読み込まれています...
ページが読み込まれています...
ページが読み込まれています...
ページが読み込まれています...
ページが読み込まれています...
ページが読み込まれています...
ページが読み込まれています...
ページが読み込まれています...
ページが読み込まれています...
ページが読み込まれています...
ページが読み込まれています...
ページが読み込まれています...
ページが読み込まれています...
ページが読み込まれています...
ページが読み込まれています...
ページが読み込まれています...
ページが読み込まれています...
ページが読み込まれています...
ページが読み込まれています...
ページが読み込まれています...
ページが読み込まれています...
ページが読み込まれています...
ページが読み込まれています...
ページが読み込まれています...
ページが読み込まれています...
ページが読み込まれています...
ページが読み込まれています...
ページが読み込まれています...
ページが読み込まれています...
ページが読み込まれています...
ページが読み込まれています...
ページが読み込まれています...
ページが読み込まれています...
ページが読み込まれています...
ページが読み込まれています...
ページが読み込まれています...
ページが読み込まれています...
ページが読み込まれています...
ページが読み込まれています...
ページが読み込まれています...
ページが読み込まれています...
ページが読み込まれています...
ページが読み込まれています...
ページが読み込まれています...
ページが読み込まれています...
-
 1
1
-
 2
2
-
 3
3
-
 4
4
-
 5
5
-
 6
6
-
 7
7
-
 8
8
-
 9
9
-
 10
10
-
 11
11
-
 12
12
-
 13
13
-
 14
14
-
 15
15
-
 16
16
-
 17
17
-
 18
18
-
 19
19
-
 20
20
-
 21
21
-
 22
22
-
 23
23
-
 24
24
-
 25
25
-
 26
26
-
 27
27
-
 28
28
-
 29
29
-
 30
30
-
 31
31
-
 32
32
-
 33
33
-
 34
34
-
 35
35
-
 36
36
-
 37
37
-
 38
38
-
 39
39
-
 40
40
-
 41
41
-
 42
42
-
 43
43
-
 44
44
-
 45
45
-
 46
46
-
 47
47
-
 48
48
-
 49
49
-
 50
50
-
 51
51
-
 52
52
-
 53
53
-
 54
54
-
 55
55
-
 56
56
-
 57
57
-
 58
58
-
 59
59
-
 60
60
-
 61
61
-
 62
62
-
 63
63
-
 64
64
-
 65
65
-
 66
66
-
 67
67
-
 68
68
-
 69
69
-
 70
70
-
 71
71
-
 72
72
-
 73
73
-
 74
74
-
 75
75
-
 76
76
-
 77
77
-
 78
78
-
 79
79
-
 80
80
-
 81
81
-
 82
82
-
 83
83
-
 84
84
-
 85
85
-
 86
86
-
 87
87
-
 88
88
-
 89
89
-
 90
90
-
 91
91
-
 92
92
-
 93
93
-
 94
94
-
 95
95
-
 96
96
-
 97
97
-
 98
98
-
 99
99
-
 100
100
-
 101
101
-
 102
102
-
 103
103
-
 104
104
-
 105
105
-
 106
106
-
 107
107
-
 108
108
-
 109
109
-
 110
110
-
 111
111
-
 112
112
-
 113
113
-
 114
114
-
 115
115
-
 116
116


