HMZ-T1 4-297-825-61(1)
Connect a playback equipment and a TV.
Connect the mains lead and plug it in.
Connect the head mounted unit.
Head mounted unit
Processor unit (Front)
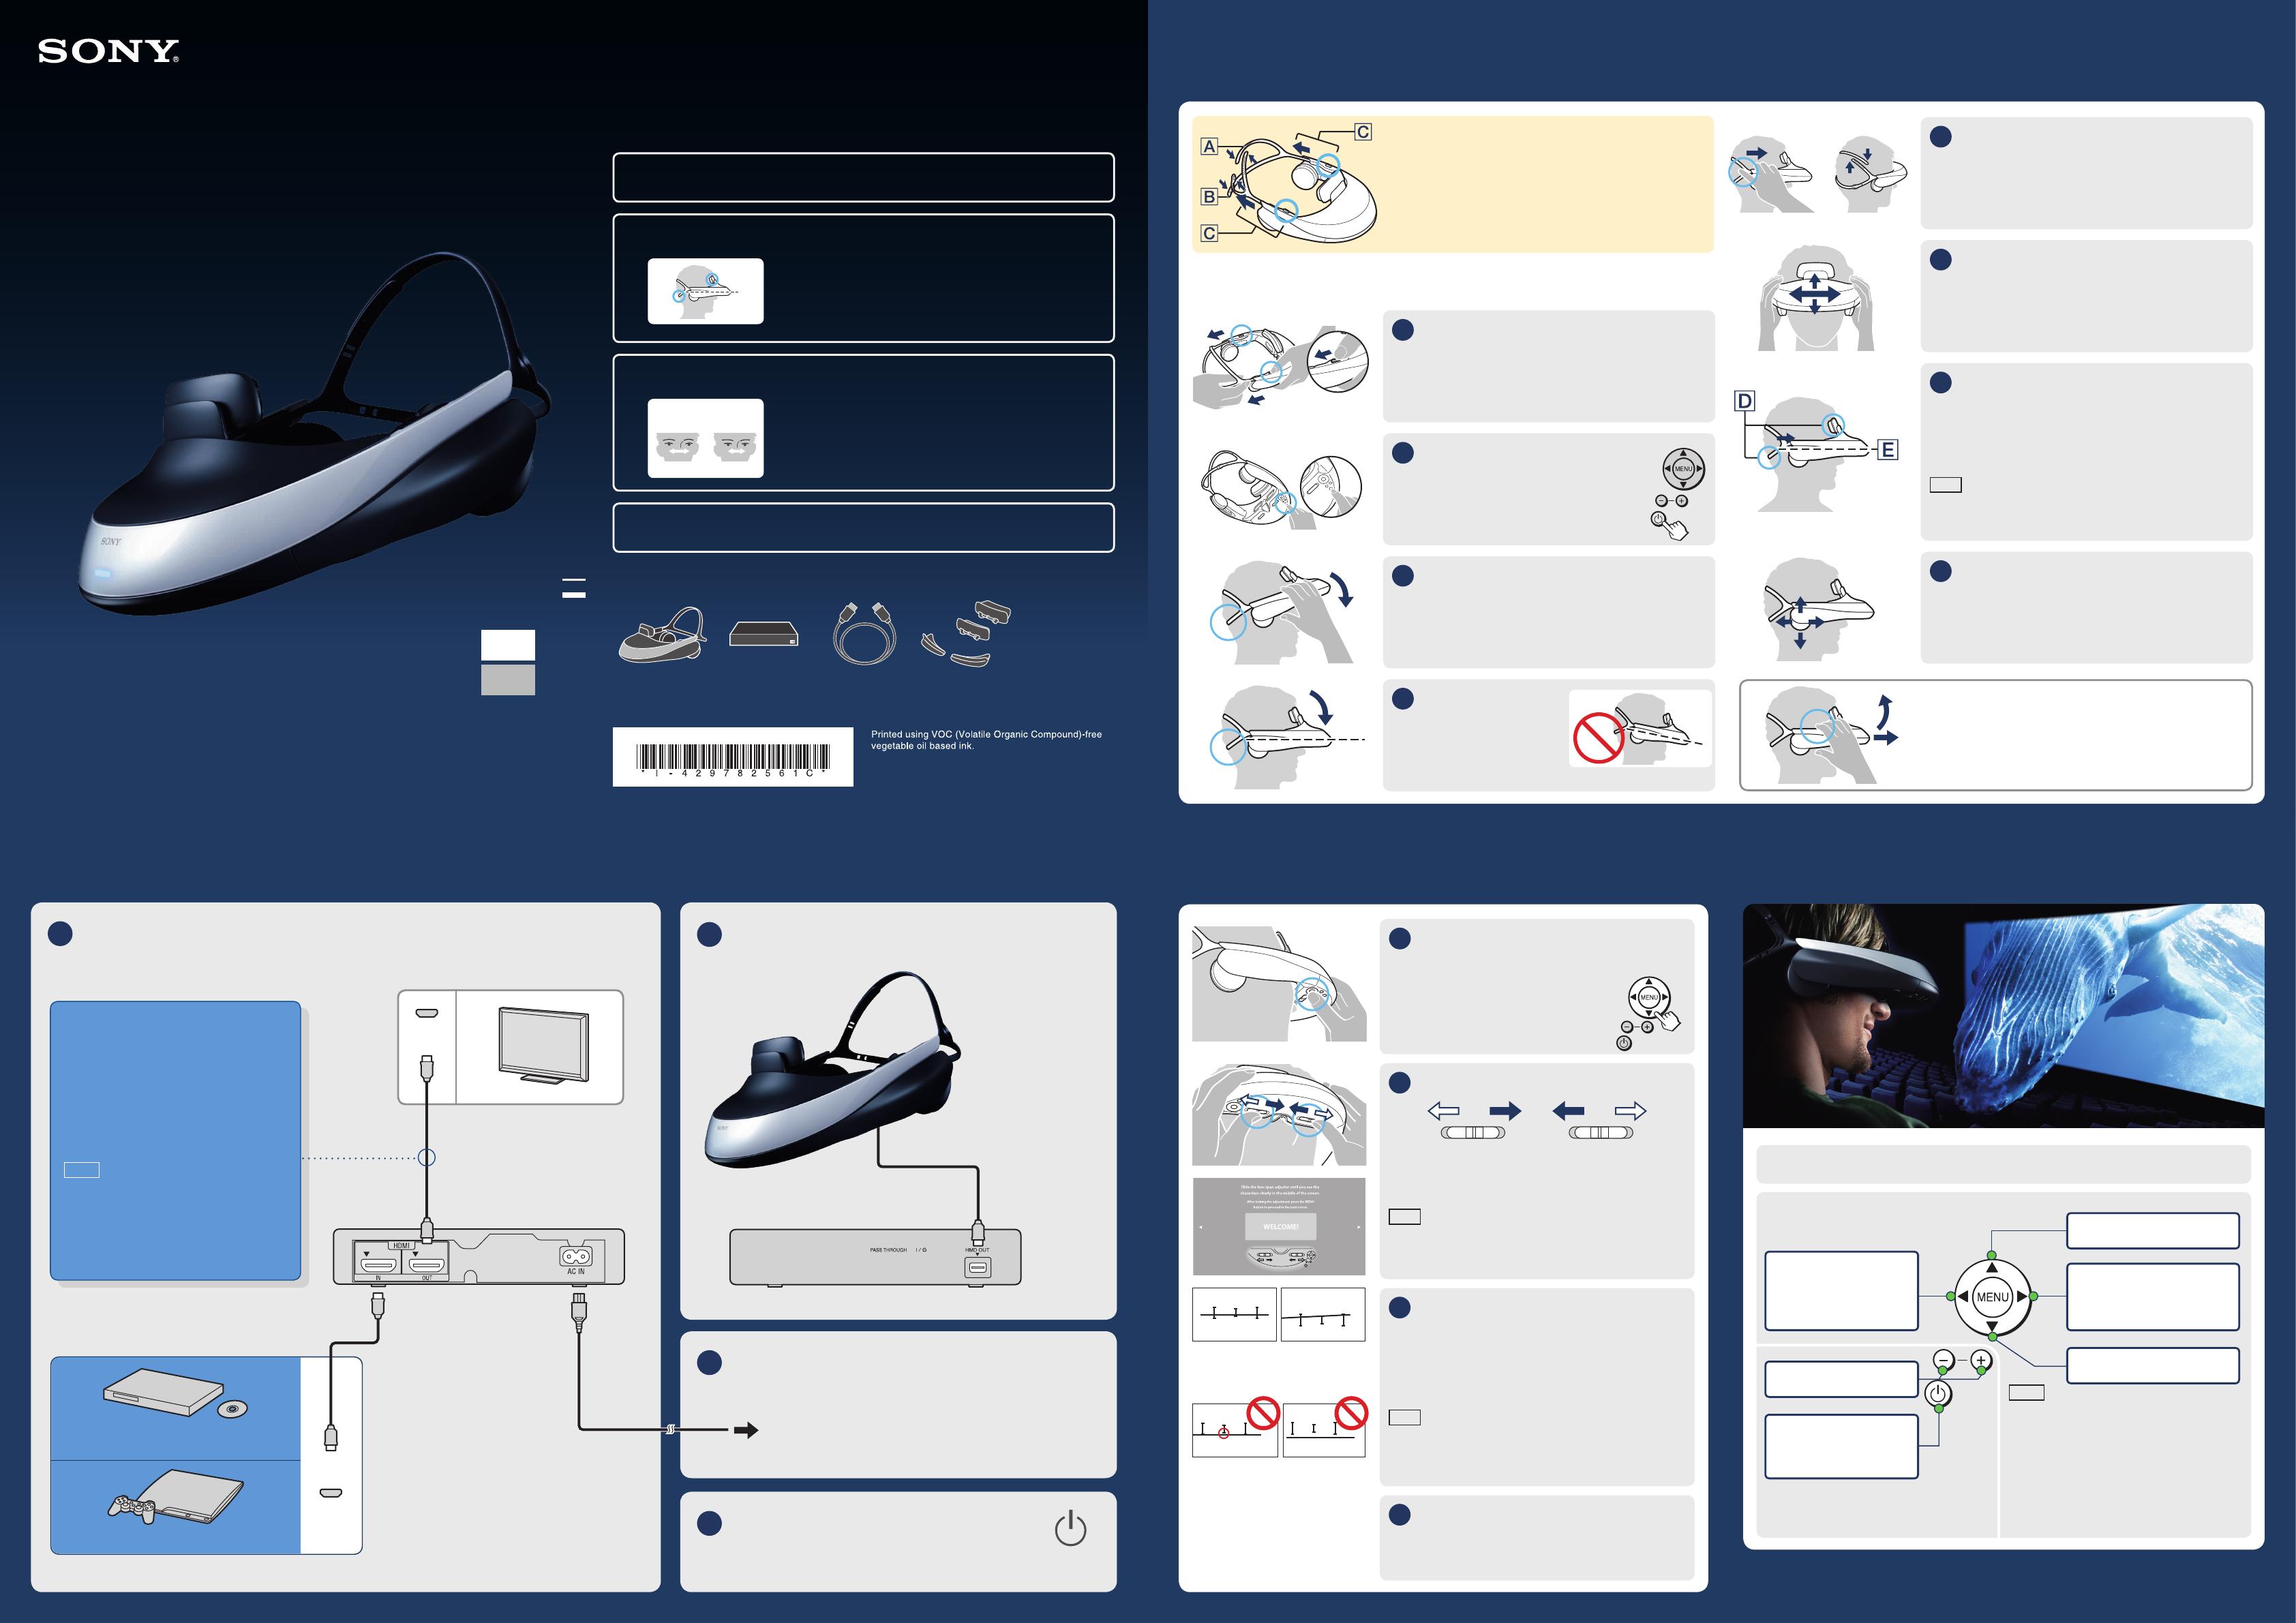
Enjoy Video in Four Steps
By design, the system will oer an impressive experience only after you take
a moment to adjust it to t you well. Conrm the following steps and prepare
for use before enjoying content with this system.
1 Connect
2 Wear Adjust the head mounted unit correctly.
Adjust the head mounted unit securely to your head, so that the
display stays directly in front of your eyes.
3 Set Up Adjust the lens span correctly.
The distance between
the centres of the pupils
Wide Narrow
The distance between pupils varies from person to person. Wear the
head mounted unit correctly and adjust the lens span to the correct
width to align images on the left and right lenses and form images.
4 Enjoy
What’s in the box
Head mounted unit Processor unit HDMI cable (1) Accessories Mains lead (1)
Head Mounted Display
Startup Guide
HMZ-T1
Before use, also refer to “Health Precautions” and
“Precautions” in the “Reference Guide.”
4-297-825-
61
(1)
1 Connect
HDMI
IN
TV
HDMI
OUT
Blu-ray Disc
TM
player
Game console
Playback Equipment
Processor unit (Back)
Turn the playback equipment on.
© 2011 Sony Corporation Printed in Japan
If your playback equipment has only one
HDMI OUT jack and you also want to
watch content from it on a TV, connect it
to the processor unit with the supplied
High-Speed HDMI cable, and connect
the processor unit to the TV with another
High-Speed HDMI cable (recommended
cable length: up to 5 m).
Notes
Make sure to set “HDMI pass-through” to
“On” in the “General Setup” menu when
connecting a TV or other display device.
Make sure that the system is in standby
mode when watching content on a
connected TV or other display device.
HDMI cable (supplied)
To mains
Adjustable Parts
Top headband strap
Bottom headband strap
Headband, release button
If you normally wear glasses or contact lenses, wear them as usual during use (with the exception of reading
glasses). Note that watching with bifocals may be less than optimal.
Pull out the headband.
On one side after another, hold the band release button
down and loosen the headband.
Turn the system on (
).
The power indicator on the processor unit is now
lit in green.
Bring the headband strap down around
the back of your head.
Lower the bottom headband strap to the base of your head.
Straighten the unit
on your head.
Straighten the front of the unit, so
that it is not tilted downward.
Tighten the headband gently.
Gently tighten the headband, evenly on both sides. If the top
or bottom headband strap is too loose, adjust the length.
Adjust the position on your head.
Carefully adjust the unit left and right (and up and down, as
needed) to nd the best position for viewing the centre of
the screens.
Tighten the headband securely.
Support the unit with both the forehead supporter and
the bottom headband strap. Do not support the unit
with the bridge of your nose.
Fasten it to keep it level on your head.
Note
If the unit tips forward, lower the bottom headband strap to
balance the unit on your head.
Adjust the headphones.
Move the headphones forward, back, up, or down to position
them over your ears.
Select a display language (rst time
only).
Press the
/
button to select a
language, and then press the MENU or
button.
Adjust the lens span.
Hold the lens span adjusters on both sides and slide
them together until you can see the screen clearly. After
adjustment, press the MENU button or
button.
Note
If you cannot see the screen clearly after lens span
adjustment, start over from “2 Wear.”
Check display alignment.
Conrm that all three “” marks and the horizontal line
intersect, and then press the MENU or
button.
It is acceptable if the “” marks and the horizontal line
intersect in a position other than the centre of the screen.
Note
If even one of the “” marks and the horizontal line do
not intersect, stop using the system. For details, see the
“Reference Guide.”
Follow the instructions displayed.
After reading the information, press the MENU or
button.
All three “” marks and the horizontal
line intersect.
More than one of the “” marks and the
horizontal line do not intersect.
Control playback from compatible playback sources.
Controlling Playback from the Unit
For details on conguring menu settings and attaching accessories, see the
“Reference Guide.”
2 Wear
Wearing the unit will prevent you from seeing outside the display. Before you put it on, take a moment to review steps 2 – 4
(Wear, Set up, and Enjoy), so that you know the sequence of operations.
3 Set Up
Follow the instructions displayed on the
screen for operations.
4 Enjoy
To remove the head mounted unit
Hold the band release buttons on both sides and pull the unit
forward as you lift it o.
Notes
The system cannot be used for advanced
playback equipment control, such as menu
operations.
Control using these buttons is only possible
when the “Control for HDMI” in “General Setup”
is set to “On” (default setting).
Some playback equipment cannot be
controlled using the head mounted unit
buttons.
Play
Fast-forward
Hold the button down to jump
to the next chapter.
Pause
Power on/standby
Hold the button down to
enter standby mode.
Fast-rewind
Hold the button down
to jump to the previous
chapter.
Volume
GB
CT


 1
1
 2
2

