Contents
•
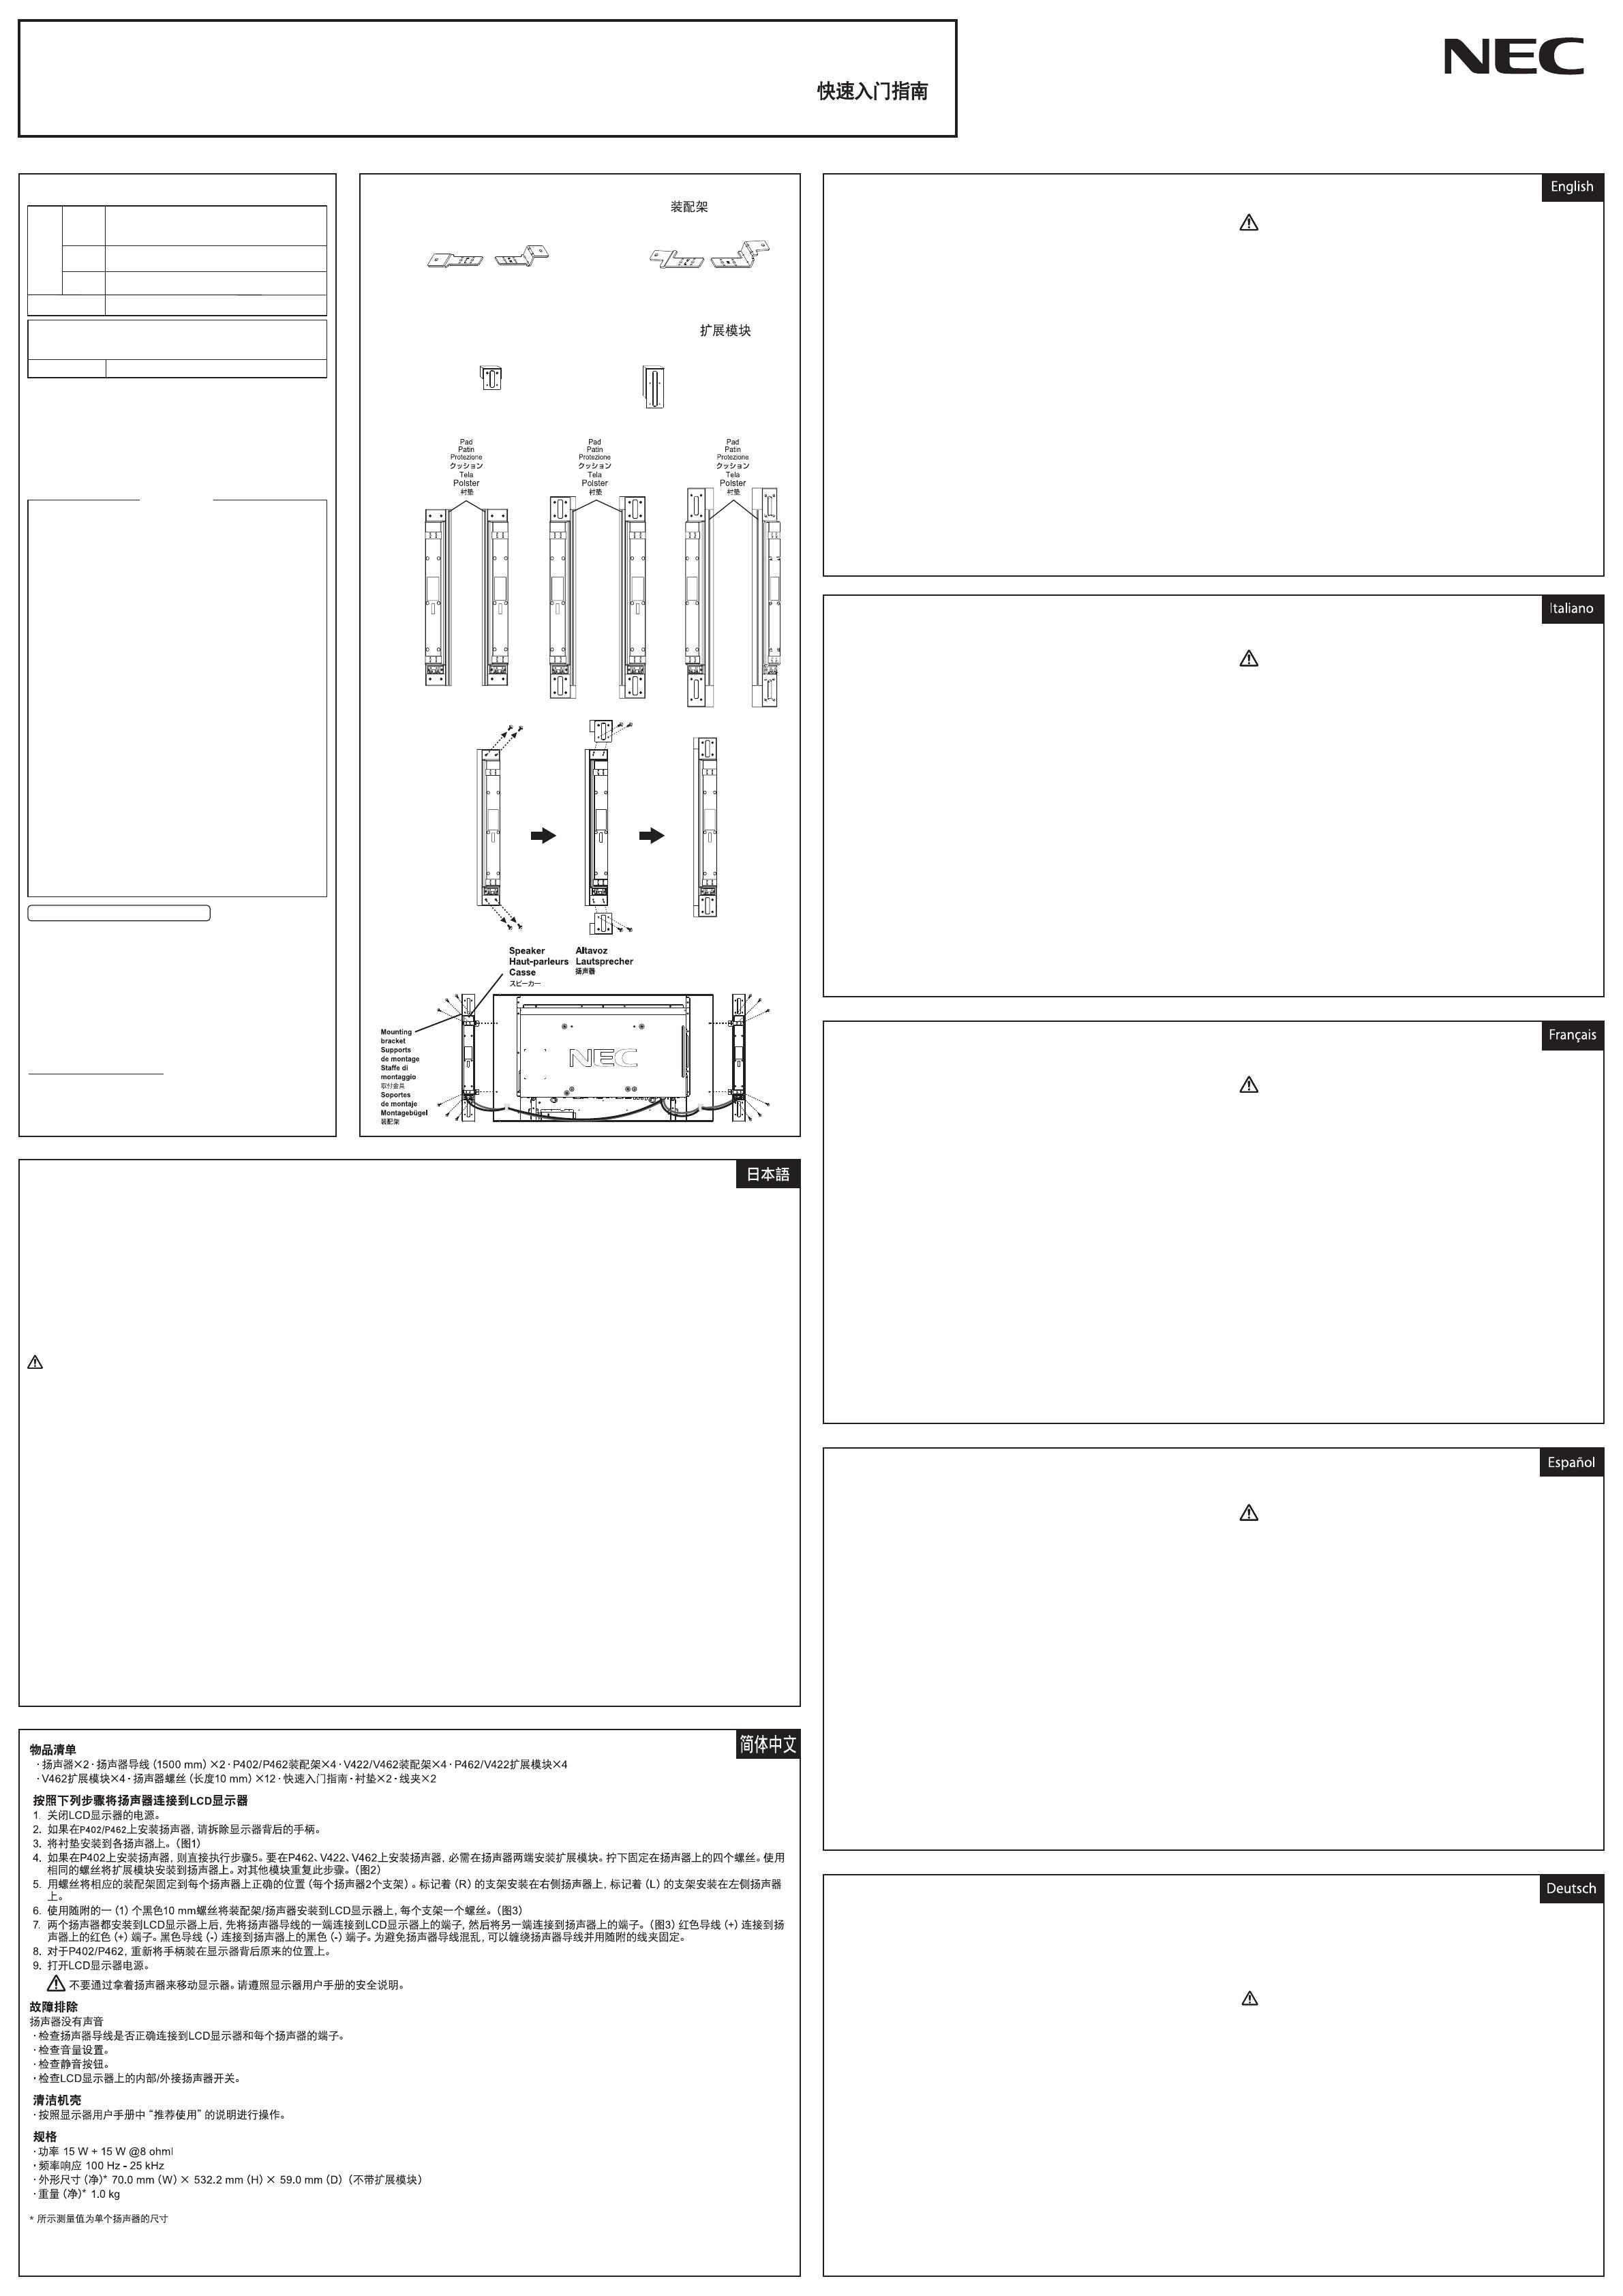
Speaker x 2 • Speaker wire (1500mm) x 2 • Mounting bracket for P402/P462 x 4
• Mounting bracket for V422/V462 x 4 • Extension block for P462/V422 x 4
• Extension block for V462 x 4
•
Speaker screws (10mm length) x 12
• Quick Start Guide • Pad x 2 • Clamp x 2
Follow these steps to connect the speaker to your LCD monitor
1. Turn off the power to the LCD monitor.
2. If mounting speakers on the P402/P462, remove the handles on the back of the
monitor.
3. Attach the pad to each speaker. (Figure1)
4. If mounting speakers on the P402, proceed to step 5. If mounting speakers on
the P462, V422, V462, you will need to attach the extension blocks to the ends
of the speakers. Remove the four screws attached to the speaker. Use the
same screws to attach the extension block to the speaker. Repeat for other
block. (Figure2)
5. Screw appropriate mounting brackets into appropriate position on each speaker
(2 brackets per speaker).
Use the brackets labeled (R) on the right speaker and brackets labeled (L) on
the left speaker.
6. Attach mounting bracket / speakers to the LCD monitor using one (1) black
10mm screw (included)per bracket. (Figure3)
7. Once both speakers are attached to the LCD monitor, connect the speaker
wires first to the terminals on the LCD and then to the terminals on the attached
speakers. (Figure3)
The red wire (+) connects to the red (+) terminal on the speaker.
The black wire (-) connects to the black (-) terminal on the speaker.
To manage excess speaker wire, coil the speaker wire and wrap it using
included clamp.
8. For P402/P462, reattach the handles on their original position on the back of the
monitor.
9. Turn the LCD monitor power on.
Contenuti
•
2 Casse • Cavo casse (1.500 mm) • Staffa di montaggio per modello P402/P462 x 4
• Staffa di montaggio per modello V422/V462 x 4
• Modulo di espansione per modello P462/V422 x 4
• Modulo di espansione per modello V462 x 4
•
12 Viti casse (da 10 mm) • Guida rapida • 2 Protezioni • 2 fermagli
Attenersi alle seguenti istruzioni per collegare le casse al monitor LCD
1. Disattivare l’interruttore d’alimentazione del monitor LCD.
2. Se si stanno montando le casse sul modello P402/P462, rimuovere le maniglie
nella parte posteriore del monitor.
3. Attaccare la protezione su ciascuna cassa. (Figura 1)
4. Se si stanno montando le casse sul modello P401, passare al punto 4. Se si
stanno montando le casse sul modello P461, sarà necessario attaccare i
moduli di espansione all’estremità delle casse. Rimuovere le quattro viti che
fissano la cassa. Usare le stesse quattro viti per attaccare i moduli di
espansione alla cassa. Ripetere con l’altro modulo. (Figura 2)
5. Montare le staffe di montaggio nella posizione corretta su ciascuna cassa (2
staffe per cassa).
Usare le staffe contrassegnate con (R) della cassa destra e le staffe
contrassegnate con (L) della cassa sinistra.
6. Montare il gruppo staffa/cassa sul monitor LCD usando una (1) vite da 10 mm
(fornito) per staffa. (Figura 3)
7. Una volta che entrambe le casse sono attaccate al monitor LCD, collegare i
cavi delle casse ai terminali sul monitor LCD e poi ai terminali delle casse.
(Figura 3)
Il cavo rosso (+) si collega al terminale rosso (+) della cassa.
Il cavo nero (-) si collega al terminale nero (-) della cassa.
8. Per il modello P402/P462, fissare di nuovo le maniglie nella posizione originale
sulla parte posteriore del monitor.
Per gestire il cavo in eccesso: arrotolare il cavo e fermarlo usando il fermaglio
fornito in dotazione.
Contenu
• Haut-parleur x 2 • Fil de haut-parleur (1500mm)
• Support de montage pour le P402/P462 x 4
• Support de montage pour le V422/V462 x 4
• Bloc d’extension pour le P462/V422 x 4• Bloc d’extension pour le V462 x 4
• Vis de haut-parleurs (longueur 10mm) x 12 • Guide de démarrage rapide
• Patin x 2 • Attache x 2
Suivez ces étapes pour brancher les haut-parleurs sur votre moniteur LCD
1. Éteignez le bouton d’alimentation du moniteur LCD.
2. Si vous devez fixer les haut-parleurs au P402/P462, retirez les poignées à
l’arrière du moniteur.
3. Fixez le patin sur chaque haut-parleur. (Figure 1)
4. Si vous devez fixer les haut-parleurs au P401, passez à l’étape 4. Si vous
devez fixer les haut-parleurs au P461, vous devrez aussi fixer les blocs
d’extension aux extrémités des haut-parleurs. Retirez les quatre vis fixées au
haut-parleur. Utilisez ces mêmes vis pour fixer le bloc d’extension au
haut-parleur. Répétez l’opération pour l’autre bloc. (Figure 2)
5. Vissez les supports de montage appropriés à leur position prévue sur chaque
haut-parleur (2 supports par haut-parleur).
Utilisez les supports étiquetés (R) sur le haut-parleur droit et les supports
étiquetés (L) sur le haut-parleur gauche.
6. Vissez les supports de montage/haut-parleurs sur le moniteur LCD à l’aide
d’une (1) vis noire de 10mm (incluse) par support. (Figure3)
7. Une fois que les deux haut-parleurs sont fixés au moniteur LCD, branchez les
fils des haut-parleurs sur les bornes du moniteur LCD puis sur les bornes des
haut-parleurs attachés. (Figure3)
Le fil rouge (+) se branche sur la borne rouge (+) du haut-parleur.
Le fil noire (-) se branche sur la borne noire (-) du haut-parleur.
8. Pour le P402/P462, fixez de nouveau les poignées à leur position d’origine à
l’arrière du moniteur.
Pour gérer le surplus de fil de haut-parleur, enroulez-le et faites-en une bobine à
l’aide de l’attache fournie.
SP -4 04 6PV
Quick Start Guide / Guide de démarrage rapide / Guida rapida
/ Schnellstartanleitung / Guía de inicio r ápido /
Printed in China
Rev, 1
Do not hold the display by the speakers when moving or shifting the
display. Follow the safety instructions in the monitor’s user’s manual.
Troubleshooting
No speaker sound
• Check that the speaker wire is correctly attached to the LCD monitor and to
each speaker terminal.
• Check the volume setting.
• Check the mute button.
• Check the internal/external speaker switch on the LCD monitor.
Cleaning the Cabinet
• Follow the “Recommended Use” in the display’s user manual.
Specifications
• Power 15W + 15W@8 ohm
• Frequency response 100Hz - 25kHz
•
Dimension* (Net) 70.0mm(W) x 532.2mm(H) x 59.0mm(D)(without extension block)
• Weight* (Net) 1.0 kg
*Measurements shown are for each individual speaker
9. Accendere il monitor LCD
Quando si sposta il monitor, non afferrarlo per le casse.
Osservare le istruzioni di sicurezza nel manuale dell'utente del monitor.
Risoluzione dei problemi
Assenza sonoro casse
• Controllare che il cavo delle casse sia collegato in modo corretto, ed ai
terminali corretti del monitor LCD e delle casse.
• Controllare il volume delle casse.
• Controllare il tasto Mute.
• Controllare l'interruttore della cassa interna/esterna sul monitor LCD.
Pulizia del mobile
• Seguire le raccomandazioni d’uso del Manuale.
Specifiche
• Potenza 15W + 15W a 8 ohm
• Risposta di frequenza 100Hz - 25kHz
• Dimensioni* (Netto) 70,0 mm (L) x 532,2 mm (A) x 59,0 mm (P) (senza
modulo di espansione)
• Peso* (Netto) 1,0 kg
*Le misure indicate fanno riferimento ad ogni singola cassa
9. Allumez l’alimentation du moniteur LCD.
Ne tenez pas l’écran par les haut-parleurs lorsque vous le déplacez.
Suivez les consignes de sécurité du mode d'emploi du moniteur.
Dépannage
Aucun son dans les haut-parleurs
• Vérifiez que le fil du haut-parleur est correctement attaché au moniteur LCD et
que chaque haut-parleur est branché sur chaque borne de haut-parleur.
• Vérifiez le réglage de volume sur les haut-parleurs.
• Vérifiez le bouton de coupure du son.
• Vérifiez l’interrupteur des haut-parleurs internes/externes sur le moniteur LCD.
Nettoyage du boîtier
• Suivez l’utilisation recommandée dans le mode d’emploi de l’écran.
Spécifications
• Puissance 15W + 15W@8 ohms
• Réponse en fréquences 100Hz - 25kHz
• Dimensions* (Nettes) 70,0 mm (L) x 532,2 mm (H) x 59,0 mm (P) (sans bloc
d’extension)
• Poids* (Net) 1,0 kg
*Les dimensions indiquées correspondent à chaque haut-parleur
Contenido
• Altavoz x 2 • Cable de altavoz (1.500 mm) • Soporte de montaje para P402/P462 x 4
• Soporte de montaje para V422/V462 x 4• Bloque alargador para P462/V422 x 4
• Bloque alargador para V462 x 4
• Tornillos para altavoz (10 mm de largo) x 12 • Guía de inicio rápido • Tela x 2
• Abrazadera x 2
Siga estos pasos para conectar el altavoz al monitor LCD
1. Coloque el conmutador del monitor LCD en la posición de apagado.
2. Si va a montar altavoces en el modelo P402/P462, retire los asas de la parte
posterior del monitor.
3. Acople la tela a cada altavoz. (Figura 1)
4. Si va a montar altavoces en el modelo P401, vaya al paso 4. Si los altavoces
se montan en el P461, necesitará acoplar los bloques alargadores a los
extremos de los altavoces. Retire los cuatro tornillos que unen el altavoz. Utilice
los mismos tornillos para unir los bloques alargadores al altavoz. Repita la
operación con el otro bloque. (Figura 2)
5. Atornille los soportes de montaje adecuados en la posición correcta en cada
altavoz (2 soportes por altavoz).
Utilice los soportes etiquetados con (R) en el altavoz derecho y los etiquetados
con (L) en el altavoz izquierdo.
6. Atornille el soporte de montaje y los altavoces al monitor LCD utilizando un (1)
tornillo de 10mm (incluido) de color negro por soporte. (Figure 3)
7. Cuando haya acoplado los dos altavoces al monitor LCD, conecte sus cables a
los terminales de éste y, a continuación, a los terminales de los altavoces
montados. (Figura 3)
El cable rojo (+) se conecta al terminal de color rojo (+) del altavoz.
El cable negro (-) se conecta al terminal de color negro (-) del altavoz.
Para administrar el cable sobrante de los altavoces enrolle el cable de los
altavoces y envuélvalo utilizando la abrazadera que se inlcuye.
8. Para el modelo P402/P462, vuelva a acoplar las asas en su posición original en
la parte posterior del monitor.
9. Encienda el monitor LCD.
No agarre los altavoces cuando mueva o levante la pantalla.
Siga las instrucciones de seguridad en el manual de usuario del monitor.
Solucionar problemas
Los altavoces no emiten sonido
• Compruebe que el cable de los altavoces está correctamente conectado al
monitor LCD y, a su vez, aquéllos están perfectamente conectados a sus
terminales.
• Compruebe la configuración del volumen de los altavoces.
• Compruebe si el botón de silencio está activado.
• Compruebe el interruptor del altavoz interno/externo en el monitor LCD.
Limpiar la carcasa
• Siga las instrucciones de uso recomendado del manual del usuario de la
pantalla.
Especificaciones
• Potencia: 15 W + 15 W a 8 ohm
• Respuesta de frecuencia: 100 Hz - 25kHz
• Dimensiones* (netas) 70,0 mm (A) x 532,2 mm (L) x 59,0 mm (F) (sin bloque
alargador)
• Peso* (neto) 1,0 kg
*Estos parámetros hacen referencia a cada uno de los altavoces
Lieferumfang
• Lautsprecher x 2 • Lautsprecherkabel (1500 mm) • Montagebügel für P402/P462 x 4
• Montagebügel für V422/V462 x 4• Erweiterungsblock für P462/V422 x 4
• Erweiterungsblock für V462 x 4 • Lautsprecherschrauben 10 mm x 12
• Schnellstartanleitung • Klemme x 2 • Polsterstück x 2
So verbinden Sie die Lautsprecher mit lhrem LCD-Monitor
1. Schalten Sie den LCD-Monitor über den Ein-/Ausschalter ab.
2. Wenn Sie die Lautsprecher am P402/P462 montieren, entfernen Sie die Griffe
auf der Rückseite des Monitors.
3. Bringen Sie das Polsterstück an jedem Lautsprecher an. (Abbildung 1)
4. Wenn Sie die Lautsprecher am P401 montieren, fahren Sie mit Schritt 4 fort.
Wenn die Lautsprecher am P461 montiert werden, müssen Sie die
Erweiterungsblöcke an den Enden des Lautsprechers wechseln. Entfernen Sie
die vier Schrauben, die am Lautsprecher angebracht sind. Verwenden Sie
diese Schrauben zum Anbringen des Erweiterungsblocks am Lautsprecher.
Wiederholen Sie diese Schritte zum Befestigen des anderen Blocks. (Abbildung 2)
5. Befestigen Sie die Montagebügel an der richtigen Position an den einzelnen
Lautsprechern (2 Bügel pro Lautsprecher).
Verwenden Sie die mit (R) gekennzeichneten Halterungen am rechten
Lautsprecher und die mit (L) gekennzeichneten Halterungen am linken Lautsprecher.
6. Befestigen Sie die Lautsprecher mit den Montagebügeln am LCD-Monitor;
verwenden Sie dazu jeweils eine (1) schwarze mitgelieferte 10-mm-Schraube
pro Bügel. (Abbildung 3)
7. Nachdem Sie beide Lautsprecher am LCD-Monitor angebracht haben,
verbinden Sie die Lautsprecherkabel mit den Anschlüssen am LCD-Monitor;
das andere Ende der Kabelverbindungen verbinden Sie mit den Anschlüssen
an den Lautsprechern. (Abbildung 3)
Das Kabel mit der roten Kennzeichnung (+) wird mit dem roten Anschluss (+)
am Lautspre-cher verbunden.
Das schwarz gekennzeichnete Kabel (-) wird mit dem schwarzen Anschluss (-)
am Lautspre-cher verbunden.
So verfahren Sie mit überschüssigem Lautsprecherkabel: wickeln Sie das
Lautsprecherka-bel auf und befestigen Sie es mit Hilfe der mitgelieferten Klemme.
8. Bringen Sie beim P402/P462 die Griffe wieder an ihrer ursprünglichen Position
an der Rückseite des Monitors an.
9. Schalten Sie den LCD-Monitor ein.
Fassen Sie den Monitor nicht an den Lautsprechern, wenn Sie ihn bewegen
oder verschieben.
Befolgen Sie die Sicherheitsanweisungen in der Bedienungsanleitung des
Monitors.
Problemlösung
Kein Ton aus den Lautsprechern
• Überprüfun Sie, ob die Lautsprecherkabel richtig an die Anschlüsse von
LCD-Monitor und jedem Lautspre-cher angeschlossen sind.
• Überprüfun Sie die Lautstärkeeinstellung an den Lautsprechern.
• Überprüfen Sie, ob die Stummschaltungstaste betätigt wurde.
• Überprüfen Sie den Schalter für interne/externe Lautsprecher an dem
LCD-Monitor.
Gehäuse reinigen
• Bitte halten Sie sich an die Empfehlungen in der Bedienungsanleitung des
Monitors.
Technische Daten
• Ausgangsleistung: 15 W + 15 W bei 8 Ohm
• Frequenzgang: 100 Hz bis 25kHz
• Abmessungen* (netto) 70,0 mm(B) x 532,2 mm(H) x 59,0 mm(T) (ohne
Erweiterungsblock)
• Gewicht* (netto) 1,0 kg
*Die angegebenen Abmessungen gelten für jeden einzelnen Lautsprecher
Figure 1
Mounting bracket / Support de montage / Staffe di montaggio /
/ Soporte de montaje / Montagebügel /
Extension block / Bloc d’extension / Modulo di espansione /
/ Bloque alargador / Erweiterungsblock /
Figure 2
Figure 3
For P402 For P462
V422
For P462
V422
For P402
For P462
For V422
For V462
For V462
For V462
NECPC
TEL 0120-00-8283
TEL 0570-064-211
9: 0018: 00
121 TEL 0120-977-121
PHS
9:0021:00
TEL 03-6670-6000
Serial No.
108-0023 13 23 MS


