
1
6
7
4
2
5
3
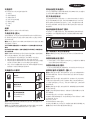
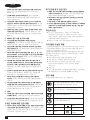
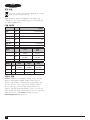
SBW920
www.stanleytools.com

23
English (original instructions) 4
简体中文 11
繁體中文 16
한국어 21
Bahasa Indonesia 27
34
TIẾNG VIỆT 42

23
1
8
8b
8a
1
1 1a
D
1
1b
A B
C D
11 12
10
E
11
F

4
ENGLISH (Original instructions)
English (original instructions)
Intended use
Your STANLEY FATMAX SBW920 brushless impact
wrench has been designed for screwdriving and nut setting
applications. This appliance is intended for professional and
private, non-professional users.
Safety instructions
General power tool safety warnings
Warning! Read all safety warnings,
instructions, illustrations and specications
provided with this power tool. Failure to follow
all instructions listed below may result in electric
shock, re and/or serious injury.
Save all warnings and instructions for future reference.
The term "power tool" in all of the warnings listed below
refers to your mains operated (corded) power tool or battery
operated (cordless) power tool.
1. Work area safety
a. Keep work area clean and well lit. Cluttered or dark
areas invite accidents.
b. Do not operate power tools in explosive atmospheres,
such as in the presence of ammable liquids, gases
or dust. Power tools create sparks which may ignite the
dust or fumes.
c. Keep children and bystanders away while operating a
power tool. Distractions can cause you to lose control.
2. Electrical safety
a. Power tool plugs must match the outlet. Never modify
the plug in any way.
Do not use any adapter plugs with earthed (grounded)
power tools. Unmodied plugs and matching outlets will
reduce risk of electric shock.
b. Avoid body contact with earthed or grounded
surfaces such as pipes, radiators, ranges and
refrigerators. There is an increased risk of electric shock
if your body is earthed or grounded.
c. Do not expose power tools to rain or wet conditions.
Water entering a power tool will increase the risk of
electric shock.
d. Do not abuse the cord. Never use the cord for
carrying, pulling or unplugging the power tool. Keep
cord away from heat, oil, sharp edges or moving
parts. Damaged or entangled cords increase the risk of
electric shock.
e. When operating a power tool outdoors, use an
extension cord suitable for outdoor use. Use of a cord
suitable for outdoor use reduces the risk of electric shock.
f. If operating a power tool in a damp location is
7
13
G
14
3
6
4
H

5
ENGLISH
(Original instructions)
tools. Such preventive safety measures reduce the risk of
starting the power tool accidentally.
d. Store idle power tools out of the reach of children and
do not allow persons unfamiliar with the power tool or
these instructions to operate the power tool.
Power tools are dangerous in the hands of
untrained users.
e. Maintain power tools and accessories. Check for
misalignment or binding of moving parts, breakage of
parts and any other condition that may affect the
power tools operation. If damaged, have the power
tool repaired before use. Many accidents are caused by
poorly maintained power tools.
f. Keep cutting tools sharp and clean. Properly
maintained cutting tools with sharp cutting edges are less
likely to bind and are easier to control.
g. Use the power tool, accessories and tool bits etc. in
accordance with these instructions, taking into
account the working conditions and the work to be
performed.
Use of the power tool for operations different from those
intended could result in a hazardous situation.
h. Keep handles and grasping surfaces dry, clean and
free from oil and grease. Slippery handles and grasping
surfaces do not allow for safe handling and control of the
tool in unexpected situations.
5. Battery tool use and care
a. Recharge only with the charger specied by the
manufacturer. A charger that is suitable for one type of
battery pack may create a risk of re when used with
another battery pack.
b. Use power tools only with specically designated
battery packs. Use of any other battery packs may create
a risk of injury and re.
c. When battery pack is not in use, keep it away from
other metal objects, like paper clips, coins, keys,
nails, screws, or other small metal objects, that can
make a connection from one terminal to another.
Shorting the battery terminals together may cause burns
or a re.
d. Under abusive conditions, liquid may be ejected from
the battery; avoid contact. If contact accidentally
occurs, ush with water. If liquid contacts eyes,
additionally seek medical help. Liquid ejected from the
battery may cause irritation or burns.
e. Do not use a battery pack or tool that is damaged or
modied. Damaged or modied batteries may exhibit
unpredictable behaviour resulting in re, explosion or risk
of injury.
f. Do not expose a battery pack or tool to re or
unavoidable, use a residual current device (RCD)
protected supply. Use of an RCD reduces the risk of
electric shock.
3. Personal safety
a. Stay alert, watch what you are doing and use common
sense when operating a power tool.
Do not use a power tool while you are tired or under
the inuence of drugs, alcohol or medication. A
moment of inattention while operating power tools may
result in serious personal injury.
b. Use personal protective equipment. Always wear eye
protection. Protective equipment such as dust mask,
non-skid safety shoes, hard hat, or hearing protection
used for appropriate conditions will reduce
personal injuries.
c. Prevent unintentional starting. Ensure the switch is in
the off-position before connecting to power source
and/or battery pack, picking up or carrying the tool.
Carrying power tools with your nger on the switch or
energising power tools that have the switch on
invites accidents.
d. Remove any adjusting key or wrench before turning
the power tool on. A wrench or a key left attached to a
rotating part of the power tool may result in personal injury.
e. Do not overreach. Keep proper footing and balance at
all times. This enables better control of the power tool in
unexpected situations.
f. Dress properly. Do not wear loose clothing or
jewellery. Keep your hair and clothing away from
moving parts. Loose clothes, jewellery or long hair can
be caught in moving parts.
g. If devices are provided for the connection of dust
extraction and collection facilities, ensure these are
connected and properly used. Use of dust collection
can reduce dust-related hazards.
h. Do not let familiarity gained from frequent use of
tools allow you to become complacent and ignore
tool safety principles. A careless action can cause
severe injury within a fraction of a second.
4. Power tool use and care
a. Do not force the power tool. Use the correct power
tool for your application.
The correct power tool will do the job better and safer at
the rate for which it was designed.
b. Do not use the power tool if the switch does not turn it
on and off. Any power tool that cannot be controlled with
the switch is dangerous and must be repaired.
c. Disconnect the plug from the power source and/or the
battery pack from the power tool before making any
adjustments, changing accessories, or storing power

6
ENGLISH (Original instructions)
excessive temperature. Exposure to re or temperature
above 130 °C may cause explosion.
g. Follow all charging instructions and do not charge the
battery pack or tool outside the temperature range
specied in the instructions. Charging improperly or at
temperatures outside the specied range may damage the
battery and increase the risk of re.
6. Service
a. Have your power tool serviced by a qualied repair
person using only identical replacement parts. This
will ensure that the safety of the power tool is maintained.
b. Never service damaged BATTERY packs. Service of
BATTERY packs should only be performed by the
manufacturer or authorized service providers.
1) Safety instructions for all operations
a) Hold the power tool by insulated gripping surfaces,
when performing an operation where the fastener may
contact hidden wiring. Fasteners contacting a "live" wire
may make exposed metal parts of the power tool "live"
and could give the operator an electric shock.
Additional power tool safety warnings
u Use clamps or another practical way to secure and
support the work piece to a stable platform. Holding
the work by hand or against your body leaves it unstable
and may lead to loss of control.
u Before driving fasteners into walls, oors or ceilings,
check for the location of wiring and pipes.
u The intended use is described in this
instruction manual.
u The use of any accessory or attachment or
performance of any operation with this tool other
than those recommended in this instruction manual
may present a risk of personal injury and/or damage
to property.
Safety of others
u This tool is not intended for use by persons (including
children) with reduced physical, sensory or mental
capabilities, or lack of experience and knowledge,
unless they have been given supervision or instruction
concerning use of the appliance by a person responsible
for their safety.
u Children should be supervised to ensure that they do not
play with the appliance.
Residual risks
Additional residual risks may arise when using the tool which
may not be included in the enclosed safety warnings. These
risks can arise from misuse, prolonged use etc.
Even with the application of the relevant safety regulations
and the implementation of safety devices, certain residual
risks can not be avoided. These include:
u Injuries caused by touching any rotating/moving parts.
u Injuries caused when changing any parts, blades
or accessories.
u Injuries caused by prolonged use of a tool. When
using any tool for prolonged periods ensure you take
regular breaks.
u Impairment of hearing.
u Health hazards caused by breathing dust developed when
using your tool (example:- working with wood, especially
oak, beech and MDF.)
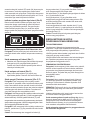
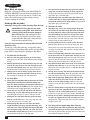
Labels on tool
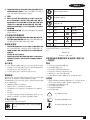
The label on your tool may include the following symbols:
WARNING! To reduce the risk of injury, the
user must read the instruction manual before
use.
Wear safety glasses or goggles.
Wear ear protection.
Wear a dust mask.
V Volts Direct Current
A Amperes n0No-Load Speed
Hz Hertz Class II
Construction
W Watts Earthing
Terminal
min minutes Safety Alert
Symbol
Alternating
Current
/min. Revolutions or
Reciprocation
per minute
Position of date code
The Date Code, which also includes the year of manufacture, is
printed into the housing.
Example:
2020 XX JN
Year of manufacturing
Additional safety instructions for batteries and
chargers (Not provided with the tool)

7
ENGLISH
(Original instructions)
Batteries
u Never attempt to open for any reason.
u Do not expose the battery to water.
u Do not store in locations where the temperature may
exceed 40 °C.
u Charge only at ambient temperatures between 10 °C and
40 °C.
u Charge only using the charger provided with the tool.
u When disposing of batteries, follow the instructions given
in the section "Protecting the environment".
Chargers
u Use your STANLEY FATMAX charger only to charge
the battery in the tool with which it was supplied. Other
batteries could burst, causing personal injury and damage.
u Never attempt to charge non-rechargeable batteries.
u Have defective cords replaced immediately.
u Do not expose the charger to water.
u Do not open the charger.
u Do not probe the charger.
The charger is intended for indoor use only.
Read the instruction manual before use.
Do not attempt to charge damaged batteries.
lectrical safety
Your charger is double insulated; therefore no
earth wire is required. Always check that the
mains voltage corresponds to the voltage on
the rating plate. Never attempt to replace the
charger unit with a regular mains plug.
●If the supply cord is damaged, it must be replaced by the
manufacturer or an authorised Stanley FatMax Service
Centre in order to avoid a hazard.
Warning! Never attempt to replace the charger unit with a
regular mains plug.
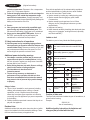
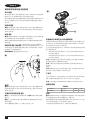
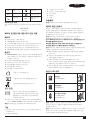
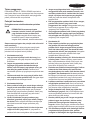
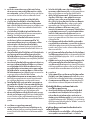
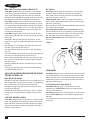
Features
This appliance includes some or all of the following features.
1. Battery pack
2. Battery release button
3. Variable speed trigger
4. Forward/reverse control button
5. Speed selector
6. Worklight
7 Anvil
Assembly
Warning! Before assembly, remove the battery from the tool.
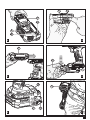
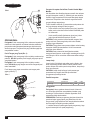
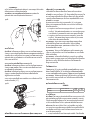
Charging the battery (Fig. A)
The battery needs to be charged before rst use and
whenever it fails to produce sufcient power on jobs that were
easily done before. The battery may become warm while
charging; this is normal and does not indicate a problem.
Warning! Do not charge the battery at ambient temperatures
below 10 °C or above 40 °C. Recommended charging
temperature: approx. 24 °C.
Note: The charger will not charge a battery if the cell
temperature is below approximately 10 °C or above 40 °C.
The battery should be left in the charger and the
charger will begin to charge automatically when the cell
temperature warms up or cools down.
Note: To ensure maximum performance and life of lithium-ion
battery packs, charge the battery pack fully before rst use.
u Plug the charger (8) into an appropriate outlet before
inserting battery pack (1).
u The green charging light (8a) will blink continuously
indicating that the charging process has started.
u The completion of charge will be indicated by the green
charging light (8a) remaining ON continuously. The battery
pack (1) is fully charged and may be removed and used at
this time or left in the charger (8).
u Charge discharged batteries within 1 week. Battery life will
be greatly diminished if stored in a discharged state.
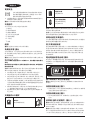
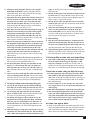
Charger LED Modes
Charging:
Green LED Intermittent
Fully Charged:
Green LED Solid
Hot/Cold Pack Delay:
Green LED Intermittent
Red LED Solid
Note: The compatible charger(s) will not charge a faulty
battery pack. The charger will indicate a faulty battery pack by
refusing to light.
Note: This could also mean a problem with a charger. If the
charger indicates a problem, take the charger and battery
pack to be tested at an authorized service centre.

8
ENGLISH (Original instructions)
Leaving the battery in the charger
The charger and battery pack can be left connected with the
LED glowing indenitely. The charger will keep the battery
pack fresh and fully charged.
Hot/Cold Pack Delay
When the charger detects a battery that is too hot or too
cold, it automatically starts a Hot/Cold Pack Delay, the green
LED (8a) will ash intermittently, while the red LED (8b) will
remain on continuously, suspending charging until the battery
has reached an appropriate temperature. The charger then
automatically switches to the pack charging mode. This
feature ensures maximum battery life.
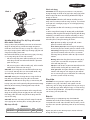
Battery state of charge indicator (Fig. B)
The battery includes a state of charge indicator to quickly
determine the extent of battery life as shown in gure B. By
pressing the state of charge button (1a) you can easily view
the charge remaining in the battery as illustrated in gure B.
Installing and Removing the Battery Pack from
the tool
Warning! Make certain the lock-off button is engaged to
prevent switch actuation before removing or installing battery.
To install battery pack (Fig. C)
u Insert battery pack rmly into tool until an audible click is
heard as shown in gure C. Ensure battery pack is fully
seated and fully latched into position.
To remove battery pack (Fig. D)
u Depress the battery release button (1b) as shown in
gure D and pull battery pack out of tool.
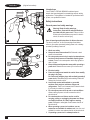
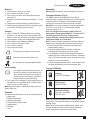
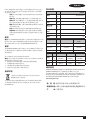
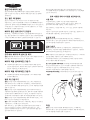
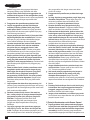
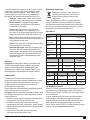
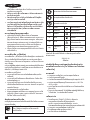
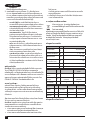
Belt hook (Optional extra) (Fig. E, F)
Warning! To reduce the risk of serious personal injury,
place the forward/reverse button in the lock-off position or
turn tool off and disconnect battery pack before making
any adjustments or removing/installing attachments or
accessories. An accidental start-up can cause injury.
Warning! To reduce the risk of serious personal injury, ONLY
use the tool’s belt hook (11) to hang the tool from a work belt.
DO NOT use the belt hook (11) for tethering or securing the
tool to a person or object during use. DO NOT suspend tool
overhead or suspend objects from the belt hook.
Warning! To reduce the risk of serious personal injury, ensure
the screw (12) holding the belt hook is secure.
Note: When attaching or replacing the belt hook (8), use only
the screw (12) that is provided. Be sure to securely tighten
the screw.
The belt hook (11) can be be attached by sliding into the
slots (10) on either side of the tool.
using only the screw (12) provided, to accommodate left- or
right-handed users. If the hook is not desired at all, it can be
removed from the tool.
To move the belt hook, remove the screw (12) that holds the
belt hook (11) in place then reassemble on the opposite side.
Be sure to securely tighten the screw (12).
Note: Various trackwall hooks and storage congurations
are available.
SAVE THESE INSTRUCTIONS FOR FUTURE USE
INTENDED USE
This impact wrench is designed for impact fastening and
drilling applications. The impact function makes this tool
particularly useful for driving fasteners in wood, metal
and concrete.
DO NOT use under wet conditions or in presence of
ammable liquids or gases.
DO NOT let children come into contact with the tool.
Supervision is required when inexperienced operators use
this tool.
ASSEMBLY AND ADJUSTMENTS
Warning! To reduce the risk of serious personal injury,
turn unit off and remove the battery pack before making
any adjustments or removing/installing attachments or
accessories. An accidental start-up can cause injury.
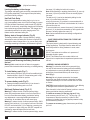
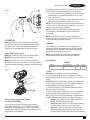
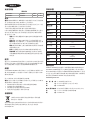
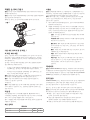
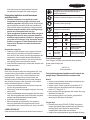
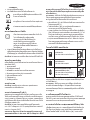
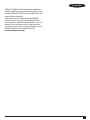
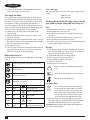
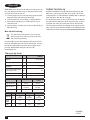
Anvil (Fig. I)
Warning!Use only impact accessories. Non-impact
accessories may break and cause a hazardous condition.
Inspect accessories prior to use to ensure that it con tains
no cracks.
CAUTION: Inspect anvils and hog rings prior to use. Missing
or damaged items should be replaced before use.
Place the switch in the locked off (center) position or remove
battery pack before changing accessories.
To install an accessory on the hog ring anvil, rmly
push accessory onto the anvil (15) . The hog ring (16)
compresses to allow the accessory to slide on. After
accessory is installed, the hog ring applies pressure to help
provide accessory retention.
To remove an accessory, grasp the accessory and rmly
pull it off.

9
ENGLISH
(Original instructions)
Fig. I 15
16
OPERATION
Warning! To reduce the risk of serious personal injury,
turn unit off and remove the battery pack before making
any adjustments or removing/installing attachments or
accessories. An accidental start-up can cause injury.
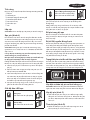
Proper Hand Position (Fig. J)
Warning! To reduce the risk of serious personal injury,
ALWAYS use proper hand position as shown.
Warning! To reduce the risk of serious personal injury,
ALWAYS hold securely in anticipation of a sudden reaction.
Proper hand position requires one hand on the main handle
(17) .
Fig. J
17
Variable Speed Trigger and Forward/
Reverse Control Button
The tool is turned on and off by pulling and releasing
the variable speed trigger (3) . The farther the trigger is
depressed, the higher the speed of the tool. Your tool is
equipped with a brake. The chuck will stop as soon as the
trigger switch is fully released.
A forward/reverse control button (4) determines the rotational
direction of the tool and also serves as a lock-off button.
• To select forward rotation (clockwise), release the trigger
and depress the forward/reverse control button on the
right side of the tool.
• To select reverse (counterclockwise), depress the forward/
reverse control button on the left side of the tool.
NOTE: The center position of the control button locks the tool
in the off position. When changing the position of the control
button, be sure the trigger is released.
NOTE: Continuous use in variable speed range is not
recommended. It may damage the switch and should
be avoided.
NOTE: The rst time the tool is run after changing the
direction of rotation, you may hear a click on start up. This is
normal and does not indicate a problem.
Worklight
The worklight (6) is activated when the trigger switch is
depressed, and will automatically turn off 20 seconds after
the trigger switch is released. If the trigger switch remains
depressed, the worklight will remain on.
NOTE: The worklight is for lighting the immediate work
surface and is not intended to be used as a ashlight.
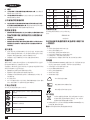
Speed Selector
SBW920
Low Mode Normal Impacting RPM 0–900
High Mode High Speed Impacting RPM 0–1900
Usage
Warning!Use only impact accessories. Non-impact
accessories may break and cause a hazardous condition.
Inspect accessory prior to use to ensure that it con tains no
cracks.
CAUTION: Ensure fastener and/or system will withstand the
level of torque generated by the tool. Excessive torque may
cause breakage and possible personal injury.
1. Place the accessory on the fastener head. Keep the tool
pointed straight at the fastener.
2. Press variable speed trigger switch (3) to start operation.
Release variable speed trigger switch to stop operation.
Always check torque with a torque wrench, as the fastening
torque is affected by many factors including the following:
-Voltage: Low voltage, due to a nearly discharged
battery, will reduce fastening torque.
-Accessory size: Failure to use the correct accessory
size will cause a reduction in fastening torque.
-Bolt size: Larger bolt diameters generally require
higher fastening torque. Fastening torque will also
vary according to length, grade, and torque coefficient.

10
ENGLISH (Original instructions)
-Bolt: Ensure that all threads are free of rust and other
debris to allow proper fastening torque.
-Material: The type of material and surface finish of the
material will affect fastening torque.
-Fastening time: Longer fasten ing time results in
increased fastening torque. Using a longer fastening
time than recommended could cause the fasteners to
be overstressed, stripped or damaged.
Accessories
Warning!Since accessories, other than those offered by
STANLEY, have not been tested with this product, use of
such accessories with this tool could be hazardous. To reduce
the risk of injury, only STANLEY recommended accessories
should be used with this product.
Maintenance
Your STANLEY FATMAX tool has been designed to operate
over a long period of time with a minimum of maintenance.
Continuous satisfactory operation depends upon proper tool
care and regular cleaning.
Your charger does not require any maintenance apart from
regular cleaning.
Warning! Before performing any maintenance on the tool,
remove the battery from the tool. Unplug the charger before
cleaning it.
u Regularly clean the ventilation slots in your tool and
charger using a soft brush or dry cloth.
u Regularly clean the motor housing using a damp cloth.
Do not use any abrasive or solvent-based cleaner.
u Regularly open the chuck and tap it to remove any dust
from the interior.
Protecting the environment
Separate collection. Products and batteries marked
with this symbol must not be disposed of with
normal household waste.
Products and batteries contain materials that can be
recovered or recycled reducing the demand for raw materials.
Please recycle electrical products and batteries according to
local provisions. Further information is available at
www.2helpU.com
Technical data
SBW920
Voltage VDC 18V (20V MAX)
No-load speed Min-1 0 - 900 / 1900
Impact IPM 0 - 3100
Max. torque
(PTI Method)
Nm 370
Anvil Size mm 12.7 (Hog Ring)
Weight kg 1.6
Charger SC200 SC400
SC401
Input Voltage VAC 220-240 220-240
Output Voltage VDC 18V
(20V MAX)
18V
(20V MAX)
Current A 2 4
Battery SB202 SB204 SB206
Voltage VDC 18V
(20V MAX)
18V
(20V MAX)
18V
(20V MAX)
Capacity Ah 2.0 4.0 6.0
Type Li-Ion Li-Ion Li-Ion
SERVICE INFORMATION
STANLEY FATMAX offers a full network of company-owned
and authorized service locations. All STANLEY FATMAX
Service Centers are staffed with trained personnel to provide
customers with efcient and reliable power tool service.
For more information about our authorized service centers
and if you need technical advice, repair, or genuine factory
replacement parts, contact the STANLEY FATMAX location
nearest you or visit us at www.stanleytools.com.

11
简体中文
5
简体中文
e .
手不要过分伸展。时刻注意立足点和身体平衡。这样能在意外
情况下能更好地控制住电动工具。
f . 着装适当。不要穿宽松衣服或佩戴饰品。让你的头发和衣服远
离运动部件。宽松衣服、佩饰或长发可能会卷入运动部件。
g . 如果提供了与排屑、集尘设备连接用的装置,要确保其连接完
好且使用得当。使用集尘装置可降低尘屑引起的危险。
h . 不要因为频繁使用工具而产生的熟悉感而掉以轻心,忽视工
具的安全准则。某个粗心的动作可能在瞬间导致严重的伤害。
4. 电动工具使用和注意事项
a . 不要勉强使用电动工具,根据用途使用合适的电动工具。选
用合适的按照额定值设计的电动工具会使你工作更有效、
更安全。
b . 如果开关不能接通或关断电源,则不能使用该电动工具。不能
通过开关来控制的电动工具是危险的且必须进行修理。
c . 在进行任何调节、更换附件或贮存电动工具之前,必须从电源
上拔掉插头和/或卸下电池包(如可拆卸)。这种防护性的安全
措施降低了电动工具意外起动的风险。
d . 将闲置不用的电动工具贮存在儿童所及范围之外,并且不允
许不熟悉电动工具和不了解这些说明的人操作电动工具。电
动工具在未经培训的使用者手中是危险的。
e . 维护电动工具及其附件。检查运动部件是否调整到位或卡住,
检查零件破损情况和影响电动工具运行的其他状况。如有损
坏,应在使用前修理好电动工具。许多事故是由维护不良的
电动工具引发的。
f . 保持切削刀具锋利和清洁。维护良好地有锋利切削刃的刀具
不易卡住而且容易控制。
g . 按照使用说明书,并考虑作业条件和要进行的作业来选择电
动工具、附件和工具的刀头等。将电动工具用于那些与其用途
不符的操作可能会导致危险情况。
h . 保持手柄和握持表面干燥、清洁,不得沾有油脂。在意外的情
况下,湿滑的手柄不能保证握持的安全和对工具的控制。
5. 电池式工具使用和注意事项
a . 仅使用生产者规定的充电器充电。将适用于某种电池包的充
电器用到其他电池包时可能会发生着火危险。
b . 仅使用配有专用电池包的电动工具。使用其他电池包可能会
产生伤害和着火危险。
c . 当电池包不用时,将它远离其他金属物体,例如回形针、硬币、
钥匙、钉子、螺钉或其他小金属物体,以防电池包一端与另一
端连接。电池包端部短路会引起燃烧或着火。
d . 在滥用条件下,液体可能会从电池包中溅出,应避免接触。如
果意外碰到液体,用水冲洗。如果液体碰到了眼睛,还要寻求
医疗帮助。从电池中溅出的液体可能会发生腐蚀或燃烧。
e . 不要使用损坏或改装过的电池包或工具。损坏或改装过的电
池包可能呈现无法预测的结果,导致着火、爆炸或伤害。
f . 不要将电池包暴露于火或者高温中。电池包暴露于火或高于
130°C的高温中可能导致爆炸。
g . 请遵循所有充电说明,而且请勿在超出说明手册规定的温度
范围外为电池包或工具充电。不当充电或在超出说明手册规
定的温度范围外充电会损坏电池并增加火灾风险。
设计用途
您的STANLEY FATMAX SBW920无刷冲击扳手被设计用于拧紧螺丝
和螺母安装应用。该设备供专业、私人以及非专业用户使用。
安全说明
电动工具通用安全警告
警告!阅读随该电动工具提供的所有安全警告、
说明、图解和规定。如不遵守以下任何警告和说
明,可能会导致触电、火灾和/或严重伤害。
保存所有警告和说明书以备今后查阅。
以下所有警告中列出的�电动工具�指的是电驱动(有线)电动工具
或电池驱动(无线)电动工具。
1. 工作场地的安全
a .
保持工作场地清洁和明亮。杂乱和黑暗的场地会引发事故。
b . 不要在易爆环境,如有易燃液体、气体或粉尘的环境下操作电
动工具。电动工具产生的火花会点燃粉尘或气体。
c . 操作电动工具时,远离儿童和旁观者。注意力不集中会使你失
去对工具的控制。
2. 电气安全
a . 电动工具插头必须与插座相配。绝不能以任何方式改装插头。
需接地的电动工具不能使用任何转换插头。未经改装的插头
和相配的插座将降低电击风险。
b . 避免人体接触接地表面,如管道、散热片和冰箱。如果你身体
接触接地表面会增加电击风险。
c . 不得将电动工具暴露在雨中或潮湿环境中。水进入电动工具
将增加电击风险。
d . 不得滥用软线。绝不能用软线搬运、拉动电动工具或拔出其插
头。使软线远离热源、油、锐边或运动部件。受损或缠绕的软线
会增加电击风险。
e . 当在户外使用电动工具时,使用适合户外使用的延长线。适合
户外使用的电线将降低电击风险。
f . 如果无法避免在潮湿环境下操作电动工具,应使用带有剩余
电流装置(RCD)保护的电源。RCD的使用可降低电击风险。
3. 人身安全
a .
保持警觉,当操作电动工具时关注所从事的操作并保持清醒。
当你感到疲倦,或在有药物、酒精或治疗反应时,不要操作电
动工具。在操作电动工具时瞬间的疏忽会导致严重人身伤害。
b . 使用个人防护装置。始终佩戴护目镜。防护装置,诸如适当条
件下使用防尘面具、防滑安全鞋、安全帽、听力防护等装置能
减少人身伤害。
c . 防止意外起动。在连接电源和/或电池盒、拿起或搬运工具前
确保开关处于关断位置。手指放在开关上搬运工具或开关处
于接通时通电会导致危险。
d . 在电动工具接通之前,拿掉所有调节钥匙或扳手。遗留在电动
工具旋转零件上的扳手或钥匙会导致人身伤害。

12
简体中文
6
简体中文
6.
维修
a . 让专业维修人员使用相同的备件维修电动工具。这将保证所
维修的电动工具的安全。
b . 决不能维修损坏的电池包。电池包仅能由生产者或其授权的
维修服务商进行维修。
1) 所有操作的使用说明
a . 当在钻削附件可能触及暗线或其自身导线的场合进行操作
时,要通过绝缘握持面握持工具。紧固件碰到带电导线会使工
具外露的金属零件带电而使操作者受到电击。
附加安全警告
使用夹具或其他实用的方法,将工件固定、支撑到稳定的平台
上。手持或用身体顶住工件都是不稳定的,会导致操作失控。
在墙面、地板或天花板上安装紧固件之前,请先检查电线和
管道位置。
本说明手册介绍了目的用途。
使用任何非本说明手册中建议的附件或配件,或将其与本工
具搭配进行任何操作,可能存在导致人身伤害和/或财产损
坏的风险。
他人安全
生理、感官或心理机能较差的人员(包括儿童),或者对该类产
品缺少使用经验和知识的人员,除非由负责其安全的人员提
供使用工具的监督或指示,否则不得使用此工具。
应看管好儿童,以确保他们不将此设备当做玩具来玩。
剩余风险
使用工具时,可能出现本安全警示之外的其他剩余风险。这些风
险可能来自使用不当、使用时间过长等。
尽管遵守了相关的安全法规并采用了安全装备,某些剩余风险仍
然是无法避免的。这些风险包括:
接触旋转/运动部件时所导致的伤害风险。
更换零件、锯片或配件时所导致的伤害风险。
长期使用工具所导致的伤害风险。长期使用任何工具时,均
应定期休息。
听力损伤风险。
吸入工具使用过程中产生的粉尘导致的健康危害(例如,锯切
木材,特别是橡木、山毛榉和中密度纤维板时)。
工具上的标签
您工具上的标签可能包含以下符号:
警告!为降低伤害风险,请用户在使用前阅读使
用手册。
佩戴安全眼镜或护目镜。
请佩戴听力保护器。
佩戴防尘口罩。
V伏特 直流电
A安培 n0空载转速
Hz 赫兹 II级构造
W瓦特 接地端子
min 分钟 安全警示符号
交流电 /min. 每分钟转速
日期码的位置
包含制造年份的日期,打印在工具外壳上。
示例:
2020 XX JN
制造年份
针对电池和充电器的额外安全说明(未随工具
一同提供)
电池
不得以任何理由尝试拆开电池包。
请勿让电池暴露在水中。
请勿存放在温度超过40°C的环境中。
仅在温度10°C到40°C之间的环境中充电。
仅用随工具一同提供的充电器充电。
在处理电池时,请遵循“保护环境”部分的说明进行操作。
充电器
仅用您的STANLEY FATMAX充电器为随工具一同提供的电池充
电。其它电池可能会引起爆裂,并导致人身伤害和损害。
不得试图为不可充电的电池充电。
应立即更换有缺陷的电线。
请勿让充电器接触到水。
请勿拆开充电器。
请勿刺破充电器。
本工具仅供室内使用。
请在使用前请阅读使用手册。
请勿试图对损坏的电池充电。
电气安全
您的充电器是双层绝缘;因此无需接电线。请务必
检查电源电压是否和铭牌上的电压一致。不得试
图用常规电源插座替换充电器。
如果电线损坏,必须由产商或授权STANLEY FATMAX服务中心
负责更换,避免出现危险。
警告!不得试图用常规电源插座替换充电器。

13
简体中文
7
简体中文
功能部件
本工具包括以下部分或全部功能部件。
1. 电池包
2. 电池释放按钮
3. 变速扳机开关
4. 正向/反向控制按钮
5. 速度选择器
6. 工作灯
7. 砧座
组装
警告!在组装前,请先从工具中拆除电池。
为电池充电 (图 A)
在首次使用前,以及在电池不能提供顺利完成工作所需的电力
时,需要为电池充电。电池在充电时可能会发热;这是正常现象,
并非出现问题。
警告!请勿在温度低于10°C或高于40°C的环境中为电池充电。建议
充电温度为:约24°C。
注意:如果电池温度低于10°C或高于40°C,则充电器不会为电池
充电。
应将电池留在充电器中,当电池温度回升或冷却后,充电器将自
动为电池充电。
注意:为确保实现最高性能,最大限度地延长锂离子电池的使用
寿命,请在初次使用前,先为电池包充满电量。
将充电器(8)插入适当的插座中,然后再插入电池包(1)。
绿色充电指示灯(8a)会持续闪烁,表示充电已经开始。
绿色充电指示灯(8a)持续常亮,表示充电完成。电池包(1)电量
已充满,可以取出使用,也可以将其留在充电器内(8)。
请在一周内为电量用完的电池充电。如果将电量耗尽的电池
存放起来,将会极大缩短电池的寿命。
充电器的LED模式
充电中:
绿色LED间歇亮起
电量已充满
绿色LED常亮
热/冷电池包延迟:
绿色LED间歇亮起
红色LED常亮
注意:此兼容充电器不能为故障的电池包充电。充电器指示灯不
亮时表示电池包有故障。
注意:这也可能意味着充电器有故障。如果充电器提示存在故障,
请将充电器和电池包送到授权的服务中心进行测试。
将电池留在充电器中。
可以让充电器和电池包始终保持联通,同时LED会常亮。充电器将
让电池包维持电量刚被充满的状态。
热/冷电池包延迟
当充电器检测到电池过热或过冷,它就会自动开启热/冷电池包
延迟,绿色LED(8a)将会闪烁,同时红色LED(8b)将常亮,充电将会
暂停,直到电池恢复到适当温度为止。然后,充电器将自动切换
到电池包充电模式。该特色功能可以最大程度地延长电池包的
使用寿命。
电池电量状态指示灯(图B)
电池包含一个电量状态指示灯,能够快速确定电池寿命的情况,
如图B所示。按下电量状态按钮(1a),您就能轻松看到剩余电量,
如图B所 示 。
插入或取出工具上的电池包
警告!先确保已按下锁止按钮,防止开关启动,然后再拆除或安
装电池。
如需安装电池包(图C)
将电池包插入工具,直至听见咔哒声为止,如图C所示。确保电
池包已被牢固安装并锁定到位。
如需拆除电池包(图D)
按下电池释放按钮(1b),如 图 D所示,并将电池包从工具中拉出。
皮带钩(额外可选物件)(图E,F)
警告!为降低造成严重人身伤害的风险,在进行任何调整或拆卸/
安装附件或配件前,请关闭工具并拆除电池包。意外启动可能会
导致人身伤害。
警告!为降低造成严重人身伤害的风险,仅使用工具上的皮带钩
(11)通过作业皮带来吊挂工具。在使用工具时,请勿用皮带钩(11)
将工具系在或固定在人员身上。请勿将工具悬吊在头上或用皮带
钩悬吊物体。
警告!为降低造成严重人身伤害的风险,请确保固定皮带钩的螺
丝(12)足够牢固。
注意:在安装或更换皮带钩(8)时,仅使用产品提供的螺丝(12)。确
保拧紧螺栓。
可将皮带钩(11)滑入工具任何一侧的插槽(10)。
仅使用产品提供的螺栓(12),以适应惯用左手或右手的用户。如果
无需皮带钩,可以将
其从工具上拆除。
如需拆除皮带钩,请卸下固定
皮带钩(11)的螺丝(12),然后在另一侧重新安装。确保拧紧螺栓(12)。
注意:提供多种不同的轨墙挂钩和存放设置。

14
简体中文
8
简体中文
保存说明手册以备今后查阅
设计用途
该冲击扳手被设计用于紧固和钻孔应用。冲击功能令工具在将紧
固件钻入木材、金属和混凝土中时变得极为有用。
请勿在潮湿环境中或在易燃液体或气体存在的环境中使用本工具。
请勿让儿童接触本工具。缺乏经验的操作员需要在监督下使用
本工具。
组装和调整
警告!为降低造成严重人身伤害的风险,在进行任何调整或拆卸/
安装附件或配件前,请关闭工具并拆除电池包。意外启动可能会
导致人身伤害。
砧座(图I)
警告!仅使用冲击附件。无冲击附件可能会破裂,从而引发危险情
况。在使用前先进行检查,确保附件上没有裂痕。
小心:在使用前先检查砧座和弓形环。应在使用前更换缺失或受
损的物件。
将开关置于锁止(中央)位置,或拆除电池包,然后在更换附件。
如需在弓形环砧上安装附件,请用力将附件推到砧座上(15)。弓 形
环(16)会被压紧,使得附件能够滑动到位。安装完附件后,弓形环
会施加压力,协助固定附件。
如需拆除附件,请握住附件并用力拉出。
图I15
16
操作
警告!为降低造成严重人身伤害的风险,在进行任何调整或拆卸/
安装附件或配件前,请关闭工具并拆除电池包。意外启动可能会
导致人身伤害。
正确的双手放置位置(图J)
警告!为了减低严重人身伤害的风险,请务必如图示那样正确放
置双手。
警告!为了减低造成严重人身伤害的风险,预期有突然反作用力
时务必握紧。
手的正确摆放位置要求一只手放在主手柄上(17)。
图J
17
变速扳机开关和正向/反向控制按钮
可通过扣动和松开变速扳机开关来开启和关闭工具。越是用力扣
下扳机开关,工具的运转速度就越高。您的工具配有一个制动装
置。在完全松开开关时,卡盘将停止。
正向/反向控制按钮(4)决定了工具的转向,同时该控制按钮也具有
锁止按钮的作用。
· 如需选择正向转动(顺时针),松开工具右侧的扳机并按下正
向/反向控制按钮。
· 如需选择反向转动(逆时针),按下工具左侧的扳机并按下正
向/反向控制按钮。
注意:控制按钮的中央位置会将工具锁定在关闭位置。在变换控
制按钮的位置时,请确保已松开扳机。
注意:不建议在不同速度档位持续使用。这样可能会损坏开关,
应注意
避免。
注意:变换转动方向后,在首次使用工具时,您可能会在启动时听
见咔哒声。这是正常情況,并非出现问题。
工作灯
当扣下扳机开关,工作灯(6)亮起,而且会在松开开关后,继续亮起
20秒。如果仍然按住扳机开关,那么工作灯也会一直亮起。
注意:工作灯是用于照亮眼前的作业表面,不可将其用作手电。
速度选择器
SBW920
低冲击模式 正常冲击 RPM 0–900
高冲击模式 高速冲击 RPM 0–1900
使用
警告!仅使用冲击附件。无冲击附件可能会破裂,从而引发危险情
况。在使用前先进行检查,确保附件上没有裂痕。
小心:确保紧固件和/或系统能够耐受工具产生的力矩水平。力矩
过大可能会导致损坏,引发可能的人员受伤。
1.将附件放在紧固件的头部。让工具始终对准紧固件。

15
简体中文
9
简体中文
2.
按下变速扳机开关
(3)
开始运行。松开变速扳机开关,停止运行。
务必用力矩扳手检查力矩,因为紧固力矩会受到多个因素的影
响,包括以下方面:
-电压:由于电池电量几乎耗尽而造成的低电压会降低紧
固力矩。
-附件尺寸:未能使用正确的附件尺寸将降低紧固力矩。
-螺母尺寸:更大的螺母尺寸一般要求更高的紧固力矩。紧
固力矩还会根据长度、级别和力矩系数发生变化。
-螺栓:确保所有螺纹上都没有锈蚀和其他碎屑,从而实现
适当的紧固力矩。
-材料:这种类型的材料及其饰面效果会影响紧固力矩。
-紧固时间:较长的紧固时间会让紧固力矩增加。使用超
出建议范围的紧固时间可能会让坚固件过度承压、剥落
或受损。
配件
警告!除了由STANLEY提供的配件外,其他附件均未接受过本产品
的测试,因此与该工具搭配使用这些配件可能会导致风险。为降
低人身伤害风险,本产品只可使用STANLEY推荐的配件。
维护
您的STANLEY FATMAX工具设计精良,可以长期使用,仅需极少维
护。要持续获得令人满意的工作效果,需要进行合适的工具维护
和定期清洁。
除了定期清洁,您的充电器无需任何维护。
警告!在对工具进行任何维护前,请从工具上拆除电池。先切断充
电器的电源,然后再进行清洁。
用软刷或干布定期清洁您工具和充电器的通风槽。
定期使用湿布清洁电机外壳。
请勿使用任何研磨性或溶剂型清洁剂。
定期打开卡盘并轻拍,清除内部灰尘。
保护环境
分类回收。带有此符号标记的产品与电池不得与
普通家庭垃圾一起处理。
产品和电池包含可恢复或回收的材料,从而降低对原材料的需
求。请根据当地规定回收电气产品和电池。更多信息,请访问
www.2helpU.com。
技术参数
SBW920
电压 VDC 18V (20V MAX)
空载转速 Min-1 0 - 900 / 1900
冲击 IPM 0 - 3100
最大力矩
(PTI方法) Nm 370
最大拆卸
扭力 Nm 650
砧座尺寸 mm 12.7 (弓形环)
重量 kg 1.6
充电器 SC200 SC400
SC401
输入电压 VAC 220-240 220-240
输出电压 VDC
18V
(20V MAX)
18V
(20V MAX)
电流 A 2 4
电池 SB202 SB204 SB206
电压 VDC
18V
(20V MAX)
18V
(20V MAX)
18V
(20V MAX)
容量 Ah 2.0 4.0 6.0
类型 锂离子 锂离子 锂离子
维修信息
STANLEY FATMAX提供完整的公司隶属和授权的维修点网络。所有
STANLEY FATMAX服务中心均拥有经过训练的人员,为您
提供高效可靠的电动工具服务。如需了解有关我们授权维修中心
的更多信息,而且如需要获得技术建议、维修或原厂更换部件,请
联系距离您最近的STANLEY FATMAX,或访问我们的网站
www.stanleytools.com。
制 造 商:史丹利五金工具(上海)有限公司
制造商地址:中国(上海)自由贸易试验区美盛路263号
产 地:江苏苏州

16
繁體中文
5
繁體中文
e .
不要過度伸張雙手。時刻注意腳下與身體的平衡。如此可在意
外情況下更好地控制電動工具。
f . 適當穿著。請勿穿寬鬆衣服或佩戴飾品。讓你的頭髮、衣服
和手套遠離活動部件。寬鬆衣服、佩飾或長髮可能會捲入活
動部件中。
g . 若配備用於連接排屑裝置、集塵設備的裝置,請確定正確連接
和使用這些裝置。使用集塵設備可減少與粉塵有關的危險。
h . 請勿因頻繁使用而對工具特別熟悉,讓你變得自滿而忽略工
具的安全原則。粗心操作可以在片刻間造成嚴重傷害。
4. 電動工具的使用與注意事項
a . 請勿超負荷使用電動工具。請根據你的應用使用正確的電動
工具。若使用的電動工具正確無誤,該工具能以設計額定值更
有效、更安全地執行工作。
b . 若開關不能開啟或關閉電源,切勿使用該電動工具。若開關無
法控制電動工具,則電動工具存在危險,必須予以維修。
c . 在執行任何調整、更換配件或儲存工具之前,必須從電源上拔
掉插頭及/或卸下電池組。此類防護性安全措施可降低電動工
具意外啟動的風險。
d . 將閒置的電動工具儲存在兒童無法接觸的地方,並且不要讓
不熟悉電動工具或對這些使用指示不瞭解的人員操作電動工
具。未經訓練的使用者操作電動工具會發生危險。
e . 維護電動工具。檢查活動部件是否對準或卡住、是否存在任
何破損情況,或任何能影響電動工具運行的其他情況。若有損
毀,必須在使用之前修理電動工具。許多事故都是由於電動工
具欠缺維護所導致。
f . 保持切削工具鋒利和清潔。妥善維護、刀刃鋒利的刀具卡住的
可能性更低,更易於控制。
g . 使用電動工具、配件和工具刀頭等時,請遵循這些指示使用,
且指示須包含工作環境和所要執行工作的注意事項。若使用
電動工具執行與設計用途不相符的操作,會導致危險。
h . 手柄和抓握表面都應保持乾燥、清潔及遠離油脂。光滑手柄和
抓握表面不便於在意外情況下對工具進行安全處理與控制。
5. 電池工具的使用與注意事項
a . 只能使用製造廠商指定的充電器為電池充電 使用僅適合
一種電池組的充電器為其他類型的電池組充電會導致火災
危險。
b . 請使用原廠的電動工具電池組 使用其他非原廠的電池組會
導致人身傷害和火災危險。
c . 不使用電池組時,請將其遠離如迴紋針、硬幣、鑰匙、釘子、螺
絲以及其他可連通電池兩極的金屬物品。將電池兩極短路會
導致灼傷或火災。
d . 濫用電池的情況下,液體會從電池中噴出;避免與液體接觸。
若不小心接觸液體,請用清水沖洗。若液體噴濺到眼睛上,
沖洗之後還應進行治療。從電池噴出的液體會刺激皮膚或
造成灼傷。
e . 請勿使用已經損壞或改動的電池組或工具。損壞或改動的電
池可能表現出不可預計的行為,導致火災、爆炸或傷害風險。
f . 請勿讓電池組或工具暴露於火中或過高溫度的環境中。暴露
於火中或溫度超過 130°C的環境中可能導致爆炸。
設計用途
您的STANLEY FATMAX SBW920無刷衝擊扳手被設計用於擰緊螺絲
和螺母安裝應用。該設備供專業、私人以及非專業用戶使用。
安全說明
電動工具一般安全警告
警告!閱讀隨該電動工具提供的所有安全警告、說明、
圖解和規定。如不遵守以下任何警告和說明,可能會
導致觸電、火災和/或嚴重傷害。
保存所有警告和說明書以備今後查閱。
以下所有警告中列出的�電動工具�指的是電驅動(有線)電動工具
或電池驅動(無線)電動工具。
1. 工作場地安全
a . 請保持工作場地清潔明亮。混亂或黑暗的場地會引發事故。
b . 請勿在易爆環境,如有易燃液體、氣體或粉塵的環境中操作電
動工具。電動工具產生的火花可能會引燃粉塵或煙霧。
c . 請等待兒童和旁觀者離開之後才操縱電動工具。分心會導致
你疏於控制。
2. 電氣安全
a . 電動工具插頭必須與插座相符。切勿以任何方式改裝插頭。需
接地的電動工具不能使用任何配接器插頭。使用未經改裝的
插頭與相符的插座可降低觸電風險。
b . 避免人體接觸接地表面,如管道、散熱片、爐灶和冰箱。若你的
身體接地,會增加觸電的風險。
c . 不得將電動工具暴露在雨中或潮濕環境中。水進入電動工具
會增加觸電風險。
d . 切勿濫用電線。請勿使用電線來搬運、拉動電動工具或拔出插
頭。讓電線遠離熱、油、銳邊和活動部件。受損或纏繞的電線
會增加觸電危險。
e . 若要在戶外使用電動工具,請使用適合戶外使用的延長電線。
採用適合室外使用的電線可降低觸電危險。
f . 若必須在潮濕環境中操作電動工具,請使用受漏電保護器
(RCD) 使用RCD可降低觸電風險。
3. 人身安全
a . 保持警覺;在操作電動工具時,請留意所執行的操作並按照一
般的程式執行。請勿在疲倦或在受到毒品、酒精或藥品的影響
時使用電動工具。操作電動工具時,一時的注意力分散可能會
導致嚴重人身傷害。
b . 使用個人防護裝置。始終佩戴護目裝置。防護設備 (例如在適
當條件下使用的防塵面具、防滑安全鞋、安全帽或聽力保護裝
置) 可減少人身傷害。
c . 避免意外啟動。連接電源及/或電池組、舉抬或搬運電動工具
之前,請確定開關處於關閉位置。若搬運電動工具時將手指放
在開關上,或者在電動工具開關開啟時將插頭插入電源插座,
這兩種行為都會引發事故。
d . 啟動電動工具之前,請卸下所有的調整鑰匙或扳手。遺留在電
動工具旋轉部件上的扳手或鑰匙會導致人身傷害。
6
繁體中文
g . 請遵循所有充電說明,請勿在說明中規定的溫度範圍以外的
環境對電池組或工具充電。不當或在指定範圍以外的溫度下
充電,可能導致電池損壞並增加火災風險。
6. 檢修
a . 電動工具之修理,僅可由認證的技術人員執行。請勿交由非
STANLEY認證服務中心的技術人員進行修理、維護、調整。若
產品經由非STANLEY認證的維修中心拆解、組裝、調整,恕無
法適用STANLEY保修條款。為充份發揮其功能,修理、維護、
調整請務必使用原廠零件。STANLEY認證服務中心擁有保修
條款解釋權。
b . 切勿維修損毀的電池組。電池組的維修應僅由製造商或授權
服務提供商執行。
1) 所有操作的使用說明
a . 當在鑽削附件可能觸及暗線或其自身導線的場合進行操作
時,要通過絕緣握持面握持工具。緊固件碰到帶電導線會使工
具外露的金屬零件帶電而使操作者受到電擊。
附加安全警告
使用夾具或其他實用的方法,將工件固定、支撐到穩定的平臺
上。手持或用身體頂住工件都是不穩定的,會導致操作失控。
在牆面、地板或天花板上安裝緊固件之前,請先檢查電線和
管道位置。
本說明手冊介紹了目的用途。
使用任何非本說明手冊中建議的附件或配件,或將其與本工
具搭配進行任何操作,可能存在導致人身傷害和/或財產損
壞的風險。
他人安全
生理、感覺或心理機能不健全的人員 (包括兒童) 或缺乏經驗
及知識的人員,除非由負責其安全的人員提供有關使用此器
具的監督或指示,否則不得使用本工具。
必須對兒童進行監督,以確保其不會玩耍本工具。
剩餘風險
使用本工具時,可能會出現隨附安全警告中所不包括的其他剩餘
風險。誤用、長時間使用工具等因素會導致這些風險。
即使遵循相關安全規定並採用安全裝置,仍然無法避免某些剩餘
風險。此類風險包括:
接觸旋轉/活動部件引起的傷害。
變更任何零件、刀片或配件時引起的傷害。
長時間使用工具引起的傷害。若長時間使用工具,請確保定
時休息。
聽力受損。
吸入使用工具時產生的粉塵引起的健康危害(譬如:在木材上
使用時,尤其是櫟木、山毛櫸和中密度纖維板 (MDF) )。
工具上的標籤
本工具上具有以下圖示與日期代碼:
警告!為降低傷害風險,請用戶在使用前閱讀使
用手冊。
佩戴安全眼鏡或護目鏡。
請佩戴聽力保護器。
佩戴防塵口罩。
V伏特 直流電
A安培 n0空載轉速
Hz 赫茲 II級構造
W瓦特 接地端子
min 分鐘 安全警示符號
交流電 /min. 每分鐘轉速
日期碼的位置
包含製造年份的日期,打印在工具外殼上。
示例:
2020 XX JN
製造年份 週數 號碼
針對電池和充電器的額外安全說明(未隨工具
一同提供)
電池
不得以任何理由嘗試拆開電池組。
請勿讓電池暴露在水中。
請勿存放在溫度超過40°C的環境中。
僅在溫度10°C到40°C之間的環境中充電。
僅用隨工具一同提供的充電器充電。
在處理電池時,請遵循“保護環境”部分的說明進行操作。
充電器
僅用您的STANLEY FATMAX充電器為隨工具一同提供的電池充
電。其它電池可能會引起爆裂,並導致人身傷害和損害。
不得試圖為不可充電的電池充電。
應立即更換有缺陷的電線。
請勿讓充電器接觸到水。
請勿拆開充電器。
本工具僅供室內使用。
請在使用前請閱讀使用手冊。
請勿試圖對損壞的電池充電。

17
繁體中文
6
繁體中文
g .
請遵循所有充電說明,請勿在說明中規定的溫度範圍以外的
環境對電池組或工具充電。不當或在指定範圍以外的溫度下
充電,可能導致電池損壞並增加火災風險。
6. 檢修
a . 電動工具之修理,僅可由認證的技術人員執行。請勿交由非
STANLEY認證服務中心的技術人員進行修理、維護、調整。若
產品經由非STANLEY認證的維修中心拆解、組裝、調整,恕無
法適用STANLEY保修條款。為充份發揮其功能,修理、維護、
調整請務必使用原廠零件。STANLEY認證服務中心擁有保修
條款解釋權。
b . 切勿維修損毀的電池組。電池組的維修應僅由製造商或授權
服務提供商執行。
1) 所有操作的使用說明
a . 當在鑽削附件可能觸及暗線或其自身導線的場合進行操作
時,要通過絕緣握持面握持工具。緊固件碰到帶電導線會使工
具外露的金屬零件帶電而使操作者受到電擊。
附加安全警告
使用夾具或其他實用的方法,將工件固定、支撐到穩定的平臺
上。手持或用身體頂住工件都是不穩定的,會導致操作失控。
在牆面、地板或天花板上安裝緊固件之前,請先檢查電線和
管道位置。
本說明手冊介紹了目的用途。
使用任何非本說明手冊中建議的附件或配件,或將其與本工
具搭配進行任何操作,可能存在導致人身傷害和/或財產損
壞的風險。
他人安全
生理、感覺或心理機能不健全的人員 (包括兒童) 或缺乏經驗
及知識的人員,除非由負責其安全的人員提供有關使用此器
具的監督或指示,否則不得使用本工具。
必須對兒童進行監督,以確保其不會玩耍本工具。
剩餘風險
使用本工具時,可能會出現隨附安全警告中所不包括的其他剩餘
風險。誤用、長時間使用工具等因素會導致這些風險。
即使遵循相關安全規定並採用安全裝置,仍然無法避免某些剩餘
風險。此類風險包括:
接觸旋轉/活動部件引起的傷害。
變更任何零件、刀片或配件時引起的傷害。
長時間使用工具引起的傷害。若長時間使用工具,請確保定
時休息。
聽力受損。
吸入使用工具時產生的粉塵引起的健康危害(譬如:在木材上
使用時,尤其是櫟木、山毛櫸和中密度纖維板 (MDF) )。
工具上的標籤
本工具上具有以下圖示與日期代碼:
警告!為降低傷害風險,請用戶在使用前閱讀使
用手冊。
佩戴安全眼鏡或護目鏡。
請佩戴聽力保護器。
佩戴防塵口罩。
V伏特 直流電
A安培 n0空載轉速
Hz 赫茲 II級構造
W瓦特 接地端子
min 分鐘 安全警示符號
交流電 /min. 每分鐘轉速
日期碼的位置
包含製造年份的日期,打印在工具外殼上。
示例:
2020 XX JN
製造年份 週數 號碼
針對電池和充電器的額外安全說明(未隨工具
一同提供)
電池
不得以任何理由嘗試拆開電池組。
請勿讓電池暴露在水中。
請勿存放在溫度超過40°C的環境中。
僅在溫度10°C到40°C之間的環境中充電。
僅用隨工具一同提供的充電器充電。
在處理電池時,請遵循“保護環境”部分的說明進行操作。
充電器
僅用您的STANLEY FATMAX充電器為隨工具一同提供的電池充
電。其它電池可能會引起爆裂,並導致人身傷害和損害。
不得試圖為不可充電的電池充電。
應立即更換有缺陷的電線。
請勿讓充電器接觸到水。
請勿拆開充電器。
本工具僅供室內使用。
請在使用前請閱讀使用手冊。
請勿試圖對損壞的電池充電。

18
繁體中文
7
繁體中文
電氣安全
您的充電器是雙層絕緣;因此無需接電線。請務必
檢查電源電壓是否和銘牌上的電壓一致。不得試
圖用常規電源插座替換充電器。
如果電線損壞,必須由產商或授權STANLEY FATMAX服務中心
負責更換,避免出現危險。
警告!不得試圖用常規電源插座替換充電器。
功能部件
本工具包括以下部分或全部功能部件。
1. 電池組
2. 電池釋放按鈕
3. 變速扳機開關
4. 正向/反向控制按鈕
5. 速度選擇器
6. 工作燈
7. 夾頭
組裝
警告!在組裝前,請先從工具中拆除電池。
為電池充電 (圖A)
在首次使用前,以及在電池不能提供順利完成工作所需的電力
時,需要為電池充電。電池在充電時可能會發熱;這是正常現象,
並非出現問題。
警告!請勿在溫度低於10°C或高於40°C的環境中為電池充電。建
議充電溫度為:約24°C。
注意:如果電池溫度低於10°C或高於40°C,則充電器不會為電池
充電。
應將電池留在充電器中,當電池溫度回升或冷卻後,充電器將自
動為電池充電。
注意:為確保實現最高性能,最大限度地延長鋰離子電池的使用
壽命,請在初次使用前,先為電池組充滿電量。
將充電器(8)插入適當的插座中,然後再插入電池組(1)。
綠色充電指示燈(8a)會持續閃爍,表示充電已經開始。
綠色充電指示燈(8a)持續常亮,表示充電完成。電池組(1)電
量已充滿,可以取出使用,也可以將其留在充電器內(8)。
在電池用完電量後,建議馬上充電,鋰電池請勿過度放電, 電
力過度耗竭會導致鋰電池損壞。如果將電量耗盡的電池存放
起來,將會極大縮短電池的壽命。
請將電池從機身卸下分開存放,若長時間未使用電池(1年以
上),請每6個月為電池充電一次,以確保電池壽命。
當主機突然停止動作,或無法輕鬆完成以往的作業量時,請
馬上充電。
充電器的LED模式
充電中:
綠色LED間歇亮起
電量已充滿
綠色LED常亮
熱/冷電池組延遲:
綠色LED間歇亮起
紅色LED常亮
注意:此兼容充電器不能為故障的電池組充電。充電器指示燈不
亮時表示電池組有故障。
注意:這也可能意味著充電器有故障。如果充電器提示存在故障,
請將充電器和電池組送到授權的服務中心進行測試。
將電池留在充電器中。
可以讓充電器和電池組始終保持聯通,同時LED會常亮。充電器將
讓電池組維持電量剛被充滿的狀態。
熱/冷電池組延遲
當充電器檢測到電池過熱或過冷,它就會自動開啟熱/冷電池組
延遲,綠色LED(8a)將會閃爍,同時紅色LED(8b)將常亮,充電將
會暫停,直到電池恢復到適當溫度為止。然後,充電器將自動切
換到電池組充電模式。該特色功能可以最大程度地延長電池組
的使用壽命。
電池電量狀態指示燈(圖B)
電池組含一個電量狀態指示燈,能夠快速確定電池壽命的情況,
如圖B所示。按下電量狀態按鈕(1a),您就能輕鬆看到剩餘電量,
如圖B所 示 。
插入或取出工具上的電池組
警告!先確保已按下鎖止按鈕,防止開關啟動,然後再拆除或安
裝電池。
如需安裝電池組(圖C)
將電池組插入工具,直至聽見哢噠聲為止,如圖C所示。確保電
池組已被牢固安裝並鎖定到位。
如需拆除電池組(圖D)
按下電池釋放按鈕(1b),如 圖 D所示,並將電池組從工具中
拉出。
皮帶鉤(額外可選物件)(圖E,F)
警告!為降低造成嚴重人身傷害的風險,在進行任何調整或拆卸/
安裝附件或配件前,請關閉工具並拆除電池組。意外啟動可能會
導致人身傷害。
警告!為降低造成嚴重人身傷害的風險,僅使用工具上的皮帶
鉤( 11)通過作業皮帶來吊掛工具。在使用工具時,請勿用皮帶鉤
(11)將工具系在或固定在人員身上。請勿將工具懸吊在頭上或

19
繁體中文
8
繁體中文
用皮帶鉤懸吊物體。
警告!為降低造成嚴重人身傷害的風險,請確保固定皮帶鉤的螺絲
(12)足夠牢固。
注意:在安裝或更換皮帶鉤(8)時,僅使用產品提供的螺絲(12)。
確保擰緊螺栓。
可將皮帶鉤(11)滑入工具任何一側的插槽(10)。
僅使用產品提供的螺栓(12),以適應慣用左手或右手的用戶。如果
無需皮帶鉤,可以將其從工具上拆除。
如需拆除皮帶鉤,請卸下固定皮帶鉤(11)的 螺 絲( 12),然後在另一
側重新安裝。確保擰緊螺栓(12)。
注意:提供多種不同的軌牆掛鉤和存放設置。
保存說明手冊以備今後查閱
設計用途
該衝擊扳手被設計用於緊固和鑽孔應用。衝擊功能令工具在將緊
固件鑽入木材、金屬和混凝土中時變得極為有用。
請勿在潮濕環境中或在易燃液體或氣體存在的環境中使用本工具。
請勿讓兒童接觸本工具。缺乏經驗的操作員需要在監督下使用
本工具。
組裝和調整
警告!為降低造成嚴重人身傷害的風險,在進行任何調整或拆卸/
安裝附件或配件前,請關閉工具並拆除電池組。意外啟動可能會
導致人身傷害。
夾頭 (圖I)
警告!僅使用衝擊附件。無衝擊附件可能會破裂,從而引發危險情
況。在使用前先進行檢查,確保附件上沒有裂痕。
小心:在使用前先檢查夾頭和C型扣。應在使用前更換缺失或受
損的物件。
將開關置於鎖止(中央)位置,或拆除電池組,然後在更換附件。
如需在C型扣上安裝附件,請用力將附件推到夾頭上(15)。C型扣
(16)會被壓緊,使得附件能夠滑動到位。安裝完附件後,C型扣會
施加壓力,協助固定附件。
如需拆除附件,請握住附件並用力拉出。
圖I15
16
操作
警告!為降低造成嚴重人身傷害的風險,在進行任何調整或拆卸/
安裝附件或配件前,請關閉工具並拆除電池組。意外啟動可能會
導致人身傷害。
正確的雙手放置位置(圖J)
警告!為了減低嚴重人身傷害的風險,請務必如圖示那樣正確放
置雙手。
警告!為了減低造成嚴重人身傷害的風險,預期有突然反作用力
時務必握緊。
手的正確擺放位置要求一隻手放在主手柄上(17)。
圖J
17
變速扳機開關和正向/反向控制按鈕
可通過扣動和鬆開變速扳機開關來開啟和關閉工具。越是用力扣
下扳機開關,工具的運轉速度就越高。您的工具配有一個制動裝
置。在完全鬆開開關時,卡盤將停止。
正向/反向控制按鈕(4)決定了工具的轉向,同時該控制按鈕也具
有鎖止按鈕的作用。
· 如需選擇正向轉動(順時針),鬆開工具右側的扳機並按下正
向/反向控制按鈕。
· 如需選擇反向轉動(逆時針),按下工具左側的扳機並按下正
向/反向控制按鈕。
注意:控制按鈕的中央位置會將工具鎖定在關閉位置。在變換控
制按鈕的位置時,請確保已鬆開扳機。
注意:不建議在不同速度檔位持續使用。這樣可能會損壞開關,
應注意避免。
注意:變換轉動方向後,在首次使用工具時,您可能會在啟動時聽
見哢噠聲。這是正常情況,並非出現問題。
工作燈
當扣下扳機開關,工作燈(6)亮起,而且會在鬆開開關後,繼續亮
起20秒。如果仍然按住扳機開關,那麼工作燈也會一直亮起。
注意:工作燈是用於照亮眼前的作業表面,不可將其用作手電。

20
繁體中文
9
繁體中文
速度選擇器
SBW920
低衝擊模式 正常衝擊 RPM 0–900
高衝擊模式 高速衝擊 RPM 0–1900
使用
警告!僅使用衝擊附件。無衝擊附件可能會破裂,從而引發危險情
況。在使用前先進行檢查,確保附件上沒有裂痕。
小心:確保緊固件和/或系統能夠耐受工具產生的力矩水平。力矩
過大可能會導致損壞,引發可能的人員受傷。
1.將附件放在緊固件的頭部。讓工具始終對準緊固件。
2.按下變速扳機開關(3)開始運行。鬆開變速扳機開關,停止運行。
務必用力矩扳手檢查力矩,因為緊固力矩會受到多個因素的影
響,包括以下方面:
-電壓:由於電池電量幾乎耗盡而造成的低電壓會降低緊
固力矩。
-附件尺寸:未能使用正確的附件尺寸將降低緊固力矩。
-螺母尺寸:更大的螺母尺寸一般要求更高的緊固力矩。緊
固力矩還會根據長度、級別和力矩係數發生變化。
-螺栓:確保所有螺紋上都沒有銹蝕和其他碎屑,從而實現
適當的緊固力矩。
-材料:這種類型的材料及其飾面效果會影響緊固力矩。
-緊固時間:較長的緊固時間會讓緊固力矩增加。使用超
出建議範圍的緊固時間可能會讓堅固件過度承壓、剝落
或受損。
配件
警告!除了由STANLEY提供的配件外,其他附件均未接受過本產品
的測試,因此與該工具搭配使用這些配件可能會導致風險。為降
低人身傷害風險,本產品只可使用STANLEY推薦的配件。
維護
您的STANLEY FATMAX工具設計精良,可以長期使用,僅需極少維
護。如需持續獲得令人滿意的工作效果,需要進行合適的工具維
護和定期清潔。
除了定期清潔,您的充電器無需任何維護。
警告!在對工具進行任何維護前,請從工具上拆除電池。先切斷充
電器的電源,然後再進行清潔。
用軟刷或幹布定期清潔您工具和充電器的通風槽。
定期使用濕布清潔電機外殼。
請勿使用任何研磨性或溶劑型清潔劑。
定期打開卡盤並輕拍,清除內部灰塵。
保護環境
分類回收由此符號標記的產品和電池不得與普通
家庭垃圾一起處理。
產品和電池組含可恢復或回收的材料,從而降低對原材料的需求。
請根據當地規定回收電子產品和電池。更多信息,請訪問
www.2helpU.com。
技術參數
SBW920
電壓 VDC 18V (20V MAX)
空載轉速 Min-1 0 - 900 / 1900
衝擊 IPM 0 - 3100
最大力矩
(PTI方法) Nm 370
最大拆卸
扭力 Nm 650
夾頭 尺寸 mm 12.7 (四分C型扣)
重量 kg 1.6
充電器 SC200
輸入電壓 VAC 110
輸出電壓 VDC
18V
(20V MAX)
電流 A 2
電池 SB204
電壓 VDC
18V
(20V MAX)
容量 Ah 4.0
類型 鋰離子
維修信息
STANLEY FATMAX提供完整的公司隸屬和授權的維修點網絡。所
有STANLEY FATMAX服務中心均擁有經過訓練的人員,為您提供
高效可靠的電動工具服務。如需瞭解有關我們授權維修中心的更
多信息,而且如需獲得技術建議、維修或原廠更換部件,請聯繫距
離您最近的STANLEY FATMAX,或訪問我們的網站
www.stanleytools.com。
總 經 銷 商:
地 址:
電 話:
永安實業股份有限公司
新北市三重區新北大道二段137號
02-2999-4633
進口/委製廠商:
地 址:
電 話:
新加坡商百得電動工具(股)公司台灣分公司
台北市士林區德行西路33號2樓
02-2834-1741
ページが読み込まれています...
ページが読み込まれています...
ページが読み込まれています...
ページが読み込まれています...
ページが読み込まれています...
ページが読み込まれています...
ページが読み込まれています...
ページが読み込まれています...
ページが読み込まれています...
ページが読み込まれています...
ページが読み込まれています...
ページが読み込まれています...
ページが読み込まれています...
ページが読み込まれています...
ページが読み込まれています...
ページが読み込まれています...
ページが読み込まれています...
ページが読み込まれています...
ページが読み込まれています...
ページが読み込まれています...
ページが読み込まれています...
ページが読み込まれています...
ページが読み込まれています...
ページが読み込まれています...
ページが読み込まれています...
ページが読み込まれています...
ページが読み込まれています...
ページが読み込まれています...
-
 1
1
-
 2
2
-
 3
3
-
 4
4
-
 5
5
-
 6
6
-
 7
7
-
 8
8
-
 9
9
-
 10
10
-
 11
11
-
 12
12
-
 13
13
-
 14
14
-
 15
15
-
 16
16
-
 17
17
-
 18
18
-
 19
19
-
 20
20
-
 21
21
-
 22
22
-
 23
23
-
 24
24
-
 25
25
-
 26
26
-
 27
27
-
 28
28
-
 29
29
-
 30
30
-
 31
31
-
 32
32
-
 33
33
-
 34
34
-
 35
35
-
 36
36
-
 37
37
-
 38
38
-
 39
39
-
 40
40
-
 41
41
-
 42
42
-
 43
43
-
 44
44
-
 45
45
-
 46
46
-
 47
47
-
 48
48


