
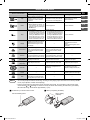
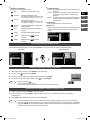
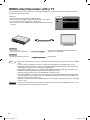
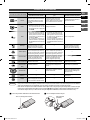
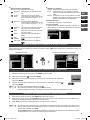
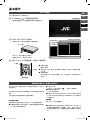
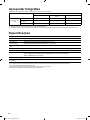
Accessories
Power cable A/V cable Remote
control
Instruction Man-
ual (this manual)
and other docu-
mentation
● Important Safety Instructions ......................... 3
● Component Names and Functions ................. 4
Player front panel ................................................ 4
Player rear panel ................................................. 4
Remote control .................................................... 4
Remote Control Buttons ...................................... 5
● Connecting to a TV ........................................... 6
Connecting the player to a TV equipped with an
HDMI input jack ................................................... 6
Connecting the player to a TV equipped with AV
input jacks ........................................................... 6
● Basic Operation ................................................ 7
Playback from an SD card ................................... 7
Selecting fi les and folders (choosing movies and
photos) ................................................................ 7
Content Menu ..................................................... 8
Switching the fi le list display format ..................... 9
Setting the interval for photo slideshows ............. 9
Simultaneously playback of photos and music
fi les ..................................................................... 9
● Copying SD Cards .......................................... 10
Copying the entire content of the copy
source SD card (All copy) .................................. 10
Copying selected content from the copy
source SD card (Select copy)............................ 10
● Folders and Files on an SD Card .................. 12
● Confi guring the Player Settings .................... 13
● HDMI Linked Operation with a TV ................. 14
● Troubleshooting .............................................. 15
● Message displayed ......................................... 16
● Caution ............................................................ 17
● Displaying Photos .......................................... 18
● Specifi cations ................................................. 18
ENGLISH
FRANÇAIS
CASTELANO
PORTUGUÊS
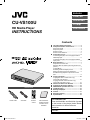
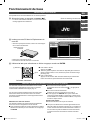
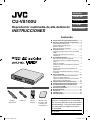
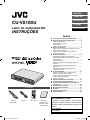
CU-VS100U
HD Media Player
INSTRUCTIONS
For Customer Use:
Enter the Model No. and Serial No. (located
on the bottom of the player) below Retain
this information for future reference
Model No.
Serial No.
Contents
2M50101A_ENG.indd 12M50101A_ENG.indd 1 10/7/2009 15:49:5310/7/2009 15:49:53

2
ATTENTION:
This unit contains microcomputers. External electronic noise
or interference could cause malfunctioning. In such cases,
switch the unit off and unplug the mains power cord. Then
plug it in again and turn the unit on.
Take out the SD card. After checking the SD card, operate
the unit as usual.
CAUTION:
To avoid electric shock or damage
to the unit, fi rst fi rmly insert the
small end of the power cord into the
AC INPUT of the player until it is
no longer wobbly, and then plug the larger end of the power
cord into an AC outlet.
If malfunctioning occurs, stop using the unit
immediately and consult your local JVC dealer.
Caution on Replaceable lithium battery
The battery used in this device may present a fi re or
chemical burn hazard if mistreated.
Do not recharge, disassemble, heat above 100
o
C or
incinerate. Replace battery with Panasonic, Sanyo, Sony or
Maxell CR2025.
Danger of explosion or Risk of fi re if the battery is incorrectly
replaced.
• Dispose of used battery promptly.
• Keep away from children.
• Do not disassemble and do not dispose of in fi re.
For USA-California Only
This product contains a CR Coin Cell Lithium Battery which
contains Perchlorate Material – special handling may apply.
See www.dtsc.ca.gov/hazardouswaste/perchlorate
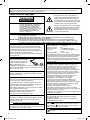
The lightning fl ash with arrowhead symbol,
within an equilateral triangle is intended to
alert the user to the presence of uninsulated
dangerous voltage within the product's
enclosure that may be of suffi cient magnitude to
constitute a risk of electric shock.
The exclamation point within an equilateral
triangle is intended to alert the user to
the presence of important operating and
maintenance (servicing) instructions in the
literature accompanying the appliance.
CAUTION:
TO REDUCE THE RISK OF ELECTRIC
SHOCK, DO NOT REMOVE COVER
(OR BACK). NO USER-SERVICEABLE
PARTS INSIDE. REFER SERVICING TO
QUALIFIED SERVICE PERSONNEL.
WARNING: TO PREVENT FIRE OR SHOCK HAZARD, DO NOT EXPOSE THIS APPLIANCE TO RAIN OR MOISTURE.
TO PREVENT THE SPREAD OF FIRE, KEEP CANDLES OR OPEN FLAMES AWAY FROM THIS PRODUCT
AT TIMES.
CAUTION: TO PREVENT ELECTRIC SHOCK, DO NOT USE THIS POLARIZED PLUG WITH AN EXTENSION CORD,
RECEPTACLE OR OTHER OUTLET UNLESS THE BLADES CAN BE FULLY INSERTED TO PREVENT
BLADE EXPOSURE.
Declaration of Conformity (for owners in the U.S.A.)
Model Number : CU-VS100U
Trade Name : JVC
Responsible party : JVC AMERICAS CORP.
Address : 1700 Valley Road Wayne,
N. J. 07470
Telephone Number : 973-317–5000
This device complies with Part 15 of FCC Rules.
Operation is subject to the following two conditions: (1) This
device may not cause harmful interference, and (2) this
device must accept any interference received, including
interference that may cause undesired operation.
(For owners in the U.S.A.)
Changes or modifi cations not approved by JVC could void
the user’s authority to operate the equipment.
This equipment has been tested and found to comply with
the limits for a Class B digital device, pursuant to Part 15
of the FCC Rules. These limits are designed to provide
reasonable protection against harmful interference in a
residential installation. This equipment generates, uses,
and can radiate radio frequency energy and, if not installed
and used in accordance with the instructions, may cause
harmful interference to radio communications. However,
there is no guarantee that interference will not occur in a
particular installation. If this equipment does cause harmful
interference to radio or television reception, which can be
determined by turning the equipment off and on, the user is
encouraged to try to correct the interference by one or more
of the following measures: Reorient or relocate the receiving
antenna.
Increase the separation between the equipment and
receiver.
Connect the equipment into an outlet on a circuit diff erent
from that to which the receiver is connected.
Consult the dealer or an experienced radio/ TV technician for
help.
(For owners in Canada)
This Class B digital apparatus complies with Canadian
ICES-003.
Cet appareil numérique de la classe B est conforme à la
norme NMB-003 du Canada.
The button does not completely shut off mains power from
the unit, but switches operating current on and off . “
” shows
electrical power standby and “
” shows ON.
If this symbol is shown, it is only valid in the
European Union.
Dear Customer,
Thank you for purchasing this player. Before use, please read the safety information and precautions contained in pages 2 and
3 to ensure safe use of this product.
WARNING:
Batteries shall not be exposed to excessive heat such as
direct sunshine, fi re or the like.
Safety Precautions
2M50101A_ENG.indd 22M50101A_ENG.indd 2 10/7/2009 15:49:5410/7/2009 15:49:54

3
EN
FR
CA
PT
Safety Precautions for SD Cards
Do not use the following SD cards.
• Damaged SD cards
• Unclean SD cards
Installation
Do not install in any of the following locations.
• Humid location
• Location of 60 °C or above
• Location subject to direct sunlight
• Location where overheating is likely
• Narrow place. When placing on a shelf leave 10 cm
(4 inches) free space around the entire unit.
• Dusty or smoky locations
• Locations subject to oily smoke or steam such as a
kitchen counter or beside a humidifi er
• Unstable location
• Bathroom
• Dusty places
• Slanted location
ATTENTION:
On placing the unit:
Some TVs or other appliances generate strong
magnetic fi elds. Do not place such appliances on top
of the unit as it may cause picture disturbance.
When moving the product:
Press
to turn off the power, and wait at least 30
seconds before unplugging the power cord. Then, wait
at least 2 minutes before moving the product.
Important Safety Instructions
2M50101A_ENG.indd 32M50101A_ENG.indd 3 10/7/2009 15:49:5410/7/2009 15:49:54

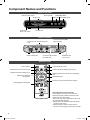
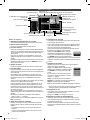
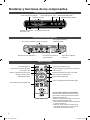
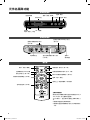
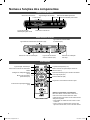
Component Names and Functions
Player front panel
Player rear panel
Remote control
Power "On/Off "
Power lamp
Power "On": Green
Enter (OK)
Select/Skip back
Select/Skip ahead
Ventilation slots
Do not cover.
Remote control sensor
Access lamp
Power cable socket
Connects to the TV HDMI
input jack (P.6)
Connects to the TV video
input jack (P.6)
Connects to the TV audio input jack
(P.6)
Copies fi les/folders (P.10)
Switches the fi le list display format (P.8, 9)
Displays information for the fi le currently playing
(P.5)
Select/Enter (OK)
Returns to previous screen/Cancels copying
Power "On/Off "
Selects the SD card slot to be used
Confi gures the basic settings (P.13)
Switches the displayed
fi le type (P.8)
Basic playback controls (P.9)
SD card slots
Using the remote control correctly
Do not attempt to use the remote control any
further than roughly 5 meters (16 feet) from the
player's remote control sensor.
The remote control may malfunction or fail to oper-
ate in the following situations:
• Where there is an obstacle between the player
and the remote control.
• When the player's remote control sensor is
exposed to a strong light, such as direct sunlight.
4
2M50101A_ENG.indd 42M50101A_ENG.indd 4 10/7/2009 15:49:5510/7/2009 15:49:55

Remote Control Buttons
Remote control button
Details
During movie playback During music playback During photo playback
Play
When playback is paused, fast-
forward, reverse or slow, press
this button to revert to normal
playback.
When playback is paused, fast-
forward or reverse, press this but-
ton to revert to normal playback.
When playback is paused,
starts a slideshow.
Pause
Pauses playback.
• When playback is paused, you
can advance the movie one
frame at a time by pressing the
SLOW button.
Pauses playback. Stops a slideshow.
Stop
Stops playback.
•
The Resume function allows you
to restart playback from the point
at which you stopped simply by
pressing the PLAY button again.
Turning the player off or remov-
ing the SD card resets the stop
location in the Resume function.
Stops playback.
•
The Resume function allows you
to restart playback from the point
at which you stopped simply by
pressing the PLAY button again.
Turning the player off or remov-
ing the SD card resets the stop
location in the Resume function.
Stops a slideshow.
Display
Displays information such as the
playback mode on the screen.
Press this button again to clear
the display.
—
Displays information such as
the playback mode on the
screen.
Press this button again to clear
the display.
Fast-forward
Fast-forwards playback. Each
time you press this button, play-
back speed increases (without
sound).
Fast-forwards playback. Each
time you press this button, play-
back speed increases (without
sound).
—
Reverse
Reverses playback. Each time
you press this button, the reverse
speed increases (without sound).
Reverses playback. Each time
you press this button, the reverse
speed increases (without sound).
—
Skip/Page
(Skip ahead)
Displays the next movie.
Plays the next music track. Displays the next photo.
Skip/Page
(Skip back)
Plays the previous movie.
Plays the previous music track. Displays the previous photo.
Select/
OK —
Select fi le or playback the se-
lected fi le.
Use this button to set up a
slideshow display interval. (P.9)
Rotate — — Rotates a photo 90° to the right.
Slow
Plays the movie in slow motion.
Each time you press this button,
the playback speed slows down.
——
Note • You can skip chapters while fast-forwarding, reversing or slow-playing only if video fi les are recorded by AVCHD
mode. (If you skip titles, it will be normal playing.)
• If remote control response speeds slow down, the battery may be fl at. Fit a new battery in the remote control.
Check that the
and markings are oriented correctly as shown when inserting the new battery. (The battery
life varies with usage, but should be approximately 1 year.)
■
The fi rst time you use the remote control.
■
When you replacing the battery.
Pull out insulating sheet
Lithium battery
(CR2025)
5
EN
FR
CA
PT
2M50101A_ENG.indd 52M50101A_ENG.indd 5 10/7/2009 16:55:2010/7/2009 16:55:20

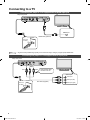
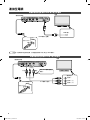
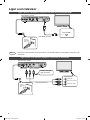
Connecting to a TV
Connecting the player to a TV equipped with an HDMI input jack
Note • To get the best possible image quality, we recommend using a Category 2 (high speed) HDMI cable.
Connecting the player to a TV equipped with AV input jacks
Player rear panel
TV
HDMI input
HDMI cable (optional)
TV
A/V cable (supplied)
Video input
Audio input (left)
Audio input (right)
Video input
Player rear panel
Using the A/V cable
connect to the TV.
White
Red
Yellow
AC Outlet
Wider Hole
and Blade
AC Outlet
Wider Hole
and Blade
6
2M50101A_ENG.indd 62M50101A_ENG.indd 6 10/7/2009 15:49:5610/7/2009 15:49:56

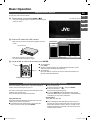
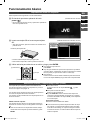
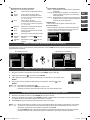
Basic Operation
Playback from an SD card
You can play video shot on an Everio.
➊
Turn the player on by pressing power ( ).
• The power lamp lights green and start-up screen appears
on the TV screen.
(TV start-up screen)
➋
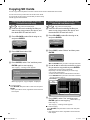
Insert an SD card into the SD card slot.
• After a few seconds, the content menu appears on the TV
screen.
(TV content menu screen)
Content Manager
Slot A
17 Jun 2009 11:13 1/0 00 : 00 : 00
STREAM
17 June 2009 11:30
Slot A/PRIVATE/AVCHD/BDMV/STREAM
SD CARD FILE VIEW COPY
• Push the card in until you hear a click.
• To remove the SD card, push it in again.
➌
Use ▲/▼/◀/▶ to select a fi le and then press ENTER.
①
Select
②
OK
And playback begins!
■ To stop playback
press STOP.
■ A range of playback options are available using fast-forward, reverse,
skip, slow, pause and single frame step.(P.5)
■ To view photos
Press ◀/▲ buttons on the remote control to select the UP folder icon
and then select the DCIM folder.
Selecting fi les and folders (choosing movies and photos)
SD cards containing content shot on a JVC Everio appear as
folders, as shown in the fi gure on page 12.
The names of the folders currently in the folder appear in the
folder list of the content menu.
Files currently in the folder appear in the fi le list.
Using the folder list
Folders inside the selected folder are displayed in the order
that they are recorded on the SD card.
■ To view the fi les in the selected folder, simply select the
folder you want to look at, then press ENTER.
■ To move up one level.
Select the UP folder icon ( ) and press ENTER.
■ To move to the fi le list.
Move the cursor by pressing the ▶.
■ If you press DISPLAY when the AVCHD format contents
folder, SD-VIDEO format contents folder, or the DCIM folder
is displayed, you can move to each folder.
Selecting fi les
Select fi les using ▲/▼/◀/▶.
■ When selecting the folder that appears at the very top of
the folder list, press ▲ and the fi le at the very bottom of the
fi le list will be selected. However, when no content can be
displayed on the fi le list, the folder at the very bottom of the
folder list will be selected.
SD card slot A
7
EN
FR
CA
PT
2M50101A_ENG.indd 72M50101A_ENG.indd 7 10/7/2009 15:49:5710/7/2009 15:49:57

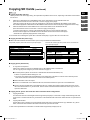
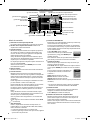
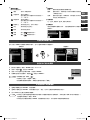
Content Menu
..
folder_0_1
folder_0_2
folder_0_3
folder_0_4
folder_0_5
folder_0_6
folder_0_7
Content Manager
Slot A
17 Nov 2009 07:06 5/36 00 : 00 : 00
folder_0_1
Camera#5
Movie_0_1
Music_0_1
Music_0_2
Music_0_3
Picture_0_1
Picture_0_2
Picture_0_3
Picture_0_4
Picture_0_5
Picture_0_6
Dimension:
Camera Model:
640×480
Slot A/folder_0_1/Picture_0_1
SD CARD FILE VIEW COPY
⑪
Playback mode display
File details
⑥
Operation button guide
⑫
Thumbnail display
③
Folder list
②
Selected folder name
①
SD card slot display
File creation date/
time
⑩
Folder/File number display
⑤
File list
Icon
④
File path
Elapsed playback time
display
⑦
Switch SD CARD
⑧
Switch fi le
⑨
Switch view
⑬
Switch copy
⑭
Music icon
Content menu
①
SD card slot display
The slot currently displayed in the content menu.
②
Selected folder name
The name of the folder that is currently selected.
③
Folder list
Shows the folders contained in the folder displayed in the
selected folder name fi eld listed in the order that they are
recorded on the SD card. (Can display up to 100 folders)
If there are too many folders to fi t in the displayed list, a
scroll bar appears that allows you to view the folders not
shown.
The folder shown at the top of the list is the UP folder icon.
Select this icon and press ENTER to view the next level up.
④
File path
Shows the location of the currently selected fi le.
⑤
File list
Shows the fi les contained in the currently selected folder
listed in the order that they are recorded on the SD card.
(Can display up to 9,999 fi les. When there are a large
number of fi les, it may take a while before these appear in
the fi le list.)
You can choose to either display a thumbnail image in the
fi eld on the right, or show only the list.(P. 9 )
For SD cards with content shot on an Everio, movie fi les
are listed fi rst.
Shooting dates and times are also shown for SD cards
containing content shot on an Everio.
If there are too many fi les to fi t in the displayed list, a scroll
bar appears that allows you to view the fi les not shown.
If there are no fi les that can be shown, "No content..." is
displayed.
You can choose one of the displayed fi les using FILE. (
⑧
on the right)
⑥
Operation button guide
Indicates whether, depending on the condition of the
player, the SD CARD, FILE, VIEW and COPY buttons of the
remote control can be utilized or not.
• Grayed out buttons cannot be used.
•
When the guide is the same color as the button, that button
can be used.
⑦
Switch SD CARD
This is only available when SD cards are inserted in the
player.
If there is only an SD card in slot A or slot B, only the
current slot is displayed and you cannot switch slots.
You can switch slots when SD cards are inserted in both
slots.
Press
SD CARD, use
▲/▼ to select the slot
containing the card you want to read and
then press ENTER to switch slots.
After you switch slots, the player reads the
slot information and displays it in the content menu.
⑧
Switch fi les
Use this to select the type of fi le displayed in the fi le list.
Press
FILE, use
▲/▼ to select the fi le type and then press
ENTER to switch the display mode.
If there are no fi les of the specifi ed type in the selected
folder, "No content..." is displayed.
Video: Displays movie fi les.
Music: Displays music fi les.
Picture: Displays photo fi les.
All: Displays all the fi les. (Factory preset)
• Switch fi les is not possible when displaying AVCHD
format or SD-VIDEO format video fi les.
⑨
Switch view
This allows you to choose whether thumbnails are
displayed in the fi le list.
Press VIEW to switch views (P. 9 ).
⑩
Folder/File number display
Displays the total number of items in the folder or fi le list
along with the number of the currently selected folder or
fi le.
Currently selected folder or fi le number/Total number of
items displayed in the folder or fi le list
SD CARD
Slot A
Slot B
Video
Music
Picture
All
8
2M50101A_ENG.indd 82M50101A_ENG.indd 8 10/13/2009 4:03:11 PM10/13/2009 4:03:11 PM

⑪
Playback mode display
Displays the current playback mode.
Play Indicates normal playback mode.
F-Search Indicates fast-forward mode.
The speed is displayed side of the icon
as a number of steps (+1, +2, +3 or +4).
B-Search
Indicates reverse mode.
The speed is displayed side of the icon
as a number of steps (-1, -2, -3 or -4).
Resume
Stop
Indicates that playback is stopped but
can be resumed.
Stop Indicates that playback is completely
stopped.
Pause Indicates that playback is paused.
F-Skip
Displayed when
has been
pressed.
B-Skip
Displayed when
has been
pressed.
⑫
Thumbnail display
Movies: The opening video image and the resolution are
displayed.
Photos: The photo, its resolution and the camera used
to shoot it (if the information is available) are
displayed.
Music: A musical note icon, the album name, artist name
and track length (if the information is available)
are displayed.
⑬
Switch copy
Switches between All copy and Select copy.
⑭
Music icon
Appears during the time the music fi le is being played back.
The fi le list can be moved while the music fi le is being
played.
Movie 07
Picture 08
Picture 09
Picture 10
Picture 11
Picture 12
ABCDEFGHIJKLMN...
abcdefghijklmnopqrs...
1234567890123456...
item f0_4
item f0_5
item f0_6
Switching the fi le list display format
Yo u can switch the file list display mode by pressing VIEW. You can choose either list display or thumbnail display.
List display Thumbnail display
Movie 07
Picture 08
Picture 09
Picture 10
Picture 11
Picture 12
Picture 13
Picture 14
Picture 15
Picture 16
ABCDEFGHIJKLMN...
abcdefghijklmnopqrs...
1234567890123456...
item f0_4
item f0_5
item f0_6
item f0_7
item f0_8
item f0_9
item f0_10
Dimension:
Camera Model:
640×480
Camera#5
ABCDEFGHIJKLMN...
abcdefghijklmnopqrs...
1234567890123456...
item f0_4
item f0_5
item f0_6
item f0_7
item f0_8
item f0_9
item f0_10
Setting the interval for photo slideshows
1
While a photo fi le is displayed, press ENTER or press ▲/▼/◀/▶.
2
Use ▶ to select and then press ENTER.
3
Use ▲/▼ to select the slide show display interval and then press ENTER.
4
To omit from the slideshow setting screen, select and press ENTER.
Note
• Factory preset is Off ( ).
• To stop the slideshow, select "Off ".
• The interval setting automatically reverts to "Off " when you turn the player off .
Simultaneously playback of photos and music fi les
1
Select a music fi le and press ENTER to play back the fi le.
2
Select a photos fi le and press ENTER to begin the slide show. You can now watch the slide show while listening
to the music fi le.
3
Press STOP to stop playback of both the music and image fi les.
Note
• If you have selected a video or photos fi le while a thumbnail is displayed, playback of the current music fi le will be
temporarily stopped. (If the list is displayed, no interruption of playback will occur.) To reinitiate playback, press PLAY.
• If you press PAUSE during simultaneous playback, playback of the slideshow will be temporarily stopped without any
simultaneous interruption to the playback of the music fi le.
5 sec
10 sec
15 sec
Off
9
EN
FR
CA
PT
2M50101A_ENG.indd 92M50101A_ENG.indd 9 10/7/2009 15:49:5910/7/2009 15:49:59

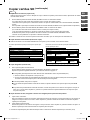
Copying SD Cards
You can copy movies and photos recorded on an SD card in slot A to another SD card in slot B.
You can save movies you have shot onto an SD card in slot B.
It's a good idea to save copies of movies that you want to keep.
Cannot copy from slot B to Slot A.
Copying the entire content of the copy
source SD card (All copy)
Preparation
Turn on the TV and the player.
➊
Insert the SD card containing the fi les you
want to copy (copy source) into slot A, and
the destination SD card into slot B.
➋
Press SD CARD, select Slot A using ▲ / ▼,
and press ENTER.
SD CARD
Slot A
Slot B
➌
Press COPY and select "All".
All
Select
➍
Press ENTER, select "Yes" and then press
ENTER again to start copying.
The "Copying..." message screen appears.
Copying...
To cancel, press the RETURN key.
30%
When copying ends, "Copy Complete!" is displayed.
■ To cancel copying
Press RETURN, then press ◀/▶ to select “Yes” and press
ENTER.
The copied data is erased, regardless of how much has
been copied.
Copying selected content from the copy
source SD card (Select copy)
Preparation
Turn on the TV and the player.
➊
Insert the SD card containing the fi les you
want to copy (copy source) into slot A, and
the destination SD card into slot B.
➋
Press SD CARD, select Slot A using ▲ / ▼,
and press ENTER.
SD CARD
Slot A
Slot B
➌
Press COPY, select "Select" and then press
ENTER.
All
Select
● Press RETURN when you want to cancel the command.
➍
Use ▲/▼/◀/▶ to select the movie fi le or photo
fi le you want to copy and then press ENTER.
A checkmark is placed on the selected fi le.
Repeat step 4 to select another fi le you want to copy.
• You can also select folders.
• Folders and fi les cannot be selected at the same time.
• Press RETURN when you want to cancel the command.
(You can go back to step 3.)
Content Manager
SlotA
7/37 00 : 00 : 00
SD_VIDEO
Slot A/SD_VIDEO/01 Jan 2007 00:00
SD CARD FILE VIEW COPY
..
01 Jan 2007 00:00
01 Jan 2007 00:00
01 Jan 2007 00:00
01 Jan 2007 00:00
01 Jan 2007 00:00
01 Jan 2007 00:00
01 Jan 2007 00:00
01 Jan 2007 00:00
01 Jan 2007 00:00
01 Jan 2007 00:00
01 Jan 2007 00:00
01 Jan 2007 00:00
01 Jan 2007 00:00
01 Jan 2007 00:00
01 Jan 2007 00:00
01 Jan 2007 00:00
01 Jan 2007 00:00
01 Jan 2007 00:00
01 Jan 2007 00:00
01 Jan 2007 00:00
01 Jan 2007 00:00
➎
Press COPY, select "Yes" and then press
ENTER again to start copying.
(Select “No” to go
back to step 4.)
The "Copying..." message screen appears.
■ To cancel copying
Press RETURN, then press ◀/▶ to select “Yes” and press
ENTER.
The copied data is erased, regardless of how much has
been copied.
10
2M50101A_ENG.indd 102M50101A_ENG.indd 10 10/14/2009 17:16:0010/14/2009 17:16:00

Copying SD Cards
(continued)
Note
■ Copying all the fi les (All copy)
When you select "All" as the copy setting, the copied fi les may diff er from the source, depending on the status of the destina-
tion SD card.
1
If there are no AVCHD-format or SD-VIDEO-format or DCF-format folders on the destination SD card
(if the card has not been used in a camcorder or used for copying on the player)
⇒Files are copied to the SD card of the copy destination in conformance with AVCHD, SD-VIDEO or DCF formats.
This will allow playback on AVCHD-format, SD-VIDEO-format and DCF-format media players (supported formats only).
2
If there are AVCHD-format or SD-VIDEO-format or DCF format folders on the destination SD card
(if the card has been used in a camcorder or used for copying on the player)
⇒ Create a folder called CU_VS100 on the destination SD card and copy the data into that folder.
The fi les cannot be played on an AVCHD-format or SD-VIDEO-format or DCF-format media player.
* There will be no problems playing the fi les on this player.
To use the SD card containing the copied data on another media player, copy the data onto a new SD card.
■ Copying selected fi les (Select copy)
● When a fi le with an AVCHD format has been copied, it may be handled as indicated below
■ Copying photos (DCF-format)
1
To copy DCF-format photos.
If there are no folders recorded in the AVCHD-format or SD-VIDEO-format on the SD card.
You can copy the photos using the procedure described on page 10.
● Recorded photos by Everio are located in a “XXXJVCSO” inside the DCIM folder (P.12).
XXX is a sequential number starting from 100.
The name of the folder inside the DCIM folder varies depending on the brand of camera used to take the photos.
Refer to the instruction manual for the camera used to take the photos.
● DPOF information cannot be copied.
● If there is no DCIM folder on the destination SD card, the folders and fi les are copied into a new DCIM folder.
● If there is already a DCIM folder on the destination SD card, a folder with a 4-digit number starting from 0001 as the
name is created inside the CU_VS100 folder, and the folders and fi les inside the DCIM folder on the copy source are
copied into that folder.
■ Copying movies, photos and sound fi les with non-standard folder confi gurations
1
Copying all the fi les.
For each folder structure containing fi le formats supported by this player, a folder with a 4-digit number starting from 0001
as the name is created inside the CU_VS100 folder on the destination SD card and the folder structure is copied into that
folder.
2
Copying selected fi les.
A folder with a name consisting of a 4-digit number starting with 0001 is created inside the copy destination CU_VS100
folder, and the fi les and folders that have been selected are copied into this folder.
Refer to the specifi cations for information on the fi le formats supported by this player (P.19).
Content to be copied (SD card in slot A)
Copy destination (SD card in slot B)
Content to be copied (SD card in slot A)
Copy destination (SD card in slot B)
Chapter 1 Chapter 2 Chapter 3
Video fi le (00000.mts)
Video fi le (00000.mts)
Chapter 1
Video fi le
(00000.mts)
Video fi le
(00001.mts)
Video fi le
(00002.mts)
Video fi le
(00000.mts)
Video fi le
(00001.mts)
Video fi le
(00002.mts)
A fi le partially copied by Everio that has been copied by the player. A fi le that has created a play list by means of Everio, and which has
been copied by the player.
11
EN
FR
CA
PT
2M50101A_ENG.indd 112M50101A_ENG.indd 11 10/7/2009 15:50:0210/7/2009 15:50:02

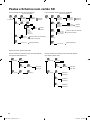
Folders and Files on an SD Card
For an AVCHD-format camcorder For an SD-VIDEO-format camcorder
EVERIO
_SD
DCIM 100JVCSO
101JVCSO
102JVCSO
…
AVCHD BDMV
EXTMOV
MISC
PRIVATE
STREAM
BACKUP
CLIPINF
PLAYLIST
INDEX.BD M
MOVIEOBJ.BDM
00000.MTS
00001.MTS
MOV_0001.MTS
MOV_0002.MTS
PIC_0001.JPG
PIC_0002.JPG
PIC_0003.JPG
…
…
AUTPRINT.MRK
EVERIO
_SD
DCIM 100JVCSO
101JVCSO
102JVCSO
SD_VIDEO
MGR_INFO
PRG001
PRG002
PRG003
MOV001.MOD
EXTMOV
PRIVATE
MOV_0001.MOD
MOV_0002.MOD
MOV_0003.MOD
PIC_0001.JPG
PIC_0002.JPG
PIC_0003.JPG
……
……
MISC
AUTPRINT.MRK
Folders and fi les copied on this player
When AVCHD-format camcorder movies are fi rst copied When AVCHD-format camcorder movies are copied multiple
times
PRIVATE AVCHD
BDMV STREAM
00000.MTS
00001.MTS
CU_VS100 0001
EXTMOV
PRIVATE AVCHD
BDMV STREAM
00000.MTS
00001.MTS
CU_VS100 0001
0002 00000.MTS
00001.MTS
00000.MTS
00001.MTS
0003 00000.MTS
00001.MTS
(SD card)
(Photo folder)(Photo folder)
(Photo fi le)
(Photo fi le)
(Movie fi le)
(Movie fi le)
(Movie fi le with corrupted
management information)
(DPOF information)
(DPOF information)
(Movie fi le with corrupted
management information)
12
2M50101A_ENG.indd 122M50101A_ENG.indd 12 10/13/2009 4:03:12 PM10/13/2009 4:03:12 PM

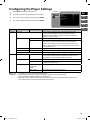
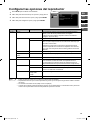
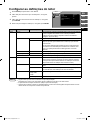
Confi guring the Player Settings
1
Press SETUP to display the SETUP menu.
SETUP
Language : English
Repeat : Off
HDMI control : On
Overlay Bitmap : Off
Reset
General
Video
2
Use ▲/▼ to select the type of settings and then press ▶.
3
Use ▲/▼ to select a setting item and then press ENTER.
4
Use ▲/▼ to confi gure the setting and then press ENTER.
Type Item Setting Details
General Language For specifying the language to be displayed for SETUP menu
screen and others. “English” is set as the default language.
(English / Français / Deutsch / Español / Italiano / Nederlands /
Português / Русский / )
Repeat*¹ Off Repeat playback is disabled.
On Plays all the fi les in a folder repeatedly.
• Repeat
plays only fi les of the same type as the selected fi le.
•
Linked repeat playback can also be used running from SD card
slot A to SD card slot B, but this only applies for movie fi les record-
ed in AVCHD format.
HDMI control On/Off See page 14.
Overlay Bitmap On/Off Turns AVCHD Overlay Bitmap*
4
display on and off .
Reset Restores the settings in place when you purchased the player.
Video TV Screen*² 4:3/16:9 Sets the screen size to match that of the connected TV. (When the
TV screen size is fi xed, images are displayed using the TV's set-
tings regardless of the setting selected on the player.)
Color System NTSC Forcibly converts fi les to the NTSC system for playback.
PAL Forcibly converts fi les to the PAL system for playback. This setting
should not normally be used.
HDMI 480i/480p/
720p/1080i/
1080p
Displays images at the selected resolution.
Auto - 480p *³ Outputs the recommended TV resolution.
Note
*¹
Some fi les may not be included in repeat playback.
*²
Depending on the video being played, changing the setting may have no visible eff ect.
*³
The TV resolution is displayed. (480p is just an example.)
*⁴
When this content consists of Everio photo images, the date and time of the photo will be displayed in the
lower right-hand side of the screen when the fi le is played bac
13
EN
FR
CA
PT
2M50101A_ENG.indd 132M50101A_ENG.indd 13 10/7/2009 15:50:0210/7/2009 15:50:02

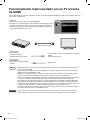
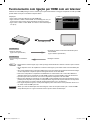
HDMI Linked Operation with a TV
Using an HDMI cable to connect the player to TV that supports HDMI CEC-compliant linked operation allows you to use the
convenient functions outlined below.
Preparation
• Connect the player to the TV using an HDMI cable (P.6).
• Turn on the TV and set “HDMI control” in the Setup menu to “On” (actual
menu and item names diff er depending on the TV used).
• Turn on the player and set “HDMI control” in “General” in the SETUP menu to
“On” (P.13).
SETUP
General
Video
Language : English
Repeat : Off
HDMI control : On
Overlay Bitmap : Off
Reset
Procedure 1
• Insert an SD card
(Turn the player on beforehand.)
• The TV input automatically switches to HDMI input.
(Turn the TV on beforehand.)
Procedure 2
• The player automatically turns off .
• Turn off the TV.
Note • Depending on the connected TV, turning on the player may automatically turn on the TV and switch it to HDMI
input.
• If a device such as an amplifi er or selector is connected, it may malfunction. Set "HDMI control" to "Off ".
• HDMI CEC (Consumer Electronics Control) is an industry standard that allows interlinked operation between
compatible devices when they are connected via an HDMI cable.
• Not all HDMI-compatible devices are compliant with the HDMI CEC standard. If the connected device is not
HDMI CEC-compliant, the HDMI control function on the player will not work.
• The player is not guaranteed to work with all HDMI CEC-compliant devices.
• Even among HDMI CEC-compliant devices, the functionality provided diff ers depending on the specifi cations
of the particular device. Accordingly, some of the functions linked with this device may not work. (Refer to the
instruction manual provided with your TV.)
• With some connected devices, the interlinked functions may not operate as intended. If this occurs, set "HDMI
control" to "Off ".
Caution • Once the power cable has been disconnected, the player will not operate even if "HDMI control" is set to "On".
Turn the player back on by pressing the power button.
HDMI cable (optional)
14
2M50101A_ENG.indd 142M50101A_ENG.indd 14 10/7/2009 15:50:0310/7/2009 15:50:03

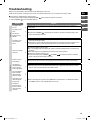
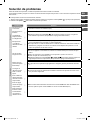
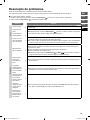
Troubleshooting
Before you request repairs, check the items in the table below once more.
If there is still a problem, contact the store where you purchased this product or your nearest JVC service outlet.
■ If the player is malfunctioning, reset the player.
1. Turn the player off by pressing and holding power (
) on the player for at least 10 seconds.
2. Press the power (
) to turn the player back on.
Problem Solution
General
The player won't
turn on.
● Ensure that you are using the special power cable provided and that it is connected cor-
rectly. (P.6)
The player won't
work.
● Press and hold power ( ) on the player for at least 10 seconds to reset the player. (The
player automatically turns off .)
The screen
freezes during
SETUP.
The player or its
power cable is
warm.
● If used for an extended period, the player and its power cable become warm. This is normal
and does not indicate a fault.
● If the player or power cable becomes abnormally hot, disconnect the power cable and con-
tact the store where you purchased this product or your nearest JVC service outlet.
Playback
There is no image
on the TV.
● Connect the player to the TV. (P.6)
● On a TV equipped with A/V input jacks, switch to the external input for the connection with
the player.
● The content type is not supported by the player and is not recognized.
● Review the resolution setting. (P.13)
● Press and hold the player's power (
) and SKIP for at least 2 seconds to reset the
player. (The player automatically turns off .)
It takes a time to
start playing.
● It may take some more time to start playing long recorded movies or large sized images.
The image is
disrupted during
reverse or fast-
forward playback.
● The image may become disrupted during the change in playback speed when you switch
speeds. This is normal and does not indicate a fault.
The TV switches
input automati-
cally when the
player is played.
● This is caused by the operation of the HDMI-CEC control function. To disable this function,
set "HDMI control" to "
Off
" in the SETUP menu. (P.13)
The TV turns off
when this player
is turned off .
This player
functions when
the TV’s remote
control is being
operated.
15
EN
FR
CA
PT
2M50101A_ENG.indd 152M50101A_ENG.indd 15 10/7/2009 15:50:0310/7/2009 15:50:03

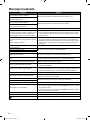
Message displayed
Problem Solution
This operation may cause the screen not to dis-
play. Do you want to continue?
● This is displayed when you change the Color System setting.
Color system has changed. Do you want to
save these settings?
This operation may cause the screen not to dis-
play. Do you want to continue?
● This is displayed when you change the HDMI resolution.
Video resolution has changed. Do you want to
save these settings?
Do you want to start copying? ● Select "Yes" to begin copying.
Content with the same format was found at the
copy destination. The newly-copied content
may not be played with other devices if you
continue copying. Do you want to start copy-
ing?
● There is an AVCHD, SD-Video or DCF folder on the copy destination SD
card in slot B. If you select "Yes", the content may be saved in another
folder. See page 12 for details.
The SD Card in Slot B cannot be recognized.
Do you want to format the card?
● An SD card that has been formatted in something other than the FAT32
fi le system is loaded in slot B. If it is okay to purge the data in the SD card
and reformat it, select ‘Yes’; if you do not want to purge the data, select ‘No’.
Insert another SD card if you choose not to purge the data on the fi rst SD
card.
Do you want to cancel copying? ● Select "Yes" to cancel copying.
Copy Complete!
● Select "OK" to return to the normal screen.Copying has been cancelled.
Format complete.
No SD Card is inserted. ● Insert an SD card into SD card slot A or B.
The SD Card in Slot A cannot be recognized.
● An SD card that has been formatted in something other than the FAT32
fi le system is loaded in slot A. Insert an SD card that has been properly
formatted.
The SD Card in Slot B is locked. ● Unlock the SD card in slot B.
There is not enough memory space on the
card.
● There is not enough free space on the SD card in slot B.
Insert a diff erent SD card.
The number of folders exceeds the limit.
● There are 100 or more folders in the "CU_VS100" folder on the SD card
in slot B. Using a computer or similar device, set the number of folders to
100 or less, or insert a diff erent SD card.
There is not any content to be copied. ● Insert a diff erent SD card.
Select the content to be copied.
● No content has been selected for “Select copy”. Select the content you
want to copy.
Copy Error
● Redo the copy procedure or insert a diff erent SD card.
Format Error
Formatting… ● Processing will take a short time.
The content is not compatible.
● This content cannot be played.
When you play the following content, press ENTER in your remote
controller and select OK. If you want to choose another content, press
STOP in your remote controller and go back to contents menu.
CARD INSERTED ● Displayed when an SD card is inserted.
CARD EJECTED ● Displayed when an SD card is removed.
● Indicates an action that cannot be performed.
16
2M50101A_ENG.indd 162M50101A_ENG.indd 16 10/7/2009 15:50:0410/7/2009 15:50:04

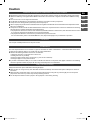
Caution
Trademark and Registered Trademarks for Third-party Products
●
Manufactured under licence from Dolby Laboratories. Dolby and the double-D symbol are trademarks of Dolby Laboratories.
●
HDMI, the HDMI logo and High-Defi nition Multimedia Interface are trademarks or registered trademarks of HDMI Licensing
LCC.
●
The x.v.Color and x.v.Color logos are trademarks.
●
The AVCHD and AVCHD logos are trademarks of Panasonic Corporation and Sony Corporation.
●
This product uses TrueType fonts produced by Ricoh Company Ltd.
●
Other company and product names mentioned herein are registered trademarks and/or trademarks of their respective holders.
●
SD Logo is a trademark.
●
This product is licensed under the AVC Patent Portfolio License. It is only licensed to the customer for individual use involving
personal and non-commercial activities as described below:
• The playback of videos that conform to AVC standards (hereinafter referred to as AVC video) and which have been recorded
by a consumer engaged in individual and non-commercial activities.
• The playback of AVC video received from a provider that has procured a license.
For more information, please consult with MPEG LA, LLC (http://www.mpegla.com), an American corporation.
Disclaimers
JVC accepts no liability whatsoever for any loss of data.
Condensation
The water droplets that form on the outside of a glass of cold water are called "condensation". Condensation that causes water
droplets to form inside the player or on an SD card can cause malfunctions.
●
Note that the following situations can lead to condensation:
•
Taking the player from a cold place into a warm room
•
Heating the room very suddenly
•
Placing the player directly into a cold air fl ow (e.g. from an air-conditioner)
•
Placing the player in a very humid location
●
If you think condensation is likely to occur, take out the SD card and turn on the power of the player in advance. The resulting
heat that is generated inside the player will discourage the development of condensation.
Daily Care and Cleaning
Always disconnect the power cable before cleaning the player.
■ Wipe off dust, etc. using a soft dry cloth. Note that excessive dust build-up around the mains power outlet poses a smoke or
fi re hazard.
■ When the player is extremely soiled, soak a rag in diluted mild detergent, wring the rag out thoroughly and use to wipe the
player clean. Then use a dry cloth to wipe off any remaining moisture.
■ Do not subject the remote control or player to strong impacts or force during cleaning.
17
EN
FR
CA
PT
2M50101A_ENG.indd 172M50101A_ENG.indd 17 10/7/2009 15:50:0410/7/2009 15:50:04

Displaying Photos
Still image sizes can be displayed with following restrictions.
No. of horizontal pixels
31 or less 31 or more
to 6,048 or less
6,049 or more
No. of vertical pixels
31 or less
---
32 or more to 10,000
or less
-
3
1
-
10,001 or more
-
3
1
-
*1: Images with more than 24 megapixels in total are not displayed.
*2: Still images that have larger sizes than HDMI resolution settings will be automatically adjusted with the display size.
Specifi cations
External dimensions 193 x 36 x 148 mm (W x H x D)
Weight Approx. 490 g (not including power and dedicated connection cables)
Power source AC110V - 120V, 50Hz/60Hz
Operating environ-
ment
Permissible operating temperature: 5°C to 40°C
Permissible storage temperature: -20°C to 60°C
Supported SD cards SD/SDHC See P.19 for details.
Video output jacks 1.0 V, 75 Ω (pin-jack)
Audio output jacks 2.0 Vrms (pin-jack)
HDMI output jack 19-pin
Video: 1080p/1080i/720p/480p/480i (compatibility with DVI-D not guaranteed)
Audio: 2-ch PCM/bitstream
Power consumption 7.5 W (110-120V AC)
Standby power con-
sumption
0.3 W (110-120V AC)
Photos and fi gures in the manual use emphasis, omission and merging to make explanations easier to understand.
As such, they may diff er slightly from the actual product.
The product appearance and specifi cations are subject to change without prior notice.
A ratings label is affi xed to the underside of the player.
18
2M50101A_ENG.indd 182M50101A_ENG.indd 18 10/7/2009 15:50:0410/7/2009 15:50:04

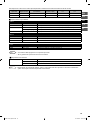
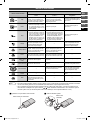
This player is equipped with 2 SD card slots. The functions of the slots are shown below.
SD card
slot
Playback Formatting Append (copy) File deletion File editing
A
{¯ ¯¯¯
B
{
{
(FAT32 only)
{¯¯
■
Playable fi le types
Movies
Format File extension Format restrictions
AVCHD .m2ts or .mts (Video) MPEG-4 AVC/H.264 (Audio) Dolby Digital
SD-Video .tod (Video) MPEG-2 TS (Audio) MPEG-1 Audio Layer2 2 ch
.mod, .mpg or .mpeg (Video) MPEG-2 PS (Audio) Dolby Digital
H.264 .mov (Video) MPEG-4 AVC/H.264 (Audio) AAC
Music
Format File extension Format restrictions
WAV .wav Sampling: 44.1 kHz
MP3 .mp3 Sampling: 32, 44.1 or 48 kHz
Photos
Format File extension Format restrictions
JPEG .jpg or jpeg Maximum resolution: See page 18.
Note
•
Progressive JPEG fi les cannot be played back.
•
Playback is not guaranteed for all fi les.
■
Recommended SD cards
SD/SDHC Manufacturer Panasonic, Sandisk, Toshiba or ATP
Maximum capacity 2 GB (SD) or 4 to 32 GB (SDHC)
Class 4 or 6
Note • Use of this player may not be possible or optimal performance may not be achieved depending on the SD card
used. We suggest using the recommended SD cards.
19
EN
FR
CA
PT
2M50101A_ENG.indd 192M50101A_ENG.indd 19 10/13/2009 4:03:13 PM10/13/2009 4:03:13 PM

2M50101A_ENG.indd 202M50101A_ENG.indd 20 10/8/2009 14:06:3810/8/2009 14:06:38
ページが読み込まれています...
ページが読み込まれています...
ページが読み込まれています...
ページが読み込まれています...
ページが読み込まれています...
ページが読み込まれています...
ページが読み込まれています...
ページが読み込まれています...
ページが読み込まれています...
ページが読み込まれています...
ページが読み込まれています...
ページが読み込まれています...
ページが読み込まれています...
ページが読み込まれています...
ページが読み込まれています...
ページが読み込まれています...
ページが読み込まれています...
ページが読み込まれています...
ページが読み込まれています...
ページが読み込まれています...
ページが読み込まれています...
ページが読み込まれています...
ページが読み込まれています...
ページが読み込まれています...
ページが読み込まれています...
ページが読み込まれています...
ページが読み込まれています...
ページが読み込まれています...
ページが読み込まれています...
ページが読み込まれています...
ページが読み込まれています...
ページが読み込まれています...
ページが読み込まれています...
ページが読み込まれています...
ページが読み込まれています...
ページが読み込まれています...
ページが読み込まれています...
ページが読み込まれています...
ページが読み込まれています...
ページが読み込まれています...
ページが読み込まれています...
ページが読み込まれています...
ページが読み込まれています...
ページが読み込まれています...
ページが読み込まれています...
ページが読み込まれています...
ページが読み込まれています...
ページが読み込まれています...
ページが読み込まれています...
ページが読み込まれています...
ページが読み込まれています...
ページが読み込まれています...
ページが読み込まれています...
ページが読み込まれています...
ページが読み込まれています...
ページが読み込まれています...
ページが読み込まれています...
ページが読み込まれています...
ページが読み込まれています...
ページが読み込まれています...
ページが読み込まれています...
ページが読み込まれています...
ページが読み込まれています...
ページが読み込まれています...
ページが読み込まれています...
ページが読み込まれています...
ページが読み込まれています...
ページが読み込まれています...
ページが読み込まれています...
ページが読み込まれています...
ページが読み込まれています...
ページが読み込まれています...
ページが読み込まれています...
ページが読み込まれています...
ページが読み込まれています...
ページが読み込まれています...
ページが読み込まれています...
ページが読み込まれています...
ページが読み込まれています...
ページが読み込まれています...
-
 1
1
-
 2
2
-
 3
3
-
 4
4
-
 5
5
-
 6
6
-
 7
7
-
 8
8
-
 9
9
-
 10
10
-
 11
11
-
 12
12
-
 13
13
-
 14
14
-
 15
15
-
 16
16
-
 17
17
-
 18
18
-
 19
19
-
 20
20
-
 21
21
-
 22
22
-
 23
23
-
 24
24
-
 25
25
-
 26
26
-
 27
27
-
 28
28
-
 29
29
-
 30
30
-
 31
31
-
 32
32
-
 33
33
-
 34
34
-
 35
35
-
 36
36
-
 37
37
-
 38
38
-
 39
39
-
 40
40
-
 41
41
-
 42
42
-
 43
43
-
 44
44
-
 45
45
-
 46
46
-
 47
47
-
 48
48
-
 49
49
-
 50
50
-
 51
51
-
 52
52
-
 53
53
-
 54
54
-
 55
55
-
 56
56
-
 57
57
-
 58
58
-
 59
59
-
 60
60
-
 61
61
-
 62
62
-
 63
63
-
 64
64
-
 65
65
-
 66
66
-
 67
67
-
 68
68
-
 69
69
-
 70
70
-
 71
71
-
 72
72
-
 73
73
-
 74
74
-
 75
75
-
 76
76
-
 77
77
-
 78
78
-
 79
79
-
 80
80
-
 81
81
-
 82
82
-
 83
83
-
 84
84
-
 85
85
-
 86
86
-
 87
87
-
 88
88
-
 89
89
-
 90
90
-
 91
91
-
 92
92
-
 93
93
-
 94
94
-
 95
95
-
 96
96
-
 97
97
-
 98
98
-
 99
99
-
 100
100


他の言語で
- español: JVC DVD Player CU-VS100U Manual de usuario
- français: JVC DVD Player CU-VS100U Manuel utilisateur
- português: JVC DVD Player CU-VS100U Manual do usuário