Anker A1S1HbZNG9L ユーザーマニュアル

カテゴリー
ウェブカメラ
タイプ
ユーザーマニュアル
Anker PowerConf C200
USER MANUAL
English 01
Čeština 07
Dansk 14
Deutsch 21
Español 27
Suomi 34
Français 41
Italiano 48
Nederlands 55
Norsk 62
Język polski 69
Portugues do Brasil 75
Pусский 83
Svenska 90
Türkçe 96
日本語 102
한국어 109
简体中文 115
繁體中文 121
 127

133
01 EN
At a Glance
1
6
2
5
3
4
7
8
9
1. Privacy cover switch
2. Privacy cover
3. Autofocus 2K HD lens
4. Microphones
5. LED light
6. USB-C port
7. Air vents
8. Adjustable clip/stand
9. Tripod thread
Mounting
Option A: On Top of Your Monitor
1. Unfold the clip so it ts over the top of your monitor or laptop screen. For a
secure t, adjust the clip by pressing it against the back of your device.
2. Adjust the webcam up and down for the optimal position to frame.
EN 02
Option B: On a Tripod on Your Desk
With the clip folded in, mount the webcam onto a tripod (not provided) with the ¼
inch thread.
Connecting
1. Plug the USB-C connector on the provided cable into the USB-C port on the
webcam.
2. Plug the USB-A connector into an available port on your computer.
Plug-and-play support will let your computer instantly recognize the webcam.
If your computer does not instantly recognize the webcam, try plugging into a
different USB port or restart the computer.
3. Open the app you want to use with the webcam.
The LED light will light up white when the webcam is in use by an app.
03 EN
You may need to manually select this webcam and its built-in microphones for your
PC system or software.
A) Windows
1. Go to Settings > Privacy > Camera and turn on “Allow apps to access your
camera”.
2. Turn on each of the listed apps where you want to use the camera. After you
open the Camera app, you may need to switch to the Full HD Camera.
B) macOS
1. Go to the Apple menu > System Preferences > Security & Privacy, then choose
Camera from the list on the left side.
2. Locate the app(s) you want to enable camera access for and check the box
alongside that app name to enable camera access for that application.
C) Software (Zoom or more)
Go to Settings > Video > Camera and choose this webcam.
Controls
Slide to cover the camera lens for privacy. The camera will turn off automatically
when blocked by the privacy cover.
OFF
Using AnkerWork Software
Download the AnkerWork Software from
software.ankerwork.com
Download and install the AnkerWork software on your PC to update rmware and adjust settings.
EN 04
Specifications
Specications are subject to change without notice.
Input 5V 1 A
Resolution 2K@30fps; 1080P@30fps; 720P@30fps; 320x240@30fps
Field of View (FOV) 65°, 78°, 95°
Focus Type Automatic focus
Sensor 5 MP CMOS (1 / 2.7 in.)
Focus Distance 15 cm to 3 m
Maximum Video Frame Rate 2K video capture @ 30fps
Video Codec MJPEG, YUV
Supported Operating
Systems or Software
Windows® 7 or later; macOS® 10.11 or later; Skype
for Business; Zoom; Google Meet; BlueJeans;
Cisco Webex; WeChat; Microsoft Teams; FaceTime;
YouTube; XSplit; OBS; Twitch; Facebook Messenger;
Twitter; Mixer
Microphone Dual stereo microphones
Voice Algorithm AGC (Auto Gain Control), ANC (Auto Noise Cancellation)
Voice Pickup Distance 3 m
05 CS
ehled
1
6
2
5
3
4
7
8
9
1. Přepínač krytky kamery
2. Krytka kamery
3. Objektiv 2K HD s automatickým ostřením
4. Mikrofony
5. LED světlo
6. Port USB-C
7. Větrací otvory
8. Nastavitelná svorka / stojánek
9. Závit na stativ
Montáž
Možnost A: Na horní část monitoru
1. Otevřete svorku, aby se umístila přes horní část monitoru nebo obrazovky
notebooku. Pro bezpečné uchycení přitlačte klip k zadní části zařízení.
2. Pro nastavení optimální pozice záběru nakloňte webovou kameru nahoru nebo
dolů.
CS 06
Možnost B: Na stativ na vašem stole
Když je svorka složená, připevněte webovou kameru na stativ (není součástí balení)
pomocí ¼palcového závitu.
Připojení
1. Konektor USB-C na dodaném kabelu zapojte do portu USB-C na webové
kameře.
2. Konektor USB-A zapojte do volného portu v počítači.
Díky podpoře funkce Plug-and-play by měl počítač webovou kameru ihned
rozpoznat.
Pokud počítač webovou kameru nerozpozná, zapojte ji do jiného portu USB
nebo počítač restartujte.
3. Otevřete aplikaci, kterou chcete používat s webovou kamerou.
Když používáte webovou kameru prostřednictvím aplikace, kontrolka LED se
rozsvítí bíle.
07 CS
Je možné, že v počítačovém systému nebo softwaru budete muset webovou kameru
a integrované mikrofony manuálně vybrat.
A) Windows
1. Přejděte do části Nastavení > Soukromí > Kamera a zapněte možnost Povolit
aplikacím přístup ke kameře.
2. Zapněte tuto možnost pro všechny aplikace, kterým chcete dovolit používat
kameru. Po otevření aplikace Kamera možná budete muset přepnout na
možnost Kamera s rozlišením Full HD.
B) macOS
1. Přejděte do části Nabídka Apple > Předvolby systému >Zabezpečení a soukromí
a poté v seznamu na levé straně vyberte možnost Kamera.
2. Najděte aplikace, kterým chcete dovolit přístup ke kameře, a vedle názvu každé
z těchto aplikací zaškrtněte políčko.
C) Software (Zoom nebo jiný)
Přejděte do Nastavení > Video > Kamera a vyberte tuto webovou kameru.
Ovládání
Posunutím zakryjete objektiv kamery, abyste měli soukromí. Kamera se automaticky
vypne, pokud je zacloněná krytkou kamery.
OFF
Použití softwaru AnkerWork
Download the AnkerWork Software from
software.ankerwork.com
Chcete-li aktualizovat rmware a upravit nastavení, stáhněte si software AnkerWork a nainstalujte ho
do počítače.
CS 08
Specifikace
Specikace se mohou bez předchozího upozornění změnit.
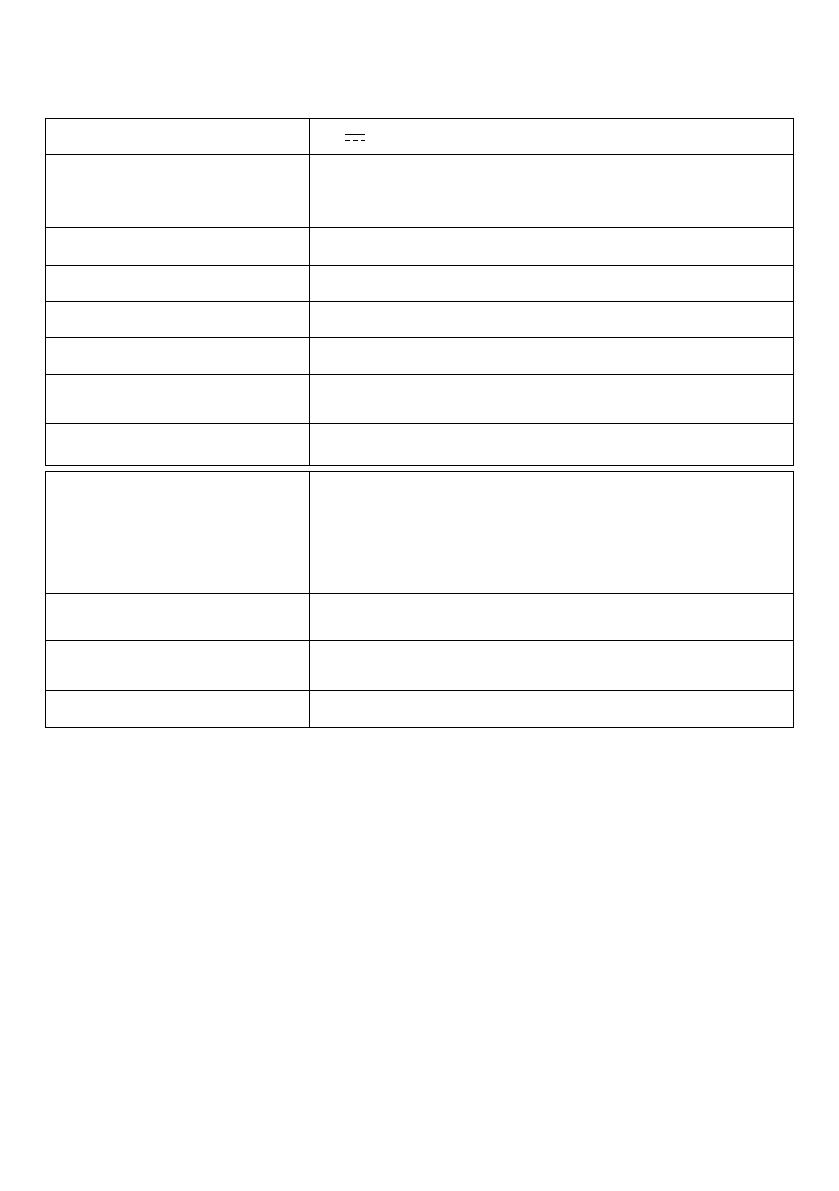
Vstup 5 V 1 A
Rozlišení
2K při 30 snímcích za sekundu, 1080 p při 30 snímcích
za sekundu, 720 p při 30 snímcích za sekundu, 320 ×
240 při 30 snímcích za sekundu
Zorné pole (FOV) 65°, 78°, 95°
Typ zaměření Automatické zaměření
Senzor 5Mpx snímač CMOS (1/2,7″)
Vzdálenost zaměření 15 cm až 3 m
Maximální snímkovací
frekvence videa Záznam videa v rozlišení 2K při 30 snímcích za sekundu
Kodek pro videa MJPEG, YUV
Podporované operační
systémy nebo software
Windows® 7 nebo novější, macOS® 10.11 nebo
novější, Skype for Business, Zoom, Google Meet,
BlueJeans, Cisco Webex, WeChat, Microsoft Teams,
FaceTime, YouTube, XSplit, OBS, Twitch, Facebook
Messenger, Twitter, Mixer
Mikrofon Duální stereofonní mikrofony
Hlasový algoritmus AGC (Automatické vyrovnávání citlivosti), ANC
(Automatické potlačení šumu)
Vzdálenost zachycení hlasu 3 m
09 DA
Et overblik
1
6
2
5
3
4
7
8
9
1. Kontakt til privatlivscover
2. Privatlivscover
3. 2K HD-objektiv med autofokus
4. Mikrofoner
5. LED-lys
6. USB-C-port
7. Luftventiler
8. Justerbar klemme/stativ
9. Stativgevind
Monterings-
Mulighed A: Oven på din skærm
1. Fold klemmen ud, så den passer over toppen på skærmen eller laptopskærmen.
Juster klemmen ved at trykke den mod bagsiden af din enhed for sikker
fastgørelse.
2. Juster webkameraet op og ned for at få den optimale position til billedet.
DA 10
Mulighed B: På et stativ på dit skrivebord
Med klemme foldet ind, monter webkameraet på et stativ (medfølger ikke) med en
¼ " gevindadapter.
Oprettelse af forbindelse
1. Forbind USB-C-stikket til det medfølgende kabel i USB-C-porten
webkameraet.
2. Sæt USB-A-stikket i en ledig port på din computer.
Plug-and-play-understøttelse gør det muligt for din computer at genkende
webkameraet med det samme.
Hvis din computer ikke genkender webkameraet med det samme, kan du
prøve at forbinde til en anden USB-port eller genstarte computeren.
3. Åbn appen du vil bruge med webkameraet.
LED-lyset lyser op, når webkameraet bruges af en app.
11 DA
Du skal muligvis manuelt vælge dette webkamera og de indbyggede mikrofoner til
dit pc-system eller software.
A) Windows
1. Gå til Indstillinger > Beskyttelse af personlige oplysninger > Kamera, og slå
"Tillad apps at få adgang til dit kamera" til.
2. Slå hver af de oplistede apps til, hvor du vil bruge kameraet. Når du har åbnet
Kamera-appen, skal du muligvis skifte til Full HD-kameraet.
B) macOS
1. Gå til Apple-menuen > Systemindstillinger > Sikkerhed & anonymitet, og vælg
derefter Kamera fra listen i venstre side.
2. Find den eller de app/apps, du vil aktivere kameraadgang for, og afkryds boksen
ved siden af det appnavn, du vil tillade kameraadgang for.
C) Software (Zoom eller mere)
Gå til Indstillinger > Video > Kamera og vælg dette webkamera.
Kontroller
Skub for at dække kameralinsen af hensyn til dit privatliv. Kameraet slukkes
automatisk, når det blokeres af privatlivscoveret.
OFF
Brug af AnkerWork-software
Download the AnkerWork Software from
software.ankerwork.com
Download og installer AnkerWork-softwaren på din pc for at opdatere rmware og justere indstillinger.
DA 12
Specifikationer
Specikationerne kan ændres uden varsel.
Input 5 V 1 A
Opløsning 2K ved 30 fps; 1080P ved 30 fps; 720P ved 30 fps; 320
x 240 ved 30 fps
Synsfelt (FOV) 65°, 78°, 95°
Fokuseringstype Automatisk fokusering
Sensor 5 MP CMOS (1/2,7 tommer)
Fokuseringsafstand 15 cm til 3 m
Maksimal billedfrekvens 2K-videooptagelse ved 30 fps
Video-codec MJPEG, YUV
Understøttet operativsystem
eller software
Windows® 7 eller nyere; macOS® 10.11 eller nyere;
Skype for Business; Zoom; Google Meet; BlueJeans;
Cisco Webex; WeChat; Microsoft Teams; Facetime;
Youtube; XSplit; OBS; Twitch; Facebook Messenger;
Twitter; Mixer
Mikrofon Dobbelte stereomikrofoner
Stemmealgoritme AGC (Automatisk forstærkningsstyring), ANC (Aktiv
støjbegrænsning)
Afstand for stemmeopsamling 3 m
13 DE
Auf einen Blick
1
6
2
5
3
4
7
8
9
1. Schalter für die Abdeckung zum Schutz der Privatsphäre
2. Abdeckung zum Schutz der Privatsphäre
3. Autofokus 2K HD-Objektiv
4. Mikrofone
5. LED-Licht
6. USB-C-Anschluss
7. Lüftungsschlitze
8. Einstellbarer Clip/Ständer
9. Stativgewinde
MONTAGE
Option A: Oben auf Ihrem Monitor
1. Klappen Sie den Clip so auf, dass er über den oberen Rand des Bildschirms
Ihres Monitors oder Laptops passt. Passen Sie den Clip für einen sicheren Sitz
an, indem Sie ihn gegen die Rückseite des Geräts drücken.
2. Passen Sie die Webcam nach oben und unten an, um die optimale Bildposition
zu erzielen.
DE 14
Option B: Auf einem Stativ auf Ihrem Schreibtisch
Befestigen Sie bei eingeklapptem Clip die Webcam mithilfe des ¼-Zoll-Gewindes an
einem Stativ (nicht im Lieferumfang enthalten).
Verbinden
1. Schließen Sie den USB-C-Stecker des mitgelieferten Kabels an den USB-C-
Anschluss der Webcam an.
2. Schließen Sie den USB-A-Stecker an einen freien Anschluss Ihres Computers an.
Dank Plug-and-Play-Unterstützung erkennt Ihr Computer die Webcam sofort.
Wenn Ihr Computer die Webcam nicht sofort erkennt, schließen Sie sie an
einen anderen USB-Anschluss an oder starten Sie den Computer neu.
3. Öffnen Sie die App, die Sie mit der Webcam verwenden möchten.
Die LED-Anzeige leuchtet weiß, wenn die Webcam von einer Anwendung
genutzt wird.
15 DE
Je nach PC-System oder Software müssen Sie die Webcam und die integrierten
Mikrofone möglicherweise manuell auswählen.
A) Windows
1. Gehen Sie zu „Einstellungen > Datenschutz > Kamera“, und aktivieren Sie
„Zulassen, dass Apps auf Ihre Kamera zugreifen“.
2. Schalten Sie jede der aufgeführten Apps ein, die Sie mit der Kamera verwenden
möchten. Nachdem Sie die Kameraanwendung geöffnet haben, müssen Sie
möglicherweise zur Full-HD-Kamera wechseln.
B) macOS
1. Gehen Sie im Apple-Menü zu „Systemeinstellungen > Sicherheit &
Datenschutz“, und wählen Sie in der linken Liste „Kamera“ aus.
2. Suchen Sie die App(s), für die Sie den Kamerazugriff aktivieren möchten, und
markieren Sie das Kästchen neben dem Namen der App, um den Kamerazugriff
für diese App zu aktivieren.
C) Software (Zoom oder mehr)
Gehen Sie zu „Einstellungen > Video > Kamera“ und wählen Sie diese Webcam aus.
Steuerung
Schieben Sie den Schalter, um das Objektiv zum Zweck der Privatsphäre zu
schließen. Die Kamera schaltet sich automatisch aus, wenn sie durch die Abdeckung
zum Schutz der Privatsphäre blockiert wird.
OFF
Verwendung der AnkerWork-Software
Download the AnkerWork Software from
software.ankerwork.com
Laden Sie die AnkerWork Software herunter und installieren Sie sie auf Ihrem PC, um die Firmware zu
aktualisieren und die Einstellungen anzupassen.
DE 16
Technische Daten
Änderungen der technischen Daten ohne Vorankündigung vorbehalten.
Leistungsaufnahme 5 V 1 A
Auösung 2K @ 30 fps, 1080P @ 30 fps, 720P @ 30 fps,
320 x 240 @ 30 fps
Sichtfeld 65°, 78°, 95°
Fokusart Autofokus
Sensor 5 MP CMOS (1/2,7 Zoll)
Fokusabstand 15 cm bis 3 m
Maximale Videobildrate 2K-Videoaufnahme @ 30 fps
Videocodec MJPEG, YUV
Unterstützte Betriebssysteme
oder Software
Windows® 7 oder höher, macOS® 10.11 oder höher,
Skype for Business, Zoom, Google Meet, BlueJeans,
Cisco Webex, WeChat, Microsoft Teams, FaceTime,
YouTube, XSplit, OBS, Twitch, Facebook Messenger,
Twitter, Mixer
Mikrofon Dual-Stereo-Mikrofone
Sprachalgorithmus Automatische Verstärkungsregelung (AGC),
automatische Geräuschunterdrückung (ANC)
Sprachaufnahmebereich 3 m
17 ES
Vista general
1
6
2
5
3
4
7
8
9
1. Pulsador para la tapa de protección de la privacidad
2. Tapa de protección de la privacidad
3. Lente 2K HD con enfoque automático
4. Micrófonos
5. Indicador LED
6. Puerto USB-C
7. Rejilla de ventilación
8. Pinza/Soporte ajustable
9. Acople de rosca para trípode
Instalación
Opción A: Encima del monitor
1. Desdoble la pinza de forma que quede ajustada a la parte superior del monitor
o de la pantalla del portátil. Para un ajuste seguro, ajuste el clip presionándolo
contra la parte posterior del dispositivo.
2. Mueva la cámara web hacia arriba y hacia abajo hasta encontrar la posición
óptima para encuadrar.
ES 18
Opción B: En un trípode sobre la mesa
Con la pinza doblada, instale la cámara web en un trípode (no incluido) utilizando la
rosca de ¼ de pulgada.
Conexión
1. Enchufe el conector USB-C del cable provisto en el puerto USB-C de la cámara
web.
2. Enchufe el conector USB-A en un puerto disponible en su ordenador.
La compatibilidad con plug-and-play permitirá que su ordenador reconozca al
instante la cámara web.
Si su ordenador no reconoce al instante la cámara web, intente conectarla a
un puerto USB diferente o reinicie el ordenador.
3. Abra la aplicación que quiera usar con la cámara web.
La luz LED se iluminará en blanco cuando una aplicación esté usando la
cámara web.
  • Page 1 1
  • Page 2 2
  • Page 3 3
  • Page 4 4
  • Page 5 5
  • Page 6 6
  • Page 7 7
  • Page 8 8
  • Page 9 9
  • Page 10 10
  • Page 11 11
  • Page 12 12
  • Page 13 13
  • Page 14 14
  • Page 15 15
  • Page 16 16
  • Page 17 17
  • Page 18 18
  • Page 19 19
  • Page 20 20
  • Page 21 21
  • Page 22 22
  • Page 23 23
  • Page 24 24
  • Page 25 25
  • Page 26 26
  • Page 27 27
  • Page 28 28
  • Page 29 29
  • Page 30 30
  • Page 31 31
  • Page 32 32
  • Page 33 33
  • Page 34 34
  • Page 35 35
  • Page 36 36
  • Page 37 37
  • Page 38 38
  • Page 39 39
  • Page 40 40
  • Page 41 41
  • Page 42 42
  • Page 43 43
  • Page 44 44
  • Page 45 45
  • Page 46 46
  • Page 47 47
  • Page 48 48
  • Page 49 49
  • Page 50 50
  • Page 51 51
  • Page 52 52
  • Page 53 53
  • Page 54 54
  • Page 55 55
  • Page 56 56
  • Page 57 57
  • Page 58 58
  • Page 59 59
  • Page 60 60
  • Page 61 61
  • Page 62 62
  • Page 63 63
  • Page 64 64
  • Page 65 65
  • Page 66 66
  • Page 67 67
  • Page 68 68
  • Page 69 69
  • Page 70 70
  • Page 71 71
  • Page 72 72
  • Page 73 73
  • Page 74 74
  • Page 75 75
  • Page 76 76
  • Page 77 77
  • Page 78 78
  • Page 79 79
  • Page 80 80
  • Page 81 81
  • Page 82 82
  • Page 83 83
  • Page 84 84
  • Page 85 85
  • Page 86 86

Anker A1S1HbZNG9L ユーザーマニュアル

カテゴリー
ウェブカメラ
タイプ
ユーザーマニュアル