
HD8650


5
19
14
10
12
8
9
11
6
3
4
13
21
20
17
18 16
15
7
21
1

6
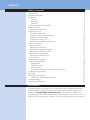
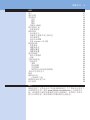
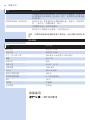
Table of contents
Introduction 6
General description 7
Important 7
Danger 7
Warning 7
Caution 8
Electromagnetic elds (EMF) 8
Before rst use 8
Installing the machine 8
Preparing for use 9
Filling the water tank 9
Filling the coffee bean container 9
Heating up the machine 10
Automatic rinsing cycle 11
Installing the Intenza+ water lter 12
Using the machine 12
Brewing coffee 13
Adjusting the machine 13
Adjusting the grinding degree 13
Adjusting the coffee volume 14
Cleaning and maintenance 14
Cleaning the brewing unit 15
Lubrication 17
Descaling the machine 18
Descaling procedure 18
Preparation 18
Descaling cycle 19
Rinsing cycle 19
If you are unable to nish the descaling cycle 21
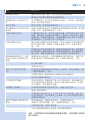
Meaning of light signals 21
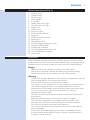
Recycling 24
Guarantee and support 24
Ordering maintenance products 24
Troubleshooting 24
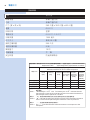
Technical specications 26
Introduction
Congratulations on buying this fully automatic Philips espresso machine!
To fully benet from the support that Philips offers, please register your
product at www.philips.com/welcome. The machine is suitable for
preparing espresso coffee using whole coffee beans. In this user manual you
nd all the information you need to install, use and maintain your machine.
ENGLISH

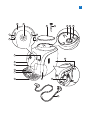
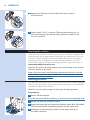
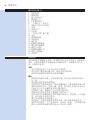
General description (Fig. 1)
1 Control panel
2 Coffee button
3 Descaling light
4 Warning light
5 2-cup light
6 ’Water tank empty’ light
7 On/off button with light
8 Water tank
9 Coffee spout
10 Drip tray cover
11 ’Drip tray full’ indicator
12 Drip tray
13 Coffee grounds container
14 Brewing unit
15 Maintenance door
16 Grinding degree adjustment knob
17 Ceramic coffee grinder
18 Coffee bean container
19 Grinding degree adjustment tool
20 Lid of coffee bean container
21 Mains cord
Important
Read and follow the safety instructions carefully and only use the machine
as described in this user manual to avoid accidental injury or damage due to
improper use of the machine. Keep this user manual for future reference.
Danger
- Never immerse the machine in water or any other liquid.
- Never direct the steam wand at the body as this causes scalding.
- Never insert body parts or objects into the coffee grinder.
Warning
- Check if the voltage indicated on the machine corresponds to the local
mains voltage before you connect the machine.
- Connect the machine to an earthed wall socket.
- This machine is not intended for use by persons (including children)
with reduced physical, sensory or mental capabilities, or lack of
experience and knowledge, unless they have been given supervision
or instruction concerning use of the appliance by a person
responsible for their safety.
- Children should be supervised to ensure that they do not play with
the machine.
- Keep the machine and its cord out of the reach of children.
- This machine is designed to grind beans and brew coffee. Use it
correctly and with care to avoid scalding by hot water and steam.
- Do not pour liquids on the mains cord connector.
- Do not use the machine if the plug, the mains cord or the machine
itself is damaged.
- If the mains cord is damaged, you must have it replaced by Philips,
a service centre authorised by Philips or similarly qualied persons
in order to avoid a hazard.
ENGLISH 7

Caution
- Always return the machine to a service centre authorised by Philips for
examination or repair. Do not attempt to repair the machine yourself,
otherwise your guarantee becomes invalid.
- Always put the machine on a at and stable surface. Keep it in upright
position, also during transport.
- Do not place the machine on a hotplate or directly next to a hot oven,
heater or similar source of heat.
- Unplug the machine if problems occur during grinding or brewing and
before you clean it.
- Let the machine cool down before inserting or removing any parts.
The heating element surface is subject to residual heat after use.
- Descale the machine regularly.
- If you do not clean and descale the machine, you run the risk that the
machine stops working and that your guarantee becomes invalid.
- Never ll the water tank with warm, hot or sparkling water, as this may
cause damage to the water tank and the machine.
- Do not use aggressive cleaning agents, solvents or chemicals to clean
the machine.
- Do not keep the machine at temperatures below 0°C. Water left in
the heating system may freeze and cause damage.
- This machine is intended for normal household use only. It is not
intended for use in environments such as staff kitchens of shops, ofces,
farms or other work environments.
Electromagnetic elds (EMF)
This machine complies with all applicable standards and regulations
regarding exposure to electromagnetic elds.
Before rst use
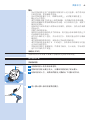
Installing the machine
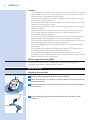
1 Remove all packaging material from the machine.
2 Place the machine on a table or worktop away from the tap, the sink
and heat sources.
3 Leave at least 15cm of free space above, behind and on both sides of
the machine.
4 Insert the small plug into the socket located on the back of the
machine.
15cm
15cm
15cm
15cm
15cm
ENGLISH8

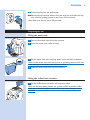
5 Insert the plug into the wall socket.
6 Remove the protective sticker from the drip tray and slide the drip
tray into the guiding grooves in the front of the machine.
Note: Make sure the drip tray is fully inserted.
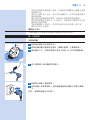
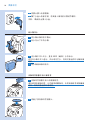
Preparing for use
Filling the water tank
1 Remove the water tank from the machine.
2 Rinse the water tank under the tap.
3 Fill the water tank with cold tap water up to the MAX indication.
Never ll the water tank with warm, hot or sparkling water, as this may
cause damage to the water tank and the machine.
4 Slide the water tank back into the machine.
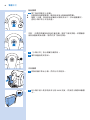
Filling the coffee bean container
1 Fill the coffee bean container with espresso beans.
Only use espresso beans. Never use ground coffee, unroasted coffee
beans or caramelised coffee beans, as this may cause damage to the
machine.
ENGLISH 9

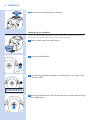
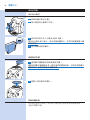
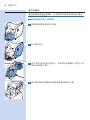
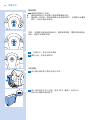
2 Put the lid on the coffee bean container.
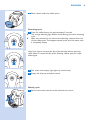
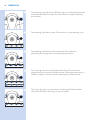
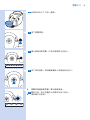
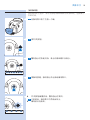
Heating up the machine
During the initial heat-up process, fresh water ows through the internal
circuit to heat up the machine. This takes a few seconds.
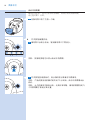
1 Place a bowl under the coffee spout.
2 Press the on/off button.
3 The warning light ashes quickly to indicate there is no water in the
internal circuit.
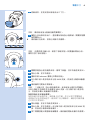
4 Press the coffee button. The machine lets the hot water ow through
the coffee spout.
ENGLISH10

, The on/off button ashes slowly and the warning light goes out.
5 After a few seconds hot water stops coming out of the coffee spout.
, The machine is heating up.
Automatic rinsing cycle
When the machine has heated up, it performs an automatic rinsing cycle to
clean the internal circuit with fresh water. This takes approximately
one minute.
1 Place a bowl under the coffee spout.
, The on/off button ashes slowly.
2 Water ows from the coffee spout. Wait until the water stops
coming out of the coffee spout.
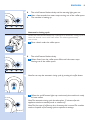
Note: You can stop the automatic rinsing cycle by pressing the coffee button.
3 When the on/off button lights up continuously, the machine is ready
to brew coffee.
Note: The automatic rinsing cycle also takes place 15 minutes after the
appliance switches to standby mode or switches off.
Note: The rst cups of coffee may be a bit watery, this is normal. The machine
needs to complete a few brewing cycles to optimise its settings.
ENGLISH 11

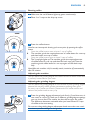
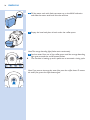
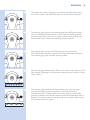
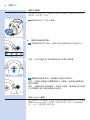
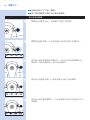
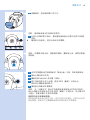
Installing the Intenza+ water lter
We advise you to install the Intenza+ water lter as this prevents scale
build-up in your machine. You can buy the Intenza+ water lter separately.
For more details, see chapter ‘Guarantee and support’, section ‘Ordering
maintenance products’.
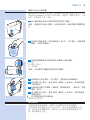
1 Remove the small white lter from the water tank and store it in a
dry place.
Note: Please keep the small white lter for future use. You will need it for the
descaling process.
2 Remove the lter from its packaging and immerse it in cold water
with the opening pointing upwards. Press the sides of the lter gently
to let out the air bubbles.
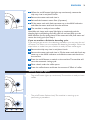
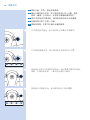
3 Turn the knob of the lter to the setting that corresponds to the
water hardness of the area you live in.
A Soft water
B Hard water (default)
C Very hard water
Note: You can test the water hardness with a water hardness test strip.
4 Place the lter in the empty water tank. Press it down until it cannot
move any further.
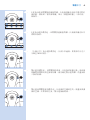
5 Fill the water tank with fresh water up to the MAX indication and
slide it into the machine.
6 Let the machine brew a few coffees (see chapter ‘Using the machine’,
section ‘Brewing coffee’).
7 Rell the water tank with fresh water up to the MAX indication and
slide it back into the machine.
, The on/off button lights up continuously.
The machine is ready for use.
Using the machine
To guarantee perfect coffee, the machine regularly rinses its inner circuit
with water. This automatic rinsing cycle takes place 15 minutes after the
appliance switches to standby mode or switches off. During the automatic
rinsing cycle, some of the water ows through the inner circuit directly into
the drip tray. Empty the drip tray regularly.
ENGLISH12

Brewing coffee
1 Make sure the on/off button lights up green continuously.
2 Place 1 or 2 cups on the drip tray cover.
3 Press the coffee button.
Note: You can interrupt the brewing cycle at any time by pressing the coffee
button.
- Press the coffee button once to brew 1 cup of coffee.
, The machine grinds the required amount of coffee beans for one cup
and then brews one cup of coffee.
- Press the coffee button twice to brew 2 cups of coffee.
, The 2-cup light lights up. The machine grinds the required amount
of coffee beans for one cup and then lls both cups half. Then the
machine grinds coffee beans for one cup again and lls both cups
fully.
Note: When the machine is left in standby mode, it switches off automatically
after 30 minutes.
Adjusting the machine
You can adjust the grinding degree and coffee volume to obtain coffee that
is perfectly customised to your taste.
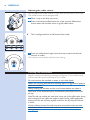
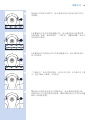
Adjusting the grinding degree
You can adjust the grinding degree of the machine. At each grinding degree
selected, the ceramic coffee grinder guarantees a perfectly even grind
for every cup of coffee you brew. It preserves the full coffee aroma and
delivers the perfect taste to every cup.
1 Press the grinding degree adjustment knob rmly (1) and then turn it
one notch at a time (2). There are 5 different grinding degree settings
you can choose from. The smaller the dot, the stronger the coffee.
The difference becomes noticeable after you have brewed 2-3 cups
of coffee at the new setting.
Do not turn the grinding degree adjustment knob more than one notch
at a time to prevent damage to the grinder.
2
1
ENGLISH 13

Adjusting the coffee volume
You can adjust the coffee volume to your taste and the size of your cups.
The coffee button can be programmed.
1 Place a cup on the drip tray cover.
2 Press and hold the coffee button for a few seconds. Release the
button when the machine starts to grind coffee beans.
, The 2-cup light and the on/off button ash slowly.
3 Press the coffee button again when the cup contains the desired
amount of coffee.
The machine automatically saves the new setting.
Cleaning and maintenance
Regular cleaning and descaling prolongs the lifetime of your machine and
ensures optimum quality and taste of your coffee.
Do not immerse the machine in water or any other liquid.
Never use scouring pads, abrasive cleaning agents or aggressive liquids to
clean the machine.
Always unplug the machine and let it cool down before you clean it.
Note: None of the detachable parts are dishwasher-proof. Rinse them under
the tap.
Note: The drip tray collects the water that comes out of the coffee spout during
each rinsing cycle and coffee that might be spilled during coffee preparation.
Empty and clean the drip tray regularly and when the ‘drip tray full’ indicator
is raised.
Caution: Never remove the drip tray when the machine has just been
switched on. Wait a few minutes until the machine has performed a
rinsing cycle.
ENGLISH14

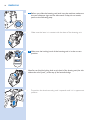
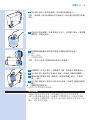
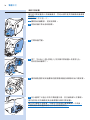
Cleaning the brewing unit
Do not clean the brewing unit in the dishwasher and do not use
washing-up liquid or a cleaning agent to clean it.
Clean the brewing unit once a week.
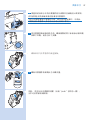
1 Switch off the machine and unplug it.
2 Remove the coffee grounds container from the machine.
3 Open the maintenance door.
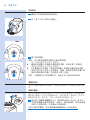
4 Press the PUSH button (1) and pull at the grip of the brewing unit
(2) to remove it from the machine.
5 Clean the coffee exit duct thoroughly with a spoon handle or
another round-tipped kitchen utensil.
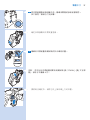
6 Rinse the outside of the brewing unit under a lukewarm tap and
clean the upper lter carefully.
Never use any washing-up liquid or other cleaning agent to clean the
brewing unit.
Do not dry the brewing unit with a cloth to prevent bres from
collecting inside the brewing unit. After rinsing, just shake excess water
off the brewing unit or let it air-dry.
1
2
ENGLISH 15

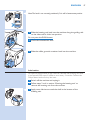
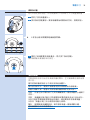
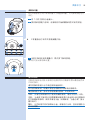
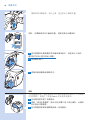
7 Before you slide the brewing unit back into the machine, make sure
the two reference signs on the side match. If they do not match,
perform the following step:
- Make sure the lever is in contact with the base of the brewing unit.
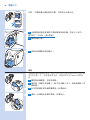
8 Make sure the locking hook of the brewing unit is in the correct
position.
Note: You can nd the locking hook on the back of the brewing unit (the side
without the word “push”), at the top of the horizontal edge.
- To position the hook correctly, push it upwards until it is in uppermost
position.
ENGLISH16

Note: The hook is not correctly positioned if it is still in bottommost position.
9 Slide the brewing unit back into the machine along the guiding rails
on the sides until it clicks into position.
Do not press the PUSH button.
10 Close the maintenance door.
11 Slide the coffee grounds container back into the machine.
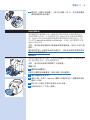
Lubrication
For optimal performance of the machine, lubricate the brewing unit after
it has brewed 500 cups of coffee or once every 3 months. Contact the
Philips Saeco hotline to buy lubricant.
1 Switch off the machine and unplug it.
2 Follow steps 2 to 4 in section ‘Cleaning the brewing unit’ to
remove the brewing unit from the machine.
3 Apply some lubricant around the shaft in the bottom of the
brewing unit.
ENGLISH 17

4 Apply some lubricant to both sides of the part shown in
the illustration.
5 Follow steps 7 to 11 in section ‘Cleaning the brewing unit’ to
place the brewing unit and the coffee grounds container back
into the machine.
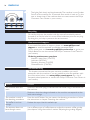
Descaling the machine
Scale builds up inside the machine during use. It is essential to descale the
machine when the orange descaling light lights up continuously. Only use
the special Saeco descaling solution to descale the machine. The Saeco
descaling solution is designed to ensure optimal performance of the
machine. You can buy the Saeco descaling solution in the online shop at
www.shop.philips.com/service.
Note: The use of other descaling products may cause damage to the machine
and leave residues in the water.
Never drink the water with descaling mixture that you pour into the
water tank or any water with residues that comes out of the machine
during the descaling procedure.
Descaling procedure
The descaling procedure lasts 30 minutes and consists of a descaling cycle
and a rinsing cycle. When the orange descaling light lights up continuously,
you need to descale the machine.
Note: Do not remove the brewing unit during the descaling procedure.
Preparation
1 Switch off the machine.
If you do not switch off the machine, you cannot enter the descaling cycle.
2 Empty the drip tray and place it back.
3 Empty the water tank and remove the Intenza+ water lter (if present).
Pour the entire bottle of descaling solution into the water tank.
4 Add water to the descaling solution in the water tank up to
the MAX indication.
ENGLISH18

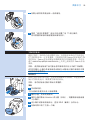
5 Place a bowl under the coffee spout.
Descaling cycle
1 Press the coffee button for approximately 5 seconds.
, The orange descaling light ashes slowly during the entire descaling
cycle.
, After each interval of one minute, the descaling solution ows out
of the coffee spout. This happens several times until the water tank
is completely empty.
Note: If you want to interrupt the ow of the descaling solution press the
coffee button.To restart the ow of the descaling solution, press the coffee
button again.
2 The ‘water tank empty’ light lights up continuously.
3 Empty the drip tray and place it back.
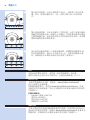
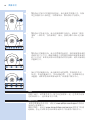
Rinsing cycle
1 Remove the water tank from the machine and rinse it.
5 sec
ENGLISH 19

2 Fill the water tank with fresh tap water up to the MAX indication
and slide the water tank back into the machine.
3 Empty the bowl and place it back under the coffee spout.
Note: The orange descaling light ashes twice continuously.
4 Let hot water ow out of the coffee spout until the orange descaling
light goes out and the on/off button ashes.
, The machine is heating up and it performs an automatic rinsing cycle.
Note: If you want to interrupt the water ow press the coffee button.To restart
the water ow, press the coffee button again.
ENGLISH20
ページが読み込まれています...
ページが読み込まれています...
ページが読み込まれています...
ページが読み込まれています...
ページが読み込まれています...
ページが読み込まれています...
ページが読み込まれています...
ページが読み込まれています...
ページが読み込まれています...
ページが読み込まれています...
ページが読み込まれています...
ページが読み込まれています...
ページが読み込まれています...
ページが読み込まれています...
ページが読み込まれています...
ページが読み込まれています...
ページが読み込まれています...
ページが読み込まれています...
ページが読み込まれています...
ページが読み込まれています...
ページが読み込まれています...
ページが読み込まれています...
ページが読み込まれています...
ページが読み込まれています...
ページが読み込まれています...
ページが読み込まれています...
ページが読み込まれています...
ページが読み込まれています...
ページが読み込まれています...
ページが読み込まれています...
ページが読み込まれています...
ページが読み込まれています...
ページが読み込まれています...
ページが読み込まれています...
ページが読み込まれています...
ページが読み込まれています...
ページが読み込まれています...
ページが読み込まれています...
ページが読み込まれています...
ページが読み込まれています...
ページが読み込まれています...
ページが読み込まれています...
ページが読み込まれています...
ページが読み込まれています...
ページが読み込まれています...
ページが読み込まれています...
ページが読み込まれています...
ページが読み込まれています...
-
 1
1
-
 2
2
-
 3
3
-
 4
4
-
 5
5
-
 6
6
-
 7
7
-
 8
8
-
 9
9
-
 10
10
-
 11
11
-
 12
12
-
 13
13
-
 14
14
-
 15
15
-
 16
16
-
 17
17
-
 18
18
-
 19
19
-
 20
20
-
 21
21
-
 22
22
-
 23
23
-
 24
24
-
 25
25
-
 26
26
-
 27
27
-
 28
28
-
 29
29
-
 30
30
-
 31
31
-
 32
32
-
 33
33
-
 34
34
-
 35
35
-
 36
36
-
 37
37
-
 38
38
-
 39
39
-
 40
40
-
 41
41
-
 42
42
-
 43
43
-
 44
44
-
 45
45
-
 46
46
-
 47
47
-
 48
48
-
 49
49
-
 50
50
-
 51
51
-
 52
52
-
 53
53
-
 54
54
-
 55
55
-
 56
56
-
 57
57
-
 58
58
-
 59
59
-
 60
60
-
 61
61
-
 62
62
-
 63
63
-
 64
64
-
 65
65
-
 66
66
-
 67
67
-
 68
68


