
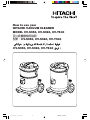
How to use your
HITACHI VACUUM CLEANER
MODEL CV-S950, CV-S960, CV-T940
CV-S950, CV-S960, CV-T940
CV-S950, CV-S960, CV-T940
01/CV-S950_Cover(CS) 15/10/03, 3:02 PM1

– 2 –
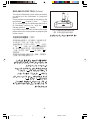
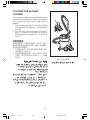
ACCESSORIES
1. Flexible crush proof hose
2. Extension pipes (CV-S950), (CV-T940)
3. Telescopic extension pipe (CV-S960)
4. Rug and floor tool
5. Crevice nozzle
6. Dusting brush
7. Joint pipe
8. Curved joint pipe
Fig. 1 Hitachi Vacuum Cleaner and its accessories
1
1.
2. (CV-S950)(CV-T940)
3. (CV-S960)
4.
5.
6.
7.
8.
(CV-S950), (CV-T940)
(CV-S960)
02/CV-S950_02-11(CS) 15/10/03, 5:44 PM2
1
6
5
7
8
2
3
4

– 3 –
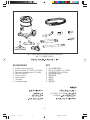
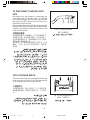
HOW TO OPERATE
TO ASSEMBLE HOSE
The hose and joint pipes are packed individually.
To put them together, insert the curved joint pipe
1 and joint pipe 2 into each end of the hose 3
until the claws 4 of the stopper ring 5 click into
the holes 6 of the curved joint pipe and joint pipe.
1 2 3
5 4
6
Fig. 3 To attach hose to cleaner
3
Fig. 2 To assemble hose
2
1
2
3
5
3
4
6
TO ATTACH HOSE TO CLEANER
Insert the joint pipe 2 into suction inlet 7 of the
cleaner. When you want to remove the hose 3,
press the button 8 and pull out the joint pipe 2.
2 7
3 8
2
2
8
37
12
3
45
6
27
3
82
02/CV-S950_02-11(CS) 15/10/03, 5:44 PM3

– 4 –
Fig. 4 Extension pipes
4
TO ATTACH EXTENSION PIPES
(CV-S950), (CV-T940)
Attach the extension pipes 9 together by joining
the two ends and twist a little to make it tight.
(CV-S950) (CV-T940)
9
9
(CV-S950), (CV-T940
)
9
Fig. 5 Telescopic extension pipe
5
!
1
TO OPERATE THE TELESCOPIC
EXTENSION PIPE
(CV-S960)
Hold the grip ! in one hand and the curved joint
pipe 1 in another hand. Extend/Retract the
telescopic extension pipe by pulling/pushing the
curved joint pipe.
(CV-S960)
!
1
(CV-S960)
!
1
02/CV-S950_02-11(CS) 15/10/03, 5:44 PM4

– 5 –
ON/OFF SWITCH
Motor is switched ON/OFF by changing the power
switch .
Fig. 6 ON/OFF switch
6
ON/OFF
ON/OFF
02/CV-S950_02-11(CS) 15/10/03, 5:44 PM5
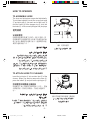
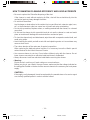
RUG AND FLOOR TOOL
Fig. 6A Rug and floor tool
The tool is fitted with a brush at the back which can either be used in the “withdrawn” or “projected”
position. These positions are operated by the pedal on the tool marked “ ” (Carpet)
and “ ” (Floor) For cleaning rug or carpet, keep the brush in its “withdrawn” position,
i.e., with the pedal marked “ ” pressed down with your toe.
If you feel the tool is heavy to slide on the carpet, please reduce the suction power by adjusting
the suction control. (Fig. 9)
12 A
11A

– 6 –
Fig. 7 Deluxe rug and floor tool
7
RUG AND FLOOR TOOL (Deluxe)
The nozzle is fitted with a brush at the back which
can either be in the “withdrawn” or “projected”
position.
These positions are operated by the pedal on the
tool marked “
” (Carpet) # and “ ” (Floor)
$. For cleaning rugs or carpets keep the brush in
its “withdrawn” position, i.e., align the “
”
indicator with the “
” symbol.
If you feel the tool is too heavy to slide on the carpet,
please reduce the suction power by adjusting the
suction control.
#
$
$
#
#
$
02/CV-S950_02-11(CS) 15/10/03, 5:44 PM6

– 7 –
Fig. 9 Suction control
9
SUCTION CONTROL
Suction pressure can be reduced by moving the adjustment
ring & on the curved joint pipe 1 to expose a hole. The
more hole area exposed, the lower the suction. Low suction
pressure is recommended for cleaning curtains, blinds,
delicate fabrics etc.
1 &
&
1
DUST INDICATOR
When the orange sign % appears in the large window
continuously, the cleaner requires emptying.
Check the dust indicator by lifting suction tool from the floor
and removing the crevice nozzle when it is used.
NOTE: If the cleaner is used when the orange sign appears
in the large window, air to the motor will be reduced
and the motor will eventually burn out.
%
Fig. 8 Dust indicator
8
%
%
&1
02/CV-S950_02-11(CS) 15/10/03, 5:44 PM7

– 8 –
Fig. 12 Using the crevice nozzle
12
Fig. 11 Using the dusting brush
11
Brush head can be turned to
adjust the angle
Fig. 10 Blower
10
BLOWER
Use your vacuum cleaner as a blower for hard to
reach areas.
1. Insert the joint pipe 2 of the hose into the
blower outlet ( until it snaps into place.
2. To remove the hose, press the button 8 and
pull the hose from the cleaner.
1. 2 (
2. 8
8
2
(
2
(
8
TO USE ATTACHMENTS
02/CV-S950_02-11(CS) 15/10/03, 5:44 PM8

– 9 –
Fig. 14 Tool storage space
14
TOOL STORAGE SPACE
The back of the dolly has a storage for the dusting
brush and crevice nozzle. Place the attachments
on the storage space for handy retrieval.
TO DISCONNECT CURVED JOINT
PIPE
Blockages may be cleared by separating the
curved joint pipe 1 from the hose. To separate
the curved joint pipe, pull the hose and press the
two claws 4 that is clicked into the holes 6 on
both sides of the joint pipe.
When needed, the hose collar ) can be removed
from the hose end by turning it (left-handed screw).
Likewise, you can disconnect the hose joint on the
other end of the hose.
1
4
6
)
Fig. 13 Curved joint pipe
13
1
6
)4
1
4
6
)
02/CV-S950_02-11(CS) 15/10/03, 5:44 PM9

– 10 –
TO REMOVE DUST
When the dust accumulation is excessive, remove the dust by the following procedure.
1. Switch off the power supply and disconnect the power cord.
2. Remove the hose, and release the clamp ~ by pulling the lower side of it on each side
and take off the upper case +.
3. Take the fiIter guide , and shake the filter for about 20 times to remove the clogging dust
from the filter cloth -. When fluff remains excessively on the filter cloth, remove it by a
brush.
NOTE: Do not shake up and down.
4. Take off the filter and dispose of the dust in the tank ..
5. Replace the filter - to the tank ., and set the upper case + on the tank.
1.
2. ~ +
3. , -
4. .
5. . - +
~
+
,
-
.
-.+
02/CV-S950_02-11(CS) 15/10/03, 5:44 PM10

– 11 –
POWER CORD STORAGE
To store the power cord /, wound the power cord
and place it on the cord storage hook :.
/
:
Fig. 15 To remove dust
15
Fig. 16 Power cord storage
16
+
~
+
,
-
-
.
.
.
~
:
/
/
:
02/CV-S950_02-11(CS) 15/10/03, 5:44 PM11

– 12 –
TO STORE THE VACUUM
CLEANER
Hose, extension pipes and rug and floor tool can
be stored in an assembled condition to the cleaner.
This combination allows you a neat and tidy
storage.
1. Slide the nozzle hook ; of the rug and floor
tool into the hook supporter < at the rear of
the dolly.
2. Coil the hose around the extension pipe to
make it compact and stable and rest the
extension pipe on the pipe rest = as shown in
Fig. 17.
1.
;<
2.
=
17
Fig. 17 Storing the vacuum cleaner
17
=
;
<
;
<
=
03/CV-S950_12-16(CS) 15/10/03, 4:02 PM12

– 13 –
Fig. 18 Cleaning the filter 18
CARE OF FILTER
Once or twice a year, to ensure good suction power, after disposing of the dust, clean the filter using the
following method.
1. Take off the filter ring > from the packing ?.
2. Wash the filter @ in tepid water or a neutral detergent. If detergent is used, rinse it out thoroughly.
3. Allow the filter to dry naturally.
NOTE:
•Avoid washing in boiling water and by the washing machine.
•Avoid drying over a fire or in hot sun.
• If the filter is used when wet, suction is impaired and the motor may be damaged.
1. ? >
2. @
3.
•
•
•
>
?
?
>
@
>?
@
●
●
●
03/CV-S950_12-16(CS) 15/10/03, 4:02 PM13

– 14 –
HOW TO MAINTAIN CLEANING EFFICIENCY AND AVOID ACCIDENTS
•Be sure to replace the Filter after disposing of the dust.
If the cleaner is used without replacing its filter, dust will be sucked directly into the
mechanical parts and may damage the motor.
• Do not block the airflow.
Any blockages or obstructions to the suction inlet, rug and floor tool, extension pipe, hose,
etc., or the exhaust air outlet can cause loss of power and motor overheating.
•Do not pick up matches, fireplace ashes, or smoking material with the cleaner, as a hazard
may result.
•Do not use the cleaner to pick up wet dirt, and do not use the cleaner in a wet and moist
place as moisture will damage the motor and other mechanical parts.
•To clean the cleaner body and attachments, wipe them with a soapsuds-soaked cloth, and
avoid using spirits.
•Avoid cleaning the switch part with a wet cloth and splashing water on it as moisture may
cause a short circuit.
•The carbon brushes of the motor are of special composition.
When replacing the defaced carbon brushes, it is necessary to use the Hitachi special
carbon brushes for the Hitachi Vacuum Cleaner.
•Your vacuum cleaner is not a toy. Do not allow children to play with the cleaner. Do not
leave cleaner connected to an electrical outlet and leave it unattended.
•Always disconnect cord from electrical outlet before servicing the cleaner.
• Warning :
Electrical shock could occur if used outdoors or on wet surfaces.
Before you plug in your Hitachi Vacuum Cleaner, make sure that the voltage indicated on
the rating plate located on the back of the vacuum cleaner is the same as your local power
supply.
CAUTION :
If the supply cord is damaged, it must be replaced by the manufacturer or its service agent
or a similarly qualified person in order to avoid a hazard.
03/CV-S950_12-16(CS) 15/10/03, 4:02 PM14

– 15 –
•
•
•
•
•
•
•
•
•
•
03/CV-S950_12-16(CS) 15/10/03, 4:02 PM15

3-J1861-5D
THE HITACHI ATAGO BLDG.
15-12, Nishi-Shinbashi 2-chome, Minato-ku, Tokyo, 105-8410 Japan
Tel : Tokyo (03) 3502-2111
●
●
●
●
●
●
●
●
●
●
03/CV-S950_12-16(CS) 15/10/03, 4:02 PM16
-
 1
1
-
 2
2
-
 3
3
-
 4
4
-
 5
5
-
 6
6
-
 7
7
-
 8
8
-
 9
9
-
 10
10
-
 11
11
-
 12
12
-
 13
13
-
 14
14
-
 15
15
-
 16
16


