
DCD708
DCD709
Final page size: A5 (148mm x 210mm)

B
Copyright DeWALT
English 3
简体中文 13
繁體中文 21
한국어 29
38

1
12
11
13
1
2
2
4
6
8
9
10
5
7
14
1
3
Fig. A
图
A
圖
A
그림
A
A
Fig. B
图
B
圖
B
그림
B
B

2
3
9
10
5
4
Fig. C
图
C
圖
C
그림
C
C
Fig. D
图
D
圖
D
그림
D
D
Fig. E
图
E
圖
E
그림
E
E

ENGLISH
3
Congratulations!
You have chosen a DeWALT tool. Years of experience, thorough
product development and innovation make DeWALT one of the
most reliable partners for professional power toolusers.
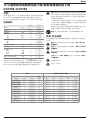
Technical Data
DCD708 DCD709
Voltage
V
DC
18(20 Max) 18(20 Max)
Battery type
Li-Ion Li-Ion
Power output
W 340 340
No-load speed
1st gear
2nd gear
min
-1
min
-1
0–450
0–1650
0–450
0–1650
Beats per minute
1st gear
– 0–7650
2nd gear
– 0–28050
Max. Torque (hard/soft)
Nm 65/26 65/26
Chuck capacity
mm 1.5–13 1.5–13
Maximum
drilling
capacity
Wood
Metal
Masonary
mm
mm
mm
30
13
–
30
13
13
Weight (without battery pack)
kg 1.10 1.20
The vibration emission level given in this information sheet has
been measured in accordance with a standardised test given in
IEC60335 and may be used to compare one tool with another. It
may be used for a preliminary assessment ofexposure.
WARNING: The declared vibration emission level
represents the main applications of the tool. However if
the tool is used for different applications, with different
accessories or poorly maintained, the vibration emission
may differ. This may significantly increase the exposure
level over the total workingperiod.
An estimation of the level of exposure to vibration should
also take into account the times when the tool is switched
off or when it is running but not actually doing the job.
This may significantly reduce the exposure level over the
total workingperiod.
Identify additional safety measures to protect the operator
from the effects of vibration such as: maintain the tool
and the accessories, keep the hands warm, organisation
of workpatterns.
WARNING: To reduce the risk of injury, read the
instructionmanual.
Definitions: Safety Guidelines
The definitions below describe the level of severity for each
signal word. Please read the manual and pay attention to
thesesymbols.
DANGER: Indicates an imminently hazardous
situation which, if not avoided, will result in death or
seriousinjury.
WARNING: Indicates a potentially hazardous situation
which, if not avoided, could result in death or
seriousinjury.
CAUTION: Indicates a potentially hazardous situation
which, if not avoided, may result in minor or
moderateinjury.
NOTICE: Indicates a practice not related to
personal injury which, if not avoided, may result in
propertydamage.
Denotes risk of electricshock.
Denotes risk offire.
English (original instructions)
CORDLESS COMPACT 13 mm DRILL/DRIVER/HAMMERDRILL
DCD708, DCD709
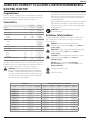
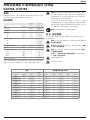
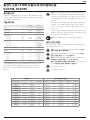
Batteries Chargers/Charge Times (Minutes)
Cat# V
DC
Ah Weight(kg)
DCB107 DCB112 DCB115 DCB118 DCB132
DCB546 18/54 6.0/2.0 1.05 270 170 90 60 90
DCB547 18/54 9.0/3.0 1.46 420 270 140 85 140
DCB548 18/54 12.0/4.0 1.44 540 350 180 180 120
DCB181 18 1.5 0.35 70 45 22 22 22
DCB182 18 4.0 0.61 185 120 60 60 60
DCB183/B 18 2.0 0.40 90 60 30 30 30
DCB184/B 18 5.0 0.62 240 150 75 75 75
DCB185 18 1.3 0.35 60 40 22 22 22
DCB187 18 3.0 0.54 140 90 45 45 45
DCB189 18 4.0 0.54 185 120 60 60 60

4
ENGLISH
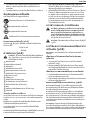
GENERAL POWER TOOL SAFETY WARNINGS
WARNING: Read all safety warnings, instructions,
illustrations and specifications provided with this
power tool. Failure to follow all instructions listed below
may result in electric shock, fire and/or seriousinjury.
SAVE ALL WARNINGS AND INSTRUCTIONS
FOR FUTUREREFERENCE.
The term “power tool” in the warnings refers to your mains-
operated (corded) power tool or battery-operated (cordless)
powertool.
1) Work Area Safety
a ) Keep work area clean and well lit. Cluttered or dark
areas inviteaccidents.
b ) Do not operate power tools in explosive
atmospheres, such as in the presence of flammable
liquids, gases or dust. Power tools create sparks which
may ignite the dust orfumes.
c ) Keep children and bystanders away while operating
a power tool. Distractions can cause you to losecontrol.
2) Electrical Safety
a ) Power tool plugs must match the outlet. Never
modify the plug in any way. Do not use any adapter
plugs with earthed (grounded) power tools.
Unmodified plugs and matching outlets will reduce risk of
electricshock.
b ) Avoid body contact with earthed or grounded
surfaces such as pipes, radiators, ranges and
refrigerators. There is an increased risk of electric shock if
your body is earthed orgrounded.
c ) Do not expose power tools to rain or wet conditions.
Water entering a power tool will increase the risk of
electricshock.
d ) Do not abuse the cord. Never use the cord for
carrying, pulling or unplugging the power tool. Keep
cord away from heat, oil, sharp edges or moving
parts. Damaged or entangled cords increase the risk of
electricshock.
e ) When operating a power tool outdoors, use an
extension cord suitable for outdoor use. Use of a cord
suitable for outdoor use reduces the risk of electricshock.
f ) If operating a power tool in a damp location is
unavoidable, use a residual current device (RCD)
protected supply. Use of an RCD reduces the risk of
electricshock.
3) Personal Safety
a ) Stay alert, watch what you are doing and use
common sense when operating a power tool. Do not
use a power tool while you are tired or under the
influence of drugs, alcohol or medication. A moment
of inattention while operating power tools may result in
serious personalinjury.
b ) Use personal protective equipment. Always wear
eye protection. Protective equipment such as dust mask,
non-skid safety shoes, hard hat or hearing protection used
for appropriate conditions will reduce personalinjuries.
c ) Prevent unintentional starting. Ensure the switch
is in the off-position before connecting to power
source and/or battery pack, picking up or carrying
the tool. Carrying power tools with your finger on the
switch or energising power tools that have the switch on
invitesaccidents.
d ) Remove any adjusting key or wrench before turning
the power tool on. A wrench or a key left attached
to a rotating part of the power tool may result in
personalinjury.
e ) Do not overreach. Keep proper footing and balance
at all times. This enables better control of the power tool
in unexpectedsituations.
f ) Dress properly. Do not wear loose clothing or
jewellery. Keep your hair and clothing away from
moving parts. Loose clothes, jewellery or long hair can be
caught in movingparts.
g ) If devices are provided for the connection of dust
extraction and collection facilities, ensure these are
connected and properly used. Use of dust collection
can reduce dust-relatedhazards.
h ) Do not let familiarity gained from frequent use of
tools allow you to become complacent and ignore
tool safety principles. A careless action can cause severe
injury within a fraction of asecond.
4) Power Tool Use and Care
a ) Do not force the power tool. Use the correct power
tool for your application. The correct power tool
will do the job better and safer at the rate for which it
wasdesigned.
b ) Do not use the power tool if the switch does not turn
it on and off. Any power tool that cannot be controlled
with the switch is dangerous and must berepaired.
c ) Disconnect the plug from the power source and/
or the battery pack, if detachable, from the power
tool before making any adjustments, changing
accessories, or storing power tools. Such preventive
safety measures reduce the risk of starting the power
toolaccidentally.
d ) Store idle power tools out of the reach of children
and do not allow persons unfamiliar with the power
tool or these instructions to operate the power tool.
Power tools are dangerous in the hands of untrainedusers.
e ) Maintain power tools and accessories. Check for
misalignment or binding of moving parts, breakage
of parts and any other condition that may affect the
power tool’s operation. If damaged, have the power
tool repaired before use. Many accidents are caused by
poorly maintained powertools.
f ) Keep cutting tools sharp and clean. Properly
maintained cutting tools with sharp cutting edges are less
likely to bind and are easier tocontrol.
g ) Use the power tool, accessories and tool bits, etc.
in accordance with these instructions, taking into
account the working conditions and the work to be
performed. Use of the power tool for operations different
from those intended could result in a hazardoussituation.

5
ENGLISH
h ) Keep handles and grasping surfaces dry, clean and
free from oil and grease. Slippery handles and grasping
surfaces do not allow for safe handling and control of the
tool in unexpectedsituations.
5) Battery Tool Use and Care
a ) Recharge only with the charger specified by the
manufacturer. A charger that is suitable for one type
of battery pack may create a risk of fire when used with
another batterypack.
b ) Use power tools only with specifically designated
battery packs. Use of any other battery packs may create
a risk of injury andfire.
c ) When battery pack is not in use, keep it away from
other metal objects, like paper clips, coins, keys,
nails, screws or other small metal objects, that can
make a connection from one terminal to another.
Shorting the battery terminals together may cause burns
or afire.
d ) Under abusive conditions, liquid may be ejected
from the battery; avoid contact. If contact
accidentally occurs, flush with water. If liquid
contacts eyes, additionally seek medical help. Liquid
ejected from the battery may cause irritation orburns.
e ) Do not use a battery pack or tool that is damaged or
modified. Damaged or modified batteries may exhibit
unpredictable behaviour resulting in fire, explosion or risk
ofinjury.
f ) Do not expose a battery pack or tool to fire or
excessive temperature. Exposure to fire or temperature
above 130 °C may causeexplosion.
g ) Follow all charging instructions and do not charge
the battery pack or tool outside the temperature
range specified in the instructions. Charging
improperly or at temperatures outside the specified range
may damage the battery and increase the risk of fire.
6) Service
a ) Have your power tool serviced by a qualified repair
person using only identical replacement parts. This
will ensure that the safety of the power tool ismaintained.
b ) Never service damaged battery packs. Service
of battery packs should only be performed by the
manufacturer or authorized serviceproviders.
Safety Instructions When Using Long
DrillBits
• Never operate at higher speed than the maximum
speed rating of the drill bit. At higher speeds, the bit is likely
to bend if allowed to rotate freely without contacting the
workpiece, resulting in personalinjury.
• Always start drilling at low speed and with the bit tip
in contact with the workpiece. At higher speeds, the bit is
likely to bend if allowed to rotate freely without contacting the
workpiece, resulting in personalinjury.
• Apply pressure only in direct line with the bit and do not
apply excessive pressure. Bits can bend causing breakage or
loss of control, resulting in personalinjury.
Additional Safety Warnings for Drill/ Driver/
Hammerdrill
• Use clamps or other practical way to secure and support
the workpiece to a stable platform. Holding the work by
hand or against your body is unstable and may lead to loss
ofcontrol.
• Accessories and tool may get hot during operation. Wear
gloves when handling them if performing heat producing
applications such as drillingmetals.
• Air vents often cover moving parts and should be
avoided. Loose clothes, jewelry or long hair can be caught in
movingparts.
• Wear safety goggles or other eye protection. Hammering
and drilling operations cause chips to fly. Flying particles can
cause permanent eye damage.
• Wear ear protectors when impact drilling. Exposure to
noise can cause hearing loss.
• Use auxiliary handle(s), if supplied with the tool. Loss of
control can cause personal injury.
• Hold power tool by insulated gripping surfaces, when
performing an operation where the cutting accessory
may contact hidden wiring. Cutting accessory contacting
a “live” wire may make exposed metal parts of the power tool
“live” and could give the operator an electric shock.
• Do not operate this tool for long periods of time.
Vibration caused by tool action may be harmful to your
hands and arms. Use gloves to provide extra cushion and
limit exposure by taking frequent rest periods.
Residual Risks
In spite of the application of the relevant safety regulations
and the implementation of safety devices, certain residual risks
cannot be avoided. These are:
• Impairment ofhearing.
• Risk of personal injury due to flyingparticles.
• Risk of burns due to accessories becoming hot
duringoperation.
• Risk of personal injury due to prolongeduse.
SAVE THESE INSTRUCTIONS
Chargers
DeWALT chargers require no adjustment and are designed to be
as easy as possible tooperate.
Electrical Safety
The electric motor has been designed for one voltage only.
Always check that the battery pack voltage corresponds to the
voltage on the rating plate. Also make sure that the voltage of
your charger corresponds to that of yourmains.
Your DeWALT charger is double insulated in
accordance with IEC60335; therefore no earth wire
isrequired.
If the supply cord is damaged, it must be replaced by a
specially prepared cord available through the DeWALT
serviceorganisation.

6
ENGLISH
Using an Extension Cable
An extension cord should not be used unless absolutely
necessary. Use an approved extension cable suitable for
the power input of your charger (see Technical Data). The
minimum conductor size is 1mm
2
; the maximum length
is30m.
When using a cable reel, always unwind the cablecompletely.
Important Safety Instructions for All Battery
Chargers
SAVE THESE INSTRUCTIONS: This manual contains important
safety and operating instructions for compatible battery
chargers (refer to TechnicalData).
• Before using charger, read all instructions and cautionary
markings on charger, battery pack, and product using
batterypack.
WARNING: Shock hazard. Do not allow any liquid to get
inside charger. Electric shock mayresult.
WARNING: We recommend the use of a residual current
device with a residual current rating of 30mA orless.
CAUTION: Burn hazard. To reduce the risk of injury,
charge only DeWALT rechargeable batteries. Other types of
batteries may burst causing personal injury anddamage.
CAUTION: Children should be supervised to ensure that
they do not play with theappliance.
NOTICE: Under certain conditions, with the charger
plugged into the power supply, the exposed charging
contacts inside the charger can be shorted by foreign
material. Foreign materials of a conductive nature such
as, but not limited to, steel wool, aluminum foil or any
buildup of metallic particles should be kept away from
charger cavities. Always unplug the charger from the
power supply when there is no battery pack in the cavity.
Unplug charger before attempting to clean
• DO NOT attempt to charge the battery pack with any
chargers other than the ones in this manual. The charger
and battery pack are specifically designed to worktogether.
• These chargers are not intended for any uses other than
charging DeWALT rechargeable batteries. Any other uses
may result in risk of fire, electric shock orelectrocution.
• Do not expose charger to rain orsnow.
• Pull by plug rather than cord when disconnecting
charger. This will reduce risk ofdamage to electric plug
andcord.
• Make sure that cord is located so that it will not be
stepped on, tripped over, or otherwise subjected to
damage orstress.
• Do not use an extension cord unless it is absolutely
necessary. Use of improper extension cord could result in risk
of fire,electric shock, orelectrocution.
• Do not place any object on top of charger or place
the charger on a soft surface that might block the
ventilation slots and result in excessive internal heat.
Place the charger in a position away from any heat source. The
charger is ventilated through slots in the top and the bottom
of thehousing.
• Do not operate charger with damaged cord or plug—
have them replacedimmediately.
• Do not operate charger if it has received a sharp blow,
been dropped, or otherwise damaged in any way. Take it
to an authorised servicecentre.
• Do not disassemble charger; take it to an authorised
service centre when service or repair is required. Incorrect
reassembly may result in a risk of electric shock, electrocution
orfire.
• In case of damaged power supply cord the supply cord must
be replaced immediately by the manufacturer, its service agent
or similar qualified person to prevent anyhazard.
• Disconnect the charger from the outlet before
attempting any cleaning. This will reduce the risk of
electric shock. Removing the battery pack will not reduce
thisrisk.
• NEVER attempt to connect two chargerstogether.
• The charger is designed to operate on standard 220-
240V household electrical power. Do not attempt to
use it on any other voltage. This does not apply to the
vehicularcharger.
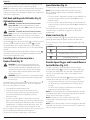
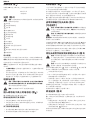
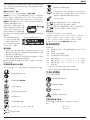
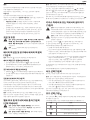
Charging a Battery (Fig. B)
1. Plug the charger into an appropriate outlet before inserting
batterypack.
2. Insert the battery pack
1
into the charger, making sure the
battery pack is fully seated in the charger. The red (charging)
light will blink repeatedly indicating that the charging
process hasstarted.
3. The completion of charge will be indicated by the red
light remaining ON continuously. The battery pack is fully
charged and may be used at this time or left in the charger.
To remove the battery pack from the charger, push the
battery release button
2
on the batterypack.
NOTE: To ensure maximum performance and life of lithium-ion
battery packs, charge the battery pack fully before firstuse.
Charger Operation
Refer to the indicators below for the charge status of the
batterypack.
Charge Indicators
Charging
Fully Charged
Hot/Cold Pack Delay*
* The red light will continue to blink, but a yellow indicator light
will be illuminated during this operation. Once the battery pack
has reached an appropriate temperature, the yellow light will
turn off and the charger will resume the chargingprocedure.
The compatible charger(s) will not charge a faulty battery pack.
The charger will indicate faulty battery by refusing tolight.
NOTE: This could also mean a problem with acharger.

7
ENGLISH
If the charger indicates a problem, take the charger and battery
pack to be tested at an authorised servicecentre.
Hot/Cold Pack Delay
When the charger detects a battery pack that is too hot or too
cold, it automatically starts a Hot/Cold Pack Delay, suspending
charging until the battery pack has reached an appropriate
temperature. The charger then automatically switches to the
pack charging mode. This feature ensures maximum battery
packlife.
A cold battery pack will charge at a slower rate than a warm
battery pack. The battery pack will charge at that slower rate
throughout the entire charging cycle and will not return to
maximum charge rate even if the battery packwarms.
The DCB118 charger is equipped with an internal fan designed
to cool the battery pack. The fan will turn on automatically
when the battery pack needs to be cooled. Never operate the
charger if the fan does not operate properly or if ventilation slots
are blocked. Do not permit foreign objects to enter the interior
of thecharger.
Electronic Protection System
XR Li-Ion tools are designed with an Electronic Protection
System that will protect the battery pack against overloading,
overheating or deepdischarge.
The tool will automatically turn off if the Electronic Protection
System engages. If this occurs, place the lithium-ion battery
pack on the charger until it is fullycharged.
Wall Mounting
These chargers are designed to be wall mountable or to sit
upright on a table or work surface. If wall mounting, locate the
charger within reach of an electrical outlet, and away from a
corner or other obstructions which may impede air flow. Use
the back of the charger as a template for the location of the
mounting screws on the wall. Mount the charger securely using
drywall screws (purchased separately) at least 25.4mm long
with a screw head diameter of 7–9mm, screwed into wood to
an optimal depth leaving approximately 5.5mm of the screw
exposed. Align the slots on the back of the charger with the
exposed screws and fully engage them in theslots.
Charger Cleaning Instructions
WARNING: Shock hazard. Disconnect the charger
from the AC outlet before cleaning. Dirt and grease
may be removed from the exterior of the charger using a
cloth or soft non-metallic brush. Do not use water or any
cleaning solutions. Never let any liquid get inside the tool;
never immerse any part of the tool into aliquid.
Battery Packs
Important Safety Instructions for All Battery
Packs
When ordering replacement battery packs, be sure to include
catalogue number andvoltage.
The battery pack is not fully charged out of the carton. Before
using the battery pack and charger, read the safety instructions
below. Then follow charging proceduresoutlined.
READ ALL INSTRUCTIONS
• Do not charge or use battery in explosive atmospheres,
such as in the presence of flammable liquids, gases or
dust. Inserting or removing the battery from the charger may
ignite the dust orfumes.
• Never force battery pack into charger. Do not modify
battery pack in any way to fit into a non-compatible
charger as battery pack may rupture causing serious
personalinjury.
• Charge the battery packs only in DeWALTchargers.
• DO NOT splash or immerse in water or otherliquids.
• Do not store or use the tool and battery pack in
locations where the temperature may reach or exceed
40 ˚C (104 ˚F) (such as outside sheds or metal buildings
insummer).
• Do not incinerate the battery pack even if it is severely
damaged or is completely worn out. The battery pack can
explode in a fire. Toxic fumes and materials are created when
lithium-ion battery packs areburned.
• If battery contents come into contact with the skin,
immediately wash area with mild soap and water. If
battery liquid gets into the eye, rinse water over the open eye
for 15 minutes or until irritation ceases. If medical attention
is needed, the battery electrolyte is composed of a mixture of
liquid organic carbonates and lithiumsalts.
• Contents of opened battery cells may cause respiratory
irritation. Provide fresh air. If symptoms persists, seek
medicalattention.
WARNING: Burn hazard. Battery liquid may be flammable
if exposed to spark orflame.
WARNING: Never attempt to open the battery pack for
any reason. If battery pack case is cracked or damaged,
do not insert into charger. Do not crush, drop or damage
battery pack. Do not use a battery pack or charger that
has received a sharp blow, been dropped, run over or
damaged in any way (i.e., pierced with a nail, hit with
a hammer, stepped on). Electric shock or electrocution
may result. Damaged battery packs should be returned to
service centre forrecycling.
WARNING: Fire hazard. Do not store or carry the
battery pack so that metal objects can contact
exposed battery terminals. For example, do not place
the battery pack in aprons, pockets, tool boxes, product kit
boxes, drawers, etc., with loose nails, screws, keys,etc.
CAUTION: When not in use, place tool on its side on
a stable surface where it will not cause a tripping
or falling hazard. Some tools with large battery packs
will stand upright on the battery pack but may be easily
knockedover.
Transportation
WARNING: Fire hazard. Transporting batteries can
possibly cause fire if the battery terminals inadvertently
come in contact with conductive materials. When
transporting batteries, make sure that the battery
terminals are protected and well insulated from materials

8
ENGLISH
that could contact them and cause a shortcircuit.
NOTE: Lithium-ion batteries should not be put in
checkedbaggage.
DeWALT batteries comply with all applicable shipping
regulations as prescribed by industry and legal standards which
include UN Recommendations on the Transport of Dangerous
Goods; International Air Transport Association (IATA) Dangerous
Goods Regulations, International Maritime Dangerous Goods
(IMDG) Regulations, and the European Agreement Concerning
The International Carriage of Dangerous Goods by Road (ADR).
Lithium-ion cells and batteries have been tested to section 38.3
of the UN Recommendations on the Transport of Dangerous
Goods Manual of Tests andCriteria.
In most instances, shipping a DeWALT battery pack will be
excepted from being classified as a fully regulated Class 9
Hazardous Material. In general, only shipments containing a
lithium-ion battery with an energy rating greater than 100 Watt
Hours (Wh) will require being shipped as fully regulated Class 9.
All lithium-ion batteries have the Watt Hour rating marked on
the pack. Furthermore, due to regulation complexities, DeWALT
does not recommend air shipping lithium-ion battery packs
alone regardless of Watt Hour rating. Shipments of tools with
batteries (combo kits) can be air shipped as excepted if the Watt
Hour rating of the battery pack is no greater than 100Whr.
Regardless of whether a shipment is considered excepted
or fully regulated, it is the shipper's responsibility to consult
the latest regulations for packaging, labeling/marking and
documentationrequirements.
The information provided in this section of the manual is
provided in good faith and believed to be accurate at the time
the document was created. However, no warranty, expressed or
implied, is given. It is the buyer’s responsibility to ensure that its
activities comply with the applicableregulations.
Transporting the FLEXVOLT
TM
Battery
The DeWALT FLEXVOLT
TM
battery has two modes: Use
andTransport.
Use Mode: When the FLEXVOLT
TM
battery stands alone or is in
a DeWALT 18V product, it will operate as an 18V battery. When
the FLEXVOLT
TM
battery is in a 54V or a 108V (two 54V batteries)
product, it will operate as a 54Vbattery.
Transport Mode: When the cap is attached to the FLEXVOLT
TM
battery, the battery is in Transport mode. Keep the cap
for shipping.
When in Transport mode, strings
of cells are electrically
disconnected within the pack
resulting in 3 batteries with a
lower Watt hour (Wh) rating as compared to 1 battery with a
higher Watt hour rating. This increased quantity of 3 batteries
with the lower Watt hour rating can exempt the pack from
certain shipping regulations that are imposed upon the higher
Watt hour batteries.
For example, the Transport
Wh rating might indicate
3x36 Wh, meaning 3
Example of Use and Transport Label Marking
batteries of 36 Wh each. The Use Wh rating might indicate
108Wh (1batteryimplied).
Storage Recommendations
1. The best storage place is one that is cool and dry away
from direct sunlight and excess heat or cold. For optimum
battery performance and life, store battery packs at room
temperature when not inuse.
2. For long storage, it is recommended to store a fully charged
battery pack in a cool, dry place out of the charger for
optimalresults.
NOTE: Battery packs should not be stored completely
depleted of charge. The battery pack will need to be recharged
beforeuse.
Labels on Charger and Battery Pack
In addition to the pictographs used in this manual, the
labels on the charger and the battery pack may show the
following pictographs:
Read instruction manual beforeuse.
See Technical Data for chargingtime.
Do not probe with conductiveobjects.
Do not charge damaged batterypacks.
Do not expose to water.
Have defective cords replacedimmediately.
Charge only between 4 ˚C and 40 ˚C.
Only for indooruse.
Discard the battery pack with due care for
theenvironment.
Charge DeWALT battery packs only with designated
DeWALT chargers. Charging battery packs other
than the designated DeWALT batteries with a
DeWALT charger may make them burst or lead to
other dangeroussituations.
Do not incinerate the batterypack.
USE (without transport cap). Example: Wh rating
indicates 108 Wh (1 battery with 108 Wh).
TRANSPORT (with built-in transport cap). Example:
Wh rating indicates 3 x 36 Wh (3batteries of 36Wh).

9
ENGLISH
Battery Type
The DCD708/DCD709 operates on an 18 volt batterypack.
These battery packs may be used: DCB181, DCB182, DCB183,
DCB183B, DCB184, DCB184B, DCB185, DCB187, DCB189,
DCB546, DCB547, DCB548. Refer to Technical Data for
moreinformation.
Package Contents
The package contains:
1 Drill/driver (DCD708) or Hammerdrill (DCD709)
1 Charger
1 Belt hook (included with some models)
1 Magnetic bit holder (included with some models)
1 Li-Ion battery pack (C1, D1, L1, M1, P1, S1, T1, X1, Y1 models)
2 Li-Ion battery packs (C2, D2, L2, M2, P2, S2, T2, X2, Y2 models)
3 Li-Ion battery packs (C3, D3, L3, M3, P3, S3, T3, X3, Y3 models)
1 Instruction manual
• Check for damage to the tool, parts or accessories which may
have occurred duringtransport.
• Take the time to thoroughly read and understand this manual
prior tooperation.
Markings on Tool
The following pictograms are shown on the tool:
Read instruction manual beforeuse.
Wear earprotection.
Wear eyeprotection.
Visible radiation. Do not stare intolight.
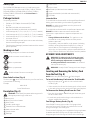
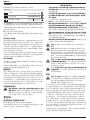
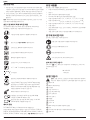
Date Code Position (Fig. A)
The date code
14
, which also includes the year of manufacture,
is printed into thehousing.
Example:
2018 XX XX
Year of Manufacture
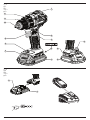
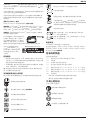
Description (Fig. A)
WARNING: Never modify the power tool or any part of it.
Damage or personal injury couldresult.
1
Battery pack
2
Battery pack release button
3
Main handle
4
Variable speed trigger
5
Forward/reverse control button
6
Mode selection collar
7
Speed selector
8
Worklight
9
Chuck sleeve
10
Keyless chuck
11
Belt hook (included with some models)
12
Screw
13
Magnetic bit holder (included with some models)
14
Date code
Intended Use
These drills/drivers/hammerdrills are designed for professional
drilling, percussion drilling and screwdrivingapplications.
DO NOT use under wet conditions or in the presence of
flammable liquids orgases.
These drills/drivers/hammerdrills are professional powertools.
DO NOT let children come into contact with the tool.
Supervision is required when inexperienced operators use
thistool.
• Young children and the infirm. This appliance is not
intended for use by young children or infirm persons
withoutsupervision.
• This product is not intended for use by persons (including
children) suffering from diminished physical, sensory or
mental abilities; lack of experience, knowledge or skills
unless they are supervised by a person responsible for their
safety. Children should never be left alone with thisproduct.
ASSEMBLY AND ADJUSTMENTS
WARNING: To reduce the risk of serious personal
injury, turn tool off and remove the battery pack
before making any adjustments or removing/
installing attachments or accessories. An accidental
start-up can causeinjury.
WARNING: Use only DeWALT battery packs andchargers.
Inserting and Removing the Battery Pack
from the Tool (Fig. B)
NOTE: Make sure your battery pack
1
is fullycharged.
To Install the Battery Pack into the Tool Handle
1. Align the battery pack
1
with the rails inside the tool’s
handle (Fig.B).
2. Slide it into the handle until the battery pack is firmly seated
in the tool and ensure that you hear the lock snap intoplace.
To Remove the Battery Pack from the Tool
1. Press the release button
2
and firmly pull the battery pack
out of the toolhandle.
2. Insert battery pack into the charger as described in the
charger section of thismanual.
Fuel Gauge Battery Packs (Fig. B)
Some DeWALT battery packs include a fuel gauge which
consists of three green LED lights that indicate the level of
charge remaining in the batterypack.
To actuate the fuel gauge, press and hold the fuel gauge button.
A combination of the three green LED lights will illuminate
designating the level of charge left. When the level of charge

10
ENGLISH
in the battery is below the usable limit, the fuel gauge will not
illuminate and the battery will need to berecharged.
NOTE: The fuel gauge is only an indication of the charge left on
the battery pack. It does not indicate tool functionality and is
subject to variation based on product components, temperature
and end-userapplication.
Belt Hook and Magnetic Bit Holder (Fig.A)
(Optional Accessories)
WARNING: To reduce the risk of serious personal
injury, DO NOT suspend tool overhead or suspend
objects from the belt hook. ONLY hang tool’s belt hook
from a workbelt.
WARNING: To reduce the risk of serious personal
injury, ensure the screw holding the belt hook issecure.
IMPORTANT: When attaching or replacing a belt hook or
magnetic bit holder, use only the screw that is provided. Be sure
to securely tighten thescrew.
A belt hook
11
and magnetic bit holder
13
can be be attached
to either side of the tool using only the screw
12
provided,
to accommodate left- or right-handed users. If the hook or
magnetic bit holder is not desired at all, it can be removed from
thetool.
To move belt hook or magnetic bit holder, remove the screw
12
that holds it in place then reassemble on the opposite side. Be
sure to securely tighten thescrew.
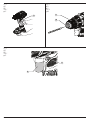
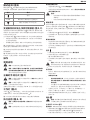
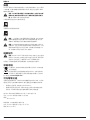
Installing a Bit or Accessory into a
KeylessChuck (Fig.D)
WARNING: Do not attempt to tighten drill bits (or
any other accessory) by gripping the front part of the
chuck and turning the tool on. Damage to the chuck
and personal injury may result. Always lock off trigger
switch and disconnect tool from power source when
changingacces sories.
WARNING: Always ensure the bit is secure before starting
the tool. A loose bit may eject from tool causing possible
personalinjury.
Your tool features a keyless chuck
10
with one rotating sleeve
9
for one-handed operation of the chuck. To insert a drill bit or
other accessory, follow thesesteps.
1. Turn tool off and remove batterypack.
2. Grasp the black sleeve of the chuck with one hand
and use the other hand to secure the tool. Rotate the
sleeve counterclockwise far enough to accept the
desiredaccessory.
3. Insert the accessory about 19 mm into the chuck and
tighten securely by rotating the chuck sleeve clockwise with
one hand while holding the tool with the other. Your tool is
equipped with an automatic spindle lock mechanism. This
allows you to open and close the chuck with onehand.
Be sure to tighten chuck with one hand on the chuck sleeve and
one hand holding the tool for maximumtightness.
To release the accessory, repeat steps 1 and 2above.
Speed Selection (Fig.A)
The tool features two speed settings for greaterversatility.
NOTE: Do not change speeds when the tool is running.
Always allow the tool to come to a complete stop before
changingspeed.
1. To select speed 1 (high torque setting), turn the tool off and
permit it to stop. Slide the speed selector
7
back (away
from thechuck).
2. To select speed 2 (high speed setting), turn the tool off and
permit it to stop. Slide the speed selector
7
forward (toward
thechuck).
If the tool does not change speeds, confirm that the speed
selection switch is completely engaged in the forward or
backposition.
Mode Selection (Fig. A)
The mode selection collar
6
can be used to select the correct
operating mode depending upon the plannedapplication.
To select, rotate the collar until the desired symbol aligns with
thearrow.
Symbol Mode
Drilling
1–15 Screwdriving (higher number = greater torque)
Hammerdrilling (DCD709 only)
Variable Speed Trigger and Forward/Reverse
Control Button (Fig. A, E)
The drill is turned on and off by pulling and releasing the
variable speed trigger
4
. The farther the trigger is depressed,
the higher the speed of the drill. Your tool is equipped with
a brake. The chuck will stop as soon as the trigger switch is
fullyreleased.
A forward/reverse control button
5
determines the rotational
direction of the tool and also serves as a lock-offbutton.
• To select forward rotation, release the trigger and depress
the forward/reverse control button on the right side of
thetool.
• To select reverse, depress the forward/reverse control
button on the left side of thetool.
NOTE: The centre position of the control button locks the tool
in the off position. When changing the position of the control
button, be sure the trigger isreleased.
NOTE: Continuous use in variable speed range is not
recommended. It may damage the switch and should
beavoided.
NOTE: The first time the tool is run after changing the direction
of rotation, you may hear a click on start up. This is normal and
does not indicate aproblem.

11
ENGLISH
OPERATION
Instructions for Use
WARNING: Always observe the safety instructions and
applicableregulations.
WARNING: To reduce the risk of serious personal
injury, turn tool off and remove the battery pack
before making any adjustments or removing/
installing attachments or accessories. An accidental
start-up can causeinjury.
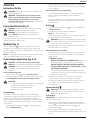
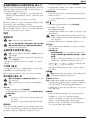
Proper Hand Position (Fig. C)
WARNING: To reduce the risk of serious personal injury,
ALWAYS use proper hand position asshown.
WARNING: To reduce the risk of serious personal
injury, ALWAYS hold securely in anticipation of a
suddenreaction.
Proper hand position requires one hand on the main handle
3
and one hand on the batterypack.
Worklight (Fig.A)
There is a worklight
8
located on the foot of the tool. The
worklight is activated when the trigger switch is depressed.
When the trigger is released, the worklight will stay illuminated
for up to 20seconds.
NOTE: The worklight is for lighting the immediate work surface
and is not intended to be used as aflashlight.
Performing an Application (Fig.A, D)
WARNING: To reduce the risk of personal injury,
ALWAYS ensure workpiece is anchored or clampedfirmly.
WARNING: Always wait until the motor has come to
a complete standstill before changing the direction
ofrotation.
Prior to performing work:
• Set the speed selector
7
. Refer to SpeedSelection.
• Install the appropriate bit or accessory into the chuck. Refer
to Installing a Bit or Accessory into a KeylessChuck.
WARNING:
• Do not use this tool to mix or pump easily combustible
or explosive fluids (benzine, alcohol,etc.).
• Do not mix or stir flammable liquids
labeledaccordingly.
Screwdriving
Your tool has a clutch with adjustable torque for driving
and removing a wide array of fastener shapes and sizes. The
numbers on the mode selection collar
6
are used to set a
torque range for screwdriving. The higher the number on the
collar, the higher the torque and the larger the fastener which
can bedriven.
1. Turn the mode selection collar
6
to the desiredposition.
Refer to Mode Selection.
2. Pull the trigger switch applying pressure in a straight line
with the bit until the fastener is seated at the desired depth
in theworkpiece.
Recommendations for Screwdriving
• Start with lower torque settings, then advance to higher
torque settings to avoid damage to the workpiece
orfastener.
• Make some practice runs in scrap or on unseen areas of the
workpiece to determine the proper position of the mode
selectioncollar.
Drilling
1. Turn the mode selection collar
6
to the drillsymbol. Refer
to ModeSelection.
2. Place drill bit in contact with theworkpiece.
NOTE: Use sharp drill bitonly.
3. Pull the trigger applying pressure in a straight line with the
bit until it reaches the desireddepth.
WARNING: Drill may stall if overloaded causing a sudden
twist. Always expect the stall. Grip the drill firmly to control
the twisting action and avoidinjury.
4. Keep the motor running when pulling the bit back out of a
drilled hole to preventjamming.
Recommendations for Drilling
• When drilling, always apply pressure in a straight line with
the bit, but do not push hard enough to stall the motor or
deflect thebit.
• IF THE DRILL STALLS:
- RELEASE TRIGGER SWITCH IMMEDIATELY, remove
drill bit from work, and determine cause ofstalling.
- DO NOT DEPRESS TRIGGER SWITCH ON AND OFF
IN AN ATTEMPT TO START A STALLED DRILL—THIS
CAN DAMAGE THEDRILL.
- To minimize stalling or breaking through the material,
reduce pressure on drill and ease the bit through the last
fractional part of thehole.
• Large holes (7.9 mm to 12.7 mm) in steel can be made
easier if a pilot hole (4 mm to 4.8mm) is drilledfirst.
• If drilling thin material or material that is prone to splinter,
use a wood “back-up” block to prevent damage to
theworkpiece.
Hammerdrilling
WARNING: Wear proper respiratory protection. Collect
residual dust with a vacuum or dust collection system
designed for the application.
DCD709 Only
IMPORTANT: Use carbide-tipped or masonry bits rated for
percussion drillingonly.
1. Select the desired speed/torque range using the speed
selector
7
to match the speed and torque to the planned
operation. Turn the mode selection collar
6
to the
hammerdrillsymbol.
2. Pull the trigger, applying just enough pressure on the
hammer to keep it from bouncing excessively or "rising" off
the bit.

12
ENGLISH
Recommendations for Hammerdrilling
• Too much force will cause slower drilling speeds,
overheating, and a lower drillingrate.
• A smooth even flow of material indicates the proper
drillingrate.
• Drill straight, keeping the bit at a right angle to the work. Do
not exert side pressure on the bit when drillling as this will
cause clogging of the bit flutes and a slower drillingspeed.
• When drilling deep holes, if the hammer speed starts to
drop off, pull the bit partially out of the hole with tool still
running to help clear debris from thehole.
MAINTENANCE
Your DeWALT power tool has been designed to operate
over a long period of time with a minimum of maintenance.
Continuous satisfactory operation depends upon proper tool
care and regularcleaning.
WARNING: To reduce the risk of serious personal
injury, turn tool off and remove the battery pack
before making any adjustments or removing/
installing attachments or accessories. An accidental
start-up can causeinjury.
The charger and battery pack are notserviceable.
Lubrication
Your power tool requires no additionallubrication.
Cleaning
WARNING: Blow dirt and dust out of the main housing
with dry air as often as dirt is seen collecting in and around
the air vents. Wear approved eye protection and approved
dust mask when performing thisprocedure.
WARNING: Never use solvents or other harsh chemicals
for cleaning the non-metallic parts of the tool. These
chemicals may weaken the materials used in these parts.
Use a cloth dampened only with water and mild soap.
Never let any liquid get inside the tool; never immerse any
part of the tool into aliquid.
Optional Accessories
WARNING: Since accessories, other than those offered
by DeWALT, have not been tested with this product, use
of such accessories with this tool could be hazardous.
To reduce the risk of injury, only DeWALT recommended
accessories should be used with thisproduct.
Consult your dealer for further information on the
appropriateaccessories.
Protecting the Environment
Separate collection. Products and batteries marked
with this symbol must not be disposed of with normal
householdwaste.
Products and batteries contain materials that can be recovered
or recycled reducing the demand for raw materials. Please
recycle electrical products and batteries according to local
provisions. Further information is available at www.2helpU.
com.
Rechargeable Battery Pack
This long life battery pack must be recharged when it fails
to produce sufficient power on jobs which were easily done
before. At the end of its technical life, discard it with due care for
our environment:
• Run the battery pack down completely, then remove it from
thetool.
• Li-Ion cells are recyclable. Take them to your dealer or a
local recycling station. The collected battery packs will be
recycled or disposed ofproperly.

13
简体中文
简体中文
3
恭喜!
感谢您选购
DeWALT
工具。凭借多年的产品开发和创新经验,
DeWALT
已经成为专业电动工具用户最可靠的合作伙伴之一。
技术参数
DCD708 DCD709
电压
伏特
直流
18
(最大
20
)
18
(最大
20
)
电池类型
锂离子 锂离子
功率输出
瓦
340 340
空载转速
1
档
2
档
转/分
转/分
0–450
0–1650
0–450
0–1650
每分钟冲击数
1
档
– 0–7650
2
档
– 0–28050
最大扭矩(硬/软)
Nm 65
/
26 65
/
26
夹头尺寸
毫米
1.5–13 1.5–13
最大
钻孔
能力
木材
金属
砖石
毫米
毫米
毫米
30
13
–
30
13
13
重 量( 不 含 电 池 组 )
千克
1.10 1.20
本信息表中所载的振动发射标准依据
IEC60335
提供的标准测试
测量,并且可用于工具间的比较。它可用于噪音的初步评估。
警告:我们所公布的振动发射级适用于本工具的主要应
用。然而,如果将本工具用于其他应用、为其使用不同的
配件或保养不当,则振动发射值可能会不同。这可能会大
幅度提高总工作时间内的噪音级。
在关闭工具电源、或运行中的工具实际上并未工作时,也应考虑
到其噪音级或振动。这可能会大幅度降低总工作期间的噪音级。
确定额外的安全措施以保护操作员免受振动影响,比如:保
养工具和配件、双手保持温暖、组织工作模式。
警告:为降低伤害风险,请阅读使用手册。
定义:安全指南
下列定义描述了各标志术语的严重程度。请仔细阅读本手册,并
注意这些标志。
危险:表示存在紧急危险情况,如果不加以避免,将导致
死亡或严重伤害。
警告:表示存在潜在的危险情况,如果不加以避免,可能
导致死亡或严重伤害。
警示:表示存在潜在危险情况,如果不加以避免,可能导
致轻度或中度伤害。
注意:表示存在不涉及人身伤害的情况,如果不加以避
免,可能导致财产损失。
表示存在触电风险。
表示存在火灾风险。
充电式紧凑型
13
毫米电钻/起子/冲击钻
DCD708
,
DCD709
电池
充电器
/
充 电 时 间( 分 钟 )
目录号 伏特
直流
安时
重量
(千克)
DCB107 DCB112 DCB115 DCB118 DCB132
DCB546 18/54 6.0/2.0 1.05 270 170 90 60 90
DCB547 18/54 9.0/3.0 1.46 420 270 140 85 140
DCB548 18/54 12.0/4.0 1.44 540 350 180 180 120
DCB181 18 1.5 0.35 70 45 22 22 22
DCB182 18 4.0 0.61 185 120 60 60 60
DCB183/B 18 2.0 0.40 90 60 30 30 30
DCB184/B 18 5.0 0.62 240 150 75 75 75
DCB185 18 1.3 0.35 60 40 22 22 22
DCB187 18 3.0 0.54 140 90 45 45 45
DCB189 18 4.0 0.54 185 120 60 60 60

14
简体中文
4
简体中文
电动工具通用安全警告
警告!阅读随电动工具提供的所有安全警告、说明、图示
和规定。不遵照以下所列说明会导致电击、着火和/或严
重伤害。
保存所有警告和说明书以备查阅。
警告中的术语
“
电动工具
”
指 市 电 驱 动( 有 线 )电 动 工 具 或 电 池 驱 动( 无 线 )
电动工具。
a)
工作场地的安全
1 )
保持工作场地清洁和明亮。杂乱和黑暗的场地会引发事故。
2 )
不要在易爆环境,如有易燃液体、气体或粉尘的环境下
操作电动工具。电动工具产生的火花会点燃粉尘或气体。
3 )
操作电动工具时,远离儿童和旁观者。注意力不集中会使
你失去对工具的控制。
b)
电气安全
1 )
电动工具插头必须与插座相配。绝不能以任何方式改装插头。
需接地的电动工具不能使用任何转换插头。未经改装的插头
和相配的插座将降低电击风险。
2 )
避免人体接触接地表面,如管道、散热片和冰箱。如果你
身体接触接地表面会增加电击风险。
3 )
不得将电动工具暴露在雨中或潮湿环境中。水进入电动
工具将增加电击风险。
4 )
不得滥用软线。绝不能用软线搬运、拉动电动工具或拔
出其插头。使软线远离热源、油、锐边或运动部件。受损
或缠绕的软线会增加电击风险。
5 )
当在户外使用电动工具时,使用适合户外使用的延长线。适合
户外使用的电线将降低电击风险。
6 )
如果无法避免在潮湿环境下操作电动工具,应使用带有剩余
电流装置
(RCD)
保护的电源。
RCD
的使用可降低电击风险。
c)
人身安全
1 )
保持警觉,当操作电动工具时关注所从事的操作并保持
清醒。当你感到疲倦,或在有药物、酒精或治疗反应时,
不要操作电动工具。在操作电动工具时瞬间的疏忽会导
致严重人身伤害。
2 )
使用个人防护装置。始终佩戴护目镜。防 护 装 置 ,诸 如 适
当条件下使用防尘面具、防滑安全鞋、安全帽、听力防护
等装置能减少人身伤害。
3 )
防止意外起动。在连接电源和/或电池盒、拿起或搬运工
具前确保开关处于关断位置。手指放在开关上搬运工具
或开关处于接通时通电会导致危险。
4 )
在电动工具接通之前,拿掉所有调节钥匙或扳手。遗留在
电动工具旋转零件上的扳手或钥匙会导致人身伤害。
5 )
手不要过分伸展。时刻注意立足点和身体平衡。这样能
在意外情况下能更好地控制住电动工具。
6 )
着装适当。不要穿宽松衣服或佩戴饰品。让你的头发和
衣服远离运动部件。宽松衣服、佩饰或长发可能会卷入
运动部件。
7 )
如果提供了与排屑、集尘设备连接用的装置,要确保其
连接完好且使用得当。使用集尘装置可降低尘屑引起的
危险。
8 )
不要因为频繁使用工具而产生的熟悉感而掉以轻心,忽视
工具的安全准则。某个粗心的动作可能在瞬间导致严重的
伤害。
d)
电动工具使用和注意事项
1 )
不要勉强使用电动工具,根据用途使用合适的电动工具。
选用合适的按照额定值设计的电动工具会使你工作更有效、
更安全。
2 )
如果开关不能接通或关断电源,则不能使用该电动工具。
不能通过开关来控制的电动工具是危险的且必须进行修理。
3 )
在进行任何调节、更换附件或贮存电动工具之前,必须从
电源上拔掉插头和/或卸下电池包(如可拆卸)。这种防
护性的安全措施降低了电动工具意外起动的风险。
4 )
将闲置不用的电动工具贮存在儿童所及范围之外,并且不允
许不熟悉电动工具和不了解这些说明的人操作电动工具。
电动工具在未经培训的使用者手中是危险的。
5 )
维护电动工具及其附件。检查运动部件是否调整到位或卡
住,检查零件破损情况和影响电动工具运行的其他状况。
如有损坏,应在使用前修理好电动工具。许多事故是由维
护不良的电动工具引发的。
6 )
保持切削刀具锋利和清洁。维护良好地有锋利切削刃的
刀具不易卡住而且容易控制。
7 )
按照使用说明书,并考虑作业条件和要进行的作业来选
择电动工具、附件和工具的刀头等。将电动工具用于那些
与其用途不符的操作可能会导致危险情况。
8 )
保持手柄和握持表面干燥、清洁,不得沾有油脂。在意外的
情况下,湿滑的手柄不能保证握持的安全和对工具的控制。
e)
电池式工具使用和注意事项:
1 )
仅使用生产者规定的充电器充电。将 适 用 于 某 种 电 池 包
的充电器用到其他电池包时可能会发生着火危险。
2 )
仅使用配有专用电池包的电动工具。使用其他电池包可能
会产生伤害和着火危险。
3 )
当电池包不用时,将它远离其他金属物体,例如回形针、硬
币、
钥 匙 、钉 子 、螺 钉 或 其 他 小 金 属 物 体 ,以 防 电 池 包 一
端与另一端连接。电池组端部短路会引起燃烧或着火。
4 )
在滥用条件下,液体可能会从电池组中溅出,应避免接触。如
果意外碰到液体,用水冲洗。如果液体碰到了眼睛,还要寻
求医疗帮助。从电池中溅出的液体可能会发生腐蚀或燃烧。
5 )
不要使用损坏或改装过的电池包或工具。损坏或改装过的
电池组可能呈现无法预测的结果,导致着火、爆炸或伤害。
6 )
不要将电池包暴露于火或者高温中。电池包暴露于火或高
于
130°C
的高温中可能导致爆炸。
f)
维修
1 )
让专业维修人员使用相同的备件维修电动工具。这将保
证所维修的电动工具的安全。
2 )
决不能维修损坏的电池包。电池包仅能由生产者或其授
权的维修服务商进行维修。
电钻专用警告语:
使用冲击电钻时要戴好耳罩。暴露在噪声中会引起听力损伤。
使用随工具提供的辅助手柄。操作失手会引起人身伤害。
当在钻削附件可能触及暗线之处进行操作时,要通过绝缘握持面
来握持工具。钻削附件碰到带电导线会使工具外露的金属零件带
电从而使操作者受到电击。
使用长钻头的安全说明
•
切勿以高于钻头最大额定速度的速度运行。在 较高的速 度 下,
如果允许在不接触工件的情况下自由旋转,钻头可能会弯曲,
从而导致人身伤害。

15
简体中文
5
简体中文
•
始终以低速进行钻孔,钻头尖端与工件保持接触。在较高的速
度下,如果允许在不接触工件的情况下自由旋转,钻头可能会
弯曲,从而导致人身伤害。
•
仅在与钻头直接对齐时施加压力,并且不施加过大的压力。钻头
可能弯曲致破损或失控,从而导致人身伤害。
电钻/起子/电锤附加安全警告
•
使用夹具或采取其它可行的方法,将工件固定、支撑到稳定
的平台上。手持或用身体顶住工件都是不稳定的,会导致操
作失控。
•
附件和工具可能会在使用过程中发热。如果进行放热应用(如金
属 钻 孔 ),处 理 时 请 佩 戴 手 套 。
•
通 风 口 通 常 会 盖 住 运 动 部 件 ,应 予 以 避 免 。宽 松 衣 服 、佩 饰 或
长发可能会卷入运动部件。
•
请佩戴安全护目镜或其他护目装备。冲击或钻孔会导致碎片飞
散。飞散的颗粒会对眼睛造成永久性伤害。
•
使用冲击电钻时请佩戴听力保护器。暴露在噪声中会引起听
力损伤。
•
使用工具随附的辅助手柄。工具失控会导致人身伤害。
•
在切削附件可能触及暗线之处进行操作时,要通过绝缘握持
面来握持电动工具。切割配件如果接触到
“
带电
”
导线,电动工
具金属部件表面就会
“
带电
”
并使操作人员触电。
•
请勿长时间操作此工具。工具运行导致的振动可能会伤害您
的手和手臂。使用手套提供额外缓冲,经常停下休息,限制
使用时间。
剩余风险
尽管遵守了相关的安全法规并采用了安全装备,某些剩余风险仍
然是无法避免的。这些风险包括:
•
听力损伤。
•
飞溅颗粒造成的人身伤害风险。
•
使用时附件发热导致的灼伤风险。
•
长时间使用引起的人身伤害风险。
请妥善保管好这些说明
充电器
DeWALT
充电器无需做出任何调整,专为简易操作而设计。
电气安全
电机只适用一种工作电压。请务必检查电池组的电压是否和铭牌
上的电压一致。另外,请确保充电器电压和主电源的电压一致。
DeWALT
充电器符合
IEC60335
双重绝缘要求,因此无
需使用接地线。
若 电 源 线 损 坏 ,必 须 交 由
DeWALT
维修部门采用专门制备的电线
进行更换。
使用延长线
除非绝对必要,否则请勿使用延长线。使用适合您的充电器输入功
率 的 合 格 延 长 线( 见
技术参数
)。最 小 的 导 线 尺 寸 为
1
平方毫米;
最大长度为
30
米。
使用电缆卷筒时,请务必拉出所有的电缆
。
针对所有电池充电器的重要安全说明
请妥善保管好这些说明:
本手册包含重要的兼容电池充电器安全
和 操 作 说 明( 请 参 阅
技术参数
)。
•
在使用充电器之前,请先阅读所有指示以及充电器、电池组和
使用电池组的产品上的警示标记。
警告:触电危险。请勿让任何液体渗入充电器,否则会引
起触电。
警告:我们建议使用漏电保护额定电流为
30
毫安或以下
的漏电保护装置。
警示:灼伤危险。为降低人身伤害风险,请仅使用
DeWALT
充 电 式 电 池 充 电 。使 用 其 它 类 型 的 电 池 可 能 会 引 起 爆 裂 ,并
导致人身伤害和损害。
警示:应看管好儿童,以确保他们不将此设备当做玩具来玩。
注意:在某些情况下,当充电器的插头插入电源插座时,充电
器内部裸露的充电接触点可能因为外来物件而短路。请勿让
能导电的异物靠近充电器腔,这些外来物件包括但不限于钢
棉、铝箔或任何金属颗粒的堆积物。充电器内没有电池组时,
请断开充电器与电源的连接。清洗前,务必拔掉充电器
。
•
请勿试图使用本手册指定的充电器以外的其他任何充电器为电
池组充电。充电器和电池组都是专门设计的,互相配合使用。
•
除了为
DeWALT
充电式电池充电以外,这些充电器并非设计
用于其他用途。否则,可能会导致火灾、触电或电击。
•
请勿将充电器暴露于雨中或雪中。
•
断开充电器连接时,应拔下插头,切勿拉拽电源线。这将降低
对电插头和电线的损害风险。
•
确保电源线布置在不易踩踏、踢绊、拉扯或会受到损害或压
力的位置。
•
除非绝对必要,否则请勿使用延长线。使用不正确的延长线
可能导致火灾、触电或电击的风险。
•
请勿将任何物件放在充电器上面,或是把充电器放在可能会
堵住通风槽的柔软表面,导致充电器的内部过热。请把充电
器放置在远离任何热源的地方。充电器通过外壳顶端和底端
的槽进行通风。
•
禁止使用电源线或插头已损坏的充电器。请立即更换这些
充电器。
•
如果充电器受到强烈重击、掉落或出现其他损坏情况,请勿
使用充电器。请将损坏的充电器送到授权服务中心。
•
请勿自行拆卸充电器。请将需要检修或修理的充电器送到授
权服务中心。重装不正确可能导致触电、电击或火灾风险。
•
必须立即将已损坏的电源线交由制造商、服务代理或类似的
合格人员进行更换以防止安全隐患。
•
清洁前,请先断开充电器和插座的连接,以降低触电风险。取出
电池组不会降低此风险。
•
切勿将两个充电器连接在一起。
•
充电器是为
220-240 V
的标准家用电源而设计。请勿试图在
任何其他电压下使用充电器。此规则不适用于车载充电器。
为电池充电(图
B
)
1.
放进电池组前,先将充电器的插头插到相应的电源插座上。
2.
将电池组
1
插入到充电器中,确定电池组完全就位。红色(充电
中 )指 示 灯 将 不 断 闪 烁 ,表 示 充 电 过 程 已 经 开 始 。
3.
红色灯持续亮起表示充电完成。此时电池组已完全充电,您可
以使用电池组或将电池组留在充电器上。要从充电器上取下
电池组,请按下电池组上的电池释放按钮
2。
注:为了确保锂离子电池的效能和使用寿命最大化,在首次使用
电池组之前必须将其完全充电。

16
简体中文
6
简体中文
充电器操作
关于电池组的充电状态,请参阅以下指示灯说明。
充电状态指示灯
充电中
已完全充电
热/冷电池组延迟
*
*
红色指示灯会继续闪烁,但黄色指示灯在本次操作过程中会亮起。
电池组达到适当温度后,黄色指示灯会熄灭,充电器将恢复充电
程序。
此兼容充电器不能为故障的电池组充电。充电器指示灯不亮时表
示电池有故障。
注:这也可能意味充电器有故障。
如果充电器提示存在故障,请将充电器和电池组送到授权的维修
中心进行测试。
热/冷电池组延迟
当充电器检测到电池组过热或过冷时,它会自动启动热
/
冷电池
延迟模式,暂停充电,直到电池组达到适当的温度。然后,充电器
会自动切换到电池组充电模式。此功能可确保电池组拥有最长的
使用寿命。
冷电池组充电速度比热电池组充电速度慢。电池组在整个充电周期
的充电速度都会较慢,即使电池组升温也不会恢复到最大速度。
DCB118
充电器配备专用于冷却电池组的内部风扇。电池组需要冷
却时,风扇会自动启动。如果风扇运转不正常或通风槽堵塞,切勿
操作充电器。请勿让异物进入充电器内部。
电子保护系统
XR
锂离子电池工具具有电子保护系统设计,可保护电池组免受过
载、过热或过度放电之害。
如果电子保护系统处于运作状态,该工具将自动停止操作。如果发
生这种情况,请将锂离子电池组放在充电器上,直至其完全充电。
壁挂式安装
这些充电器设计为可以安装在墙上,也可以直立在桌面或工作台
面上。如果安装在墙上,请确保充电器的位置可以连接到电源插
座,并且远离墙角或其他可能妨碍空气流通的障碍物。将充电器背
面作为在墙上安装螺丝的位置模板。使用至少
25.4
毫米长、螺丝
帽直径至少
7-9
毫米的石膏板螺丝(单独购买)牢牢固定充电器,
将螺丝最大限度钉入木材,预留约
5.5
毫米露在墙外。将充电器背
面的安装槽对准露出的螺丝,完全放置到位。
充电器清洁说明
警告:触电危险。清洁前,请将充电器从交流电源插座上拔下。
可用布或非金属软刷清除充电器外部的污垢和油脂。请勿使用
水或任何清洁剂。切勿让任何液体渗入工具,切勿让工具的任
何部件浸在液体中。
电池组
针对所有电池组的重要安全说明
在订购更换电池组时,请务必附上目录型号和电压。
包装箱内的电池组并未完全充电。使用电池组和充电器之前,请阅
读下列安全指示,然后遵循所述的充电程序。
请阅读所有说明
•
请勿在易爆环境,如有易燃液体、气体或粉尘的环境中充电
或使用电池。在充电器中插入或取出电池时可能会点燃粉尘
或气体。
•
切勿强行将电池放进充电器。请勿以任何方式改装电池组以
在不相容的充电器中使用,否则电池组可能会破裂,导致严
重人身伤害。
•
只使用
DeWALT
充电器为电池组充电。
•
请勿喷溅电池组或将其浸泡在水或其他液体中。
•
请勿在温度可能达到或超过
40˚C
(104˚F)
的 地 方( 如 夏 天
户外的棚子或金属建筑物中)存储或使用工具和电池组。
•
即使电池组严重受损或完全损坏,也请勿焚化电池组。电池
组在火中会发生爆炸。锂离子电池组在燃烧时会释放有毒烟
雾和物质。
•
如果电池液体接触到皮肤,请立即以中性肥皂和清水冲洗接
触的地方。如果电池液体不慎进入眼睛,应睁开眼睛并用清
水冲洗至少
15
分钟或直到刺激感消失。如果需要医疗救助,
请告知医护人员。电池电解质由液状有机碳酸盐和锂盐的混
合物组成。
•
已打开电池的内部物质可能导致呼吸道刺激。请保持空气流通。
如果症状持续存在,请就医。
警告:灼伤危险。电池液如果接触到火花或火焰可能会燃烧。
警告:切勿以任何理由试图打开电池组。电池组外壳破裂
或损坏时,请勿将电池组插入充电器。请勿挤压、掉落或
损坏电池组。请勿使用受过强烈重击、掉落、碾压或以任
何 其 它 方 式( 如 被 钉 子 穿 破 、受 到 锤 子 的 重 击 、踩 踏 )受
损的电池组或充电器。否则可能会引起触电或电击。损坏
的电池组应送回维修中心进行回收。
警告:火灾危险。请勿在存储或搬运电池组时让金属物品
接触暴露的电池两极。例 如 ,请 勿 将 电 池 组 放 在 围 裙 、口
袋、工具盒、产品套件盒、抽屉等可能与散钉、螺丝、钥匙
等物品接触的地方。
警示:不用时,将工具侧放在平稳的表面上,确保不会有
踢绊或掉落的危险。一些具有大型电池组的工具可以直立
但可能会轻易被撞倒。
运输
警告:火灾危险。电池运输途中,如果电池两极意外接触
导电材料,可能会引发火灾。运输电池时,务必保护电池
两极,确保与可能接触电池导致短路的材料良好绝缘。
注:锂离子电池不应放在托运行李中。
DeWALT
电池符合所有适用的行业和法律标准规定的运输规范,
包括《联合国危险品运输建议规章范本》
(UN Recommendations
on the Transport of Dangerous Goods)
、《国际航空运输协会
(IATA)
危险品规则》
(International Air Transport Association (IATA)
Dangerous Goods Regulations)
、《 国 际 海 运 危 险 品
(IMDG)
规则》
(International Maritime Dangerous Goods (IMDG) Regulations)
和《欧洲危险货物国际公路运输协定》
(European Agreement
Concerning The International Carriage of Dangerous Goods by
Road) (ADR)
。锂离子电池和电池组已遵循《联合国危险品运输建议
规 章 范 本 手 册 》第
38.3
节关于测试和标准的说明通过测试。
大 多 数 情 况 下 ,发 运
DeWALT
电池组不属于完全管制的
9
类危险
品。通常情况下,只有当运输包含一个能量等级大于
100
瓦时
(Wh)
的锂离子电池时,才需要作为完全管制的
9
类 危 险 品 发 运 。所 有 锂 离
子电池外壳上均标注有瓦时等级。此外,由于法规比较复杂,无论瓦

17
简体中文
7
简体中文
时等级 是多少,
DeWALT
都不建议单独空运锂离子电池组。发运包含
电池的工具(组合套件)时,如果电池组的额定能量不大于
100
瓦时
(Wh)
,则 可 以 空 运 。
无论发运是否纳入完全管制范围内,运输公司均有责任遵循最新法规
中关于包装、标签
/
标记和单据的要求。
本手册本节的信息是出于善意提供,且认为在编制文档时准确无误。
但是不提供明示或暗示的担保。购买方负有确保其行为遵守适用法
规的责任。
运输
FLEXVOLT
TM
电池
DeWALT
FLEXVOLT
TM
电池有两种模式:使用和运输。
使用模式:当
FLEXVOLT
TM
电池单独使用或用于
DeWALT
18
伏产
品时,将作为
18
伏 电 池 操 作 。当
FLEXVOLT
TM
电池用于
54
伏或
108
伏( 两 个
54
伏电池)的产品时,将作为
54
伏电池进行操作。
运输模式:当电池盖连接到
FLEXVOLT
TM
电池时,电池会进入运输模
式。保留电池盖用于运输。
处于运输模式时,电池组内部的电池
芯会处于断电状态,使
3
个低瓦时
(Wh)
等级的电池相当于
1
个高瓦时
等级电池。这样,增加
3
个低瓦时等
级的电池可以使电池组不必遵守适用于更高瓦时电池的运输法规。
例 如 ,若 运 输 额 定 瓦 时 为
3x36
瓦 时 ,则 表 示
3
个
36
瓦时的电池。使用瓦时额定
值可能是
108
瓦 时( 表 示
1
个 电 池 )。
存放建议
1.
最好将电池存放在阴凉、干燥、远离阳光直射、不会过热或过
冷的地方。为了获得最佳的电池性能和使用寿命,请您在不使
用电池组时将其存储在室温下。
2.
长期存储时,建议将完全充电的电池组从充电器取出,存储在
阴凉、干燥的地方,以达到最佳效果。
注:电池组不应在电池已完全耗尽的状态下存放。使用电池组之
前 ,必 须 重 新 为 电 池 组 充 电 。
充电器和电池组上的标签
除了在本手册中所使用的标志,充电器和电池组的标签还包括:
使用前请阅读使用手册。
要 了 解 充 电 时 间 ,请 参 阅
技术参数
。
请勿使用导电物体戳刺。
请勿对损坏的电池组充电。
请勿将其暴露于水中。
应立即更换有缺陷的电线。
使用和运输标签标记示例
请只在
4°C
和
40°C
之间的温度下充电。
只能在室内使用。
弃置电池组时,请妥善处理以保护我们的环境。
只使用指定的
DeWALT
充电器为
DeWALT
电池组充
电 。使 用
DeWALT
充电器为非
DeWALT
电池充电可能
会导致电池爆炸或出现其他危险情况。
请勿焚化电池组。
使用(无电池盖)。示例:瓦时额定值为
108
瓦时
(
1
个
108
瓦时的电池)。
运输(有内置运输盖)。示例:瓦时额定值为
3 x 36
瓦时
(
3
个
36
瓦时的电池)。
电池类型
DCD708/DCD709
使用
18
伏特电池组。
这些电池 组可用于:
DCB181
、
DCB182
、
DCB183
、
DCB183B
、
DCB184
、
DCB184B
、
DCB185
、
DCB187
、
DCB189
、
DCB546
、
DCB547
,
DCB548
。
更 多 信 息 ,请 参 阅
技术参数
。
包装内的物品
包装内的物品包括:
1
只
电钻
/
起子
(DCD708)
或电锤
(DCD709)
1
只
充电器
1
只
皮 带 扣( 部 分 型 号 内 自 带 )
1
只
磁 力 钻 头 夹 持 器( 部 分 型 号 内 自 带 )
1
只
锂 离 子 电 池 组(
C1
、
D1
、
L1
、
M1
、
P1
、
S1
、
T1
、
X1
、
Y1
型号)
2
只
锂 离 子 电 池 组(
C2
、
D2
、
L2
、
M2
、
P2
、
S2
、
T2
、
X2
、
Y2
型号)
3
只
锂 离 子 电 池 组(
C3
、
D3
、
L3
、
M3
、
P3
、
S3
、
T3
、
X3
、
Y3
型号)
1
本
说明手册
•
检查工具、部件或附件是否在运输过程中损坏。
•
操 作 前 ,请 抽 空 仔 细 阅 读 并 掌 握 本 手 册 。
工具上的标记
工具上印有下列图形:
使用前请阅读使用手册。
请佩戴听力保护器。
请佩戴护目装备。
可见辐射。切勿直视激光束。

18
简体中文
8
简体中文
日 期 码 位 置( 图
A
)
日期码
14
印 在 工 具 外 壳 上 ,其 中 还 包 含 制 造 年 份 。
示例:
2018 XX XX
制造年份
说 明( 图
A
)
警告:切勿改装电动工具或其任何部件,否则可能会导致
损坏或人身伤害。
1
电池组
2
电池组释放按钮
3
主手柄
4
变速触发开关
5
正/反转控制按钮
6
模式选择环
7
转速选择器
8
工作灯
9
夹头套管
10
无锁匙夹头
11
皮 带 扣( 部 分 型 号 内 自 带 )
12
螺丝
13
磁 力 钻 头 夹 持 器( 部 分 型 号 内 自 带 )
14
日期代码
设计用途
这些电钻
/
起子
/
冲击钻设计用于专业钻孔、冲击钻孔和螺丝安装。
请勿在潮湿环境中或在易燃液体或气体存在的环境中使用本工具。
这些电钻
/
起子
/
冲击钻是专业型电动工具。
请勿让儿童接触本工具。缺乏经验的操作员需要在监督下使用
本工具。
•
儿童和体弱者。在没有他人监督的情况下,儿童或体弱者不适
宜使用本产品。
•
本产品不适合体力、感官或智力不足以及缺乏经验、知识或技
能的人员(包括儿童)使用,除非一旁有能为他们的安全负责
的监督人员。不得在无人监管的情况下让儿童接触本产品。
组装与调整
警告:为降低严重的人身伤害风险,在进行任何调整或取
出/安装附加装置或附件之前,请关闭装置并取下电池组。
意外启动可能会导致人身伤害。
警告:请只使用
DeWALT
电池组和充电器。
插入或取出工具上的电池组(图
B
)
注:请确保您的电池组
1
已完全充电。
将电池组安装到工具手柄中
1.
将电池组
1
对齐工具手柄内的轨道(图
B
)。
2.
将电池组滑入手柄内,使其牢牢地固定在工具内,并确保您听
到其锁定到位的声音。
从工具中取出电池组
1.
按下释放按钮
2,将电池组从工具手柄中稳妥地拉出。
2.
按本手册充电器部分所述将电池组插入充电器中。
电池组电量计(图
B
)
一些
DeWALT
电池组带有一个包含三个绿色
LED
指示灯的电量
计,用于指示电池组内的剩余电量。
按下电量计按钮不松开,即可启动电量计。三个绿色
LED
指示灯
将以组合方式亮起,以指示剩余电量。当电池内的电量低于可用限
制 时 ,电 量 计 将 不 会 亮 起 ,电 池 将 需 要 重 新 充 电 。
注:电量计仅指示电池组的剩余电量。它并不表示该工具的功能,
且将根据产品组件、温度和最终用户的使用情况而有所不同。
皮带扣和磁力钻头夹具(图
A
)
(
可选配件
)
警告:为降低严重的人身伤害风险,请不要将工具悬挂在
头顶上方或用皮带扣悬挂物品。只能使用工作皮带悬挂
工具的皮带扣。
警告:为 了 降 低 严 重 人 身 伤 害 的 危 险 ,请确保固定皮带扣
子的螺丝是牢固的。
重要信息:安装或更换皮带扣或磁力钻头夹持器时,只使用提供
的螺丝。务必拧紧螺丝。
可使用提供的螺丝
12
将皮带扣
11
和磁力钻头夹持器
13
装
到
工具的任意一侧,以方便习惯左手操作或习惯右手操作的用户使用。
如果不需要使用皮带扣或磁力钻头夹持器,则可将其从工具上拆除。
若要拆除皮带扣或磁力钻头夹持器,请取下固定它们的螺丝
12,
然后在另一边重新装上。务必拧紧螺丝。
将钻头或附件安装到无锁匙夹头中(图
D
)
警告:不要尝试通过握住夹头前端和打开工具来拧紧钻
头(或任何其它配件)。这可能会导致夹头受损和人身伤
害。更换配件时,请始终锁定触发开关并断开工具的电
源连接。
警告:启动工具之前应确保钻头安装稳固。松动的钻头可
能会从工具脱落,从而可能导致人身伤害。
您的工具备有无锁匙夹头
10,带 有 一 个 旋 转 套 管
9,便 于 单 手 操
作夹头。如果要插入钻头或其他配件,请执行下列步骤。
1.
关闭电源并取下电池组。
2.
用一只手抓住夹头的黑色套管,用另一只手固定工具。逆时针
旋转套管以插入所需的配件。
3.
将附件插入夹头约
19
毫米,然后用一只手顺时针旋转夹头,
另一只手则握住工具,将附件转紧。您的工具配备一个自动主
轴锁装置。凭借此装置,您只需一只手即可打开和关闭夹头。
请确保在拧紧夹头时用一只手握住夹头套管,用另一只手握住工
具 ,以 获 得 最 大 的 紧 密 性 。
若要松开附件,请重复上述步骤
1
和
2
。
转 速 选 择( 图
A
)
该工具有两种速度设置,可用于不同作业场景。
注:工具运行时切勿更改速度。在更改速度之前,务必等待工具
完全停止。
1.
若要选择速度
1
(高扭矩设置),请关闭工具并让它停止转动。
向后滑动转速选择器
7
(远离夹头)
。
2.
若要选择速度
2
(高速设置),请关闭工具并让它停止转动。向前
滑动转速选择器
7
(滑向夹头)
。
如果工具没有改变速度,请确认转速选择开关完全啮合在前进或
后退位置。
ページが読み込まれています...
ページが読み込まれています...
ページが読み込まれています...
ページが読み込まれています...
ページが読み込まれています...
ページが読み込まれています...
ページが読み込まれています...
ページが読み込まれています...
ページが読み込まれています...
ページが読み込まれています...
ページが読み込まれています...
ページが読み込まれています...
ページが読み込まれています...
ページが読み込まれています...
ページが読み込まれています...
ページが読み込まれています...
ページが読み込まれています...
ページが読み込まれています...
ページが読み込まれています...
ページが読み込まれています...
ページが読み込まれています...
ページが読み込まれています...
ページが読み込まれています...
ページが読み込まれています...
ページが読み込まれています...
ページが読み込まれています...
ページが読み込まれています...
ページが読み込まれています...
ページが読み込まれています...
ページが読み込まれています...
ページが読み込まれています...
ページが読み込まれています...
-
 1
1
-
 2
2
-
 3
3
-
 4
4
-
 5
5
-
 6
6
-
 7
7
-
 8
8
-
 9
9
-
 10
10
-
 11
11
-
 12
12
-
 13
13
-
 14
14
-
 15
15
-
 16
16
-
 17
17
-
 18
18
-
 19
19
-
 20
20
-
 21
21
-
 22
22
-
 23
23
-
 24
24
-
 25
25
-
 26
26
-
 27
27
-
 28
28
-
 29
29
-
 30
30
-
 31
31
-
 32
32
-
 33
33
-
 34
34
-
 35
35
-
 36
36
-
 37
37
-
 38
38
-
 39
39
-
 40
40
-
 41
41
-
 42
42
-
 43
43
-
 44
44
-
 45
45
-
 46
46
-
 47
47
-
 48
48
-
 49
49
-
 50
50
-
 51
51
-
 52
52


