
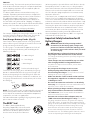
DCE511

ENGLISH
English 1
繁體中文 11

ENGLISH
1
Definitions: Safety Alert Symbols and Words
This instruction manual uses the following safety alert symbols and words to alert you to hazardous situations and your risk
of personal injury or property damage.
DANGER: Indicates an imminently hazardous situation which, if not avoided, will result in death or seriousinjury.
WARNING: Indicates a potentially hazardous situation which, if not avoided, could result in death or seriousinjury.
CAUTION: Indicates a potentially hazardous situation which, if not avoided, may result in minor or moderateinjury.
(Used without word) Indicates a safety related message.
NOTICE: Indicates a practice not related to personal injury which, if not avoided, may result in propertydamage.
WARNING! Read all safety warnings and all
instructions. Failure to follow the warnings and
instructions may result in electric shock, fire and/or
seriousinjury.
WARNING: To reduce the risk of injury, read the
instructionmanual.
If you have any questions or comments about this or
any DeWALT tool, call us toll free at: 02-29994633.
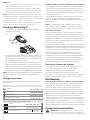
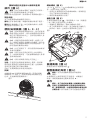
1
Control knob
2
Battery nook
3
AC plug
4
Top handle
5
Hanging hooks
Fig. A
1
2
3
4
5

ENGLISH
2
Important Safety Instructions
WARNING! When using the jobsite
fan, basic precautions should always be followed,
including the following:
a ) Read all the instructions before using the jobsitefan.
b ) To reduce the risk of injury, close supervision is
necessary when a jobsite fan is used nearchildren.
c ) Turn the jobsite fan off, disconnect from power source
and remove the battery packs when not in use and
before servicing orcleaning.
d ) Do not operate any jobsite fan after it
malfunctions or is dropped or damaged in any
manner. Turn the jobsite fan off, disconnect
from power source and remove the battery
pack. Return jobsite fan to the nearest authorized
service facility for examination, repair, or electrical or
mechanicaladjustment.
e ) To reduce the risk of electrical shock, do not put
jobsite fan in water or other liquid. Do not place
or store jobsite fan where it can fall or be pulled into
a tub orsink.
f ) Only use attachments recommended or sold by
themanufacturer.
NOTE: This jobsite fan has a rating of IP54 which
means it has some level of protection from dust and
water ingress. Refer to IEC60529 IP54 for the specific
meaning of this rating. The battery does not have an IP
rating on its own. Do not submerge jobsite fan or battery
inliquid.
SAVE THESE INSTRUCTIONS
Specific Safety Rules for Jobsite Fans
WARNING: Fire hazard. Do not operate jobsite fan
or charger near flammable liquids or in gaseous or
explosive atmospheres. Internal sparks may ignite
fumes causing personalinjury.
• Do not wash jobsite fan with water or allow water to get
inside the fan. Do not submerge jobsite fan in water at
anytime.
• While jobsite fan is in use, do not cover with cloth or other
flammable materials due to increased risk offire.
• The jobsite fan is intended for commercial and household
use.
• Store the jobsite fan indoors when not inuse.
• Make sure extension cord is located so that it will not
be stepped on, tripped over, or otherwise subjected to
damage orstress.
• Use only a proper extension cord that is necessary to
operate the jobsite fan on AC power. Use of an improper
extension cord could result in risk of fire, electric shock,
orelectrocution.
• Disconnect the jobsite fan from the outlet before
attempting any cleaning. This will reduce the risk of
electric shock. Removing the battery pack will not reduce
thisrisk.
• The jobsite fan is designed to operate on 110 Volts, 60
Hz AC or on direct current (DC) through fully charged
DeWALT 20V Max* lithium-ion battery packs. Do not use
any othervoltage.
WARNING: Do not use the fan with any solid-
state speed controldevice.
• Use type BSMI cord when operating the jobsite fan on
ACpower.
CAUTION: When not in use, place jobsite fan
on its back on a stable surface where it will not
cause a tripping or falling hazard. Some tools with
large battery packs will stand upright on the battery
pack but may be easily knockedover.
Additional Safety Information
WARNING: ALWAYS use safety glasses. Everyday
eyeglasses are NOT safety glasses. Also use face or
dust mask if cutting operation is dusty. ALWAYS WEAR
CERTIFIED SAFETYEQUIPMENT:
• ANSI Z87.1 eye protection (CAN/CSA Z94.3),
• ANSI S12.6 (S3.19) hearing protection,
• NIOSH/OSHA/MSHA respiratoryprotection.
WARNING: Some dust created by power sanding,
sawing, grinding, drilling, and other construction
activities contains chemicals known to the State
of California to cause cancer, birth defects or
other reproductive harm. Some examples of these
chemicalsare:
• lead from lead-based paints,
• crystalline silica from bricks and cement and other
masonry products, and
• arsenic and chromium from chemically-
treatedlumber.
Your risk from these exposures varies, depending on how
often you do this type of work. To reduce your exposure to
these chemicals: work in a well ventilated area, and work with
approved safety equipment, such as those dust masks that are
specially designed to filter out microscopicparticles.
• Avoid prolonged contact with dust from power
sanding, sawing, grinding, drilling, and other
construction activities. Wear protective clothing and
wash exposed areas with soap and water. Allowing
dust to get into your mouth, eyes, or lay on the skin may
promote absorption of harmfulchemicals.
WARNING: Use of this tool can generate and/
or disperse dust, which may cause serious and
permanent respiratory or other injury. Always use
NIOSH/OSHA approved respiratory protection
appropriate for the dust exposure. Direct particles
away from face andbody.
• Air vents often cover moving parts and should be
avoided. Loose clothes, jewelry or long hair can be
caught in movingparts.
The label on your fan may include the following symbols. The
symbols and their definitions are asfollows:
V ......................... volts
Hz .......................hertz
min ..................... minutes
or DC ......direct current

ENGLISH
3
...................... Class I Construction
(grounded)
…/min ..............per minute
BPM .................... beats per minute
IPM ..................... impacts per minute
RPM .................... revolutions per
minute
sfpm ................... surface feet per
minute
SPM .................... strokes per minute
A ......................... amperes
W ........................watts
or AC ...........alternating current
or AC/DC .... alternating or
direct current
...................... Class II
Construction
(double insulated)
n
o
.......................no load speed
n .........................rated speed
......................earthing terminal
.....................safety alert symbol
.....................visible radiation
..................... wear respiratory
protection
..................... wear eye
protection
..................... wear hearing
protection
..................... read all
documentation
BATTERIES AND CHARGERS
The battery pack is not fully charged out of the carton.
Before using the battery pack and charger, read the
safety instructions below and then follow charging
proceduresoutlined. When ordering replacement battery
packs, be sure to include the catalog number andvoltage.
Your tool uses a DeWALT charger. Be sure to read all safety
instructions before using your charger. Consult the chart
at the end of this manual for compatibility of chargers and
batterypacks.
READ ALL INSTRUCTIONS
Important Safety Instructions for All
Battery Packs
WARNING: Read all safety warnings and all
instructions for the battery pack, charger and
power tool. Failure to follow the warnings and
instructions may result in electric shock, fire and/
or seriousinjury.
• Do not charge or use the battery pack in explosive
atmospheres, such as in the presence of flammable
liquids, gases or dust. Inserting or removing the battery
pack from the charger may ignite the dust orfumes.
• NEVER force the battery pack into the charger. DO
NOT modify the battery pack in any way to fit into
a non-compatible charger as battery pack may
rupture causing serious personal injury. Consult
the chart at the end of this manual for compatibility of
batteries andchargers.
• Charge the battery packs only in designated
DeWALTchargers.
• DO NOT splash or immerse in water or otherliquids.
• Do not store or use the tool and battery pack in
locations where the temperature may reach or
exceed 104°F (40°C) (such as outside sheds or metal
buildings in summer). For best life store battery packs in
a cool, drylocation.
NOTE: Do not store the battery packs in a tool with
the trigger switch locked on. Never tape the trigger
switch in the ONposition.
• Do not incinerate the battery pack even if it is
severely damaged or is completely worn out. The
battery pack can explode in a fire. Toxic fumes and
materials are created when lithium ion battery packs
areburned.
• If battery contents come into contact with the skin,
immediately wash area with mild soap and water. If
battery liquid gets into the eye, rinse water over the open
eye for 15 minutes or until irritation ceases. If medical
attention is needed, the battery electrolyte is composed of
a mixture of liquid organic carbonates and lithiumsalts.
• Contents of opened battery cells may cause
respiratory irritation. Provide fresh air. If symptoms
persist, seek medicalattention.
WARNING: Burn hazard. Battery liquid may be
flammable if exposed to spark orflame.
WARNING: Fire hazard. Never attempt to open the
battery pack for any reason. If the battery pack case
is cracked or damaged, do not insert into the charger.
Do not crush, drop or damage the battery pack. Do
not use a battery pack or charger that has received a
sharp blow, been dropped, run over or damaged in
any way (e.g., pierced with a nail, hit with a hammer,
stepped on). Damaged battery packs should be
returned to the service center forrecycling.
Transportation
WARNING: Fire hazard. Do not store or carry the
battery pack so that metal objects can contact
exposed battery terminals. For example, do
not place the battery pack in aprons, pockets, tool
boxes, product kit boxes, drawers, etc., with loose
nails, screws, keys, etc. Transporting batteries
can possibly cause fires if the battery terminals
inadvertently come in contact with conductive
materials such as keys, coins, hand tools and the
like. The US Department of Transportation Hazardous
Material Regulations (HMR) actually prohibit
transporting batteries in commerce or on airplanes in
carry-on baggage UNLESS they are properly protected
from short circuits. So when transporting individual
battery packs, make sure that the battery terminals
are protected and well insulated from materials that
could contact them and cause a shortcircuit.
Shipping the DeWALT FLEXVOLT™ Battery
The DeWALT FLEXVOLT™ battery has two modes: Use and
Shipping.
Use Mode: When the FLEXVOLT™ battery stands alone or is
in a DeWALT 20V Max* product, it will operate as a 20V Max*
battery. When the FLEXVOLT™ battery is in a 60V Max* or a
120V Max* (two 60V Max* batteries) product, it will operate
as a 60V Max* battery.
Shipping Mode: When the cap is attached to the
FLEXVOLT™ battery, the battery is in Shipping Mode.
Strings of cells are electrically disconnected within the pack
resulting in three batteries
with a lower Watt hour
(Wh) rating as compared to
one battery with a higher

ENGLISH
4
Watt hour rating. This increased quantity of three batteries
with the lower Watt hour rating can exempt the pack from
certain shipping regulations that are imposed upon the
higher Watt hourbatteries.
The battery label indicates two Watt hour ratings (see
example). Depending on how the battery is shipped, the
appropriate Watt hour rating must be used to determine
the applicable shipping requirements. If utilizing the
shipping cap, the pack will be considered 3 batteries at
the Watt hour rating indicated for “Shipping”. If shipping
without the cap or in a tool, the pack will be considered one
battery at the Watt hour rating indicated next to “Use”.
USE: 120 Wh Shipping: 3 x 40 Wh
Example of Use and Shipping Label Marking
For example, Shipping Wh rating might indicate 3 x 40 Wh,
meaning 3 batteries of 40 Watt hours each. The Use Wh
rating might indicate 120 Wh (1 battery implied).
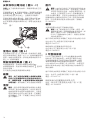
Fuel Gauge Battery Packs (Fig. B)
Some DeWALT battery packs include a fuel gauge which
consists of three green LED lights that indicate the level of
charge remaining in the batterypack.
The fuel gauge is an indication of approximate levels of
charge remaining in the battery pack according to the
followingindicators:
75–100% charged
51–74% charged
< 50% charged
Pack needs to be charged
To actuate the fuel gauge, press and hold the fuel gauge
button. A combination of the three green LED lights will
illuminate designating the level of charge left. When the
level of charge in the battery is below the usable limit, the
fuel gauge will not illuminate and the battery will need to
berecharged.
Fig. B
NOTE: The fuel gauge is only an indication of the charge left
on the battery pack. It does not indicate tool functionality
and is subject to variation based on product components,
temperature and end-userapplication.
For more information regarding fuel gauge battery packs,
please contact call 02-29994633.
The RBRC® Seal
The RBRC® (Rechargeable Battery
Recycling Corporation) Seal on the nickel
cadmium, nickel metal hydride or lithium-
ion batteries (or battery packs) indicates
that the costs to recycle these batteries
(or battery packs) at the end of their useful life have already
been paid by DeWALT. In some areas, it is illegal to place
spent nickel cadmium, nickel metal hydride or lithium-ion
batteries in the trash or municipal solid waste stream and
the Call2Recycle® program provides an environmentally
consciousalternative.
Call 2 Recycle, Inc., in cooperation with DeWALT and other
battery users, has established the program in the United
States and Canada to facilitate the collection of spent nickel
cadmium, nickel metal hydride or lithium-ion batteries. Help
protect our environment and conserve natural resources by
returning the spent nickel cadmium, nickel metal hydride
or lithium-ion batteries to an authorized DeWALT service
center or to your local retailer for recycling. You may also
contact your local recycling center for information on
where to drop off the spent battery. RBRC® is a registered
trademark of Call 2 Recycle,Inc.
Important Safety Instructions for All
Battery Chargers
WARNING: Read all safety warnings and all
instructions for the battery pack, charger and
power tool. Failure to follow the warnings and
instructions may result in electric shock, fire and/
or seriousinjury.
• DO NOT attempt to charge the battery pack with
any chargers other than the ones in this manual.
The charger and battery pack are specifically designed to
worktogether.
• These chargers are not intended for any uses other
than charging DeWALT rechargeable batteries.
Any other uses may result in risk of fire, electric shock
orelectrocution.
• Do not expose the charger to rain orsnow.
• Pull by the plug rather than the cord when
disconnecting the charger. This will reduce the risk of
damage to the electric plug andcord.
• Make sure that the cord is located so that it will not
be stepped on, tripped over or otherwise subjected
to damage orstress.
• Do not use an extension cord unless it is absolutely
necessary. Use of improper extension cord could result in
risk of fire, electric shock orelectrocution.
• When operating a charger outdoors, always provide
a dry location and use an extension cord suitable
for outdoor use. Use of a cord suitable for outdoor use
reduces the risk of electricshock.
• An extension cord must have adequate wire size
(AWG or American Wire Gauge) for safety. The smaller
the gauge number of the wire, the greater the capacity
of the cable, that is, 16 gauge has more capacity than 18
gauge. An undersized cord will cause a drop in line voltage
resulting in loss of power and overheating. When using
more than one extension to make up the total length,
be sure each individual extension contains at least the
minimum wire size. The following table shows the correct
size to use depending on cord length and nameplate

ENGLISH
5
ampere rating. If in doubt, use the next heavier gauge. The
lower the gauge number, the heavier thecord.
Minimum Gauge for Cord Sets
Volts
Total Length of Cord in Feet
(meters)
110 V 25 (7.6) 50 (15.2) 100 (30.5) 150 (45.7)
240 V 50 (15.2) 100 (30.5) 200 (61.0) 300 (91.4)
Ampere Rating
American Wire Gauge
More
Than
Not
More
Than
0 6 18 16 16 14
6 10 18 16 14 12
10 12 16 16 14 12
12 16 14 12 Not Recommended
• Do not place any object on top of the charger or
place the charger on a soft surface that might block
the ventilation slots and result in excessive internal
heat. Place the charger in a position away from any heat
source. The charger is ventilated through slots in the top
and the bottom of thehousing.
• Do not operate the charger with a damaged cord
orplug.
• Do not operate the charger if it has received a sharp
blow, been dropped or otherwise damaged in any
way. Take it to an authorized servicecenter.
• Do not disassemble the charger; take it to an
authorized service center when service or repair
is required. Incorrect reassembly may result in a risk of
electric shock, electrocution orfire.
• Disconnect the charger from the outlet before
attempting any cleaning. This will reduce the risk of
electric shock. Removing the battery pack will not reduce
thisrisk.
• NEVER attempt to connect 2 chargerstogether.
• The charger is designed to operate on standard
110V household electrical power. Do not attempt to
use it on any other voltage. This does not apply to the
vehicularcharger.
WARNING: Shock hazard. Do not allow any liquid to
get inside the charger. Electric shock mayresult.
WARNING: Burn hazard. Do not submerge the
battery pack in any liquid or allow any liquid to
enter the battery pack. Never attempt to open the
battery pack for any reason. If the plastic housing of
the battery pack breaks or cracks, return to a service
center forrecycling.
CAUTION: Burn hazard. To reduce the risk of injury,
charge only DeWALT rechargeable battery packs.
Other types of batteries may overheat and burst
resulting in personal injury and propertydamage.
NOTICE: Under certain conditions, with the charger
plugged into the power supply, the charger can
be shorted by foreign material. Foreign materials
of a conductive nature, such as, but not limited to,
grinding dust, metal chips, steel wool, aluminum
foil or any buildup of metallic particles should be
kept away from the charger cavities. Always unplug
the charger from the power supply when there is no
battery pack in the cavity. Unplug the charger before
attempting toclean.
Wireless Certifications and Safety
Information
• This device is CAN ICES-3(B)/NMB-3(B)compliant.
• This device complies with Part 15 of the FCC rules and
Industry Canada License-exempt RSS standard(s).
Operation is subject to the following two conditions:
ʵ This device may not cause harmful interference, and
ʵ This device must accept any interference
received, including interference that may cause
undesiredoperation.
This equipment has been tested and found to comply
with the limits for a Class B digital device, pursuant to Part
15 of the FCC Rules. These limits are designed to provide
reasonable protection against harmful interference in a
residential installation. This equipment generates, uses and
can radiate radio frequency energy and, if not installed and
used in accordance with the instructions, may cause harmful
interference to radio communications. However, there is no
guarantee that interference will not occur in a particular
installation. If this equipment does cause harmful interference
to radio or television reception, which can be determined by
turning the equipment off and on, the user is encouraged
to try to correct the interference by one or more of the
followingmeasures:
ʵ Reorient or relocate the receivingantenna.
ʵ Increase the separation between the equipment
andadaptor.
ʵ Connect the equipment into an outlet on a circuit
different from that to which the adaptor isconnected.
ʵ Consult the dealer or an experienced radio/TV
technician forhelp.
• Changes or modifications to this equipment not expressly
approved by the manufacturer could void the user’s
authority to operate the device. This Class B digital
apparatus complies with Canadian ICES-003.
• Under Industry Canada regulations, this radio transmitter
may only operate using an antenna of a type and
maximum (or lesser) gain approved for the transmitter by
Industry Canada. To reduce potential radio interference
to other users, the antenna type and its gain should
be so chosen that the equivalent isotropically radiated
power (e.i.r.p.) is not more than that necessary for
successfulcommunication.
• To comply with FCC and Industry Canada RF radiation
exposure limits for general population, the antenna used
for this device must not be co-located or operating in
conjunction with any other antenna ortransmitter.
For Bluetooth® Products
• When traveling on airlines, be sure to comply with the
airline restrictions on usage of personal electronic devices
and Bluetooth®.
• The out of range alert feature has been designed to act
as an aid to warn against products getting misplaced or
stolen. It is not a securitysystem.

ENGLISH
6
• The connectivity range is up to 100 feet (30.5 meters)
depending on environment andlocation.
• The shortwave radio frequency signals of a Bluetooth®
device may impair the operation of other electronic and
medical devices (such as pacemakers or hearing aids).
NOTE: The Bluetooth® word mark and logos are registered
trademarks owned by the Bluetooth®, SIG, Inc. and any use of
such marks by DeWALT is under license. Other trademarks and
trade names are those of their respectiveowners.
This product complies with these standards when operated
with a 6 foot (1.8 meter) or shorter extensioncord.
Charging a Battery (Fig. C)
1. Plug the charger into an appropriate outlet before
inserting batterypack.
6
7
Fig. C
2. Insert the battery pack
6
into the charger, making sure
the battery pack is fully seated in the charger. The red
(charging) light will blink continuously indicating that
the charging process hasstarted.
3. The completion of charge will be indicated by the red
light remaining ON continuously. The battery pack is
fully charged and may be used at this time or left in the
charger. To remove the battery pack from the charger,
push the battery release button
7
on the batterypack.
NOTE: To ensure maximum performance and life of lithium-
ion battery packs, charge the battery pack fully before
firstuse.
Charger Operation
Refer to the indicators below for the charge status of the
batterypack.
DCB101
Charging
Fully Charged
Hot/Cold Pack Delay
Problem Pack or Charger
DCB107, DCB112, DCB113, DCB115, DCB118, DCB132
Charging
Fully Charged
Hot/Cold Pack Delay*
* DCB107, DCB112, DCB113, DCB115, DCB118, DCB132:
The red light will continue to blink, but a yellow indicator
light will be illuminated during this operation. Once the
battery pack has reached an appropriate temperature, the
yellow light will turn off and the charger will resume the
chargingprocedure.
The compatible charger(s) will not charge a faulty battery
pack. The charger will indicate faulty battery pack by
refusing to light or by displaying a problem pack or charger
blinkpattern.
NOTE: This could also mean a problem with acharger.
If the charger indicates a problem, take the charger and
battery pack to be tested at an authorized servicecenter.
Hot/Cold Pack Delay
When the charger detects a battery pack that is too hot
or too cold, it automatically starts a Hot/Cold Pack Delay,
suspending charging until the battery pack has reached an
appropriate temperature. The charger then automatically
switches to the pack charging mode. This feature ensures
maximum battery packlife.
A cold battery pack will charge at a slower rate than a warm
battery pack. The battery pack will charge at that slower rate
throughout the entire charging cycle and will not return to
maximum charge rate even if the battery packwarms.
The DCB118 charger is equipped with an internal fan
designed to cool the battery pack. The fan will turn on
automatically when the battery pack needs to becooled.
Never operate the charger if the fan does not operate
properly or if ventilation slots are blocked. Do not permit
foreign objects to enter the interior of thecharger.
Electronic Protection System
Li-Ion tools are designed with an Electronic Protection
System that will protect the battery pack against
overloading, overheating or deepdischarge.
The tool will automatically turn off if the Electronic
Protection System engages. If this occurs, place the lithium-
ion battery pack on the charger until it is fullycharged.
Wall Mounting
DCB107, DCB112, DCB113, DCB115, DCB118, DCB132
These chargers are designed to be wall mountable or to
sit upright on a table or work surface. If wall mounting,
locate the charger within reach of an electrical outlet,
and away from a corner or other obstructions which may
impede air flow. Use the back of the charger as a template
for the location of the mounting screws on the wall. Mount
the charger securely using drywall screws (purchased
separately) at least 1" (25.4 mm) long, with a screw head
diameter of 0.28–0.35" (7–9mm), screwed into wood to an
optimal depth leaving approximately 7/32" (5.5 mm) of the
screw exposed. Align the slots on the back of the charger
with the exposed screws and fully engage them in theslots.
Charger Cleaning Instructions
WARNING: Shock hazard. Disconnect the charger
from the AC outlet before cleaning. Dirt and grease
may be removed from the exterior of the charger using

ENGLISH
7
a cloth or soft non-metallic brush. Do not use water or
any cleaningsolutions.
Important Charging Notes
1. Longest life and best performance can be obtained if
the battery pack is charged when the air temperature is
between 65°F and 75°F (18° – 24°C). DO NOT charge
the battery pack in an air temperature below +40°F
(+4.5°C), or above +104°F (+40°C). This is important
and will prevent serious damage to the batterypack.
2. The charger and battery pack may become warm to the
touch while charging. This is a normal condition, and
does not indicate a problem. To facilitate the cooling of
the battery pack after use, avoid placing the charger or
battery pack in a warm environment such as in a metal
shed or an uninsulatedtrailer.
3. If the battery pack does not charge properly:
a. Check operation of receptacle by plugging in a lamp
or other appliance;
b. Check to see if receptacle is connected to a light
switch which turns power off when you turn out the
lights;
c. Move the charger and battery pack to a location
where the surrounding air temperature is
approximately 65°F – 75°F (18° – 24°C);
d. If charging problems persist, take the tool, battery
pack and charger to your local servicecenter.
4. The battery pack should be recharged when it fails to
produce sufficient power on jobs which were easily
done previously. DO NOT CONTINUE to use under these
conditions. Follow the charging procedure. You may
also charge a partially used pack whenever you desire
with no adverse effect on the batterypack.
5. Foreign materials of a conductive nature such as, but
not limited to, grinding dust, metal chips, steel wool,
aluminum foil, or any buildup of metallic particles
should be kept away from charger cavities. Always
unplug the charger from the power supply when there
is no battery pack in the cavity. Unplug the charger
before attempting toclean.
6. Do not freeze or immerse the charger in water or any
otherliquid.
Storage Recommendations
1. The best storage place is one that is cool and dry, away
from direct sunlight and excess heat orcold.
2. For long storage, it is recommended to store a fully
charged battery pack in a cool dry place out of the
charger for optimalresults.
NOTE: Battery packs should not be stored completely
depleted of charge. The battery pack will need to be
recharged beforeuse.
SAVE THESE INSTRUCTIONS FOR
FUTURE USE
COMPONENTS FIG. A
WARNING: Never modify the power tool or any part
of it. Damage or personal injury couldresult.
Refer to Figure A at the beginning of this manual for a
complete list ofcomponents.
INTENDED USE
This jobsite fan is designed for professionalapplications.
DO NOT use in presence of flammable liquids, gases
ordust.
DO NOT let children come into contact with the tool.
Supervision is required when inexperienced operators use
thistool.
Suspending/Mounting the Fan (FigA,D,E)
CAUTION: When the fan hangs by the hang hooks, do
not shake the fan or the object from which it hangs. Do
not hang the fan from any electrical wires or anything
that is not secure. Personal injury or property damage
mayoccur.
CAUTION: Only use the hang hooks for hanging
the fan as shown in Fig. D. The hang hooks are not
intended to support additional weight. Do not attach
or hang anything additional to the fan or risk of
breakage may occur.
CAUTION: Do not use the hang hooks to reach with
or to support your weight in anysituation.
CAUTION: Do not stand underneath the fan when it is
mounted overhead. Serious personal injury or damage
to the fan may result if the fanfalls.
CAUTION: Do not mount the fan to theceiling.
NOTE: When using an extension cord to power the fan,
locate the fan within reach of an electrical outlet, and away
from a corner or other obstructions which may impede
airflow.
Your jobsite fan has multiple options formounting.
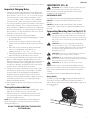
Hang Hooks
The built-in hang hooks
5
telescope out of the back legs
and can be used to suspend the fan from 2X lumber as
shown. Be sure to fully extend the hooks before using, then
rotate asneeded.
Fig. D

ENGLISH
8
Screw Threads (Fig. E)
Screw threads, 1/4"-20
9
and 5/8"-11
8
, are provided on
the bottom of the fan to allow mounting to atripod.
1. Place the fan on the tripod's mounting screw using the
appropriate screw threads on the base of thefan.
2. Rotate the fan clockwise toattach.
Keyhole Slots (Fig. E)
If using the keyhole slots
10
, use at least 2 screws, one on
each side, secured into a sturdy surface.
1. Place the wide portion of the keyhole slot over the head
of thescrew.
2. Slide the jobsite fan down until the screw is inside the
narrow portion of the keyhole and check to be sure the
fan issecure.
Fig. E
8
9
10
10
Carrying the Fan (Fig. A)
Carry the fan using the top handle
4
.
Adjusting the Fan Angle (Fig. A)
WARNING: Keep fingers away from the front and rear
grill of thefan.
This fan has soft detents to maintain multiple angles. To
adjust, gently push or pull the fan handle
4
.
OPERATION
WARNING: To reduce the risk of serious personal
injury, turn unit off, disconnect from power
source and remove the battery packs before
making any adjustments or removing/installing
attachments or accessories. An accidental start-up
can causeinjury.
Installing and Removing the Battery Pack
(Fig. A, F)
NOTE: For best results, make sure your battery pack is
fullycharged.
To install the battery pack
6
into the fan, align the battery
pack with the rails inside the fan's battery nook
2
and slide
it in until the battery pack is firmly seated and ensure that it
does notdisengage.
To remove the battery pack from the fan, press the release
button
7
and firmly pull the battery pack out of the fan's
battery nook. Insert it into the charger as described in the
charger section of thismanual.
Fig. F
7
6
Using the AC Plug (Fig. A)
An extension cord can be plugged into the AC plug
3
then
into a wall outlet to power the fan. Lower the AC plug cover
to use. To keep the plug safe from moisture, remove the
extension cord then close the AC plug cover securely.
Turning the Fan On and Off (Fig. A)
To turn the fan ON, rotate the control knob
1
clockwise.
To turn the fan OFF, rotate the control knob
1
counterclockwise until itclicks.
Fan speeds are variable and can be adjusted by the
controlknob.
MAINTENANCE
WARNING: To reduce the risk of serious personal
injury, turn unit off, disconnect from power
source and remove the battery packs before
making any adjustments or removing/installing
attachments or accessories. An accidental start-up
can causeinjury.
Cleaning
WARNING: Never use solvents or other harsh
chemicals for cleaning the non-metallic parts of
the tool. These chemicals may weaken the plastic
materials used in these parts. Use a cloth dampened
only with water and mild soap. Never let any liquid
get inside the tool; never immerse any part of the tool
into aliquid.
Accessories
WARNING: Since accessories, other than those
offered by DeWALT, have not been tested with this
product, use of such accessories with this tool could be
hazardous. To reduce the risk of injury, only DeWALT
recommended accessories should be used with
thisproduct.
Recommended accessories for use with your tool are
available at extra cost from your local dealer or authorized
service center. If you need assistance in locating any
accessory, please contact 02-29994633.

ENGLISH
9
Repairs
The charger and battery pack are notserviceable.
WARNING: To assure product SAFETY and
RELIABILITY, repairs, maintenance and adjustment
(including brush inspection and replacement, when
applicable) should be performed by a DeWALT factory
service center or a DeWALT authorized service center.
Always use identical replacementparts.
Three Year
DeWALT will repair, without charge, any defects due to
faulty materials or workmanship for three years from the
date of purchase. This warranty does not cover part failure
due to normal wear or tool abuse. For further detail of
warranty coverage and warranty repair information, visit
www.dewalt.com or call 02-29994633.

ENGLISH
10
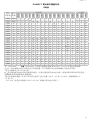
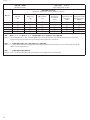
DeWALT BATTERY AND CHARGER SYSTEMS
Chargers
Battery
Cat #
Output
Voltage
110 Volts 12 Volts
DC9000
DC9310
DC9320
DCB095
DCB102
DCB103
DCB107
DCB112
DCB113
DCB114
DCB115
DCB116
DCB118
DCB132
DCB119
DW0249
DCB412
DCB609 20/60 X X X X 135 135 432 270 230 X 135 X 75 270 X X X
DCB606 20/60 X X X X 100 100 272 170 140 X 90 X 60 90 X X X
DCB404 40 X X X X X X X X X 90 X 30 X X X X 130
DCB406 40 X X X X X X X X X 130 X 45 X X X X 190
DCB407 40 X X X X X X X X X 170 X 60 X X X X 235
DC9360 36 45 X X X X X X X X X X X X X X X X
DCB361 36 45 X X X X X X X X X X X X X X X X
DC9280 28 60 X X X X X X X X X X X X X X X X
DW0242 24 X X X X X X X X X X X X X X X 60 X
DCB200 20 X X X X 60 60 140 90 67 X 45 X 45/30** 45 90 X X
DCB201 20 X X X X 30 30 70 45 35 X 22 X 22 22 45 X X
DCB203 20 X X X X 35 35 90 60 45 X 30 X 30 30 60 X X
DCB203BT* 20 X X X X 35 35 90 60 45 X 30 X 30 30 60 X X
DCB204 20 X X X X 70 70 185 120 90 X 60 X 60/40** 60 120 X X
DCB204BT* 20 X X X X 70 70 185 120 90 X 60 X 60 60 120 X X
DCB205 20 X X X X 95 95 240 150 112 X 75 X 75/47** 75 150 X X
DCB206 20 X X X X 100 100 272 170 140 X 90 X 60 90 X X X
DCB207 20 X X X X 30 30 60 40 30 X 22 X 22 22 X X X
DC9182 18 X 40 40 X X 40 X X X X X X X X X 40 X
DCB120 12 X X X X 30 30 60 45 35 X 20 X X X 45 X X
DCB127 12 X X X X 35 35 90 60 50 X 30 X X X 60 X X
DCB080 8 X X X 60 X X X X X X X X X X X X X
*BT - Bluetooth® NOTE: The Bluetooth® word mark and logos are registered trademarks owned by the Bluetooth®,
SIG, Inc. and any use of such marks by DeWALT is under license. Other trademarks and trade names are those of their
respective owners.
**Battery Datecode 201536 or later.
“X” Indicates that the battery pack is not compatible with that specific charger. All charge times are approximate. Actual
charge time may vary. Read the instruction manual for more specific information.
* Maximum initial battery voltage (measured without a workload) is 20, 60 or 120 volts. Nominal voltage is 18, 54 or108.
(120V Max* is based on using 2 DeWALT 60V Max* lithium-ion batteries combined.)
.

11
繁體中文
警告! 請閱讀所有安全警告及所有指示。
不遵循這些警告及說明可能會導致觸電、
火災及/或嚴重傷害。
警告:為了降低受傷的風險,必須仔細閱
讀使用手冊。
若對本工具或任何 DeWALT 工具有疑問或意見,
請隨時透過以下免費電話聯絡我們:
台灣總經銷商-永安實業 02-29994633
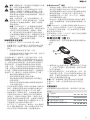
1
控制旋鈕
2
電池槽
3
AC插頭
4
頂部手柄
5
掛鉤
圖A
1
2
3
4
5
Definitions: Safety Alert Symbols and Words
This instruction manual uses the following safety alert symbols and words to alert you to hazardous situations and your risk
of personal injury or property damage.
DANGER: Indicates an imminently hazardous situation which, if not avoided, will result in death or seriousinjury.
WARNING: Indicates a potentially hazardous situation which, if not avoided, could result in death or seriousinjury.
CAUTION: Indicates a potentially hazardous situation which, if not avoided, may result in minor or moderateinjury.
(Used without word) Indicates a safety related message.
NOTICE: Indicates a practice not related to personal injury which, if not avoided, may result in propertydamage.
定義:安全警示符號與用詞
本使用手冊使用以下安全警示符號與用詞,讓您注意危險狀況以及人身傷害或財產損失的風險。
危險:表示緊急危險狀況,若未能避免,將導致死亡或嚴重傷害。
警告:表示潛在危險情況,若未能避免,可能導致死亡或嚴重傷害。
小心:表示潛在危險情況,若未能避免,可能導致輕微或中度傷害。
(
使用時沒有詞
)
表示安全相關訊息。
注意:表示一種非人身傷害的行為,若未能避免,可能導致財產損失。

12
繁體中文
重要安全指示
警告!
使用工地電風扇時,
應始終遵循包括以下的基本預防措施:
a )
使用工地電風扇前請閱讀所有指示。
b )
為了降低受傷的風險,在兒童附近使用工地
電風扇時,有必要進行密切監督。
c )
在不使用工地電風扇及進行維修或清潔之
前,請關閉裝置、中斷其與電源的連接及移
除電池組。
d )
如果工地電風扇發生故障、墜落或出現
其他損壞情況,請勿操作裝置。請關閉工
地電風扇、中斷其與電源的連接及移除電
池組。請將工地電風扇送回最接近您的授
權維修中心,以便進行檢查、維修或電氣
或機械調整。
e )
為降低觸電風險,請勿將工地電風扇浸在
水中或任何其他液體中。請勿將工地電風
扇放置或儲存在可能會掉落或拉進浴盆或
水槽的地方。
f )
請僅使用製造商推薦或銷售的附件。
注意:本工地電風扇達到
IP54
評級,代表在某
種程度上可以抗水和防塵。有關該評級的具體
含義,請參閱
IEC60529
IP54
。電池沒有特定的
IP
評級。任何時候都不能將工地電風扇或電池浸
入液體中。
妥善保存這些安全指示
工地電風扇的特殊安全規定
警告:火災危險。請勿在易燃液體附近或
在氣體或易爆環境中使用工地電風扇或充
電器。內部火花可能會引起燃燒,從而導
致人身傷害。
•
請勿用水清洗工地電風扇或讓水進入風扇。
任何時候都請勿將工地電風扇浸入水中。
•
工地電風扇正在運作時,請勿使用布條或其
他易燃物料遮蓋風扇,否則可能會增加火災
危險。
•
工地電風扇僅供商業和家庭使用。
•
不使用時,請將工地電風扇存放在室內。
•
請確保延長電線的位置不會被踐踏、令人
絆倒,或引起其他方式的損壞或受壓。
•
如以
AC
電源操作風扇,請僅使用適當的延長
電線。使用不適當的延長電線會引起火災、觸
電或觸電致死。
•
在清潔之前,請將工地電風扇的插頭從電源插
座上拔掉,這樣可以減低觸電風險。取出電池
組並不能降低該風險。
•
工地電風扇專門設計在
110
伏特、
60
赫茲
AC
或直流電(
DC
)下搭配完全充電的
DeWALT
20V
Max
*
鋰離子電池組進行操作。請勿使用任何
其他電壓。
警告:請勿將風扇與任何固態速度控制裝
置一起使用。
•
如以
AC
電源操作風扇,請使用
BSMI
合格
電線。
小心:不使用工地電風扇時,請將裝置的背
面放在沒有絆倒或墜落危險的穩定表面上。
一些具有大型電池組的工具可以直立但可能
會輕易被撞倒。
附加安全資訊
警告:務必使用護目鏡。常規眼鏡並不具備
護目鏡功能。若切削操作會產生大量灰塵,
還必須使用面罩或防塵面具。務必配戴經認
證的安全裝備:
• ANSI
Z87.1
護目裝備(
CAN
/
CSA
Z94.3
),
• ANSI
S12.6
(
S3.19
)聽力保護裝備,
• NIOSH
/
OSHA
/
MSHA
呼吸保護裝備。
警告:加州認定,電動砂光、切鋸、打磨、
鑽孔以及其他建造活動所產生的一些粉塵
中包含會導致癌症、生育缺陷或其他生殖
傷害的化學物質。這些化學物質的某些範
例包括:
•
來自含鉛油漆的鉛,
•
來自磚石及水泥與其他建工產品的結晶
二氧化矽,以及
•
來自化學處理木材的砷和鉻。
這些暴露產生的風險根據您做這類工作的頻率
而定。為減少您對這些化學物質的接觸:請在通風
性好的區域工作,以及使用經認證的安全設備,
例如經特別設計用於過濾微粒的防塵面具。
•
避免與電動砂光、切鋸、打磨、鑽孔以及其他
建造操作所導致的粉塵長時間接觸。身穿防護
服,用肥皂和水將所接觸到的區域清洗乾淨。
別讓粉塵進入或接觸到您的嘴巴、眼睛或皮
膚!您的身體可能會吸收到有害的化學物質。
警告:使用本工具會產生及/或驅散灰塵,
可能造成嚴重且永久的呼吸或其他傷害。
始終使用
NIOSH
/
OSHA
認可的呼吸保護裝
置,適當保護自己對粉塵的接觸。請將粉塵
引向遠離身體和臉部的方向。
•
通風口通常會蓋住活動部件,應予以避免。
寬鬆衣服、佩飾或長髮可能會捲入活動部件。
您風扇上的標籤可能包含下列符號。符號及其定
義如下:
V ......................... 伏 特
Hz ....................... 赫茲
min ..................... 分鐘
或DC ..... 直流電
....................... I級結構
(接地)
…/min .............. 每分鐘
BPM .................... 每分鐘搏
動次數
IPM ..................... 每分鐘衝
擊次數
RPM .................... 每分鐘轉數
sfpm ................... 每分鐘表
面長度
SPM .................... 每分鐘行程
A ......................... 安培
W ........................ 瓦特
或AC .......... 交流電
或AC/DC ... 交流電
或直流電
....................... II級結構
(雙重絕緣)

13
繁體中文
n
o
....................... 空載轉速
n ........................ 額定速度
...................... 接地終端
..................... 安全警告
符號
..................... 可見輻射
..................... 請佩戴呼吸
保護裝置
..................... 請佩戴護
目鏡
..................... 請佩戴聽力
保護裝置
..................... 請閱讀所有
指示
電池和充電器
包裝內的電池組並未完全充電。在使用電池組和
充電器之前,請先閱讀以下安全指示並遵循所列
的充電程序。購買更換電池組時,務必附上目錄
號和電壓資料。
本工具使用DeWALT充電器。請在使用充電器前
請閱讀所有安全指示。如需瞭解充電器與電池組
的相容性,請查閱本手冊末尾的表。
請閱讀所有指示
所有電池組之重要安全指示
警告:請閱讀電池組、充電器與電動工具
的所有安全警告與所有指示。不遵循這些
警告及說明可能會導致觸電、火災及/或嚴
重傷害。
•
不要在易爆環境,如有易燃液體、氣體或粉塵
的環境中進行充電或使用電池組。將電池組放
進充電器或從充電器中取出電池組可能會點燃
粉塵或氣體。
•
切勿強行將電池組放進充電器。請勿以任何方
式改裝電池組以在不相容的充電器中使用,否
則電池組可能會破裂,導致嚴重人身傷害。如
需瞭解充電器與電池的相容性,請查閱本手冊
末尾的表。
•
請僅使用指定的
DeWALT
充電器為電池充電。
•
請勿將水分或其他液體飛濺到電池組或將電池
組浸沒。
•
請勿在溫度可能達到或超過
104° F (40° C)
的
地方(例如夏季時屋外的棚屋或金屬建築物)
儲存或使用本工具和電池組。為了取得最長
的電池組使用壽命,請將其存放在涼爽乾燥的
地方。
注意:請勿將電池組存放在觸發開關鎖定在開
啟狀態的工具中。切勿捆紮處於開啟狀態的觸
發開關。
•
即使電池組已嚴重損毀或磨損,也請勿焚燒電
池組。電池組可能會在火中爆炸。焚燒鋰離子
電池組時會產生有毒氣體和物料。
•
如果電池液體接觸到皮膚,請立即以中性肥皂
和清水沖洗接觸範圍。若電池液體進入眼睛,
請睜開眼睛,用清水沖洗
15
分鐘或直到不適
感消失為止。如果需要接受治療,電池的電解
質由液化有機碳酸鹽和鋰鹽構成。
•
開啟的電池中的物質可能會導致刺激呼吸道。
請轉移至空氣流通處。如果症狀持續,請尋求
醫療救助。
警告:灼燒危險。電池液如遇到火花或火焰
可能會引起燃燒。
警告:火災危險。不論是因為任何理由,
都不要嘗試打開電池組。如果電池組的外
殼破裂或損毀,請勿將電池組放進充電器。
請勿撞擊、摔落或損毀電池組。請勿使用
受到重擊、墜落或出現其他損壞情況的電
池組或充電器(例如釘子刺穿、以錘子敲
打或踐踏
)
,損毀的電池組應該送回服務中
心進行回收。
運輸
警告:火災危險。請勿在儲存或搬運電
池組時讓金屬物件接觸暴露的電池兩極。
例如,不要將電池組放在帶有鬆動的釘子、
螺絲、鑰匙等的地方(如圍裙、口袋、工具
箱、產品包裝箱、抽屜等)。搬運電池時若
電池兩極意外接觸導電材料(如鑰匙、硬
幣、手持工具等),可能會引起火災。美國
交通部危險品法規(
HMR
)實際上規定除非
已經過適當的短路防護處理,否則禁止運
輸商用電池或在飛機上的隨身行李中運輸
電池。因此運輸個別電池組時,請確保電池
兩級受到保護並與可能接觸兩級並導致短
路的材料隔絕。
運輸 DeWALT FLEXVOLT™ 電池
DeWALTFLEXVOLT™電池有兩種模式:使用與
運輸。
使用模式:若FLEXVOLT™電池單獨使用或在
DeWALT20VMax
*
產品中使用時,將作為20V
Max
*
電池運作。若FLEXVOLT™電池在60VMax
*
或120VMax
*
(兩個60VMax
*
電池)產品中使
用,將作為60VMax
*
電池運作。
運輸模式:將護蓋連接至FLEXVOLT™電池時,
電池將處於運輸模式。若將電池組內的一連串電
池中斷電氣連接,會導致3個電池各自的瓦時
(Wh)額定值低於1個電池的瓦時額定值。這樣電
池數量雖然增加到3個,但瓦時額定值更低,因
此能避開針對較高瓦時電池的運輸規章。
電池標籤為2瓦時額
定值(請參見範例)。
根據電池的運輸方式,
必須使用適當的瓦時額
定值來確定適用的運
輸要求。如果使用運輸護蓋,電池組將根據「運
輸」模式指定的瓦時額定值視作3個電池。如果
在沒有護蓋或放入工具內的情況下運輸,電池組
將根據「使用」模式旁邊標明的瓦時額定值視作
1個電池。
USE:120 Wh Shipping:3 x 40 Wh
使用與運輸標籤標記的示例
例如,若運輸瓦時額定值為3x40瓦時,表示運
輸3個電池,每個電池的額定值為40瓦時。使用
瓦時額定值可能為120瓦時(表示1個電池)。

14
繁體中文
電量計電池組(圖 B)
一些DeWALT電池組帶有包含三個綠色LED燈的
電量計,可以指示電池組的剩餘電量。
電量計根據下列指示燈指示電池組中剩餘的大約
電量:
75–100%充電電量
51–74%充電電量
<50%充電電量
電池組需要充電
若要啟用電量計,請按下並按住電量計按鈕。
三個綠色LED燈將以組合方式亮起,以指示剩餘
電量。電池電量低於可用限值時,電量計不會
亮起,此時需要對電池充電。
圖B
注意:電量計只指示電池組的剩餘電量。它並不
指示工具功能,且根據工具組件、溫度和最終使
用者的應用而有所不同。
如需有關電量計電池組的詳細資訊,請撥打
02-29994633。
RBRC® 密封件
位於鎳鎘、鎳氫或鋰離子電池
(或電池組)上的RBRC®(美國可
充電電池回收公司)密封件代表
DeWALT已支付這些電池(或電
池組)在使用週期結束時的回收費
用。在某些地區,將已使用過的鎳鎘、鎳氫或鋰
離子電池棄置在垃圾箱或城市固體廢物物流中是
非法行為,Call2Recycle®計劃提供了更加環保的
替代方案。
Call2Recycle,Inc.與DeWALT及其他電池使用者
在美國和加拿大合作建立該計劃,協助收集已使
用過的鎳鎘、鎳氫或鋰離子電池。為保護我們的
環境和自然資源,請將已使用過的鎳鎘、鎳氫或
鋰離子電池送交授權的DeWALT維修中心或您
當地的零售商進行回收。您亦可以與您當地的回
收中心聯絡,以獲知有關已使用過的電池的送交
地點。RBRC®是Call2Recycle,Inc的註冊商標
。
所有電池充電器之重要安全指示
警告:請閱讀電池組、充電器與電動工具
的所有安全警告與所有指示。不遵循這些
警告及說明可能會導致觸電、火災及/或嚴
重傷害。
•
請勿嘗試使用本手冊未提到的充電器為電池組
充電。充電器和電池組是為了一同使用而特別
設計。
•
除了為
DeWALT
可充電電池充電之外,這些充
電器不可以用於其他用途。否則可能會導致火
災、觸電或觸電致死。
•
請勿將充電器暴露在雨或雪中。
•
中斷充電器的電源時,請拔除插頭而非拉扯電
線。這樣會減低電源插頭和電線損壞的風險。
•
請確保電線的位置不會遭踐踏、令人絆倒或容
易受到其他方式的損壞或受壓。
•
除非絕對需要,否則請勿使用延長電線。使用
不適當的延長電線會引起火災、觸電或觸電
致死。
•
若要在戶外使用充電器,請使用適合乾燥場合
和戶外使用的延長電線。使用適合戶外使用的
電線可減少觸電危險。
•
為保安全,延長電線必須具備足夠的導線尺寸
(
AWG
或
BSMI
認證線規
)
。導線的線規數字
越小,電線的承載電流能力越高,即
16
號線
規比
18
號線規的承載電流能力高。若電線的
電阻不夠小,會引起線路電壓下降,進而導
致能量損失與過熱狀況發生。若要使用多於一
條延長電線補足長度,請確保每條延長電線至
少達到最小的導線尺寸。下表展示了要使用的
正確斷面面積大小,該值取決於電線長度與銘
牌上的額定電流值。若有疑問,請使用斷面面
積更大一級的電線。斷面面積越小,電線電阻
越大。
電線的最小規格
伏特
以英呎為單位的電線總長度
(公尺)
110伏特 25(7.6) 50(15.2) 100(30.5)150(45.7)
240伏特 50(15.2) 100(30.5)200(61.0)300(91.4)
額定電流
美國線規
大於 不大於
0 6 18 16 16 14
6 10 18 16 14 12
10 12 16 16 14 12
12 16 14 12
不建議
•
請勿將任何物件放在充電器上面,或是把充電
器放在可能會堵住通風槽的柔軟表面,導致充
電器的內部過熱。請將充電器放到遠離熱源的
位置。充電器透過外殼頂部及底部的槽散熱。
•
請勿操作電線或插頭損壞的充電器。
•
如果充電器受到重擊、墜落或出現其他損壞情
況,請勿使用充電器,並應拿到授權修維修
中心修理。
•
請勿自行拆卸充電器。需要維護或修理時,請
拿到授權服務中心。重新組裝不當可能會導致
觸電、觸電致死或火災。
•
在清潔之前,請將充電器的插頭從電源插座上
拔掉,這樣可以減低觸電風險。拆除電池組並
不能夠降低這種風險。
•
切勿試圖將
2
個充電器連接在一起。
•
本充電器是為標準
110V
家用電源而設計。
請勿試圖使用其他電壓。本規定不適用於車載
充電器。

15
繁體中文
警告:觸電危險。請勿讓任何液體進入充電
器,否則可能會導致觸電。
警告:燒傷危險。請勿將電池組浸入任何
液體中,或讓任何液體進入電池組。不論
是因為任何理由,都不要嘗試打開電池組。
如果電池組的塑膠外殼破損或裂開,請送回
維修中心進行回收。
小心:灼燒危險。為了減低受傷風險,請
僅使用
DeWALT
可再充電的電池組。其他類
型的電池可能會過熱爆裂,導致人身傷害
和財產損失。
注意:在某些情況下,充電器連接到電源
供應器後,會因異物導致短路。導電的異物
(包括但不限於研磨粉塵、金屬屑、鋼絲
絨、鋁箔紙或任何由金屬粒子組成的物件)
必須要遠離充電器的孔隙。充電器裡沒有電
池組時,一定要拔掉充電器的電源。請先拔
掉電源插頭,然後再清潔充電器。
無線認證及安全資訊
•
此裝置符合
CAN
ICES
-
3
(
B
)/
NMB
-
3
(
B
)標準。
•
此裝置符合
FCC
規則第
15
部分和加拿大工業
部免許可
RSS
標準。操作必須符合以下兩個
條件:
ʵ
此裝置不會造成有害干擾,以及
ʵ
此裝置必須接受任何接收到的干擾,包括可
能導致操作不佳的干擾。
此設備根據
FCC
規則第
15
部分進行測試,符合
B
級數位裝置的限制。這些限制旨在為防止住宅
安裝中的有害干擾提供合理的保護。此設備會產
生、使用並放射射頻能量,如果未按照說明進行
安裝和使用,可能會對無線電通訊造成有害的
干擾。但是,不能保證在特定的安裝中不會發生
干擾。如果此設備對無線電或電視接收造成有害
的干擾(可關閉然後開啟設備來確定
)
,建議使用
者採取下列一種或以上的措施來嘗試糾正干擾:
ʵ
重新調整或擺放接收天線。
ʵ
增加設備和配接器之間的距離。
ʵ
將設備連接到與配接器連接的不同電路上
的電源插座。
ʵ
請諮詢代理商或有經驗的無線電/電視技術
人員以獲得協助。
•
若未經製造商明確許可而對本設備執行變更或
改裝,將導致使用者操作本裝置的授權失效。
此
B
級數位裝置符合加拿大
ICES
-
003
標準。
•
根據加拿大工業部的規定,此無線電發射機
只能使用由加拿大工業部批准以及配備最大
(
或較小)增益的天線進行操作。為減少對其
他使用者的潛在無線電干擾,在選擇天線類型
及其增益時,應確保等效全向輻射功率(
e.i.r.p.
)
不超過進行成功通訊所需的功率。
•
為了符合
FCC
和加拿大工業部為一般大眾制定
的
RF
輻射暴露限制,用於此裝置的天線不得
與任何其他天線或發射機一起放置或操作。
針對 Bluetooth
®
產品
•
如果乘坐飛機,請務必遵守航空公司對於使用
個人電子裝置和
Bluetooth®
的限制。
•
超出範圍警報功能設計用於在產品遭誤放或盜
竊時發出警告。該功能不是一個安全系統。
•
連接範圍可達
100
英呎(
30.5
公尺
)
,具體取
決於周圍環境和位置。
• Bluetooth®
裝置的短波射頻訊號可能會干擾其
他電子和醫療裝置(例如起搏器或助聽器)的
運作。
注意:
Bluetooth®
文字標記與標誌是歸
Bluetooth®
,
SIG
,
Inc.
所有的註冊商標,
DeWALT
對此類標記的
任何使用皆已取得授權。其它商標及商品名稱歸
屬於其各自所有者。
使用長度為
6
英呎(
1.8
公尺)或以下的延長電線
時,本產品符合這些標準。
為電池充電(圖 C)
1. 放進電池組前,先將充電器的插頭插到適當的
插座。
6
7
圖C
2. 將電池組
6
放進充電器,確保電池組已完全放
入。紅燈(充電中)會不斷閃爍,這表示充電
程序已經開始。
3. 當紅燈持續亮起時,代表充電完成。此時,電
池組的電力全滿,可以立即使用或是留在充電
器裡。若要從充電器中取出電池組,請按下電
池組上的電池釋放按鈕
7
。
注意:為了確保鋰離子電池組的效能及使用壽
命最大化,在第一次使用電池組之前必須完全
充電。
充電器操作
如需瞭解電池組的充電狀態,請參閱以下指示燈。
DCB101
充電中
已完全充電
電池組熱/冷延遲
電池組或充電器故障

16
繁體中文
DCB107、DCB112、DCB113、DCB115、DCB118、DCB132
充電中
已完全充電
電池組熱/冷延遲
*
*
DCB107、DCB112、DCB113、DCB115、
DCB118、DCB132:紅燈會繼續閃爍,但在執
行此操作期間黃色指示燈將亮起。電池組達到適
當溫度後,黃色指示燈將熄滅,充電器將恢復充
電程序。
相容的充電器不會為有故障的電池組充電。充電
器不亮燈,或者顯示電池組故障或充電器閃爍圖
案,以此表示電池組有故障。
注意:亦有可能是充電器發生故障。
如果充電器指示故障,請將充電器和電池組拿到
授權維修中心進行測試。
電池組熱/冷延遲
當充電器偵測到電池組過熱或過冷,就會自動啟
動電池組熱/冷延遲,在電池組達到適合的溫度之
前暫停充電。然後,充電器會自動轉換到電池組
充電模式。此功能可確保電池組的使用壽命最大化。
冷電池組的充電速度大約是暖電池組的一半。
在整個充電週期,電池組會以較慢的充電速度進
行充電,即使電池組變暖,充電速度亦不會回復
至最大充電速度。
DCB118充電器具有專為冷卻電池組而設計的內部
風扇。在需要冷卻電池組時,風扇會自動開啟。
若風扇運作不正確或通風槽堵塞,請勿操作充電
器。請勿讓異物進入充電器內部。
電子保護系統
鋰離子工具的設計具有電子保護系統,可保護電
池組,避免過載、過熱或深度放電。
如果電子保護系統啟動,本工具會自動關閉。如
果出現此情況,請將鋰離子電池組放進充電器直
到電力全滿。
牆面安裝
DCB107、DCB112、DCB113、DCB115、
DCB118、DCB132
這些充電器經過精心設計,可以安裝在牆面上
或立在桌面或工作表面上。若採用牆面安裝,
請將充電器安裝在電源插座連接範圍內的位置,
並遠離角落或可能阻礙空氣流動的障礙。將充電
器的背面用作在牆面上確定安裝螺絲位置的型
板。使用長度至少1"(25.4mm)、螺頭直徑為
0.28–0.35"(7–9mm)的牆用螺絲(另售)牢固
安裝充電器,旋進木料的最佳深度為螺絲大約有
7/32"(5.5mm)長度露在木料外。將露出的螺絲與
充電器背面的槽對齊,並完全接合到槽中。
充電器清潔指示
警告:觸電危險。在清潔之前,請將充電器
的插頭從電源插座上拔掉。使用軟布或非金
屬軟刷,去除充電器外部的污垢和油脂。請
勿使用水或任何清潔劑。
重要充電說明
1. 在空氣溫度介於65 °F至75 °F(18 °-24 °C)之間
的環境中充電可以達到最長的使用壽命和最佳
的效能。請勿在空氣溫度低於 +40 °F(+4.5 °C)
或高於+104°F(+40 °C)的環境中對電池組
充電。這很重要,可以防止對電池組造成嚴重
損壞。
2. 充電器和電池組在充電時可能會變熱。這是正
常現象,並不代表出現任何問題。使用後,為
了加速電池組冷卻,請不要將充電器或電池組
置於高溫環境中,例如金屬貨棚或非絕緣的
拖車。
3. 如果電池組沒有正常充電:
a. 在插座中插入燈具或其他電器的插頭,以檢
查插座是否運作正常。
b. 檢查插座是否與燈具開關相連接,如果連
接,燈具開關在關閉燈具時會切斷電源。
c. 將充電器和電池組移至空氣溫度約為65 °F-
75 °F(18-24 °C)的環境中。
d. 如果問題仍然存在,請將工具、電池組和充
電器送到當地的維修中心。
4. 當電池組無法像從前一樣為作業輕鬆提供足夠
的電量時,應該對其充電。在此類情況下請勿
繼續使用。請按充電程序進行充電。如有需
要,您還可對已使用部分電量的電池組進行充
電,這對電池組不會有任何不良影響。
5. 導電的異物(包括但不限於研磨粉塵、金屬
屑、鋼絲絨、鋁箔紙或任何由金屬粒子組成的
物件)必須要遠離充電器的孔隙。充電器裡沒
有電池組時,一定要拔掉充電器的電源。請先
拔掉電源插頭,然後再清潔充電器。
6. 請勿冷凍充電器,或將充電器浸在水中或任何
其他液體中。
儲存建議
1. 乾燥、涼爽、太陽不會直接照射、不會過熱或
過冷的地方,就是電池組的最佳存放地點。
2. 欲長期儲存,建議將電力全滿的電池組從充電
器卸下,儲存於涼爽、乾燥處,使電池組效能
達到最佳。
注意:電池組不應在電力耗盡的情況下儲存。
在使用之前,電池組必須再次充電。

17
繁體中文
請保存這些安全指示以備將來查閱
部件(圖 A)
警告:請勿改動本電動工具或其任何部件,
否則可能導致損壞或人身傷害。
如需部件的完整清單,請參閱本手冊開頭的圖A。
設計用途
本工地電風扇為專業應用而設計。
請勿在存有易燃液體、氣體或粉塵的環境下使用。
請勿讓兒童接觸此工具。缺乏經驗的操作人員需
要在監督下使用本工具。
懸掛/安裝風扇(圖 A、D、E)
小心:當風扇透過掛鉤懸吊時,請勿搖晃風
扇或其鉤住的物件。請勿將風扇懸掛在電線
或任何不穩固的物件上,否則可能導致人身
傷害或財產損失。
小心:請僅利用掛鉤懸吊風扇,如圖
D
所
示。掛鉤不能用於支撐額外的重量。請勿在
掛鉤上安裝或懸掛風扇以外的其他物件,否
則可能會有斷裂的風險。
小心:在任何情況下,請勿使用掛鉤伸展或
支撐您的體重。
小心:請勿站在安裝於頭頂上方的風扇之
下。如果風扇掉落,可能會導致嚴重人身傷
害或風扇損壞。
小心:請勿將風扇安裝在天花板上。
注意:若使用延長電線將風扇接上電源,請將風
扇安裝在電源插座連接範圍內的位置,並遠離角
落或可能阻礙空氣流動的障礙。
您的工地電風扇提供多個安裝選項。
掛鉤
內置掛鉤
5
從風扇後腳延伸出來,可用於將風
扇懸掛在2X木材上。使用前請確保將掛鉤完全
拉出,並根據需要旋轉掛鉤。
圖D
螺絲螺紋(圖 E)
1/4"-20
9
和5/8"-11
8
的螺絲螺紋位於風扇底
部,以便安裝在三腳架上。
1. 使用位於風扇底部的合適螺絲螺紋,將風扇固
定在三腳架的安裝螺絲上。
2. 順時針轉動風扇以安裝。
鑰匙孔槽(圖 E)
若要使用鑰匙孔槽
10
,請使用最少2枚(每邊各
一枚)穩定在堅固表面上的螺絲。
1. 將鑰匙孔槽較寬的一側放到螺絲的頂部。
2. 將工地電風扇滑入到底,直至螺絲套入鑰匙孔
較窄的一側內,並檢查以確保風扇已固定。
圖E
8
9
10
10
搬運風扇(圖 A)
請使用頂部手柄搬運風扇
4
。
調整風扇的角度(圖 A)
警告:將手指遠離風扇前面和後面的
護網。
本風扇的定位銷可調整至不同角度。如要進行
調整,請輕輕推動或拉動風扇手柄
4
。
操作
警告:為了減低造成嚴重人身傷害的風險,
在進行任何調整或取出/安裝附件或配件之
前,請關閉裝置、中斷其與電源的連接並取
出電池組。意外啟動工具可能會造成傷害。

18
繁體中文
安裝和取出電池組(圖 A、F)
注意:為了達到最好的效果,請確保電池組已完
全充電。
若要將電池組
6
安裝到風扇中,請將電池組對齊
風扇電池槽
2
內的軌道,將電池組滑入電池槽,
直到電池組固定到位為止,並確保沒有鬆開。
若要從風扇中取出電池組,請按下釋放按鈕
7
,
將電池組從風扇的電池槽中穩妥地拉出。按照
本手冊有關充電器的章節所述,將電池組放進充
電器。
圖F
7
6
使用AC 插頭(圖 A)
延長電線可插入至AC插頭
3
,然後再插入牆壁
插座以將風扇接上電源。拉下AC插頭的護蓋即可
使用。為避免插頭受潮,移除延長電線後請牢牢
蓋上AC插頭的護蓋。
開啟和關閉風扇(圖 A)
如要開啟風扇,請順時針轉動控制旋鈕
1
。
如要關閉風扇,請逆時針轉動控制旋鈕
1
直到其
發出咔嗒聲。
您可使用控制旋鈕調整風扇的風速。
維護
警告:為了減低造成嚴重人身傷害的風險,
在進行任何調整或取出/安裝附件或配件之
前,請關閉裝置、中斷其與電源的連接並取
出電池組。意外啟動工具可能會造成傷害。
清潔
警告:請勿使用溶劑或其他刺激性化學品
來清潔工具的非金屬部件。這些化學品可
能會削弱零件中使用的塑膠材料。只能使
用抹布蘸中性肥皂水進行清潔。不要讓任
何液體進入工具;不要讓工具的任何部分
浸入液體中。
配件
警告:由於非
DeWALT
所提供的配件未在本
產品上進行過使用測試,在本產品上使用這
些附件可能發生危險。為降低傷害危險,在
本產品上只應使用
DeWALT
所推薦的配件。
只需支付額外費用,您就可以通過當地代理商或
授權維修中心獲取能與您的工具一起使用的推薦
配件。若您需要尋找配件方面的協助,請聯絡
02-29994633
維修
充電器和電池組是不可檢修的裝置。
警告:為了確保產品安全可靠,修理、維
護與調整作業(包括碳刷的檢查與更換,如
適用)應由
DeWALT
原廠維修中心或
DeWALT
授權維修中心執行。請務必使用相
同的替換零件。
進口商:新加坡商百得電動工具(股)公司台灣分公司
地址:台北市士林區德行西路33號2樓
電話:02-28341741
總經銷商:永安實業股份有限公司
地址:新北市三重區新北大道二段137號
電話:02-29994633
3 年整機保修
DeWALT會在購買日起3年內免費維修由故障
物料或工序引致的缺陷。本保固不適用於由於
正常磨損或濫用工具所引致的部件故障。如需
有關保固範圍和保固維修的詳細資訊,請造訪
www.dewalt.com或撥打02-29994633。本保固不
適用於配件或由他人進行或嘗試進行的維修所引
致的損壞。
進口商:新加坡商百得電動工具(股)公司台灣分公司
地址:台北市士林區德行西路33號2樓
電話:02-28341741
總經銷商:永安實業股份有限公司
地址:新北市三重區新北大道二段137 號
電話:02-29994633
ページが読み込まれています...
ページが読み込まれています...
ページが読み込まれています...
ページが読み込まれています...
-
 1
1
-
 2
2
-
 3
3
-
 4
4
-
 5
5
-
 6
6
-
 7
7
-
 8
8
-
 9
9
-
 10
10
-
 11
11
-
 12
12
-
 13
13
-
 14
14
-
 15
15
-
 16
16
-
 17
17
-
 18
18
-
 19
19
-
 20
20
-
 21
21
-
 22
22
-
 23
23
-
 24
24


