
final page size: 8.5 x 5.5 in
DCV580

ENGLISH
English 1
繁體中文
10
한국어
18

ENGLISH
1
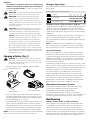
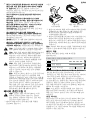
Definitions: Safety Alert Symbols and Words
This instruction manual uses the following safety alert symbols and words to alert you to hazardous situations and your risk of
personal injury or property damage.
DANGER: Indicates an imminently hazardous situation which, if not avoided, will result in death or seriousinjury.
WARNING: Indicates a potentially hazardous situation which, if not avoided, could result in death or seriousinjury.
CAUTION: Indicates a potentially hazardous situation which, if not avoided, may result in minor or moderateinjury.
(Used without word) Indicates a safety related message.
NOTICE: Indicates a practice not related to personal injury which, if not avoided, may result in propertydamage.
WARNING! Read all safety warnings and all
instructions. Failure to follow the warnings and
instructions may result in electric shock, fire and/or
seriousinjury.
WARNING: To reduce the risk of injury, read the
instructionmanual.
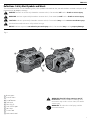
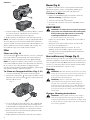
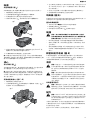
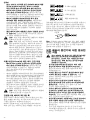
1
Battery port
2
Vacuum hose
3
On/off button
4
Tank latch
5
Filter (Fig.E)
6
Side exhaust port
7
Hose clip
8
Crevice tool
9
Wide nozzle tool
Fig. A
2
6
3
7
1
4
9
8

ENGLISH
2
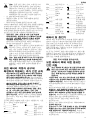
Technical Data
DCV580
Power source DC
Battery voltage V
DC
18/20*
Tank volume l 7.5
Max. airflow l/s 15.9
Hose nozzle diameter mm 32
Weight (without battery pack) kg 4.15
*
Maximum initial battery voltage(measured without a workload) is 20 volts. rated
voltage is 18.
Battery pack DCB140 DCB141 DCB142 DCB143 DCB144 DCB145
Battery type Li-Ion Li-Ion Li-Ion Li-Ion Li-Ion Li-Ion
Voltage V
DC
14.4 14.4 14.4 14.4 14.4 14.4
Capacity Ah 3.0 1.5 4.0 2.0 5.0 1.3
Weight kg 0.53 0.30 0.54 0.30 0.52 0.30
Battery pack DCB180 DCB181 DCB182 DCB183 DCB184 DCB185
Battery type Li-Ion Li-Ion Li-Ion Li-Ion Li-Ion Li-Ion
Voltage V
DC
18 18 18 18 18 18
Capacity Ah 3.0 1.5 4.0 2.0 5.0 1.3
Weight kg 0.64 0.35 0.61 0.40 0.62 0.35
Charger DCB105
Mains voltage V
AC
220-240
Battery type 10.8/14.4/18 Li-Ion
Approx. charging time
of battery packs
min 25 (1.3 Ah) 30 (1.5 Ah) 40 (2.0 Ah)
55 (3.0 Ah) 70 (4.0 Ah) 90 (5.0 Ah)
Weight kg 0.49
Charger DCB107
Mains voltage
V
AC
220-240
Battery type 10.8/14.4/18 Li-Ion
Approx. charging time
of battery packs
min 60 (1.3 Ah) 70 (1.5 Ah) 90 (2.0 Ah)
140 (3.0 Ah) 185 (4.0 Ah) 240 (5.0 Ah)
Weight kg 0.29
Charger DCB112
Mains voltage
V
AC
220-240
Battery type 10.8/14.4/18 Li-Ion
Approx. charging time
of battery packs
min 40 (1.3 Ah) 45 (1.5 Ah) 60 (2.0 Ah)
90 (3.0 Ah) 120 (4.0 Ah) 150 (5.0 Ah)
Weight kg 0.36
Charger DCB115
Mains voltage
V
AC
220-240
Battery type 10.8/14.4/18 Li-Ion
Approx. charging time
of battery packs
min 25 (1.3 Ah) 30 (1.5 Ah) 40 (2.0 Ah)
55 (3.0 Ah) 70 (4.0 Ah) 90 (5.0 Ah)
Weight kg 0.5
Charger DCB118
Mains voltage
V
AC
220-240
Battery type 18/54 Li-Ion
Approx. charging time
of battery packs
min 22 (1.3 Ah) 22 (1.5 Ah) 30 (2.0 Ah)
45 (3.0 Ah) 60 (4.0 Ah) 75 (5.0 Ah)
60 (6.0 Ah)
Weight kg 0.66
Charger DCB132
Mains voltage
V
AC
220-240
Battery type 18/54 Li-Ion
Approx. charging time
of battery packs
min 22 (1.3 Ah) 22 (1.5 Ah) 30 (2.0 Ah)
45 (3.0 Ah) 60 (4.0 Ah) 75 (5.0 Ah)
90 (6.0 Ah 140 (9.0 Ah)
Weight kg 1.2
SAVE THESE INSTRUCTIONS FOR
FUTURE USE
COMPONENTS FIG. A
WARNING: Never modify the power tool or any part
of it. Damage or personal injury couldresult.
Refer to Figure A at the beginning of this manual for a
complete list ofcomponents.
Intended Use
The vacuum is designed to operate on a DeWALT 18V Li-Ion
or a 20V Max* Li-Ion battery pack. The battery pack and
charger are sold separately.
The vacuum is designed to perform as a wet/dry unit with
no component changes required when changing from wet
to dry, or dry to wet pick up. This vacuum is for household
use.
It is recommended that the tank be emptied of any dry
contents prior to being used for wet pick up to facilitate
tank cleaning.
DO NOT use under wet conditions or in presence of
flammable liquids orgases.
DO NOT let children come into contact with the tool.
Supervision is required when inexperienced operators use
thistool.
IMPORTANT SAFETY INSTRUCTIONS
WARNING: When using electric appliances, always
follow basic safety precautions to reduce the risk of
fire, electric shock and personal injury, including the
following:
To Reduce Risk of Injury
• Before any use, be sure everyone using this vacuum
reads and understands all safety instructions and other
information contained in this manual.
• Save these instructions and review frequently prior to use
and in instructing others.

ENGLISH
3
• Instructions for compatible batteries and chargers are
included for reference in this manual. Read all instruction
manuals included with your battery pack or charger.
Read all cautionary markings on the charger and battery
pack. Consult the chart at the end of this manual for
compatibility of chargers and battery packs.
When using this vacuum, basic safety precautions should
always be followed including the following:
READ ALL INSTRUCTIONS BEFORE
USING VACUUM
WARNING: To reduce the risk of electric shock. Do not
expose to rain. Store indoors.
• Do not leave the vacuum when connected to power
source. Remove the battery pack when not in use and
before servicing.
• Do not allow vacuum to be used as a toy. Close attention
is necessary when used by or near children.
• Use this appliance ONLY as described in the manual. Use
only
DeWALT recommended attachments.
• Do not use this appliance if it is showing signs of
malfunction in anyway. If the appliance is not working
correctly, has been dropped, damaged, left outdoors, or
dropped into water, return it to a service center.
• Do not handle the appliance with wet hands.
• Do not put any objects into the openings of the appliance.
Do not use the appliance with any opening blocked; keep
free of dust, lint, hair and anything else that may reduce
air flow.
• Keep hair, loose clothing, fingers, and all body parts away
from the openings and moving parts.
• Do not place outlet of vacuum near eyes or ears when
operating.
• The blower operation can result in foreign objects being
blown into eyes, which can result in eye damage. Always
wear safety goggles when using blower feature.
• Use safety equipment. Always wear eye protection.
Dust mask, non-skid safety shoes, hard hat, or hearing
protection must be used for appropriate conditions.
• Use extra care when cleaning on stairs.
• Do not use without filter in place.
• Do not use the appliance to pick up flammable or
combustible liquids, such as gasoline, or use in areas
where flammable or combustible liquids are present.
• Do not pick up anything that is burning or smoking, such
as cigarettes, matches or hot ashes.
• Do not use in areas where explosive vapors may be
present.
• Do not use to pick up explosive dust, or in areas where
air contains explosive dust such as coal, grain, or other
combustible material.
• Static shocks are possible in dry areas or when the relative
humidity of the air is low. This is only temporary and does
not affect the use of the vacuum. To reduce the frequency
of static shocks, add moisture to the air with a console or
installed humidifier.
• To avoid spontaneous combustion, empty canister after
each use.
• Store idle tools. When not in use, the vacuum should be
stored in a dry, high or locked up place – out of the reach
of children.
• Disconnect the battery pack from the vacuum before
making any adjustments, changing accessories, servicing,
moving or storing the vacuum. Such preventative safety
measures reduce the risk of starting the appliance
accidentally.
• Avoid accidental starting. Be sure the switch is in the off
position before inserting the battery pack.
• Never leave vacuum running unattended. Turn power off.
• Keep your work area clean and well lit. Cluttered benches
and dark areas invite accidents.
• Do not overreach. Keep proper footing and balance at all
times. Proper footing and balance enables better control
of the vacuum in unexpected situations.
• Do not use appliance if switch does not turn it on or off.
Any appliance that cannot be controlled with the switch is
dangerous and must be repaired.
• Turn off all controls before removing the battery pack.
SAVE THESE INSTRUCTIONS
Additional Safety Information
WARNING: When not in use, place vacuum on a
stable surface where it will not cause a tripping
or falling hazard.
• Do not use vacuum as a step ladder.
• Do not place heavy objects on vacuum.
• Air vents often cover moving parts and should be
avoided. Loose clothes, jewelry or long hair can be
caught in moving parts.
WARNING: ALWAYS use safety glasses. Everyday
eyeglasses are NOT safety glasses. Also use face or
dust mask if cutting operation is dusty. ALWAYS WEAR
CERTIFIED SAFETY EQUIPMENT:
• ANSI Z87.1 eye protection (CAN/CSA Z94.3),
• ANSI S12.6 (S3.19) hearing protection,
• NIOSH/OSHA/MSHA respiratory protection.
WARNING: Some dust created by power sanding,
sawing, grinding, drilling, and other construction
activities contains chemicals known to the State
of California to cause cancer, birth defects or other
reproductive harm. Some examples of these chemicals
are:
• lead from lead-based paints,
• crystalline silica from bricks and cement and other
masonry products, and
• arsenic and chromium from chemically-treated lumber.
Your risk from these exposures varies, depending on how
often you do this type of work. To reduce your exposure to
these chemicals: work in a well ventilated area, and work with
approved safety equipment, such as those dust masks that are
specially designed to filter out microscopic particles.

ENGLISH
4
• Avoid prolonged contact with dust from power
sanding, sawing, grinding, drilling, and other
construction activities. Wear protective clothing and
wash exposed areas with soap and water. Allowing
dust to get into your mouth, eyes, or lay on the skin may
promote absorption of harmful chemicals.
WARNING: Use of this tool can generate and/
or disperse dust, which may cause serious and
permanent respiratory or other injury. Always use
NIOSH/OSHA approved respiratory protection
appropriate for the dust exposure. Direct particles
away from face and body.
WARNING: Always wear proper personal hearing
protection that conforms to ANSI S12.6 (S3.19)
during use. Under some conditions and duration of
use, noise from this product may contribute to hearing
loss.
Additional Specific Safety Rules for All
Battery-Operated Tools
• A battery-operated tool with integral batteries or a
separate battery pack must be recharged only with
the specified charger for the battery pack. A charger
that may be suitable for one type of battery pack may
create a risk of fire when used with another battery pack.
• Use battery-operated tool only with the specifically
designed
DeWALT battery pack. Use of any other
batteries may create a risk of fire.
• When battery pack is not in use, keep it away from
other metal objects like: paper clips, coins, keys,
nails, screws, or other small metal objects that can
make a connection from one terminal to another.
Shorting the battery terminals together may cause sparks,
burns, or a fire.
The label on your tool may include the following symbols. The
symbols and their definitions are asfollows:
V ......................... volts
Hz .......................hertz
min ..................... minutes
or DC ......direct current
...................... Class I Construction
(grounded)
…/min ..............per minute
BPM .................... beats per minute
IPM ..................... impacts per minute
RPM .................... revolutions per
minute
sfpm ................... surface feet per
minute
SPM .................... strokes per minute
A ......................... amperes
W ........................watts
or AC ...........alternating current
or AC/DC .... alternating or
direct current
...................... Class II
Construction
(double insulated)
n
o
.......................no load speed
n .........................rated speed
......................earthing terminal
.....................safety alert symbol
.....................visible radiation
..................... wear respiratory
protection
..................... wear eye
protection
..................... wear hearing
protection
..................... read all
documentation
BATTERIES AND CHARGERS
The battery pack is not fully charged out of the carton.
Before using the battery pack and charger, read the
safety instructions below and then follow charging
proceduresoutlined. When ordering replacement battery
packs, be sure to include the catalog number andvoltage.
Your tool uses a
DeWALT charger. Be sure to read all safety
instructions before using your charger. Consult the chart
at the end of this manual for compatibility of chargers and
batterypacks.
READ ALL INSTRUCTIONS
Important Safety Instructions for All
Battery Packs
WARNING: Read all safety warnings and all
instructions for the battery pack, charger and
power tool. Failure to follow the warnings and
instructions may result in electric shock, fire and/
or serious injury.
• Do not charge or use the battery pack in explosive
atmospheres, such as in the presence of flammable
liquids, gases or dust. Inserting or removing the battery
pack from the charger may ignite the dust orfumes.
• NEVER force the battery pack into the charger. DO
NOT modify the battery pack in any way to fit into
a non-compatible charger as battery pack may
rupture causing serious personal injury. Consult
the chart at the end of this manual for compatibility of
batteries andchargers.
• Charge the battery packs only in designated
DeWALTchargers.
• DO NOT splash or immerse in water or otherliquids.
• Do not store or use the tool and battery pack in
locations where the temperature may reach or
exceed 104°F (40°C) (such as outside sheds or metal
buildings in summer). For best life store battery packs in
a cool, drylocation.
NOTE: Do not store the battery packs in a tool with
the trigger switch locked on. Never tape the trigger
switch in the ONposition.
• Do not incinerate the battery pack even if it is
severely damaged or is completely worn out. The
battery pack can explode in a fire. Toxic fumes and
materials are created when lithium ion battery packs
areburned.
• If battery contents come into contact with the skin,
immediately wash area with mild soap and water. If
battery liquid gets into the eye, rinse water over the open
eye for 15 minutes or until irritation ceases. If medical
attention is needed, the battery electrolyte is composed of
a mixture of liquid organic carbonates and lithiumsalts.
• Contents of opened battery cells may cause
respiratory irritation. Provide fresh air. If symptoms
persist, seek medicalattention.
WARNING: Burn hazard. Battery liquid may be
flammable if exposed to spark orflame.

ENGLISH
5
WARNING: Fire hazard. Never attempt to open the
battery pack for any reason. If the battery pack case
is cracked or damaged, do not insert into the charger.
Do not crush, drop or damage the battery pack. Do
not use a battery pack or charger that has received a
sharp blow, been dropped, run over or damaged in
any way (e.g., pierced with a nail, hit with a hammer,
stepped on). Damaged battery packs should be
returned to the service center forrecycling.
Specific Safety instructions for Lithium
Ion (Li-Ion)
• Do not incinerate the battery pack even if it is
severely damaged or is completely worn out. The
battery pack can explode in a fire. Toxic fumes and
materials are created when lithium ion battery packs are
burned.
• If battery contents come into contact with the skin,
immediately wash area with mild soap and water. If
battery liquid gets into the eye, rinse water over the open
eye for
15 minutes or until irritation ceases. If medical attention is
needed, the battery electrolyte is composed of a mixture of
liquid organic carbonates and lithium salts.
• Contents of opened battery cells may cause respiratory
irritation. Provide fresh air. If symptoms persist, seek
medical attention.
WARNING: Burn hazard. Battery liquid may be
flammable if exposed to spark or flame.
Fuel Gauge Battery Packs (Fig. B)
Some DeWALT battery packs include a fuel gauge which
consists of three green LED lights that indicate the level of
charge remaining in the batterypack.
The fuel gauge is an indication of approximate levels of
charge remaining in the battery pack according to the
followingindicators:
75–100% charged
51–74% charged
< 50% charged
Pack needs to be charged
To actuate the fuel gauge, press and hold the fuel gauge
button. A combination of the three green LED lights will
illuminate designating the level of charge left. When the
level of charge in the battery is below the usable limit, the
fuel gauge will not illuminate and the battery will need to
berecharged.
Fig. B
NOTE: The fuel gauge is only an indication of the charge left
on the battery pack. It does not indicate tool functionality
and is subject to variation based on product components,
temperature and end-userapplication.
Important Safety Instructions for All
Battery Chargers
WARNING: Read all safety warnings and all
instructions for the battery pack, charger and
power tool. Failure to follow the warnings and
instructions may result in electric shock, fire and/
or serious injury.
• DO NOT attempt to charge the battery pack with
any chargers other than the ones in this manual.
The charger and battery pack are specifically designed to
worktogether.
• These chargers are not intended for any uses other
than charging
DeWALT rechargeable batteries.
Any other uses may result in risk of fire, electric shock
orelectrocution.
• Do not expose the charger to rain orsnow.
• Pull by the plug rather than the cord when
disconnecting the charger. This will reduce the risk of
damage to the electric plug andcord.
• Make sure that the cord is located so that it will not
be stepped on, tripped over or otherwise subjected
to damage orstress.
• Do not use an extension cord unless it is absolutely
necessary. Use of improper extension cord could result in
risk of fire, electric shock orelectrocution.
• When operating a charger outdoors, always provide
a dry location and use an extension cord suitable
for outdoor use. Use of a cord suitable for outdoor use
reduces the risk of electricshock.
• ampere rating. If in doubt, use the next heavier gauge. The
lower the gauge number, the heavier thecord.
• Do not place any object on top of the charger or
place the charger on a soft surface that might block
the ventilation slots and result in excessive internal
heat. Place the charger in a position away from any heat
source. The charger is ventilated through slots in the top
and the bottom of thehousing.
• Do not operate the charger with a damaged cord
orplug.
• Do not operate the charger if it has received a sharp
blow, been dropped or otherwise damaged in any
way. Take it to an authorized servicecenter.
• Do not disassemble the charger; take it to an
authorized service center when service or repair
is required. Incorrect reassembly may result in a risk of
electric shock, electrocution orfire.
• Disconnect the charger from the outlet before
attempting any cleaning. This will reduce the risk of
electric shock. Removing the battery pack will not reduce
thisrisk.
• NEVER attempt to connect 2 chargerstogether.

ENGLISH
6
• The charger is designed to operate on standard 220-
240V household electrical power. Do not attempt to
use it on any other voltage. This does not apply to the
vehicularcharger.
WARNING: Shock hazard. Do not allow any liquid to
get inside the charger. Electric shock mayresult.
WARNING: Burn hazard. Do not submerge the
battery pack in any liquid or allow any liquid to
enter the battery pack. Never attempt to open the
battery pack for any reason. If the plastic housing of
the battery pack breaks or cracks, return to a service
center for recycling.
CAUTION: Burn hazard. To reduce the risk of injury,
charge only DeWALT rechargeable battery packs.
Other types of batteries may overheat and burst
resulting in personal injury and propertydamage.
NOTICE: Under certain conditions, with the charger
plugged into the power supply, the charger can
be shorted by foreign material. Foreign materials
of a conductive nature, such as, but not limited to,
grinding dust, metal chips, steel wool, aluminum
foil or any buildup of metallic particles should be
kept away from the charger cavities. Always unplug
the charger from the power supply when there is no
battery pack in the cavity. Unplug the charger before
attempting toclean.
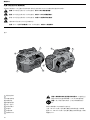
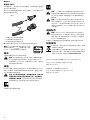
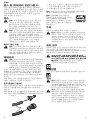
Charging a Battery (Fig. C)
DANGER: Electrocution hazard. 220-240 volts are
present at recessed terminals of the tower port. Do
not probe with conductive objects. Electric shock or
electrocution may result.
1. Plug the charger into an appropriate outlet before
inserting battery pack.
Fig. C
Li-Ion
Tower Battery
Li-Ion Slide Battery
2. Insert the battery pack into the charger, making sure
the battery pack is fully seated in the charger. The red
(charging) light will blink continuously indicating that
the charging process has started.
3. The completion of charge will be indicated by the red
light remaining ON continuously. The battery pack is
fully charged and may be used at this time or left in the
charger. To remove the battery pack from the charger,
push the battery release button on the battery pack.
NOTE: To ensure maximum performance and life of battery
packs, charge the battery pack fully before first use.
Charger Operation
Refer to the indicators below for the charge status of the
battery pack.
DCB107, DCB112, DCB115, DCB118, DCB132
Charging
Fully Charged
Hot/Cold Pack Delay*
* DCB107, DCB112, DCB115, DCB118, DCB132: The red
light will continue to blink, but a yellow indicator light will
be illuminated during this operation. Once the battery
pack has reached an appropriate temperature, the yellow
light will turn off and the charger will resume the charging
procedure.
The compatible charger(s) will not charge a faulty battery
pack. The charger will indicate faulty battery pack by
refusing to light or by displaying a problem pack or charger
blink pattern.
NOTE: This could also mean a problem with a charger.
If the charger indicates a problem, take the charger and
battery pack to be tested at an authorized service center.
Hot/Cold Pack Delay
When the charger detects a battery pack that is too hot
or too cold, it automatically starts a Hot/Cold Pack Delay,
suspending charging until the battery pack has reached an
appropriate temperature. The charger then automatically
switches to the pack charging mode. This feature ensures
maximum battery pack life.
A cold battery pack will charge at a slower rate than a warm
battery pack. The battery pack will charge at that slower rate
throughout the entire charging cycle and will not return to
maximum charge rate even if the battery pack warms.
The DCB118 charger is equipped with an internal fan
designed to cool the battery pack. The fan will turn on
automatically when the battery pack needs to be cooled.
Never operate the charger if the fan does not operate
properly or if ventilation slots are blocked. Do not permit
foreign objects to enter the interior of the charger.
Electronic Protection System
Li-Ion tools are designed with an Electronic Protection
System that will protect the battery pack against
overloading, overheating or deep discharge.
The tool will automatically turn off if the Electronic
Protection System engages. If this occurs, place the lithium-
ion battery pack on the charger until it is fully charged.
Wall Mounting
DCB107, DCB112, DCB115, DCB118, DCB132
These chargers are designed to be wall mountable or to
sit upright on a table or work surface. If wall mounting,
locate the charger within reach of an electrical outlet,
and away from a corner or other obstructions which may
impede air flow. Use the back of the charger as a template
for the location of the mounting screws on the wall. Mount
the charger securely using drywall screws (purchased

ENGLISH
7
separately) at least 1" (25.4 mm) long, with a screw head
diameter of 0.28–0.35" (7–9mm), screwed into wood to an
optimal depth leaving approximately 7/32" (5.5 mm) of the
screw exposed. Align the slots on the back of the charger
with the exposed screws and fully engage them in the slots.
Charger Cleaning Instructions
WARNING: Shock hazard. Disconnect the charger
from the AC outlet before cleaning. Dirt and grease
may be removed from the exterior of the charger using
a cloth or soft non-metallic brush. Do not use water or
any cleaning solutions.
Important Charging Notes
1. Longest life and best performance can be obtained if
the battery pack is charged when the air temperature is
between 65°F and 75°F (18° – 24°C). DO NOT charge
the battery pack in an air temperature below +40°F
(+4.5°C), or above +104°F (+40°C). This is important
and will prevent serious damage to the battery pack.
2. The charger and battery pack may become warm to the
touch while charging. This is a normal condition, and
does not indicate a problem. To facilitate the cooling of
the battery pack after use, avoid placing the charger or
battery pack in a warm environment such as in a metal
shed or an uninsulated trailer.
3. If the battery pack does not charge properly:
a. Check operation of receptacle by plugging in a lamp
or other appliance;
b. Check to see if receptacle is connected to a light
switch which turns power off when you turn out the
lights;
c. Move the charger and battery pack to a location
where the surrounding air temperature is
approximately 65°F – 75°F (18° – 24°C);
d. If charging problems persist, take the tool, battery
pack and charger to your local service center.
4. The battery pack should be recharged when it fails to
produce sufficient power on jobs which were easily
done previously. DO NOT CONTINUE to use under these
conditions. Follow the charging procedure. You may
also charge a partially used pack whenever you desire
with no adverse effect on the battery pack.
5. Foreign materials of a conductive nature such as, but
not limited to, grinding dust, metal chips, steel wool,
aluminum foil, or any buildup of metallic particles
should be kept away from charger cavities. Always
unplug the charger from the power supply when there
is no battery pack in the cavity. Unplug the charger
before attempting to clean.
6. Do not freeze or immerse the charger in water or any
other liquid.
Storage Recommendations
1. The best storage place is one that is cool and dry, away
from direct sunlight and excess heat or cold.
2. For long storage, it is recommended to store a fully
charged battery pack in a cool dry place out of the
charger for optimal results.
NOTE: Battery packs should not be stored completely
depleted of charge. The battery pack will need to be
recharged before use.
OPERATION
WARNING: To reduce the risk of serious personal
injury, turn unit off and remove the battery pack
before making any adjustments or removing/
installing attachments or accessories. An
accidental start-up can causeinjury.
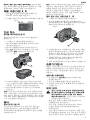
Installing and Removing the Battery Pack
(Fig.D)
NOTE: Make sure your battery pack is fully charged.
To install the battery pack into the vaccum, insert/slide
battery pack into battery port
1
. Make sure the battery pack
is fully seated.
Fig. D
1
To remove the battery pack from the vacuum, press and
hold the battery release on the battery pack and remove. To
charge the pack, insert it into your DeWALT charger.
Using the Appliance (Fig.A,E)
1. Attach the appropriate accessory to the hose
2
.
2. Insert the
DeWALT battery pack.
3. To turn machine on, press the I/O (on/off) button
3
.
Fig. E
Vacuum Cleaning
To empty tank (Fig. F)
The sound of the motor changes and suction is reduced
when the tank is full.
1. Turn machine off and remove the battery pack.
2. Unlatch the tank latches
4
and remove the power head
from the tank.
3. Empty the contents of the tank into a suitable container.
4. Clean or change filters
5
. See Filter section of this
manual.

ENGLISH
8
Fig. F
5
4
5. Inspect machine for damage by foreign objects. Contact
the nearest DeWALT authorized service center for
replacement of damaged or missing parts.
6. Replace power head onto the tank and latch securely.
NOTE: The machine must be used in the upright position at
all times to prevent unwanted actuation of the Automatic
Vacuum Shutoff. If unwanted actuation should happen, turn
off the motor and wait until the motor stops turning. Turn
the motor on again and suction will be restored.
Filter
Filter care (Fig. G)
The wet/dry filter
5
included with this vacuum is a long life
filter. To be effective in minimizing dust recirculation the
filters MUST be installed correctly and in good condition.
NOTE: Never operate without a filter in place. A clean filter
is the most important factor in the operation and efficiency
of any vacuum. If the filter becomes clogged beyond
cleaning, damaged, or fails to operate properly, replace only
with genuine
DeWALT replacement filters.
To Clean or Change the Filter (Fig. F, G)
1. Turn the machine off and remove the battery pack.
2. Unlatch the tank latches
4
and remove the power head
from the tank. Twist the filter
5
to the right to remove it
from the power head.
Fig. G
5
3. Clean the filter by shaking off excess dust, tapping into
a waste receptacle, then rinsing under running water.
Depending on the condition of the filter, a water wash is
not always required. Do not use a brush to clean filter.
4. Reinstall and secure the filter onto the power head by
twisting the filter to the left.
5. Replace power head onto the tank and secure latches.
Blower (Fig.A)
The blower function can be used to remove debris from
behind small spaces, to dry a damp floor, to blow grass
clippings or leaves from an outside walk, patio, etc.
To Use as a Blower
1. Empty the tank following the instructions under the
Vacuum Cleaning section of this manual.
2. Twist the vacuum hose
2
to remove.
3. Insert the hose into the side exhaust port
6
and twist
to secure.
MAINTENANCE
WARNING: To reduce the risk of serious personal
injury, turn unit off and remove the battery pack
before making any adjustments or removing/
installing attachments or accessories. An
accidental start-up can causeinjury.
• Empty the vacuum often, especially when wet debris is
in the canister.
• MAINTAIN TOOL WITH CARE. Keep fan area clean for
best and safest performance.
• Do not attempt to repair the vacuum. To assure
product safety and reliability, repairs, maintenance,
and adjustments should be performed by authorized
DeWALT service centers.
Hose and Accessory Storage (Fig.A)
When the vacuum is not in use, the hose can be wrapped
around the appliance, underneath the battery interface, and
secured with the hose clip
7
also located at the back of the
vacuum. The two accessories (crevice tool and wide nozzle)
can be stored on board the vacuum as well.
Cleaning
WARNING: Blow dirt and dust out of all air vents with
clean, dry air at least once a week. To minimize the risk
of eye injury, always wear ANSI Z87.1 approved eye
protection when performingthis.
WARNING: Never use solvents or other harsh
chemicals for cleaning the non-metallic parts of
the tool. These chemicals may weaken the plastic
materials used in these parts. Use a cloth dampened
only with water and mild soap. Never let any liquid
get inside the tool; never immerse any part of the tool
into aliquid.
Charger Cleaning Instructions
WARNING: Shock hazard. Disconnect the charger
from the AC outlet before cleaning. Dirt and grease
may be removed from the exterior of the charger using
a cloth or soft non-metallic brush. Do not use water or
any cleaning solutions.

ENGLISH
9
Accessories
WARNING: Since accessories, other than those
offered by
DeWALT, have not been tested with this
product, use of such accessories with this tool could be
hazardous. To reduce the risk of injury, only DeWALT
recommended accessories should be used with
thisproduct.
Recommended accessories for use with your tool are
available at extra cost from your local dealer or authorized
service center. If you need assistance in locating any
accessory, please visit our website: www.dewalt.com.
A replacement filter is available at extra cost at your local
DeWALT service center.
Dust collector (Fig. H)
In the vacuum mode, the appliance can also function as a
dust collector for power tool applications producing dust
or debris.
Install the DWV9000 dust extraction adaptor, available at
additional cost, to facilitate connection of a power tool to
the vacuum hose
2
.
Fig. H
2
1. Unscrew and remove the standard hose nozzle.
2. Screw on the dust extraction adaptor to the hose.
3. Attach the adaptor to the power tool.
NOTE: Follow these instructions in reverse to set up the
appliance for standard vacuum use.
IMPORTANT! The DWV9000 dust
extraction adaptor is designed to work
with Dust System Compatible
DeWALT
power tools. An additional adaptor will be
necessary for use with
DeWALT tools.
Repairs
The charger and battery pack are notserviceable.
WARNING: To assure product SAFETY and
RELIABILITY, repairs, maintenance and adjustment
(including brush inspection and replacement, when
applicable) should be performed by a
DeWALT factory
service center or a DeWA LT authorized service center.
Always use identical replacementparts.
Maintenance
Your DeWALT power tool has been designed to operate
over a long period of time with a minimum of maintenance.
Continuous satisfactory operation depends upon proper
tool care and regularcleaning.
WARNING: To reduce the risk of serious personal
injury, turn tool off and disconnect tool from
power source before making any adjustments or
removing/installing attachments or accessories.
An accidental start-up can causeinjury. in the OFF
position. An accidental start-up can causeinjury.
Lubrication
Your power tool requires no additionallubrication.
Cleaning
WARNING: Blow dirt and dust out of the main
housing with dry air as often as dirt is seen collecting
in and around the air vents. Wear approved eye
protection and approved dust mask when performing
thisprocedure.
WARNING: Never use solvents or other harsh
chemicals for cleaning the non-metallic parts of the
tool. These chemicals may weaken the materials used
in these parts. Use a cloth dampened only with water
and mild soap. Never let any liquid get inside the tool;
never immerse any part of the tool into aliquid.
Optional Accessories
WARNING: Since accessories, other than those
offered by DeWALT, have not been tested with this
product, use of such accessories with this tool could be
hazardous. To reduce the risk of injury, only
DeWALT
recommended accessories should be used with
thisproduct.
Consult your dealer for further information on the
appropriateaccessories.
Protecting the Environment
Separate collection. Products and batteries marked
with this symbol must not be disposed of with
normal householdwaste.
Products and batteries contain materials that can
be recovered or recycled reducing the demand for raw
materials. Please recycle electrical products and batteries
according to local provisions. Further information is
available at www.2helpU.com.

繁體中文
10
繁體中文
1
定義:安全警示符號與用詞
危 險:將死亡或嚴重傷害
警 告:可能死亡或嚴重傷害
小 心:可能輕微或中度傷害
注 意:
非人身傷害
可能
財產損失
警告!請閱讀所有安全警告及所有指示。
警 告:
20V Max
18V
60V Max
54V
1
2
3
4
5
E
6
7
8
9
A
2
6
3
7
1
4
9
8

繁體中文
11
繁體中文
2
技術資料
DCV580
18
20
7
5
15
9
32
kg 4
15
20
18
DCB203 DCB184 DCB205
18 18 18
2
0 5
0 5
0
kg 0
40 0
62 0
62
DCB105
110
10
8
18
25
1
3
30
1
5
40
2
0
55
3
0
70
4
0
90
5
0
kg 0
49
DCB115
110
10
8
18
25
1
3
30
1
5
40
2
0
55
3
0
70
4
0
90
5
0
kg 0
5
DCB118
110
18
54
22
1
3
22
1
5
30
2
0
45
3
0
60
4
0
75
5
0
60
6
0
kg 0
66
請保存這些安全指示以備將來查閱
部 件( 圖
A
)
警 告:
A
設計用途
DeWALT
18
20
請勿
請勿
重要安全指示
警 告:
降低傷害風險
•
•
•
使用吸塵器前請閱讀所有指示
警告
•
•
•
DeWALT
•
•
•
•
•
•
•
•
•
•
•
•
•
•
•
•

繁體中文
12
繁體中文
3
•
•
•
•
•
•
•
•
•
所有電池工具的其他特殊安全規定
•
必須僅使用指定的充電器為帶有內建電池或單獨電池組
的 電 池 工具 充 電。
•
請使用原廠的
DeWALT
電池組操作電池工具。
•
不使用電池組時,請將其遠離如迴紋針、硬幣、鑰匙、
釘子、螺絲以及其他可連通電池兩極的金屬物品。
V .........................
Hz .......................
min .....................
DC .....
...................... I
…
min ..............
BPM ....................
IPM .....................
RPM ....................
sfpm ...................
SPM ....................
A .........................
W ........................
AC ..........
AC
DC ...
...................... II
no .......................
n .........................
......................
.....................
.....................
.....................
.....................
.....................
.....................
電池和充電器
DeWALT
11
請閱讀所有指示
所有電池組之重要安全指示
警告:請閱讀電池組、充電器與電動工具的所有安全
警告與所有指示。不遵循這些警告和說明可能會導
致觸電、火災及/或嚴重傷害。
•
不要在易爆環境,如有易燃液體、氣體或粉塵的環境中進
行充電 或 使 用 電 池 組。
•
切勿強行 將電池 組 放進 充電器。請 勿以任 何 方 式 改 裝 電
池組以在不相容的充電器中使用,否則電池組可能會破
裂,導致嚴重人身傷害。
•
DeWALT
•
請勿
•
請勿在溫度可能達到或超過
104°F (40°C)
的 地 方( 例 如
夏季時屋外的棚屋或金屬建築物)儲存或使用本工具和
電 池 組。
註:請勿將電池組存放在觸發開關鎖定在開啟狀態的工
具中。切勿捆紮處於開啟狀態的觸發開關。
•
即使電池組已嚴重損毀或磨損,也請勿焚燒電池組。
•
如果電池液體接觸到皮膚,請立即以中性肥皂和清水沖
洗 接 觸 範圍。
15
•
開啟的電池中的物質可能會導致刺激呼吸道。
警 告:
警 告:
鋰離子
(
Li
-
Ion
)
之特殊安全指示
•
即使電池組已嚴重損毀或磨損,請勿焚燒電池組。
•
15
•
警告
電 量 計 電 池 組( 圖
B
)
DeWALT
LED

繁體中文
13
繁體中文
4
75–100
51–74
50
LED
B
註:
所有電池充電器之重要安全指示
警告:請閱讀電池組、充電器與電動工具的所有安全
警告與所有指示。不遵循這些警告和說明可能會導
致觸電、火災及/或嚴重傷害。
•
請勿嘗試使用本手冊未提到的充電器為電池組充電。
•
除了為
DeWALT
可充電電池充電之外,這些充電器不
可以 用於 其他 用 途。
•
請勿將充電器暴露在雨或雪中。
•
中斷充電器的電源時,請拔除插頭而非拉扯電線。
•
請確保電線的位置不會遭踐踏、令人絆倒或容易受到其
他方式的損壞或受壓。
•
除非絕對需要,否則請勿使用延長電線。
•
若要在戶外使用充電器,請使用適合乾燥場合和戶外
使 用 的 延 長電 線。
•
•
請勿將任何物件放在充電器上面,或是把充電器放在可
能會堵住通風槽的柔軟表面,導致充電器的內部過熱。
•
請勿操作電線或插頭損壞的充電器。
•
如果充電器受到重擊、墜落或出現其他損壞情況,請勿
使 用 充 電 器,
•
請 勿自行拆 卸 充電器。需 要 維 護 或 修 理時,請拿到授權
維 修 中心。
•
在清潔之前,請將充電器的插頭從電源插座上拔掉,這
樣 可以 減 低 觸電 風 險。
•
切勿
2
•
充電器是為標準
110
伏特的家用電源而設計。請勿試圖
使 用 其他 電 壓。
警 告:
警 告:
小 心:
DeWALT
注 意:
為 電 池 充 電( 圖
C
)
危 險:
110
1.
C
2.
3.
註:
充電器操作
DCB115
DCB118
* DCB115、DCB118:

繁體中文
14
繁體中文
5
註:
電池組熱/冷延遲
/
DCB118
電子保護系統
牆面安裝
DCB115、DCB118
1"
25
4mm
0
28–0
35"
7–9mm
7/32"
5
5 mm
充電器清潔指示
警 告:
重要充電說明
1.
65
F
75
F
18
- 24
C
40
F
4
5
C
104
F
40
C
2.
3.
65°F – 75°F
18 – 24°C
4.
5.
6.
儲存建議
1.
2.
註:
操作
警告:為了減低造成嚴重人身傷害的風險,在進行
任何調整或取出
/
安裝附件或配件之前,請關閉裝置
並
取出電池組。
安裝和取出電池組(圖
D
)
註:
/
1
D
1
若要從吸塵器中卸下電池組
DeWALT
使 用 器 具( 圖 A、E)
1.
2
2.
DeWALT
3.
I
O
3
E
關閉位置 開啟位置

繁體中文
15
繁體中文
6
吸塵
清 空 集 塵 箱( 圖
F
)
1.
2.
4
3.
4.
5
濾心
F
5
4
5.
DeWALT
6.
註:
濾心
濾 心 保 養( 圖
G
)
5
註:
DeWALT
清潔或更換濾心(圖
F
、
G
)
1.
2.
4
5
G
5
3.
4.
5.
吹 風 機( 圖
A
)
當作吹風機使用
1.
吸塵
2.
2
3.
6
維護
警告:為了減低造成嚴重人身傷害的風險,在進行
任何調整或取出/安裝附件或配件之前,請關閉裝置
並
取出電池組。
•
•
•
DEWALT
軟管和配件收納(圖
A
)
7
清潔
警 告:
ANSI Z87
1
警 告:
充電器清潔指示
警 告:
配件
警 告:
DeWALT
DeWALT
DeWALT

繁體中文
16
繁體中文
7
集 塵 器( 圖
H
)
DWV9000
2
H
2
1.
2.
3.
註:
重 要!
DWV9000
DeWALT
DeWALT
維修
警 告:
DeWALT
DeWALT
維護
DeWALT
警告:為了降低造成嚴重人身傷害的風險,在進行任
何調整或卸下或安裝附件或配件之前,切記關閉工
具並 斷 開工 具電 源。
潤滑
清潔
警 告:
警 告:
選購配件
警 告:
DeWALT
DeWALT
保護環境
www.2helpU.com
33
2
02-28341741
137
02-29994633

繁體中文
17
繁體中文
8
Equipment name
DCV580
Type designation Type
Unit
Restricted substances and its chemical symbols
Lead
Pb
Mercury
Hg
Cadmium
Cd
Hexavalent
chromium
CrVI
Polybrominated
biphenyls
PBB
Polybrominated
diphenyl ethers
PBDE
塑膠外殼
馬達
濾網
配線
開關
1.
"
0.1 wt %"
"
0.01 wt %"
Note 1: "Exceeding 0.1 wt %" and "exceeding 0.01 wt %" indicate that the percentage content of the restricted substance exceeds the reference percentage
value of presence condition.
2.
"
"
Note 2: "" indicates that the percentage content of the restricted substance does not exceed the percentage of reference value of presence.
3.
"
"
Note 3: The "" indicates that the restricted substance corresponds to the exemption.

한국어
18
C
한국어
경고! 안전 경고와 지시 사항을 모두
읽으십시오. 경고와 지시 사항을 준수하지
않으면 감전, 화재 및
/
또는 심각한 부상을
초래할 수 있습니다.
경고: 부상 위험을 줄이려면 사용 설명서를
숙지하십시오.
1
배터리 포트
2
진공 호스
3
On/off 버튼
4
탱크 래치
5
필터(그림 E)
6
사이드 집진 포트
7
호스 클립
8
틈새 노즐
9
와이드 노즐
그림
A
2
6
3
7
1
4
9
8
정의: 안전 경고 기호 및 문구
본 사용 설명서는 다음과 같은 안전 경고를 사용해서 위험한 상황과 부상 또는 재산 피해에 대한 위험을
사용자에게 경고합니다.
위험: 절박한 위험 상태를 나타내며, 방지하지 않으면 사망 또는 심각한 부상을 초래합니다.
경고: 잠재적 위험 상태를 나타내며, 방지하지 않으면 사망 또는 심각한 부상을 초래할 수 있습니다.
주의: 잠재적으로 위험한 상태를 나타내며, 방지하지 않으면 경미하거나 가벼운 부상을 초래할 수
있습니다.
(
문구 없이 사용됨
)
안전 관련 메시지를 나타냅니다.
참고: 신체 부상을 초래하지 않는 행위를 나타내며, 방지하지 않으면 재산상의 손해가 발생할 수
있습니다.
ページが読み込まれています...
ページが読み込まれています...
ページが読み込まれています...
ページが読み込まれています...
ページが読み込まれています...
ページが読み込まれています...
ページが読み込まれています...
ページが読み込まれています...
ページが読み込まれています...
ページが読み込まれています...
ページが読み込まれています...
ページが読み込まれています...
-
 1
1
-
 2
2
-
 3
3
-
 4
4
-
 5
5
-
 6
6
-
 7
7
-
 8
8
-
 9
9
-
 10
10
-
 11
11
-
 12
12
-
 13
13
-
 14
14
-
 15
15
-
 16
16
-
 17
17
-
 18
18
-
 19
19
-
 20
20
-
 21
21
-
 22
22
-
 23
23
-
 24
24
-
 25
25
-
 26
26
-
 27
27
-
 28
28
-
 29
29
-
 30
30
-
 31
31
-
 32
32


