

21
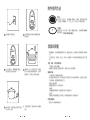
Importantes mesures de sécurité
Appliquez les mesures de sécurité élémentaires suivantes lorsque vous utilisez un
appareil électrique:
Lisez toutes les instructions.
Ne touchez pas les surfaces qui peuvent être chaudes. Utilisez les poignées ou
les boutons.
Pour éviter les chocs électriques, ne plongez pas le cordon, la che ou l’appareil
portatif
(indiquer au besoin d’autres pièces similaires) dans l’eau ou un autre liquide.
(i) Appareils portatifs. Débranchez l’appareil de la prise de courant quand
vous ne l’utilisez pas, avant d’enlever ou d’installer des pièces et avant
de le nettoyer. Laissez l’appareil refroidir avant de le manipuler.
(ii) Appareils branchés à demeure. Assurez-vous que l’appareil est
ARRÊTÉ quand vous ne l’utilisez pas, avant d’enlever ou d’installer des
pièces et avant de le nettoyer.
Appareils portatifs. Ne faites pas fonctionner l’appareil si le cordon ou la che
sont endommagés, si l’appareil ne fonctionne pas correctement, s’il est tombé
ou s’il a été endommagé. Confiez au service de réparation recommandé le
plus proche tout examen, réparation ou réglage électrique ou mécanique de
l’appareil.
L’utilisation d’accessoires non recommandés par le fabricant de l’appareil peut
causer des blessures.
N’utilisez pas l’appareil à l’extérieur (cette consigne peut être omise si le
produit est destiné à être utilisé à l’extérieur).
Ne laissez pas le cordon pendre par-dessus le bord d’une table ou d’un
comptoir et assurez-vous que le cordon n’est pas en contact avec des surfaces
chaudes.
Ne placez pas l’appareil près d’un brûleur à gaz allumé ou d’un élément
électrique ou tension ou dans un four allumé.
Soyez très prudent en déplaçant un appareil qui contient de l’huile ou un autre
liquide
Le cas échéant, branchez toujours la fiche à l’appareil et assurez-vous que
l’interrupteur de celui-ci est à la position ARRÊT (OFF) avant de brancher la
che dans la prise. Pour débrancher l’appareil, placez l’interrupteur à ARRÊT
(OFF), puis retirez la prise de courant.
N’utilisez l’appareil que pour la fonction à laquelle il est destiné.
Évitez de toucher les pièces mobiles.
Conservez ces instructions.
1.
2.
3.
4.
5.
6.
7.
8.
9.
10.
11.
12.
13.
14.
15.
CONTENTS
Important Safeguards . . . . . . . . . . . . . . . . . . . . . . . . . . . . . . . . . . . . . . . . 3
Overview .................................................... 4
Box Contents ....................................................................... 4
Precautions ......................................................................... 4
Names of the Parts .................................................................. 6
Directions .................................................... 7
Accessory Directions ......................................... 9
Cleaning and Maintenance ................................... 9
Other Recipe ................................................. 9
White Rice V.S. Water Tables .................................. 12
Product Specications ....................................... 13
Troubleshooting ............................................. 16

43
Important Safeguards
1
DO NOT use outdoors. For HOUSEHOLD use
only.
2
ALWAYS focus on extreme caution when
moving an appliance containing hot oil
or other hot liquid. Allow to cool before
putting on or taking o parts.
DO NOT touch any hot surface of appliance.
Use handles or knobs.
3
Do not place on or near a hot gas or electric
burner, or in a heated oven.
4
This appliance is not intended for use by
individuals with certain disabilities or by
children. For their safety, please have close
supervision.
5
To protect against electrical shock, do not
immerse cord, plug or the appliance itself in
water or other liquid. Also, DO NOT let cord
hang over edge of table or counter, or touch
hot surfaces.
ALWAYS unplug the power cord from the
wall outlet when appliance is not in use and
before cleaning.
6
Do not use attachments or accessories other
than those supplied or recommended
by the manufacturer. Incompatible parts
create a hazard. Do not operate any
appliance with a damaged cord or plug
or after the appliance malfunctions or has
been damaged in any manner. Return
appliance to the nearest authorized
service facility for examination, repair or
adjustment.
Overview
Box Contents
Cooker Inner Pot Inner Cover (Optional)
Steam Plate (Optional) Measuring Cup Rice Spatula
* The above specifications are for Reference Only, and all models and specifications subject to
change without any notice.
Precautions
1 2
Do not ll water over the max water level
marked in the Inner Pot, and this action
is easy to prolong cooking time or to
damage the Cooker.
When placing the Inner Pot into the Cooker,
it is suggested to twist the Inner Pot gently
for a perfect fit; if the Inner Pot inclines
to one side, the rice will not be cooked
equally.

65
3
The automatic Cooker Switch is specially designed
for shutting off the electric current. Once the
electric current is shut off during the cooking,
there will be no worry about fusing of the electric
wire, and take care not to raise the cover of the
pot. Please just wait until the current is restored.
The work will continue. If your home voltage
is below normal voltage 10%, the time for
cooking will be slightly prolonged, but there is no
possibility of getting the rice burned.
4
Before using cooker first time, please clean
stainless steel accessories with dish soap or
natural detergent. Then put these accessories
(except Inner Cover) and 2-3 cups of water
inside the Cooker, insert the plug in the socket,
and push the Cooker Switch lever down. After
30 minutes, pull the Cooker Switch lever up.
Finally, you can begin to cook.
5
After Cook Switch is o or pop up, you must wait
15 minutes before removing the cover, and you
have delicious rice porridge.
CAUTION!! Keep Warm
Function Lasts Only 3
Hours.
6
The Outer pot has been under the process of
oxidization-resistance. Though the pot would
discolor or streak due to the water quality and
the way you operate it, please use it without
any hesitate. You can pour a Measuring Cup of
vinegar and water into the Outer Pot over half.
Then, after the water was boiling, the pot would
return to normal. However, the discoloration
and streaks would reappear because of the
water quality and the way of operation. For
other accessories of stainless steel, you also can
follow this process to clean those incrustation
and red specks of stainless steel's surface.
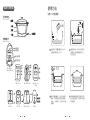
Names of the Cooker's Parts
The Names of Parts
WARM
COOK
ON / OFF
COOK WARM
WARM
COOK
WARM COOK
WARM COOK
WARM COOK
TAC-11A TAC-11B TAC-15/20/20S
TAC-3A
TAC-11KA TAC-06Q/10Q
/11QN
TAC-6G/6GS/
06KN/10G/10GS
TAC-11KN/15GS
Keep Warm Lamp
Cook Lamp
Warm Button
Cook Button
Keep Warm on/o Switch
Cook Switch
1
2
3
4
4
4
4
4
1
2
2
2
2
2
2
3
3
4
1
2
3
4
Pot Cover
Outer pot
Inner Pot
Case
Power Cord
ON
WARM
COOK
OFF
Control Panel

87
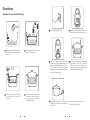
Directions
Example: Six cups of rice for cooking
x 6
6
1
Add six cups of rice into the Inner Pot,
and rinse the rice (repeat 2~3 times) if
necessary.
2
After rinsing, add water to the line
marked "6" in the inner pot.
x 1.5
3
Add 1.5 cups of water into the outer
pot. (use the table on page 10 for
reference.)
4
Put inner pot in the center of the
cooker and close the pot cover.(It's
not necessary to put on inner pot
cover while cooking)
5 6
Insert the plug into the socket. Push the Cooker Switch lever down to the
"COOK" position, and then begin to cook.
7 8
After 25~30 minutes, the Cooker Switch
will move up to the keep warm and the
light indicating "WARM" will be on instead.
(If your switch is "on" in the keep warm
function, the cooker will automatically keep
the rice warm after cooking.)
9
Do not remove the Pot Cover immediately,
Allow the rice to "rest" for 10-15 minutes
before removing the Pot Cover. This is
commonly recommended to minimise the
amount of rice that sticks to the pot.
When nished, if you do not need to heat or
prolonged use, please disconnect the plug
to keep safty.
For more information, please check
the Rice V.S. Water Tables

109
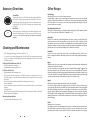
Accessory Directions
Steam Plate:
First, take the Inner Pot out of the Cooker. Second, put the Steam Plate in
the Cooker for steaming eggs, spongecake, and other foods. Then pour
a little water into the Cooker and push the Cooker Switch lever down.
Using Model No. TAC-10Q/11KN/11B stewing soup can without using
steam plate.
Inner Cover:
When cooking is done, take the Inner Pot out with the handle, and cover
the Inner Pot with the Inner Cover. Then you may use the Cooker for any
other purposes. It's not necessary to pot on inner pot cover while
cooking
Cleaning and Maintenance
* Before cleaning, please unplug your Cooker and allow to cool .
* Use only dish soap or neutral detergent with soft cloth. DO NOT use benzene, thinner, abrasive
cleaners, scouring pads or metallic brushes because they will damage the surfaces of the cooker
and other accessories.
Cooker (Outer Pot with Power Cord set)
* DO NOT soak in water or other liquid.
* Lightly wipe with a soft-warm-damp cloth.
Pot Cover and Inner Pot
* Lightly wipe with a soft-warm-damp cloth.
* Fill with warm soap water and allow to soak before cleaning, it is the best way to clean. Or
wash with sponge or soft cloth, non-abrasive detergents may be applied if necessary and dry
thoroughly.
* The pot cover knobs can be disassembled by the following steps, if necessary.
To disassemble Knob:
Press the head of the screw from inside the Pot Cover and turn the Knob in a counter-clockwise
direction.
To Assemble knob:
Press the screw through the hole from inside the Pot Cover, then turn the Knob in a Clockwise
Direction until it is securely tighten.
Measuring Cup and Spatula
* Soak in water and wash with sponge or cloth.
Other Recipe
Rice Porridge:
Add the ratio of water to rice of your desired consistency.
Example: When cooking a cup of rice porridge, put 4 cups of water into the inner pot and add
water up to the 3rd water level line of the cup into the cooker, then push down the switch lever.
After cook switch is o or pop up, you must wait 15 minutes before removing the cover, and
you have delicious rice porridge.
Buns, Dumplings, Wafers, etc.:
Add the ratio of water to make your food thoroughly cooking. If you add the quantity of water
up to 1.5-2 water level line, it will take 20-25 minutes to cook.
Greasy Rice:
Greasy rice is commonly cooked from glutinous rice. When cooking it, consider placing less
water in the inner pot, the other procedures are the same as those for cooking rice, except
that when the rice is done, remove the cover immediately and put avors, such as fried meat,
mushrooms, shrimps, chestnuts, and oil, into the inner pot, and mix them with the rice. Thus the
palatable greasy rice is served. Rice Pudding can be cooked in the same way.
Brown Rice:
Increase at least one cup of water in the cooker or soak it fully in water for at least 2 hours
before cooking. Miscellaneous: Generally, it may be used in all cooking requiring steaming or
boiling.
Eggs I:
Materials: eggs, salt, soy sauce, dried mushrooms, shrimps parsley dried mushrooms, Matsutake,
shrimps, lotus seeds, and corianders
It is also convenient to steam eggs with the cooker. Example: When steaming 2 eggs, rst add
three times amounts of the soup or water, a little salt, soy sauce, and stir them well. Then place
them into a suitable porcelain bowl together with dried mushrooms, Matsutake, shrimps, lotus
seeds, and corianders for steaming. Finally, ll water to the 2nd water level line in the measuring
cup and pour them into the cooker, and then steam for 20-25 minutes to eat.
Eggs II:
Materials: two eggs, two tea spoon water (about two cups water grid)
First, wash the eggs and place the eggs directly into the Outer Pot. Then, pour the two tea
spoon water into the Outer Pot, attach the Pot Cover, and push the switch to start cooking. After
the cooking is nished, please put the cooked eggs to cool, and then you can peel the shell to
enjoy the eggs. In addition, when steaming the shell eggs, you can use steam plate instead of
the inner pot, and each shell eggs with 3-5 waterlevel-line water of the measuring cup. But the
quantity of water in the cooker should be inproportion to the amount of shell eggs when more
than 4 shell eggs.
Potato:
Material: potato, a cup of water
First, wash the potatoes and put them into the Inner Pot, and then pour water into the Inner
Pot until the water covers the top of all potatoes. Then, pour a cup of water into the Outer Pot,
placed the Inner Pot in the cooker, attach the Pot Cover, and push the switch to start cooking.

1211
When the cooking is nished, please wait for 10 minutes to remove the Pot Cover. After that,
you can enjoy the delicious potatoes.
Chicken Breast:
Materials: chicken breast (about half a pound), two slices of gingers
First, wash the chicken breast and put them into the Inner Pot with two slices of gingers, and
then pour water into the Inner Pot until the water covers the top of all chicken breast. Then,
pour a cup of water into Outer Pot, placed the Inner Pot in the cooker, attach the Pot Cover,
and push the switch to start cooking. When the cooking is nished, please take up the chicken
breast immediately. Finally, add some rice wine, salt, and a little pepper on the chicken breast to
wait the marinated and cooling process. After that, you can cut them into pieces to make a cold
salad or sandwich purposes. In addition, you can use remaining pour chicken soup to make
some special soup, such as tofu-egg soup and corn-egg soup.
Corns:
Materials: Three corns (cut six pieces of corns without leaves)
First, wash the six pieces of corns and put them into Inner Pot, and then pour a cup of water into
the Inner Pot and a cup of water into Outer Pot. Then, placed the Inner Pot in the cooker, attach
the Pot Cover, and push the switch to start cooking.After the cooking is nished, you can enjoy
the corns.
Pizza:
Materials: two pieces of cool pizzas, one slice of the foil
First, the foil settles in the Outer Pot. Then, place two pieces of cool pizza on the foil, attach the
Pot Cover, and push the switch to start cooking.After the cooking is nished, you can enjoy the
pizzas.
For other dishes, please referring to http://tatung3csvc.pixnet.net/blog/
category/2390864 or search key word :
大同料理廚房
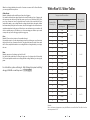
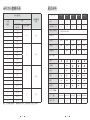
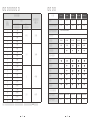
White Rice V.S. Water Tables
The proportion of Rice and Water
Time needed for
cooking (Minutes)
Quantity of Rice
Measuring Cup
Quantity of Water
Water in the inner pot
(Including rice)
Water in the cooker
(Measuring Cup)
1 1 Line
0.5~1 15~30
2 2 Line
3 3 Line
4 4 Line
5 5 Line
1.5 30~45
6 6 Line
7 7 Line
8 8 Line
9 9 Line
10 10 Line
11 11 Line
2 45~60
12 12 Line
13 13 Line
14 14 Line
15 15 Line
16 16 Line
17 17 Line
2.5 60~70
18 18 Line
19 19 Line
20 20 Line
Remarks:
Due to the climate and temperature, it may be dierent to stew and boil time. This table is based on
water temperature of 20C.

1413
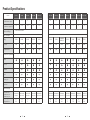
Product Specications
Model TAC-3A TAC-6G TAC-6GS TAC-06KN TAC-06Q TAC-10G TAC-10Q TAC-10GS TAC-11A TAC-11B TAC-11KN TAC-11KA
Volume
(Max. Rice Volume <Cup>)
3 6 6 6 6 10 10 10 11 11 11 11
Capacity
(Max. Inner Pot Capacity <L>)
1.6 2.4 2.4 2.4 2.4 4 4 4 4 4 4 4
Available Voltage
(Follow Local Voltage)
110V/120V/220V/240V
Power Consumption
Cooking
350W 600W 600W 600W 600W 700W 700W
700W(CCC)
800W(UL)
760W 700W 760W 760W
Keep-warm
35W 35W 35W 35W 35W 40W 40W 40W 40W 40W 40W 40W
Keep-Warm Switch
● ● ● ● ● ● ● ● ●
Standard Accessory (Material)
Inner Pot
Inner Cover
● ●
Steam Plate
●
-
●
Spatula
● ● ● ● ● ● ● ● ● ● ● ●
Measuring Cup
● ● ● ● ● ● ● ● ● ● ● ●
User Manual
● ● ● ● ● ● ● ● ● ● ● ●
Dimension & Weight
Product Dimension
H x W x D (mm) / Set
H x W x D (inch) / Set
220x203x203
8.7x8x8
240x310x255
9.4x12.2x10
240x310x255
9.4x12.2x10
240x310x255
9.4x12.2x10
220x308x260
8.7x12.2x10.2
265x348x290
10.4x13.7x11.4
265x348x295
10.4x13.7x11.6
265x348x290
10.4x13.7x11.4
272x372x310
10.7x14.6x12.2
258x369x312
10.1x14.5x12.3
265x348x290
10.4x13.7x11.4
272x372x310
10.7x14.6x12.2
Net Weight (Kg) / Set
Net Weight(lb) / Set
2.1
4.6
2.5
5.5
2.7
6
3.2
7
2.8
6.2
3.6
7.9
3.9
8.6
3.8
8.4
5
11
5.4
11.9
4.7
10.4
4.7
10.4

1615
Model
TAC-11QN TAC-15 TAC-15GS TAC-20 TAC-20S
Volume
(Max. Rice Volume <Cup>)
11 15 15 20 20
Capacity
(Max. Inner Pot Capacity <L>)
4 6 6 9 9
Available Voltage
(Follow Local Voltage)
110V/120V/220V/240V
Power Consumption
Cooking
700W 1000W 1000W 1200W 1200W
Keep-warm
40W 50W 50W 80W 80W
Keep-Warm Switch
● ●
Standard Accessory(Material)
Inner Pot
● ●
Inner Cover
● ● ●
Steam Plate
● ● ●
Spatula
● ● ● ● ●
Measuring Cup
● ● ● ● ●
User Manual
● ● ● ● ●
Dimension & Weight
Product Dimension
H x W x D (mm) / Set
H x W x D (inch) / Set
265x348x290
10.4x13.7x11.6
290x285x330
11.4x11.2x13
290x285x330
11.4x11.2x13
315x418x370
12.4x16.5x14.6
315x418x370
12.4x16.5x14.6
Net Weight (Kg) / Set
Net Weight(lb) / Set
4.7
10.4
5.2
11.5
5.4
11.9
5.9
13
6.3
13.9
SUS304 Stainless Steel SUS304 Stainless Steel + Nano Ceramic Coating
* The above specifications are for Reference Only, and all models and specifications subject to
change without any notice.
Please check the actual specications for any purchased products.
* The voltage of all products MUST follow the local voltage for using correctly!
Troubleshooting
1. No power?
Please conrm whether the electrical power cord is plugged in socket, or the overload device of
this socket has been tripped.
2. The cooker does not work?
Please conrm whether the Cooker Switch lever has been down, or cooking if the power cord is
plugged in.
3. The food is unable to be cooked for the prepared food?
Please conrm whether the Cooker Cover is closed perfectly, or if the water has been added to
the Outer Pot suciently.
4. When the power cord of the Cooker is the separated-type model,
no power?
Please check the power joint of the Cooker to see whether there is contamination or moisture
patina on the joint. If YES, please immediately contact the qualied Maintenance Sta to get new
power cord. This is the best way to avoid re danger.

1817
目錄
安全注意事項
18
電鍋總覽
19
包裝箱內容物
19
使用前注意事項
19
認識大同電鍋
21
使用方法
22
附件使用方法
24
清潔與保養
24
製作其他美食
25
米和水份量關係表
27
產品規格
28
故障排除
31
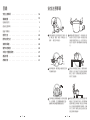
安全注意事項
1
本產品僅限於室內廚房使用如家庭、商
店、辦公室、農莊、酒店、汽車旅館、民
宿等⋯⋯,請勿於戶外使用。
2
當電器處於高溫狀態下,或裝有熱水或
熱油時,請先拔下插頭,利用提把或捏
手幫助移動並特別小心,此外如欲取出
或放入物品時,請待電器稍冷卻後再進
行。
3
使用本產品時,請勿靠近火爐或放在加熱
中的烤箱內使用。
4
本產品具有高溫之危險性,嚴禁兒童玩
耍靠近以及行為能力不全或缺乏相關經
驗之人使用,如需使用請在家長或專人
陪同下正確使用。
5
勿將本產品及其電源線浸於水或其他液體
中,以防漏電,並注意電源線擺放位置,
遠離有尖角的桌邊或接觸高溫物品。
6
本產品請勿在非指定之狀況或搭載非原
廠指定之附件器具下使用,例如電源線
插頭採極性防呆保護,請勿自行拆解替
換,若本體或其電源零件有損壞、故障
或不正常時,請停止使用並送到指定服
務站由專業人員檢修。

2019
電鍋總覽
包裝箱內容物
電鍋本體 內鍋 內鍋蓋 ( 選配 )
蒸盤(選配) 計量杯 飯匙
★ 以上規格配件僅供參考,依各機型實際出貨狀況為準,規格變更恕不另行通知。
使用前注意事項
1 2
內鍋水量勿超越最高水位線,易造成
水外溢到外鍋(建議當煮、燉湯時,內
鍋放置於蒸盤上,可避免油水外溢),
進而影響烹調時間與損傷鍋具。
內鍋位置請輕放置於外鍋中央,可避
免蒸煮的米飯不均勻問題。
3
一般使用狀況下,按下開關按鍵,煮
飯指示燈亮起,當燉煮完成時,開關
自動跳上進入保溫狀態,其自動切斷
電流並非保險絲燒斷(電壓低於正常
值 10% 時,燉煮時間可能稍加變長),
另外燉煮過程中,電源意外中斷時請
勿掀開鍋蓋,待電源恢復後燉煮將會
繼續完成。
4
第一次使用時,請以中性清潔劑清洗
不鏽鋼材質附件,並於外鍋加水 2~3
杯,置入以上附件 ( 內鍋蓋除外 ) 蒸
煮約半小時後,再行燉煮食物 ; 外
鍋不可直接浸入水中沖洗,只需以水
洗清洗外鍋內壁即可。
5
當完成煮飯開關跳開時,利用鍋內餘
熱繼續蒸炊,請稍待 10~15 分鐘再打
開鍋蓋,米飯味道會更好。另外,
請
注意保溫時間不宜超
過 3 小時。
6
不鏽鋼內鍋與外鍋(已作防氧化處
理),在使用後會因水質(含有石灰
質或雜質)及使用方式而產生紅斑斑
紋或變色的現象,請安心使用。另外
可倒入“1 計量杯之白醋於外鍋中,
加水至 8 分滿”或“1 計量杯之白醋
於不鏽鋼內鍋加入水至最高刻度”
後,予以加熱至水滾即可回復,再度
產生上述現象時,可反覆操作。

2221
使用方法
以煮 6 人份量為例:
x 6
6
1
利用附件之計量杯量取生米 6 杯,
並放進內鍋淘洗約 2~3 次 。
2
掏洗完成後,取水加入裝有米之
內鍋裏,直至內鍋側壁記有「6」
的刻度位置。
x 1.5
3
再以計量杯量取 15 杯的水倒進外
鍋裡。( 所需刻度已標記於計量杯
杯身上 ) 可參閱 P27 米與水份量
關係表。
4
將內鍋輕輕放置於外鍋的中央位
置並蓋上鍋蓋。( 烹煮時不需使
用內鍋蓋 )
TAC-11A TAC-11B TAC-15/20/20S TAC-3A
TAC-11KA
TAC-6G/6GS/
06KN/10G/10GS
TAC-11KN/15GS TAC-06Q/10Q
/11QN
保 溫
開 關
炊 煮
保溫燈
煮飯燈
保溫開關
開關按鍵
1
2
3
4
4
4
4
4
1
2
2
2
3
3
4
1
2
3
4
2
2
2
開關指示
認識大同電鍋
各部名稱

2423
5
將插頭插入電源插座。
6
按下開關按鍵,煮飯指示燈隨即亮起,
開始煮飯。
7
約 25 分鐘左右,開關按鍵自動跳上,
完成煮飯並進入保溫狀態。
8
請稍等,約 15 分鐘不要立即打開鍋
蓋,利用鍋內餘熱繼續蒸炊,米飯味
道會更好,且可減少米飯黏於鍋底。
9
使用完畢,不需保溫或長時間不使用
時,請拔下插頭。
★ 如需更多資訊,請參閱米與水份量關
係表
附件使用方法
蒸盤:
取出內鍋 ( 不使用 ),將蒸盤置入電鍋內,可蒸蛋、蛋糕或其他食物
,然後按下開關燉煮。TAC-10G/11KN/11B 系列可以不用再放蒸盤。
內鍋蓋:
當飯煮好後,取出內鍋,可蓋上內鍋蓋於內鍋上,然後電鍋可繼續燉
煮其他食物。
烹煮時不需使用內鍋蓋 !
清潔與保養
清潔電鍋前,先拔掉電源插頭等其冷卻。僅能使用肥皂、洗碗精及中性清潔劑等以軟布擦
拭。
⋯ 不可使用汽油、松節油、去污粉、菜瓜布、金屬刷等,因其可能造成電鍋表面及附件之損
傷。
本體 ( 外鍋 , 外殼與電源線 ):
⋯ 不要浸於水或其他液體中。
⋯ 輕輕地用可飲用熱水沾濕軟布擦拭,必要時可以加些許清潔劑。
鍋蓋與內鍋:
⋯ 以可飲用熱水沾濕軟布輕輕擦拭。
⋯ 每次飯後或食物用完後,可將其浸泡於可飲用熱水中以海棉或軟布清洗,必要時也可使用
中性清潔劑。這是最容易清潔的方法。
⋯ 請務必以軟布擦拭。
⋯ 鍋蓋鈕必要時可以下列步驟拆解。
拆解時 :
從鍋蓋裡壓住螺絲頭,將鍋蓋鈕反時針方向旋鬆即可。
組合時 :
把螺絲由內穿過鍋蓋孔並用手壓住,再將鍋蓋鈕順時針方向旋緊即可。
計量杯與飯匙:
⋯ 置於水中以海棉或軟布洗淨。
•
•
•
•
•
•
•
•
•

2625
製作其他美食
煮稀飯:
煮稀飯時內鍋水量約米量之 4~5 倍,但以內鍋之最高刻度為限。外鍋水量為量杯的 3~5 刻
度,可以軟硬的喜好調節。例如:煮一杯米,內鍋放水 4 杯,外鍋放入量杯 3 刻度的水,
然後按下開關即可自動煮成稀飯,非常簡便。開關跳上斷電後請靜放約 10~15 分鐘利用鍋
內餘熱使稀飯更均勻好吃。
蒸包子、餃子、糕餅 :
依所蒸時間長短,酌予增減外鍋水量。若水量為計量杯 5 刻度為 15 分鐘左右。
( 將一片菜葉放在蒸盤上,把包子、餃子置在菜葉上蒸煮 , 可以減少黏附於鍋具上 )
煮油飯、糯米飯:
煮油飯、糯米飯時酌量減少內鍋的水,其餘與煮飯時相同。煮熟,自動斷電後,請立即打
開鍋蓋,將用油炒好的肉、香菇、蝦米、栗子等佐料放進內鍋與米飯攪拌適宜,即可得到
美味的油飯。八寶飯亦可類推應用。
煮糙米、胚芽米:
煮糙米、胚芽米至少增加 1 計量杯的水放進外鍋;或是米洗淨後浸泡 2 小時以上,然後按
下開關即可。
蒸蛋一 :
材料 : 兩個蛋時、鹽、醬油、松茸、香菇、蝦米、蓮子、香菜
作法:
1 蒸兩個蛋時,可先加上約 3 倍的清湯或水,再添上少量的鹽、醬油將之攪拌均勻
2 然後把松茸、香菇、蝦米、蓮子、香菜等一起放在蒸碗內
3 在外鍋放進計量杯 2 刻度的水,按下開關,經過 20~25 分鐘即可享用
蒸蛋二:
材料 : 二個雞蛋、兩茶匙水 ( 大約二格的量杯水位 )
做法 :
1 將雞蛋洗爭後直接置於電鍋外鍋⋯
2 將兩茶匙水倒入電鍋
3 蓋上外鍋蓋,按下開關煮約至開關跳起
4 取出煮好的雞蛋,冷卻後即可剝蛋殼食用
帶殼蒸蛋時,可以不使用內鍋而直接將蛋放在蒸盤來蒸,外鍋的水量,每個蛋以計量杯
3~5 刻度水量為準。( 須同時蒸 4 個以上時得按比例增加水量 )
煮馬鈐薯 :
材料 : 馬鈴薯6顆及、一杯水
做法 :
1 將馬鈴薯洗淨後放入內鍋並加入水至蓋⋯馬鈴薯
2 將一杯水倒入外鍋裡,在將⋯鍋的材料置於外鍋
3 蓋上鍋蓋並按下開關
4 開關跳起繼續悶 10 分鍾煮熟的馬鈴薯即可取出食用
煮雞胸肉 :
材料 : 去皮雞胸肉一片 ( 大約半磅 )、二片薑
做法 :
1 將雞胸肉洗淨置於⋯鍋,加水置蓋⋯雞肉 , 同時將薑片加入內鍋
2 倒入一杯水在外鍋,將⋯鍋的雞胸及水擺到外鍋中
3 蓋上鍋蓋,按下開關煮約至開關跳起
4 即時取出雞胸肉
5 加一條根米酒,及少許胡椒鹽在煮熟的雞胸上,醃冷之後可切成雞片做沙拉或三明治之
用
6 煮好的雞湯可做豆腐蛋花湯或玉米蛋花湯
煮玉蜀黍 ( 玉米 ):
材料 : 玉米三根 ( 切成六塊 )
做法 :
1 玉米洗淨並剝掉外層葉子
2 將六塊玉米放入⋯鍋 加一杯水在內鍋
3 倒一杯水⋯外鍋裡,在將內鍋置於外鍋中
4 將鍋蓋蓋好,按下開關至開關跳起,把鍋蓋打開取出玉米即可食用
熱披薩 :
材料 : 隔夜披薩二塊及錫箔紙一張
做法 :
1 將錫箔⋯擺平在外鍋中 , 在將隔夜兩塊披薩放在錫箔紙上
2 將外鍋蓋蓋好,按下開關,等開關跳起之後 , 熱的披薩即可食用
其他相關佳餚 , 請參閱網址 : http://tatung3csvcpixnetnet/blog/
category/2390864 或搜尋關鍵字 : 大同料理廚房

2827
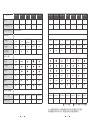
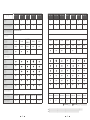
米和水份量關係表
米和水量分配
自動斷電時間
(分鐘)
米量
( 計量杯 )
水量
內鍋水位線
( 連米在內 )
外鍋 ( 計量杯 )
1 1 刻
05~1 15~30
2 2 刻
3 3 刻
4 4 刻
5 5 刻
15 30~45
6 6 刻
7 7 刻
8 8 刻
9 9 刻
10 10 刻
11 11 刻
2 45~60
12 12 刻
13 13 刻
14 14 刻
15 15 刻
16 16 刻
17 17 刻
25 60~70
18 18 刻
19 19 刻
20 20 刻
備註 : 由於氣候及溫度變化 , 燉煮時間可能不同 , 此對照表係依水溫 20C 為基準
型 名
TAC-3A TAC-6G TAC-6GS TAC-06KN TAC-06Q
人份
3 6 6 6 6
內鍋容量 ( 公升 )
1.6 2.4 2.4 2.4 2.4
電壓(依出貨地)
110V/120V/220V/240V
消耗功率
烹煮時
350W 600W 600W 600W 600W
保溫時
35W 35W 35W 35W 35W
保溫開關
● ● ● ●
配件(材質)
內鍋
內鍋蓋
●
蒸盤
●
飯匙
● ● ● ● ●
量杯
● ● ● ● ●
說明書
● ● ● ● ●
產品尺寸與重量
尺寸(公釐)
220x203x203 240x310x255 240x310x255 240x310x255 220x308x260
淨重(公斤)
2.1 2.5 2.7 3.2 2.8
產品規格

3029
型 名
TAC-10G TAC-10Q TAC-10GS TAC-11A TAC-11B
人份
10 10 10 11 11
內鍋容量 ( 公升 )
4 4 4 4 4
電壓(依出貨地)
10V/120V/220V/240V
消耗功率
烹煮時
700W 700W
700W(CCC)
800W(UL)
760W 700W
保溫時
40W 40W 40W 40W 40W
保溫開關
● ● ●
配件(材質)
內鍋
內鍋蓋
●
蒸盤
●
飯匙
● ● ● ● ●
量杯
● ● ● ● ●
說明書
● ● ● ● ●
產品尺寸與重量
尺寸(公釐)
265x348x290 265x348x295 265x348x290 272x372x310 258x369x312
淨重(公斤)
3.6 3.9 3.8 5 5.4
TAC-11KN TAC-11KA TAC-11QN TAC-15 TAC-15GS TAC-20 TAC-20S
11 11 11 15 15 20 20
4 4 4 6 6 9 9
760W 760W 700W 1000W 1000W 1200W 1200W
40W 40W 40W 50W 50W 80W 80W
● ● ● ●
● ●
● ● ●
● ● ●
● ● ● ● ● ● ●
● ● ● ● ● ● ●
● ● ● ● ● ● ●
265x348x290 272x372x310 265x348x290 290x285x330 290x285x330 315x418x370 315x418x370
4.7 4.7 4.7 5.2 5.4 5.9 6.3
SUS304 不鏽鋼
SUS304 不鏽鋼 + 奈米陶瓷塗層
★ 以上規格配件僅供參考,依各機型實際出貨狀況為準,規格變更恕不另行通知。
★ 產品電壓依出貨地不同而不同,請依實際出貨產品正確使用電壓規格!

3231
故障排除
1 無電源?
請確認電鍋電源線插頭是否已插上插座或者插座之過負載裝置已跳開。
2 無法進行烹煮動作?
請確認烹煮開關是否已經按下或者電源插頭是否已插上。
3 食物無法蒸煮為熟食
請確認蒸煮時,鍋蓋是否已緊閉或者水量是否已充足加入外鍋內。
4 電鍋之電源線為分離式時,無電源?
請確認與鍋體接觸處之接頭,是否有污損或因為潮濕產生銅綠,請即刻報修取得替代電源
線,以免發生火災造成危險。
33
34
34
34
35
36
38
38
39
41
42
45

3433
1 2
3 4
5 6
1 2

3635
TAC-06Q/10Q
/11QN
1
2
3
4
4
1
2
2
3
3
4
1
2
3
4
TAC-11KN/15GS
4
4
4
2
2
2
2
x 6
6
1 2
x 1.5
3 4

3837
5 6
7 8
9
•
•
•
•
•
•
•
•
•
ページが読み込まれています...
ページが読み込まれています...
ページが読み込まれています...
ページが読み込まれています...
ページが読み込まれています...
-
 1
1
-
 2
2
-
 3
3
-
 4
4
-
 5
5
-
 6
6
-
 7
7
-
 8
8
-
 9
9
-
 10
10
-
 11
11
-
 12
12
-
 13
13
-
 14
14
-
 15
15
-
 16
16
-
 17
17
-
 18
18
-
 19
19
-
 20
20
-
 21
21
-
 22
22
-
 23
23
-
 24
24
-
 25
25


他の言語で
- français: Tatung TAC-11KN(UL) Mode d'emploi
- English: Tatung TAC-11KN(UL) User guide
その他のドキュメント
-
Siruba VC008 Air Type 取扱説明書
-
Panasonic SR-SG501 Operating Instructions Manual
-
-
Tiger JBX-B Series White Micom Rice Cooker ユーザーマニュアル
-
Cuckoo CRP-JHVR1009F 取扱説明書
-
Tiger JBX-A Series Black Micom Rice Cooker ユーザーマニュアル
-
-
-
LG LGW150.AITAPG 取扱説明書
-