
English 3
繁體中文8
STDR5206

FIG. A
FIG. B FIG. C
3
1
2
4
4
5
5
5
6

FIG. D
FIG. F
FIG. H
FIG. J
FIG. E
FIG. G
FIG. I
FIG. K
5
6
7
1
1
2
2
2
10
8
7
1
8
9

3
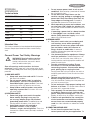
ENGLISH
STDR5206
SCREWDRIVER
Intended Use
This Stanley screwdriver has been designed for driving drywall
fasteners through drywall board into timber or metal framing
studs.
General Power Tool Safety Warnings
@
WARNING! Read all safety warnings
and all instructions. Failure to follow the
warnings and instructions may result in electric
shock, fire and/or serious injury.
Save all warnings and instructions for future
reference.The term “power tool” in the warnings refers to your
mains-operated (corded) power tool or battery-operated (cordless)
power tool.
1) work area safety
a) Keep work area clean and well lit. Cluttered or
dark areas invite accidents.
b) Do not operate power tools in explosive
atmospheres, such as in the presence of
flammable liquids, gases or dust. Power tools
create sparks which may ignite the dust or fumes.
c) Keep children and bystanders away while
operating a power tool. Distractions can cause
you to lose control.
2) electrical safety
a) Power tool plugs must match the outlet.
Never modify the plug in any way. Do
not use any adapter plugs with earthed
(grounded) power tools. Unmodified plugs and
matching outlets will reduce risk of electric shock.
b) Avoid body contact with earthed or
grounded surfaces, such as pipes,
radiators, ranges and refrigerators. There is an
increased risk of electric shock if your body is earthed or
grounded.
c) Do not expose power tools to rain or wet
conditions. Water entering a power tool will increase
the risk of electric shock.
d) Do not abuse the cord. Never use the
cord for carrying, pulling or unplugging the
power tool. Keep cord away from heat, oil,
sharp edges or moving parts. Damaged or
entangled cords increase the risk of electric shock.
e) When operating a power tool outdoors, use
an extension cord suitable for outdoor use.
Use of a cord suitable for outdoor use reduces the risk of
electric shock.
f) If operating a power tool in a damp location
is unavoidable, use a residual current
device (RCD) protected supply. Use of an RCD
reduces the risk of electric shock.
3) Personal safety
a) Stay alert, watch what you are doing and
use common sense when operating a
power tool. Do not use a power tool while
you are tired or under the influence of
drugs, alcohol or medication. A moment of
inattention while operating power tools may result in
serious personal injury.
b) Use personal protective equipment. Always
wear eye protection. Protective equipment such
as dust mask, non-skid safety shoes, hard hat, or
hearing protection used for appropriate conditions will
reduce personal injuries.
c) Prevent unintentional starting. Ensure
the switch is in the off-position before
connecting to power source and/or battery
pack, picking up or carrying the tool.
Carrying power tools with your finger on the switch or
energising power tools that have the switch on invites
accidents.
d) Remove any adjusting key or wrench
before turning the power tool on. A wrench or
a key left attached to a rotating part of the power tool
may result in personal injury.
e) Do not overreach. Keep proper footing and
balance at all times. This enables better control of
the power tool in unexpected situations.
f) Dress properly. Do not wear loose clothing
or jewellery. Keep your hair, clothing and
gloves away from moving parts. Loose clothes,
jewellery or long hair can be caught in moving parts.
g) If devices are provided for the connection
of dust extraction and collection facilities,
ensure these are connected and properly
used. Use of dust collection can reduce dust-related
hazards.
4) Power tool use and care
a) Do not force the power tool. Use the
correct power tool for your application. The
SPECIFICATION STDR5206
Voltage V 110
Ampers A 5
Power input W 520
No-load speed /min 0-4500
Chuck mm 6.35
Cable Length m 2
Weight kg 1.4
Technical data

4
ENGLISH
correct power tool will do the job better and safer at
the rate for which it was designed.
b) Do not use the power tool if the switch
does not turn it on and off. Any power tool that
cannot be controlled with the switch is dangerous and
must be repaired.
c) Disconnect the plug from the power source
and/or the battery pack from the power
tool before making any adjustments,
changing accessories, or storing power
tools. Such preventive safety measures reduce the
risk of starting the power tool accidentally.
d) Store idle power tools out of the reach
of children and do not allow persons
unfamiliar with the power tool or these
instructions to operate the power tool. Power
tools are dangerous in the hands of untrained users.
e) Maintain power tools. Check for
misalignment or binding of moving parts,
breakage of parts and any other condition
that may affect the power tool’s operation.
If damaged, have the power tool repaired
before use. Many accidents are caused by poorly
maintained power tools.
f) Keep cutting tools sharp and clean. Properly
maintained cutting tools with sharp cutting edges are
less likely to bind and are easier to control.
g) Use the power tool, accessories and
tool bits etc. in accordance with these
instructions, taking into account the
working conditions and the work to be
performed. Use of the power tool for operations
different from those intended could result in a
hazardous situation.
5) service
a) Have your power tool serviced by a
qualified repair person using only identical
replacement parts. This will ensure that the safety
of the power tool is maintained.
SPECIFIC SAFETY RULESV
Warning! Know your drywall screwdriver. Do
not plug the tool into the power source until you
have read and understand this Instruction Manual.
Learn the tool’s applications and limitations, as
well as the specific potential hazards related to
this tool.
f Following this rule will reduce the risk of electric
shock, fire, or serious injury.
f Always wear eye protection. Any power tool can
throw foreign objects into your eyes and cause permanent
eye damage. ALWAYS wear safety goggles (not glasses).
f Never use the drywall screwdriver to drive screws other
than drywall screws. The drywall screwdriver and the
screwdriver bits are designed specifically for driving
drywall screws.
f Only use screwdriver bits that are designed for use with
this tool.
f Always keep hands out of the path of the drywall screw.
Avoid awkward hand positions where a sudden slip could
cause your hand to move into the path of the saw blade.
f Make sure there are no nails or foreign objects in
the part of the workpiece to be cut or sanded.
f To avoid injury from accidental starting, always remove the
plug from the power source before installing or removing
a screwdriver bit or when adjusting the depth control.
f Always check the wall area where screws will be driven to
be sure there are no hidden electrical
wires in the area.
f Never leave the Lock-on button ON. Before plugging
the tool into the power source, make sure the lock-on
button is OFF.
f Hold power tool by insulated gripping surfaces,
when performing an operation where the fastener
may contact hidden wiring or its own cord. Fasteners
contacting a “Live“ wire may make exposed metal parets
of power tool “Live“ and could give the operator an
electric shock.
GENERAL SAFETY WARNINGS
Warning! Wear a dust mask that is designed to be used
when operating a power tool in a dusty environment.
Warning! Dust that is created by power sanding, sawing,
grinding, drilling, and other construction activities may contain
chemicals that are known to cause cancer, birth defects, or
other genetic abnormalities. These chemicals include:
f Lead from lead-based paints
f Crystalline silica from bricks, cement, and other
masonry products
f Arsenic and chromium from chemically treate lumber
The level of risk from exposure to these chemicals varies,
according to how often this type of work is performed. In
order to reduce exposure to these chemicals, work in a well-
ventilated area, and use approved safety equipment, such as a
dust mask that is specifically designed to filter out microscopic
particles.
Electrical safety
Your tool is double insulated; therefore no earth
wire is required. Always check that the main voltage
corresponds to the voltage on the rating plate.
Warning! If the power cord is damaged, it must
be replaced by the manufacturer, authorized

5
ENGLISH
Stanley Service Center or an equally qualified person in order
to avoid damage or injury. If the power cord is replaced by an
equally qualified person, but not authorized by Stanley, the
warranty will not be valid.
Using an extension cable
If an extension cable is requred, use an approved extension
cable suitable for the power input of this tool (see technical
data). The minimum conductor size is 1.5 mm2.
When using a cable reel, always unwind the cable completely.
Also refer to the table below.
Conductor size (mm
2
)
Cable rating (Amperes)
0.75 6
1.00 10
1.50 15
2.50 20
4.00 25
Cable length (m)
7.5 15 25 30 45 60
Voltage Amperes Cable rating (Amperes)
115 0 - 2.0 6 6 6 6 6 10
2.1 - 3.4 6 6 6 6 15 15
3.5 - 5.0 6 6 10 15 20 20
5.1 - 7.0 10 10 15 20 20 25
7.1 - 12.0 15 15 20 25 25 -
12.1 - 20.0 20 20 25 - - -
230 0 - 2.0 6 6 6 6 6 6
2.1 - 3.4 6 6 6 6 6 6
3.5 - 5.0 6 6 6 6 10 15
5.1 - 7.0 10 10 10 10 15 15
7.1 - 12.0 15 15 15 15 20 20
12.1 - 20.0 20 20 20 20 25 -
Labels on tool
The following symbols are shown on the tool:
:
WARNING! To reduce the risk of injury,
the user must read the instruction manual.
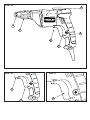
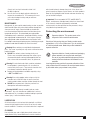
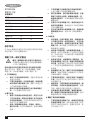
FEATURES (Fig. A)
1. Depth stop
2. Depth adjuster
3. Belt clip
4. Forward/Reverse switch
5. Variable speed trigger switch
6. Lock-on button
CONTENTS
Carefully unpack the drywall screwdriver. Compare the
contents against the “Drywall screwdriver components”
chart below.
ASSEMBLY AND OPERATING
Warning! To avoid fire or toxic reaction, never use gasoline,
naphtha, acetone, lacquer thinner or similar highly volatile
solvents to clean the tool.
Forward/Reverse switch (Fig. B)
The forward/reverse switch (4) is conveniently mounted in
front of the variable speed trigger switch (5). To make the
screwdriver rotate clockwise for driving screws, push the
forward/reverse switch (4) to the left. To make the screwdriver
rotate counter-clockwise to remove screws, push the forward/
reverse switch (4) to the right.
Notes:
a. Never change the position of the forward/reverse
switch (4) while the screwdriver bit is turning.
b. The variable speed trigger switch (5) will NOT function
with the forward/reverse switch (4) in the middle position.
Variable speed trigger switch (Fig. C)
This screwdriver is equipped with a variable speed
On/Off trigger switch.
1. To start screwdriver, gently squeeze the variable
speed trigger switch (5).
Note: The screwdriver will turn at its slowest speed
when the variable speed trigger switch is depressed
slightly. The screwdriver will turn at its fastest speed
when the variable speed trigger switch is fully depressed.
2. To stop the screwdriver, release the variable speed
trigger switch (5).
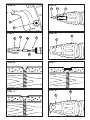
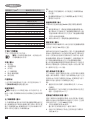
Lock-on button (Fig. D)
The lock-on button feature allows the trigger switch to be
locked in the ON position at full speed when continuous
operation for extended periods of time is required.
To lock the lock-on button in the ON position, pull back on the
variable speed trigger switch (5) to start the screwdriver and push
the lock-on button (6) into the screwdriver handle. Release the
variable speed trigger switch while holding the lock-on button
into the screwdriver handle. The screwdriver will continue to run. To
release the lock-on button, pull variable speed trigger switch back
(5) and then release the trigger.
Note: Operating the screwdriver with the variable speed trigger
switch for an extended period of time may cause the screwdriver
motor to overheat. If the screwdriver gets hot, stop driving screws
and allow it to cool for at least 15 minutes.
Inserting a screwdriver bit (Fig. E)
This tool has a magnetic bit holder that provides convenient bit
changes. To install a bit, simply insert the hex bit shank (7)
into the magnetic bit holder (8) that is located inside the depth
stop (1). Push the bit into the magnetic bit holder until the
magnet holds the bit in place.

6
ENGLISH
Notes:
a. Use only 1” (25 mm) long bits that are designed for
use in driving drywall screws.
b. Make sure the bit size is correct for the drywall screws
being driven. This will usually be a #2 size.
Replacing the magnetic bit holder (Fig. F)
If the magnetic bit holder becomes worn or damaged, it must
be replaced. The replacement bit holder must be of the same
dimensions as the original and have the ANSI retention groove
on the end that is inserted into the tool.
1. Remove the nosepiece (2) by turning it counter clockwise.
Note: Do not use pliers on the nosepiece. Only use
your hand.
2. Grasp the screwdriver bit (7) with pliers and pull it out
of the magnetic bit holder (8).
3. Grasp the large end of the bit holder with pliers and
pull it straight out of the screwdriver spindle (9).
4. Reverse the process by inserting the replacement
magnetic bit holder into the tool.
Note: When inserting the replacement for magnetic
bit holder, gently tap it into place to make sure it is
fully inserted. Grasp the large end of the magnetic bit
holder to ensure the retention groove (10) is holding
the magnetic bit holder in place in the tool.
5. Reinstall the screwdriver bit and nose piece.
SAFETY RECOMMENDATIONS
Check the following every time you use the screwdriver:
1. Wear safety glasses or a mask.
2. Use hearing protection.
3. The screwdriver tip is the right size and it is
in good condition.
4. No power cables “live” where you are inserting the screws.
Note: Failure to follow these safety rules will significantly
increase the risk of injury.
Adjusting the screwdrive bit depth (Fig. G)
It is important to control the depth to which the drywall screw
will be driven. Over driving the screw will drive the screw too
deep and break the outer paper layer of the drywall. Under
driving the screw will leave the screw head above the drywall
surface making it impossible to properly finish the drywall.
The depth control system is made up of the depth stop (1) and
the depth adjuster (2).
Warning! The following adjustments should always be
verified using a scrap piece of drywall to avoid damaging the
“good” drywall sections.
1. Rotate the depth adjuster counter clockwise until
approximately 1/4” of the screwdriver bit extends
beyond the depth stop.
2. Place a drywall screw onto the screwdriver bit. The
magnetized bit will hold the screw onto the bit.
Note: Before driving the screw, press the screw
point into the drywall and make sure the screw is
perpendicular to the drywall.
3. Press the screw against the drywall with steady even
pressure and squeeze the trigger switch. The clutch
in the tool will engage and the screw will be driven to
the preset depth.
4. If the screw is not driven deep enough, the head of the
screw will not be recessed into the drywall (Fig. H). In
this case, turn the depth adjustment sleeve clockwise
until the correct depth has been achieved. If the screw is
driven too deep, it will be recessed too far into the drywall
and the outer paper of the drywall will be fractured (Fig.
I). In this case, turn the depth adjustment sleeve counter
clockwise until the correct depth has been achieved. Fig.
J illustrates the correct depth for the screw to be driven.
Note: For each revolution the depth adjustment
sleeve is rotated, the depth will increase/decrease
approximately 1/16” (1.6 mm).
Tips for driving drywall screws
f Always drive the screws perpendicular to the drywall so
the heads are properly countersunk. They should never be
driven at an angle.
f Support the tool with both hands wherever possible.
This will provide better control over the tool help eliminate
screws being driven at an angle.
f Place the drywall screw on the screwdriver bit. The
magnetic bit holder will hold any steel screw for easy
starting.
f Press the screw against the drywall with steady even
pressure and squeeze the variable speed trigger switch.
The clutch in the tool will engage and the screw will be
driven to the preset depth. Once fully driven, the
clutch will make a chattering sound until the variable
speed trigger is released.
f When the screw is properly driven, the screw head will
be slightly countersunk into the drywall without
breaking the outer drywall paper. At this point, the
clutch will release to prevent over driving the screw.
This will result in minimum work to fill the holes and
taping the seams.
f The belt clip allows you to conveniently attached the
screwdriver to your belt. This will allow you to use both
hands for positioning the drywall.
Removing drywall screws (Fig. K)
To remove drywall screws, remove the depth stop (1) to
expose the screwdriver bit.
Notes:
a. The depth stop is a press fit onto the depth adjuster (2).

7
ENGLISH
Simply twist and pull outward to slide it off
the depth adjuster.
b. You can also turn the depth adjuster clockwise to
expose the screwdriver bit. This however will cause
you to lose the depth setting and you will have
to re-set the depth.
MAINTENANCE
Keep guards, air vents and the motor housing as clear as possible
of dust and dirt. Wipe with a clean cloth and blow through with
a low-pressure air supply. Excessive build-up of metal dust
can cause tracking of electrical current from the internal parts
to exposed metal parts. Do not overload your angle grinder.
Overloading causes a reduction in speed and efficiency, causing
your angle grinder to become too hot. If this happens, operate
your angle grinder under no load for one or two minutes until it
has cooled to normal operating temperature. Switching your angle
grinder off under load will reduce the life of the switch.
Warning! When servicing, use only identical replacement
parts. The use of any other part may create a hazard or cause
product damage.
f DO NOT use solvents when cleaning plastic parts.
Plastics are susceptible to damage from various types
of commercial solvents and may be damaged by their use.
Use a clean cloth to remove dirt, dust, oil, grease etc.
Warning! Do not allow brake fluids, gasoline, petroleum-
based products, penetrating oils, etc. to come into
contact with plastic parts. They contain chemicals that
can damage, weaken or destroy plastic.
f Remove accumulated dust and debris regularly using
a SOFT and DRY brush.
Warning! Use safety goggles when using an air jet to
blow dust out of the tool. Keep air vents clean and
unobstructed to allow maximum airflow through the tool.
f DO NOT abuse power tools. Abusive practices can
damage the tool and the workpiece.
Warning! DO NOT attempt to modify tools or create
accessories. Any such alteration or modification is misuse
and could result in a hazardous condition leading to possible
serious injury. It will also void the warranty.
LUBRICATION
All of the bearings in this tool are lubricated with a sufficient
amount of high-grade lubricant for the life of the unit under
normal conditions. Therefore, no further lubrication is required.
CLEANING
Use only mild soap and a slightly damp cloth to clean your
angle grinder. Many household cleaners contain chemicals
which could seriously damage the plastic. Also, do not use
petrol, turpentine, lacquer or paint thinners or similar products.
Never let any liquid get inside the tool and never immerse any
part of the tool into liquid.
Important! To assure product SAFETY and RELIABILITY,
repairs, maintenance and adjustment (other than those listed
in this manual) should be performed by authorized
service centers or other qualified service personnel, always
using identical replacement parts.
Protecting the environment
Separate collection. This product must not be
disposed of with normal household waste.
Should you nd one day that your Stanley product needs
replacement, or if it is of no further use to you, do not dispose
of it with household waste. Make this product available for
separate collection.
Separate collection of used products and packaging
allows materials to be recycled and used again.
Re-use of recycled materials helps prevent environ-
mental pollution and reduces the demand for raw
materials.
Local regulations may provide for separate collection of elec-
trical products from the household, at municipal waste sites or
by the retailer when you purchase a new product.

8
繁體中文
STDR5206
電動起子機
技術資料
規格 STDR5206
電壓 V 110
安培數 A 5
輸入功率 W 520
空載速度 /min 0-4500
夾頭 mm 6.35
纜線長度 m 2
重量 kg 1.4
設計用途
本 Stanley 電動起子機設計用於透過石膏板將石膏板
緊固件鑽入木材或金屬框架柱。
電動工具一般安全警告
@
警告!請閱讀所有安全警告及使用指示。
不遵循這些警告和指示可能會導致觸電、
火災及/或嚴重傷害。
請妥善保存所有的警告和使用手冊以備將來查閱。
警告中的名詞「電動工具」是指電源驅動 (插電)
電動工具,或者電池驅動 (充電) 電動工具。
1) 工作場地安全
a) 保持工作場地清潔和明亮。混亂或黑暗的場
地會引發事故。
b) 不要在易爆環境,如有易燃液體、氣體或塵
埃的環境中操作電動工具。電動工具產生的
火花會點燃塵埃或氣體。
c) 請等待兒童和旁觀者離開之後才操縱電動工
具。分心會導致您疏於控制。
2) 電力安全
a) 電動工具插頭必須與插座相符。請勿以任何
方式改裝插頭。需接地的電動工具不能使用
任何配接器插頭。未經改裝的插頭和相符的
插座可以減少觸電危險。
b) 避免人體接觸接地表面,如管道、散熱片、
爐灶和冰箱。若您的身體接地,會增加觸電
危險。
c) 不得將電動工具暴露在雨中或潮濕環境中。
水進入電動工具會增加觸電危險。
d) 請勿濫用電線。請勿使用電線來搬運、拉動
電動工具或拔出插頭。讓電線遠離熱、油、
銳邊或活動部件。受損或纏繞的電線可增加
觸電危險。
e) 若要在戶外使用電動工具,請使用適合戶外
使用的延長電線。使用適合戶外使用的電線
可減少觸電危險。
f) 若必須在潮濕場合使用電動工具,請使用漏
電保護器 (RCD)。使用 RCD 可降低觸電危
險。
3) 人身安全
a) 保持警覺;在操作電動工具時,請留意所執
行的操作並按照一般的常識執行。切勿在疲
倦,或受到藥物、酒精或治療的影響下操作
電動工具。操作電動工具期間註意力分散會
導致嚴重人身傷害。
b) 使用個人防護裝置。始終佩戴護目裝備。防
護裝置,例如在適當條件下可使用的防塵面
具、防滑安全鞋、安全帽或聽力保護等裝置
可減少人身傷害。
c) 避免意外啟動。連接電源及/或電池組、撿
取或搬運電動工具之前,請確定開關處於關
閉位置。搬運電動工具時若將手指放在開關
上,或是在接通開關電源時插入插頭都會引
發危險。
d) 接通電動工具之前,請卸下所有的調整鑰匙
或扳手。遺留在電動工具旋轉部件上的扳手
或鑰匙會導致人身傷害。
e) 不要過度伸張雙手。時刻註意腳下與身體的
平衡。如此即可在發生意外的情況下更好地
控制電動工具。
f) 適當穿著。不要穿寬鬆衣服或佩戴飾品。讓
您的頭髮、衣服和手套遠離活動部件。寬鬆
衣服、佩飾和長髮可能會捲入活動部件。
g) 若配備用於連接排屑裝置、集塵設備的裝
置,請確定正確連接和使用這些裝置。使用
集塵設備可減少與塵埃有關的危險。
4) 電動工具的使用與維護
a) 不要超負荷使用電動工具。根據您的用途使
用適當的電動工具。使用適當的電動工具在
其設計可負荷的應用內,會讓您更有效、更
安全地執行工作。

9
繁體中文
b) 若開關不能開啟或關閉電源,請勿使用該電
動工具。不能用開關來控制的電動工具將存
在危險,因此必須進行修理。
c) 在執行任何調整、更換配件或儲存工具之
前,必須從電源上拔掉插頭及/或卸下電池
組。這類防護性措施可降低電動工具意外啟
動的風險。
d) 將閒置的電動工具儲存在兒童無法接觸的地
方,並且不要讓不熟悉電動工具或對這些使
用指示不瞭解的人員操作電動工具。電動工
具在未經培訓的使用者手中會發生危險。
e) 維護電動工具。檢查活動部件是否對準或卡
住、破損情況以及是否存在影響電動工具運
行的其他情況。若有損毀,必須在使用之前
修理電動工具。許多事故都是由於欠缺維護
電動工具所導致。
f) 保持刀具鋒利和清潔。妥善維護、切削鋒利
的切割工具不會輕易卡住並可更輕鬆控制。
g) 遵循使用指示以及工作條件和所要執行的工
作使用電動工具、配件和工具刀頭等。不按
照設計目的使用電動工具會導致危險。
5) 檢修
a) 本電動工具必須由合格的維修人員並只採用
相同的原廠零件來執行檢修。這將確保電動
工具的安全性。
特殊安全規則
警告!了解您的石膏板螺絲起子。請在閱讀並理
解本使用手冊後將該工具插入電源。了解該工具的
應用與限制,以及與該工具有關的特定潛在危害。
f 遵循此規則可降低觸電、火災或嚴重傷害的風
險。
f 始終佩戴護目裝備。任何電動工具都可能拋撒異
物到您的眼睛中,並對眼睛造成永久傷害。始終
佩帶護目鏡 (並非眼鏡)。
f 切勿使用石膏板螺絲起子來鑽入石膏板螺絲以外
的螺絲。石膏板螺絲起子和螺絲起子頭專為鑽入
石膏板螺絲而設計。
f 請僅使用設計用於本工具的螺絲起子頭。
f 始終將雙手放在石膏板螺絲的路徑以外。避免不
正確的手部位置,突然打滑會造成手部移到鋸片
路 徑 中。
f 確保要切割或砂光的工件部分中無指甲或異物。
f 要避免意外啟動造成的傷害,務必在安裝或移除
螺絲起子頭前或調節深度控制時從電源插座拔
出 插 頭。
f 始終檢查螺絲將被鑽入所在的牆壁區域以確保其
中無隱藏電線。
f 切勿讓鎖定按鈕處於 ON (開啟) 狀 態。在 將 此 工
具插入電源插座前,確保鎖定按鈕處於 OFF (關
閉) 位 置。
f 若在執行操作時緊固件可能會接觸隱藏的電線
或 它 本 身 的 電 線,請從絕緣手柄表面握住電動工
具。若扣件接觸到「帶電」導線,電動工具金屬部
件表面就會「帶電」,從而導致操作人員觸電。
一般安全警告
警 告!當在多塵環境中操作電動工具時,需佩帶設
計使用的防塵面具。
警 告!電動砂光、切鋸、打磨、鑽孔以及其他建造操
作所導致的粉塵可能包含已知會導致癌症、生育缺陷
或其他生殖異常的化學物。這些化學物包括:
f 來自含鉛油漆的鉛
f 來自磚石、水泥與其他建工產品的結晶二氧化矽
f 來自化學處理木材的砷和鉻
根據此類工作執行的頻率,暴露於這些化學物的風險
級別有所差異。為了減少暴露於這些化學物,需在通
風性好的區域工作,以及使用經認證的安全設備,例
如經特別設計用於過濾微觀粒子的防塵面具。
電氣安全
您的工具經過雙重絕緣,因此不需要
使用接地線。請務必檢查主電壓是否與銘牌
一 致。
警 告!若電源線受損,必須由製造廠商、授權
的 Stanley 維修中心或類似的合格人員進行更
換以避免發生損壞或傷害。如果您的電源線
由非 Stanley 所授權的類似合格人員所更換,
則保固將無效。
使用延長電纜
若需要使用延長電纜,請使用適合本工具電源輸入的
認證延長電纜 (參閱技術資料)。導電體的最小尺寸
為 1.5 mm2。
使用電纜捲筒時,每次必須把電纜完全展開。還請參
閱 下 表。

10
繁體中文
導電體尺寸 (mm
2
)
纜線額定電流 (安培)
0.75 6
1.00 10
1.50 15
2.50 20
4.00 25
纜線長度 (m)
7.5 15 25 30 45 60
電壓 安培 纜線額定電流 (安培)
115 0 - 2.0 6 6 6 6 6 10
2.1 - 3.4 6 6 6 6 15 15
3.5 - 5.0 6 6 10 15 20 20
5.1 - 7.0 10 10 15 20 20 25
7.1 - 12.0 15 15 20 25 25 -
12.1 - 20.0 20 20 25 - - -
230 0 - 2.0 6 6 6 6 6 6
2.1 - 3.4 6 6 6 6 6 6
3.5 - 5.0 6 6 6 6 10 15
5.1 - 7.0 10 10 10 10 15 15
7.1 - 12.0 15 15 15 15 20 20
12.1 - 20.0 20 20 20 20 25 -
工具上的標籤
工具上可能會附帶下列符號:
:
警告!若要降低傷害危險,使用者必須
仔細閱讀使用手冊。
功能(圖 A)
1. 限深器
2. 深度調節器
3. 皮帶扣
4. 正/反轉開關
5. 變速 觸發開關
6. 鎖定按鈕
內含物品
小心打開石膏板螺絲起子包裝。將內含物品與以下
「石膏板 螺絲 起子 元件」圖比 較。
裝配與操作
警 告!為避免火災或毒性反應,切勿使用汽油、石
腦 油、丙 酮、漆 稀 釋 劑 或 類 似 的 高 揮 發 性 溶 劑 來 清 潔
工 具。
正/反轉開關(圖 B)
正/反轉開關 (4) 便利地安裝於變速觸發開關 (5) 的正
面。要讓螺絲起子順時針旋轉以鑽入螺絲,需向左推
動正/反轉開關 (4)。要讓螺絲起子逆時針旋轉以取下
螺絲,需向右推動正/反轉開關 (4)。
注:
a. 螺絲起子頭在轉動時,切勿變更正/反轉開關 (4)
的 位 置。
b. 變速 觸發開關 (5) 在正/反轉開關 (4) 處於中間位
置 時 將 不 起 作 用。
變速觸發開關
(圖 C)
本螺絲起子配備有變速 On/Off (開啟/關閉) 觸發開
關。
1. 要啟動螺絲起子,需輕輕按壓變速觸發開關 (5)。
注:螺絲起子在輕輕按下變速觸發開關時將以最
低速度旋轉。螺絲起子在完全按下變速觸發開關
時將以最高速度旋轉。
2. 要停止螺絲起子,需鬆開變速觸發開關 (5)。
鎖定按鈕(圖 D)
當需要長時間持續操作時,鎖定按鈕功能讓觸發開關
在全速下鎖定於 ON (開啟) 位 置。
要將鎖定按鈕鎖定於 ON (開啟) 位 置,拉 回 變 速 觸 發 開
關 (5) 以啟動螺絲起子並將鎖定按鈕 (6) 推入螺絲起子
手柄。在將鎖定按鈕保持在螺絲起子手柄中時,鬆開
變速觸發開關。螺絲起子將繼續運行。要鬆開鎖定按
鈕,將 變 速 觸 發 開 關 (5) 拉回,然後鬆開觸發開關。
注:使用變速觸發開關長時間操作螺絲起子可能造成
螺絲起子電機過熱。若螺絲起子變熱,則停止鑽入螺
絲,讓 其 冷 卻 至 少 15 分 鐘。
插 入 螺 絲 起 子 頭( 圖 E)
本工具擁有一個磁力鑽頭夾持器,可提供便利的鑽頭
變動。要安裝鑽頭,只需將六角形鑽頭軸 (7) 插入位於
限深器 (1) 內的磁力鑽頭夾持器 (8)。將 鑽 頭 推 入磁 力
鑽頭夾持器,直到磁力將鑽頭固定到位。
注:
a. 僅使用設計用於鑽入石膏板螺絲的長 1” (25 mm)
的 鑽 頭。
b. 確保鑽頭尺寸對於被鑽入的石膏板螺絲來說是正
確 的。這 裡 通 常 為 #2 尺 寸。
更換磁力鑽頭夾持器(圖 F)
若磁力鑽頭夾持器磨損或損壞,則必須更換。更換用
鑽頭夾持器必須與原鑽頭夾持器的尺寸相同,並且端
部具有用於插入工具的 ANSI 固 定 槽。
1. 逆時針旋轉將接頭 (2) 移 除。
注:請 勿 在 接 頭 使 用 鉗 子。僅 用 手 操 作。
2. 用鉗子夾住螺絲起子頭 (7) 並將其從磁力鑽頭夾
持器 (8) 拔 出。

11
繁體中文
3. 用鉗子夾住鑽頭夾持器的較大端,並直接從螺絲
起子軸 (9) 拔 出。
4. 透過將替換用磁力鑽頭夾持器插入工具,反向操
作 此 程 序。
注:當為磁力鑽頭夾持器插入替換件時,將其輕輕
敲擊到位,以確保完全插入。抓住磁力鑽頭夾持器
的較大端以確保固定槽 (10) 將磁力鑽頭夾持器在
工 具 中 固 定 到 位。
5. 重新安裝螺絲起子頭和接頭。
安全建議
每次使用螺絲起子時需檢查以下事項:
1. 佩 帶 安 全 護 目 鏡 或 面 具。
2. 使 用 聽 力 保 護 裝 置。
3. 螺絲起子頭為正確尺寸,並且處於良好的狀況。
4. 插 入 螺 絲 的 地 方 不 能 有「 帶 電 」的 電 線。
注:不遵循這些安全規則將顯著增加傷害危險。
調 節 螺 絲 起 子 頭 深 度( 圖 G)
務必要控制鑽入石膏板螺絲的深度。螺絲過度鑽入會
令螺絲鑽入太深,並破壞石膏板的外部紙層。螺絲鑽
入不足會讓螺絲頭位於石膏板表面以上,使得無法正
確 完 成 石 膏 板。
深度控制系統由限深器 (1) 和深度調節器 (2) 構 成。
警 告!應務必使用一塊廢石膏板來驗證下列調節,
以避免損壞「良好的」石膏板部分。
1. 逆時針旋轉深度調節器,直到螺絲起子頭的大約
1/4” 延 伸 出 限 深 器 以 外。
2. 在螺絲起子頭上放一個石膏板螺絲。磁力鑽頭將
螺絲固定在鑽頭上。
注:在鑽入螺絲前,將螺絲尖按入石膏板,並確保
螺絲與石膏板垂直。
3. 以平穩均勻的壓力將螺絲按到石膏板上,並按下
觸發開關。工具中的夾頭將接合,螺絲將被鑽入至
預 設 深 度。
4. 若螺絲被鑽入得不夠深,螺絲頭將無法嵌入到石
膏板 (圖 H) 中。在此情況下,需順時針旋轉深度調
節套管,直到達到正確的深度。若螺絲被鑽入得太
深,則過度嵌入到石膏板中並且石膏板得外層紙
將斷裂 (圖 I)。在此情況下,需逆時針旋轉深度調
節套管,直到達到正確的深度。圖 J 描述了要鑽入
螺 絲 的 正 確 深 度。
注:深度調節套管每旋轉一圈,深度就將增加/減
小大約 1/16” (1.6 mm)。
鑽入石膏板螺絲的提示
f 務必垂直於石膏板鑽入螺絲,以將螺絲頭正確裝
入 埋 頭 孔 。切 勿 將 其 以 一 定 角 度 鑽 入。
f 可能的話,雙手托住工具。這將對工具提供更好
的控制,從而有助於消除以一定角度鑽入螺絲的
情 況。
f 在螺絲起子頭上放石膏板螺絲。磁力鑽頭夾持器
將固定鋼螺絲以便於啟動。
f 以平穩均勻的壓力將螺絲按到石膏板上,並按下
變速觸發開關工具中的夾頭將接合,螺絲將被
f 鑽入至預設深度。一旦完全鑽入,夾頭將發出吱吱
聲,直到變速觸發開關被鬆開。
f 正確鑽入螺絲後,螺絲頭將略為嵌入到石膏板,而
不 需 破 壞 石 膏 板 外 部 紙 層。此 時,夾 頭 將 鬆 開 以
防止螺絲鑽入過度。這可將填孔和敲擊接合的工
作 減 到 最 少。
f 皮帶扣可用於方便地將螺絲起子連接到皮帶。這
讓您可用雙手定位石膏板。
取 下 石 膏 板 螺 絲( 圖 K)
要 取 下 石 膏 板 螺 絲,需 移 除 限 深 器 (1) 以暴露出螺絲
起 子 頭。
注:
a. 限深器壓合到深度調節器 (2) 上。只 需 要 扭 轉 並 向
外拉,就可以將限深器從深度調節器滑脫。
b. 您還可順時針旋轉深度調節器以暴露出螺絲起子
頭。但是,這會造成丟失深度設定,您將必須重設
深 度。
維護
讓防護罩、通風口和電動機外殼儘量無塵無污垢。用
乾淨的布條擦拭,並吹送低壓氣流進行清潔。金屬塵
埃過度積聚會導致內部零件的電流流動到暴露的金屬
零件上。請勿讓砂輪機過載。過載會導致速度和效率
下 降,從 而 造 成 砂 輪 機 變 得 太 熱。若 發 生 此 情 況,需
在無負載條件下操作砂輪機一兩分鐘,直到砂輪機冷
卻到正常的工作溫度。在負載條件下關閉砂輪機會縮
減 開 關 的 壽 命。
警 告!執行維修時,請僅使用相同的替換用零件。
使用任何其他零件會產生危險或導致產品損壞。
f 請勿使用溶劑來清洗塑料零件。塑料容易受到各
類商用溶劑的傷害,並導致損壞。使用乾淨的布
條 來 清 除 污 垢、塵 土、油、油 脂 等。

12
繁體中文
警 告!請勿讓制動液、汽油、石油產品、滲透油等接
觸到塑料零件。這些物件包含的化學物會損壞、
削弱或破壞塑料。
f 定期使用柔軟且乾燥的刷子來清除積聚的塵土
和 碎 片。
警 告!在使用噴氣吹除工具中的塵土時請佩帶護
目鏡。令通風口保持潔淨暢通,讓最大氣流通過
工 具。
f 請勿濫用電動工具。濫用實務可損壞工具和工
件。
警 告!請勿嘗試改裝工具或創造配件。任何此類改
動 或 修 改 皆 屬 誤 用,可 導 致 出 現 危 險 情 況,可 能 造 成
嚴重的人身傷害。還將令保固失效。
潤滑
正常條件下,本工具中的所有軸承在裝置的壽命內都
採用足量的高級潤滑劑進行潤滑。因此,不需要進一
步的潤滑。
清潔
請僅使用中性肥皂和略微打濕的布條清洗角磨機。許
多家用清潔劑包含可能嚴重損壞塑料的化學物質。另
外,請 勿 使 用 汽 油、松 節 油、漆 或 油 漆 稀 釋 劑 或 類 似 的
產品。不要讓任何液體進入工具,也不要讓工具的任
何 部 分浸 入 液 體 中。
重要資訊!為了確保產品安全及可靠,所有的維修、
維護和調整(除了本手冊中列出的之外),都應該由
授權的
維修中心或合格維修人員執行,並始終使用相同的替
換 部 件。
保護環境
個別收集。本產品必須與一般家居廢物分開
處置。
若您發現您的 Stanley 產品需要進行更換,或您已經
不再需要使用這些產品,請不要將它們與家庭廢物
一起處置。務必將本產品送往分類收集處。
個別收集用過的產品和包裝允許材料再循環
利用。重新使用循環利用的材料有助於防止
環境污染,並減少原材料的需求。
當地法規可能要求由市政廢物回收點,或由向您出
售新產品的經銷商來提供從家庭中分類收集電子產
品的服務。
進口商:永安實業股份有限公司
地址:新北市三重區新北大道二段137號
電話:02-29994633
-
 1
1
-
 2
2
-
 3
3
-
 4
4
-
 5
5
-
 6
6
-
 7
7
-
 8
8
-
 9
9
-
 10
10
-
 11
11
-
 12
12
-
 13
13


