
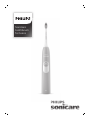
Sonicare
toothbrush
for teens


1
3
4
5
6
72
1


English
Introduction
Congratulations on your purchase and welcome to Philips! To fully
benefit from the support that Philips offers, register your product at
www.philips.com/welcome.
Important safety information
Read this important information carefully before you use the device
and save it for future reference.
Danger
- Keep the charger away from water. Do not place or store it over or
near water contained in a bathtub, washbasin, sink etc. Do not
immerse the charger in water or any other liquid. After cleaning,
make sure the charger is completely dry before you connect it to
the mains.
Warning
- The mains cord cannot be replaced. If the mains cord is damaged,
discard the charger.
- Always have the charger replaced with one of the original type in
order to avoid a hazard.
- Do not use the charger outdoors or near heated surfaces.
- If the appliance is damaged in any way (brush head, toothbrush
handle or charger), stop using it. This appliance contains no
serviceable parts. If the appliance is damaged, contact the
Consumer Care Centre in your country (see chapter ‘Guarantee
and support').
- This appliance is not intended for use by persons (including
children) with reduced physical, sensory or mental capabilities, or
lack of experience and knowledge, unless they have been given
supervision or instruction concerning use of the appliance by a
person responsible for their safety.
- Children should be supervised to ensure that they do not play with
the appliance.
Caution
- Do not clean the brush head, the handle or the charger in the
dishwasher.
6
English

- If you have had oral or gum surgery in the previous 2 months,
consult your dentist before you use the toothbrush.
- Consult your dentist if excessive bleeding occurs after using this
toothbrush or if bleeding continues to occur after 1 week of use.
Also consult your dentist if you experience discomfort or pain
when you use the Philips Sonicare.
- The Philips Sonicare toothbrush complies with the safety
standards for electromagnetic devices. If you have a pacemaker or
other implanted device, contact your physician or the device
manufacturer of the implanted device prior to use.
- If you have medical concerns, consult your doctor before you use
the Philips Sonicare.
- This appliance has only been designed for cleaning teeth, gums
and tongue. Do not use it for any other purpose. Stop using the
appliance and contact your doctor if you experience any
discomfort or pain.
- The Philips Sonicare toothbrush is a personal care device and is
not intended for use on multiple patients in a dental practice or
institution.
- Stop using a brush head with crushed or bent bristles. Replace the
brush head every 3 months or sooner if signs of wear appear. Do
not use other brush heads than the ones recommended by the
manufacturer.
- If your toothpaste contains peroxide, baking soda or bicarbonate
(common in whitening toothpastes), thoroughly clean the brush
head with soap and water after each use. This prevents possible
cracking of the plastic.
Electromagnetic fields (EMF)
This Philips appliance complies with all applicable standards and
regulations regarding exposure to electromagnetic fields.
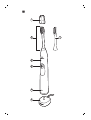
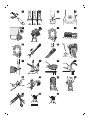
General description (Fig. 1)
1 Hygienic travel cap
2 Brush head with unique identifier
3 Handle
4 Power on/off button
5 Battery level indicator
7
English

6 Charger
7 TongueCare+ Tongue brush
- Not shown: Travel case
Note: The content of the box may vary based on the model
purchased.
Note: Brush head type may vary based on the model purchased
(different appearance as the picture shown here)
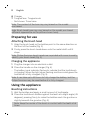
Preparing for use
Attaching the brush head
1 Align the brush head so the bristles point in the same direction as
the front of the handle (Fig. 2).
2 Firmly press the brush head down onto the metal shaft until it
stops.
Note: Philips Sonicare brush heads are imprinted with icons to easily
identify your brush head (Fig. 3).
Charging the appliance
1 Plug the charger into an electrical outlet.
2 Place the handle on the charger (Fig. 4).
- The battery level indicator flashes to indicate that the toothbrush
is charging. When the light stops flashing and turns solid green the
toothbrush is fully charged. (Fig. 5)
Note: It can take up to 48 hours to fully charge the battery, but the
Philips Sonicare may be used before it is fully charged.
Using the appliance
Brushing instructions
1 Wet the bristles and apply a small amount of toothpaste.
2 Place the toothbrush bristles against the teeth at a slight angle (45
degrees), pressing firmly to make the bristles reach the gumline or
slightly beneath the gumline (Fig. 6).
Note: Keep the center of the brush in contact with the teeth at all
times.
8
English

3 Press the power on/off and mode button to turn on the Philips
Sonicare.
4 Gently keep the bristles placed on the teeth and in the gumline.
Brush your teeth with small back and forth motion so the bristles
reach between the teeth. Continue this motion throughout your
brushing cycle.
Note: The bristles should slightly flare. Do not scrub.
5 To clean the inside surfaces of the front teeth, tilt the brush handle
semi-upright and make several vertical overlapping brushing
strokes on each tooth (Fig. 7).
Note: To make sure you brush evenly throughout the mouth,
divide your mouth into 4 sections using the Quadpacer feature
(see chapter ‘Features’).
6 Begin brushing in section 1 (outside upper teeth) and brush for 30
seconds before you move to section 2 (inside upper teeth).
Continue brushing in section 3 (outside lower teeth) and brush for
30 seconds before you move to section 4 (inside lower teeth (Fig.
8)).
7 After you have completed the brushing cycle, you can spend
additional time brushing the chewing surfaces of your teeth and
areas where staining occurs. (Fig. 9)
Your Philips Sonicare toothbrush is safe to use on:
- Braces (brush heads wear out sooner when used on braces)
Dental restorations (fillings, crowns, veneers)
Note: Ensure that braces or dental restorations are properly adhered
and not compromised. If not, braces or dental restorations may be
damaged when they come into contact with the brush head.
Note: When the Philips Sonicare toothbrush is used in clinical studies,
the handle should be fully charged and the Easy-start feature
deactivated.
Battery status (when handle is not on charger)
- A yellow battery level indicator indicates a low charge.
- A green battery level indicator indicates a high charge.
9
English

- The battery level indicator turns off when the battery is in between
a low and a high charge.
Note:When you hear 3 beeps and the yellow LED of the battery level
indicator flashes, this means the battery charge is below 10% and the
toothbrush should be recharged.
Note:To keep the battery fully charged at all times, you may keep the
Sonicare on the charger when not in use.
Features
Quadpacer
- The Quadpacer is an interval timer that has a short beep and
pause to remind you to brush the 4 sections of your mouth evenly
and thoroughly. (Fig. 10)
Smartimer
The Smartimer indicates that your brushing cycle is complete by
automatically turning off the toothbrush at the end of the brushing
cycle.
Dental professionals recommend brushing no less than 2 minutes
twice a day.
Note: If you press the power on/off button after you started the
brushing cycle, the toothbrush will pause. After a pause of 30
seconds, the Smartimer resets.
Easy-start
The Easy-start feature gently increases power over the first 14
brushings to help you get used to brushing with the Philips Sonicare
toothbrush. This Philips Sonicare toothbrush comes with the Easy-
start feature activated.
Activating or deactivating the Easy-start feature:
Place the handle in the plugged-in charger.
- To activate Easy-start:
Press and hold the power on/off button for 2 seconds. You hear 2
beeps and the battery level indicator lights up green to indicate
that the Easy-start feature has been activated.
10
English

- To deactivate Easy-start:
Press and hold the power on/off button for 2 seconds. You hear 1
beep and the battery level indicator lights up yellow to indicate
that the Easy-start feature has been deactivated.
Note: Each of the first 14 brushings must last at least 1 minute to move
through the Easy-start ramp-up cycle properly.
Note: Use of the Easy-start feature beyond the initial ramp-up period
is not recommended and reduces the effectiveness of the Philips
Sonicare toothbrush in removing plaque.
Attaching the TongueCare+ Tongue brush
1 Remove the brush head.
2 Align the TongueCare+ Tongue brush so the MicroBristles face the
front of the handle. (Fig. 11)
3 Firmly click the TongueCare+ Tongue brush down on the metal
shaft until it stops.
Using your TongueCare+ Tongue brush
Cleaning your tongue
1 Wet MicroBristles. (Fig. 12)
Note: Mouthwash can be used on the middle of the tongue before
using the TongueCare+ Tongue brush.
2 Place TongueCare+ Tongue brush so that MicroBristles are
positioned against your tongue and apply light pressure.
3 Turn power on, begin cleaning.
- Lightly rub the TongueCare+ Tongue brush front to back on the
tongue, going only as far back as is comfortable for you. (Fig. 13)
- Clean evenly over the entire tongue for 20 seconds.
4 Rinse and repeat to ensure a total of 3 times.
Getting comfortable
Using a powered tongue cleaner for the first time?
11
English

Tingling
Your tongue cleaner is powered by Philips Sonicare technology, with
31,000 vibrations per minute to get your tongue squeaky clean. These
vibrations are safe for the tongue, but you may experience some
tingling as you adjust. This is a normal reaction and usually fades after
a week of use.
Gagging
Any form of tongue cleaning can elicit a gag reflex for new users. To
avoid triggering a gagging response, start slowly and only bring your
TongueCare+ Tongue brush as far back as is comfortable, working
your way deeper over time as you adjust.
Cleaning
You should clean your Philips Sonicare toothbrush regularly to
remove toothpaste and other residue. Failure to clean your Philips
Sonicare toothbrush may result in an unhygienic product and
damage to it may occur.
Warning: Do not clean brush heads, the handle or the charger in the
dishwasher.
Toothbrush handle
1 Remove the brush head and rinse the metal shaft area with warm
water. Make sure you remove any residual toothpaste (Fig. 14).
Caution: Do not push on the rubber seal on the metal shaft with
sharp objects, as this may cause damage.
2 Wipe the entire surface of the handle with a damp cloth.
Brush head
1 Rinse the brush head and bristles after each use (Fig. 15).
2 Remove the brush head from the handle and rinse the brush head
connection with warm water at least once a week. Rinse the travel
cap as often as needed.
Charger
1 Unplug the charger before you clean it.
12
English

2 Wipe the surface of the charger with a damp cloth.
TongueCare+ Tongue brush
Do not clean TongueCare+ Tongue brush in dishwasher.
1 Rinse TongueCare+ Tongue brush after each use.
2 Remove TongueCare+ Tongue brush from the handle and rinse
the tongue brush connection at least once a week with warm
water.
Storage
If you are not going to use the product for a long time, unplug it, clean
it (see chapter 'Cleaning') and store it in a cool and dry place away
from direct sunlight.
Replacement
Brush head and TongueCare+ Tongue brush
Replace Philips Sonicare brush heads and TongueCare+ Tongue
brushes every 3 months to achieve optimal results. Use only Philips
Sonicare replacement brush heads and tongue brushes.
Ordering accessories
To buy accessories or spare parts, visit
www.shop.philips.com/service or go to your Philips dealer. You can
also contact the Philips Consumer Care Center in your country (see
the international warranty leaflet for contact details)
Recycling
- This symbol means that this product shall not be disposed of with
normal household waste (2012/19/EU) (Fig. 23).
- This symbol means that this product contains a built-in
rechargeable battery which shall not be disposed of with normal
household waste (Fig. 24) (2006/66/EC). We strongly advise you
to take your product to an official collection point or a Philips
service centre to have a professional remove the rechargeable
battery.
13
English

- Follow your country’s rules for the separate collection of electrical
and electronic products and rechargeable batteries. Correct
disposal helps prevent negative consequences for the
environment and human health.
Removing the rechargeable battery
Warning: Only remove the rechargeable battery when you
discard the appliance. Make sure the battery is completely
empty when you remove it.
Warning: Please note that this process is not reversible.
To remove the rechargeable battery, you need a towel or cloth, a
hammer and a flat-head (standard) screwdriver. Observe basic safety
precautions when you follow the procedure outlined below. Be sure
to protect your eyes, hands, fingers, and the surface on which you
work.
1 To deplete the rechargeable battery of any charge, remove the
handle from the charger, turn on the Philips Sonicare toothbrush
and let it run until it stops. Repeat this step until you can no longer
turn on the Philips Sonicare toothbrush.
2 Remove and discard the brush head. Cover the entire handle with
a towel or cloth (Fig. 16).
3 Hold the top of the handle with one hand and strike the handle
housing 0.5 inch above the bottom end. Strike firmly with a
hammer on all 4 sides to eject the end cap (Fig. 17).
Note: You may have to hit on the end several times to break the
internal snap connections.
4 Remove the end cap from the toothbrush handle. If the end cap
does not release easily from the housing, repeat step 3 until the
end cap is released (Fig. 18).
5 Holding the handle upside down, press the shaft down on a hard
surface. If the internal components do not easily release from the
housing, repeat step 3 until the internal components are released
(Fig. 19).
14
English

6 Remove the inner assembly from the housing by fully inserting a
small flat-head screwdriver into the slot opposite the circuit board
and pry until it comes apart (Fig. 20).
7 Grab the battery and pull it out of the internal assembly (Fig. 21).
Caution: Be aware of the sharp edges of the battery tabs so as
to avoid injury to your fingers.
8 Cut the battery wires from the circuit board close to the battery
(Fig. 22).
9 Cover the battery contacts with tape to prevent any electrical short
from residual battery charge. The rechargeable battery can now be
recycled and the rest of the product discarded appropriately.
Guarantee and support
If you need information or support, please visit
www.philips.com/support or read the separate worldwide guarantee
leaflet.
Guarantee restrictions
The terms of the international guarantee do not cover the following:
- Brush heads.
- Damage caused by use of unauthorised replacement parts.
- Damage caused by misuse, abuse, neglect, alterations or
unauthorised repair.
- Normal wear and tear, including chips, scratches, abrasions,
discolouration or fading.
15
English

简介
感谢您的惠顾,欢迎光临飞利浦! 为了让您能充分享受飞利浦提供的支
持,请在 www.philips.com/welcome 上注册您的产品。
重要安全信息
使用本产品之前,请仔细阅读本使用说明书,并
妥善保管以供日后参考。
危险
-
使充电器远离水源。 切勿将它放置或存放在任
何有水的容器的上方或附近,如:浴盆、脸盆、
水池等。切勿将充电器浸入水或任何其他液体中
。 清洁后,确保充电器完全干燥,再将其连接
至电源。
警告
-
必须安装需要固定的部件,以免它们掉入水中。
-
不得更换电源线。 如果电源线损坏,请丢弃充
电器。
-
应始终使用原装型号的充电器进行更换,以免发
生危险。
-
切勿在户外或高温表面附近使用充电器。
16
简体中文

-
如果本产品受到任何损坏(牙刷头、牙刷柄或充
电器),请勿再使用。 本产品包含不可维 修的
部件。 如果本产品已损坏,请联系您所在国家
/地区的客户服务中心(请参阅“保修和支持”一
章)。
-
肢体不健全、精神有障碍及取乏相关经验和知识
的人(包括儿童)必须在监护人的监督及指导下
使用。
-
请照看好儿童,确保他们不会把本产品当成玩具
。
警告
-
请勿在洗碗机中清洗牙刷头、牙刷柄或充电器。
-
如果您在前 2 个月中曾做过口腔或牙龈手术,
请在使用本产品前先咨询您的牙医。
-
如果使用本产品后牙龈大量出血或在使用 1 周后
仍会出血,请咨询您的牙医。 如果使用飞利浦
Sonicare 时感觉不适或疼痛,也请咨询您的牙
医。
-
飞利浦 Sonicare 牙刷符合电磁装置的安全标准
。 有关任何涉及心脏起搏器或其他植入装置的
问题,请在使用之前咨询医生或相关植入装置的
设备制造商。
17
简体中文

-
如果您有医学问题,请在使用飞利浦 Sonicare
前咨询医生。
-
本产品设计仅用于清洁牙齿、牙龈和舌头。 请
勿将其用作任何其它用途。 如果感觉任何不适
或疼痛,请停止使用本产品并与医生联系。
-
飞利浦 Sonicare 牙刷为私人用品,不可供牙医
诊所或机构对多位患者使用。
-
请停止使用变形或刷毛弯曲的牙刷头。 请每 3
个月更换一次牙刷头,如果出现磨损迹象,应提
前更换。 切勿使用非制造商推荐的其他刷头。
-
如果您所用的牙膏中含有过氧化物、碳酸氢钠或
其它重碳酸盐(增白牙膏中的常见成份),则请
务必在每次使用后用肥皂和水彻底清洗刷头。
这可以预防可能出现的塑料破裂。
电磁场 (EMF)
本飞利浦产品符合所有有关暴露于电磁场的适用
标准和法规。
基本说明(图 1)
1 旅行用卫生保护盖
2 带有标识符的刷头
3 手柄
4 开/关按钮
18
简体中文

5 电池电量指示灯
6 充电器
7 舌苔清洁刷头
-
未显示: 1 个旅行收藏盒
注意: 包装盒内物品可能会因所购买型号而异。
注意: 牙刷头类型因购买型号而异(外观不同,
如此处图中所示)
使用准备
安装牙刷头
1 对齐牙刷头,使刷毛方向与牙刷柄 (图 2)正面的方向一致。
2 用力将牙刷头向下按到金属轴上,直到按不动为止。
注意: 飞利浦 Sonicare 刷头印有图标,便于识别刷头 (图 3)。
为产品充电
1 将充电器插入电源插座。
2 将牙刷柄放在充电器 (图 4)上。
- 电池电量指示灯闪烁表示牙刷正在充电。 充电指示灯停止闪烁,并呈绿
色持续亮起,即代表牙刷已经完全充满。 (图 5)
注意: 电池充满电需要 48 小时,但飞利浦 Sonicare 在未充满电时亦可使
用。
使用本产品
刷牙说明
1 浸湿刷毛并挤上少量牙膏。
2 将牙刷的刷毛以小角度(45 度)放在牙齿上,用力按下以使刷毛接触牙
龈或牙龈 (图 6)略下方。
注意: 始终将牙刷中间与牙齿接触。
3 按下电源开/关和模式按钮,打开飞利浦 Sonicare。
19
简体中文

4 将刷毛轻轻放置于牙齿和牙龈上, 来回小幅度缓慢移动,这样可以让刷
毛能够刷到牙缝。 在整个刷牙周期中连续这样移动即可。
注意: 刷毛应稍微呈喇叭形, 请勿过度用力。
5 要清洁门牙内表面,请将牙刷柄呈半直立状倾斜,在每颗牙齿 (图 7)上
反复垂直震动。
注意: 为确保牙刷能均匀清洁整个口腔,可使用 Quadpacer 30 秒时段
计时器功能将口腔分为 4 个区域(参见“功能”一章)。
6 从第 1 个刷牙区域(上牙外侧)开始,刷 30 秒钟,然后移到第 2 个刷
牙区域(上牙内侧)。 继续刷第 3 个刷牙区域(下牙外侧),刷 30 秒
钟,然后移到第 4 个刷牙区域(下牙 (图 8)内侧)。
7 在完成刷牙周期之后,可以多花一些时间刷洗牙齿的咀嚼面以及污垢容
易出现的区域。 (图 9)
您的飞利浦 Sonicare 声波震动牙刷可安全用于:
- 牙齿矫正器(在牙齿矫正器上使用时,牙刷头磨损较快)
修复牙体(补牙、齿冠、烤瓷牙)
注意: 确保牙齿矫正器或修复牙体正确固着并且未损坏。 否则,当其与牙
刷头接触时可能会损坏。
注意: 飞利浦 Sonicare 声波震动牙刷用于临床研究时,刷柄必须充满电且
应禁用 Easy-start 功能。
电池状态(牙刷柄未置于充电器上时)
- 黄色电池电量指示灯表示电池电量低。
- 绿色电池电量指示灯表示电池电量高。
- 电池电量处于低电量和高电量之间时,电池电量指示灯将熄灭。
注意:听到 3 声蜂鸣音且电池电量指示灯的黄色 LED 闪烁时,表示电池电
量低于 10%,应该为牙刷充电。
注意:为确保电池始终电量充沛,可在不使用时将 Sonicare 声波震动牙刷
置于充电器上。
功能
Quadpacer 30 秒时段计时器
- Quadpacer 30 秒时段计时器是一种会发出短暂蜂鸣音并暂停的时段计
时器,提醒您均匀彻底 (图 10)地刷净口腔的四个区域。
20
简体中文
ページが読み込まれています...
ページが読み込まれています...
ページが読み込まれています...
ページが読み込まれています...
ページが読み込まれています...
ページが読み込まれています...
ページが読み込まれています...
ページが読み込まれています...
ページが読み込まれています...
ページが読み込まれています...
ページが読み込まれています...
ページが読み込まれています...
ページが読み込まれています...
ページが読み込まれています...
ページが読み込まれています...
ページが読み込まれています...
-
 1
1
-
 2
2
-
 3
3
-
 4
4
-
 5
5
-
 6
6
-
 7
7
-
 8
8
-
 9
9
-
 10
10
-
 11
11
-
 12
12
-
 13
13
-
 14
14
-
 15
15
-
 16
16
-
 17
17
-
 18
18
-
 19
19
-
 20
20
-
 21
21
-
 22
22
-
 23
23
-
 24
24
-
 25
25
-
 26
26
-
 27
27
-
 28
28
-
 29
29
-
 30
30
-
 31
31
-
 32
32
-
 33
33
-
 34
34
-
 35
35
-
 36
36


