Sony DAV-IS50 インストールガイド

タイプ
インストールガイド

Sony DAV-IS50 は、映画や音楽を臨場感あふれるサラウンドサウンドで楽しめるホームシアターシステムです。5.1chサラウンドシステムで、フロントスピーカー、センタースピーカー、サラウンドスピーカー、サブウーファーの計5つのスピーカーと、それらを制御するアンプで構成されています。

アンプには、CDプレーヤー、DVDプレーヤー、ゲーム機など、さまざまな機器を接続できる端子が備わっています。また、AM/FMラジオを聴くこともできます。スピーカーは、コンパクトな設計なので、省スペースで設置できます。また、ワイヤレスなので、配線のわずらわしさもありません。

Sony DAV-IS50 は、ホームシアター初心者にもおすすめできる、シンプルで使いやすいホームシアターシステムです。臨場感あふれるサラウンドサウンドで、映画や音楽を存分に楽しめます。

Quick Start Guide
You can enjoy the system by performing the preparation in this Quick Start
Guide.
For details, refer to the operating instructions.
3-299-550-51(1)
© 2008 Sony Corporation Printed in Malaysia
A
DAV-IS50
M
BCDEFA
GHI
JK
L
B
(1)
English
A Unpacking
A Control unit
B Front le speaker (white
connector, 4.5 m cord)
C Center speaker (green
connector, 3.0 m cord)
D Front right speaker (red
connector, 4.5 m cord)
E Surround le speaker (blue
connector, 12.0 m cord)
F Surround right speaker (gray
connector, 12.0 m cord)
G Subwoofer
H AM loop antenna (aerial)
I FM wire antenna (aerial)
J Video Cord (yellow)
K Remote Commander (remote)
L R6 (size AA) batteries (2)
M Calibration microphone
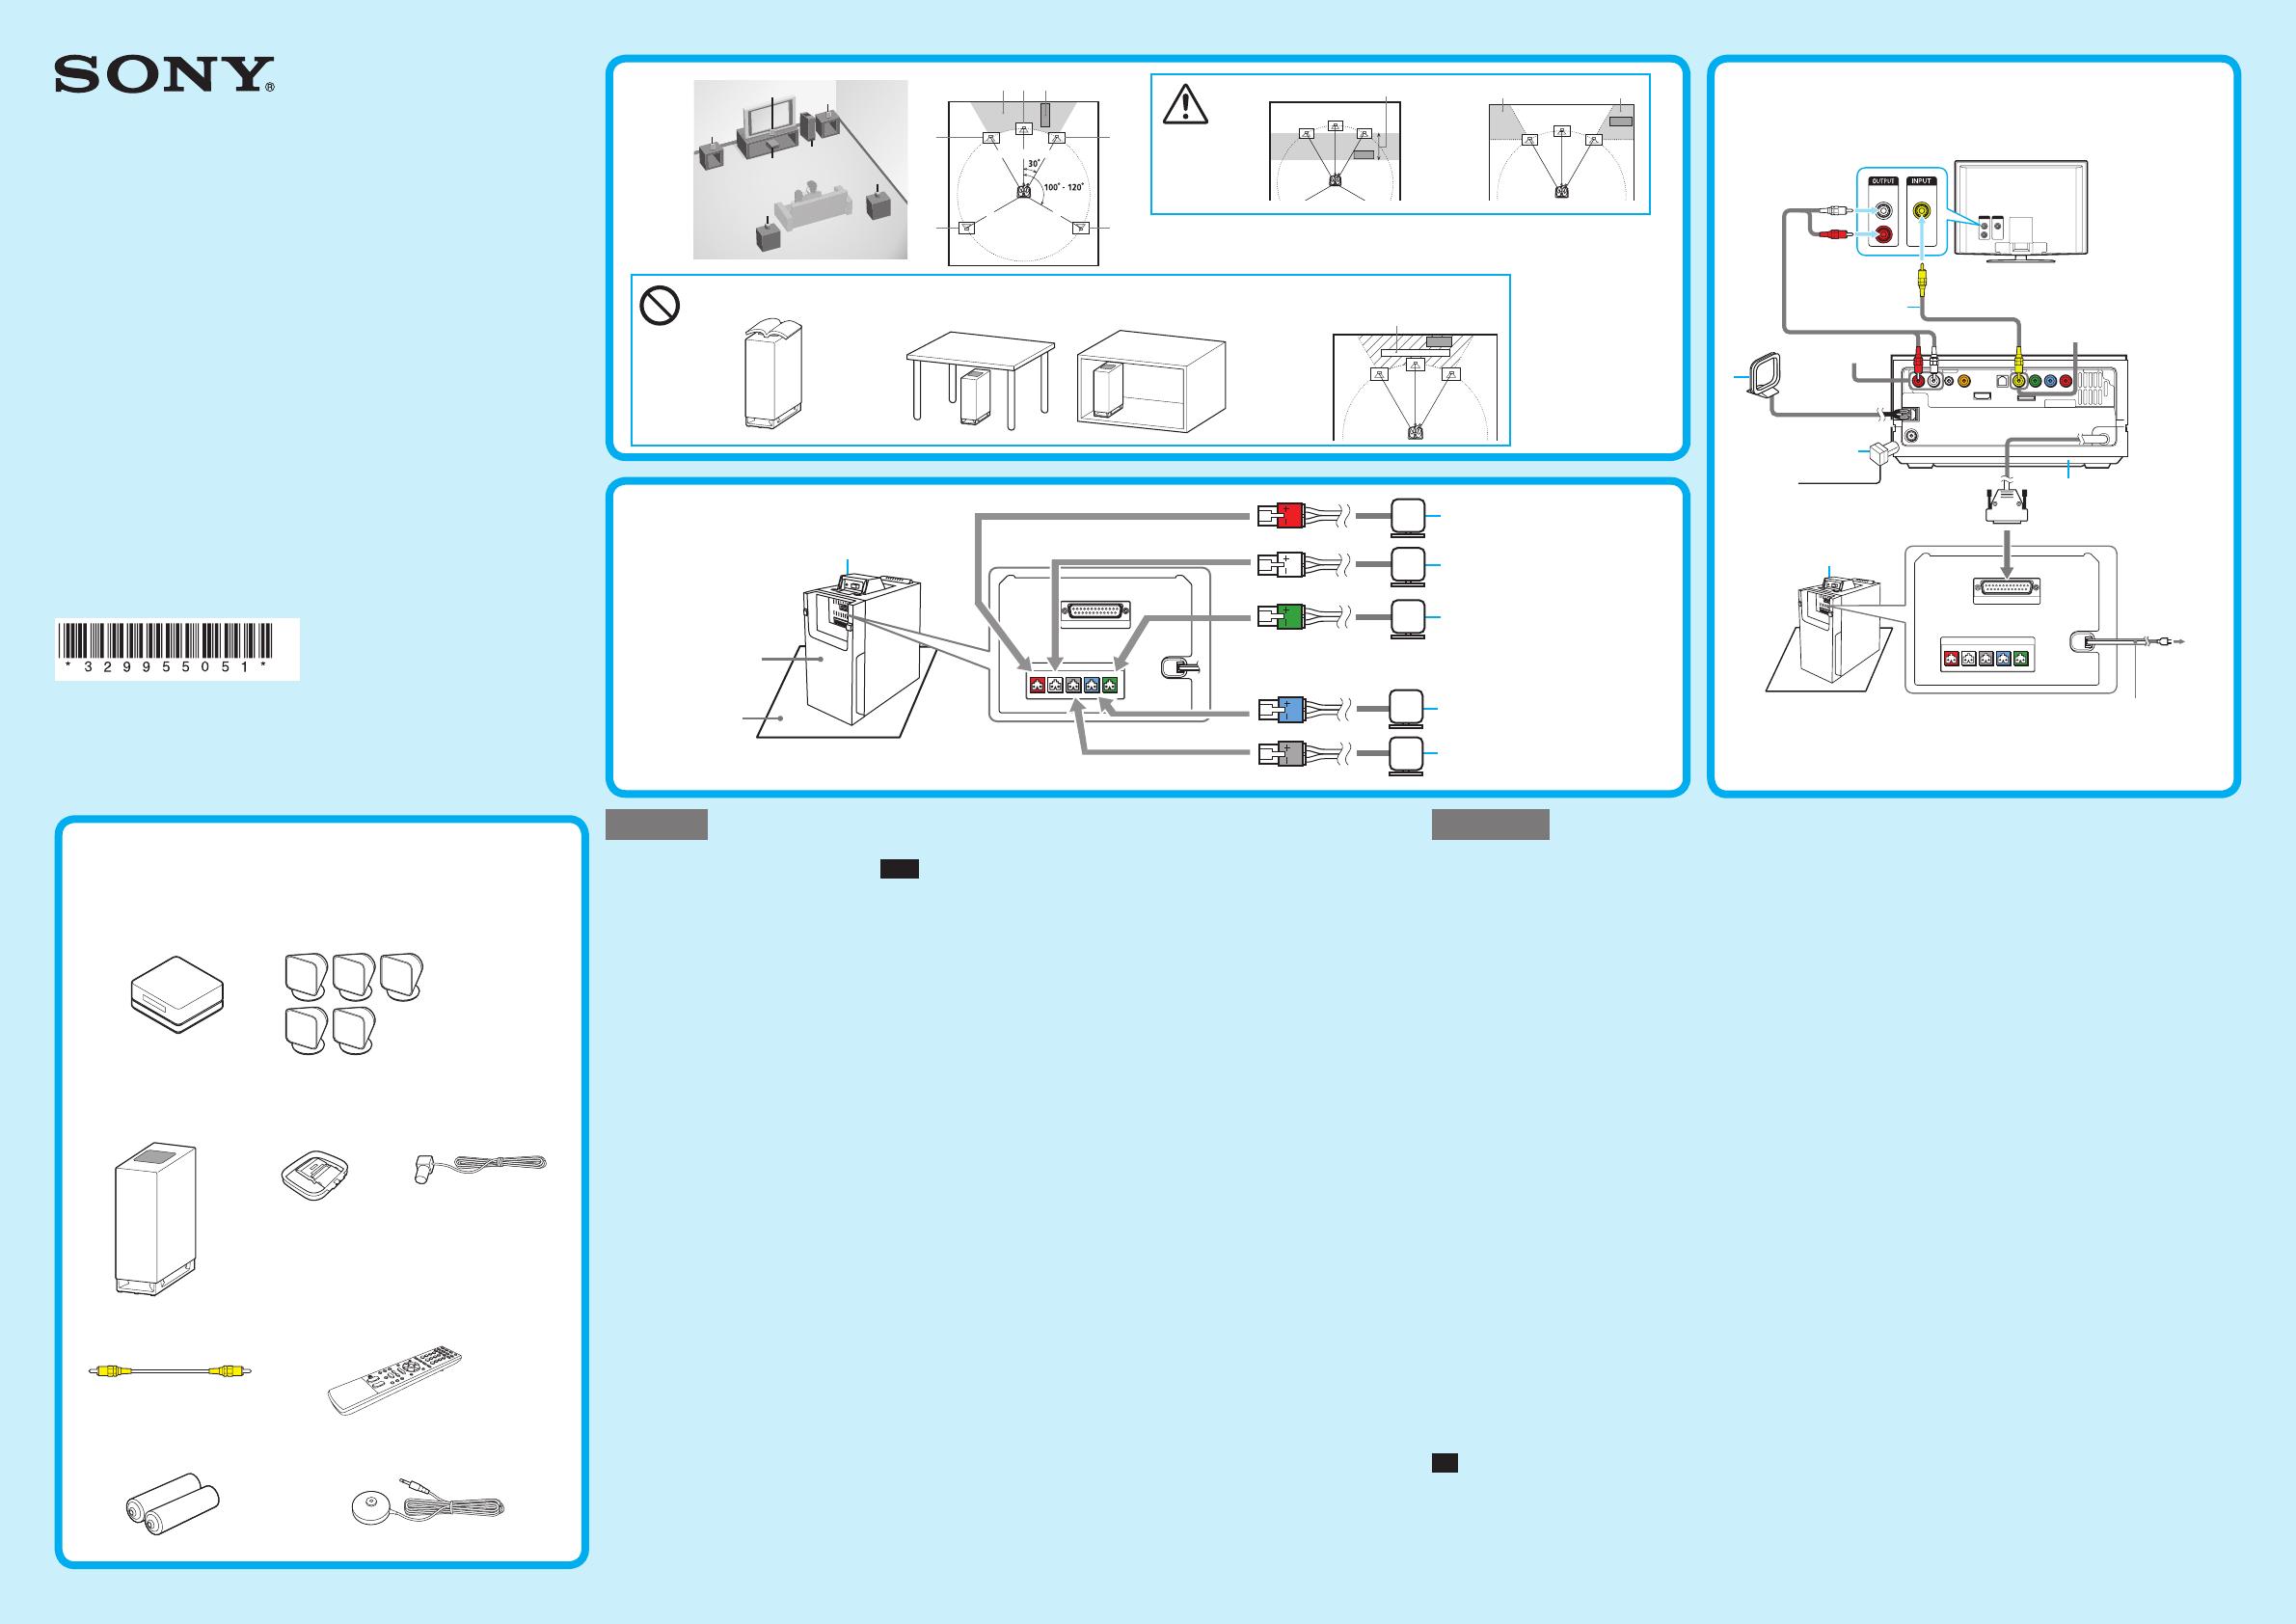
B Positioning the
speakers
For the best possible surround
sound, all the speakers other than
the subwoofer should be placed at
the same distance from the listening
position (
1
). It is recommended that
the subwoofer should be placed (
2
).
Note
Image distortion on the TV screen
may occur depending on the location
of the subwoofer. In this case, place
the subwoofer away from the TV.
3 If the subwoofer is to be placed
ahead of the front speaker, the
distance should be less than
0.5 m
1)
.
4 You may not get the bass sound
efficiently when the subwoofer is
placed outside
2)
. You need to
adjust the setting of the distance
from the listening position.
5 Do not place objects on the top
of the subwoofer where the
speaker unit is installed.
6 Do not place the subwoofer
under a desk or in a cabinet, etc.
7 Do not place the subwoofer back
of the obstruction, such as TV,
etc. Middle range sound will fall.
C Connecting the
speakers
Before connecting the speakers,
place the subwoofer on a stable
work surface that is larger than the
subwoofer.
Be sure to place a so cloth on the
work surface to avoid damaging the
surface of the subwoofer.
Connect the connectors of the
speaker cords to the corresponding
SPEAKER jacks.  e connectors
of the speaker cords have the same
color as the jacks to be connected.
Mark your speakers so that you can
be sure of each speaker position.
D Connecting the
system and TV
is hookup is the basic connection
of the system and TV. An audio cord
(red/white) is not supplied.
3)
Be sure to connect the AC power
cord (mains lead) last.
繁体中文
A 拆裝
A 控制器
B 前置左揚聲器 (白色接頭,
4.5 米導線)
C 中置揚聲器 (綠色接頭,
3.0 米導線)
D 前置右揚聲器 (紅色接頭,
4.5 米導線)
E 後置左揚聲器 (藍色接頭,
12.0 米導線)
F 後置右揚聲器 (灰色接頭,
12.0 米導線)
G 超低音揚聲器
H AM 環形天線
I FM 線型天線
J
視頻導線 (黃色)
K 遙控器
L R6 (AA尺寸) 電池 (2)
M 校正麥克風
B 放置揚聲器
為盡可能獲得最佳的環繞聲效果 ,
除超低音揚聲器外的所有揚聲器
都應與聆聽位置距離相同 (
1
)。
建議超低音揚聲器要放置在 (
2
)。
視超低音揚聲器的位置而定,
電視機螢幕上可能出現影像失真。
此時,請將超低音揚聲器遠離電
視機放置。
3 如果將超低音揚聲器放置在
前置揚聲器前方,距離應小於
0.5 米
1)
.
4 當超低音揚聲器放置在外側
時,可能無法有效聆聽
低音
2)
。您必須調整聆聽位置
與其之間距離的設定。
5 請勿將物品放置在超低音揚聲
器的上方,因為這裡置有揚聲
器單元。
6 請勿將超低音揚聲器放置在桌
子下面或壁櫥內等位置。
7 請勿將超低音揚聲器放置在電
視機等障礙物後面。中間範圍
聲音會降低。
C 連接揚聲器
在連接揚聲器之前,請將超低音
揚聲器放置到大於超低音揚聲器
自身的穩定工作平台。
必須在工作台上放置柔軟布匹,
以避免損傷超低音揚聲器表面。
將揚聲器導線的接頭連接到相應
SPEAKER 插孔。揚聲器導線的
接頭與要連接插孔的顏色相同。
在揚聲器上做好標記,以便確保
各個揚聲器的位置。
D 連接該系統和
電視機
該接線圖所示的是系統和電視機
的基本連接。音頻導線(紅/白)
未附帶。
3)
要確保最後才連接交流電源導線
(主導線)。
快速入門指南
只要進行本快速開始入門中的各項準備,您就可以享用本系統。
有關詳情,請參考使用說明書。
D
D
G
A
C
F
E
B
SYSTEM CONTROL
ONLY FOR HCD-IS50
SPEAKER
ONLY FOR SS-IS15
CENTERSUR LSUR RFRONT LFRONT R
C
TV, etc.
電視機等
SYSTEM CONTROL
ONLY FOR HCD-IS50
SPEAKER
ONLY FOR SS-IS15
CENTERSUR LSUR RFRONT LFRONT R
DMPORT
R
AUDIO
OUT
L
VIDEO
IN
J
AC power cord (mains lead)
3)
交流電源導線(主導線)
3)
To a wall outlet
(mains)
至牆上的
電源插座
TV
電視機
Audio cord (not supplied)
音頻導線(不提供)
TV (AUDIO IN)
VIDEO OUT (VIDEO)
D
H
I
A
Soft cloth
軟布
Bottom of the
subwoofer
超低音揚聲器底部
G
B
C
E
F
G
1)
C
D
F
34
2)
2)
B
E
G
675
E
English
E Inserting the batteries
K Remote Commander (remote)
L R6 (size AA) batteries (2)
F Performing the Quick Setup
Note
e displayed items are di erent depending on the area.
1 Turn on the TV.
2 Press ?/1.
e system turns on.
3 Switch the input selector on your TV so that the signal from the
system appears on the TV screen.
[Press [ENTER] to run QUICK SETUP.] appears at the bottom of
the TV screen. If this message does not appear, recall the Quick
Setup display and perform again. For details, see the Operating
Instructions: “To recall the Quick Setup display” in “Step 3:
Performing the Quick Setup.
4 Press without inserting a disc.
e Setup Display for selecting the language used in the on-screen
display appears on the TV screen.
5 Press X/x to select a language.
e system displays the menu and subtitles in the selected language.
6 Press .
e Setup Display for selecting the aspect ratio of the TV to be
connected appears.
VIDEO SETUP
PROGRESSIVE
(COMPONENT OUT)
:
4:3 OUTPUT:
COLOR SYSTEM (VIDEO CD)::
PAUSE MODE:
4:3 PAN SCAN
AUTO
4:3 LETTER BOX
TV TYPE:
16:9
16:9
F
繁体中文
E 置入電池
K 遙控器
L R6 (AA尺寸)電池 (2)
F 執行快速設定
根據地區的不同,所顯示的項目也不同。
1 打開電視機。
2 按下 ?/1
啓動系統。
3 切換電視機的輸入選擇器,使得系統的信號顯示在電視機
螢幕上。
[按下 [ENTER] 以運行快速設定。] 出現在電視螢幕底部。
如果不出現此訊息,則恢復快速設定顯示並再次執行。有關
詳情可參考使用說明書:“步驟3:執行快速設定”的“恢復
快速設定顯示”。
4 不插入光碟按下
電視機螢幕上出現用於選擇畫面顯示語言的設定顯示。
5 按下 X/x 選擇語言。
系統以選擇的語言顯示菜單和字幕。
6 按下 .
用於選擇要連接的電視機的縱橫比的設定顯示出現。
ⷞ⸙⸳ቯ
ㅙⴕ
(COMPONENT OUT): :
4:3 ャ಴:
ᓀ⦡♽⛔ (VIDEO CD):
ᥳ஗ᮨᑼ:
4:3 ో᥊᝹ឬ
⥄േ
4:3 ା▫ᒻᑼ
㔚ⷞᯏᒻᑼ:
16:9
16:9
7 Press X/x to select the setting that matches the TV type.
x If you have a wide-screen TV or a 4:3 standard TV with a wide-
screen mode
[16:9]
x If you have a 4:3 standard TV
[4:3 LETTER BOX] or [4:3 PAN SCAN]
8 Press .
e [AUTO CALIBRATION] display appears.
9 Connect the calibration microphone (M) to the ECM-AC2 jack on
the rear of the control unit, and set it up at the ear level using a
tripod, etc. (not supplied).
e front of each speaker should face the calibration microphone,
and there should be no obstruction between the speakers and the
calibration microphone.
10 Press C/c to select [YES], then press .
[AUTO CALIBRATION] starts. Be quiet during the measurement.
Note
Loud test sound is output when [AUTO CALIBRATION] starts.
You cannot turn the volume down. Give consideration to children
and neighbor.
11 Unplug the calibration microphone and press C/c to select [YES].
12 Press .
Quick Setup is  nished. All connections and setup operations are
complete.
Note
If measurement fails, follow the message then retry [AUTO
CALIBRATION].
7 按下 X/x 選擇符合電視機類型的設定。
x 如果您有寬螢幕電視機或帶有寬螢幕模式的 4:3 標準電視機
[16:9]
x 如果您有 4:3 標準電視機
[4:3 信箱形式][4:3 全景掃描]
8 按下 .
[自動校正] 顯示出來。
9 連接校正麥克風 (M) 到控制器背面的 ECM-AC2 插孔,使用
三腳架等物(未附帶)將其設置到與耳朵等高的水平。
各個揚聲器的正面應該面對校正麥克風,在揚聲器和校正
麥克風之間不能存在障礙物。
10 按下 C/c 選擇 [是],然後按 .
[自動校正] 開始。在測量時要保持安靜。
當 [ 自動校正 ] 開始後,會發出很大的測試聲音。您無法降
低音量。請注意不要吵到兒童和鄰居。
11 拔掉校正麥克風,然後按下 C/c 選擇 [是]。
12 按下 .
快速設定完成。所有連接和設定操作結束。
如果測量失敗,請根據提示,然後重試 [ 自動校正 ]。
DMPORT
C/X/x/c,
+/1
K
L
M
ECM-AC2
  • Page 1 1
  • Page 2 2

Sony DAV-IS50 インストールガイド

タイプ
インストールガイド

Sony DAV-IS50 は、映画や音楽を臨場感あふれるサラウンドサウンドで楽しめるホームシアターシステムです。5.1chサラウンドシステムで、フロントスピーカー、センタースピーカー、サラウンドスピーカー、サブウーファーの計5つのスピーカーと、それらを制御するアンプで構成されています。

アンプには、CDプレーヤー、DVDプレーヤー、ゲーム機など、さまざまな機器を接続できる端子が備わっています。また、AM/FMラジオを聴くこともできます。スピーカーは、コンパクトな設計なので、省スペースで設置できます。また、ワイヤレスなので、配線のわずらわしさもありません。

Sony DAV-IS50 は、ホームシアター初心者にもおすすめできる、シンプルで使いやすいホームシアターシステムです。臨場感あふれるサラウンドサウンドで、映画や音楽を存分に楽しめます。

他の言語で