ENGLISH
2
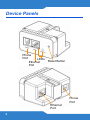
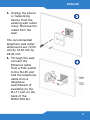
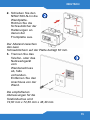
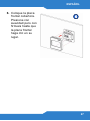
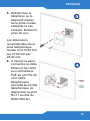
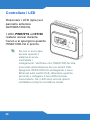
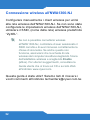
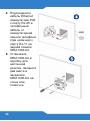
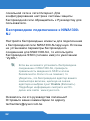
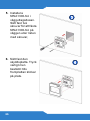
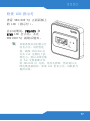
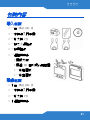
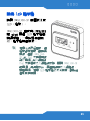
Device Panels
LEDs
Ethernet
Port
Phone
Port
Ethernet
Port
Phone
Port
Reset Button

ENGLISH
3
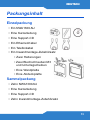
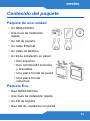
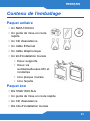
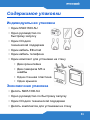
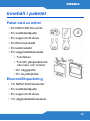
Package Contents
Single-Unit Package
• One NWA1300-NJ
• One Quick Start Guide
• One Support CD
• One Ethernet Cable
• One Telephone Cable
• One In-wall Installation Kit
• Two Brackets
• Two M3 Tapping Screws
and Washers
• One Wall Faceplate
• One Cover Faceplate
Eco Package
• Ten NWA1300-NJs
• One Quick Start Guide
• One Support CD
• Ten In-wall Installation Kits
ENGLISH

4
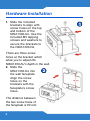
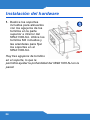
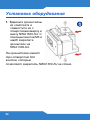
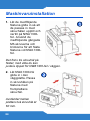
Hardware Installation
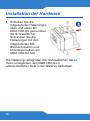
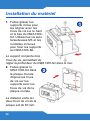
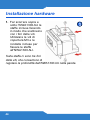
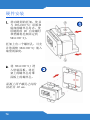
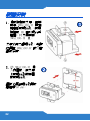
1. Slide the included
brackets to align with
screw holes on the top
and bottom of the
NWA1300-NJ. Use the
included M3 tapping
screws and washers to
secure the brackets to
the NWA1300-NJ.
There are three screw
holes on the bracket, which
allow you to adjust the
NWA1300-NJ’s depth in the wall.
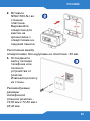
2. Slide the
NWA1300-NJ into
the wall faceplate.
Align the screw
holes on the
brackets with the
faceplate’s screw
holes.
The distance between
the two screw holes of
the faceplate is 60 mm.
.
1
2

ENGLISH
5
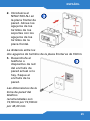
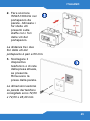
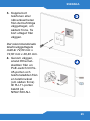
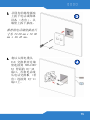
3. Unplug the phone
or networking
device from the
existing wall outlet
if any. Remove the
outlet from the
wall.
The recommended
telephone wall outlet
dimensions are 72.60
mm by 72.60 mm by
48.40 mm.
4. Through the wall,
connect the
Ethernet cable
from a PoE switch
to the RJ-45 port
and the telephone
cable from a
telephone
switchboard (if
available) to the
RJ-11 port on the
back of the
NWA1300-NJ.
3
4

6
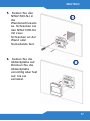
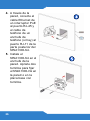
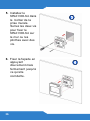
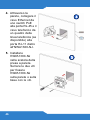
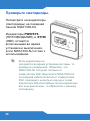
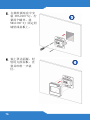
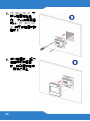
5. Install the
NWA1300-NJ in
the wall outlet box.
Fasten two screws
to secure the
NWA1300-NJ onto
the wall or
baseboard with
screws.
6. Attach the cover
faceplate. Press
gently but firmly
until the faceplate
clicks into place.
5
6

ENGLISH
7
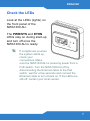
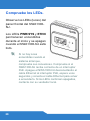
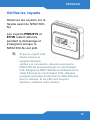
Check the LEDs
Look at the LEDs (lights) on
the front panel of the
NWA1300-NJ.
The PWR/SYS and ETHN
LEDs stay on during start-up
and turn off once the
NWA1300-NJ is ready.
If no lights are on when
the system starts up,
check your
connections. Make
sure the NWA1300-NJ is receiving power from a
PoE switch. Turn the NWA1300-NJ off by
disconnecting the Enternet cable to the PoE
switch, wait for a few seconds and connect the
Ethernet cable to turn it back on. If the LEDs are
still off, contact your local vendor.

8
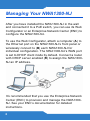
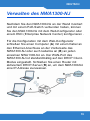
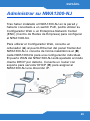
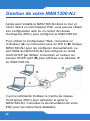
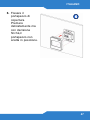
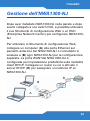
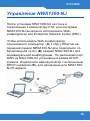
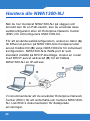
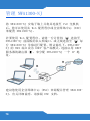
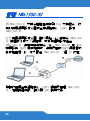
Managing Your NWA1300-NJ
After you have installed the NWA1300-NJ in the wall
and connected it to a PoE switch, you can use its Web
Configurator or an Enterprise Network Center (ENC) to
configure the NWA1300-NJ.
To use the Web Configurator, attach a computer (A) to
the Ethernet port on the NWA1300-NJ’s front panel or
wirelessly connect to (B) each NWA1300-NJ for
individual configuration. The NWA1300-NJ’s WAN port
is set to DHCP client mode by default. Connect a router
with DHCP server enabled (R) to assign the NWA1300-
NJ an IP address.
It’s recommended that you use the Enterprise Network
Center (ENC) to provision and manage the NWA1300-
NJ. See your ENC’s documentation for detailed
instructions.
B
A
R

ENGLISH
9
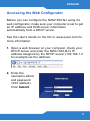
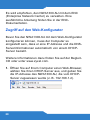
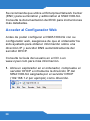
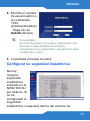
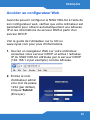
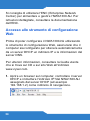
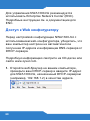
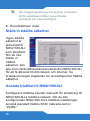
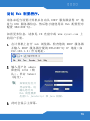
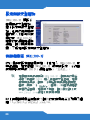
Accessing the Web Configurator
Before you can configure the NWA1300-NJ using it’s
web configurator, make sure your computer is set to get
an IP address and DNS server information
automatically from a DHCP server.
See the User's Guide on the CD or www.zyxel.com for
more information.
1. Open a web browser on your computer, check your
DHCP server and enter the NWA1300-NJ’s IP
address assigned by the DHCP server (192.168.1.2
for example) as the address.
2. Enter the
username admin
and password
1234 (default).
Click Submit.

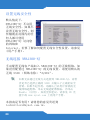
10
If the login screen does not open, make sure you
allow web browser pop-up windows, JavaScripts
and Java permissions.
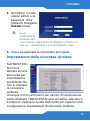
3. The main screen displays.
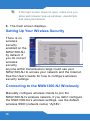
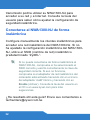
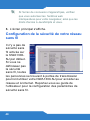
Setting Up Your Wireless Security
There is no
wireless
security
enabled on the
NWA1300-NJ
by default. If
you do not set
wireless
security,
anyone within transmission range could use your
NWA1300-NJ to access your network and the Internet.
See the User’s Guide for how to configure wireless
security settings.
Connecting to the NWA1300-NJ Wirelessly
Manually configure wireless clients to join the
NWA1300-NJ’s wireless network. If you didn’t configure
the NWA1300-NJ’s wireless settings, use the default
wireless SSID (network name) “ZyXEL”.

ENGLISH
11
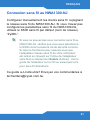
If you cannot connect wirelessly to the NWA1300-
NJ, check you have selected the correct SSID
and entered the correct security key. If that does
not work, ensure your computer’s wireless
network adapter is enabled by clicking on the
wireless adapter icon and clicking Enable. See
the User's Guide on the CD or www.zyxel.com for
more suggestions.
Was this guide helpful? Send your comments to
techwriters@zyxel.com.tw.

12

DEUTSCH
13
Packungsinhalt
Einzelpackung
• Ein NWA1300-NJ
• Eine Kurzanleitung
• Eine Support-CD
• Ein Ethernet-Kabel
• Ein Telefonkabel
• Ein Inwandmontage-Zubehörsatz
• Zwei Halterungen
• Zwei Blechschrauben M3
und Unterlegscheiben
• Eine Wandplatte
• Eine Abdeckplatte
Sammelpackung
• Zehn NWA1300-NJ
• Eine Kurzanleitung
• Eine Support-CD
• Zehn Inwandmontage-Zubehörsatz
DEUTSCH

14
Installation der Hardware
1. Schieben Sie die
mitgelieferten Halterungen
oben und unten am
NWA1300-NJ genau über
die Schraublöcher.
Schrauben Sie die
Halterungen mit den
mitgelieferten M3-
Blechschrauben und
Unterlegscheiben am
NWA1300-NJ fest.
Die Halterung verfügt über drei Schraublöcher, die es
Ihnen ermöglichen, den NWA1300-NJ in
unterschiedlicher Tiefe in der Wand zu befestigen.
1

DEUTSCH
15
2. Schieben Sie den
NWA1300-NJ in die
Wandplatte.
Richten Sie die
Schraublöcher der
Halterungen an
denen der
Frontplatte aus.
Der Abstand zwischen
den zwei
Schraublöchern auf der Platte beträgt 60 mm.
3. Trennen Sie das
Telefon- oder das
Netzwerkgerät
vom
Wandanschluss
ab, falls
vorhanden.
Entfernen Sie den
Anschluss von der
Wand.
Die empfohlenen
Abmessungen für die
Telefonbuchse sind
72,60 mm x 72,60 mm x 48,40 mm.
2
3

16
4. Schließen Sie
durch die Wand
das von einem
PoE-Switch
kommende
Ethernet-Kabel an
den RJ-45-Port
und das von einer
Telefonanlage
kommende
Telefonkabel (falls
vorhanden) an den
RJ-11-Port an der
Rückseite des
NWA1300-NJ an.
4

DEUTSCH
17
5. Setzen Sie den
NWA1300-NJ in
die
Wandanschlussdo
se. Schrauben sie
den NWA1300-NJ
mit zwei
Schrauben an der
Wand oder
Sockelleiste fest.
6. Setzen Sie die
Abdeckplatte auf.
Drücken Sie die
Abdeckplatte
vorsichtig aber fest
auf, bis sie
einrastet.
5
6

18
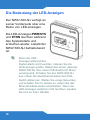
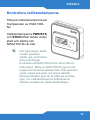
Die Bedeutung der LED-Anzeigen
Der NWA1300-NJ verfügt an
seiner Vorderseite über eine
Reihe von LED-Anzeigen.
Die LED-Anzeigen PWR/SYS
und ETHN leuchten während
des Systemstarts und
erlöschen wieder, sobald der
NWA1300-NJ betriebsbereit
ist.
Wenn die LED-
Anzeigen während des
Systemstarts nicht leuchten, müssen Sie die
Verbindungen prüfen. Stellen Sie sicher, dass der
NWA1300-NJ über einen PoE-Switch mit Strom
versorgt wird. Schalten Sie den NWA1300-NJ
aus, indem Sie das Ethernet-Kabel zum PoE-
Switch abtrennen. Warten Sie einige Sekunden,
und schalten Sie ihn wieder an, indem Sie das
Ethernet-Kabel wieder anschließen. Wenn die
LED-Anzeigen weiterhin nicht leuchten, wenden
Sie sich an Ihren Händler.

DEUTSCH
19
Verwalten des NWA1300-NJ
Nachdem Sie den NWA1300-NJ an der Wand montiert
und mit einem PoE-Switch verbunden haben, können
Sie den NWA1300-NJ mit dem Web-Konfigurator oder
einem ENC (Enterprise Network Center) konfigurieren .
Für die Konfiguration mit dem Web-Konfigurator
schließen Sie einen Computer (A) mit einem Kabel an
den Ethernet-Anschluss an der Vorderseite des
NWA1300-NJ oder auch kabellos an (B) an jeden
einzelnen NWA1300-NJ an. Der WAN-Port des
NWA1300-NJ ist standardmäßig auf den DHCP Client-
Modus eingestellt. Schließen Sie einen Router mit
aktiviertem DHCP-Server (R) an, um dem NWA1300-NJ
eine IP-Adresse zuzuweisen.
B
A
R

20
Es wird empfohlen, den NWA1300-NJ mit dem ENC
(Enterprise Network Center) zu verwalten. Eine
ausführliche Anleitung finden Sie in der ENC-
Dokumentation.
Zugriff auf den Web-Konfigurator
Bevor Sie den NWA1300-NJ mit dem Web-Konfigurator
konfigurieren können, muss der Computer so
eingestellt sein, dass er eine IP-Adresse und die DNS-
Serverinformationen automatisch von einem DHCP-
Server bezieht.
Weitere Informationen dazu finden Sie auf der Begleit-
CD oder unter www.zyxel.com.
1. Öffnen Sie auf Ihrem Computer einen Web-Browser,
wählen Sie Ihren DHCP-Server aus, und geben Sie
die IP-Adresse des NWA1300-NJ, die vom DHCP-
Server zugewiesen wurde (z. B. 192.168.1.2).
ページが読み込まれています...
ページが読み込まれています...
ページが読み込まれています...
ページが読み込まれています...
ページが読み込まれています...
ページが読み込まれています...
ページが読み込まれています...
ページが読み込まれています...
ページが読み込まれています...
ページが読み込まれています...
ページが読み込まれています...
ページが読み込まれています...
ページが読み込まれています...
ページが読み込まれています...
ページが読み込まれています...
ページが読み込まれています...
ページが読み込まれています...
ページが読み込まれています...
ページが読み込まれています...
ページが読み込まれています...
ページが読み込まれています...
ページが読み込まれています...
ページが読み込まれています...
ページが読み込まれています...
ページが読み込まれています...
ページが読み込まれています...
ページが読み込まれています...
ページが読み込まれています...
ページが読み込まれています...
ページが読み込まれています...
ページが読み込まれています...
ページが読み込まれています...
ページが読み込まれています...
ページが読み込まれています...
ページが読み込まれています...
ページが読み込まれています...
ページが読み込まれています...
ページが読み込まれています...
ページが読み込まれています...
ページが読み込まれています...
ページが読み込まれています...
ページが読み込まれています...
ページが読み込まれています...
ページが読み込まれています...
ページが読み込まれています...
ページが読み込まれています...
ページが読み込まれています...
ページが読み込まれています...
ページが読み込まれています...
ページが読み込まれています...
ページが読み込まれています...
ページが読み込まれています...
ページが読み込まれています...
ページが読み込まれています...
ページが読み込まれています...
ページが読み込まれています...
ページが読み込まれています...
ページが読み込まれています...
ページが読み込まれています...
ページが読み込まれています...
ページが読み込まれています...
ページが読み込まれています...
ページが読み込まれています...
ページが読み込まれています...
ページが読み込まれています...
ページが読み込まれています...
ページが読み込まれています...
ページが読み込まれています...
ページが読み込まれています...
ページが読み込まれています...
-
 1
1
-
 2
2
-
 3
3
-
 4
4
-
 5
5
-
 6
6
-
 7
7
-
 8
8
-
 9
9
-
 10
10
-
 11
11
-
 12
12
-
 13
13
-
 14
14
-
 15
15
-
 16
16
-
 17
17
-
 18
18
-
 19
19
-
 20
20
-
 21
21
-
 22
22
-
 23
23
-
 24
24
-
 25
25
-
 26
26
-
 27
27
-
 28
28
-
 29
29
-
 30
30
-
 31
31
-
 32
32
-
 33
33
-
 34
34
-
 35
35
-
 36
36
-
 37
37
-
 38
38
-
 39
39
-
 40
40
-
 41
41
-
 42
42
-
 43
43
-
 44
44
-
 45
45
-
 46
46
-
 47
47
-
 48
48
-
 49
49
-
 50
50
-
 51
51
-
 52
52
-
 53
53
-
 54
54
-
 55
55
-
 56
56
-
 57
57
-
 58
58
-
 59
59
-
 60
60
-
 61
61
-
 62
62
-
 63
63
-
 64
64
-
 65
65
-
 66
66
-
 67
67
-
 68
68
-
 69
69
-
 70
70
-
 71
71
-
 72
72
-
 73
73
-
 74
74
-
 75
75
-
 76
76
-
 77
77
-
 78
78
-
 79
79
-
 80
80
-
 81
81
-
 82
82
-
 83
83
-
 84
84
-
 85
85
-
 86
86
-
 87
87
-
 88
88
-
 89
89
-
 90
90


ZyXEL NWA1300-NJ ユーザーマニュアル
- タイプ
- ユーザーマニュアル
- このマニュアルも適しています
他の言語で
- italiano: ZyXEL NWA1300-NJ Manuale utente
- français: ZyXEL NWA1300-NJ Manuel utilisateur