

2
(F) Introduction (D) Einleitung (I) Introduzione (ES) Introducción (P) Introdução (NL) Inleiding (DK) Introduktion (RU) Введение (PL) Wstęp
(CN) 简介
INTRODUCTION
(F) Utilisation du manuel (D) Verwendung der Anleitung (I) Uso del manuale (ES) Uso del manual (P) Utilização do manual (NL) Gebruik van de
handleiding (DK) Brug af manualen (RU) Использование руководства (PL) Zastosowanie instrukcji (CN) 使用本手册
USING THE MANUAL
(GB) Read
(F) ‘A lire’
(D) Lesen
(I) Leggere
(ES) Lea
(P) Leia
(NL) Lees
(DK) Gennemlæs
(RU) Прочитайте
(PL) Przeczytaj
(CN) 阅读
(GB) Correct
(F) Correct
(D) Richtig
(I) Corretto
(ES) Correcto
(P) Correcto
(NL) Juist
(DK) Korrekt
(RU) правильно
(PL) Dobrze
(CN) 正确
(GB) Wrong
(F) Incorrect
(D) Falsch
(I) Errato
(ES) Incorrecto
(P) Errado
(NL) Fout
(DK) Forkert
(RU) Неправильно
(PL) Źle
(CN) 错误
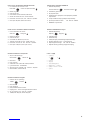
The following icons are used throughout this manual to help you safely install your new speakers. Please follow them carefully.
GB
F
D
I
ES
P
NL
DK
RU
PL
Les icônes reprises ci-après sont utilisées dans tout le manuel de manière à vous aider à installer vos nouveaux haut-parleurs en toute
sécurité. Veuillez suivre scrupuleusement leur signification.
Die folgenden Symbole finden Sie in der gesamten Anleitung. Sie erleichtern eine sichere Installation Ihrer neuen Lautsprecher. Bitte
achten Sie sorgf ltig auf die Symbole.
Le seguenti icone usate nel manuale aiutano ad installare correttamente i diffusori. Si raccomanda di seguirle con attenzione.
Se utilizan los iconos siguientes en este manual para ayudarle a instalar con seguridad sus nuevos altavoces. S galas cuidadosamente.
Os seguintes ícones são utilizados no manual afim de o ajudarem a instalar com segurança as suas novas colunas. Siga-os
cuidadosamente.
De hierna volgende pictogrammen worden in de hele handleiding gebruikt om u te helpen bij het veilig aansluiten en gebruiken van uw
nieuwe luidsprekers. Volg de instructies steeds nauwgezet op.
Følgende symboler benyttes i denne manual, for at hjælpe dig med sikker installation af dine højttalere. F¿lg dem n¿je.
W niniejszej instrukcji znajdą Państwo następujące symbole. Ułatwią one bezpieczną instalację nowych głośników. Prosimy zwrócić szczególną uwagę
na symbole.
CN
Thank you for purchasing the KEF Model HTB2SE-W powered subwoofer. We are confident that your HTB2SE-W will provide reliable, high
performance sound for many years to come. Please read this manual fully before you attempt any connections to the HTB2SE-W.
GB
F
D
I
ES
P
NL
DK
RU
PL
KEF vous remercie de votre achat d’un subwoofer modèle HTB2SE-W. Nous sommes convaincus que votre haut-parleur HTB2SE-W vous
procurera un son fiable et de hautes performances pendant de longues années. Veuillez lire intégralement le présent manuel avant de
procéder à des connexions quelconques.
Vielen Dank fur den Kauf des aktiven Subwoofers KEF HTB2SE-W. Wir sind davon überzeugt, daß Ihr HTB2SE-W lange Zeit zuverlässig
funktionieren und eine hohe Klangqualität gewährleisten wird. Lesen Sie bitte diese Anleitung sorgfältig durch, bevor Sie Ihr Gerät
anschließen.
Vi ringraziamo per aver dato la Vs preferenza al subwoofer attivo KEF, apparecchio affidabile e dalle elevate prestazioni. Prima di effettuare
i collegamenti si consiglia di leggere per intero il presente manuale.
Le damos las gracias por haber adquirido el altavoz para graves KEF Modelo HTB2SE-W. Estamos seguros de que el HTB2SE-W le proporcionará
un sonido de calidad y de altas prestaciones durante muchos años. Por favor, lea este manual antes de intentar conectar y poner en
funcionamiento el altavoz.
Obrigado por ter escolhido o modelo KEF HTB2SE-W: um subwoofer com amplificador. Acreditamos que o seu HTB2SE-W lhe oferecerá durante
muitos anos, um som de alta fidelidade. Leia, por favor, este manual integralmente antes de tentar quaisquer conexões com o HTB2SE-W.
Wij danken u van harte voor uw aankoop van de actieve subwoofer KEF Model HTB2SE-W. Wij zijn ervan overtuigd dat uw subwoofer u
jarenlang hoogwaardig luisterplezier zal geven. Lees eerst deze handleiding aandachtig door alvorens u de subwoofer HTB2SE-W aansluit.
Tillykke med erhvervelsen af din KEF model HTB2SE-W subwoofer med forstærker. Vi er overbevist om, at din HTB2SE-W vil give dig en
stabil high performance sound i mange år fremover. Gennemlæs venligst denne manual inden du foretager nogen tilslutning til din model
HTB2SE-W.
Bardzo dziękujemy za zakupienie aktywnego subwoofera KEF HTB2SE-W. Jesteśmy przekonani, że Państwa HTB2SE-W będzie działał niezawodnie
przez długi czas i zapewni wysoką jakość brzmienia. Przed podłączeniem urządzenia prosimy starannie przeczytać niniejszą instrukcję.
CN 谢谢购买本公司的 HTB2SE-W 有源超低音音箱。我们向您保证经久耐用的 HTB2SE-W 以其出色的演绎在未来数年里给您带来超值享受。请在连接本音箱前仔细阅读本手册。
本手册用以下图表帮助您正确地、安全地安装您新置的音箱。请按说明进行安装。
Благодарим вас за приобретение сабвуфера KEF HTB2SE-W. Мы уверенны, что ваш сабвуфер KEF HTB2SE-W обеспечит высококачественное
звучание вашей системы на многие годы.
Приведенные ниже значки используются в данном руководстве с целью обеспечения необходимых мер безопасности при установке вашего
сабвуфера. Пожалуйста, тщательно следуйте этим мерам предосторожности.

3
(GB) Option
(F) Option
(D) Option
(I) Opzione
(ES) Opción
(P) Opcional
(NL) Optie
(DK) Tilbehør
(RU) Опция
(PL) Opcja
(CN) 选择
(GB) Caution/Warning
(F) Attention/Avertissement
(D) Achtung / Warnung
(I) Attenzione/Avvertenza
(ES) Precaución/Atención
(P) Atenção/ Aviso
(NL) Opgelet/Waarschuwing
(DK) Forsigtigt / Advarsel
(RU) Внимание предупреждение
(PL) Uwaga
(CN) 注意警告
(GB) Electrical Warning
(F) Danger électrique
(D) Warnung: Gefährliche Spannungen
(I) Rischi elettrici
(ES) Advertencia eléctrica
(P) Aviso sobre a parte eléctrica
(NL) Opgelet! Elektriciteit!
(DK) Elektrisk advarsel
(RU) Предупреждение при обращении с
электричеством
(PL) Niebezpieczne napięcie
(CN) 注意强电
(GB) Positive/RED
(F) Positif / ROUGE
(D) Positiv / ROT
(I) Positivo / ROSSO
(ES) Positivo / ROJO
(P) Positivo/Vermelho
(NL) Positief / ROOD
(DK) Positiv / RØD
(RU) Плюс/КРАСНЫЙ
(PL) Dodatni/CZERWONY
(CN) 正极/红色
(GB) Negative/BLACK
(F) Négatif / NOIR
(D) Negativ / SCHWARZ
(I) Negativo / NERO
(ES) Negativo / NEGRO
(P) Negativo/ Preto
(NL) Negatief / ZWART
(DK) Negativ / SORT
(RU) Минус/ЧЕРНЫЙ
(PL) Ujemny/CZARNY
(CN) 负极/黑色
(GB) Switch off appliance
(F) Couper l’appareil
(D) Gerät abschalten
(I) Disattivazione dell’ap
parecchio
(ES) Interruptor del aparato
(P) Interruptor para desligar
(NL) Het toestel uitschakelen
(DK) Afbryd apparatet
(RU) Отключить устройство
(PL) Wyłącz urządzenie
(CN) 切断电源
SAFETY INFORMATION
WARNING
TO REDUCE THE RISK OF FIRE OR ELECTRICAL SHOCK, DO NOT EXPOSE
THIS APPLIANCE TO RAIN OR MOISTURE
CAUTION: TO REDUCE THE RISK
OF
ELECTRIC SHOCK, DO NOT
REMOVE COVER (OR BACK).
NO USER-SERVICEABLE PARTS
INSIDE. REFER SERVICING TO
QUALIFIED SERVICE PERSONNEL.
Explanation of Graphical Symbols
The lightning flash with arrowhead symbol, within an equilateral triangle, is intended to alert the user
to the presence of uninsulated “dangerous voltage” within the products enclosure that may be of a
sufficient magnitude to constitute a risk of electrical shock to persons.
The exclamation mark within an equilateral triangle is intended to alert the user to the presence
of important operating and maintenance (servicing) instructions in the literature accompanying the
appliance.
RISK OF
ELECTRIC SHOCK
DO NOT OPEN
• A combined mains power input lead and country specific mains
plug is provided.
• Check before connecting to your local mains supply that the local
supply voltage is the same as that marked on the rear panel. If it
is not, check with your supplier before proceeding.
WARNING:
Due to the mains switch being located on the rear panel bottom, the apparatus must be located in an
open area without anything obstructing access to the mains switch.

4
(F) Utilisation du manuel (D) Verwendung der Anleitung (I) Uso del manuale (ES) Uso del manual (P) Utilização do manual (NL) Gebruik van de
handleiding (DK) Brug af manualen (RU) Важные меры предосторожности (PL) Ważne instrukcje bezpieczeństwa (CN) 重要安全事项
IMPORTANT SAFETY INSTRUCTIONS
Please take heed of the following before using the KEF Model HTB2SE-W. Note also that the word
appliance shall refer to the KEF HTB2SE-W subwoofer, or any part of it.
1. Read Instructions — All the Safety and Operating Instructions should be read before the
appliance is operated.
2. Retain Instructions — The Safety and Operating Instructions should be retained for future
reference.
3. Heed Warnings — All warnings on the appliance and in the Operating Instructions should be
adhered to.
4. Follow Instructions — All Operating and Use Instructions should be followed. Only use
attachments/accessories specified by the manufacturer.
5. Important — Do not defeat the safety purpose of the polarized or grounding type plug. The third
prong is provided for your safety.
If the provided plug does not fit into your outlet, consult an electrician for replacement of the
obsolete outlet.
Refer all servicing to a qualified service personnel. Servicing is required for any damaged parts
such as power-supply cord or plug.
6. Water and Moisture — The appliance should not be used in or near water - for example, near
a bathtub, washbowl, kitchen sink, laundry tub, in a wet basement, or near a swimming pool,
and the like. The apparatus shall not be exposed to dripping or splashing. Care should be taken
so that objects containing liquids are not placed upon or spilled into the enclosure through
openings and that no objects filled with liquids, such as a vase, shall be placed on apparatus.
7. Ventilation — The appliance should be situated so that its location or position does no interfere
with its proper ventilation. For example, the appliance should not be situated on a bed, sofa, or
similar surface that may block any ventilation openings.
8. Heat — The appliance should be situated away from heat sources such as radiators, heat
registers, stoves or other appliances (including amplifiers) that produce heat.
9. Power Sources — The appliance should be connected to a power supply only of the type
described in the operating instructions or as marked on the appliance and it shall remain readily
operable. Mains plug is used as the disconnect device. To be completely disconnected from the
power input, the mains plug of the apparatus must be disconnected from the mains completely.
10. Power-cord Protection — Power supply cords should be routed so that they are not likely to be
walked on or pinched by items placed upon or against them, paying particular attention to cords
at plugs, convenience receptacles and the point where they exit from the appliance. The main
plug should not be obstructed OR should be easily accessed during intended use.
11. Attachments and Accessories — Use only attachments/accessories specified by the
manufacturer.
12. Non-use Periods — Unplug this apparatus during lightning storms or when unused for long
periods of time.
13. Damage Requiring Service — The appliance should be serviced by qualified service personnel
when:
a) The power supply cord or the plug has been damaged; or
b) Objects have fallen or liquid has been spilled into the appliance; or
c) The appliance has been exposed to rain; or
d) The appliance does not appear to operate normally or exhibits a marked change in
performance; or
e) The appliance has been dropped or the enclosure damaged.
14. Servicing — The user shall not attempt to service the appliance beyond that described in the
Operating Instructions. All other servicing should be referred to qualified service personnel.

5
重要的安全注意事项
警 告
为避免发生火灾或触电事故,本机不准淋雨或受潮。
CAUTION 警 告
RISK OF
ELECTRIC SHOCK
DO NOT OPEN
不准打开
以防触电
注意:为避免触电,不准打开机壳(或机背)。
机壳内没有用户能自行维修的零部件。本机须
由合格维修人员维修。
左示三角形内加闪电标志,提醒用户本机内有未
经绝缘的“危险电压”存在,可能足以令人发生
触电危险。
左示三角形内加感叹号标志,提醒用户本机附有
重要的文字指南,介绍如何操作及维修。
请在使用HTB2SE-W之前务必留意以下指引。注意,“本
机”在这里是指HTB2SE-W超低音音箱或其部分。
1. 在对本机进行操作之前,必须阅读所有安全信息和操
作说明。
2. 务必保留所有安全信息和操作说明以备日后参考。
3. 必须遵守本机和操作说明上的所有警告信息。
4. 必须遵守所有操作和使用说明。只能使用KEF规定的
附件。
5. 切勿让分了极性的或接地型的插头失去安全效用。第
三插脚是用于安全目的的。
如果跟机提供的插头与您的插座不匹配,请咨询电
工、更换不适用的插座。
请将所有维修事项交给合格维修人员完成。对于受损
的零件如电源线或插头,必须进行维修。
6. 不准在近水地方使用本机,例如在靠近浴缸、洗手
盆、厨房洗涤盆或洗衣盆的地方,或在潮湿的地库
内,或靠近泳池的地方使用本机。本机不得暴露于
滴水或溅水中。必须注意,不要将装有液体的物品放
置在本机上,不要让液体由机箱的开口处进入机内。
本机上不应放置诸如花瓶一类的装液体的物品。
7. 本机应安装或放置在不影响正常通风的位置上使用,
例如不应将其放在可能堵塞其通风孔的睡床、沙发、
毯子或类似表面上。
8. 本机的安装位置应远离热源,例如暖炉、加热器、火
炉或其他产热装置(包括功放)。
9. 本机的操作说明或本机上的标识都有对电源要求的
描述,只能连接符合此要求的电源,并且要保证便
于操作。电源插头是断开电源的装置,为了完全断
开电源,必须将本机的插头完全拔出电源插座。
10. 布置电源线时,确保电源线不被踩踏或挤压,尤其要
注意插头、转接插座及接出本机处的电源线部分。必
须确保电源插头不被阻挡,便于操作。
11. 只能使用KEF规定的附件。
12. 本机只能使用KEF规定的或跟机提供的推车、架子、三
角架或桌子进行搬运。在使用推车搬运时,必须注意
整体移动推车/本机,避免翻倒引起伤害。
13. 打雷或长期闲置不用时,必须将电源插头拔掉。
14. 本机在发生下列情形时,必须交给合格维修人员进行
维修:
a)电源线或插头损坏,
b)有异物掉进或液体溅入本机,
c)本机受到雨淋,
d)本机运行不正常或性能上出现明显变化,
e)本机坠落或机箱受损。
15. 用户不得试图对本机进行操作说明所描述的之外的维
修操作。所有其他的维修事项必须交给合格的维修人
员进行。
警告:
由于电源开关位于后面板,因此本机必须放置在敞开的区
域,电源开关不被阻挡,便于操作。
本机必须连接至带有保护接地的电源插座。
请注意:铭牌在设备底部。
请正确处置本产品。该标识表示,在全欧洲本产
品不得随其他家庭废物一起处置。为了防止由于
不受控制的废物处置引起的对人体或环境可能造
成的损害,请尽责地循环使用以促进资源的可持
续性再利用。若要退回不再使用的设备,请使用退回收集
系统或联系销售商。他们可以将本产品进行有利环境的安
全循环利用。

6
(F) Utilisation du manuel (D) Verwendung der Anleitung (I) Uso del manuale (ES) Uso del manual (P) Utilização do manual (NL) Gebruik van de
handleiding (DK) Brug af manualen (RU) Важные меры предосторожности (PL) Ważne instrukcje bezpieczeństwa (CN)
重要安全事项
IMPORTANT SAFETY INSTRUCTIONS
(GB) Follow this manual carefully for best results from speakers.
(F) Afin de tirer les meilleurs résultats des haut-parleurs, veuillez suivre scrupuleusement les instructions reprises dans le présent
manuel.
(D) Für optimale Ergebnisse mit Ihrem Lautsprecher befolgen Sie diese Anleitung.
(I) Per ottenere le migliori prestazioni dai diffusori seguire le istruzioni contenute nel presente manuale.
(ES) Siga las instrucciones de este manual para obtener los mejores resultados de los altavoces.
(P) Siga este manual atentamente para obter o melhor resultado das colunas.
(NL) Volg terwille van een optimaal resultaat de instructies nauwkeurig op.
(DK) Følg denne manual omhyggeligt for at opnå det bedste resultat fra højttalerne.
(RU) Для получения наилучших результатов от громкоговорителей, тщательно следуйте данной инструкции.
(PL) Aby osiągnąć jak najlepsze rezultaty, należy ściśle stosowac się do poniższej instrukcji.
(CN) 仔细阅读和遵循本手册以取得最佳的效果。
(GB) Read and return warranty card.
(F) Veuillez lire et renvoyer la carte de garantie.
(D) Lesen Sie die Garantiekarte und senden Sie sie ausgefüllt zurück.
(I) Si prega di restituire la scheda di garanzia, previa attenta lettura.
(ES) Lea y envíenos la tarjeta de garantía.
(P) Leia e devolva o cartão de garantia.
(NL) U kunt na lezing en invulling de garantiekaart aan de importeur sturen.
(DK) Gennemlæs og send garantibeviset tilbage.
(RU) Прочтите гарантийный талон.
(PL) Proszę przeczytać, a następnie odesłać kartę rejestracyjną.
(CN) 阅读和寄回质量保证卡。
(GB) Do not use spirit based cleaners.
(F) Ne pas utiliser d’agents nettoyants à base d’alcool.
(D) Keine alkoholhaltigen Reinigungsmittel verwenden.
(I) Non utilizzare prodotti a base di alcol.
(ES) No use limpiadores con base de alcohol.
(P) Não utilize produtos de limpeza à base de álcool.
(NL) Gebruik geen reinigingsprodukten op basis van alcohol.
(DK) Brug ikke rengøringsmidler med alkohol.
(RU) Не используйте растворители для чистки.
(PL) Do czyszczenie powierzchni nie należy używać płynów zawierających alkohol.
(CN) 不要使用含有机溶剂的清洁剂。
(GB) Avoid direct sunlight.
(F) Eviter l’exposition directe aux rayons du soleil.
(D) Direktes Sonnenlicht vermeiden.
(I) Evitare l’esposizione diretta ai raggi del sole.
(ES) Evite la luz directa del sol.
(P) Evite a exposição directa à luz do sol.
(NL) Vermijd rechtstreeks zonlicht.
(DK) Undgä direkte sollys.
(RU) Избегайте прямых солнечных лучей.
(PL) Należy unikać bezpośredniego nasłonecznienia.
(CN) 避免阳光直射。
(GB) Avoid temperature extremes.
(F) Eviter les températures extrêmes.
(D) Extreme Temperaturen vermeiden.
(I) Evitare temperature troppo alte o troppo basse.
(ES) Evite temperaturas extremas.
(P) Evite temperaturas extremas.
(NL) Vermijd extreme temperaturen.
(DK) Undgå ekstreme temperaturer.
(RU) Используйте при нормальной комнатной температуре.
(PL) Należy unikać wysokich i niskich temperatur.
(CN) 避免过高或过低的温度。
(GB) SAFETY NOTICE! trailing cables are dangerous, secure all cables.
(F) NOTE DE SECURITE ! Les câbles de haut-parleurs traînant sur le sol peuvent être source de danger. Fixer tous les câbles.
(D) SICHERHEITSHINWEIS ! Herumliegende Lautsprecherkabel sind eine Gefahrenquelle. Bitte alle Lautsprecherkabel sorgfältig verlegen.
(I) NOTA PER LA SICUREZZA: i cavi di uscita dei diffusori possono essere pericolosi se non sistemati in un posto sicuro.
(ES) ¡ATENCION! los cables de conexión sueltos de los altavoces son peligrosos. Fíjelos.
(P) Precauções de segurança! Os cabos das colunas espalhados são perigosos, fixe todos os cabos.
(NL) VOOR UW VEILIGHEID! Loshangende luidsprekerkabels zijn gevaarlijk! De kabels steeds op een veilige plaats leggen.
(DK) BEMÆRK! skarpe knæk og slid på højttalerledningerne er farlig, de skal fastgøres.
(RU) Замечание по безопасности! Не допускайте образования петель из кабелей, закрепите все кабели.
(PL) UWAGA! Wszystkie przewody muszą być zabezpieczone i przytwierdzone do podłoża.
(CN) 注意安全!散乱曳尾的连接线和电线有潜在危险,必须固定所有连接线及电线。
(GB) Clean with a dry lint free cloth.
(F) Nettoyer à l’aide d’un chiffon humide, non pelucheux.
(D) Mit einem angefeuchteten, nicht fusselnden Tuch abwischen.
(I) Pulire con un panno umido non sfilacciato.
(ES) Limpie con un paño húmedo.
(P) Limpe com um pano húmido sem pêlos.
(NL) Reinigen met een vochtige niet pluizende doek.
(DK) Rengør med en fugtig klud, der ikke fnugger.
(RU) Очищайте влажной тканью, не содержащей волокон.
(PL) Czyść wilgotna szmatką bez nici.
(CN) 用不含麻质的湿布清洁。

7
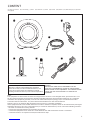
x1
x1
x1
x1
x3
x1
(F) Table des matières (D) Lieferumfang (I) Indice (ES) Contenido (P) Índice (NL) Inhoud (DK) Indhold (RU) Комплектация (PL) Spis treści
(CN)
包装内容
CONTENT
This device complies with Part 15 of the FCC Rules.
Operation is subject to the following two conditions:
(1) this device may not cause harmful interference, and
(2) this device must accept any interference received,
including interference that may cause undesired operation.
NOTE:
This equipment has been tested and found to comply with the limits for a Class B digital device, pursuant to Part 15 of
the FCC Rules.These limits are designed to provide reasonable protection against harmful interference in a residential
installation.This equipment generates, uses and can radiate radio frequency energy and, if not installed and used in
accordance with the instructions, may cause detrimental interference to radio communications.
However, there is no guarantee that interference will not occur in a particular installation.
If this equipment does cause harmful interference to radio or television reception, which can be determined by turning the
equipment off and on, the user is encouraged to try to correct the interference by one or more of the following measures:
• Re-orient or relocate the receiving antenna.
• Increase the separation between the equipment and receiver.
• Connect the equipment into an outlet on a circuit different from that to which the receiver is connected.
• Consult the dealer or an experienced radio/TV technician for help.
WARNING:
THE MANUFACTURER IS NOT RESPONSIBLE FOR ANY
RADIO OR TV INTERFERENCE CAUSED BY UNAUTHORIZED
MODIFICATIONS TO THIS EQUIPMENT. SUCH MODIFICATIONS
COULD VOID THE USER AUTHORITY TO OPERATE THE
EQUIPMENT.

8
(F)
Commandes et prises
(D)
Bedienungselemente und Anschlüsse
(I)
Comandi e prese
(ES)
Controles y conexiones
(P)
Comandos e fichas
(NL)
Regelaars en aansluitingen
(DK)
Betjeningsknapper og stik
(RU) Элементы управления и коммутационные разъемы
(PL) Elementy obsługi i
przyłącza
(CN) 控制和接口
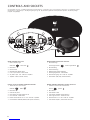
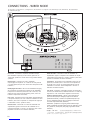
CONTROLS AND SOCKETS
Model HTB2SE-W Rear Panel
1. Mains indicator light
Power ON Power OFF
2. Bass Boost
3. Phase control
4. Wired/Wireless Mode switch
5. Line in input socket - Wired mode
6. AC power input 100 - 240V AC 50/60Hz
7. ‘ON/OFF’ switch (vacation switch)
Panneau arrière du modèle HTB2SE-W Subwoofer.
1. Témoin de mise sous tension
MARCHE ARRET
2. Bass Boost
3. Contrôle de phase
4. Interrupteur de mode câblé/sans fil
5. Prise d’entrée – Mode câblé
6. Entrée d’alimentation en c.a. 100 - 240V AC 50/60Hz
7. Commutateur ‘MARCHE/ARRET (Interrupteur Vacances)
Modell HTB2SE-W Subwoofer Rückseite
1. Betriebsanzeige
Gerät eingeschaltet Gerät ausgeschaltet
2. Bassanhebung
3. Phasensteuerung
4. Modusschalter (Kabel/Kabellos)
5. Netzeingangsbuchse - Kabelmodus
6. Netzstromeingang 100 - 240V AC 50/60Hz
7. Netzschalter (EIN/AUS) (Urlaubsschalter)
Modello HTB2SE-W Subwoofer Pannello posteriore
1. Indicatore luminoso di alimentazione
Acceso Spento
2. Bass Boost
3. Interruttore di fase
4. Interruttore modalità cablata/wireless
5. Presa ingresso linea – modo con cavo
6. Alimentazione a c.a. 100 - 240V AC 50/60Hz
7. Interruttore ON/OFF (Interruttore Vacanze)

9
Задняя панель сабвуфера HTB2SE-W
1. Wskaźnik eksploatacji
Питание включено Питание выключено
2. Повышение уровня НЧ
3. Регулировка фазы
4. Переключатель проводного и беспроводного режимов
подключения
5. Гнездо линейного входа (проводное подключение)
6. разъем для кабеля питания 100 - 240V AC 50/60Hz
7. ВКЛ/ВЫКЛ - вуключатель
Panel trasero del Modelo HTB2SE-W Subwoofer
1. Luz indicadora de conexión a red
Encendido Power OFF (desconectado)
2. Realce de graves
3. Controllo di fase
4. Conmutador modo cableado/inalámbrico
5. Zócalo de entrada de línea: modo cableado
6. Entrada de corriente (CA) 100 - 240V AC 50/60Hz
7. Interruptor ON/OFF (botón Vacaciones)
Painel traseiro do Modelo HTB2SE-W Subwoofer
1. Luzes indicadoras de tensão
Power On Desligado
2. Reforço de Baixos
3. Controlo de fase
4. Comutador do Modo com/sem Fios
5. Tomada de entrada de linha – Modo Com Fios
6. Entrada de corrente AC 100 - 240V AC 50/60Hz
7. Interruptor “ON/OFF” (Interruptor Férias)
HTB2SE-W Subwoofer achterpaneel
1. Aan/uit indicatielampje
Netschaklaar Toestel UIT
2. Bass Boost
3. Fases regelaar
4. Schakelaar voor modus Met kabel/Draadloos
5. LijnInvoercontact - DraadModus
6. Aansluiting voor netkabel 100 - 240V AC 50/60Hz
7. Netschakelaar (Vakantiestand)
HTB2SE-W Subwoofer bagside
1. Indikator for net spænding
TÆNDT SLUKKET
2. Bass Boost
3. Fase-regulering
4. Kabel/Trådløs funktionsskifter
5. Indgangsstik – til den ledningsforbundne funktion
6. AC net indgang 100 - 240V AC 50/60Hz
7. TÆND/SLUK afbryder (Hoved afbryder)
Subwoofer HTB2SE-W strona tylna
1. Wskaźnik eksploatacji
Włączony Wyłączony
2. Ustawienie basu
3. Sterowanie fazą
4. Przełącznik trybu przewodowego/ bezprzewodowego
5. Gniazdo wejściowe Line in – Tryb przewodowy
6. Wejście prądu sieciowego 100 - 240V AC 50/60Hz
7. Włącznik sieciowy (ON/OFF) (Wyłącznik urlopowy)
HTB2SE-W 后面板
1. 电源指示灯
开 关
2. 低音控制
3. 相位控制
4. 有线/无线模式选择开关
5. 线路输入插孔 — 有线模式
6. 电源输入 100-240V AC 50/60Hz
7. 电源开关

10
(F)
Commandes et prises
(D)
Bedienungselemente und Anschlüsse
(I)
Comandi e prese
(ES)
Controles y conexiones
(P)
Comandos e fichas
(NL)
Regelaars en aansluitingen
(DK)
Betjeningsknapper og stik
(RU) Элементы управления и коммутационные разъемы
(PL) Elementy obsługi i
przyłącza
(CN) 控制和接口
CONTROLS AND SOCKETS
Wireless Transmitter Panel
8. Line in input socket - Wireless Mode
9. Wireless Latency Selector
10. LED Indicator
Steady: Transmitter and receiver units are successfully
bonded and ready to output audio.
Flashing: Module is powered on but there is a problem that
will prevent audio from sounding.
1) Check that all modules are powered on.
2) Check that both receivers are within range.
11. ‘ON/OFF’ Switch
12. DC Power Input
Tableau de commande de l’émetteur sans fil
8. Prise d’entrée – Mode sans fil
9. Sélecteur de latence sans fil
10. Voyant DEL
Constant : Le transmetteur et le récepteur sont bien reliés et
prêts à émettre un signal audio.
Clignotant : Le module est bien sous tension, mais un
problème empêche l’émission audio.
1) Vérifiez que le module et le caisson de basses sont bien
allumés.
2) Vérifiez que le transmetteur et le caisson de basses sont
bien placés dans les limites de la zone de réception.
11. Bouton marche/arrêt
12. Entrée d’alimentation CC
Transmitter
8. Netzeingangsbuchse – kabelloses Modul
9. Kabellos - Schalter für die Latenzzeit
10. LED-Anzeige
Konstant: Sender und Empfänger wurden erfolgreich
verbunden und sind bereit für die Audio-Ausgabe.
Blinkend: Das Modul ist eingeschaltet, aber es gibt ein
Problem, das die Audio-Ausgabe verhindert.
1) Prüfen Sie, ob das Modul und der Subwoofer eingeschaltet
sind
2) Prüfen Sie, ob Sender und Subwoofer in Reichweite sind.
11. Ein-/Ausschalter
12. DC-Eingang
Pannello trasmettitore wireless
8. Presa ingresso linea – modo wireless
9. Selettore latenza wireless
10. Indicatore LED
Fisso: il trasmettitore e il subwoofer sono correttamente
collegati e pronti ad emettere audio.
Lampeggiante: il modulo è acceso ma vi è un problema che
impedisce la riproduzione dell’audio.
1) Verificare che il modulo e il subwoofer siano accesi.
2) Verificare che il trasmettitore e il subwoofer si trovino
entro la portata.
11. Interruttore On/Off
12. Ingresso alimentazione CC

11
无线发射器面板
8. 线路输入插孔 — 无线模式
9. 无线延时选择器
10. LED 指示灯
稳定:发射器和接收器已成功连接,可输出音频。
闪烁:模块已接通电源,但由于存在某个问题而无法输出音频。
1) 检查模块和超低音音箱是否均已打开
2) 检查发射器和超低音音箱的距离是否在射程之内
11. 电源开关
12. DC输入插孔
Panel del transmisor inalámbrico
8. Zócalo de entrada de línea: modo inalámbrico
9. Selector de latencia inalámbrico
10. Indicador LED
Fijo: El transmisor y el receptor están correctamente
enlazados y listos para emitir sonido.
Parpadeando: El módulo está encendido pero hay un
problema que impide la emisión de sonido.
1) Compruebe que el módulo y el subwoofer estén
encendidos
2) Compruebe que el transmisor y el subwoofer estén dentro
del alcance.
11. Interruptor de encendido/apagado
12. Entrada alimentación DC
Painel do Transmissor Sem Fios
8. Tomada de entrada de linha – Modelo Sem Fios
9. Selector de Latência Sem Fios
10. Luz indicadora LED
Fixa: O transmissor e o receptor estão correctamente
ligados e preparados para dar saída de áudio.
Intermitente: O módulo está ligado, mas há um problema
que impede que se oiça o áudio.
1) Verifique se o módulo e o subwoofer estão ligados
2) Verifique se o transmissor e o subwoofer estão próximos.
11. Interruptor “On/Off”
12. Entrada de Corrente DC
Transmissiepaneel voor draadloos systeem
8. LijnInvoercontact – Draadloos Model
9. Draadloos Vertragingsselector
10. LED indicatielampje
Stabiel: Zendtoestel en ontvanger zijn succesvol op elkaar
aangesloten en klaar om audio te verzenden.
Knipperen: Module is ingeschakeld maar er is een probleem
waardoor audio niet gehoord wordt.
1) controleer of module en subwoofer ingeschakeld zijn
2) Controleer of zendtoestel en subwoofer binnen bereik
zijn.
11. Aan Uit schakelaar
12. DC-stroomingang
Trådløst sendepanel
8. Indgangsstik – til den trådløse funktion
9. Valg af latenstid
10. Indikator
Lyser konstant: Senderen og modtageren er forbundet og
klar til at gengive et lydsignal.
Blinker: Systemet er tændt, men der er et problem, som gør,
at der ikke kan gengives lyd.
1) Kontroller, at systemet og subwooferen er tændt
2) Kontroller, at senderen og subwooferen er inden for
rækkevidden.
11. Afbryder
12. DC strømtilslutning
Панель беспроводного передатчика
8. Гнездо линейного входа (беспроводное подключение)
9. Переключатель задержки беспроводного соединения
10. Светодиодный индикатор
Непрерывное свечение: передатчик и приемник соединены
между собой и готовы к воспроизведению звука.
Мигание: модуль включен, но существует проблема,
препятствующая воспроизведению звука.
1) Убедитесь в том, что все модули включены.
2) Проверьте, находятся ли оба приемника в пределах
диапазона.
11. Переключатель «ВКЛ./ВЫКЛ.»
12. Разъем источника питания переменного тока
Panel nadajnika bezprzewodowego
8. Gniazdo wejściowe Line in – Tryb bezprzewodowy
9. Przełącznik opóźnienia łączności bezprzewodowej
10. Wskaźnik LED
Świeci: Nadajnik i odbiornik są poprawnie połączone i gotowe do
odtwarzania dźwięku.
Miga: Moduł jest włączony, jednak wystąpił problem
uniemożliwiający odtwarzanie muzyki.
1) Sprawdź, czy wszystkie moduły są włączone.
2) Sprawdź, czy oba odbiorniki znajdują się w zasięgu.
11. Wyłącznik
12. Wejście zasilania

12
(F)
Connexions
(D)
Anschlüsse
(I)
Collegamenti
(ES)
Conexiones
(P)
Ligações
(NL)
Aansluitingen
(DK)
Forbindelser
(RU) Подключение
(PL) Połączenia
(CN) 连接
CONNECTIONS - WIRED MODE
Line Level - connected to amplifier subwoofer Output
(Set subwoofer frequency on the receiver/processor to
120Hz and “speakers to small” when using model HTS3001
speakers).
Уровень сигнала в линии – связан с расположенным на
усилителе выходом для сабвуфера (при использовании
динамиков HTS3001 установите на приемнике/процессоре
частоту сабвуфера равную 120 Гц и выберите в качестве
источника звука небольшие динамики).
Line Level – podłączone do wyjścia głośnika niskotonowego
(ustaw częstotliwość głośnika niskotonowego na odbiorniku na120
Hz i głośniki na „small” (małe) korzystając z głośników modelu
HTS3001).
Niveau ligne - connecté a la sortie “subwoofer
output”(regler la frequence sur 120Hz et les haut parleurs
sur “small”(petit) lorsque vous utilisez des haut-parleurs KEF
HTS3001)
Niederpegel-Anschluss - Wird an den Subwoofer-Ausgang
des Verstärkers angeschlossen (Stellen Sie die Subwoofer-
Frequenz Ihres Receivers/Prozessors auf 120 Hz ein, und
wählen Sie die Lautsprecher-Einstellung “klein”, wenn Sie
HTS3001-Lautprecher verwenden).
Line Level - collegato all’uscita sub-woofer dell’amplificatore
o del processore(che, nel caso di utilizzo di diffusori acustici
HTS3001, deve essere impostato su: frequenza di taglio per
il sub-woofer 120 Hz, “speakers small”).
Nivel de línea - Conectado a la salida de subwoofer del
amplificador (Ajuste la frecuencia del subwoofer en en
receptor/procesador a 120 Hz y los altavoces como “small-
pequeños” cuando use los altavoces HTS3001)
Nível de Linha - Conectado à saída do subwoofer do
amplificador (Ajuste a frequência do subwoofer no amplif.
sintonizador/processador para 120Hz e “speakers para small”
quando usa o modelo de colunas HTS3001).
Lijn Niveau - aangesloten op de subwoofer uitgang op de
processor/versterker (Kies in het menu van de processor/
versterker voor 120 Hz als overgangsfrequentie voor de
subwoofer en selecteer ‘kleine luidsprekers’ wanneer u
HTS3001 satellieten toepast).
Line Level - tilsluttet til “Subwoofer Output” på forstaerker/
receiver (saet delefrekvens/subwoofer-frekvens til 120Hz og
hojttalere til “små” når HTS3001 hojttalerene anvendes).
信号输入(LINE INPUT) — 连接至放大器的超低音输出(SUBWOOFER-OUT)
(当与 HTS3001 卫星音箱同时使用时,将影音放大器/处理器的超低音频率设
为120Hz,以及“speakers”设为“small”)。

13
(F)
Connexions
(D)
Anschlüsse
(I)
Collegamenti
(ES)
Conexiones
(P)
Ligações
(NL)
Aansluitingen
(DK)
Forbindelser
(RU) Подключение
(PL) Połączenia
(CN) 连接
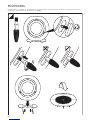
CONNECTIONS - TRANSMITTER
Connecting the transmitter unit
1. Set the Subwoofer Mode to wireless
2. Connect the subwoofer to the mains supply and turn the
subwoofer on.
3. Power off all A/V equipment during the installation of the
wireless system.
4. Connect the supplied AC-DC adaptor to the DC jack
socket on the rear panel of the transmitter unit.
5. Connect the RCA cable from the amplifier subwoofer out
to the signal input jack on the transmitter.
6. Rotate the position of the transmitter unit such that the
front panel is facing toward the subwoofer.
7. Connect the AC-DC adaptor to the mains supply and turn
on the transmitter.
8. Ensure the blue bonding light is permanently on, this
shows the transmitter unit and the subwoofer are
successfully bonded and ready to output audio. If the
bonding light is flashing ensure that both units are on
and within range.
Anschließen des Sendegerätes
1. Stellen Sie den Subwoofer-Modus auf kabellos ein.
2. Schließen Sie den Subwoofer an das Stromnetz an und
schalten Sie den Subwoofer ein.
3. Schalten Sie während der Installation der kabellosen
Anlage sämtliche AV-Geräte aus.
4. Verbinden Sie den mitgelieferten AC/DC-Adapter mit der
DC-Klinkenbuchse auf der Rückwand des Sendegerätes.
5. Verbinden Sie das RCA-Kabel vom Verstärkerausgang
des Subwoofers mit der Signaleingangsbuchse auf dem
Sender.
6. Drehen Sie die Position des Sendegerätes so, dass die
Vorderseite Richtung Subwoofer zeigt.
7. Schließen Sie den AC/DC-Adapter an das Stromnetz an
und schalten Sie den Sender ein.
8. Vergewissern Sie sich, dass das blaue Verbindungslicht
permanent eingeschaltet ist; dies zeigt an, dass das
Sendegerät und der Subwoofer erfolgreich angeschlossen
und bereit zur Audio-Ausgabe sind. Wenn das
Verbindungslicht blinkt, prüfen Sie, ob beide Geräte
eingeschaltet sind und sich innerhalb der Reichweite
befinden.
Connexion de l’unité de transmission
1. Réglez le mode du caisson de basses sur Sans fil.
2. Branchez le caisson de basses sur le courant et allumez-
le.
3. Eteignez tous les appareils audio/vidéo pendant
l’installation du système sans fil.
4. Branchez l’adaptateur AC-DC (piles/secteur) fourni à la
prise de courant femelle (DC) à l’arrière de l’unité de
transmission.
5. Branchez le câble RCA entre l’amplificateur du caisson de
basses et la prise d’entrée de l’unité de transmission.
6. Faites pivoter l’unité de transmission de sorte que son
tableau frontal soit orienté vers le caisson de basses.
7. Branchez l’adaptateur AC-DC (piles/secteur) sur le courant
et allumez l’unité de transmission.
8. Assurez-vous que le voyant de connexion bleu soit allumé
en permanence. Cela indique que l’unité de transmission
et le caisson de basses sont bien reliés et prêts à émettre
un signal audio. Si le voyant de connexion clignote,
vérifiez que les deux appareils sont bien allumés et qu’ils
sont placés dans les limites de la zone de réception.
DC INPUT
Collegamento dell'unità trasmittente
1. Impostare il modo Subwoofer su Wireless.
2. Collegare il subwoofer alla rete elettrica e accenderlo.
3. Spegnere tutti i dispositivi audio/video durante
l’installazione del sistema wireless.
4. Collegare l’adattatore ca/cc fornito alla presa cc situata sul
pannello posteriore dell’unità trasmittente.
5. Collegare il cavo RCA del subwoofer dell'amplificatore alla
presa di ingresso del segnale del trasmettitore.
6. Ruotare la posizione dell’unità trasmittente in modo che il
pannello anteriore sia rivolto verso il subwoofer.
7. Collegare l’adattatore ca/cc fornito alla rete elettrica ed
accendere il trasmettitore
8. Assicurarsi che la luce di collegamento blu sia sempre
accesa ad indicare che l’unità trasmittente e il subwoofer
sono correttamente collegati e pronti ad emettere audio.
Se la luce di collegamento lampeggia, assicurarsi che
entrambe le unità siano accese ed entro la portata.

14
Conexión de la unidad transmisora
1. Establezca el Modo subwoofer en inalámbrico
2. Conecte el subwoofer a la toma de corriente y enciéndalo.
3. Apague todo el equipo de audio/vídeo durante la
instalación del sistema inalámbrico
4. Conecte el adaptador suministrado AC-DC a la toma
DC que se encuentra en la parte posterior de la unidad
transmisora.
5. Busque el cable RCA procedente de la salida del
subwoofer del amplificador y conéctelo en la toma de
entrada de señal del transmisor
6. Gire la posición de la unidad transmisora de modo que el
panel frontal esté enfrente del subwoofer
7. Conecte el adaptador AC-DC a la toma de corriente y
encienda el transmisor.
8. Asegúrese de que la luz azul de enlace esté
permanentemente encendida. Esto indica que la unidad
transmisora y el subwoofer están correctamente enlazados
y listos para emitir sonido. Si la luz de enlace está
parpaedando asegúrese de que las dos unidades están
encendidas y dentro del alcance.
Conectar a unidade do transmissor
1. Configure o Subwoofer para o Modo sem fios
2. Conecte o subwoofer à corrente e ligue-o.
3. Desligue todo o equipamento A/V durante a instalação do
sistema sem fios
4. Conecte o adaptador AC-DC fornecido à tomada DC no
painel traseiro da unidade do transmissor.
5. Conecte o cabo RCA da tomada de saída do amplificador
subwoofer na tomada de entrada do transmissor
6. Rode a posição da unidade do transmissor de forma a que
o painel frontal fique virado de frente para o subwoofer
7. Conecte o adaptador AC-DC à corrente e ligue o
transmissor.
8. Certifique-se de que a luz azul de ligação fica
permanentemente ligada, isto indica que a unidade do
transmissor e o subwoofer estão correctamente ligados
e preparados para dar saída de áudio. Se a luz de ligação
estiver intermitente, certifique-se de que ambas as
unidades estão ligadas e próximas.
Het aansluiten van het zendtoestel
1. Stel de Subwoofer Modus in op draadloos
2. Sluit de subwoofer aan op het lichtnet en zet hem aan.
3. Schakel alle A/V uitrusting uit tijdens de installatie van het
draadloze systeem
4. Sluit de meegeleverde AC-DC adaptor aan op het DC
stopcontact op het achterpaneel van het zendtoestel.
5. Sluit de RCA kabel van de subwoofer versterker aan op het
signaal-in contact op het zendtoestel
6. Draai de stand van het zendtoestel zo dat het voorste
paneel naar de subwoofer gericht is
7. Sluit de AC-DC adapter aan op het lichtnet en zet het
zendtoestel aan.
8. zorg ervoor dat het blauwe aansluitingslampje permanent
brandt, dit geeft aan dat het zendtoestel en de subwoofer
succesvol zijn aangesloten op elkaar en klaar zijn om
audio te verzenden. Als het aansluitingslampje knippert,
zorg er dan voor dat beide eenheden aan zijn en binnen
bereik.
Tilslutning af senderen
1. Vælg subwooferens trådløse funktion
2. Slut subwooferen til lysnettet, og tænd for den.
3. Sluk for alle a/v-enhederne under installationen af det
trådløse system
4. Slut den medfølgende strømadapter til strømstikket på
senderens bagpanel.
5. Slut RCA-kablet fra subwooferens udgangsstik til
indgangsstikket på senderen
6. Drej senderen således, at dens frontpanel vender mod
subwooferen
7. Slut strømadapteren til lysnettet, og tænd for senderen.
8. Kontroller, at den blå indikator for forbindelsen lyser.
Det betyder, at senderen og subwooferen er forbundet
og klar til at gengive et lydsignal. Hvis indikatoren for
forbindelsen blinker, skal du sørge for, at begge enheder
er tændte og inden for rækkevidden.
连接发射器装置
1. 将超低音音箱模式设置为无线
2. 将超低音音箱连接至市电电源,然后将打开开关
3. 无线系统安装过程中,请关闭所有视听设备
4. 将提供的 AC-DC 适配器插到发射器背板上的 DC 插孔。
5. 将 RCA 线缆的一端与放大器的超低音输出端口相连,另一端插入
发射器的信号插孔内
6. 旋转发射器的位置,使其前面板正对超低音音箱
7. 将 AC-DC 适配器连接至市电电源,然后打开发射器开关。
8. 确保蓝色的连接指示灯恒亮,这样表示发射器和超低音音箱已成
功连接,且可以输出音频。如果连接指示灯在闪,请确保两个装
置都已打开并且距离在射程之内。
Połączenie z nadajnikiem
1. Ustaw tryb głośnika niskotonowego na bezprzewodowy
2. Podłącz głośnik niskotonowy do zasilania i włącz głośnik.
3. Wyłącz wszystkie urządzenia audio/wideo w trakcie instalacji
systemu bezprzewodowego.
4. Podłącz dołączony zasilacz do gniazda zasilania na tylnym
panelu nadajnika.
5. Podłącz przewód RCA z wyjścia głośnika niskotonowego do
gniazda wejściowego sygnału nadajnika.
6. Obróć nadajnik, aby przedni panel był skierowany w stronę
głośnika niskotonowego.
7. Podłącz zasilacz do gniazdka i włącz nadajnik.
8. Upewnij się, że niebieski wskaźnik połączenia świeci bez
przerwy, to oznacza, że nadajnik i głośnik niskotonowy są
odpowiednio połączone i gotowe do odtwarzania dźwięku. Jeżeli
wskaźnik połączenia miga, sprawdź, czy obie jednostki znajdują
się w zasięgu.
Подключение передатчика
1. Переведите сабвуфер в беспроводной режим.
2. Подключите сабвуфер к источнику питания и включите его.
3. На время установки беспроводной системы выключите все
аудио- и видеоустройства.
4. Подключите поставляемый в комплекте адаптер питания
к разъему питания, который находится на задней панели
передатчика.
5. С помощью RCA-кабеля соедините выход для сабвуфера,
расположенный на усилителе, с разъемом входного сигнала
на передатчике.
6. Поверните передатчик таким образом, чтобы его передняя
панель была обращена в сторону сабвуфера.
7. Подключите адаптер к источнику питания и включите
передатчик.
8. Убедитесь в том, что синий индикатор горит непрерывно.
Это означает, что передатчик и сабвуфер соединены между
собой и готовы к воспроизведению звука. Если индикатор
мигает, проверьте, находятся ли оба устройства в пределах
необходимого диапазона.

15
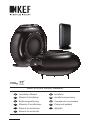
HTB2SE-W
WIRELESS SUBWOOFER
HTB2SE-W
WIRELESS SUBWOOFER
HTB2SE-W
WIRELESS SUBWOOFER
HTB2SE-W
WIRELESS SUBWOOFER
HTB2SE-W
WIRELESS SUBWOOFER
(F)
Positionnement
(D)
Aufstellung
(I)
Posizionamento
(ES)
Posicionamiento
(P)
Posicionamento
(NL)
Plaats en aansluiting van het netsnoer
(DK)
Placering
(RU) Размещение (PL) Umiejscowienie
(CN) 位置摆放
POSITIONING
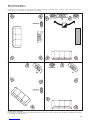
Positioning the transmitter:
The KEF wireless subwoofer transmitter should be located at minimum 1 to 2 meters from any other KEF Wireless Subwoofer Transmitter
or Universal Wireless Transmitter.


17
Bass Boost
The bass boost control is intended to adjust the response of the subwoofer to compensate for room conditions and user preferences.
Boost is switchable between 0, +6 and +12dB at around 40Hz.
Phase Control
The phase control will normally be set at 0° but more output level can
sometimes be achieved in the 180° position, particularly when the
subwoofer is far away from the satellite speakers.
Wireless Latency Selector
Set to 15ms for shortest delay. Set to 20ms for extended range.
PLEASE NOTE:
Volume Control
Volume control is implemented in the source equipment.
ADJUSTING THE CONTROLS
Realce de graves
El control de realce de graves permite ajustar la respuesta del subwoofer para compensar las condiciones de la sala y las preferencias
del usuario. El realce se puede poner a 0, +6 y +12 dB en torno a 40Hz.
Controllo di fase
El Controllo di fase debe estar normalmente en 0˚, pero algunas veces
se puede obtener un mayor nivel de salida en la posición de 180˚,
especialmente cuando el altavoz de graves esta alejado de los altavoces
satélite.
Selector de latencia inalámbrico.
Establecer en 15ms para retardo mínimo. Establecer en 120s para alcance ampliado.
ATENCI N:
Control de Volumen
El control de volumen se implementa en el equipo fuente.
Bass Boost
La fonction “bass Boost”permet d’adapter la réponse au local ou aux préférences personnelles. Les basses peuvent etre “poussées” pas
par pas, 0,+6 et +12dB a +/- 40Hz
Contrôle de phase
Le contrôle de phase sera normalement positionné sur 0°. Un niveau
plus élevé de sortie peut toutefois être obtenu en position 180°, et ce
plus particulièrement
lorsque le subwoofer est éloigné des haut-parleurs satellites.
Sélecteur de latence sans fil.
Réglez-le sur 15ms pour obtenir le délai le plus court. Réglez-le sur 20ms pour agrandir la zone de réception.
REMARQUE:
Controle de volume.
Le volume est controlé par l’amplificateur
Bassanhebung
Die Einstellung der Bassanhebung erlaubt die Anpassung des Subwoofers an die Bedingungen des Raums und Ihrem personlichen
Geschmack. Die Anhebung ist schaltbar in folgenden Stufen: 0 dB, +6 dB und +12 dB bei etwa 40 Hz.
Phasensteurung
Der Phasensteurung wird normalerweise auf 0° eingestellt. Allerdings
kann manchmal in der Position 180° ein höherer Ausgangspegel
erzielt werden, insbesondere, wenn der Subwoofer weit von den
Satellitenlautsprechern entfernt ist.
Kabellos - Schalter für die Latenzzeit:
Auf 15 ms für die kürzeste Verzögerung eingestellt. Auf 20 ms für erweiterte Reichweite eingestellt.
BITTE BEACHTEN:
Lautst rkeregelung
Die Lautstärke wird vom angeschlossenen Verstärker/Prozessor geregelt. Im Auto Mode bleibt der Subwoofer in Stand-By, bis ein Signal
empfangen wird.
Bass Boost
Mediante il selettore “bass boost” è possibile apportare piccole enfasi nella risposta in frequenza del sub-woofer, per compensare
differenti situazioni ambientali o per preferenze personali. Le variazioni possibili sono +6 e +12 dB a circa 40 Hz.
Interruttore di fase
In genere l’interruttore di fase viene impostato a 0° ma a volte
si ottiene un maggior livello d’uscita nella posizione a 180°,
particolarmente se il subwoofer è molto distante dagli altoparlanti
secondari.
Selettore latenza wireless.
Impostare su 15 ms per ottenere il ritardo più breve. Impostare su 20 ms per la portata estesa.
NOTA:
Controllo del volume
La regolazione del volume si effettua dall’unità di controllo.
(F) Réglage des commandes (D) Einstellen der Bedienungselemente (I) regolazione dei comandi (ES) Ajuste de los controles (P) Ajuste
dos comandos (NL) bediening van de regelaars (DK) Justering af betjeningsknapperne (RU) Настройка регуляторов (PL) Regulacja ustawień
(CN) 调节控制

18
Подъем НЧ
Регулятор Подъема НЧ предназначен для регулировки низких частот для компенсации акустических особенностей помещения. Режим
включается между 0, +6 дБ и +12 дБ, в районе 40 Гц.
Регулятор фазы
Регулятор фазы в нормальном положении находится на отметке 0, но
иногда лучших показателей звучания можно добиться в позиции 180,
особенно когда сабвуфер располагается далеко от акустических систем.
Переключатель задержки беспроводного соединения
Установите значение в 15 мс для минимальной задержки. Установите значение в 20 мс для увеличения диапазона.
ПРИМЕЧАНИЕ.
Регулятор громкости
Регулятор громкости не предусмотрен.
Ustawienie basu
Bas ustawia się aby dopasować jego moc do warunków panujących w pomieszczeniu oraz do indywidualnych upodobań użytkownika. Można
wybierać pomiędzy 0, +6 i +12dB przy około 40Hz.
Sterowanie fazowe
Sterowanie fazowe zostaje z reguły ustawione na 0°. Można czasem w pozycji
180° osiągnąć wyższy poziom wyjściowy, w szczególności jeśli subwoofer jest
z dala od głośników satelitarnych.
Przełącznik opóźnienia łączności bezprzewodowej
Ustaw 15 ms dla najkrótszego ustawienia. Ustaw 20 ms dla ustawienia przedłużonego.
PROSZĘ ZAUWAŻYĆ:
Sterowanie głośnością
Sterowanie głośnością odbywa się w urządzeniach źródłowych.
Refor o de Baixos
O controlo de reforço de baixos destina-se a ajustar a resposta do subwoofer para compensar as condições de audição da sala e as
preferências do utilizador. O reforço é comutável entre 0, +6 e +12dB na faixa dos 40Hz.
Controlo de fase
O controlo de fase será fixado normalmente a 0° mas algumas vezes
pode-se conseguir um maior nível de saída numa posição a 180°,
nomeadamente quando o subwoofer se encontra longe das colunas
satélites.
Selector de Latência Sem Fios.
Fixar para 15ms para o retardamento mais curto. Fixar para 20ms para longa distância.
POR FAVOR NOTE:
Controlo de Volume
O controlo de volume é implementado no equipamento de fonte.
Bass Boost
Bass Boost stelt u in staat om de karakteristiek van de subwoofer rond 40 Hz in te stellen op 0, +6 of +12 dB, ter compensatie voor
akoestische omstandigheden of gebruikersvoorkeur.
Fase regelaar
De fases regelaar staat normaal gezien op 0°. Soms kunt u echter een
hoger uitgangsniveau bereiken door de regelaar op 180° te zetten,
vooral als de subwoofer ver weg staat van de satellietluidsprekers.
Draadloos Vertragingsschakelaar
Stel in op 15min. voor kortste vertraging. Stel in op 20min. voor vermeerderd bereik.
LET OP:
Volume regeling vindt plaats in de externe processor/versterker
Bass Boost
Bass Boost justerer output fra subwooferen som kompensation for storrelse af stue og brugerens praeferencer. “Boost” kan justeres
trinvis mellem 0, +6 og +12dB omkring 40 Hz.
Fase Regulering
Faseo regulering er normalt sat til 0° men større udgangsniveau kan
nogle gange
opnås i 180° positionen, specielt når subwooferen er anbragt langt fra
satellithøjttalerne.
Valg af latenstid.
Sæt den til 15 ms for at bruge den korteste latenstid. Sæt den til 20 ms for at bruge den udvidede rækkevidde.
BEMAERK VENLIGST:
Volumekontrol
Volumekontrol foretages gennem den tilsluttede forstaerker/receiver.
低音控制(BASS BOOST) — 用来调节超低音音箱的响应以空间条件的限制和用户的偏好。可以选择 0,+6 或 +12dB (在40Hz条件下)。
相位(PHASE)控制 — 通常设为 0˚,但设为 180˚ 可以取得更大的输出电平,
尤其是在超低音音箱离卫星音箱比较远的情况下。
无线延时选择器 — 最短延时为 15ms。需要扩展射程时设为 20ms。
请注意
音量控制 — 由信号来源设备控制。

19
(F)
Spécifications
(D)
Technische Daten
(I)
Specifiche
(ES)
Especificaciones
(P)
Especificações
(NL)
Technische gegevens
(DK)
Specifikationer
(RU) Тхнические характеристики (PL) Dane Techniczne
(CN) 产品规格
SPECIFICATIONS
SUBWOOFER
Model HTB2SE-W
Type Powered Subwoofer
LF Drive Unit 1 x 250 mm (10 in.) + 1 x 250 mm (10 in.) ABR
Frequency Range 30 - 150Hz
Amplifier 250 Watts built-in Class-D amplifier
Maximum Output (SPL) 110dB
Low Pass Filter Fixed 150Hz, 4th-order
Low Level Signal Inputs RCA phono socket
Enclosure Type Passive radiator
Internal Volume 15 litres
Net Weight 11.9kg (26.2lbs)
Dimensions (H x W x D) 390 x 440 x 195 mm (vertical); 227 x 440 x 385 mm (horizontal)
15.3 x 17.3 x 7.6 in. (vertical); 8.9 x 17.3 x 15.1 in. (horizontal)
Power Requirements 100 - 240V ac ~, 50/60Hz
Power Consumption 250VA
Finish High Gloss Black
TRANSMITTER
Frequency Band 2.4 - 2.4835GHz (ISM band)
Sensitivity 80dB typical
Data Rate Up to 1.1Mbps
Frequency Range 30 -150Hz
Transmission Protocol AAFHSS
Range 25m (27.3 yds) Typical Maximum*
Available Finishes Black
Dimensions (H x W x D) 147 x 79 x 79 mm (5.8 x 3.1 x 3.1 in.)
* Environmental factors such as building materials and construction may adversely affect wireless signal range.
KEF AUDIO reserves the right, in line with continuous research and development, to amend or change specifications without
prior notice. E. & O.E.

www.kef.com
GP Acoustics (UK) Ltd., Eccleston Road, Tovil, Maidstone, Kent, ME15 6QP U.K.
Telephone: + 44 (0) 1622 672261 Fax: + 44 (0) 1622 750653 Email: [email protected]
GP Acoustics (US) Inc., 10 Timber Lane, Marlboro, New Jersey 07746 U.S.A.
Telephone: +(1) 732 683 2356 Fax: +(1) 732 683 2358 Email: [email protected]
GP Acoustics GmbH, Am Brambusch 22, 44536, Lünen, Deutschland.
Telephone: +49 (0) 231 9860-320 Fax: +49 (0) 231 9860-330 Email: [email protected]
GP Acoustics (France) SAS, 39 Rue des Granges Galand - BP60414, 37554 Saint Avertin CEDEX, France.
Telephone: +33 (0) 2 47 80 49 01 Fax: +33 (0) 2 47 27 89 64 Email: [email protected]
GP Acoustics (HK) Ltd., 6/F, Gold Peak Building, 30 Kwai Wing Road, Kwai Chung, N.T., Hong Kong.
Telephone: +(852) 2410 8188 Fax: +(852) 2401 0754 Email: [email protected]
KEF Japan, 1-11-17, Honcho, Koganei-city, Tokyo, Japan. 184-0004.
Telephone: +81 (0) 42-388-2030 E-mail: [email protected]
GP Acoustics (UK) Ltd
英国肯特郡梅德斯通市
电话: +44 (0) 1622 672261
传真: +44 (0) 1622 750653
KEF 亚洲工厂:
生产商:惠州市金山电子有限公司
厂 址:广东省惠州市仲恺高新技术
产业开发区惠风四路76号
-
 1
1
-
 2
2
-
 3
3
-
 4
4
-
 5
5
-
 6
6
-
 7
7
-
 8
8
-
 9
9
-
 10
10
-
 11
11
-
 12
12
-
 13
13
-
 14
14
-
 15
15
-
 16
16
-
 17
17
-
 18
18
-
 19
19
-
 20
20


他の言語で
- italiano: KEF HTB Series HTB2SE Guida d'installazione
- polski: KEF HTB Series HTB2SE Instrukcja instalacji
- français: KEF HTB Series HTB2SE Guide d'installation
- English: KEF HTB Series HTB2SE Installation guide
- dansk: KEF HTB Series HTB2SE Installationsvejledning
- Nederlands: KEF HTB Series HTB2SE Installatie gids