1、
2、
3、
、
、
、
、
、
電源開 關
選單/S OS緊急檔案 鎖
方向上
4 方向下
5 錄影/拍照/確 認
6 模式/麥克 風開關(長按)
7 麥克風
8 重置鍵
錄影畫面
待機畫面
錄影設定
1
9
10 SD卡槽
11 AV輸出介 面
12 HDM I輸出介面
、
、
、
、
USB /車充電源插 孔
13 喇叭
14 固定 帶
15
16 顯示 螢幕
、
、
、鏡頭
、
RX7W
1 如 果汽 車檔 風玻 璃內 外有 油 漬、 指紋 劃其 他髒 汙, 請先 擦拭 乾
淨 後再 安裝 。
2 請 先將 記憶 卡依 指定 方向 插 入主 機, 並用 固定 帶將 主機 與後 視
鏡 固定 。
3 安 裝時 請調 整鏡 頭至 最佳 位 置( 注: 不要 被後 視鏡 檔住 )。
4 使 用固 定帶 時請 將固 定帶 調 整至 最緊 ,避 免鬆 動掉 落, 多 帶
子 可以 剪掉 。
5 安裝 好後 請將 鏡頭 與螢 幕 的保 護膜 撕掉 ,以 免錄 影時 影響 畫質 。
、
、
、
、 餘
、
1、當車 輛熄火後點 煙器仍供電 的使用者, 請在離開車 子時務必將 點
煙器插 頭拔起。
2、請使 用8GB Cla ss 6以上規格 的Micor S D卡。
3、檔案 被保護鎖定 後,此檔案 在錄影中不 會被刪除, 機器最多保 護
鎖定10筆 ,超過10筆會 自動將最舊 的保護檔轉 成一般檔, 持續
錄影仍 會被刪除。
停止錄 影後按一下M ENU鍵進入 錄影設定。
全時寬
動畫尺 寸:設定動 畫尺寸大小 。
攝影亮 度調整:設 定攝影明暗 度大小。
白平衡 :針對環境 光源進行調 整。
錄音: 開啟或關閉 錄音功能。
日期水 印:開啟或 關閉日期記 錄功能。
分段攝 影:設定分 段攝影時間 或關閉分段 攝影功能。
重力感 應:設定G- Senso r觸發檔案保 護的靈敏度 。
移動攝 影:開啟或 關閉移動攝 影功能。
車牌顯 示:可在視 頻上顯示車 牌號碼。
密碼設 置:設定系 統操作密碼 並保護文件 安全。
動態: 全時開啟。
停止錄 影後按二下M ENU鍵進入 系統設定。
格式化 :將記憶卡 進行格式化 ,格示化前 請先備份資 料
語言選 擇:支援多 國語言,可 依您的喜好 調整。
日期/時間 :更改系統 時間。
頻率: 調整使用環 境的光源頻 率。
按鍵音 :開啟或關 閉按鍵音功 能。
屏幕保 護:設定螢 幕自動關閉 時間,或永 遠開啟。
TV輸 出: 影像輸 出時 ,可調整NT SC與PAL。
系統版 本:查看系 統版本號。
恢復預 設值:將所 有設定回復 至原廠預設 狀態。
3、錄影 模式
4、動態 尺寸
6、攝影 亮度調整
5 3、分段 攝影 分鐘
7、麥克 風
2、錄影 圖示
1、WDR功 能全時開啟
9 位移攝 影、
11、記 憶卡圖示
12、錄 影時間
13、日 期顯示
8、連接 電源充電
10、當 前時間
14、白 平衡
1 2 3
10
13
4 5 6 7 8
11 12
9
14
1、在錄 影中,汽車 前方擋風玻 璃無隔熱紙 或貼膜,錄 影效果則最 佳。
2、車前 擋風玻璃, 內外請保持 清潔,避免 影響錄影畫 面品質。
3、雨天 錄影時,如 發現雨刷刷 不乾淨玻璃 ,請及時更 換雨刷,避 免造
成雨天 錄影品質不 佳。
4、天晴 錄影時,錄 影畫面品質 最佳,但注 意如在逆光 環境下錄影 ,畫
面則較 暗,此為正 常現象。
5、為了 呈現更好的 視頻及音頻 效果,建議 使用以下播 放軟體播放 :
暴風影 音、Wind ows Med ia Play er、Q uick Ti me P layer。
6、本機 經過耐高 溫 測試;但 了 保障更長的 壽命,夏日 車內高溫,
如本機 無需工作, 建議移到陰 涼處。
低 為
1、插入 記憶卡
2、將車 用電源分別 插入汽車點 煙頭與主機
3、發動 汽車
4、主機 開機,系統 將會自動開 始錄影
開機流程
1、停止 錄影後按二 下MODE鍵進 入影片播放 模式。
2、按上 下鍵選擇到 想要播放的 影片。
3、按下 確認鍵開始 播放影片。
4、再一 次按下確認 鍵暫停播放 影片。
播放流 程
1、停止 錄影後按二 下MODE鍵進 入影片播放 模式。
2、按上 下鍵選擇到 想要刪除的 影片。
3、按下M ENU鍵進入 選單進行影 片刪除或全 部刪除。
影片刪 除
播放10 80P 30f ps影像電腦 規格 建議:
1、int el C ore 2 D uo 2.0G Hz 以 上CPU
2、2G以上D DRII記憶 體
3、支援D irect X 10以 上規格 之顯示卡
2
3
5
7
4
6
9
10
11
12
8
13
16
14 14 15
1. 2. 3.
4.
5.

1、Power switch
2、MEN U/SOS E merge nc y Fil e
Loc k(Lon g press )
3、UP
4、DOW N
5、Vid eo Reco rdi ng /Came ra
/Co nfirm
6、MOD E/Mut e Mo de (Lon g press )
7、Mic ropho ne
Video-Play Operation
1、After stopped recording, press MODE to enter the video-play
mode.
2、Press UP or Down to select the desired video to play.
3、Press CONFIRM to start playing video.
4、Press CONFIRM again to pause the video.
Delete Video
1、After stopped recording, press MODE to enter the video-play
mode.
2、Press UP or Down to select the desired video to delete.
3、Press MENU, enter the menu to delete the video or delete all.
Play on Computer
Recommended PC requirements for 1080P 30fps video playing:
1、intel Core 2 Duo 2.0GHz or above CPU
2、2G or above DDRII RAM
3、Graphic card supports DirectX 10 or above
System Settings
Video Playback
Software Operation
Notes
Power On/Off
Switch On
Please connect the vehicle cigarette lighter and start the engine, the
device will be switched on immediately.
When car engine stooped or car power disconnected, the device will
shutdown in 10 seconds automatically.
1、For the users whose vehicle cigarette lighter keeps power
supplying after the engine stopped, please unplug the car
charger before leaving the vehicle.
2、Please use Class 6 or above Micro SD card.
3、Once the file be protected, the file will not be deleted by loop
recording. The device can protect up to 10 files, if the 11th file be
protected, the oldest protected file will be turned to unprotected
file which will be deleted by looping recording.
1、Insert the memory card.
2、Connect the car charger into the vehicle cigarette lighter
and the device.
3、Start the vehicle.
4、The device be turned
on, and start recording
automatically.
1、Please clean the oil, fingerprint or any other filth on windshield
before installing.
2、Please insert the memory card into device as instruction, and
use the belt fixer to attach the device on rear view mirror.
3、Please adjust the lens to the best position.(Note: don't be
blocked by the rear view mirror.)
4、Please tighten the belt fixer to prevent loosing, users can shear
the unnecessary belt.
5、Please remove the protect film on lens and LCD before recording
to ensure the best picture quality.
Installation and Fixation
Hardware Installation Guide
Thank you for purchasing Our company product,
please following the instruction to use the device
correctly.
Our company products are made of top materials to
provide the best quality product with the best image
quality to all customers.
Recording notes
1、Recording in a car without film on windshield can ensure the
best image recorded.
2 Please keep the windshield clean to prevent bad influence
on image quality.
、
3 If windshield wiper can't clean the windshield, please
replace it with a new one, or the image quality in the rainy
day will be influenced.
、
4 Image quality will be better while recording in a sunny day, but
please note in backlight position the image will be darker, it's
the normal reaction while image sensor face the light straightly.
、
5 In order to present a better video and audio quality, we suggest
using the following player software: Storm video, Windows
Media Player,QuickTime Player.
、
Product Structure
Recording Settings
Recording image
Standby Image
6 After the machine high and low temperature testing; But in order
to ensure a longer life, summer heat inside the car, such as the
machine without work, the proposed move to the shade.
、
13
14
Dis play Sc reen
、Spe aker
、Fix ing Str ap
15、Le ns
16、
8、Res et key
9
Power Su pp ly Ja ck
、USB /Vehic le C harge r
10、SD C ard Slo t
11、AV Ou tput Port
12、HD MI Outp ut Jack
After stopped recording, press MENU to enter the recording
settings.
Toggle on the WDR function.
Resolution:Set the recording resolution.
Exposure:Set the exposure value.
White Balance: Adjust for ambient light.
Record Audio:Toggle on or off the sound recording function.
Date Stamp:Toggle on or off the data stamp function.
Loop recording:Set the video length in recording cycle mode, or
toggle off record cycle function.
Gsensor:Set the sensitivity level of the G-sensor file protection .
Motion Detection:Toggle on or off the motion detection recording
function.
Plate stamp: can display the registration number on the
video.
Password settings: Set the system operation and to protect the
password file security.
WDR:
After stopped recording, press MENU twice to enter the system
setup.
Format: Format the memory card; please backup your data
before formatting.
Language:Support multiple languages; you can choose the
language according to your preferences.
Date/Time:Set the system time.
Frequency:Adjust the light frequency of use of the
environment.
Beep Sound:Switch on or off the system beep indicator.
Screen Saver:Set the screen automatic off time, or set it as
always on.
TV Mode:You can toggle between NTSC and PAL when in video
output mode.
Version: Check the system version number.
Default Setting:Reset all the settings to the default state.
1 2 3
10
13
4 5 6 7 8
11 12
9
14
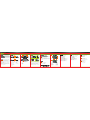
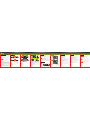
1、WDR wor ks all time
2、Recording ima ge
3、Recording mod e
4、Resolution
5、Loop recording in 3 minutes length
6、Exposure
7、Microph one
8、Power connected
9、Motion Detectio n
10、Time
11、Memor y Card icon
12、Recording ti me
13、Date
14、Whit e Ba la nce
RX7W
1
2
3
5
7
4
6
9
10
11
12
8
13 14 14 15
1. 2. 3.
4.
5.
16
-
 1
1
-
 2
2