
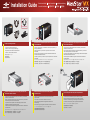
Installation Guide
Verify the package contents.
Release the four screws then pull out the rear panel and tray
of the NexStar MX.
Place the first HDD onto the drive caddy then insert the HDD
into the SATA connector.
Place the second HDD onto the drive caddy then insert the
HDD into the SATA connector.
1. 3.
4.
2.
Compruebe el contenido del paquete.
Vérifiez le contenu du paquet d’emballage.
Überprüfen Sie den Inhalt des Produktkartons.
Verificare i contenuti della confezione.
檢查包裝內容
Quite los cuatro tornillos y, a continuación, retire el panel posterior y la
bandeja de NexStar MX.
Dévissez les quatre vis puis retirez le panneau arrière et le tiroir du
NexStar MX
Lösen Sie die vier Schrauben, ziehen Sie anschließend Rückwand und
Schublade des NexStar MX heraus.
Allentare le quattro viti, poi estrarre il pannello posteriore ed il cassetto da
NexStar MX.
鬆開四顆螺絲,然後拉出NexStar MX的後面板和托盤。
Coloque la primera unidad de disco duro en su armazón y, a continuación,
insértela en el conector SATA.
Placez le premier lecteur de disque dur sur le boîtier du lecteur, puis insérez le
lecteur de disque dur dans le connecteur SATA.
Legen Sie die erste Festplatte in den Laufwerkträger, schieben Sie die Festplatte
anschließend in den SATA-Verbinder.
Collocare la prima unità HDD nel supporto unità ed inserire l’unità HDD nel
connettore SATA.
將第一個硬碟放入硬碟盒,然后將其插入 SATA 連接器。
Coloque la segunda unidad de disco duro en su armazón y, a continuación,
insértela en el conector SATA.
Placez le second lecteur de disque dur sur le boîtier du lecteur, puis insérez le
lecteur de disque dur dans le connecteur SATA.
Legen Sie die zweite Festplatte in den Laufwerkträger, schieben Sie die
Festplatte anschließend in den SATA-Verbinder.
Collocare la seconda unità HDD nel supporto unità ed inserire l’unità HDD nel
connettore SATA.
將第二個硬碟放入硬碟盒,然后將其插入 SATA 連接器。
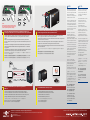
Secure the hard drive onto the drive caddy with the
provided screws.
5.
Asegure la unidad de disco duro en su armazón con los tornillos
proporcionados.
Fixez le lecteur sur le boîtier en utilisant les vis fournies.
Fixieren Sie die Festplatte mit den mitgelieferten Schrauben im
Laufwerkträger.
Fissare il disco rigido al supporto unità usando le viti fornite in dotazione.
用提供的螺絲將硬盤固定到硬碟盒上。
Guía de instalación Guide d'installation Installationsanleitung
Guida all’installazione 安裝指南 安装指南
NST-400MX-S3R Only
DC 12V
POWER
eS ATA
ON
OFF
USB 3.0
Connect the power cable and press the power button.
6.
Conecte el cable de alimentación y pulse el botón de encendido.
Branchez le câble de courant et appuyez sur le bouton de courant.
Schließen Sie die Netzleitung an und betätigen Sie den Netzschalter.
Connettere il cavo elettrico e premere il pulsante di alimentazione.
連接電源線接下來按下電源按鈕。
DC 12V
POWER
eS ATA
ON
OFF
USB 3.0

Copyright © 2012 Vantec Thermal Technologies. All Right Reserved. | All Registered Trademarks Belong To Their Respective Companies.
Model: NST-400MX-S3 or NST-400MX-S3R
Information in this document is subject to change without notice.
Reproduction of these materials in any manner whatsoever without written permission is strictly forbidden.
Printed in China
Printed on Recycled Paper.
Refer to the diagram and set the mode by switching the jumper and
pressing the reset button for 10 to 15 seconds while the unit is powered on.
7.
Consulte el diagrama y establezca el modo de funcionamiento cambiando el puente y
presione el botón de restablecimiento entre 10 y 15 segundos mientras enciende la
unidad.
Référez-vous au diagramme et réglez le mode de fonctionnement en positionnant le
cavalier. L’unité étant en marche, appuyez sur le bouton de réinitialisation pendant 10 à 15
secondes.
Schauen Sie sich das Diagramm an: Stellen Sie den Betriebsmodus per Steckbrücke ein,
halten Sie anschließend die Rücksetztaste bei eingeschaltetem Gerät 10 – 15 Sekunden
lang gedrückt.
Fare riferimento all’illustrazione e configurare la modalità operativa impostando il jumper e
poi premere il tasto di ripristino per 10-15 secondi mentre l’unità è accesa.
請參閱圖示,通過切換跳線設置操作模式,然后在設備開機運行時按住復位按鈕 10 至 15 秒。
Insert the drive caddy back into the aluminum housing.
Be sure to align and secure with the provided screws.
Connect the NexStar MX to your computer using eSATA or
USB 3.0.
Your NexStar MX is now ready for use.
8.
9.
10.
Vuelva a insertar el armazón de la unidad en la carcasa de aluminio. Asegúrese de
alinear y asegurar la unidad con los tornillos proporcionados.
Insérez le boîtier du lecteur dans le bâti en aluminium. Faites attention à l’alignement et
vissez le tout avec les vis fournies.
Schieben Sie den Laufwerkträger zurück in das Aluminiumgehäuse. Achten Sie auf
bündigen Sitz, anschließend mit den mitgelieferten Schrauben fixieren.
Inserire il supporto unità nell’alloggio di alluminio. Assicurarsi di allineare e fissare le
viti fornite in dotazione.
將硬碟盒裝回鋁架。務必用提供的螺絲將其對准並固定好。
Conecte su NexStar MX al equipo mediante la interfaz eSATA o USB 3.0.
Connectez le NexStar MX à votre ordinateur en utilisant eSATA ou USB 3.0.
Schließen Sie das NexStar MX über eSATA oder USB 3.0 an Ihren Computer an.
Collegare NexStar MX al computer usando un cavo eSATA o USB 3.0.
使用 eSATA 或 USB 3.0 將 NexStar MX 連接到電腦。
Su NexStar MX estará ahora listo para utilizarse.
Votre NexStar MX est maintenant prêt à être utilisé.
Ihr NexStar MX ist nun einsatzbereit.
Adesso NexStar MX è pronto all’uso.
NexStar MX 現在可以使用了。
eSATA Cable
or
DC 12V
POWER
eS ATA
ON
OFF
USB 3.0
NOTE: Do not remove the hard
drive while it is in use. Doing
so may corrupt the data on the
hard drive or cause damage to
the hardware.
Nota: No desconecte la unidad
de disco duro mientras se
encuentre en uso. Si lo hace,
podría dañar los datos
almacenados en ella o
provocar averías de hardware.
Remarque : Ne retirez pas le
disque dur lorsqu’il est en cours
d’utilisation. Cela pourrait
endommager les données du
disque dur ou même le matériel.
Hinweis: Finden Zugriffe auf die
Festplatte statt, dürfen Sie sie nicht
entfernen. Andernfalls können die
Daten auf der Festplatte oder die
Hardware beschädigt werden.
Nota: Non rimuovere il disco
rigido mentre è in uso. In
questo modo i dati presenti sul
disco rigido possono
danneggiarsi o si può causare
danni all'hardware.
:
備註:請勿於使用時移動硬
碟,可能損毀硬碟內的資料
或造成硬體損壞。
NOTE:
NOTE:
NOTE: New hard drives needs
to be initialized and partitioned
before it will appear in Windows
Explorer or Mac desktop.
Please refer to “Creating a New
Partition” within the manual.
Nota: Si la unidad de disco duro
es nueva, deberá inicializarla y
particionarla para que aparezca
en el Explorador de Windows o
en el escritorio de Mac. Consulte
la sección “Crear una partición
nueva” en el manual.
Remarque : Les nouveaux
disques durs doivent être
initialisés et partitionnés avant
d’apparaître dans Windows
Explorer ou Mac desktop. Veuillez
consulter le chapitre “Créer une
nouvelle partition” de ce manuel.
Hinweis: Eine neue Festplatte
muss initialisiert und partitioniert
werden, bevor sie im Windows
Explorer oder auf dem
Mac-Desktop erscheint. Lesen
Sie hierzu bitte “Erstellen einer
neuen Partition” in diesem
Handbuch.
Nota: I nuovi dischi rigidi
devono essere inizializzati e
partizionati prima che appaiano
nel desktop di Windows
Explorer o Mac. Fare
riferimento a "Creazione di una
nuova partizione" nel manuale.
:
Windows Explorer Mac
備註:新硬碟需要經過初始
化與分割,才能顯示於
Windows Explorer 或 Mac
桌面。詳細資訊請參閱手冊
中的「建立新硬碟分割」。
DC 12V
POWER
eS ATA
ON
OFF
USB 3.0
OK
NOTE:
All data previously stored on the hard drive will be
lost when activate JBOD mode! Please back up all
data to a separate storage before continuing.
NST-400MX-S3R Only
INDIVIDUAL
Mode Configuration:
NST-400MX-S3R
JBOD
RAID 0
RAID 1
INDIVIDUAL
Mode Configuration:
NST-400MX-S3
JBOD
-
 1
1
-
 2
2


他の言語で
- italiano: Vantec NST-400MX-S3 Guida d'installazione
- español: Vantec NST-400MX-S3 Guía de instalación
- Deutsch: Vantec NST-400MX-S3 Installationsanleitung
- français: Vantec NST-400MX-S3 Guide d'installation
- English: Vantec NST-400MX-S3 Installation guide