Vantec NexStar CX インストールガイド

カテゴリー
HDD / SSDエンクロージャー
タイプ
インストールガイド

Vantec NexStar CXは、2.5インチのハードドライブをUSB 3.0で接続できる外付けハードドライブケースです。WindowsとMacの両方に対応しており、ドライバーのインストールは不要です。

Vantec NexStar CXは、データのバックアップやストレージの拡張に最適です。また、ポータブルハードドライブとして持ち歩くこともできます。

Vantec NexStar CXは、コンパクトで軽量なデザインで、持ち運びに便利です。また、付属のUSB 3.0ケーブルで簡単にパソコンと接続できます。

Vantec NexStar CXは、データの転送速度が速く、大容量のデータを短時間で転送できます。また、耐衝撃性に優れており、データの安全性を確保できます。

Vantec NexStar CXは、データのバックアップやストレージの拡張に最適な外付けハードドライブケースです。また、ポータブルハードドライブとして

Installation Guide
Guía de instalación Guide d'installation
Installationsanleitung Guida all’installazione
安裝指南 安装指南
NOTE:
Compruebe el contenido del paquete.
Vérifiez le contenu du paquet d’emballage.
Überprüfen Sie den Inhalt des Produktkartons.
Verificare i contenuti della confezione.
檢查包裝內容
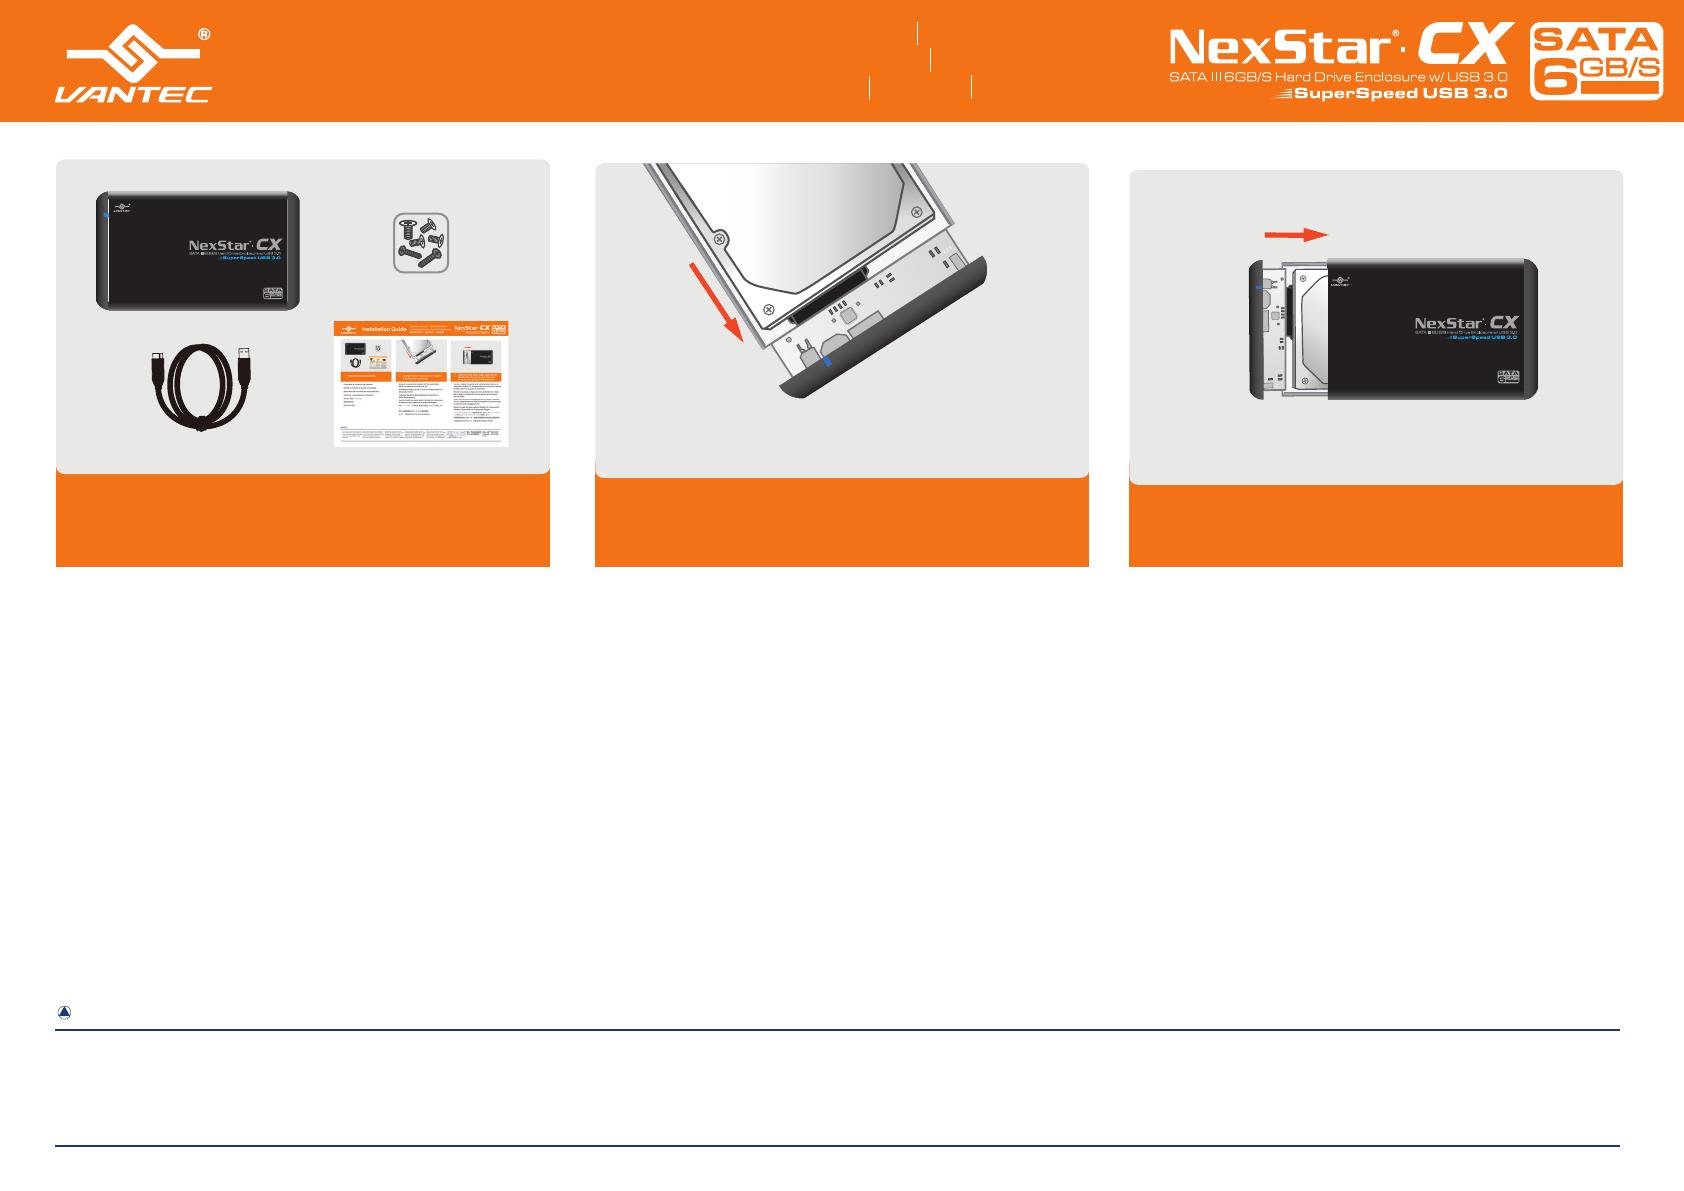
Connect the 2.5” hard drive to the SATA
& SATA-power connector.
Conecte los conectores de datos SATA y alimentación
SATA a la unidad de disco duro de 2.5".
Connectez le disque dur de 2.5” sur le connecteur SATA et
alimentation SATA.
Verbinden Sie die 2.5-Zoll-Festplatte mit dem SATA- &
SATA-Netzanschluss.
Inserire il caddy del disco rigido in NexStar CX. Assicurarsi
di allineare il disco rigido con le guide dell’alloggio.
2.5” SATA & SATA
將2.5吋硬碟連接SATA & SATA電源接頭。
Verify the package contents.
2.1.
Insert the hard drive caddy back into the
NexStar CX. Be sure to align the hard
drive with the guides in the enclosure.
3.
Vuelva a insertar el soporte de la unidad de disco duro en el
dispositivo NexStar CX. Asegúrese de hacer coincidir la unidad
de disco duro con las guías de la carcasa.
Réinsérez le plateau à disque dur dans le NexStar CX. Veillez
bien à aligner le disque dur avec les guides qui se trouvent
dans le boîtier.
Fügen Sie das externe Festplattengehäuse wieder im NexStar
CX ein. Achten Sie darauf, dass die Festplatte in die Führungen
im Aufnahmefach eingepasst wird.
Inserire il caddy del disco rigido in NexStar CX. Assicurarsi di
allineare il disco rigido con le guide dell’alloggio.
NexStar CX
將硬碟架插回NexStar CX。請確定將硬碟與外接盒內的導軌對齊。
NOTE: Do not remove the hard
drive while it is in use. Doing so
may corrupt the data on the hard
drive or cause damage to the
hardware.
Nota: No desconecte la unidad de
disco duro mientras se encuentre
en uso. Si lo hace, podría dañar los
datos almacenados en ella o
provocar averías de hardware.
Remarque : Ne retirez pas le
disque dur lorsqu’il est en cours
d’utilisation. Cela pourrait
endommager les données du
disque dur ou même le matériel.
Hinweis: Finden Zugriffe auf die
Festplatte statt, dürfen Sie sie nicht
entfernen. Andernfalls können die
Daten auf der Festplatte oder die
Hardware beschädigt werden.
Nota: Non rimuovere il disco
rigido mentre è in uso. In questo
modo i dati presenti sul disco
rigido possono danneggiarsi o si
può causare danni all'hardware.
:
備註:請勿於使用時移動
硬碟,可能損毀硬碟內的
資料或造成硬體損壞。
Secure the caddy to the housing using the
provided screws.
4.
Fije el soporte a la caja empleando los tornillos suministrados.
Fixez le disque dur sur le plateau à l’aide des vis fournies.
Befestigen Sie das externe Gehäuse mit den beigefügten Schrauben am
Hauptgehäuse.
Fissare il caddy alla struttura usando le viti fornite in dotazione.
使用隨附的螺絲將硬碟架固定於外殼上。
NST-206S3-BK
USB 3.0 Port
USB 3.0 Cable
Copyright © 2014 Vantec Thermal Technologies. All Right Reserved. | All Registered Trademarks Belong To Their Respective Companies.
Model: NST-206S3-BK
Information in this document is subject to change without notice.
Reproduction of these materials in any manner whatsoever without written permission is strictly forbidden.
Printed in China
Printed on Recycled Paper.
The Nexstar CX comes with a 1 year limited warranty (90 day parts). If your unit become defective within that time frame, please go to www.vantecusa.com for information on how to receive warranty exchange or repair. Cosmetic defects and missing parts are not covered under this
warranty. Please check the contents of the unit to make sure you received all parts. Also, check for any cosmetic flaws. If any parts are missing or if there are cosmetic defects, please contact the retailer from which you purchased the unit immediately and ask for a replacement.
Warranty
NOTE:
NOTE: New hard drives needs
to be initialized and partitioned
before it will appear in Windows
Explorer or Mac desktop.
Please refer to “Creating a New
Partition” within the manual.
Nota: Si la unidad de disco duro
es nueva, deberá inicializarla y
particionarla para que aparezca
en el Explorador de Windows o
en el escritorio de Mac. Consulte
la sección “Crear una partición
nueva” en el manual.
Remarque : Les nouveaux disques
durs doivent être initialisés et
partitionnés avant d’apparaître
dans Windows Explorer ou Mac
desktop. Veuillez consulter le
chapitre “Créer une nouvelle
partition” de ce manuel.
Hinweis: Eine neue Festplatte
muss initialisiert und partitioniert
werden, bevor sie im Windows
Explorer oder auf dem
Mac-Desktop erscheint. Lesen
Sie hierzu bitte “Erstellen einer
neuen Partition” in diesem
Handbuch.
Nota: I nuovi dischi rigidi
devono essere inizializzati e
partizionati prima che appaiano
nel desktop di Windows
Explorer o Mac. Fare
riferimento a "Creazione di una
nuova partizione" nel manuale.
:
Windows Explorer Mac
備註:新硬碟需要經過初始化與分割
,才能顯示於 Windows Explorer
或 Mac 桌面。詳細資訊請參閱手冊
中的「建立新硬碟分割」。
  • Page 1 1
  • Page 2 2

Vantec NexStar CX インストールガイド

カテゴリー
HDD / SSDエンクロージャー
タイプ
インストールガイド

Vantec NexStar CXは、2.5インチのハードドライブをUSB 3.0で接続できる外付けハードドライブケースです。WindowsとMacの両方に対応しており、ドライバーのインストールは不要です。

Vantec NexStar CXは、データのバックアップやストレージの拡張に最適です。また、ポータブルハードドライブとして持ち歩くこともできます。

Vantec NexStar CXは、コンパクトで軽量なデザインで、持ち運びに便利です。また、付属のUSB 3.0ケーブルで簡単にパソコンと接続できます。

Vantec NexStar CXは、データの転送速度が速く、大容量のデータを短時間で転送できます。また、耐衝撃性に優れており、データの安全性を確保できます。

Vantec NexStar CXは、データのバックアップやストレージの拡張に最適な外付けハードドライブケースです。また、ポータブルハードドライブとして