
J:\06I06350_HDPS_L1\EDIT\GB_CS_CT_KR\2682684211\01GB-Operating Instruc-
tions\01GBCO.fm
HDPS-L1
2-682-684-21(1)
Printed in Malaysia
01GB01COV.book Page 66 Wednesday, July 26, 2006 10:08 AM
GB
2-682-684-21(1)
J:\06I06350_HDPS_L1\EDIT\GB_CS_CT_KR\2682684211\00COV-Operating Instruc-
tions\01GB00COV.fm
HDPS-L1
2-682-684-21(1)
COPY
HDD Photo Storage
HDPS-L1
Operating Instructions
C 2006 Sony Corporation
CS
CT
KR
01GB01COV.book Page 1 Wednesday, July 26, 2006 10:08 AM
HDPS-L1
2-682-684-21 (1)

2
GB
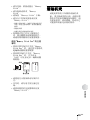
WARNING
To reduce the risk of fire or electric
shock, do not expose this apparatus
to rain or moisture.
Precautions
The nameplate is located on the rear of the
unit.
Disclaimer
Sony corporation assumes no
responsibility for the loss of information
stored on the hard disk of this unit, or
information transferred to a memory card
with your computer.
It is highly recommended to regularly
back up the contents of the hard disk.
Sony Corporation does not accept any
liability for damage caused by data loss.
Copyright
Copyright law prohibits unauthorized use
of any recorded audio/video for any other
purpose than personal enjoyment. Please
be warned that the “Memory Stick”
containing images and data protected by
copyright shall be strictly used within
copyright law.

3
GB
GB
Precautions
Usage and storage
• Only use the specified power cord.
• Never short-circuit any of the
connectors with a metallic object such
as a keyholder.
• Do not leave the unit in locations where
the temperature may rise above 60°C
(140°F), such as in direct sunlight.
• Protect the unit from water and
moisture.
• Use the unit on a flat level surface.
• Do not install this equipment in a
confined space such as a bookshelf or
similar unit.
• To prevent fire or shock hazard, do not
place objects filled with liquids, such as
vases, on the apparatus.
• Turn off the unit before carrying it.
• Do not touch the memory card while
data is being read/written.
• Do not place any objects on the unit.
• Do not place the remote control on the
floor, etc., as buttons may be pressed by
mistake.
• Do not place the unit upright.
• Watch the screen in a bright room.
Overheating
If the unit has become hotter than normal
during operation, turn off the unit,
disconnect the power cord, and then
contact a service center.
Condensation
If the unit is brought from a cold to a warm
location, or if the ambient temperature
suddenly rises, moisture may form on the
outer surface and on the interior of the
unit. Do not use the unit in such a
condition, as damage may occur. If
condensation has occurred, leave the unit
for about an hour before turning it on.
Hard disk
The hard disk has a high storage density,
and holds vast amount of images.
However, it can easily be damaged by
shock, vibration or dust, and should be
kept away from magnets. To avoid losing
important data, observe the following
precautions.
• Do not apply a strong shock to the unit.
• Do not place the unit in a location
subject to mechanical vibrations or in an
unstable location.
• Do not place the unit on top of a hot
surface, such as a VCR or amplifier
(receiver).
• Do not use the unit in a place subject to
extreme changes in temperature
(temperature gradient less than 10°C/
hour).
• Do not move the unit with its power
cord connected.
• Do not disconnect the power cord while
the power is on.
• Do not move the unit for one minute
after you have unplugged the power
cord.
• Do not attempt to replace or upgrade the
hard disk by yourself, as this may result
in malfunction.
If the hard disk drive should malfunction,
you cannot recover lost data. The hard
disk drive is only a temporary storage
space.
It is highly recommended to regularly
back up the contents of the hard disk.
Sony Corporation does not accept any
liability for damage caused by data loss.

4
GB
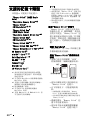
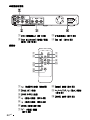
Table of Contents
WARNING ........................................................................................................... 2
Precautions ........................................................................................................... 3
Ways to Enjoy Your HDD Photo Storage ............................................................ 6
Quick Guide to the Screens ................................................................... 8
Preparations
Unpacking ........................................................................................................... 10
Preparing the remote control ............................................................................ 11
Connecting to a TV ............................................................................................ 13
Turning on the Unit ............................................................................................ 15
Setting the Date and Time .................................................................................. 16
Copying Images to the Unit
Inserting and Removing a Memory Card ........................................................... 18
Inserting a “Memory Stick” or SD Memory Card (SD)/
MultiMediaCard (MMC)/xD-Picture Card (xD) ............................................. 18
Inserting a CompactFlash (CF)/Microdrive ..................................................... 19
Copying Images from Memory Card ................................................................. 20
Viewing Images
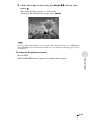
Selecting Images by Date ................................................................................... 22
Specifying a shooting date to display in the Calendar screen .......................... 24
Selecting Images by Folder ................................................................................ 26
Selecting the folder by setting the date ............................................................ 28
Zooming Images ................................................................................................. 30
Rotating Images .................................................................................................. 31
Playing a Slide Show .......................................................................................... 33
Selecting multiple images or folders ................................................................ 34

5
GB
Managing Images
Registering Images to a Group ........................................................................... 35
Viewing images registered in a group .............................................................. 38
Setting a group number to select the group ...................................................... 39
Deleting Images or Folders ................................................................................. 41
Displaying Image or Folder Information ............................................................ 42
Sorting Images by Shooting Date ....................................................................... 43
Sorting Copied Images ....................................................................................... 44
Duplicating a Folder ........................................................................................... 45
Exporting Images or a Folder to a Memory Card ............................................... 46
Setting Up the Unit
How to Set Up the Unit ...................................................................................... 48
Setting List .......................................................................................................... 49
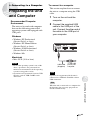
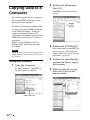
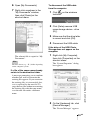
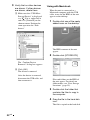
Connecting to a Computer
Preparing the Unit and Computer ....................................................................... 51
Copying Data to a Computer .............................................................................. 52
Using with Windows ........................................................................................ 52
Using with Macintosh ...................................................................................... 54
Data Storage Locations ....................................................................................... 55
Additional Information
Troubleshooting .................................................................................................. 57
Supported Memory Card Types ......................................................................... 59
Cleaning the Cabinet .......................................................................................... 60
Specifications ...................................................................................................... 61
Identifying Parts ................................................................................................. 62
Index ................................................................................................................... 64

7
GB
6
GB
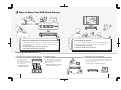
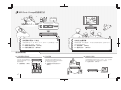
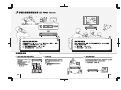
GroupA GroupB GroupC
If you have a TV (with component connection), high quality images
can be displayed. You can also enjoy images as a slide show.
☛"Viewing Images" (page 22)
☛"Playing a Slide Show" (page 33)
You can copy images to the computer for backup, printing,
etc. You can also copy images from your computer to the
unit to view on your TV.
☛"Connecting to a Computer" (page 51)
Connect to your computer
You can export images stored in the
unit to a memory card to use with
your mobile phone or video game, or
share with friends.
☛"Exporting Images or a Folder to
a Memory Card" (page 46)
Export images
You can group images by
theme, event, etc.
Even when removing images
from a group, original images
are not deleted.
☛"Registering Images to
a Group" (page 35)
Create your favorite image groups
Enjoying advanced features
Copy your images with a single press of a button
Several kinds of memory cards, such as "Memory Stick" or CF cards,
are available. For more information, see "Supported Memory Card
Types" (page 59).
☛"Copying Images to the Unit" (page 18)
☛"Sorting Copied Images" (page 44)
View images on your TV
Ways to Enjoy Your HDD Photo Storage

6
GB
GroupA GroupB GroupC
If you have a TV (with component connection), high quality images
can be displayed. You can also enjoy images as a slide show.
☛"Viewing Images" (page 22)
☛"Playing a Slide Show" (page 33)
You can copy images to the computer for backup, printing,
etc. You can also copy images from your computer to the
unit to view on your TV.
☛"Connecting to a Computer" (page 51)
Connect to your computer
You can export images stored in the
unit to a memory card to use with
your mobile phone or video game, or
share with friends.
☛"Exporting Images or a Folder to
a Memory Card" (page 46)
Export images
You can group images by
theme, event, etc.
Even when removing images
from a group, original images
are not deleted.
☛"Registering Images to
a Group" (page 35)
Create your favorite image groups
Enjoying advanced features
Copy your images with a single press of a button
Several kinds of memory cards, such as "Memory Stick" or CF cards,
are available. For more information, see "Supported Memory Card
Types" (page 59).
☛"Copying Images to the Unit" (page 18)
☛"Sorting Copied Images" (page 44)
View images on your TV
Ways to Enjoy Your HDD Photo Storage
7
GB

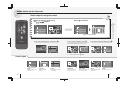
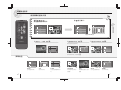
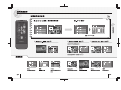
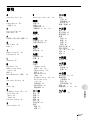
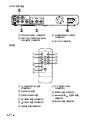
Screen types
Quick Guide to the Screens
9
GB
8
GB
To return to the previous screen, press .
Basic steps for using the screen
Select an image or item using
the buttons.
Press to confirm.
When selecting [Calendar]
To use various features, press . To return to the Home menu, press .
Home
Appears when power
is turned on
Folder
Shows folders containing
copied images
Menu
Shows the menu list
Full screen
Shows an image in full
size of the screen
Thumbnail
Shows the reduced
images as a list
Calendar
Shows a monthly
calendar
Group
Shows the registered
groups list
Quick Guide to the Screens
To close the menu list, press again.
Group
002
003
004
005
006
001
Thumbnail 1/2
Thumbnail 1/2 Thumbnail 1/2
Thumbnail 1/2
Folder 1/2
20051224.001
20051224.002
20051224.003
20060214.001
20060214.002
20051012.001
Folder 1/2
20051224.001
20051224.002
20051224.003
20060214.001
20060214.002
20051012.001
2005.10
S
2
9
1616
2323
3030
M
3
1010
1717
2424
3131
T
4
1111
1818
2525
W
5
1919
2626
T
6
1313
2020
2727
F
7
1414
2121
2828
S
1
8
1515
2222
2929
3
1010
1717
2424
3131
4
1111
1818
2525
5
1919
2626
6
1313
2020
2727
7
1414
2121
2828
3
10
17
24
31
4
11
18
25
5
19
26
6
13
20
27
7
14
21
28
3
10
17
24
31
4
11
18
25
5
19
26
6
13
20
27
7
14
21
28
2
9
16
23
30
1
8
15
22
29
121212121212
HOME
MENU
Select
Group Add/Edit
Export
Delete
Information
Slide Show
Home
Calendar
Folder
Group
Settings
Home
Calendar
Folder
Group
Settings
Home
Calendar
Folder
Group
Settings
Home
Calendar
Folder
Group
Settings
HOME
MENU
Select
Group Add/Edit
Export
Duplicate
Date Sort
Delete
Information
Find Date
Slide Show
The currently available menu items pop up.

10
GB
B
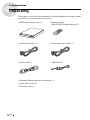
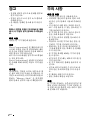
Preparations
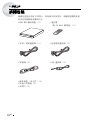
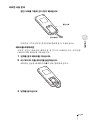
Unpacking
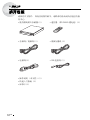
Check that you have the following items. Should anything be missing, contact
your dealer or service center in your area.
• HDD photo storage unit (1) • Remote control
(with CR2025 lithium battery) (1)
• Audio/video cable (1) • Component video cable (1)
• Power cord (1) • USB cable (1)
• Operating Instructions (this document) (1)
• Quick Start Guide (1)
• Warranty card (1)
C
O
P
Y

11
GB
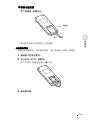
Preparations
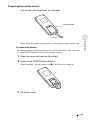
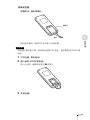
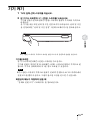
Preparing the remote control
Pull out the insulating sheet, as illustrated.
When using the remote control, point it at the remote sensor on the unit.
To replace the battery
If remote control performance deteriorates, replace the battery with a new one.
Use the CR2025 lithium battery for the remote control.
1 Open the cover and remove the battery.
2 Insert a new CR2025 lithium battery.
When inserting a battery, make sure e of the battery is facing up.
3 Close the cover.
Insulating sheet
Pull out

12
GB
Notes
• Caution: There is a risk of explosion if the battery is replaced by an incorrect type.
• Caution: To preserve our environment, dispose of used battery according to your local laws
or regulations.
• Do not leave the remote control in an extremely hot or humid place.
• Do not drop any foreign object into the remote casing, particularly when replacing the
battery.
• Improper handling of battery may result in battery leakage or corrosion. Observe the
following:
– Do not attempt to charge the battery.
– If you do not intend to use the remote control for an extended period of time, remove the battery
to avoid possible damage from leakage and corrosion.
– The battery may explode or leak if inserted incorrectly, shorted, disassembled, heated, disposed
of in fire or recharged.
• Do not expose the remote sensor to direct light from the sun or any lighting apparatus.
Doing so may cause a malfunction.

13
GB
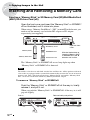
Preparations
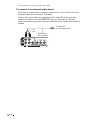
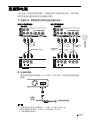
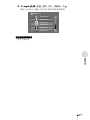
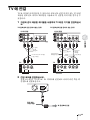
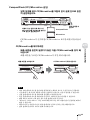
Connecting to a TV
You can view stored images on a TV. If you have a TV with a component
connection, you can enjoy clearer images by using the supplied component
video cable.
1 Connect the unit to a TV using the supplied cable as illustrated.
2 Connect the power cord.
Connect the power cord to the AC IN connector of the unit, then connect
the other end to a wall outlet.
Notes
• The "/1 (power) switch lights up in red when the power cord is connected to a wall outlet.
• Only use the supplied power cord; other power cords are not guaranteed.
TV (without component connection) TV (with component connection)
R L VIDEO
AUDIO
Ye l l o w
White
Red
Audio/video cable
(supplied)
IN
Rear of the unit
TV
Component
video cable
(supplied)
Audio/video
cable (supplied)
R L VIDEO
AUDIO
YPb/Cb Pr/Cr
Y
P
b/Cb
Pr/Cr
IN
White
Red
Ye l l o w
Rear of the unit
TV
AC IN
100-240V
Power cord
(supplied)
To wall outlet

14
GB
• Be careful not to get feet caught up in cables.
To connect to an external audio device
If the unit is connected to an external audio device, you can listen to music
from the audio device during a slide show.
Connect the audio cable (not supplied) to the Audio IN of the unit, then
connect the other end to the LINE OUT of your audio device. See the
instruction manual supplied with your audio device for future instructions if
needed.
White
Red
Audio cable
(not supplied)
To LINE OUT
of your audio device

15
GB
Preparations
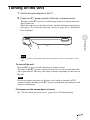
Turning on the Unit
1 Switch the input selector of the TV.
2 Press the "/1 (power) switch of the unit or remote control.
The light on the "/1 (power) switch changes from red to green when the
unit is turned on.
When the unit turns on for the first time, the date and time setting display
will appear. To set the date and time, see step 3 (page 16) of “Setting the
Date and Time”.
Note
The "/1 (power) switch lights up in red when the power cord is connected to a wall
outlet.
To turn off the unit
Press the "/1 (power) switch of the unit or remote control.
The light on the "/1 (power) switch will turn red in a few seconds when the
unit is powered off. This may take about a minute, depending on the status of
the unit.
Note
Do not disconnect the power cord from a wall outlet or from the AC IN
connector before the light on the "/1 (power) switch turns red. Otherwise, the
unit may malfunction.
If the menu on the screen does not work
See “To turn off the power by force” (page 58) of “Troubleshooting”.
COPY

16
GB
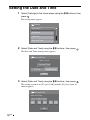
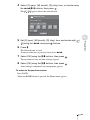
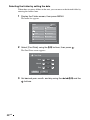
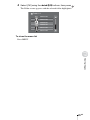
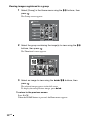
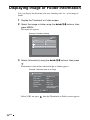
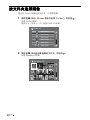
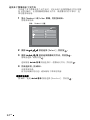
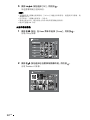
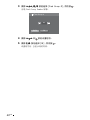
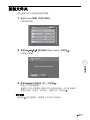
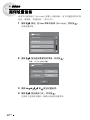
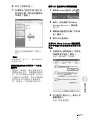
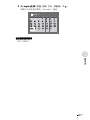
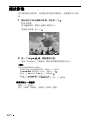
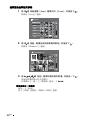
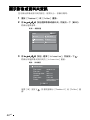
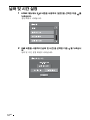
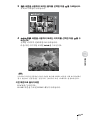
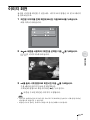
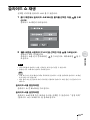
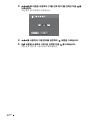
Setting the Date and Time
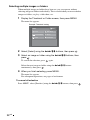
1 Select [Settings] in the Home menu using the M/m buttons, then
press .
The setting menu appears.
2 Select [Date and Time] using the M/m buttons, then press .
The Date and Time setting screen appears.
3 Select [Date and Time] using the M/m buttons, then press .
The setting screen to set [Y] (year), [M] (month), [D] (day), hour, or
minute appears.
Settings
Information
Slide Show
Video Out
Date and Time
Date and Time
2005.12.24 14:20
OK
Date and Time
Date FormatY / M / D
Date and Time
OK
Date and Time
Y M DY M D
// :
2005 12 24 14 20

17
GB
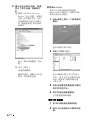
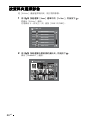
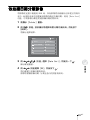
Preparations
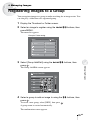
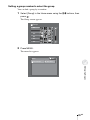
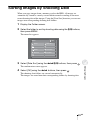
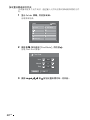
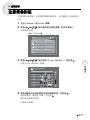
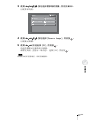
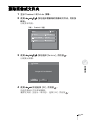
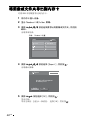
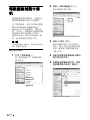
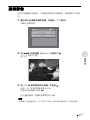
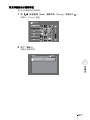
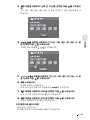
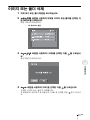
4 Select [Y] (year), [M] (month), [D] (day), hour, or minute using
the </,/M/m buttons, then press .
The / appears below the selected item.
5 Set [Y] (year), [M] (month), [D] (day), hour and minute with /
using the </, and press buttons.
6 Press M.
The Selected item is fixed.
To move to the next or previous item, press </,.
7 Select [OK] using the M/m buttons, then press .
The top menu of date and time settings appears.
8 Select [OK] using the M/m buttons, then press .
After setting is completed, the setting menu appears.
To return to the previous screen
Press BACK.
When the HOME button is pressed, the Home menu appears.
Date and Time
OK
Date and Time
Y M DY M D
// :
2005 12
+
_
24 14 20

18
GB
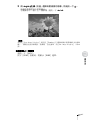
B
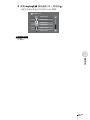
Copying Images to the Unit
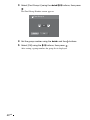
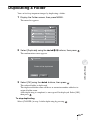
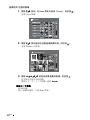
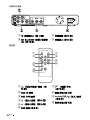
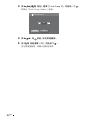
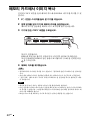
Inserting and Removing a Memory Card
Inserting a “Memory Stick” or SD Memory Card (SD)/MultiMediaCard
(MMC)/xD-Picture Card (xD)
Open the front cover and insert the “Memory Stick” or SD/MMC/
xD as illustrated, until it clicks into place.
When using a “Memory Stick Micro” (“M2”) or miniSD with the unit, you
need to use the memory card with the M2 adaptor or SD adaptor
respectively (not supplied).
The “Memory Stick” or SD/MMC/xD access lamp lights up when
“Memory Stick” or SD/MMC/xD is detected.
Note
The unit has a slot that can take both standard size and Duo size. All the products with such
a slot as this are equipped with a system which automatically measures the size of an inserted
memory card. That’s why both standard-size “Memory Stick” and smaller “Memory Stick
Duo” can be used on the unit without any Memory Stick Duo adaptor.
To remove a “Memory Stick” or SD/MMC/xD
Push the “Memory Stick” or SD/MMC/xD all the way in, briefly
release it, and pull it out.
When you push the “Memory Stick” or SD/MMC/xD all the way in, it will
pop out slightly.
COPY
SD/MMC/
X
D
STD/DUO
ConpactFlash/Micr
odrive
MENU
BACK
SD Memory Card
MultiMediaCard
xD-Picture Card
With the labeled side up,
insert the “Memory Stick”
or SD/MMC/xD in the v
direction until it clicks.
“Memory Stick”
Open the front
cover.
“Memory Stick Duo”
Push in Release briefly and pull out
SD/MMC/
X
D
STD/DUO
C
o
SD/MMC/
X
D
STD/DUO
C
o

19
GB
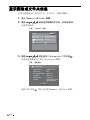
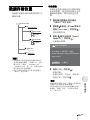
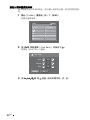
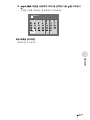
Copying Images to the Unit
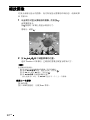
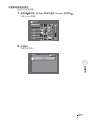
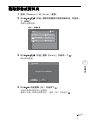
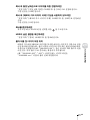
Inserting a CompactFlash (CF)/Microdrive
Open the front cover and insert the CF/Microdrive all the way
into the slot, as illustrated.
The CF/Microdrive access lamp lights up when the CF/Microdrive is
detected.
To remove a CF/Microdrive
Push the eject button all the way in, release it, and then pull the
CF/Microdrive out.
When you push the eject button in, the CF/Microdrive will pop out slightly.
Notes
• When multiple memory cards are inserted, the left side memory card has priority to be
recognized.
• Do not insert more than one memory card in each slot, as damage may occur.
• Before use, check that the memory card is inserted correctly.
• Do not remove the memory card while copying, as damage to data may occur.
• Do not close the slot cover when the eject button is out.
• If you attempt to insert “Memory Stick Micro” or miniSD without an M2 or SD adaptor
respectively, there is a possibility that it cannot be pulled out.
• Memory cards should be kept away from small children to prevent them from accidentally
swallowing it.
• Be careful not to catch a finger in the front cover.
COPY
SD/MMC/
X
D
STD/DUO
ConpactFlash/Microdrive
MENU
BACK
With the labeled side up, insert
the CF/Microdrive in the v
direction all the way into the slot.
CompactFlash
Microdrive
Open the front
cover.
COPY
ConpactFlash/Micr
odrive
MENU
BACK
Push the eject button
COPY
ConpactFlash/Micr
odrive
MENU
BACK
CF/Microdrive pops out

20
GB
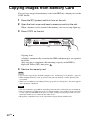
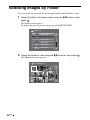
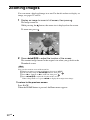
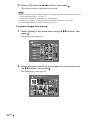
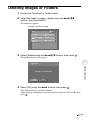
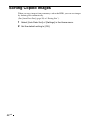
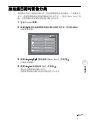
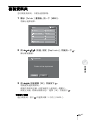
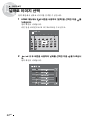
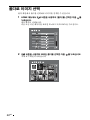
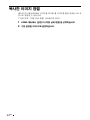
Copying Images from Memory Card
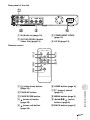
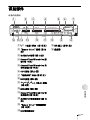
You can copy images from memory cards to the HDD by a simple press of the
COPY button.
1 Press the "/1 (power) switch to turn on the unit.
2 Open the front cover and insert a memory card into the unit.
When a memory card is inserted, the memory card access lamp lights up.
3 Press COPY on the unit.
Copying starts.
A folder is automatically created on the HDD and the images are copied to
the folder.
After copying is completed, the remaining capacity of the HDD is
displayed. Select [OK], then press .
4 Remove the memory card.
Hints
• You can also copy images from the computer. See “Connecting to a Computer” (page 51).
• When multiple memory cards are inserted, the left side memory card has priority to be
recognized.
• When you set [Memory Card Image Delete] (page 50) of “Setting List”, the menu appears
after copying is completed.
Notes
• The data read/write speed differs depending on the memory card and usage environment.
• Data of a memory card that has an access control attribute set on another device cannot be
read or copied on the HDD of the unit. To enable reading and copying of such data, you
must first disable access control on the other device.
• MagicGate-compatible data can be copied but not played back with the unit.
COPY
SD/MMC/
X
D
STD/DUO
ConpactFlash/Micr
odrive
MENU
BACK
ページが読み込まれています...
ページが読み込まれています...
ページが読み込まれています...
ページが読み込まれています...
ページが読み込まれています...
ページが読み込まれています...
ページが読み込まれています...
ページが読み込まれています...
ページが読み込まれています...
ページが読み込まれています...
ページが読み込まれています...
ページが読み込まれています...
ページが読み込まれています...
ページが読み込まれています...
ページが読み込まれています...
ページが読み込まれています...
ページが読み込まれています...
ページが読み込まれています...
ページが読み込まれています...
ページが読み込まれています...
ページが読み込まれています...
ページが読み込まれています...
ページが読み込まれています...
ページが読み込まれています...
ページが読み込まれています...
ページが読み込まれています...
ページが読み込まれています...
ページが読み込まれています...
ページが読み込まれています...
ページが読み込まれています...
ページが読み込まれています...
ページが読み込まれています...
ページが読み込まれています...
ページが読み込まれています...
ページが読み込まれています...
ページが読み込まれています...
ページが読み込まれています...
ページが読み込まれています...
ページが読み込まれています...
ページが読み込まれています...
ページが読み込まれています...
ページが読み込まれています...
ページが読み込まれています...
ページが読み込まれています...
ページが読み込まれています...
ページが読み込まれています...
ページが読み込まれています...
ページが読み込まれています...
ページが読み込まれています...
ページが読み込まれています...
ページが読み込まれています...
ページが読み込まれています...
ページが読み込まれています...
ページが読み込まれています...
ページが読み込まれています...
ページが読み込まれています...
ページが読み込まれています...
ページが読み込まれています...
ページが読み込まれています...
ページが読み込まれています...
ページが読み込まれています...
ページが読み込まれています...
ページが読み込まれています...
ページが読み込まれています...
ページが読み込まれています...
ページが読み込まれています...
ページが読み込まれています...
ページが読み込まれています...
ページが読み込まれています...
ページが読み込まれています...
ページが読み込まれています...
ページが読み込まれています...
ページが読み込まれています...
ページが読み込まれています...
ページが読み込まれています...
ページが読み込まれています...
ページが読み込まれています...
ページが読み込まれています...
ページが読み込まれています...
ページが読み込まれています...
ページが読み込まれています...
ページが読み込まれています...
ページが読み込まれています...
ページが読み込まれています...
ページが読み込まれています...
ページが読み込まれています...
ページが読み込まれています...
ページが読み込まれています...
ページが読み込まれています...
ページが読み込まれています...
ページが読み込まれています...
ページが読み込まれています...
ページが読み込まれています...
ページが読み込まれています...
ページが読み込まれています...
ページが読み込まれています...
ページが読み込まれています...
ページが読み込まれています...
ページが読み込まれています...
ページが読み込まれています...
ページが読み込まれています...
ページが読み込まれています...
ページが読み込まれています...
ページが読み込まれています...
ページが読み込まれています...
ページが読み込まれています...
ページが読み込まれています...
ページが読み込まれています...
ページが読み込まれています...
ページが読み込まれています...
ページが読み込まれています...
ページが読み込まれています...
ページが読み込まれています...
ページが読み込まれています...
ページが読み込まれています...
ページが読み込まれています...
ページが読み込まれています...
ページが読み込まれています...
ページが読み込まれています...
ページが読み込まれています...
ページが読み込まれています...
ページが読み込まれています...
ページが読み込まれています...
ページが読み込まれています...
ページが読み込まれています...
ページが読み込まれています...
ページが読み込まれています...
ページが読み込まれています...
ページが読み込まれています...
ページが読み込まれています...
ページが読み込まれています...
ページが読み込まれています...
ページが読み込まれています...
ページが読み込まれています...
ページが読み込まれています...
ページが読み込まれています...
ページが読み込まれています...
ページが読み込まれています...
ページが読み込まれています...
ページが読み込まれています...
ページが読み込まれています...
ページが読み込まれています...
ページが読み込まれています...
ページが読み込まれています...
ページが読み込まれています...
ページが読み込まれています...
ページが読み込まれています...
ページが読み込まれています...
ページが読み込まれています...
ページが読み込まれています...
ページが読み込まれています...
ページが読み込まれています...
ページが読み込まれています...
ページが読み込まれています...
ページが読み込まれています...
ページが読み込まれています...
ページが読み込まれています...
ページが読み込まれています...
ページが読み込まれています...
ページが読み込まれています...
ページが読み込まれています...
ページが読み込まれています...
ページが読み込まれています...
ページが読み込まれています...
ページが読み込まれています...
ページが読み込まれています...
ページが読み込まれています...
ページが読み込まれています...
ページが読み込まれています...
ページが読み込まれています...
ページが読み込まれています...
ページが読み込まれています...
ページが読み込まれています...
ページが読み込まれています...
ページが読み込まれています...
ページが読み込まれています...
ページが読み込まれています...
ページが読み込まれています...
ページが読み込まれています...
ページが読み込まれています...
ページが読み込まれています...
ページが読み込まれています...
ページが読み込まれています...
ページが読み込まれています...
ページが読み込まれています...
ページが読み込まれています...
ページが読み込まれています...
ページが読み込まれています...
ページが読み込まれています...
ページが読み込まれています...
ページが読み込まれています...
ページが読み込まれています...
ページが読み込まれています...
ページが読み込まれています...
ページが読み込まれています...
ページが読み込まれています...
ページが読み込まれています...
ページが読み込まれています...
ページが読み込まれています...
ページが読み込まれています...
ページが読み込まれています...
ページが読み込まれています...
ページが読み込まれています...
ページが読み込まれています...
ページが読み込まれています...
ページが読み込まれています...
ページが読み込まれています...
ページが読み込まれています...
ページが読み込まれています...
ページが読み込まれています...
ページが読み込まれています...
ページが読み込まれています...
ページが読み込まれています...
ページが読み込まれています...
ページが読み込まれています...
ページが読み込まれています...
ページが読み込まれています...
ページが読み込まれています...
ページが読み込まれています...
ページが読み込まれています...
ページが読み込まれています...
ページが読み込まれています...
ページが読み込まれています...
ページが読み込まれています...
ページが読み込まれています...
ページが読み込まれています...
ページが読み込まれています...
ページが読み込まれています...
ページが読み込まれています...
ページが読み込まれています...
ページが読み込まれています...
ページが読み込まれています...
ページが読み込まれています...
ページが読み込まれています...
ページが読み込まれています...
-
 1
1
-
 2
2
-
 3
3
-
 4
4
-
 5
5
-
 6
6
-
 7
7
-
 8
8
-
 9
9
-
 10
10
-
 11
11
-
 12
12
-
 13
13
-
 14
14
-
 15
15
-
 16
16
-
 17
17
-
 18
18
-
 19
19
-
 20
20
-
 21
21
-
 22
22
-
 23
23
-
 24
24
-
 25
25
-
 26
26
-
 27
27
-
 28
28
-
 29
29
-
 30
30
-
 31
31
-
 32
32
-
 33
33
-
 34
34
-
 35
35
-
 36
36
-
 37
37
-
 38
38
-
 39
39
-
 40
40
-
 41
41
-
 42
42
-
 43
43
-
 44
44
-
 45
45
-
 46
46
-
 47
47
-
 48
48
-
 49
49
-
 50
50
-
 51
51
-
 52
52
-
 53
53
-
 54
54
-
 55
55
-
 56
56
-
 57
57
-
 58
58
-
 59
59
-
 60
60
-
 61
61
-
 62
62
-
 63
63
-
 64
64
-
 65
65
-
 66
66
-
 67
67
-
 68
68
-
 69
69
-
 70
70
-
 71
71
-
 72
72
-
 73
73
-
 74
74
-
 75
75
-
 76
76
-
 77
77
-
 78
78
-
 79
79
-
 80
80
-
 81
81
-
 82
82
-
 83
83
-
 84
84
-
 85
85
-
 86
86
-
 87
87
-
 88
88
-
 89
89
-
 90
90
-
 91
91
-
 92
92
-
 93
93
-
 94
94
-
 95
95
-
 96
96
-
 97
97
-
 98
98
-
 99
99
-
 100
100
-
 101
101
-
 102
102
-
 103
103
-
 104
104
-
 105
105
-
 106
106
-
 107
107
-
 108
108
-
 109
109
-
 110
110
-
 111
111
-
 112
112
-
 113
113
-
 114
114
-
 115
115
-
 116
116
-
 117
117
-
 118
118
-
 119
119
-
 120
120
-
 121
121
-
 122
122
-
 123
123
-
 124
124
-
 125
125
-
 126
126
-
 127
127
-
 128
128
-
 129
129
-
 130
130
-
 131
131
-
 132
132
-
 133
133
-
 134
134
-
 135
135
-
 136
136
-
 137
137
-
 138
138
-
 139
139
-
 140
140
-
 141
141
-
 142
142
-
 143
143
-
 144
144
-
 145
145
-
 146
146
-
 147
147
-
 148
148
-
 149
149
-
 150
150
-
 151
151
-
 152
152
-
 153
153
-
 154
154
-
 155
155
-
 156
156
-
 157
157
-
 158
158
-
 159
159
-
 160
160
-
 161
161
-
 162
162
-
 163
163
-
 164
164
-
 165
165
-
 166
166
-
 167
167
-
 168
168
-
 169
169
-
 170
170
-
 171
171
-
 172
172
-
 173
173
-
 174
174
-
 175
175
-
 176
176
-
 177
177
-
 178
178
-
 179
179
-
 180
180
-
 181
181
-
 182
182
-
 183
183
-
 184
184
-
 185
185
-
 186
186
-
 187
187
-
 188
188
-
 189
189
-
 190
190
-
 191
191
-
 192
192
-
 193
193
-
 194
194
-
 195
195
-
 196
196
-
 197
197
-
 198
198
-
 199
199
-
 200
200
-
 201
201
-
 202
202
-
 203
203
-
 204
204
-
 205
205
-
 206
206
-
 207
207
-
 208
208
-
 209
209
-
 210
210
-
 211
211
-
 212
212
-
 213
213
-
 214
214
-
 215
215
-
 216
216
-
 217
217
-
 218
218
-
 219
219
-
 220
220
-
 221
221
-
 222
222
-
 223
223
-
 224
224
-
 225
225
-
 226
226
-
 227
227
-
 228
228
-
 229
229
-
 230
230
-
 231
231
-
 232
232
-
 233
233
-
 234
234
-
 235
235
-
 236
236
-
 237
237
-
 238
238
-
 239
239
-
 240
240
-
 241
241
-
 242
242
-
 243
243
-
 244
244
-
 245
245
-
 246
246
-
 247
247
-
 248
248
-
 249
249
-
 250
250
-
 251
251
-
 252
252
-
 253
253
-
 254
254
-
 255
255


